A summer cottage, a country house or just a private house in the city does not at all eliminate the need for hygiene. Most often, the problem is solved by building an ordinary bathroom, which is a combination of a bathroom and a toilet. Nevertheless, for aesthetic reasons, the construction of baths is more correct, since they are also a good place to relax, and are also a tribute to traditions.


Peculiarities
A log bath is more popular than other options for objective reasons:
- low thermal conductivity (reducing the cost of heating and accelerating the heating of the room);
- ease of construction that does not require powerful foundations and careful engineering preparation;
- high construction speed;
- simplicity of finishing;
- availability with self-construction.


As for the section 150x150 mm, it is considered quite universal and suitable for use in the middle zone of the Russian Federation, because there such material does not create any problems. It is important to consider that in the northern regions it is necessary to use logs with a cross section of at least 20 cm, or to supplement narrow options with mineral wool and other heaters.


Projects
For the construction of baths it is necessary to use spruce and pine wood; cedar is also acceptable, but only in completely exceptional situations. The advantage of such materials is their saturation with essential oils, because when heated, the oil evaporates and makes the air in the room very pleasant and healthy.


A 3x4 meter bath project is best done individually, because this significantly increases the aesthetics of the design and allows you to create it as individual as possible. The finished project of a bath 6x3 or 6x4 meters with a layout has another advantage - it was initially worked out in all details and turns out to be significantly cheaper than a custom-made counterpart.
A bath from a bar 150x150 mm with sides of 6x6 meters has an area of 36 squares, which makes it possible to make a comfortable and convenient terrace. On this site you can always gather with loved ones and spend time over barbecue. If the dimensions of the bath are 4x4, or 4x6 meters, the removal of the main furnace outside helps to save space. Then in the drawing it is necessary to provide for its optimal connection with the internal space due to air ducts or water pipes.


When the space is even smaller - 4x4, 3x3, 3x2 meters - it is advisable to compensate for this shortcoming by arranging an attic. But even in larger baths, it can be useful, because it helps to more comfortably accommodate after a stay in the steam room, to relax for a while.


Calculation of the amount of materials
It is very important to make sure that the timber does not have the slightest cracks, as they will inevitably provoke shrinkage. Another serious defect is blue spots - this is a sign of the action of insects gnawing a tree.
It is not difficult to calculate the consumption of materials for an average bath from a bar measuring 6x4 m. Shrinkage is often a significant problem as it varies with block size, climate and how well the crowns are insulated. In most cases, it is worth focusing on an indicator of 17 cubic meters. m of timber. First, the volume of materials that will be required for a single row (crown) is determined. Then multiply the resulting parameter by the total number of rows. See how many pieces are required in terms of 1 cu. m, you can in the table attached to a similar product.


As for costs, even with independent work, the foundation will cost at least 10 thousand rubles. When hiring performers, you should focus on the lowest rate of 25 thousand rubles. The purchase of materials for a 3x6 m bath will require at least 50 thousand rubles for walls and another 10-15 thousand for the roof. We are talking about the option with a roof made of metal, which is not additionally insulated. The smallest payment for the purchase of the necessary communication products (without their installation) is 30 thousand rubles; the total lower threshold for the cost of construction cannot be less than 100 thousand rubles


How to do it yourself?
Building a bath with your own hands at the stage of building the foundation, walls and roof has almost no difference from the construction of wooden houses.
You will need to do:
- a leisure room (furniture is placed there that can withstand significant humidity);
- shower room (with a floor equipped with drain fixtures);
- a steam room, supplemented by a stove - this is the main room in all baths.


The foundation will have to withstand a relatively small load, so builders can safely choose both columnar and tape structures. Both options are quite simple to perform, even if you work on your own, without the involvement of professionals. The installation site is marked, a trench is dug on it with a depth of 0.7 m (regardless of soil freezing), the width is selected according to the cross section of the timber with a small reserve. The bottom is sprinkled with 10 cm of sand, which is rammed by hand using a rammer. This tool is made on the basis of thick logs and handles attached transversely.


The edges of the trench are equipped with formwork, which is easiest to fold from a shield or from a board, and are connected by spacers. Please note that the formwork should rise above the ground by at least 0.3 m. To simplify the work, fragments of a beam with lower grooves, put on the perimeter of the formwork shield, will help. Continuing to work step by step, prepare concrete mixtures and pour them into trenches, then wait until the concrete sets and becomes dry. In hot weather, the foundation should be covered from the sun and sprinkled with water to avoid cracking.


Further, roofing material or other thermal insulation is placed on top of the base. Next, you need to build walls from profiled timber. The strapping is the most durable material, which does not have even minor cracks. The selected blocks are impregnated with an antiseptic composition, after which the original crown is attached to the foundation with metal studs with dowels. Alternatively, the bars are put on the reinforcement installed when pouring the foundation.

Places for genital lags are prepared by cutting into crowns. Fastening is carried out using the "thorn in the groove" method, adjacent crowns are connected with wooden dowels, which are hammered into the parts to be joined. When counting the number of rows of material, you need to focus on the average height of the baths from a bar of 250 cm. It is recommended to use not linen, but jute tape for compaction. Conventional gable roofs are the best way to deal with accumulating snow.


Work begins with the creation of nests for rafter legs, and they are made on the final crowns. The counter-lattice is attached to the rafters, boards are sewn onto the slats. After them, they are engaged in a vapor barrier (the gaps between the rafters are saturated with a film) and insulation (mineral wool should cover the vapor barrier layer). Then comes the turn of laying a film that restrains the spread of water. Finally, it comes to the crate, which supports the main coating (OSB sheets are used under the shingles).


Ceilings in attics are mainly sheathed with clapboard, and only in exceptional cases is it replaced with drywall.

Today it is very difficult to imagine a well-maintained country house without a classic Russian bath, which is the favorite vacation spot for the whole family. It should be noted that for the construction of such a bath, wood is most often used, which is considered an environmentally friendly and easily processed material.
Ground work on the arrangement of the foundation foundation begins with the marking of the site. Further, in accordance with the applied markings, a trench is pulled out with a depth of about 70 cm and a width slightly more (by about 10 cm) than the section of the timber used to assemble the log house. The bottom of the trench is covered with a layer of sand, which is then carefully compacted using a special tamping device.
Before pouring the concrete mixture from boards or ready-made shields, formwork is constructed, for the reliable fixing of which you will need special spacers. After pouring and complete drying of the concrete mixture, the finished foundation is covered with a layer of roofing material used as waterproofing, after which it will be possible to proceed with the direct assembly of the log house itself.
Log preparation

- After laying the first crown (strapping), floor logs from a bar are mounted in it by cutting into it, on which a subfloor will subsequently be laid.
- The fastening of the bars is carried out by the method of their joining according to the type of deaf connection "thorn in the groove". And for reliable fastening between adjacent crowns, wooden dowels are used, hammered into mating beams.
- As a sealing material laid between the log crowns, special jute fibers are most often used.
- Upon completion of the assembly of the log house, it will be possible to start manufacturing internal partitions cut into the crowns of the log house in pre-marked places.
Roofing

Upon completion of the construction of the frame of the bath, it will be possible to proceed with the arrangement of its roof. Note that in the buildings of the type we are considering, gable roof structures are most often used, excluding the accumulation of snow on them. Their installation includes the following operations:
- on the last crown of the log house, insert-nests are made for attaching rafter legs;
- from below, the slats of the counter-lattice are attached to the rafters, along which the attic ceiling is subsequently sewn;
- in the niches formed by the rafters, first a polyethylene film is laid, which acts as a vapor barrier, and then the plates of the insulation material you have chosen are laid;
- a special roofing film is laid on top of the insulation with a small gap, which is used as waterproofing;
- at the final stage of the formation of the “roofing cake”, a crate is sewn onto the rafters, which serves as the basis for laying the coating.
The attic ceiling is most often sheathed with clapboard or drywall.

The interior decoration of the bath building is usually reduced to the insulation and decoration of the walls and ceilings of its premises, which provides comfortable conditions for taking bath procedures.
As a decorative material for finishing the steam room and washing room, it is best to use larch, which is characterized by the presence of resin secretions and high resistance to moisture. In addition, larch retains heat well, but does not heat up to a state that can cause skin burns.
The type-setting floor in the washing department and in the steam room can be made of edged boards laid with small gaps through which the waste water will be removed from the room. An additional convenience of such a floor is the possibility of dismantling it and drying the floorboards at the end of the bath procedures.
A bath in the country or on the site of a country house is no longer a dream, but a necessity. The owners of private housing construction develop a construction project in such a way that it includes all the necessary buildings - a garage, a barn, a bathhouse, a pavilion. Therefore, the construction of a bath from a bar has recently been rapidly developing and popularizing. But since the land plots are mostly small, the owners choose smaller bath projects, for example, a bath 100 x 100 (beam section) 3 x 3 m in size with a ceiling height of 2 m. Even in such a small building, both a steam room and a shower room will fit and a rest room. All operations must be regulated by SNiP 31-02-2001. In larger projects, a bathhouse is built from a 150 x 150 bar with additional rooms that improve the comfort and functionality of using the building.
Small-sized log bath - we select building materials
You will need
| building materials | Units of measure and quantity | Picture |
| Portland cement brand M 400 | 150-160 kg | |
| Bar with a section of 150 x 150 mm | 3.5-4.0 m 3 | |
| Edged board 50 x 100 mm | 0.3-0.4 m 3 | |
| Rail with a section of 20 x 50 mm | 25-26 running meters | |
| clapboard | 0.5-0.6 m 3 | |
| Edged board 25 mm | 0.3-0.4 m 3 | |
| Refractory fireclay brick | 500-550 units | |
| Andulin roofing | 10-11 m2 | |
| concrete blocks | 30-35 units |
It is also necessary to prepare in advance insulation, nails, electrical wiring and its components, self-tapping screws of various lengths and diameters, corners for assembling a truss structure, fittings, plastic or wooden windows and entrance, as well as internal doors. In addition, if you plan to connect the water supply to the bath, then you need to think about the organization of sewage. For ours, do-it-yourself plumbing and sewerage were not developed.
Video instruction
How to lay timber and raise the walls of the bath:
Procurement of building materials, cost and estimate:
We build a log bath on our own - steps from the base to roofing:
Any construction of a bath from a bar can be divided into specific stages:
- Foundation pouring.
- The erection of a timber frame.
- Installation of rafters and roofs.
- Plank flooring.
- Installation of windows and doors.
- Laying of electrical wiring, installation of lamps and installation of other electrical equipment.
- Decoration of internal walls, finishing works on external walls.
Stage 1. Foundation pouring
The best option to build a bath from a bar with your own hands is a concrete base. 
The Tool You'll Need
- Trench tool.
- Wooden stakes or fittings, cord, tape measure, level.
- Building material for the assembly of formwork.
- Reinforcing bars and knitting wire for concrete reinforcement.
- Factory concrete or concrete mixer, shovel, mortar container, cement, crushed stone, water, sand.
- waterproofing materials.
The site should be leveled and the perimeter of the foundation should be marked with pegs and a cord. If we are building a bath from a small beam, then the foundation will be shallow, and a trench for it can be dug with a shovel. Trench depth - up to 50 cm.
Stage 2. Strapping and walls of a log bath
| Construction operations | How to do |
Foundation layout | We mark the contours of the base in dimensions of 3 x 3 m. For the internal partition, the foundation is not poured. Stakes are driven into the corners, a cord is pulled. |
Reinforcement | The armoframe is knitted from rods with a diameter of 12-14 mm, a knitting wire with a diameter of 2-3 mm is used to connect the longitudinal and transverse rods. The distance from the frame to any surfaces of the trench is 5-7 cm. |
Pouring concrete | It is not necessary to collect the formwork on clay soil - you can pour the solution into the trench immediately. It takes 14 days for the solution to harden. |
Pillar base for oven | Economy projects of baths from profiled timber include a stove that will be built between the steam room and the relaxation room so that heat enters two rooms at once. The base for the stove is buried to the level of soil freezing, the sand cushion under the foundation is 20-30 cm thick. In addition to sand insulation, foam sheets 2-3 cm thick can be used. The foam plastic prevents the soil from swelling, and the foundation will be motionless. |
Foundation waterproofing | The top of the base must be protected from moisture. To do this, the concrete surface is covered with two layers of roofing material or thick polyethylene. |
The bars will be connected as follows: the ends - in half a tree, the corners - in the paw.
- It is recommended to impregnate the first two rows of beams with antiseptics and fire retardants, and then lay them on a roofing material laid in two or three layers. The lower beam should have markings for windows and doors of a bathhouse that has not yet been built. The corner joints of the beam are additionally fastened, it is possible with dowels or corners. When building a 3 x 3 m bath, intermediate dowels are not needed.
- Next, floor beams are laid for flooring. The distance between the beams is 1.3-1.5 m.
- The gaps between the timber are insulated with tow, flax, jute or more modern heat-insulating materials, such as tape.
- If, nevertheless, it became necessary to install intermediate dowels, then they are fixed after 1 m. Dowels can be wooden or metal. At the corners of windows and doors, pins are fastened at a distance of 0.2 m from the edge of the opening.
- After a set of walls, the ceiling is mounted. Beams for it are mounted in two rows from the top edge of the wall, the approximate height of the ceiling that a do-it-yourself beam bath will have is 2 m.
- The two remaining rows of wall beams are laid on the ceiling beams. These two rows should be fixed especially firmly, since the last beam will serve as a power plate in the rafter system.
- Before arranging the roof, you need to make at least a temporary ceiling - it can be covered with any boards, since at the end of the roofing work they will be removed, and the permanent ceiling will be equipped.
The main problem when building a bath from a bar with your own hands is to bring the frame of the bath under the roof so that the rest of the work can be carried out not in the rain and wind, but in a protected room.
Stage 3. Roof
Arrangement schemes are for single or gable roofs. If we are building a bath from a beam with our own hands of small size (three by three meters), then a shed sloping roof option is better suited. 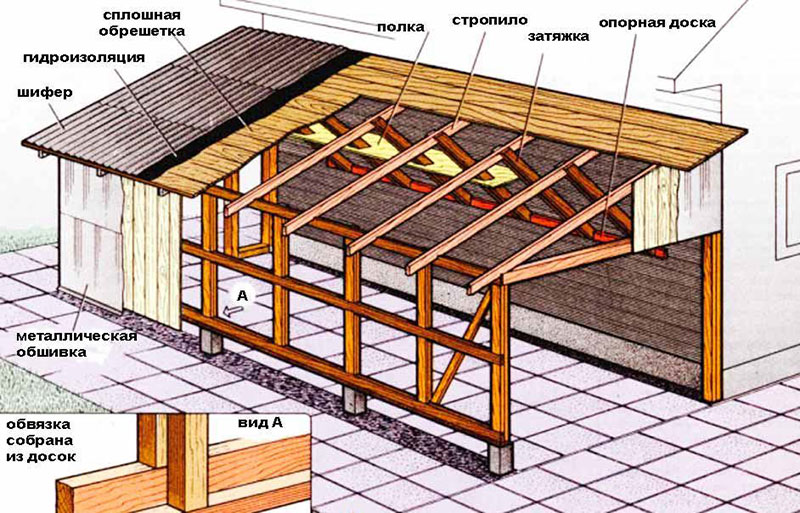
Under a shed roof, the ceiling is immediately made permanent, insulated with foam. The characteristics of the heat insulator are shown in the table below:
| Styrofoam board brand | Density, | Compressive strength at 10% deformation, ≥ MPa | Bending strength, ≥ MPa | Thermal conductivity of dry foam at 25±5 0 С, ≤ W/(m K) | Styrofoam moisture content, ≤ %, | Burning time, ≤ seconds | Moisture absorption per day, ≤ % | Service life, years (minimum - maximum) |
| PSB - S 15 | 10-11 | 0 , 05 | 0: 07 | 0,037 | 1 | 3 | 1 | 20-50 |
| PSB - S 25 | 15-16 | 0,1 | 0,18 | 0,035 | 1 | 3 | 1 | 20-50 |
| PSB - S 25 F | 16-17 | 0,12 | 0 , 2 | 0,037 | 1 | 3 | 1 | 20-50 |
| PSB - S 35 | 25-27 | 0,16 | 0 , 25 | 0,033 | 1 | 3 | 1 | 20-50 |
| PSB - S 50 | 35-37 | 0,16 | 0 , 3 | 0,041 | 1 | 3 | 1 | 20-50 |
The ceiling is insulated step by step as follows:
- From below, boards up to 20 mm thick are attached to the beams.
- Styrofoam is attached to the boards.
- Boards are also laid on top of the beams.
During the construction of a gable roof, a temporary ceiling can be equipped, and the permanent structure can be insulated later. It is necessary to build walls, build a truss system and lay a roof before the onset of frost. During the winter, the building will sit down, the moisture content of the materials will stop at a constant level.
Video instruction
Insulation of the ceiling with foam:
Stage 4. Flooring
If you use profiled timber bath projects, floor logs may not be installed. The beams are laid in increments of 1 m, a cut board 30-40 mm thick is laid on them. It is recommended to make a slope on the floor towards the water flow of 2-3 0. Sewerage can not be equipped, because:
- A shallow foundation will allow runoff to quickly soak into the ground.
- A small log house made of timber with your own hands is the minimum water consumption.

Video instruction
How to put boards on the floor of the bath:
Stage 5. Laying electrical wiring
- After calculating the total power of all electrical appliances, you need to add a margin of 2-3 kW.
- The electric cable is divided into categories according to the cross section of the cores. For example, 0.5 mm 2 can withstand ≈ 2.5 kW of load. It is better to buy proven licensed products, since a fake can have a large variation in terms of power and cross section. For complete peace of mind, it is better to buy a cable with a margin for these parameters, for example, with a cross section of not 0.75 mm 2, but 1 mm 2.
- It is imperative to equip a common ground - high humidity and high temperatures pose a danger to the operation of the bath. Grounding is done simply and quickly: you need to drive a steel rod with a diameter of 16-20 mm into the ground, the immersion depth is 1 m. A bolt is welded onto the rod, and a ground cable is connected to it.
- All electrical cables in the bath must be protected by a metal casing - corrugated or solid. The casing will help to avoid fire, and will also serve as protection against rodents.
- Before laying the cable, draw up a small guide for yourself in the form of a diagram or layout plan for sockets, lighting fixtures, and other electrical equipment.
- After that, markings are drawn on the walls, holes for fastenings are drilled, wiring is mounted.
Stage 6. More about windows and doors
It is not easy to make doors and windows for a bath yourself - you will need a woodworking machine, experience working on it, drawings of structures with exact dimensions. It is easier to purchase factory products, and PVC windows will also be appropriate in the bath. Doors can be wooden, MDF or PVC. Installation steps for structures:
- Both door and window openings are leveled - filed, planed, etc.
- Before installing the products, it is necessary to assemble special plank boxes for them - you will need boards 5 x 15 cm. Frames are assembled on nails, inserting it into the opening, you need to leave a gap of 30-40 mm from above - the log house may begin to shrink.
- In the openings of doors or windows, plank boxes are also fastened to nails or self-tapping screws. The upper slot is insulated with mounting foam or traditional heat-insulating materials.
Video instruction
How to install windows in a wooden bath:

Stage 7. Set of frame and fastening of lining strips
Lining is traditionally used to decorate the walls of the steam room and the shower room. For the recreation area, it is allowed to work with any building materials - plywood, OSB, fiberboard, chipboard, plastic or MDF. It’s more difficult to work with clapboard, so let’s take a closer look at this step:
- For the supporting frame, you will need rails with a section of 20 x 50 mm.
- First, the extreme rails are attached to the wall, a cord is pulled between them, the frame rails are attached to it in increments of 400-500 mm.
- The difference in height between the ceiling and the floor surface in the corners of the bath is removed. The discrepancies are leveled by adjusting the lining strips from below and above. Between the lining strips and the floor, the ceiling must be left with gaps of 10-20 mm in size. Subsequently, the gaps will close the plinth. Ceiling plinths should be attached to the lining, and not to the ceiling boards, otherwise, when the bath shrinks, the lining may bend.
- Nails 150 mm long are suitable for mounting the strips; they are driven into the grooves of the strips.

For outdoor decoration, any building materials are suitable. If you are building a cheap and small bath, then using expensive cladding does not make sense. Window and door openings, as well as openings of internal doors, must be closed with platbands. The presence on the market of cheap and beautiful materials allows you to choose any finish.
Video instruction
Internal thermal insulation of the bath, interior decoration and wall protection:
Today, as before, for many, many people, a bath is an integral part of life. Many dream of having it on their own site, but they do not dare to start construction, considering it too complicated. However, with a detailed examination of each stage of construction, it can be understood that there are practically no subtleties and nuances.
So, how to build a bath from a bar with your own hands? For such construction, several successive stages will be required.
All stages of construction
If the construction of the bath begins from the very beginning, then you will have to complete the following steps:
- Site preparation and purchase of all materials;
- Area marking;
- foundation device;
- The construction of walls from timber;
- floor laying;
- Furnace installation;
- Ceiling and roof installation;
- Interior decoration;
- External finishing.
As you can see, there is a lot of work, but doing it consistently, gradually understanding all the details, it becomes clear how to build a bath from a bar with your own hands.
Site preparation and procurement of materials
All construction begins, if the project is ready, with the preparation of the terrain. Everything superfluous is removed from here, that is, various plantings, some foreign objects - the usual cleaning of the area.
As for the purchase of materials for, you should know what exactly is needed.
So, for the construction of the bath you will need the following material:
- Profiled timber measuring 20 by 20 cm or more for the first crown;
- Profiled timber measuring 15 by 15 for walls and partitions;
- Moss or tow for warming the bath (laying between the bars);
- Wooden or metal dowels;
- Rebar staples for securing two perpendicular logs.
Advice! A batch of timber must be prepared in advance, for example, a year before the start of construction. This is due to the fact that the products must be completely dried, since raw wood subsequently dries out, which leads to undesirable consequences.

Marking the area and building the foundation
The markup is to mark the location of the future bath on the ground. Pegs and rope are perfect for this. In this case, you need to create a straight line, because this is how you get a flat trench for the foundation.
And for the construction of the foundation will require the following materials:
- Concrete;
- Sand;
- crushed stone;
- Formwork boards;
- Ruberoid;
- Warming material.
The concrete composition calculator will help you to comply with all proportions.
In this article we will consider the construction of a bath from a bar. Why this particular material? Because the tree for many centuries has perfectly proved its superiority in this matter. A bar is the most convenient in construction, but let's take a closer look at its advantages:
Material advantages
- Popularity. Thanks to this quality, it is easy and simple to find and, most importantly, choose the right project. The presence of many diagrams and drawings will greatly simplify the work of your own hands.

- A light weight . This means that a strong foundation is not required, which makes it possible to save significantly.
- Ease of installation work. This building material is easy to assemble. And unlike logs, it can be collected immediately on the ground, and not separately on a prepared site with subsequent transportation.
- High heat-saving qualities. A very important point in the functioning of the steam room, which should perfectly keep the heat. Otherwise, there will be very high costs for fuel materials.

- Minimum shrinkage. That is, there will be practically no deformation changes under its own pressure.
- Affordable price. Wood, although expensive in itself, there is a very large difference in prices between products with different levels of processing and between different tree species. So you can always pick up something according to your budget.
- Ecological cleanliness. The healing effect of the steam room will be even more significant if you are surrounded by completely natural materials.

Due to the combination of all the qualities listed above, the construction of baths from a bar is very popular among owners of their own suburban areas.
Construction works
The construction of a bath from a bar begins not with excavation, but with sorting. Because getting into the design of low-quality material can lead to the most undesirable consequences ().
Sorting

To protect yourself from unpleasant surprises in the future, you should postpone products with the following signs:
- Cracks of significant depth. Such a beam may soon split completely.

- The presence of fungus, traces of decay and insect pests. The process that has begun will bring its work to an end.

- Deformations along the longitudinal axis. The beam must be flat and with a smooth surface. Otherwise, cracks form in the masonry, which is absolutely unacceptable.
Tip: products affected by fungus or insects should be burned immediately. Otherwise, there will be a threat of damage to the rest of the material. Deformed samples can still be used in the base after careful processing.
Waterproofing
The instructions for installing logs on concrete require high-quality waterproofing to protect wood from moisture.
For this:
- We apply melted bitumen with a brush or roller on the cement surface.

- From above, after the bitumen has hardened, we cover a layer of roofing material.

Timber preparation
The most common and simple technology for building a bath from a bar is to connect products using the “paw” method, that is, without an outgoing part on the reverse side.

For successful work, it is necessary to create templates and use them to make proper cutouts on all wooden products.
Pay special attention to the details adjacent to the base. They should be treated with an antiseptic; to save money, you can use engine oil.
Construction of a log house
The construction of a bath from a bar is a responsible matter, especially the construction of a log house and goes as follows:
- We put wooden slats on the surface of the foundation. This will prevent the beam from docking with the base and create the necessary ventilation holes. This will significantly extend the life of the material, protecting it from the spread of mold and decay processes.
- We mount the first crown:
- We install the beam on the rails.
- We carefully check its horizontal position. If there are slightest deviations, we correct them. Since the evenness and reliability of the rest of the structure depend on this element.
- We connect the base bars together.
- The space between the wood and cement is blown with mounting foam.
Tip: you should not fix the lower crown with fasteners. For its stability, the gravity of the entire building will be enough.

- On top of the crown we create a layer of insulation.
The following materials are quite traditionally suitable for this:
- Tow.


- Jute.

At the same time, tow and moss should be laid with a release on the sides of 10 cm, in order to further compact the material tightly in the gap between the beams. Jute spreads flush with the width of the product and is nailed with staples of a construction stapler or steel nails.
- Next, we install beams with a section of 15 by 15 cm, by analogy with the first. We fix them using dowels or iron pins through pre-prepared discharge holes. At the same time, the more precisely the correspondence of the diameters of the holes with the diameters of the pins, the stronger the design will be.
- We do not fasten the last upper crown. The construction of timber baths suggests the possibility of their removal for the arrangement of ceiling beams.

Arrangement of door and window openings
There are two ways to install window frames and door frames:
- After the construction of the frame.
In this case, you provide holes in the process of laying the timber, and then level the openings with a chainsaw. This construction technology is simpler and safer.

- During the construction of the frame.
This is a more laborious and dangerous occupation. The fact is that after the construction of the structure, it will definitely shrink. And with built-in window frames, the walls can lead.
Which will lead to the need for repairs immediately after the completion of construction work and will significantly increase the final cost of building a bath from a bar.
Final stage
After the construction of the entire building with a stele on top of the timber, forty-millimeter boards are covered with roofing material. In this state, the frame must stay for at least six months in order to give the necessary shrinkage and acquire its final shape. After that, the installation of the floor and roofing works are carried out.

If you are in quality or tow, then immediately after shrinkage, you should caulk all the walls. The process consists in using a caulk to tightly drive the protruding edges of the insulating material into the gaps between the bars.

When using jute, this process is not necessary. Since it creates a fairly dense layer even with a simple overlay.
Output
This is facilitated by its remarkable feature of keeping warm, environmental friendliness, ease of processing and aesthetic appearance.
To make the work easier and the building more reliable, it is recommended to use a bar. Smooth smooth products of regular shapes are easy to install. It is also easy to calculate how much it costs to build a bath from a bar in advance when purchasing material.

The video in this article will provide additional material for your attention. The right approach to the construction process will provide you with a quality bath!