Every little girl dreams of the biggest and most beautiful dollhouse for Barbie. And every domestic cat dreams of his own house made of cardboard, where he can retire without getting in the way of his owners. By learning how to make cardboard houses with your own hands, you can not only please your children and pets, but also decorate the interior in an original way. This article shows the most requested do-it-yourself cardboard house plans with MK.

Necessary materials
Materials and tools do not require additional costs; everything you need can be found in the household of any family:
— cardboard boxes of different sizes;
- glue gun or super glue;
- knife and scissors;
- pencils, felt-tip pens, markers;
- watercolor paints, gouache;
- sparkles and other decorations.

Helpful Tips:
— when creating a box, it is better to use corrugated cardboard;
— only adults should cut cardboard;
— for the stability of the product, it is better to take cardboard pipes;
— in a house for children, it is advisable to make a door that opens outward. This will provide more space for games;
- do not throw away small cardboard boxes.
Shelter for a cat
A cardboard house for cats can be built by the whole family in a very short amount of time. The first thing to do is to draw doors and windows using templates.
Start assembling the bottom of the box. Bend the opposite flaps, apply glue to them and fold the remaining flaps on top. Press them together until the glue dries. At the top end of the box, cut off two wide flaps. Next, cut half of the remaining sash and bend it. Do the same with the second whole sash. Secure them with glue in this position.

The next stage is creating the roof. On the top of the second box, on the small flap, draw lines from the center of the top to the bottom corners. Do the same with the second flap. Then cut out one large flap. Cut the edge along the first drawn line and fold the second one. Repeat the same steps with the second leaf.

At the bottom of the second box, cut off the wide flaps, and from the first smaller one, cut off exactly half so that when gluing the two boxes there is a hole. Glue the boxes together. Then take the first wide cut flap and glue it to the bottom of the second tier to strengthen it.
The second box will be used to make the roof. To do this, cut a piece measuring 45 by 115 centimeters. Fold it in half along the long side. Apply glue to the triangles of the small flaps on the top of the second box and glue them to the wide flap. Apply glue on top and glue only the first side of the roof so that the cat can look out from under it.
The house is ready!

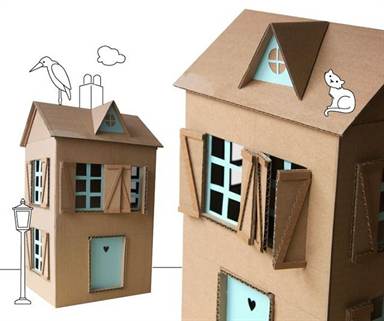
Dollhouse
You can make this wonderful gift for children yourself from ordinary cardboard boxes.
The house will consist of two floors and two rooms. First, connect the boxes together. Glue another sheet of thick cardboard to the bottom, side and sides. Strengthen the structure of the house with tape and let the glue dry.
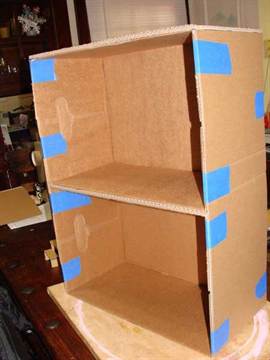
To make the structure more durable, strengthen the walls with thin cardboard.

The next stage is decorating the rooms and the appearance of the house. Decorate the walls with colored paper applications, add mirrors, window curtains, and toy furniture. In order for the dolls to “climb” to the second floor, the house will need a staircase, which will consist of two parts.
Cut steps from thin paper for the end of the stairwell. Make the same cut out of cardboard. Select the desired width and height of the steps.

Cut out a couple more pieces from a thick sheet of cardboard. You will need a couple of rectangles for the steps and the bottom.

Glue the side parts of the ladder together and press them together with your hands to make them more dense.
Don't rush to throw away cardboard boxes if you have children in your home. Such a thing, unnecessary at first glance, will serve as an excellent house for dolls, toys, or even for the child himself. We will tell you how to make a cardboard house in this article.
How to make a cardboard house for dolls
You can make a house for a doll from a small cardboard box. To create such a product, you need to stock up on:
- cardboard boxes of suitable size;
- glue, tape;
- scissors and a sharp stationery knife;
- watercolor paints and brushes;
- colored paper;
- any finishing materials for which there is enough imagination.
A multi-story cardboard dollhouse is made as follows:
- The boxes from which the floors are supposed to be built must be secured with tape along all edges so that the house does not fall apart during the game.
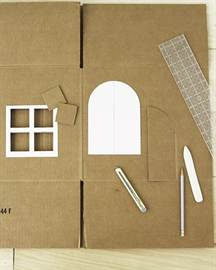
- Then you need to cut out windows in them. To begin with, it is better to draw them evenly with a pencil, and then cut them out with a stationery knife along the intended lines.
- To create a multi-story house, the boxes need to be placed on top of each other and glued together.
- Now you need to make the roof. To do this, take two cardboard sheets of suitable size and fasten them at an angle of 45°. The roof is installed on the top box.
- In order for the house to have separate rooms, it is necessary to make partitions. Like everything else, they are made of cardboard and installed inside boxes.
- In principle, the dollhouse is almost ready, the most interesting thing left is to decorate it. You can decorate such a toy structure in any way you like, for example, cover it with colored paper or fabric, decorate it with ribbons, lace, beads, buttons or something else. If you want to involve your child in the process, then cover the walls of the house with plain white paper, and let the child paint them at his own discretion.
- Just like the outside, the inside of the house also needs to be decorated. Unnecessary remnants of wallpaper, fabric, oilcloth will come in handy here.


How to make a cardboard house for a child
It's no secret that kids simply love to build small makeshift homes for themselves from whatever they can get their hands on. You can help your child and make a cardboard house for him from a large box that was left over, for example, from a refrigerator or washing machine. The process of creating such a craft is similar to the previous one:
- The cardboard house must be durable, so tape all its joints and corners from the inside with tape.
- Draw the windows with a pencil and cut them out with a utility knife. Make the doors in the same way.
- If the box is too low for a child, the top can be cut off and an L-shaped roof can be attached in its place.
- You can decorate such a house with any available materials. You can cover it with paper or wallpaper, simply paint or paint it. You can use natural materials for decoration: cones, branches, leaves.
It is better to fasten all the parts of the children's house with tape or a stapler, since the glue will not give the desired result and the house will fall apart.

The New Year's time is coming - a time of miracles, when everyone can feel a little like a helper to the kindest old man in the world. After all, think about it, if in addition to gifts for the children of the whole planet, the old grandfather also had to decorate our houses, how would he manage to do everything? That is why we, adults, help him in every possible way, because it is impossible for children to stop believing in Santa Claus.
Decorating your home is the most important task in the process of creating a New Year's mood. Buying ready-made decorative elements in a store is not a difficult task, but making New Year’s decorations with your own hands is a completely different matter! In this article you will find more than 20 master classes and schemes for creating New Year's houses. At first glance, it may seem to an unprepared person that creating a New Year's house from paper, cardboard or any other materials is an impossible task. In fact, this is not the case, especially if you have a ready-made template. So, if you are serious, then get ready to become a real builder, because in this article you will find diagrams of not only single houses, but also entire winter villages!
You can make a very beautiful New Year's house with your own hands from an ordinary cardboard box. The inside of the box is usually brown, which actually works to our advantage. The box will have to be gutted and turned inside out. Draw a house template and cut it out. Next we glue the walls and floor. You can leave the top with an improvised roof and use the house as a gift box, or you can glue a full roof and put it under the Christmas tree. You can draw on top of the cardboard with a special white marker, white gouache or regular corrector. Externally, the house is very reminiscent of the gingerbread delicacy that is common in the Western world. Well, you and I are familiar with the gingerbread house from the famous fairy tale by the Brothers Grimm “Hansel and Gretel”. If your children have not heard it yet, then it’s time to read this story, and a homemade gingerbread house from a cardboard box will be an excellent attribute for a small dramatization!
More Gift Boxes:

On the eve of the New Year holidays, store windows are full of gift boxes, decorative bags, and wrapping paper for every taste. Smiling sellers helpfully offer to provide wrapping services for New Year's gifts. And all this seems great, because you must admit, it’s much nicer to receive a New Year’s trinket in a beautiful package. But on the other hand, the whole meaning of the gift is lost, the very gift that should […]
If you are planning to make not just a house, but an entire Christmas village, then you will definitely need a church. Print out our finished diagram, cut it out of cardboard, glue it in the right places and the church layout is ready. Now all that remains is to decorate it with sparkles and artificial snow to make the church truly winter. You can download the finished diagram below.

So, the church is ready, now all that remains is to build the houses of the local residents. Download the finished diagram from the link below, cut it out of cardboard, glue the house and decorate it. Who should be accommodated in the houses? Anyone! Little dolls, pine cone elves, or any other residents you have. If there is a little Santa Claus, then feel free to accommodate him too! You'll get a whole residence!

If there are any problems with cardboard, then you can easily make a New Year’s house from salt dough. You can use it as a candlestick, it looks very cool. So, prepare the salt dough, roll it out to about 1-1.5 cm thick. Cut out the walls, windows and door. This can be done with special molds, and if there are none, then use a stationery knife and a ruler. Glue all the walls and glue the roof. Cover the joints with the remaining dough. When the house is dry, sand the rough edges with a sanding knife and enjoy your creation!

Cute houses in the style of Danish architecture can be made using this scheme. At the link below you will find diagrams of all three houses, which you just need to print and bend along the lines. Place an electric candle inside, turn off the lights and enjoy the city's winter landscape!

If you like corn flakes or, like true Englishmen, eat oatmeal in the morning, then you will probably have cardboard boxes of the appropriate sizes. Below is a step-by-step master class on how to make a New Year's house with your own hands from a cardboard box. Follow the instructions carefully and you will succeed!

Excellent New Year's houses are made from magazine clippings. Find a picture of a suitable house or castle, cut it out and glue it in a circle. Place an electric candle inside and enjoy.

Wonderful New Year's houses can be made from plain white paper, decorating some parts (roof and windows) with sparkles. You can download ready-made templates from the link below. Watch the step-by-step instructions and make your own New Year's house!

If you have accumulated a lot of greeting cards, you can use them to make wonderful houses that you can use to decorate your apartment by combining them into garlands. Or you can use these postcard houses to congratulate friends and acquaintances. You will find step-by-step instructions for making houses from old open doors below.

You can make craft houses not only from paper or cardboard. Felt is also an excellent material for making. The manufacturing process is incredibly simple; step-by-step instructions can be found below. All that remains is to get some felt and an electric candle. The New Year's craft house is ready!

With our ready-made diagram and step-by-step instructions, you can make an entire city, especially if your team has little fidgets ready for handicrafts. You will also need electronic candles or you can use a New Year's garland. Add some mini Christmas trees and the New Year's city is ready! And most importantly, the whole family is in a New Year's mood!

New Year's houses can also be made from scrap materials, which is especially great when these materials are no longer suitable for use, such as milk packaging. If you look at it, the house is almost ready, all that remains is to make the roof and adjust the size of the house itself. If the box doesn’t look very presentable, you can cover it with paper and draw windows and doors, but if you’re happy with everything, then the craft house is ready!

In this step-by-step master class you will learn how to make a simple New Year's house from ordinary cardboard. The main difficulty lies in the template, and if you do not have spatial vision and architectural education, drawing something more or less complex on paper is quite difficult. Therefore, using the link below you can download a ready-made diagram of the house and glue it together yourself.

Download the finished house template, cut and glue. The DIY Christmas house craft is ready!

Download this simple template, print and cut out. In our instructions, the house is made from an old music book. You can make from plain white paper or “draft paper”. A little decor, an electric candle and Voila! Your DIY paper house is ready!

If you don’t have time to tinker with voluminous houses, but want to decorate your apartment with the whole city, then this option is especially for you. You will need a sheet of Whatman paper (thick) in A2 format, a printed template and a stationery knife. Using the links below you can download two different versions of cities. Finished diagrams are printed on A4 sheets, printed out, glued and transferred directly to whatman paper for cutting.

Getting ready for the New Year with the children and making Santa Claus's house out of paper. Download the finished template, print it and glue it together. Young designers will be delighted!

As already noted, house crafts can be made from a variety of materials, including wooden sticks. Popsicle sticks are quite suitable for this job, but you had to collect them all year. In any case, you can take notes on the idea and be sure to do it next year!
A very cute New Year's house can be made from paper tubes. For this you will need: thin paper, scissors, glue, pencil, decorative elements. Cut the paper into strips of the same size. Wrap the paper strip around a pencil and glue it with glue, remove the pencil. You will need about 50 tubes to make a house like in the master class. When the base is ready, glue on the roof, and then the windows and other decorative elements.

Incredible New Year's houses can be made from felt. Volumetric or flat, in the form of gingerbread houses or clocks. In addition, felt houses can be used to decorate pillows or socks for gifts. You will find the finished patterns under the photo.

Useful tips
Sooner or later, everyone ends up with cardboard boxes on their balcony, storage room or dacha.
Not all of these boxes should be thrown away, as you can make many interesting and even useful crafts from them.
One of these crafts is a playhouse for children.
Such a house can be built and decorated together with children, who will be very interested in joining something new.
Folding cardboard house

1. Start with an empty box. Turn it on its side so that the open part is perpendicular to the floor.

2. Cut off the top of the box and save it - this will serve as half of the roof later.

3. Use wide tape to secure some parts of the box.

4. Cut a piece from another cardboard that will be the second half of the roof.
5. Tape the roof halves together.
6. Connect the roof and the house and secure them with tape.


7. Make the house foldable. Place the house face down and cut down the middle of the back and bottom of the house. Also cut where the bottom and back of the house meet.


8. Add tape to the places where you made the cuts. Make sure the bottom and back of the house fold in the right direction. Secure with tape the areas that you feel are loose.


DIY cardboard house with pipe and door

You will need:
Hot glue with a glue gun
Stationery knife
Scissors
Several cardboard boxes.
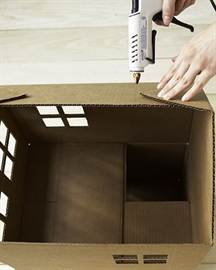
The large box will be the main part of the house, and the smaller boxes will be needed for small things like the pipe and window frames.

1. Cut off the pieces of the large box that form the lid - these will be used to create the roof.
2. Turn the box upside down. Cut out the door by making a large "L" shaped cut.
3. Cut out the squares for the windows using a utility knife.

4. Glue together 2 parts of the cut box lid. Repeat the same with the other two parts of the lid. You will get 2 halves from which you can make the roof of the house.
5. For windows, you can cut out 2 wide cardboard strips and glue them to the window. You can also cut several strips to create a window frame.
6. To glue the roof to the house, you must first connect the roof halves using small L-shaped cardboard pieces. Next, use the same parts to glue the roof to the house.

7. Now we make a small roof. You will need a sheet of cardboard of the appropriate size. Divide it in half (or just bend it) and glue it to the house in the same way as a large roof, i.e. L-shaped parts.

8. You can make a window in the door and, if desired, glue a cardboard window frame to it.

9. Optional : If you want to make a pipe for a house, you will need a small box or 4 cardboard pieces of the same size, which you need to glue into a small box.

10. Mark on a small box the places that need to be cut so that the pipe will lie flat on the roof of the house. To make this easier, lean the box against the roof exactly on the side and draw lines with a pencil. Once you have glued the pipe to the roof, you can cover it with a cardboard lid and glue a cardboard toilet paper cylinder.
11. Optional: you can add a handle to the door. Use any old handle and glue it to the door. You can also make a handle from cardboard.

How to make a house out of cardboard with your own hands

You will need:
Large cardboard box
Wide tape (adhesive tape)
Stationery or construction knife
Metal ruler (to make straight cuts)
Black marker
Double-sided tape (if necessary)
Fabric for curtains (if necessary).

1. Disassemble the box and turn it inside out so that the house will later be brown and plain, and all the drawings on the boxes will be hidden.

2. To make the house larger, those parts that form the lid of the box on one side must be lifted and secured in a vertical position using tape (adhesive tape). Place the box on its side so that there is an “entrance” to the house on one side.
3.Optional: to make a diagonal roof for the house, use a stationery (or construction) knife to cut diagonally (small angle) the upper part of the future house (the part that is now at the top, after you turned the box over).

Cut triangular pieces from a cut piece of cardboard and tape the roof back to the house.
4. Cut off the lower part of the house (the floor opposite the roof), fasten it with tape if necessary, and attach it to the open part of the box (“entrance”, which was obtained in step 2).

5. Now it’s time to cut out windows and doors in the cardboard house with a stationery knife.
If you wish, you can use a marker to draw window frames, bricks and other details. You can also cut out a small handle in the door (a semi-oval at the edge of the door).
It is very difficult to tear a modern child away from gadgets. They are so accustomed to playing games on phones, computers and tablets that playing in the yard or with dolls at home practically no longer interests them. You can only captivate a child with something truly interesting. What could be more interesting than building your own home! Remember yourself as a child. Each of us made a house under a table or in a closet and felt comfortable there. What if you and your child can’t make his own house from an ordinary cardboard box together? This will be his residence in the apartment and his private property. Every child dreams of this!
On the Internet you can find a lot of articles about building a house for children from cardboard boxes. However, almost all the instructions are very complex, and it will not be easy to follow them without preparation with your child. I have found for you simple instructions with which you can make a cozy place for your child to play in 10 minutes from any cardboard box.
What we need:
- The bigger the cardboard box, the better. For my experiments, I bought a box measuring 800*600*600 mm. Why her? Well, because it is the largest box that could fit into the trunk of a car. Of course, I wanted to buy the largest box measuring 1200*800*800 mm, but it wouldn’t fit into a passenger car. So let's choose the first size.
- Corrugated cardboard sheet 1200*800 mm. It will be needed to give greater strength to the roof. You can do without it.
- A simple pencil. You can use a pen or marker.
- Stationery knife and scissors. Use these two tools. It is better to make the initial cuts with a stationery knife, and cut large parts of the box faster and more conveniently with scissors.
- Large metal ruler or corner. The box is large, so the ruler should be large.
- Scotch tape and PVA glue. It's better to buy paper masking tape. It sticks well and you can apply PVA glue to it.
Have you found or purchased the right box, prepared your tools and are ready to start studying the instructions? Then let's begin! My instructions will be divided into 7 simple steps.
Manufacturing process:

On the small flaps of the box, mark the middle and draw lines to the bases of the flaps. Let's learn about an isosceles triangle.

Work for scissors: cut off the unnecessary part from the upper small flaps along the drawn line. We cut off all the lower valves, but do not throw them away. We will need them for the roof.

Making a roof. We glue the lower large valves with tape. These flaps will be the top of the roof.

We secure the roof into a single structure using masking tape.

We cut out a sheet of corrugated cardboard for the roof to provide greater strength. We glue the roof using PVA glue onto the roof.

On one long and one short side of the house we draw windows and cut them out with a stationery knife.

On the second long side of the house we draw a door and cut it out in the same way with a stationery knife.
The house is ready! The facade of the house can be decorated with colored cardboard or painted by hand with your child.