A gazebo is an indispensable attribute of a personal plot. The Internet is replete with offers to buy ready-made drawings of gazebos for self-construction, or to entrust the construction of a small architectural form to professionals. But often, existing proposals for some reason do not meet the needs of land owners: the size is not suitable, the shape and design are not suitable, or they are simply expensive. And the construction of a gazebo in itself is not a complicated process and can be done with your own hands.
This article is devoted to how to draw up a plan, drawing and diagrams of gazebo components, how to determine the size depending on the purpose of the building, how to properly place a barbecue, a place to relax, a kitchen, etc. And of course, we have selected ready-made diagrams and drawings of gazebos for you.
The photo shows the layout of the space with a barbecue, corner structures save space
Layout
The first thing you need to decide is where the building will be located. To do this, you will need a site plan on a scale convenient for you, which shows: the main building (house), outbuildings (bathhouse, sheds), diagrams of garden paths, trees.
Advice: It is better not to cut down perennials; they will still serve for shade and to create landscape design.
Drawings of a DIY garden gazebo, the diagram shows a rectangular building made of timber

Do-it-yourself gazebos with drawings, photo of a canopy made of logs of a non-standard simple shape with a corner barbecue
Carefully study the plan of your personal plot, taking into account the totality of the circumstances, and mark on the diagram where, in your opinion, a gazebo would be most appropriate. It is better to place it in the depths of the garden, at the end of the path, between the trees. The distance from the main house is 3-5 m. If the building is planned with a barbecue, fireplace or stove, then it is advisable to distance it from the main residential building by more than 8 m.

Plan of a gazebo for a summer residence, independent drawing with dimensions
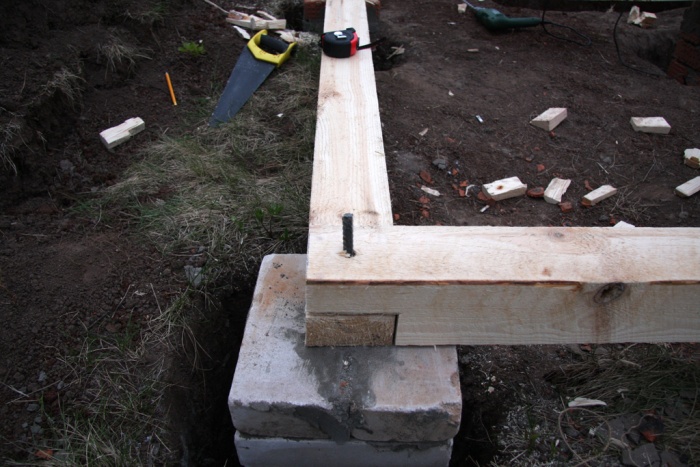
When drawing up a drawing, do not forget about the foundation. For country gazebos, it is optimal to arrange a columnar base. The distance between the pillars is 1500-2000 mm, for each vertical support. Pole section 300*300, 400*400 mm. When marking the foundation diagram on the ground, you should add 100 mm on each side so that the base is larger than the dimensions of the building.

Approximate layout of furniture for 8 corner buildings
Functionality and dimensions - what you need to know
Gazebos, first of all, are built for comfortable outdoor recreation, which means that they must be comfortable, durable, reliable, everything must be at hand, nothing should interfere or irritate. And for this you should know some ergonomic rules.

Typical drawing of a rectangular structure

As a rule, rectangular buildings have a two- (as in the diagram above) or hipped roof

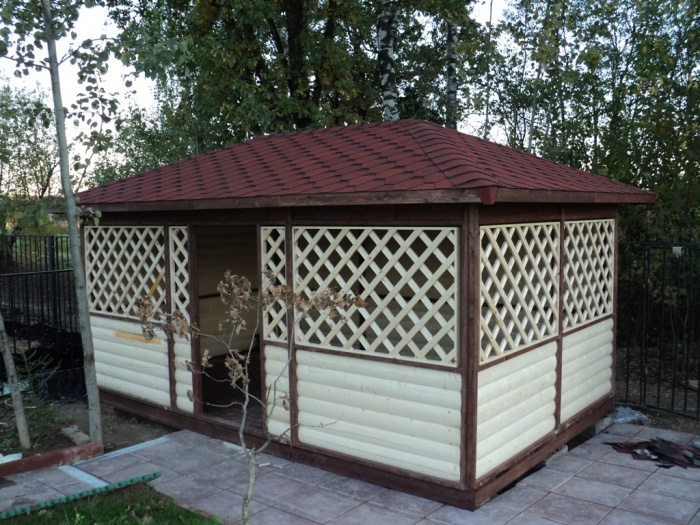
Wooden gazebos, drawings of a square building with a hipped roof
The standard table width is 600-800 mm, length 800 mm - for seating 4, 1200 mm - for 6 people. A comfortable seat size for a chair or bench is 400-450 mm. Thus, the minimum width of the gazebo is 1500 (600+450+450) mm, length 1500-2000 mm.

Do-it-yourself summerhouses, drawings of mini log structures
Note: If necessary, the dimensions of the gazebo can be reduced, in which case it is better to opt for a small frame building-shed, see the example in the diagram below.
Gazebo diagram for a small area

The product is on a metal frame, the dimensions are schematic, the length and width of the gazebo can be changed to suit your needs
To comfortably accommodate one person, a floor area of 2 m2 is required, therefore, the optimal size of the gazebo for a company of 4-8 people is 3*4 m, 4*4 m (12-16 m2).

Do-it-yourself hexagonal gazebos, drawings of a standard wooden structure
If you are planning not only a place for gatherings, but also a relaxation area, with armchairs and sun loungers, then the area of the gazebo is calculated at the rate of 4 m2 per person.
In order to correctly draw a drawing of a gazebo with a barbecue or fireplace, when calculating the area it is necessary to take into account the dimensions of the stove. The optimal depth of a brick grill is 750-1000 mm (3-4 brick lengths), width - 1200 mm (10 brick widths).

Drawing of a standard barbecue
In addition to the barbecue or barbecue, on the side of it, for convenience, you should provide a work table 600-800 mm wide, preferably a sink with a width of 600-800 mm, and on the other side a place for storing firewood, the same distance for symmetry. Based on this, the minimum length of the kitchen, including the oven, is 2400-3400 mm.

Diagram of a barbecue with a work area
In front of the grill, it is necessary to provide a free space of 1000-1200 mm in order to move freely while cooking, and the heat does not disturb those sitting at the table. Thus, when drawing up a gazebo drawing, in addition to a place for gatherings of 8-12 m2, additional area should be allocated for the barbecue: minimum - 2400 * 1750 mm, with comfort - 3400 * 2200 mm.

Gazebo with barbecue, drawing of furniture placement

Construction diagram with a barbecue, wooden structures should be treated with a fire-resistant compound
To save space, the stove can be installed in the corner of the gazebo, or you can make a separate canopy on the site near the building.

Drawings of gazebos with barbecues; this form of construction contributes to convenient zoning of the kitchen and dining areas
Shape and design features
In addition to the fact that gazebos are open and closed, they also vary in shape: rectangular, multifaceted, round, combined, etc.

Assembly diagram of a closed square garden summer house under a hipped roof

Diagram of a large wooden gazebo under a hip roof, with a foundation of 4*6 m
The easiest way is to make a drawing of a rectangular gazebo, but there are pitfalls here too: when transferring the diagram to the site, make sure that the angles are strictly 90°, the diagonals are the same, or use the rule of the Egyptian triangle.

Marking the area for the gazebo
Measure 3.0 m along one side, 4.0 m along the other, connect the points in a straight line, check the geometry, if the connecting line is 5.0 m, then the angle is 90 o
Simple rules for constructing circuits
Drawings of multi-organ structures cause some difficulties when designing independently. But let us remind you of just a few rules from the school course. So, for example, a hexagon with equal sides always consists of 6 equilateral (all sides are equal and angles = 60°) triangles. Or from two equal trapezoids.

A diagram of how to simply draw the base of a hexagonal gazebo
If you need to change the shape of the gazebo, for example, enlarge some sides, then first draw a rectangle (in the diagram below with a green line), then draw its diagonals, and find the middle. From the point of intersection of the diagonals, perpendicular to the long sides of the rectangle, I lay out identical segments (yellow line in the diagram), then the points are connected. Or you can still draw 2 equal trapezoids with a common base; the height of the trapezoid should be equal to half the side of the gazebo.

Do-it-yourself hexagonal gazebo drawings, if you need to change the length of the sides
To draw an octagonal gazebo, its base also needs to be decomposed into simple shapes, as shown in the diagram below.

2 perpendicularly intersecting lines are drawn, equal to the length and width of the structure, a rectangle is constructed, one side of which is equal to the side of the building, the other - the width


Drawing of an 8-sided gazebo, the diagram shows in yellow how to connect the sides of a polygon

To increase the number of sides in a polygon, just draw another rectangle and connect the vertices along the contour, as shown in the diagram
Gazebo projects - we build them ourselves

Drawing of a wooden gazebo, 6-sided design

Scheme of the base and roof of 6 coal buildings

Drawings of 8 coal elongated structure
Garden structures in the form of a polygon are a little more complicated in the construction of relatively simple rectangular buildings, but they look more original and impressive. To make the gazebo not only functional, but also a decoration for your garden plot, decorate it with a beautiful wooden lattice or elegant forging, plants, and select a lighting scenario.

Scheme of how to build a gazebo in Japanese style

Assembly diagram for a wooden grill house

DIY gazebo drawings, photos of metal structures

Metal gazebo made of profile pipe, decorated with decorative forging elements, frame diagram

Drawing on how to make a gazebo at the dacha with your own hands
Please note that in many drawings and diagrams the floor in its usual form is absent; instead, a flat area of paving slabs is laid out or a monolithic concrete slab is poured.

Drawing of a metal gazebo, photo of a simple design with forging elements
When making a structure from polycarbonate, try to adjust the size of the gazebo to a standard sheet of 2100 * 6000 mm.

Hexagonal metal profile structure
In order to accommodate more people, benches are installed around the perimeter; it is advisable to include a round table in such a structure.

Drawing of a welded portable structure with a polycarbonate roof

Large square canopy made of rolled metal and polycarbonate, frame diagram with dimensions
Even large buildings made of metal and polycarbonate look light and airy. To protect from side rain and wind, the sides can be covered with transparent monolithic polycarbonate, screens made of special durable polyethylene or curtains made of waterproof fabric.

Drawing of a wooden gazebo, cross section of an octagonal structure

Summer polycarbonate structure, diagram of how to weld a metal frame

Drawing of a wooden building made of timber, decorated with a wooden lattice

Closed structure with lattice, hexagonal construction project

Scheme of a log building in the Russian style
We have presented to your attention the most popular gazebo projects. If you haven’t found a suitable option, then use our tips on how to complete the construction drawing yourself.

Drawing of a lean-to timber structure

Drawing of a combined summer building with a barbecue, placement of the main zones
If you do not have professional builder skills, try to choose simple designs, without complex lines and architectural frills.

Summer room for a large company with a barbecue and a bathroom, space zoning drawing
The presence of a gazebo on the territory of a dacha or a plot with a cottage makes it possible to have a pleasant time relaxing. This can also be a great place for a family lunch together.
The material for building a gazebo can be absolutely anything. Everyone chooses it according to their own desire. You can build it from wood, use brick, polycarbonate, metal, plywood, or soft tiles. The list doesn't end there. It all depends on financial capabilities and what the size of the future building will be.
Types of gazebos
Forged and metal products are popular. Such structures are installed quickly and easily. They are resistant to the negative effects of external factors, have a long service life, and do not require special care. Some dacha owners prefer to combine construction from various materials.

The shapes of the bases of gazebos are also very diverse. They can be round, semicircular, hexagonal. Square bases are good options. They have beautiful, sophisticated shapes and are the easiest to arrange.
The advantage of wooden structures
Frame of the majority. This material is environmentally friendly and safe for health. The advantages of gazebos whose frame is made of wood are obvious:
- relatively low cost;
- the material is natural;
- ideal for people with limited construction skills;
- high speed of construction;
- perfect harmony with the environment.
This can be purchased ready-made. However, this is within the power of wealthy people. The most budget option is to build it yourself.
Choosing a roofing option
The types of roofs for garden square gazebos can also be varied. The simplest design is the single-pitch version. A semicircular roof shape is acceptable based on a welded metal lattice. In addition, they use hipped, hexagonal, hipped, and round types of roofing.


For a square garden gazebo structure, one of the best options is a roof with a gable roof. Such a building has low weight and low cost. To install a gable roof, you do not need any special carpentry skills. It won’t be difficult to build it with your own hands.
If for a summer residence the choice is made to install a gazebo of a square design, then first of all you need a drawing of it. It is compiled in several stages. Before you start, you need to decide on the design and size of the building.
The need for a construction scheme
The drawing should include the location of the gazebo from the main house. The optimal distance is 3–5 m. If a gazebo for a summer house is planned with a barbecue or stove, then it is advisable to distance it from the house by 8 meters.
When drawing up a drawing, you should definitely take into account the foundation. For a summer residence, the structure must have a columnar base. If the size of the foundation is 3x3 meters, then the distance between the pillars should be 150–200 cm. A do-it-yourself construction drawing suggests that when marking the foundation on the ground, 10 cm should be added. This makes it possible to increase the dimensions of the foundation.
The location of the table, chairs or armchairs, and the size of each of them should also be considered. The type of structure is taken into account: open or closed. If the building is closed, it is necessary to provide ventilation. There is also a collapsible design option. With it, the components can be easily dismantled and subsequently installed anywhere.
Photos of square gazebos 4x4 and 3x3


Thematic material:
A drawing of the shelter roof is made separately. It indicates the size of the roof, the angle of inclination, height, and covering material.
If you complete the drawing correctly, taking into account all the necessary building materials, this will avoid unreasonable financial costs. If desired, using the many available ready-made construction schemes, you can design your own version.
A drawing of a gazebo for a square-shaped wooden cottage with a gable roof should be made with a frontal and profile projection of the object. The foundation is displayed as a separate diagram indicating the depth of the supports and the distance between them. The size of the structure has a significant impact on the last parameter.

To make construction work more convenient to implement, detailed diagrams of individual technical units are attached to the main diagram.
The drawing of the parts associated with the gable roof should show the rafter system, which indicates how the top trim should be fastened and take into account the pitch between the rafters. Once all the diagrams and the main drawing are ready, you can begin construction with your own hands.

Gazebo drawing: dimensions 3 x 3, material – profile pipe
Preparing the site for the foundation and pouring it
Initially, the construction site should be prepared. After appropriate marking (3x3 m is a good option), the turf is removed from it along with the fertile layer. This must be done to prevent rotting of organic residues (grass, roots). Crushed stone, screenings, and construction waste are poured into the sandy soil, followed by compaction. If the soil is clayey, the pit is filled with soil, after which it is compacted.
Such preparation will effectively prevent the accumulation of water in the base, since its appearance causes an unpleasant odor.
Large flat stones are also poured into the foundation pit. Then pour the solution, leveling it with the rule. The finished hardened foundation should be insulated by covering it with roofing felt.
To install the frame, four beams are prepared. Their size should be approximately 100x100 mm. They must first undergo anti-corrosion treatment. Then they are laid horizontally and connected to each other into half a tree.

Installation of trim and frame
This design is a lower frame that supports the entire wooden frame. The material for it must be dry. Then supports are installed on the harness. It is advisable to place two additional ones at the entrance to the gazebo itself for the dacha.
They are connected to each other by horizontal jumpers. Subsequently, these jumpers serve as railings. Four more beams are placed on top of the supports, the size of which is similar to the size of the lower elements. They are attached to each other in the same way.
As a result of the work carried out, the structure is given additional rigidity. The upper bars are already used for installing the roof.
To give the supports additional stability, braces are attached to them at the bottom at an angle of 45 degrees.
The frame of the structure includes a wooden floor. To prevent it from sagging, logs are laid. The distance between them is 500–600 mm. Moreover, they should be 230 - 300 mm away from the walls. The wooden flooring is laid on logs without a gap from boards 40 mm thick.

Laying the floor and installing the top trim
Details of the rafter system
Equally important is the construction of rafters. The rafters in it are hanging or inclined. Most often, in gazebos for summer cottages, the option with hanging rafters is chosen. The dimensions of the building allow this to be done. In addition, there is no need to erect additional supports.
To arrange the rafter system you will need the following components:
- Rafters. They can be installed one by one. An alternative method involves assembling them into a truss. After this, the frame is lifted and secured to the roof.
- The support beam is the Mauerlat. Serves as a support for the lower part of the rafters.
- Run, stand, lie down. Used for inclined rafters. They are rarely used for country gazebos. These elements usually support other components of the roofing system.
- Puff. Serves to give the system greater strength.
- Brace, headstock and crossbar. These components are used with hanging rafters. The need to use each element is determined by the size of the span of the structure.
Roofing system installation
When starting to install rafters, it is very important to correctly determine their size. Determine how far they should be from each other. With a length of 3 meters, a section of 50x150 mm will be the most acceptable option.
The distance between the rafters can be determined using a special table. Very important factors are the angle of the roof and the weight of the roofing material. If the weight is large, it is better to reduce the distance between the rafters. This will make the frame of the entire system under a gable roof more durable.
The installation itself is carried out in stages. The drawing drawn up earlier will help with this. Initially, the rafter frame is installed. It would be wise to assemble it at the bottom. To make the work faster and easier, a template is initially prepared. Subsequently, the finished frame rises to the top and is attached to the Mauerlat.
Then they begin to install the sheathing. It can be either continuous or sparse. It is rational to use a solid roof in the case of a soft roof. The use of sheet materials involves the use of sparse lathing.

Installation of roof truss system
At the next stage, the lining carpet is arranged. For soft roofing, moisture-resistant plywood can be used as a material. At this stage, the cornice strips are attached.
The finishing coating is installed according to the manufacturer's instructions. The procedure and rules of work may vary. This depends on the roofing decking chosen.
The final stage is the installation of the ridge and end strips. These elements are easy to make with your own hands. After this, it is advisable to treat the entire frame of the shelter with a tinted protective impregnation. Its color can be selected taking into account the design features.

A garden gazebo made in this way will delight the owners and their guests with warm summer evenings for many years.
Order a professional gazebo
Don't have time to build yourself? Contact the following organizations.
Construction companies
“It’s a good gazebo, but they rarely fill it up!” And if there is no gazebo in the yard, then the guests will be completely dissatisfied with the event. The first problem can be easily solved by making a small investment in a few boxes of “combustible material”, but with a gazebo it’s not so simple. Here you have to be moderately rich or hardworking enough.
Many construction companies and individuals offer to build gazebos at a price from 60,000 rubles for a simple wooden structure 3 by 3 meters. Beautiful and exclusive gazebos are already standing from 450,000 to 3-3.5 million rubles, area and materials play an important role in pricing (logs and metal are always more expensive). But not everyone can pay that amount for some small architectural form in their yard.
It’s no secret that materials for building a gazebo cost pennies (compared to its market value) and up to 85% of the money is taken for the work itself. Also consider the cost of foundation and earthworks. Now we will look at a detailed guide to building a gazebo with your own hands and with its help we will make a high-quality wooden product that will be in no way inferior to the “factory” options!
Choosing a place to build a gazebo
A gazebo is built to solve many problems. It must simultaneously host a large noisy company and serve as a place for a romantic dinner, so the owner himself must choose its location on his site. In most cases, this is the most secluded place, which is not visible from all sides and where there are no drafts. The following points must also be taken into account:
- The construction of wooden gazebos should be carried out away from septic tanks, sewer channels and sedimentation tanks on a private plot. Nothing should disturb your rest, especially unpleasant odors.
- It is necessary to take into account not only the upcoming stages of construction of the gazebo, but also what will happen next. A barbecue or tandoor can become a problem in the future if the structure is located next to the house. It is better to retreat at least 3 meters from all buildings.
- You will definitely want to look at the pond or forest after a hearty dinner. It is better to place it in the most picturesque corner of the yard.
- Pay attention to drainage. Depressions in the yard must be excluded - there is a high probability of the foundation being washed away.
- A place sheltered from the wind. If you sit quietly, you will continue.
We’ve sorted out the basics of choosing a location, now let’s move on to the phased construction of a gazebo and look at how to make an excellent structure from inexpensive materials without throwing a lot of money down the drain.
DIY garden gazebo foundation
Is it necessary to make a foundation? No, you can do without it, if you are not bothered by skewed structures and periodic spring restorations of gazebos. Without a foundation, the supports will sag under the weight of the roof and the entire structure; they can be washed away by spring waters or simply move to the side after the soil freezes/thawing in the spring. In any case, it must be done - it’s the right thing to do. Let's look at several options for installing a foundation without extra costs.
. It's quite simple to do. We take a drill with a diameter of 50-60 centimeters (it’s easier to borrow from a neighbor) and start making a gazebo out of wood with our own hands. We make markings (for example, 4 by 4 meters), drill 4 holes 1 meter deep, and pour concrete. You can use M300 cement, the proportion with sand and crushed stone is the same as for foundations. After 15-20 days, you can safely build the above-ground part of the structure.
Brickwork
. A very simple method that is suitable for anyone who knows how to use a shovel and trowel. The essence of this method is as follows: dig a hole 60x60x60 cm, then pour 1-2 buckets of concrete into the bottom, lay 2 sand-lime bricks lengthwise and 1 side by side across. Lay all subsequent rows of bricks in a checkerboard pattern until the “column” is approximately 20 centimeters above ground level. So lay out 4 columns (or 6 pieces, if you are planning to make a hexagonal wooden gazebo with your own hands), after 15-20 days you can begin further construction. 
Buried block
. We take a shovel and go to bury the treasure in the yard. An ordinary concrete block 50-90 centimeters long will do. You need to dig a corresponding hole, pour in 10 cm of crushed stone (if you can compact it, that’s great), 5 cm of sand and lower the block. Repeat this for each column. 
All of the methods described above are suitable if you are making a simple gazebo with your own hands (up to 30-40 square meters). Heavier structures (including those with multi-level roofs) are installed only on strip and deep columnar foundations, since the mass of the structure can deform brickwork, blocks or poorly made concrete. In some cases (for example, two-story gazebos) even drainage systems will be required. 
According to all SNiP and recommendations, the foundation must stand for at least 24 days, but the actual period of its hardening is much shorter, since it will not be subject to heavy loads until the construction of the roof and installation of all the furniture. You can start “light” work already 5-10 days after filling it - nothing will happen to it. Now is the time to consider the features of installing a gazebo with your own hands, drawings and dimensions of the structure, materials.
Making a wooden frame
Let's start with the racks. Actually, it’s not possible to start with anything else. We will use a wooden beam 30 by 30 centimeters, since it looks much better (massive parts are always in fashion) and it will be easier to attach the body kit to it. The minimum dimensions of the timber are 10 by 12 cm. Now you have 4 supports that need to be secured to concrete posts, and this can be done in several ways.

When constructing wooden gazebos with your own hands, you should use a level as often as possible, especially in the case of concreting supports, because it will be impossible to correct it. It should form a right angle with the concrete base and be perfectly level relative to the plumb line.
Now you can move on to the bottom trim of the supports and laying the logs. It is necessary to make the most stable surface that can easily withstand the weight of the flooring and the large number of people who will be on it. Let's look at the process of building the floor of a gazebo for a summer house with your own hands step by step.
STEP 1: harness. We use a 10 by 15 cm beam (this is with a margin), which must be laid between the concrete pillars and screwed to the supports below. It should go strictly horizontally, measure with a level. If the angle deviates, you need to put something on the support, which is located at a lower level. 
STEP 2: we make a central reinforcement jumper. We fasten a 5x10 cm block exactly in the middle of the two sides of the gazebo frame. It will prevent sagging of the boards or any other flooring in the gazebo. If the structure has sides more than 3 meters, the number of lintels must be increased. Approximately 1 gain per 120-150 centimeters. 
STEP 3: stuff the boards on top. You can use boards 250 wide and 3-4 cm thick - the best option for heavy loads. The length can be selected either full (through the entire gazebo and fasteners to the reinforcements) or partial (only between the reinforcements). It is better to use short boards; they will last much longer and will be cheaper to replace if damaged. You can use both nails and screws, it doesn’t matter. 
STEP 4: We open it with anti-corrosion protection. Regular inexpensive impregnation will do. You can use a good varnish after finishing all the work; its consumption will be much less after the initial impregnation of the wood, which you do now. 
When securing floor joists and all reinforcements, it is better to use metal corners with perforated sides. You can find them in every hardware store. It is better to select the height of the clamp according to the height of the wooden beam in order to secure it as best as possible. It would be appropriate to have a powerful screwdriver, since you will have to screw in a lot of large screws; this can be done with a screwdriver, but it is quite difficult.
Additional support posts for a gazebo length of up to 4 meters do not need to be used; if the structure is larger, then the upper frame needs to be strengthened. In the middle of the wooden beam of the lower frame, you need to fix a metal stand (a 30-45 mm square is suitable) and level it, it will “support” the upper wooden frame, which we will install in the next section of the article.
Do-it-yourself construction of a gazebo roof - step-by-step instructions
Now let's move on to a more complex process - roof construction. There are a lot of options on how to make it, up to the construction of multi-level Chinese structures with curved corners. But our main goal is a do-it-yourself gazebo made from scrap materials that can be found in any market or in the warehouse of a thrifty owner, so we will make a simple and reliable design.
STEP 1: top trim. Everything is exactly the same as below, only now we use a 10x10 centimeter beam. The load on it will be much less than on the floor, so there is no point in making the structure heavier and transferring money. If the roof is made of flexible tiles or roofing felt, you can even lay 50x60 mm timber. In the middle we twist with additional support posts, which we discussed in the previous section. 
STEP 2: main rafters. A wooden beam 80x30 mm is suitable for a gazebo with dimensions of 4x4 meters or less. To install from the corners of the top frame to the middle of the room, it would be better to use a plumb line and a professional level to equally align and secure all 4 rafters. Cut the top edge of the beams at an angle of 45 degrees so that the rafters meet in the center of the room without gaps or protrusions. 
STEP 3: auxiliary rafters. We find the center on each side of the top trim and from there we lay auxiliary bars (40x30 mm) up towards the center. They will support the roofing material and prevent the roof from sagging. Be sure to lay everything level and maintain the same value. Check the evenness of the structure; if nothing protrudes anywhere, you can screw everything together with screws and secure it with metal clamps at the top. 
STEP 4: lay sheets of plywood or OSB. Everything is simple here if the rafters are well leveled beforehand. Screw every 20 centimeters to the main and auxiliary rafters. You will definitely need to cut the sheets; it is easier to do this on the ground, having first marked the necessary lines. 
STEP 5: roofing material. Now you can lay whatever you want, but euroroofing felt or flexible tiles will look beautiful. We begin to lay it from below or from above, slipping each subsequent sheet under the bottom of the previous one with an overlap of 4-5 centimeters. You can make a “ridge” on top to prevent moisture from entering. On the main rafters, you can easily turn up the edge of the material and screw it to avoid unsightly metal waterproofing. 
We looked at how to build a gazebo with your own hands and you just need to additionally varnish the entire tree so that it does not corrode. It is better to do this at the end, since during the construction process the materials are always damaged and will have to be repainted.
If you want to decorate the structure, you can install wicker panels on the bottom trim or lay a wooden beam - this will make the inside much more comfortable and tidy. But if you are looking for a way to make a gazebo with your own hands with minimal investment, then you will have to abandon such decorations. One panel (400 by 80 centimeters) made of wicker or planks will cost at least 4,000 rubles.
At the dacha, it is not customary to sit in the house when it is sunny and warm outside. Only during bad weather can a summer resident take refuge under a roof. However, you can resort to another option. You can stock up on great experiences outdoors if you build your own gazebo.
Such a building will decorate the garden plot, as well as a place for pleasant communication with family and friends. There are many ready-made schemes for light gazebos. If you assemble the structure yourself, its cost will be 50% lower than that of a finished building. The simplest gazebo can be assembled with your own hands quickly enough. If you work slowly, it can be built in 2-3 days.
Materials and designs
A cheap and practical option is a wooden gazebo. This material looks beautiful and is easy to process. If wooden elements are impregnated with special solutions, they can last quite a long time. In addition, the construction of a summerhouse will not take more than 3 days, even if you do the work slowly.

Another material that is used to construct such structures is metal. When the frame is made of profile pipes and steel corners, the gazebo can last for many decades. You can build it yourself. The work is completed quickly enough, and the materials are quite cheap.
DIY gazebo
How to build a simple gazebo with a minimum of cost and effort? To build such a structure, you will need to create a frame and floor. If it is wooden, the base is made of beams. The flooring is made of planks. It is better to pour a concrete screed as a base. This foundation option will be simple and affordable. Before work, you need to choose the right location for installing the gazebo. The site for concreting should also be leveled.

Important! For the simplest gazebo, you should not combine wooden and metal frame elements.
Practice has shown that even when wooden supports are protected with roofing felt or bitumen, when placed in concrete, the elements begin to rot. Subsequently, this can cause their destruction. For this reason, it is better to immediately exclude contact between wood and concrete.
For this purpose you should:
- Concrete round metal pipes.
- Then screw wooden posts to them. Metal rods should protrude 30 cm from the concrete base.
- Holes are made in them for fastenings.
A gazebo can stand on such supports for decades. Any roof can be mounted on the resulting supports. It is quite simple to build a wooden structure with your own hands.
For an ordinary light gazebo, there is no need to erect brick fences. You can limit yourself to a simple fence made of eurolining. Its height usually does not exceed 90 cm. Such a fence is attached to longitudinal bars. A gazebo will help you hide from the scorching rays of the sun, and will also allow you to avoid the strong wind blowing your back. The fencing for the walls of the structure is fixed to wooden supports using self-tapping screws.
Eurolining can be replaced with cellular polycarbonate. This material looks great and does not overshadow the space of the gazebo. It is also easy to install. The material is not afraid of sudden changes in temperature and high humidity.
Roof
For the roof frame it is better to find 50x50 mm timber. It is necessary to create a frame from it, on which the sheathing will be installed, and then the roofing material. The frame is installed on the top frame. The roof is covered with the following materials:
- ondulin;
- metal tiles;
- slate.

When choosing the optimal roof width, it is worth calculating it in such a way that when installing the roofing covering you do not have to cut the sheets. To do this, you first need to measure the dimensions of the panels used, and then subtract the overlaps of the sheets over each other, which will be done during installation. The result obtained will be taken into account when calculating the length and width of the roof. It is also worth considering the side overhangs and end overlap. You can make a gazebo with your own hands quite quickly. The main thing is to choose the right materials, including for roofing.

For example, for slate with 8 waves in each panel, the length of the arbor is chosen as a multiple of 1 meter. The length of the slopes can be equal to 1.75 m. If several panels are laid along the slope, the estimated length of each of them is reduced by 15 cm - this is necessary to create an overlap.
When choosing the best option for roofing, you should pay special attention to polycarbonate.
Distinctive features of the material:
- It is an excellent option for the construction of lightweight structures.
- Fencing is also made from it.
- Polycarbonate is a transparent plastic with low mass.
- A metal profile is often used in combination with it.

Such gazebos are especially attractive and practical if they are located in the shade of trees. If there is a translucent roof and shade created by dense foliage, the atmosphere in the gazebo will be as comfortable as possible for relaxation.
Garden gazebos made of polycarbonate are simple and affordable. To create them, you need to have several tens of meters of steel angle, as well as polycarbonate panels and a steel strip. Also, before constructing such a structure, it is worth preparing planed boards, which will be needed for making benches and a table. The original photo of the gazebo can be seen below.

Manufacturing stages
To understand how to make a gazebo with your own hands, you should get acquainted with the main stages of the work. It's better to choose the simpler option. First you need to equip the foundation. The support posts of the gazebo are concreted in it. After this, they should be scalded with a 25x25 mm corner. After this, 2 corner belts are welded to the racks. One of them is placed in the middle of the supports. The second one should be placed on top - the roof will rest on it.
Polycarbonate sheets have the ability to bend perfectly. For this reason, they can be used to create an arched roof. For this purpose, it is necessary to weld steel strips, which have a width of 50 mm, to the racks. They are installed on support posts. And then holes are made in them to fix the polycarbonate. You can assemble a simple gazebo for your summer house with your own hands (as in the photo) quite quickly.

Also, roofing is often made of tiles. For the base, OSB sheets should be prepared. The material does an excellent job of holding bitumen shingles on the roof. The thickness of such sheets can be 10-12 mm. It has fairly high strength and rigidity. That is why you do not have to assemble a spatial frame from wooden elements for it. You just need to firmly attach it to the harness.
Features of simple gazebos
A simple gazebo for a summer house does not have to be made with a frame frame. The foundation for it is a concrete screed, which is reinforced with steel rods. You can put a barbecue on such a surface. The safety of this design is quite high, because the concrete floor is not afraid of hot coals. In the case of the winter option, it is better to equip the floor with planed boards, and cover the area around the grill with steel sheets. This winter design looks simple and beautiful.

Inexpensive to construct and easy to install is a columnar foundation. In order not to overpay when building a gazebo for your dacha with your own hands, you can prepare red brick. To install the foundation, you need to dig holes for the support pillars, and then lay brickwork in them, place reinforcement and fill them with concrete. 20 cm anchor bolts are placed in the masonry. There should be a thread at their free end.
Supports are placed on the pillars. It is better to make the frame from 50x100 mm timber. If you put antiseptic boards on it, you can get an excellent heated floor. Subsequently, the gazebo can be equipped with an open fireplace. With this decoration, you can relax comfortably in the room even during severe frosts.
To figure out how to build a gazebo, you should get acquainted with the main features of simple structures, as well as learn more about popular materials. You should also understand the sequence of construction of simple gazebos.

Conclusion
As you can see, you can build a simple structure with your own hands, without the help of professional builders. First, an exact drawing is made, and then all the necessary work is carried out in accordance with it. It is important to consider the capacity of the gazebo, its location and materials. In order to avoid mistakes during the work process, it is worth performing the correct calculations.


The popularity of the country lifestyle is gaining momentum; the desire to spend as much time as possible in the fresh air contributes to the transformation of the garden area. Owners of private land plots are actively constructing terraces, verandas and patios. And yet, of all the light architectural structures that decorate gardens, you can most often find a gazebo made of wood.
A century ago, such a building was a light, openwork structure, a place of solitude and pleasant dreams. Modern wooden gazebos, the designs of which have undergone many changes, have managed not only to preserve the old functionality, but also to acquire new useful qualities.

Country style building
Types of country gazebos
A country gazebo is increasingly becoming a necessity, so it is not surprising that there is a variety of shapes and design solutions made in almost any style. Gazebos are distinguished by the following characteristics or features:
1. Material
When choosing a material, proceed from the purpose of the building and the general style of the local area. Wood is often combined with other materials, some of which are used for decoration. There are buildings:
- Wooden. One of the most common options, which is facilitated by the relative cheapness of wood. The building, made entirely of natural wood, is comfortable and environmentally friendly; it does not require a heavy capital foundation and is easy to build. The disadvantage lies in its naturalness - wooden elements, even with regular treatment with protective compounds, are prone to gradual destruction.
- In combination with natural stone or brick(concrete). Such gazebos serve as an excellent addition to the landscape; they are in demand, practical and durable; protect from bad weather and are suitable for setting up a barbecue area. The combination allows you to save on purchasing stone and make the building more harmonious. To erect a structure, you need accurate calculations, a solid foundation and significant financial investments.

Combined glazed gazebo with barbecue
- Combined with metal. An all-metal gazebo often looks boring; combining natural wood and metal, it will most likely fit into the decor. Metal parts are aesthetically pleasing, easy to assemble and relatively cheap. A building with forged parts can become a decoration of the site and a source of special pride for the owners. It is more practical to place metal structures in the shade (in the sun the metal heats up noticeably); They are also ideal for setting up a fireplace or barbecue.
- In combination with polycarbonate. The combination of wooden elements and polycarbonate sheets of different shades allows you to create airy buildings that do not clutter up the landscape. Gazebos with polycarbonate are cost-effective; the material is easy to process (translucent sheets bend easily), impact-resistant and does not require pouring a foundation.

A win-win combination of wood and forged parts
2. Design
To make the gazebo look natural in its surroundings, during construction they try to avoid overly massive parts. The following types of buildings are common:
- Rotunda. An open structure topped by a dome (sometimes a cone) supported by columns. At the base is a circle, hexagon or octahedron.
- Pavilion. Isolated building of round or rectangular shape; may be closed or open. Usually a pavilion is a building that is spacious enough for a large company.
- Gazebo. A gazebo from which you can admire the surrounding landscape. Such structures are erected away from the house and outbuildings, often on a hill or near a reservoir.
- Veranda. A structure that is often attached to a house (but can also stand separately). Both open and closed (glazed) buildings are popular, convenient for use in winter.

Interior of a glazed wooden veranda with a fireplace
- Pergola. Canopy with trellised supports, framed by climbing plants. A place where you can hide from the hot summer sun or have a family dinner.
- Combined. A gazebo with a dedicated area for barbecue or barbecue. Often this is a two-story building with a recreation area.
3. Roof view
The shape of the gazebo most often determines the shape of the roof; modern designs delight with a variety of roofing options:
- Single-pitch. It is typical for square or rectangular arbors, the design of which includes two opposite walls of different heights and layered rafters.
- Gable. A common option for buildings with a rectangular foundation. The rafter system can be layered or hanging.
- Four-slope (hip). Looks good on gazebos with a square or rectangular base; has a pair of triangular and a pair of trapezoidal slopes (hips). Needs a simple but durable rafter system.
- Tent. A special case of a hip roof, all 4 slopes are triangular and converge at one point (ridge unit).

Eco-friendly wooden gazebo in Japanese style
- Dome. It is built over a structure with a round or polygonal base and has many varieties; Soft tiles are optimal for roofing.
- Exotic. There are asymmetrical and concave pagoda roofs with 2-3 tiers. Such roofs have the most complex rafter system (with ribs curved inward).
- Multi-slope. Difficult to design and install, designed for structures with complex architecture.
Gazebos can also be classified by:
- Style. Buildings made in traditional (Russian, Scandinavian, country) style are popular. There are numerous variations of classic (noble, English, Mediterranean) and modern (eco-, minimalism, hi-tech) gazebos. The original decoration of the garden are buildings in oriental style (Chinese, Japanese).
- Use. Temporary (portable) gazebos have a collapsible design and are used in the warm season. The remaining structures (stationary) can be used year-round, especially if they have walls and a heating system.

Projects of closed gazebos - you can relax in them in any weather
On our website you can get acquainted with the most from construction companies presented at the exhibition of houses “Low-Rise Country”.
Design: beginning
The typical buildings that can be found on most summer cottages do not attract all owners. Ready-made gazebos lack a strong personality and may not fit into the concept of your garden. The way out of this situation is simple - entrust the construction to a construction organization with extensive practical experience. The basis for an individual design can be a modified finished project or a building designed from scratch, according to your description or a photo you liked from the Internet. The gazebo project begins with a definition:
1. Locations
An unsuccessfully located gazebo does not find the use for which it was designed; When choosing a location, they take into account the characteristics of the site and the wishes of the owners. There are also a few rules to follow:
- Traditionally, they try to locate the gazebo away from noise, in a picturesque corner of the garden. For small plots, this strategy does not work (construction will take away precious space from the garden). In this case, it is placed near the house or in the corner of the site, and privacy and aesthetics will be provided by a hedge of weaving plants or ornamental shrubs.

A gazebo with a stove will fit into any landscape
- Natural green spaces can perform another function - serve as protection from the wind, which is important for a relaxing holiday with an interesting book.
- If the gazebo will be used as a summer dining room and a place to receive numerous guests, it should be built closer to the house, equipped with a barbecue area. It’s good if there is a well nearby - there will be no problems with cooling drinks.
- If there are children in the house, you can organize a playground next to the building, and the gazebo will turn into an ideal children's playhouse.
- If the site is located on a slope, this is not always a punishment. Strong differences in heights can be effectively played up by placing the building at the highest point and providing maximum visibility of the site (and perhaps the surrounding area).

Projects of wooden gazebos in openwork design - garden decoration
2. Functional purpose
Usually the owners know exactly why they need a gazebo. Based on the purpose of use, it is easy to determine the size and content of the building. The gazebo, whose main purpose is to decorate the garden, looks like a small open-work open-type building in which it will be pleasant to dream. Design of a structure intended for recreation is simplified; A table and a couple of benches are enough to arrange it.
If you need a gazebo for frequent get-togethers with friends, you will need a spacious structure with all the amenities - a large table, comfortable benches, and a barbecue. The internal area can be streamlined by highlighting functional areas for cooking, dining and relaxation. It is convenient to highlight zones with lighting, furniture or decorative techniques (flowers, screens). In garden gazebos the following is installed:
- Brazier. Products are prepared on skewers. There are portable models and stationary structures.
- B-B-Q. Dishes are prepared on grates. A barbecue oven is often located in the center of the gazebo - both guests are not bored and the owners have less worries.

Enclosed gazebo with barbecue
On our website you can find contacts of construction companies that offer small form design services. You can communicate directly with representatives by visiting the “Low-Rise Country” exhibition of houses.
- Russian stove. Decorating a gazebo with unlimited cooking possibilities. Only a professional can fold the stove correctly.
- Fireplace. Ideal for closed gazebos and cold winter (rainy autumn) evenings.
- Grill. The mobile design with a lid is gaining more and more fans.
There are gazebos with a cauldron built into the oven (for cooking real pilaf) or a smokehouse. Sometimes water is supplied to the structure, and a countertop with a sink is installed inside.
Video description
About the gazebo made of timber for 20 people in the following video:
Project development stages
After determining the location of the gazebo (accompanied by a specialist visiting the site, taking measurements and taking photographs), an agreement is concluded and documents are drawn up:
- Design project. At this stage, a sketch of the building is developed; the purpose, material of manufacture, style, composition of the site and the buildings located on it are taken into account.

Wooden grill house project
- Detailed design (technical drawing). It is compiled for those who will build a gazebo, therefore it contains maximum information: the type of foundation and roof, diagrams and dimensions, nuances and materials. A communications plan (water supply and drainage, lighting) is drawn up separately.
- Project estimate. A document that contains all information about the cost of work and materials. The estimate allows you to conduct a comparative analysis of prices on the market and control construction.
Material selection
Most gazebos are built entirely from wood; Often there are designs combining several materials. Designing gazebos using a combination of materials requires creativity and professional skills in working with various raw materials.
For wooden buildings, timber, logs, boards, plywood and chipboards are used. To extend the life of a wooden gazebo, all parts are treated with protective impregnations and coated with primer, varnish or paint.
A spacious gazebo made of wood and brick will become a durable and practical building that can easily accommodate a stove or barbecue (or both options). Such a monumental structure requires a full foundation, which cannot but affect the price.

A structure with a stove needs a reliable foundation
Optimal size
When choosing a size (area and ceiling height), they are guided by:
- Frequency of use.
- Estimated average number of guests(you can navigate by the length of the table).
- Material. For a gazebo with a polycarbonate roof, it is better to design it at 3 m in height, otherwise there is a risk of feeling like a vegetable in a greenhouse on a summer day.
- Plot size. Round or polygonal buildings occupy less area than rectangular ones (with the same capacity). In the autumn-winter period, a stove bursting with heat is a big plus; In summer, plus turns into minus. If the plot is large, you can build 2 gazebos and equip only one with a stove.
- Formatplot. If a narrow area is allocated for construction, the elongated structure (3x6 m) can be divided into two areas - recreation and a summer kitchen.
Decor
The pavilion can be decorated with:
- Wooden elements: lattice, carving, wattle (for ethno-style).
- Facing (especially stoves) with natural stone or clinker tiles.
- Mosaic, forged parts.
- Spectacular roof.

Closed two-story gazebo in high-tech power
Features of a closed design
Designs of closed gazebos often involve their active use in winter. Closed buildings are erected taking into account the characteristics of use:
- Foundation. Reinforced tape that can withstand the weight of walls, stoves and roofs is welcome.
- Frame (walls). Walls are being erected (including door and window openings). At this stage, a stove (or brick grill) is installed.
- Roof. The rafter system is installed and the roof is installed. In buildings with
- Windows and doors are installed(double-glazed windows), communications are installed.
Video description
About the project and implementation of a two-story eco-gazebo in the following video:
Combined pavilion with elements of traditional style

Modern design using wooden slats
Conclusion
The gazebo, as a symbol of country life, serves not just as an architectural highlight of the garden area. It is an attractive place that promises comfortable relaxation and an atmosphere of relaxed communication. A professionally designed closed gazebo project allows the owners to show year-round hospitality, offering guests friendly gatherings in the lap of nature.