One of the main procedures when repairing the front suspension is replacing the struts. This applies to vehicles with MacPherson strut suspension when the strut is assembled. That is, the strut consists of a shock absorber, a spring and a support with a cup. All this is secured with a nut that is screwed onto the shock absorber rod. As a result, the strut is in constant “combat readiness” when the spring is working for compression and the shock absorber is working for tension.
But in this article we want to talk not about the work of the struts, but about how difficult it is sometimes for car enthusiasts to remove the spring. The thing is that the spring on the strut is quite powerful, which means its compression force is very large. As a result, when unscrewing the nut on the rod, the spring may “shoot”, which can lead to injury. Moreover, during reassembly, the question will arise of how to assemble the strut back, that is, compress the spring. To help car enthusiasts in this case, they mainly offer all kinds of spring pullers. This is usually a system of pins with hooks or washers. As a result, the springs are tightened by twisting the nut along the stud. This method of removing springs is quite viable, however, it also has its drawbacks. The main one is that it takes a long time to tighten and unscrew the nuts on the stud. In this article, we would like to offer you another alternative that copes with this task perfectly, while requiring much less effort from the mechanic.
A device for quickly disassembling racks and replacing (compressing) the springs on them in the garage with your own hands
The operating principle of this device is based on increasing torque by changing the shoulder of force application. It can be said to be a classic solution for most cases in mechanics. So the support points will be the wall, to which the shoulder is attached with a console, and the stand, or rather the spring. Here the forces applied to the stand will depend on the length of the arm lever. In fact, these are the handles of our device. You can simply sit on them and human weight is quite enough to compress the spring. Take a look at the picture.

And now, in order, how the replacement will take place, removing the spring from the strut. Initially, it is necessary to spread the arms of the device and install it on the cup above the spring. Next, we bring the shoulders together and fix them, for example, with a piece of pipe.

Then we simply sit on the pipe and thereby compress the spring. The force on the spring can be adjusted with your own body by sitting on the lever a little further or closer to the rack. Unscrew the nut holding the swivel support and the spring cup.

We carefully stand up, thereby relieving the compression stress on the spring itself, which is still installed on the rack. After straightening the spring, remove it from the rack.

We install and compress the new spring in the reverse order.
Summarizing the spring puller...
It must be said that the use of such a device is justified especially in cases where spring replacement on racks of this type occurs frequently. These are mainly car services. It should also be noted that the device is universal. It can be used to remove springs from the struts of any car, actually changing the height of the arm with which the spring is pressed. The work associated with removing and replacing the spring when using such a device will be significantly simplified, which is perhaps the determining factor when deciding whether to manufacture something similar in your garage.
The performance of shock absorbers greatly affects the overall condition of the car. Many car owners who want to save big on maintenance, independently replace such parts at home. For professionals, it is no longer difficult to replace either shock absorber protection or the devices themselves. But in this case, ties for the shock absorber springs are required each time. Such a device will help you get the job done quickly and efficiently, and doing it yourself, although not so easy, is still possible if you have some skills.
In this article we will talk about how, with minimal expenditure of money, time and effort, you can make ties and how to use them correctly.
There are many ways to make such a device. Their main idea is to save money and use unnecessary scrap materials to make an instrument. In any car market you will be able to find hydraulic device, which is easily used for repairs, but its cost is high for both small device.
If you dig around in your garage, you will definitely be able to find things there that seem unnecessary at first glance. Analyze whether they can partially recreate the design you saw on the market. It’s unlikely that hydraulic couplers for a shock absorber can be recreated, but they can be replaced mechanical device- is quite real.
Let's consider brief instructions How to make ties for shock absorber springs with your own hands.
- We remove the front wheel shock absorber and measure the size of the large spring that prevents replacement. We start measuring from the first large turn and end with the last one. We write down all the data on a piece of paper, preferably in one unit of measurement (centimeters or millimeters), which is more convenient for you. It is recommended to make clamps specifically for the front wheels, since these shock absorbers most often break and require repair.
- We find a strong metal pipe with a diameter of 2 centimeters in the garage and cut it into 4 pieces 10-15 centimeters long.
- Next, we find a standard rod with a diameter of 0.7-1 centimeters and cut it into pieces 20-30 centimeters long. You should have 8 such short strong rods.
- We find a threaded rod or buy a pipe with a diameter of 1.5-1.7 centimeters and cut it into 2 pieces, the length equal to the measurement obtained in the 1st point, which can be extended to 5 centimeters. If the selected tubes do not have a thread, cut it using special tool from all edges of each piece for 10-15 centimeters.
- We process all the edges of the tubes and rods in such a way as to get rid of metal burrs; the edges should be even and smooth.
- We bend the metal rods equally so that they form a hook on one side. Please note that such rods are very strong and difficult to bend, so you can use additional tools.
- Using mobile welding, we connect the rods and short tubes so that the hooks are evenly located on both sides of the tube. We cut off the excess edges of the rods so that they are flush with the tube. We get 4 small products from rods and pipes.
- We put the resulting parts on long tubes and tighten large nuts at the ends. The hook is put on so that its smooth side faces the edge of the bar.
- That's all the work, the shock absorber tie is ready. It will fit both the front wheel and the rear (if you added a few extra centimeters to the bar). Test it on one of the shock absorbers and correct any shortcomings if any appear.
Keep in mind that the above methods for producing screeds are not the only ones of their kind; they can be changed or supplemented depending on the type of car, its model, skills and desires of the car owner. It’s worth using your imagination to make this mechanism simple and uncomplicated.
Application of screeds
Such ties can be used for both front and rear wheel shock absorbers. They perform the function of compressing a large spring, which protects the shock absorber from external influences. 
Since each type and model of car has individual parts, to produce ties, use only your own dimensions, and not standard ones taken from the Internet or other literature.
After all, you still have to remove the shock absorber, so what difference does it make - before or after the production of the ties? 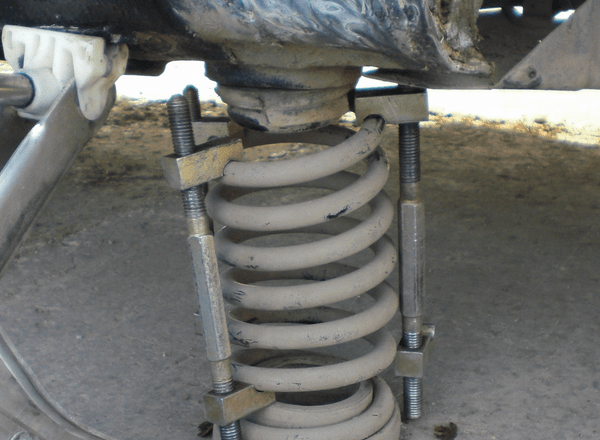
In conclusion, I would like to advise every car owner to take care not only of the appearance of the vehicle, but also of its internal parts. For example, replacing shock absorber protection becomes very simple with zip ties. And if this procedure is done on time, you will extend the life of the shock absorbers for a long time. Take care of your car and it will reward you with a long and high-quality service life.
Video “How to replace shock absorber springs”
After watching the recording, you will learn how to remove and install rear springs on a VAZ car. The video also shows what tools you need to prepare for this.
Needs replacement. For example, it leaked or simply exhausted its resource. In this case, the entire assembly is dismantled. The procedure is labor-intensive, but not complicated. You will need a tool such as a shock absorber spring tie. The device is extremely simple, but at the same time necessary when performing such work.
Universal and branded
Despite the fact that the design of the screed is extremely simple, they come in several types. For example, dealers of some companies use branded tools that are suitable only for a certain brand of car. This also applies to screeds, although in most cases such scrupulousness is not required.
Universal screeds, as the name suggests, are suitable for everything. A spring is a spring everywhere, and the device for working with it is suitable for any make of car. As for the craftsmen who repair cars in their garage, they need a screed. Let's see how to assemble such a tool with your own hands.

Required material and tools
To make a screed yourself, you will need a metal rod (reinforcement), two threaded rods (M16), as well as extended nuts and a metal tube with an internal diameter of 16 mm. This will be quite enough to make a full-fledged screed.
It is also advisable to have a grinder on hand for cutting reinforcement and several wrenches for the nuts. The set of tools is minimal; all this can be found in the garage of any motorist. Well, now let's take a closer look at the process of assembling the product.

Making a tie for shock absorber springs with your own hands
Using a grinder, we cut two meter-long pieces from a pre-prepared pipe. We adjust the threaded rods to the required length. Next, we take the reinforcement and mark eight 30 cm sections. We saw it using a grinder and using any bending equipment we try to make hooks from the rod.
It is worth noting that you will also need welding machine. If you don’t have your own, you can borrow it from a neighbor for a while. We weld 4 pre-cut rods to the nuts, the remaining 4 to the pipe. In principle, we made ties for the shock absorber springs with our own hands and can use them. Let's look at a few more interesting options which are popular among car enthusiasts.

Shock absorber spring clamp from a jack
There are also Alternative option, which do not require special preparation and availability large quantity tool. To make it, we will need a grinder, a connecting rod from a classic, as well as an old jack from a VAZ (original). The procedure is as follows.
Using a grinder, we cut off the lower support on the jack, as well as the rivets. Next, in the place of the lever for raising/lowering the jack, we mount two ears for the bolts using welding. In the place where the rivets were removed, we weld a piece of pipe measuring 25x25, we do the same in the place of the welded ears, only we take a 20x20 pipe. You can further strengthen the jack with another piece of pipe, cut to the required length. In general, this device for tightening shock absorber springs is quite effective, and it can be made quite quickly without much expense.
What you need to know when dismantling
Screed car springs- the process is quite dangerous. If you make a low-quality puller, it may come off. The high pressure puts you at risk of injury. That is why it is necessary to be extremely careful when performing such work.

To prevent anything from happening, you can make a stationary screed. Its design does not differ from that described above. The only change is the rigid attachment to the tabletop. This will ensure that the shock absorber spring tie is securely fixed, which will significantly reduce the risk of injury. Now let's look at another popular and extremely effective design.
Simple and affordable
We take two rods of equal length. The thread can be any, but it is most convenient to use standard M16 or M18. The rod must have two threads: on one side - left, on the other - right, or vice versa. It is advisable to firmly fix the elongated nut in the center as a limiter. There are such commercial rods, so if not special machine for thread cutting, we go to the car market.
All that remains is to weld a few hooks onto the nuts - and you can use them. To make the device work more smoothly, it is advisable to lubricate the thread and nut. You can use regular machine oil or grease. Here you need to achieve a smooth ride, almost any lubricant. You can also use the drawings and take them to a turner, who will do everything. A shock absorber spring tie is made in a few hours.
Cost of ties in stores
You don’t have to bother at all and buy ready product in the shop. Abundance can be confusing. There are hydraulic and mechanical shock absorber spring tensioners. The price for them differs significantly. The cheapest options will cost about 1,500 rubles, and the most expensive - about 30,000 thousand. Of course, for single jobs it is not at all necessary to purchase an expensive product. A mechanical coupler for a couple of thousand rubles will be enough for you.

You can purchase hydraulic couplers. It’s more convenient to work with them, but the price tag is twice as high. There are universal zip ties with various attachments, but this is also a fairly significant purchase. Pay attention to high-quality mechanical shock absorber spring tensioners. The price for a normal product will be in the range of 2-3 thousand rubles.
A few more points
So we have figured out that making a screed with your own hands is not so difficult. For this, apart from desire, a small amount of tools and time, you don’t need anything. If there is no tie and you need to remove the spring, then it’s better not to risk it own health and do not experiment, but contact a service station.
It will not be possible to tighten the shock absorber spring without zip ties; this has already been said. This does not apply to cases where the product has lost its elasticity and has cracks. Such a spring can no longer be called working. You can find a huge number of options for making homemade zip ties, the most popular of which we have just reviewed.
A homemade shock absorber spring tie is quick and easy to make. The main thing is that the structure is durable and fulfills its main task. Don't forget that if the tie comes off the spring, you can get seriously injured from the impact, so always try to keep the spring away from your face and securely fasten it if possible.
Sometimes it is necessary to compress the suspension spring without removing it from the car. For this you need zip ties. In a simple case, two or more rods equipped with so-called hooks can serve as ties. The hooks with their hooks cling to the spring from the outside. All ties are usually placed on opposite sides of the spring. And then, by turning the threaded rods with a wrench, you can easily perform compression.
Of course, there is special equipment used when repairing cars of a certain brand. To compress springs, however, universal ties are more often used. The appearance of these devices is shown in the figure:
Branded spring ties
It is clear that a set of universal zip ties can be bought in a store. However, the cost of such equipment is higher than the price of all constituent elements in total.
We cook the screeds ourselves
In general, it makes sense to make shock absorber spring ties yourself. How to do this is discussed further.
Four nuts and two threaded rods
The metal products listed below are easy to find in almost any supermarket. For example, you can buy two M16 threaded rods. You will also need four extended nuts, as well as a steel plumbing pipe. Her inner diameter– 16-16.5 mm.
The end result is what is shown in the pictures. You will also need a steel rod, which is used to make reinforcement. Let's look at how screeds are made:
- Two identical cylinders are cut from the pipe, the length of which is 80-120 mm;
- Threaded rods can be shortened if necessary;
- 8 rods approximately 30 cm long are made from reinforcement;
- Using any bending equipment, the rods are bent to obtain hooks;
- Four rods are welded to two nuts, another four - to pipe sections;
- The set of components is completely ready for use at this stage.
It is easier to weld by placing the workpieces on a plane. The essence of these words is illustrated by the picture:

How to weld hook rods
Actually, what follows is a film where the technology is shown “inside and out”. The author even solved the problem with the lack bending machine: to bend one rod, you need two similar rods welded to a steel profile.
If the reader thinks that using welding is difficult, then it is better not to take risks. Welded joints can withstand significant loads, but only if they are performed according to all the rules. Spring ties can be made without welding. Suitable drawing is given below.
Two ties in 10 minutes (video)
How should the spring be tightened?
Let's list the steps involved in tightening the shock absorber springs yourself. Everything looks simple:
- When the body is supported by a jack, two ties are brought to the spring from opposite sides;
- By rotating the nuts with your hands, you achieve confident engagement of the hooks and springs;
- Using a wrench, the nuts on different rods are rotated in turn;
- It is better to play it safe and secure the compressed spring with straps or wire.
Video of spring tensioners on shock absorber
No explanation required here. The result is shown in the photo.

Spring compressed by ties
When using homemade and even purchased equipment, follow these simple tips:
- Before using zip ties threaded connections lubricate with cyatim or grease;
- The ties cannot be removed from the compressed spring, even if it is additionally fixed;
- When carrying out work, exercise maximum caution. It is better to sacrifice body parts than your own health.
Features of the suspension of Lifan cars are discussed in these articles:
Drawings of universal threaded ties
Let's return to the question of how to make a device for tightening shock absorber springs yourself. Shown below appearance ready-made devices:
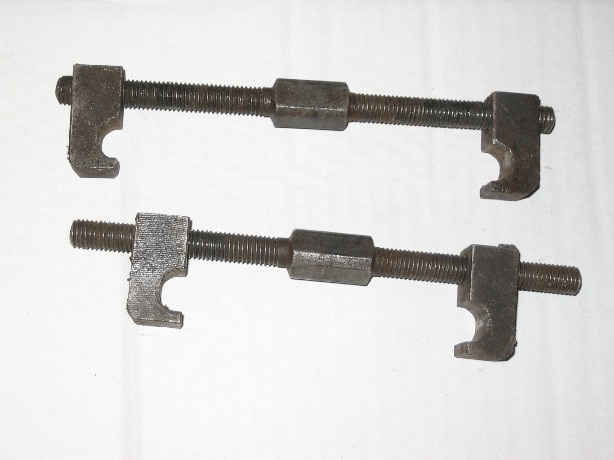
Factory-made threaded ties
On one side of the rod there is a left-hand thread, on the other - a right-hand thread. The standard thread pitch is M18. But buying threaded rods is not enough here. And to cut the thread yourself, you will need special equipment.
Drawings of the components that make up the entire structure are shown here:

Threaded tie (3 parts)
To make parts, you need a turning, drilling and, probably, milling machine. It may be easier to contact a workshop. Print the drawing by downloading it from the website.
Most likely, there are no other drawings of universal ties on the Internet. And what is shown above is taken from a book on repairing domestic cars. You can use it.
Let's say the ties were made according to the drawings and all the parts fit together. But even then the advice about using lubricant remains valid. You need to take solid oil or cyatim and apply this material to the threads of the nuts.

Packaging cyatim-201, 20 gr.
Cyatim-201 lubricant is a rather expensive material. You can reduce consumption by mixing it with machine oil in a 50/50 ratio. Good luck.

Dear site visitors " Labuda blog» today we will look at one of the options for making a homemade shock absorber spring remover with our own hands, and we will also look at step by step photos spring puller assembly and video..
Every car enthusiast who has at least once repaired a suspension passenger car He knows very well how difficult it is to remove shock absorber springs, and to perform this operation without a special tool you will have to be pretty clever. But if you think a little and use ingenuity, then a simple shock-absorbing spring remover can be made independently and at the same time with minimal costs, so to speak simple and a budget option a tool to make life easier for motorists.
Device and principle of operation The presented puller is actually quite simple and understandable; it is based on the compressive force of the spring's screw tie, namely, there are 2 metal hooks installed on the pin that hook onto the spring and, under the influence of tightening the nut, the spring is compressed and then removed from the rack.
So, let's look at what exactly is needed to assemble the puller.
Materials
- metal pipe 16-20 mm
- hairpin M-14
- corner
- nut 2 pcs
- solid oil
Tools
- welding inverter
- drill
- vice
- hammer
- wrench
- Angle grinder (grinder)
Step-by-step instructions for creating a shock absorber spring remover with your own hands.
To make metal hooks we need water pipe 16-20 mm. We first saw along making the cut, and then sawed required number blanks

This is what happens.

Then the workpiece is clamped in a vice and one side of the hook is straightened with hammer blows.

These are the hooks you should get.


Several blanks are sawed off.

Drill a hole exactly in the center.

The hooks are welded to the corners.

Additionally, to strengthen the structure, it was decided to weld a section of tube.

Then we assemble the puller into a single structure and begin dismantling the shock absorber spring, the hooks cling to the spring, and then we begin to tighten the nut along the thread of the stud, thereby loosening the spring and removing it. To consolidate the material covered, you can watch the video. Enjoy watching.