The idea of making a bouquet of paper flowers is very good. To make paper crafts, we will need to purchase colored paper, cardboard, markers, a stationery knife, tape, scissors and PVA glue.
Paper bouquet
First you need to make three blanks for each flower, two of which should be the same color, they should have six petals.

Place one blank in front of you and glue a circle on top of it.

On the mug, first make holes for the eyes and mouth in the form of a smiley face.

After gluing the mug with the flower, you need to color the eyes with a black felt-tip pen, and then bend the petals inward.

The next step is to cut out the stem, which we then attach to the flower, and on the other side of the flower we need to attach the same blank.
You can also make leaves for the bouquet, which can be made from green paper.

First you need to draw an oval and cut it out, and then use scissors to make notches.

In order for individual pieces of paper crafts to become a single whole, tie the flowers with ribbon or some other fabric to decorate the bouquet.

This bouquet will never fade and will be an excellent decoration for your home.

Simple crafts from plastic bottles
The simplest crafts for children include bottle crafts.

For example, from a bottle you can make a piggy bank, which requires only a marker, a stationery knife, dice (4 pieces), a small bottle, glue and colored paper.

The first step is to cut a straight line, the width of which can be 5 centimeters, and the length of this line should be enough to encircle the bottle.


We draw eyes with a marker, and draw nostrils on the bottle cap. Using a utility knife, cut a hole for coins.

As legs for the pig, you need to attach the dice using glue.
Note!


This craft develops a child’s imagination and is also useful in everyday life.
Ball of thread
The craft can be used as a lampshade for a lamp or simply hung as a decoration.

A ball of thread is made very simply; to make it you will need colored threads, a ball, and transparent glue.

First, we need to inflate the balloon and tie its tip so that the air does not escape.

Then you need to wrap the inflated ball with threads, then apply glue to the surface of the ball and wait until it dries.

Note!

Now you need to separate the ball from the threads, to do this, just pierce it with a needle and the craft is ready.

Plasticine gnome and pine cones
As a simple DIY craft, you can make a gnome. For the craft you will need a pine cone, light-colored plasticine, pieces of fabric, glue and a brush.
First of all, the child should roll a ball out of a piece of plasticine, after which, using a brush, they need to make indentations for the nose, eyes and mouth on the ball.


At the next stage of our craft, we need to attach the resulting head to the top of the cone.

Then the child must cut out a triangle from the fabric and glue it on the sides, resulting in a cone. The cone will act as a hat for our character.
Note!


Finally, you need to make mittens from fabric, and then attach them to the pine cone using plasticine and our gnome from the pine cone is ready.
Paper bookmark
A paper bookmark is perfect as a simple craft for kindergarten. For children to be able to make this simple craft, they will need a pencil, ruler, colored paper, scissors and glue.

To begin, children must draw a square measuring 20 by 20 centimeters.

Then divide the resulting square into 4 equal parts using a pencil and ruler, resulting in 4 squares measuring 5 by 5 centimeters.

The second step is to divide the upper right and lower left squares in such a way as to obtain triangles, that is, you need to draw a line diagonally from the upper corner to the lower corner.

We don't need the triangles with the outside and can cross them out.

Then you need to cut out a figure from paper without taking into account the crossed out triangles.

The top triangle needs to be trimmed. If everything is done correctly, the paper will be in the shape of a diamond, to which two triangles are glued.

The next step is to fold all the triangles in half, and then one by one place them on the tip of the rhombus. You should end up with a pocket that fits over the tip of the book page.

To make a bookmark original, you can advise children to cut out some kind of applique from colored paper.

Photos of simple crafts


In this article we will tell you how to create crafts for your home with your own hands. Decor made from scrap materials gives your home a unique look and helps old things find a new life.
A craft starts with an idea. It shows individuality. You can make a craft for your home yourself. It is not necessary to have a designer's education. In creativity, it is important to be careful. This is the only way the crafts turn out to be of high quality and beautiful.
What to use for crafts?
DIY home decor from scrap materials enriches the interior. The kitchen is the place that brings the whole family together. In this room you can paint the walls, hang photos, decorate furniture, kitchen aprons, etc. If you don’t have a design education, you can use stencils. An empty wall is decorated with a panel or painting on a kitchen theme.
It is better to decorate the living room with the whole family. Ideas bring people together. We offer as an option to cut out the first letter of the family surname from thick cardboard and decorate it with paper flowers, pom-poms, and beads. The letter is framed like a photo and hung on the wall. Various words are assembled from such letters: love, family, home.
Decorating in the form of vases helps to transform the interior. Old bottles are used for decoration. The elements are wrapped with twine and decorated with flowers. To create room decor, use sofa cushions, covers for which you can make yourself. Such things give comfort.
The bedroom is a place of relaxation. There is no need to overload it with decorations. A few elements will be enough. The wall of the room is decorated with family photos, and a homemade bedspread using the patchwork technique is placed on the bed. The design of bedside rugs should be made in the same style. An original solution is to use fabric birds, which are hung above the bed by satin ribbons.
The bathroom is a place of cleanliness and self-care. You can decorate it with shells and pebbles. A lot of things and accessories are stored in this room, so you can make homemade panel organizers. Wicker baskets screwed to the wall at the bottom can be used as storage shelves. Original towel hooks can be made from various materials: wood knots, wrenches. The main thing is not to stand out from the overall design of the room.
The design of the nursery is determined by its size. To create the interior of a children's room, bright things should be used. It is decorated with homemade toys, photos, bedspreads, wall paintings, and unusual lamps.
On the Internet you can find various ideas for your own interior using scrap materials. For inspiration, you just need to look around. DIY interior crafts from scrap materials can be created from:
- paper and cardboard;
- fabric scraps;
- colored threads and beads;
- unnecessary CDs;
- coins;
- satin or nylon ribbons;
- bottle caps;
- any elements made of plastic, wood, glass, etc.
Tip: you can also use larger things for crafts, for example, cabinets, wall mirrors, chests of drawers, tables.
Practical crafts
If you don’t like various trinkets, then you can make practical interior items with your own hands from scrap materials.
Shelving from an old staircase
Sometimes there isn't enough shelving at home. So why not make it yourself? This will be a truly practical craft. The rack is made from an unnecessary ladder. In addition to the ladder, you will need boards, paint, a jigsaw, a brush, sandpaper and glue.
Stages of work:
- prepare the frame of the structure: cut the stairs into equal parts and fasten them in the form of two pyramids;
- cut shelves from boards;
- attach the shelves to the frame with glue;
- polish the structure and its elements;
- paint the shelving.
On such a rack you can place books, original baskets, flowerpots with flowers, A4 size paintings and other beautiful do-it-yourself things for the home and interior using improvised materials.
We invite you to create another practical craft for your home - a table from unnecessary wooden boxes. Vegetables and fruits are often stored in such boxes. For this craft you will need 4 of these boxes, nails and a hammer.
Place the drawers on the side surface with the open side facing out and connect them together into a square. Fasten the elements with nails. It is possible to decorate the open space of the drawers with additional shelves. At the end of the work you need to paint the table.
Pallet spice rack
We invite you to create a unique spice rack from an old pallet. To do this, clean the tray with sandpaper. Use a jigsaw to saw off unnecessary elements. You can make additional shelves. The result is a panel with a pocket that is suitable for any interior. Containers with oil, wine bottles, and spices are placed in this pocket. The shelf is painted in the color of the interior.
Crafts for interior decor
A house is a reflection of its owner. It’s nice to come visit a creative person and look at the embodied ideas and unique style. We offer you some tips for interior decor and creating crafts.
Mirror frame
An interior decor item made from scrap materials can be a wall mirror decorated with an unusual frame. It is easy to make from a regular newspaper or magazine. Colored sheets are cut into equal squares measuring 10x10 cm and rolled into tubes of equal thickness. These tubes are glued along the perimeter of the frame parallel to each other. The result is a beautiful mirror design. The tubes need to be secured not only with glue, but with varnish.
Plastic lampshade
To make a plastic lampshade, you will need several sets of plastic spoons, an empty 5-liter plastic container, and glue. The neck of the container is cut off. The handles of the spoons are cut off to form petals. Using glue, the original petals are fixed to the surface of the container in the form of scales. The plastic lampshade is ready.
Fabric jewelry
The interior of a home made from scrap materials will become more lively if you use the remains of bright fabric. You can make various crafts from them, for example, fabric flowers. Using a stencil, circles d = 20 cm are cut out. A spiral is drawn on the circles, which is cut along the entire length. The spiral is twisted from the bottom, gluing it so that the bud does not fall apart. After drying, the petals are straightened. Unusual do-it-yourself decor from improvised materials for your apartment is ready. Several fabric colors are combined into a composition, panels, paintings are made, shelves, walls, etc. are decorated with them.
Candlestick made from old beads
If you have old beads, do not rush to throw them away. They are disassembled into beads to make a hand-made candlestick. You need to attach an unnecessary CD to the base of the candlestick. Glue beads in rows along the edge of its circumference to form a cup. If you put a shaped candle in this glass, it will turn into a beautiful candlestick. This decorative element has a big plus. Thanks to the beads, it shimmers beautifully when the candle is lit.
Festive garland on the window
On New Year or any other holiday, the windows of the house are decorated with garlands. It is not necessary to hang bright lights; we recommend that you make an unusual curtain from scrap materials. To create a garland you will need thick colored cardboard, thick thread, a needle, and scissors. Using a stencil, cut circles d = 10 cm. The circles are strung on threads of the required length. The threads are connected together into a curtain and secured to the window frame.
Jewelry hanger
There can never be too many DIY crafts. A woman's dressing table can be decorated with a homemade jewelry hanger made from scrap materials. It's easy to do. To realize the idea, you will need a picture frame, a small piece of plywood, paint, small hooks, and a jigsaw. Saw off the plywood to the size of the baguette, paint it with paint. Mark the places where the hooks are attached and secure them. With this decorative element you can store your jewelry in an original way.
Canvas box
We suggest you make a box from plastic canvas. Canvas is a material for embroidery and crafts. It has the dimensions of an A4 sheet. The canvas has a varying number of perforations. To work, you will need the workpiece itself, threads, a needle, a piece of fabric and scissors. You can embroider with cross stitch or satin stitch on canvas. Make the details of the future box from canvas and decorate them with your favorite embroidery method. Connect the parts with thread and a needle. The canvas box is ready, it needs to be stored on the shelf. Without a doubt, it will become the main decoration of the interior of your home.
Braided rug
The tapestry technique allows you to create a rug at home with your own hands from any available materials. For example, they cut old clothes into strips. This option is called a “grandmother’s” rug. For crafts, you should choose a durable material and draw the thread by hand.
Prepare cardboard 500x500 mm. Sew it with thread. Having secured the first thread, begin weaving the tapestry. Once you've finished the last circle, turn the rug inside out and sew some rope around the perimeter to cover the ends of the threads.
Pots from bags
From scrap materials that are sometimes accumulated at home, they make a pot for an indoor flower. For DIY crafts you will need paper bags, wooden skewers, scissors, rope, glue gun, containers (for example, you can use a mayonnaise jar).
From paper bags, make blanks in the form of ribbons measuring 70x300 mm. Using skewers, make tubes from the blanks. Secure the corners with glue. Wrap the sides of the container in a paper bag. Turn it upside down. Attach 8 tubes to the base. Return the future flowerpot to its normal position. Fold the tubes up, pressing them tightly against the walls of the pots. It remains to braid the main tubes with the remaining ones in a checkerboard pattern. The pot is pierced at the top, a rope is threaded through the holes and the pot is hung on the wall of the room.
Fabric hanger
Hangers are always needed in the household. We suggest you make several of them. For crafts you will need:
- wire hangers;
- satin ribbons in contrasting colors;
- piece of fabric;
- scissors;
- needle and thread;
- glue;
- padding polyester
Draw the outline of the hanger on a piece of fabric. Leaving a small gap, cut out 2 blanks. Sew the pieces together to make a cover. Wrap the hanger hook with satin ribbon, securing it with glue. Place the fabric cover on the hanger. Fill the internal space with padding polyester. Sew up the hole. Make a bow from a contrasting satin ribbon and secure it at the base of the hook. The fabric hanger is ready. You can hang delicate items on it.
Mirror frame
There is always a mirror in the house. Most often it is located in the hallway, bathroom or bedroom. The decorating ideas are endless. The mirror can be beautifully decorated with newspaper tubes, broken shards of porcelain or tiles, colored glass, shells, buttons, beads, hemp, etc. To fix the elements, you must use transparent silicone glue.
Decoupage
Do-it-yourself room design from scrap materials can be made using decoupage technique. We suggest you decorate a small mirror in a wooden frame:
- Clean the frame with sandpaper.
- Cover the prepared surface of the decorative element with white acrylic paint.
- After the paint has dried, apply a layer of decoupage glue to the surface.
- Cut a decoupage card to the size of the frame and glue it to the surface.
- Apply the next layer of decoupage varnish.
- Sand the edges of the frame with sandpaper and cover with craquelure. The paint will dry out and crack.
- Apply a contrasting shade of paint to the cracked surface.
- You can highlight the borders of the frame and put blots on its surface.
- Cover the frame with glossy varnish.
Decor made from plastic spoons
For crafts, it is better to use a round mirror. Cut off the handles from the plastic spoons, leaving the scoops. Glue them in several rows around the entire perimeter of the mirror. Spray paint the decor. Instead of spoons, you can take buttons, beads, shells, clothespins.
Ring decor
DIY decor using improvised materials can be inexpensive. Cut rings of the same width from plastic pipes. Finish their edges. Take a nylon cover. This will be the base of the structure. Attach the first row of rings to the lid. Attach the second and subsequent rows to the already glued rings. At the end of the work, we recommend that you decorate the decor with sequins. Secure the mirror in the center.
Rope decor
To implement the idea you will need hemp rope. Cut out the base from cardboard. It must be larger than the mirror itself. Place a mirror in the center of the base. Apply clear silicone adhesive to the base. Fix the hemp turn by turn. The result is a mirror that can be used to create a marine-style room interior.
Decor on glass
Do-it-yourself home decor from scrap materials includes painting. To work, you will need stained glass paints, glass contour, glitter, alcohol, cotton swabs, toothpicks and silicone glue. Before starting work, decide on the design. Transfer it to the mirror using carbon paper. Trace the design along the glass. Remove irregularities with alcohol. After the outline has dried, paint the pattern with stained glass paints, distributing them with a toothpick. The paints should dry for about 3 days. After this, the decor is complemented with glass beads or glitter.
Framing with beads
Beads are used to decorate the mirror. Mark the future frame using masking tape. Apply silicone glue to the resulting border. Pour the beads onto the paper and spread it over the glue strip. Carefully remove the tape and let the work dry thoroughly.
Decorate walls using simple materials
The atmosphere of the interior can be changed by paying special attention to wall decoration. To do this, you only need rollers, paints and color. It is not necessary to paint the surface of all walls. Sometimes it is enough to highlight part of it. They decorate the walls in different ways: with paintings, with the help of panels, photos, natural materials, baguettes, paper butterflies, interesting hooks and other improvised materials.
Stencil decor
This method of wall decor is considered the simplest. Stencils are made by hand from thick paper, whatman paper or plastic. Patterns can be found on the Internet. The stencil is pressed tightly against the wall and spray paint is applied.
Tip: apply paint in a thin layer so as not to smear the pattern and avoid smudges!

A dacha is a unique place that everyone ennobles to their own taste. Quite often at the dacha you can find a lot of rubbish that no one needs, and at the same time it’s a pity to throw it away. Today there are many ideas on how to give old things a new life. From seemingly ordinary objects, you can make interesting designer pieces that will decorate any garden plot.
Watch this useful video: Crafts for decorating your garden
One of the most inexpensive garden products is crafts made from plastic bottles. While the bottle may not seem attractive on its own, it can easily be turned into a creative garden decoration. We offer several ideas for crafts; you just need to show a little imagination and put in a little effort. Plastic is very flexible to work with, so even a child can handle it. Take scissors and cut out the bases for future figures.

Do you love butterflies? Make a corner in your garden with flying butterflies from plastic bottles. To do this you will need bottle centers, a marker, scissors, nail polishes, rhinestones, sequins, beads, toothpicks and tweezers.

Print out templates of a variety of butterflies or cut them out from coloring books. Do not forget to clean the bottle from the label and other contaminants; it is best to cut out the area with glue. Now transfer the templates to the plastic. This is quite easy to do: attach a template on one side and trace the contours on the other.

Carefully cut out the butterflies so as not to damage the antennae and legs. Start decorating the butterfly.

To do this, cover the surface with nail polish, sprinkle with beads or glue sequins using tweezers and a toothpick.

The reverse side of the butterfly should be painted over with a marker and covered with colorless varnish. Now you can hang the craft on a thread and secure it on a tree or in a gazebo.
In addition, with the help of bottles in the garden or dacha, you can highlight separate zones, for example, to fence off flower beds.

Washbasin and watering using eggplants
Some thrifty housewives use five-liter plastic bottles for spot watering plants. To do this, cut off the bottom of the eggplant and stick it into the ground with the neck. After this, water is poured into the structure.

Plastic is a unique material because it does not deteriorate even over time. If you have water problems in your area, make reservoirs from bottles. Don't waste your money on a new sink! It's also easy to make from a bottle.

Organizing watering using plastic bottles
Garden crafts from scrap materials
The advantage of making your own crafts from scrap materials is that they allow you to save on building materials and at the same time remain quite functional. Try making a fence out of bottles.

To do this, you need to dig stone pillars into the ground at a distance of up to 1.5 m. Using cement mortar, place bottles between the pillars. At the end, the fence will need to be plastered, leaving the bottoms of the bottles for decoration.

They look original on a personal plot, which delight with their greenery all year round. To create a tropical corner, you will need green and brown bottles. The trunk is formed from the cut bottoms, and the leaves are formed from the necks. Make each leaf for the palm tree curly. There are no specific rules for the shape and size of leaves.
In order to make creative figures, you can also use opaque plastic milk or kefir bottles.


Look at photos of interesting materials made from scrap materials and become the designer of your own garden plot!
Today, handmade gifts are popular. The souvenirs look luxurious, they are of high quality, the crafts are unique, and their creation is incredibly fun. You can create gifts using different materials. The main thing is imagination, a little patience and sincerity with which souvenirs will be created.
It’s especially nice to receive and make crafts for the New Year. This holiday is loved by adults and children. We invite you to familiarize yourself with the gifts that you can make with your own hands. For each craft, the necessary list of materials is indicated. It is very easy to create an exclusive and original gift. Crafts can be used as decorations for a Christmas tree, apartment, or as souvenirs for friends and family.
New Year's paper crafts
It's easy to make crafts out of paper. Lanterns, garlands and snowflakes, as well as other products, are made from it. Paper is a simple and affordable material, so it is widely used to create New Year's crafts. When asked “What to make from paper for the New Year,” the first thing that comes to mind is a snowflake that will decorate a Christmas tree, a window, or become a pleasant souvenir. Well, that's what we'll do. But we will not make a simple snowflake, but a three-dimensional one! To do this you will need materials: paper, scissors, stapler or glue.
Find more paper crafts in the article:

Time runs inexorably forward and now white flies are flying outside the window, slowly falling to the ground and covering everything around with a snow-white fluffy blanket. However, despite the cold, my soul is warm and joyful. And all because suddenly appearing snowflakes herald the coming of the New Year. The most important holiday of the year is already very close, which means it’s time to think […]
New Year's crafts from pine cones
The best material for creating New Year's crafts is pine cones. There is practically nothing you need to do with the pine cones. They are already an excellent decorative material in themselves. You can decorate the Christmas tree with cones or put them in a vase and place them on the table to create a festive atmosphere. We suggest making a garland of pine cones. For this we will need: cones, glue, glitter, ribbon.

We have other crafts made from pine cones for the New Year:

New Year's holidays are approaching - time to give and receive gifts, decorate the Christmas tree and decorate the house. Perhaps we no longer believe in the good old man Santa Claus, we don’t expect gifts from him under the tree, but we definitely expect a miracle, especially on New Year’s Eve. A miracle is of course good, but the realities of life dictate their own rules to us. Job, […]
New Year's crafts from dough
Everything is clear with cones! But what should those who don’t have the opportunity to look for bumps do? We'll have to improvise. Don't worry, we know you still have plenty of craft materials at home that you don't even know you need. For example, many gifts for the New Year can be made from salt dough. To prepare it you will need only three ingredients: flour - 1 cup; salt – 0.5 cups; water – 0.5 cups. You can also add sunflower oil (2 tablespoons) and dye (a few drops). We suggest making a “knitted” heart from the dough.

You will find more dough crafts in a separate article:

A wonderful, festive and magical time is the New Year, for which adults and children prepare gifts and souvenirs for friends and loved ones. You don't have to shop at the store; you can make delicious gifts yourself from scrap materials, such as puff pastry. The crafts are original and bright. Unique toys decorate Christmas trees and are used as original and unusual souvenirs. […]
New Year's crafts made from felt
In your search for improvised materials for New Year's crafts, you may well come across felt scraps. In fact, felt is a type of felt, so if felt is not available, you can use a similar material. We suggest making a penguin from felt. We will need: felt, thread, needle, cotton wool or padding polyester, buttons.
New Year's crafts are created with pleasure using felt. The souvenirs are colorful, touching and delightful.
See also other ideas for felt crafts:

The New Year holidays are approaching, which means that very soon a forest guest will appear in almost every home in our country. Some people prefer to put up an artificial Christmas tree, some prefer to put up a real forest spruce from a Christmas market, and some even confine themselves to pine branches. However, this is not so important, because the most important feature of the New Year tree is the toys. Since ancient times, people in [...]
New Year's crafts from disks
Surely everyone has unnecessary CDs; they can be used to create original New Year's crafts. The simplest craft option is a snowman. For this we will need materials: CD, felt, scissors, glue, felt-tip pens, buttons or beads, ribbons.

A child can make such a snowman; he will be captivated by this activity. The craft can be hung on the Christmas tree or given as a gift.
For more ideas on New Year's crafts from old CDs, see the article:

Winter is already sweeping through the city, the days have become shorter, but the evenings last forever. What to do with your children besides tablets, computers and TVs? Well, of course, New Year's crafts. In addition, this type of activity will engage not only children, but also adults. The main thing is to approach this activity with enthusiasm! What are New Year's crafts made from? […]
New Year's crafts from bottles
Ordinary plastic bottles can be used as a handy material for New Year crafts. We suggest making an original craft - feathers that will look great on a Christmas tree, window or as a keychain. We will need: a plastic bottle, scissors, felt-tip pens or markers. Plastic feathers will be a wonderful New Year's decoration.

New Year's crafts from tubes
For creativity with children, cocktail straws are suitable as a material for New Year's crafts. Surely on the eve of the New Year holidays you have already managed to purchase several sets. Great! Then let's get started!

New Year's crafts from cotton pads
So, what else can you find at home as material for New Year's crafts? Of course, cotton pads. By the way, if there are no disks, ordinary cotton wool will do. It makes an excellent imitation of snow. There are a lot of options for crafts made from cotton pads or cotton wool, but we suggest making a New Year's ball. You will need: cotton pads (a lot), a stapler, a needle, thread and a small ribbon. The process of creating a New Year's ball will take no more than 15 minutes, but such a Christmas tree toy looks truly wintery!

New Year's crafts made from cardboard
You can use cardboard as a material at hand for New Year's crafts. Don't know where to find cardboard? But what about old postcards, which are probably gathering dust without use. Of course, you should not use memorial cards, for example from dear and close people. But postcards that mean nothing can be used for a good cause. We suggest trying out a pine cone as a trial craft!

New Year's crafts from threads
What else can be used as improvised material for crafts for the New Year? Threads. These can be thin threads or thick yarn, depending on what exactly you want to do. We propose to build a New Year's star. We will need: threads, PVA glue, matches or safety pins, disposable container.

New Year's crafts made from fabric
A very cool New Year's craft can be made from fabric. If you are comfortable with a needle and thread, then you should start with something simple, for example, sew a nice Christmas tree using materials: fabric (you can take calico, cotton, chintz, silk, linen, satin); strong threads; needle; safety pins; scissors; filler (sintepon, holofiber, cotton wool); wooden stick; decorative elements (optional).


You can decorate a fabric Christmas tree with different objects, snowflakes. Crafts, ribbons.
In addition to the Christmas tree, you can make other New Year's toys from fabric:

Tilda is a beautiful doll that has a soul. Making such a toy yourself is very simple, the main thing is to purchase the necessary materials, show imagination and a little patience. The doll is filled with warmth and comfort, and will be an excellent gift for family and friends. Tilda's story The doll appeared at the end of the 90s in Norway. It was invented by a Scandinavian needlewoman named Toni Finanger. Then […]
New Year's crafts from candies
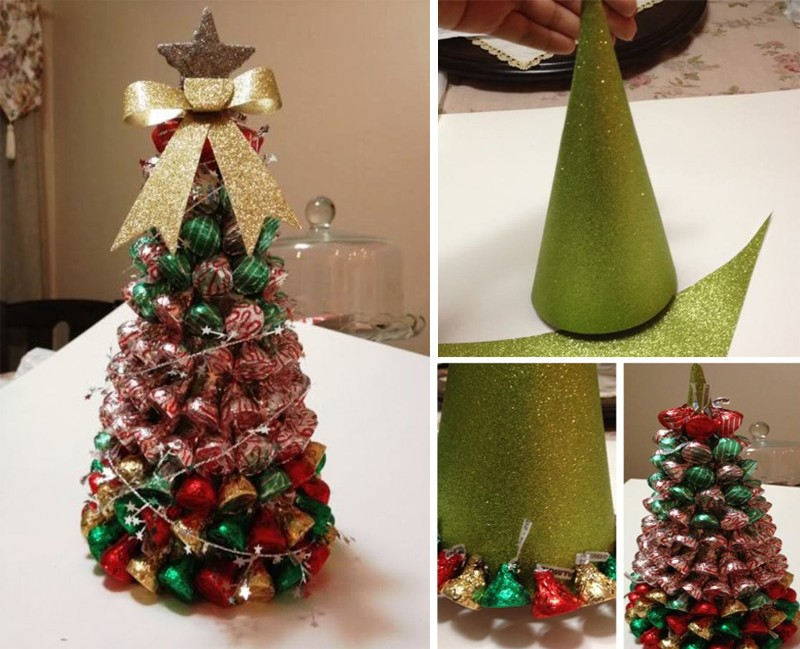
On New Year's holidays, every home is full of all kinds of sweets, mainly candies. Well, let’s not let the goodness go to waste, let’s make an excellent New Year’s craft that will be an excellent gift for friends and acquaintances. We suggest starting with the Christmas tree. For this we will need: thick paper, candy, double-sided tape, ribbons and tinsel.
By the way, if you need to add other candies, we have ideas for this:

What would New Year be without sweets and candy?! We've been good all year, so on the last day of December we look forward to some sweet treats to make the coming year as sweet as these candies. However, candies in the New Year can be used not only as a sweet treat, but also as decoration, for example, […]
New Year's crafts from cups
Plastic cups will also be used. If there is a lot of plastic containers, you can make a big snowman. By the way, if there is no snow outside, and the little one really wants to make a snowman, plastic cups will come to the rescue. By the way, you can also attract neighbors. In any case, crafting with a large group is more fun! We will need: plastic cups, stapler, glue, decorative elements.

New Year's crafts from disposable tableware
You can create real New Year's masterpieces from disposable plastic tableware. Suitable materials include plates, spoons, forks, and knives. There can be a lot of ideas, but we suggest making a Christmas wreath from plastic spoons. For this you will need: 201 spoons, glue, wreath blank ∅45 cm, red paint (preferably spray), white ribbon. Break off the handle of each spoon. Then glue the round parts of the spoon to the wreath blank in four circular layers. It is better if the workpiece is made of MDF, but if not, then thick cardboard will do. After this, paint the wreath and let it dry completely. Now all that's left to do is thread the ribbon and you're ready to hang it!

New Year's crafts from sticks
Did you have a children's New Year's party with a lot of ice cream? Great! We urgently collect sticks and get ready to create a New Year's craft. Let's make a snowflake. For this you will need: sticks, paints, glue, buttons. The craft can decorate the refrigerator or become a toy for the Christmas tree, or it can also be given as a gift.

By the way, snowflakes can be made from other materials:

What is it difficult to imagine the New Year without? Of course, without a Christmas tree, Santa Claus, and for us, residents of northern latitudes, it is extremely difficult to imagine the New Year without snow and snowflakes! If you want to create a truly New Year's atmosphere in your home, then don't be lazy and decorate everything around with snowflakes. Snowflakes can be flat or voluminous, carved or not. In addition, it is worth abandoning the stereotype [...]
New Year's crafts from cotton swabs
When all the obvious options have been considered, it's time to use the magic cotton swabs! We will use them to make a magical winter applique! For this we use: cotton swabs, glue, cardboard, paper!

New Year's crafts from pasta
So, what else do you have at home that can be used for New Year’s crafts? Pasta would be an excellent option. Yes, yes, regular pasta for cooking. True, you don’t need to cook them for this. By the way, pasta of any shape is suitable: horns, spirals, shells, bows. We suggest using pasta to create New Year's cards. For this we need: pasta, paints, glue, glitter.

For more ideas on New Year’s pasta crafts, see the article:

New Year's holidays are approaching, which means it's time to think about creating a festive atmosphere. You don’t have to use store-bought accessories for decoration. It's time to unleash your creativity and make original crafts with your own hands. If you are one of those people who are creative about once a year, then New Year’s crafts from [...]
New Year's crafts from buttons
Absolutely any materials that you can find at home are suitable for New Year crafts. Surely everyone has such a box in which spare buttons from clothes are stored. The shirt has long been thrown away, but the buttons are still there. Great! You can usefully get rid of this goodness by making cute New Year cards. In addition to buttons, you will need thick paper, glue and various decorative elements for this craft. You can decorate a card with buttons in the shape of a snowman, a New Year's garland, or a wreath.

Need more postcards? We have!

The best gift for the New Year is, of course, a gift made with your own hands. And if socks or a sweater are not an option for you at the moment, then even a child can handle a postcard. A DIY New Year's card is suitable as a gift for absolutely everyone: friends, relatives, dearest and closest people. New Year's cards can be complicated […]
New Year's crafts from toilet paper rolls
Go ahead. In search of scrap materials, you should literally look around the entire apartment. You especially shouldn’t bypass the place where everyone likes to think! Yes, yes, you can also find materials for New Year’s crafts in the toilet. Don't be alarmed. They're just toilet paper rolls. Let's make owls! For this we will need: toilet paper rolls, paint, brush, colored paper, scissors, glue.

Don't rush to throw away the bushings! We have over 100 more craft ideas!

The New Year holidays are approaching, there is less and less time left, and there are more and more worries and hassles in preparing for the holiday! It is especially difficult for mothers during these pre-holiday days. Little fidgets are looking forward to the holiday, so mothers have to come up with interesting games and activities every day. If your imagination no longer works, our cool master classes on making New Year’s crafts from […]
New Year's crafts from napkins
I think there are napkins in every home. Moreover, before the New Year, they are bought without fail for the festive feast. You can make incredibly cool crafts from ordinary napkins. We suggest choosing a Christmas tree. For this we will need: thick paper, napkins, a stapler, glue or double-sided tape, beads, rhinestones.

Another cute Christmas tree made from napkins will be a wonderful holiday decoration.
New Year's crafts from boxes
What else can be used as improvised material for New Year's crafts? Boxes, friends, boxes! And absolutely any: from shoes, milk, oatmeal, cereal, etc. The first thing that comes to mind when looking at a cardboard box is a house. You can decorate a windowsill with cardboard houses or hang them on a Christmas tree. And if you put an electric candle inside the house, you will get a magic lantern!
New Year's crafts from satin ribbons
If you have satin ribbons lying around, get them out immediately! You can’t even imagine what valuable material you have in your hands. True kanzashi professionals (this is the name for the technique of making crafts from ribbons) work wonders. Well, beginners should try something easier, for example, making a Christmas tree. For this craft we will need: thick paper, satin ribbons, scissors, glue, beads.

New Year's holidays are ahead and it's time to start decorating. You can make decorations for the New Year from a variety of materials, such as paper, beads, pine cones, and even old CDs. But in this article we will talk about New Year’s crafts made from satin ribbons. Crafts can be simple or made using a special Japanese technique - kanzashi. Christmas tree Let's start our crafts [...]
New Year's crafts from old light bulbs
Well, do you think all the ideas are over? Nope! We are urgently looking for old light bulbs. Of course, both incandescent and energy-saving lamps are suitable. But we suggest using the good old Ilyich light bulb. Let's do “winter in a jar”! You will need: an old light bulb, glitter, mini Christmas tree, glue, ribbon.
