Nowadays, furniture stores are literally overflowing with various options for upholstered furniture of domestic and foreign production, but the prices for it do not always please buyers. In addition, the cost of products sometimes clearly does not correspond to the quality of their manufacture. Therefore, in order to purchase a set of furniture, or at least one of its items, you have to save up the required amount for several months or get into debt by taking a loan.
However, there is another option to acquire the necessary interior accessory - this is to make, for example, a sofa with your own hands. For those who know at least a little how to work with carpentry tools, it will not be difficult to do this, albeit difficult, but very entertaining work. This publication will present several options for the manufacture of sofas that can be used in residential areas or at their summer cottage. Of these, it is quite possible to choose the one suitable for a particular case, both in design and in the degree of its complexity. Practice shows that it will take three to four times less money than when purchasing a finished piece of furniture - so why not try to make it yourself.
Unscrupulous manufacturers often make the frame of upholstered furniture from which they have to, since the buyer does not have the opportunity to control the quality of the material. So, for the main frame, unedged bars eaten by a bark beetle are used, and ordinary cardboard is used to shape the backs. Well, the consumer for this literally penny material, lined with more or less decent trim, gives the amount for which you can buy a used car or live comfortably for the whole family for a month. Therefore, after making the calculations and making sure that you can save a very decent amount of money, you can get down to business on your own. In essence, the money that will be saved will become the salary of the home craftsman for making the furniture. In addition, there will be a reason to be proud of your talents in front of relatives and friends.
Tools for the job
Of course, the work will require certain tools that will be useful in the household not only for making furniture, but also for repairs. They will not take up much space in a closet on a balcony, garage or in one of the outbuildings of a private house.

The list of necessary tools for work includes:
- Hand circular saw, electric jigsaw and (or) hacksaw for wood and metal.
- Roulette, folding rule, building level, square.
- or a screwdriver with a set of nozzles.
- Electric drill with a set of drills.
- It's great if you have a manual router at your disposal.
- File with a large notch.
- Clamps for temporary fixation of structural elements before their permanent fastening.
- Chisels
- Hammer.
- Pliers
- Stapler and staples.
- Sewing machine for making sofa covers.
It should be noted here that if hand tools are used to build furniture, the work will take much longer, and the accuracy of the edges of the manufactured parts will not be guaranteed.
Instructions for making several models of sofas
First option: making a corner sofa
This sofa model can have different options in terms of size and design features:
- For example, the side protruding part of the sofa can be installed both on the left and on the right side;

- Various mechanisms are used for mounting the lower, retractable part;
- Plywood or board can be used to make a sofa;
- The soft parts of the structure can be made of foam rubber and synthetic winterizer, or only of synthetic winterizer.
- For decorative sheathing, fabric or leatherette is selected.
Sofa prices
The dimensions of the sofa depend on the size of the room, the height parameters of its owners, and, of course, their preferences. Taking the dimensions proposed in the drawings, they can be “tried on” to the room where the sofa is planned to be installed, and if necessary, corrected in one direction or another, within reason.

This drawing will help to become a starting point in choosing the dimensions of this piece of furniture. However, you should pay attention to the fact that this model is somewhat different in its design from the version, the manufacture of which will be described in the table. However, the difference lies only in fixing the side back, which is built into the narrow section of the sofa.

This model is not as easy to manufacture as it might seem at first glance, as the master used special mechanisms for unfolding the sofa. But, having carefully studied the instructions for assembling it, it is quite possible to figure it out and come to the conclusion that making such a sofa in a standard apartment, and without leaving one room, is a completely achievable goal.
Manufacturing process - step by step
| Illustration | |
|---|---|
 | So, the first step is to make calculations and determine the size. Not only the convenience of the sofa and its optimal placement in the room will depend on this stage, but also the amount of necessary materials and additional structural elements. To begin with, it is worth drawing a sketch of a sofa on a piece of paper and writing out all the necessary details of the design, indicating their number. Based on the compiled list, the final amount of materials that will need to be purchased is calculated. |
 | In this case, for the manufacture of the sofa, the craftsman chose plywood 20 mm thick. However, it can be used in combination with a board with a thickness of 20 ÷ 25 mm. The board is usually used to assemble the frame of the sofa, which is then sheathed with plywood. If a complex design option is chosen, then the thickness of the plywood for sheathing can be smaller and be 15 mm. |
 | As you can see in the illustrations presented, the work can be carried out in the same room where the sofa is planned to be installed. The only thing that needs to be provided is a solid base on which it will be possible to lay plywood and a board for marking and sawing. It is best to mark and make all the details of the structure at once, since when sawing wood, naturally, a large amount of sawdust is formed, which can be removed from the room at the same time without spreading it throughout the apartment. It is even better to stretch a plastic film on the floors of the room for the duration of these works, which, after they are completed, can be rolled up together with the resulting garbage and taken out of the house. With such a simple approach, you can save yourself from small debris, which tends to clog under baseboards and fly under other furniture. |
 | Plywood is cut according to markings using a hand-held circular saw, which guarantees a perfectly even cut of the edge. In the absence of a saw, you can also use an electric jigsaw, but it is more difficult to handle it, since its cutting part can go to the side. It is recommended to number and sign the finished parts of the structure - such foresight will significantly speed up the assembly of the sofa, since the components do not have to be searched for and selected for a long time. |
 | To fasten the details of the sofa into one structure, it is necessary to prepare wood screws with fine threads, 50 ÷ 60, 30, 25 and 20 mm long. Here you need to take into account that they will be screwed into the end side of plywood 25 mm thick, so their diameter should not exceed 5 mm. Self-tapping screws should have a regular head, as they will need to be sunk flush into the wood. To avoid splitting the plywood, it is recommended to drill a hole with a diameter of 3 mm before screwing the screws into it. Then the fasteners will be screwed in easier, and the base will remain intact. |
 | Now that the sofa parts and fasteners are ready, you can proceed to the assembly of the structure. Since it consists of two sections, the larger one is assembled first. |
 | The back is taken, and the side parts of the lower box are attached to it. They are screwed through the rear wall panel to the end side of the side element with two or three self-tapping screws. |
 | Now the resulting structure is covered with a sheet of plywood prepared in size. When the sheet is screwed on, this section of the sofa will gain rigidity and strength. |
 | The sheet is laid evenly, close to the back wall and screwed with screws. First, it is attached to the horizontal end surfaces of the side walls of the box, and then, through the back wall, the screws are screwed into the thickness of the laid sheet. The pitch of fasteners should be 150÷180 mm. |
 | The assembled section is installed in the place where the sofa will be permanently located, and they begin to assemble the second, narrow part of the sofa. First, the side walls and the back of the box are assembled together. Self-tapping screws are screwed through a smaller wall and back, forming the width of the section, into the ends of the long sides, with the same step of 150 ÷ 180 mm. |
 | Now you need to screw its bottom to the assembled box. The box is covered with a sheet, leveled and screwed with self-tapping screws with a step of their installation of 200 mm. To fix the bottom, you can use self-tapping screws of a shorter length - 20 ÷ 25 mm, and their hats must be sunk into the plywood surface, otherwise there is a risk of spoiling the floor covering with them. |
 | When assembled, the design of the narrow section of the sofa looks like it is shown in the photo. When the sofa is ready, the inside of the box can be used to store bedding or other things. However, so that less dust from the floors gets into the box, it is recommended to subsequently sheathe it with a cloth. For this, a thin lining material is well suited. |
 | Now that the frames of both sections are ready, they need to be tried on each other. They are installed against the wall and move among themselves. Next, you need to return to work on the first wide section. |
 | Since it is planned to make the sofa sliding, for the part that will slide in and fold under the horizontal surface, three plywood parts will be needed - this is a horizontal surface (sunbed), a front wall and a plank 30 mm wide. In addition to wooden parts, you will need a special metal folding structure, which can be purchased at a furniture fittings store. Its width is selected depending on the linear dimensions of the wide section of the sofa. This metal mechanism is fixed on all three wooden parts that are not fastened together. |
 | First, the metal structure is screwed to the inside of the front part, and its back side, equipped with wheels, is fixed to the plywood plank. After that, the addition test can be performed. Any bar is applied to the upper structural element, which is pressed. In this case, the upper metal shelf of the mechanism should fall to the bottom. |
 | If the system works well, then you can move on to temporarily fixing the resulting folding structure on top of the plywood sheet that forms the lounger. |
 | It is temporarily fixed because it is necessary to determine the location of the metal parts of the mechanism on it, as well as to try it on for the general design of the sofa. You will have to remove the sunbed for laying foam rubber on it and covering it with fabric. |
 | So, the retractable part is fitted to the box of the wide section. At this stage, it is important to make sure how well the parts fit together, and whether they freely enter the space under the bed of the main section. |
 | The front side of the pull-out part of the sofa should have the same height as the surface of the lounger of the main section. |
 | Now it is necessary to reconcile the rise of that part of the lounger, which is fixed on the retractable structure, determine the height of the corners along which it will walk, as well as the location of the stopper. |
 | In order for the mobile part not to extend completely, but, reaching the edge of the lower part of the lounger, to stop, a rectangular profile pipe is fixed to the edge of the inner side of the wide section. For the convenience of marking its location, and then fixing it, the wide section is turned over and laid on the back wall. |
 | While the section is in an inverted position, a line is also marked on its side walls, on their inner side, along which the guide metal corners are then positioned and fixed. Thanks to these elements, the mobile part of the sofa will slide in and out freely. The corners are screwed through holes pre-drilled in the corners with self-tapping screws 20 mm long. Fastening is carried out with a step of 180÷200 mm. |
 | When the retractable lounger is fitted to the surface of the main surface of the sofa, the plywood can be removed. So it will be convenient to make another fitting, and then lay the foam on the retractable surface. |
 | The retractable part is installed with wheels screwed to the plywood plank, on the corners fixed on the sides of the wide section, and slides into the space under its lounger. |
 | Before making the soft part of the lounger, it is recommended to round the corners of the plywood a little with a jigsaw, or process it with a file with a large notch - this will help keep the sheathing material from damage. Now you can proceed to the sheathing of the retractable surface of the lounger. To do this, foam rubber with a thickness of 100 mm of the desired size must be prepared. It is recommended to glue it to the plywood surface. For this purpose, polyurethane glue or “Moment”, which is pointwise applied to plywood, is suitable. A synthetic winterizer is laid on top of the foam rubber. |
 | The next step is to put on a sheathing cover on top of the synthetic winterizer, wrap it on the reverse side and fasten it with staples driven in with a stapler. |
 | When the mobile part of the lounger is sheathed with material, a folding metal structure is screwed back to it. This finished part of the sofa needs to be set aside for the time being. |
 | Next, you can move on to sheathing the plywood base of the lounger for the narrow section of the sofa. A foam rubber sheet is also glued onto it, covered with a padding polyester, which is well leveled. After that, the lounger is sheathed with leatherette - it is also fixed to the plywood with brackets. The upholstered lounger is also set aside for the time being. |
 | The next step is to cover the backs of both sections of the structure with fabric. The corners of the plywood backs also need to be treated with sandpaper, then pieces of synthetic winterizer are fixed along their edges, after which they are covered with fabric, which is fixed with staples on the back of the walls. |
 | Further, the front part of the box and half of the side walls of the narrow section of the sofa are upholstered with leatherette. It is recommended to lay a synthetic winterizer under the sheathing material. Sheathing of only these parts of the structure is carried out because on the sides, closer to the back wall, the side back of the sofa will be fixed on one side, and a wide section will adjoin the other side. |
 | Since the lounger of the narrow part of the sofa must rise and fall. special lifting mechanisms are marked and fixed in the box of this section. |
 | To check the operation of these structural elements, after fixing them to the sides of a narrow box, a plywood strip is alternately laid and fixed on top of them and pressed down, and then rises. The bar should be springy - this will subsequently ensure easy raising and lowering of the narrow section lounger. |
 | If the mechanism works satisfactorily, then in place of the fixed bar, it is installed and screwed to the sheathed soft part of the narrow section lounger structure. Here you will need an assistant, since at this stage the sunbed must be held at the right angle. |
 | Now the pillow covers sewn from leatherette are filled with synthetic winterizer and sewn up. It should be noted here that instead of padding polyester, pillows can also be formed from foam rubber. |
 | Further, side backs are formed from plywood and wooden slats. They can have a rectangular top or rounded on one or two sides - this design is made according to one's own desire. Some craftsmen, instead of wooden planks, use thick thick cardboard 2 ÷ 2.5 mm thick, which is sprayed with water from a spray bottle before fixing. Wet material is more plastic and takes the desired shape more easily. After its installation, before sheathing these structural elements, the cardboard must be dried well. |
 | At the next stage of work, the wooden or plywood-cardboard construction of the side backs is completely upholstered with padding polyester, except for the lower part. The material is secured with staples. |
 | The next step is to put leatherette covers on the backs and fasten them with staples to their lower part. |
 | Ready-made backs are installed and fixed on both sides of the overall structure - one on the outside of the narrow one, the other on the wide section. |
 | The backrests are fixed through the walls from the inside of the box with four to five self-tapping screws. In order for the fasteners to fit snugly into the material, the backs must be pressed against the wall, or they must be held securely by an assistant. |
 | As a result, the design of the sofa without removable pillows will look like this illustration. |
 | To expand the sofa, it is necessary to push forward the lower part with the sunbed recessed into it. |
 | Then, raise the sunbed to the same level with the rest of the pillows using the installed retractable lifting mechanism. It should be noted here that the author of the project went the hard way, choosing a mechanism of a rather complex design for unfolding, requiring precise installation. If such a system is not found or seems too complicated, then you can do it a little differently by making a retractable box with a plywood lid. However, in this case, instead of separate pillows, a double folding mattress is fixed to the wide section of the sofa. For the narrow section, two parts of the mattress are provided - the lower one is fixed to the plywood part of the lounger, while the upper one is made removable. The latter is simply removed and removed into the interior of the section when the sofa is unfolded. Thus, all pillows of the structure will be on the same level. In this case, four wheels will need to be fixed on the retractable part of the sofa, and a stopper should be installed under the plywood lounger of the wide section. |
 | Another nuance that I would like to clarify. In some models of this type of sofas, the side back, installed on a narrow section, seems to crash into it, that is, it does not go beyond the overall design. This option is convenient if the sofa should be pressed against the wall with this side, so there will be no space between it and the sofa, in which dust will inevitably accumulate. |
 | If you choose a model with a built-in side back, as well as with mattresses instead of individual pillows on the lounger, the corner sofa will look like this illustration. Moreover, in this case, all the pillows are made of foam rubber, which must be covered with padding polyester, and then filled into fabric or leatherette covers. |
Second option: sofa book
Design features and required materials
This version of the sofa can be called traditional for many Russian apartments and, despite the fact that the model was developed several decades ago, it still remains in demand by buyers. This fact can be explained by the fact that it is simple and reliable in operation, and the mechanism designed for unfolding it is easy to mount, as it has a clear, simple design.

Today, the task of manufacturing such a sofa is also simplified by the fact that a large selection of fittings is presented in modern furniture stores.

For example, fiberboard, which was previously used for sheathing a structure, can be replaced with lamellas designed specifically for installation on beds and sofas. They not only perfectly replace sheet material, but also compensate for the softness of the structure, as they tend to spring. Thanks to this quality of details, the thickness of the mattresses can be made smaller.
The design, which will be presented below, must be manufactured and assembled in accordance with these recommendations, but the design, as well as the shape of the side backs, can be made according to your own sketches, but in compliance with the basic dimensions.
So, the sofa book consists of the following elements - this is a backrest, a lounger seat, side backrests and a box for storing bedding or other things.
To make a sofa of this design you will need:
- Board with a thickness of 20 ÷ 25 and a width of 200 mm for the sofa frame.
- A beam with a section size of 50 × 50, 60 × 40 and 50 × 30 mm.
- Fiberboard 4 ÷ 5 mm thick.
- 32 furniture slats 65 mm wide, 500 mm long.
- Foam rubber and synthetic winterizer.
- Upholstery fabric.
- Sofa unfolding mechanism (paired).
- Legs.

Illustrated step by step instructions for making
The first step is to draw up a sketch drawing of the sofa and put down the dimensions of all the details on it. Having such a graphic document in front of your eyes, it will be much easier to make all the necessary structural elements.
| Illustration | Brief description of the operation to be performed |
|---|---|
 | The assembly of the sofa box is carried out first. Its size should be 1900 × 800 mm. Moreover, first, bars are fixed to the long details of the box, along their edges - they are screwed using self-tapping screws 60 mm long. The next step, to the inner sides of the bars fixed on the long walls of the box, the side parts are screwed. Before the final tightening of the fixing screws, it is recommended to measure the diagonals of the box - they must have the same size. |
 | The next step, to give rigidity to the structure, in the middle part of the bottom area of the box, two transverse bars with a section of 50 × 30 mm and a length of 800 mm are screwed from the outside. They are installed at a distance of 650 mm from the edge and 600 mm between them. In order for the bars to be fixed flush with the underside of the box, grooves 55 mm wide and 30 mm deep are cut in the boards at a specified distance from each other. In these grooves and fit, and then the transverse bars are fixed. After the box is assembled, its bottom is sheathed with a fiberboard sheet, the size of which is 1800 × 800 mm. Fixing the sheet on the frame can be done with staples, nails or self-tapping screws 20 mm long. |
 | The next step is the back and seat frames - their design has the same linear parameters. For their manufacture, a beam with a section of 50 × 40 mm is prepared. Seven parts of the following sizes are cut out of it: 3 pcs. - 650 mm; 2 pcs. – 400 mm, 1 pc. - 1890 mm and 1 pc. - 1880 mm. The frames are assembled in the following sequence: first, on a beam 1890 mm long, 50 mm are deposited from its edges. Bars 650 mm long will be fixed in these places. Their other side is fixed along the edges of the beam, which has a length of 1880 mm. Then, on long bars, their middle is determined and the middle crossbar is installed. Further, elements 400 mm long are attached to the free edges of the longest beam. In addition, they are screwed with self-tapping screws 70 ÷ 80 mm long to the extreme short transverse bars. These elements, before fixing, are cut in the upper part at an angle of 30 degrees. They will be in the front of the lounger and in the upper back. When unfolding the sofa, the side back should be between these protrusions of the structure. |
 | The simplest connection of a beam is in half a tree, that is, in each beam, at the place of its connection with a perpendicular one, half of its thickness is cut out at the corners. In our case, this is 20 mm, that is, the groove should have a size of 50 × 50 × 20 mm. To install the middle beam, from each of its edges, as well as in the place marked on the long beam, 20 mm of thickness is also cut out, and the groove must also have the size indicated above. Then the transverse beam is first glued into the groove, and then screwed with two self-tapping screws 30 mm long, with their diagonal arrangement. It must be said that it is possible to fasten structural elements with other connections, but this is one of the simplest. |
 | Further, the long sides of the frame are marked for the installation of lamellas, the distance between which should be 60 mm. According to the marking, metal or plastic brackets with grooves are fixed, which come with the lamellas. After fixing them on the frame of the backrest and lounger, the edges of the lamellas are inserted into them. |
 | The next step is to make the side backrests-armrests. First, according to the dimensions shown in the illustration, four identical parts are marked out, drawn and cut out. |
 | Then the two cut parts are stacked in a mirror image to each other and marked. According to this marking, bars having a thickness of 50 mm are fixed. To begin with, they can be glued with wood glue. Their width can be the same or different, the main thing is that in the places where they will be attached to the sofa box, the beam should have a width of at least 80 ÷ 100 mm, since holes for fixing bolts 120 × 8 mm in size will be drilled in them. Bolt holes are drilled immediately after the glue on which the frame beam is fixed has dried, at a height of 150 mm from the bottom of the side back. Further, the frame is covered with a second similar part, cut out of fiberboard, which is nailed to it with nails 30 mm long. After that, the sides are turned over, and the other side of the fiberboard is also nailed and holes are also drilled in it. |
 | Further, in the side walls of the box, at a height of 150 mm, with an indent from the edge of 100 mm, holes with a diameter of 10 mm are drilled to fix the side walls. In addition, at this stage it is most convenient to screw the legs of the sofa to the box, since after fixing the remaining elements, it will be more difficult to turn the box over. |
 | The next step is to attach folding mechanisms to the back, sunbed and box. The scheme of their installation is presented in this illustration. Fixation of metal elements is carried out with the help of bolts, for which holes are drilled in the side walls of the structures. In addition to bolts, self-tapping screws are used to fix the mechanism - for example, they are additionally attached to the corner plates on the back and seat frames. |
 | To begin with, on the side wall of the box, you need to find the middle, 5 mm is deposited on each side of it, at this distance from the middle the back and sunbed are laid. A mechanism is attached to them and marks are made on all the details of the sofa, along which holes will be drilled. Further, the mechanism is fixed on all the details of the sofa. |
 | After the folding system is fixed, you need to try on the side backs to the sofa. But so far they are not screwed, since before that they will need to be sheathed. |
 | Sheathing is done starting from the back and sunbed. To do this, the sofa is laid out and first interlining is laid on the lamellas, then a thin synthetic winterizer, and on top of it - foam rubber 50 mm thick. So that the foam rubber does not interfere with the folding and unfolding of the sofa, its corners adjacent to the mechanism are cut out, as shown in this illustration. |
 | To make the back and lounger more comfortable for sitting, additional foam rubber strips are glued to their edges on top of the foam rubber, 200 wide and 20 ÷ 25 mm thick. Then, the entire flooring is covered with another sheet of foam rubber, 20 mm thick, but having a large width, such that it can be bent under the thickness of the sunbed structure and behind the back. There, the foam rubber is fixed with staples using a stapler. |
 | The foam rubber fixed on the frame is covered with a thin layer of synthetic winterizer - these materials are well fastened together without the use of glue. After that, sewn-to-size covers are put on top of the back and sunbed, which are nailed to the wooden structural elements with staples. If desired, in several places of the sofa, buttons sheathed with the same material are installed with strong cords inserted through them, which are threaded through the sheathing and tied to the lamellas, and their ends are shot to the wooden structural elements with brackets. After sheathing the lounger and the back of the structure, the upholstery is also fixed on the front side of the base-box. |
 | Next, move on to work on the side backs. The first step is to glue the foam on the top side. On the rise and in the upper part, the thickness of the foam rubber should be 50 mm, and in the lower area where the hand will lie - 80 mm. It should turn out approximately as shown in the photo. |
 | In the next step, the armrest of the side backrest is covered with foam rubber 20 mm thick, which is nailed to the fiberboard with staples. |
 | On top of the foam rubber fixed on the armrest, another foam rubber sheet 20 mm thick is fixed. It should protrude from the front of the armrest by about 100 mm. |
 | The front protruding part of the foam rubber is bent and adjusted with staples to the front of the side back frame. Further, it is recommended to cover the foam rubber on the armrest, as well as the entire area of the walls below with a padding polyester, which is also nailed with staples. |
 | Before performing the next operation, bolts are inserted into the holes drilled in the side backrests, onto which washers are put on. The next step is to cut out pieces of fabric of the desired size and shape, and then they sheathe the walls of the sides. First, the fabric is nailed with staples in the upper part, and then tucked under the bottom of the back and fixed there. |
 | Further, the armrests are covered with separate pieces of fabric. These segments are fixed under the armrests, on top of the already fixed fabric, first from the outside, and then from the inside of the armrest. After that, the fabric is neatly folded and fixed with a stapler from the front of the side backs, and is closed on top with a wooden decorative overlay, which, like all accessories, can be purchased at a specialized store. It remains only to screw the side backs to the lower box through the previously drilled holes. This process is carried out from the inside of the frame structure. |
 | When unfolded, the finished sofa-book looks as shown in this illustration. |
Prices for corner sofas
corner sofas
Find out some of the available options from our new article on our portal.
The third option is a sofa for giving from an old bath
Design features and required materials
An old bath after a major overhaul often becomes an unnecessary burden. Usually it is taken to a landfill or to a summer cottage and left to rot in the far corner of the site. At best, it heats water for watering especially whimsical plants. At the same time, a lot of money is spent on the purchase of garden furniture. At the same time, not many people know that from a bath that has served its main role for the allotted time, it may well turn out to be a comfortable and original sofa that fits perfectly into the landscape design of the territory and will last for very many years.

Such an unusual piece of furniture can be installed outdoors, on the terrace, in the gazebo or. With proper design, such a sofa and the interior of a country house will not spoil.

In order to make such a sofa, both a cast-iron and a steel bath are suitable. Of course, it is more difficult to work with cast iron, and it is also not easy to move such a piece of furniture from place to place. But with a steel bath, no special problems are foreseen. Sofas made from old bathtubs will last for many years if you work on them well. Moreover, what design and color to choose for the sofa - the master is determined by himself. The most important thing in the manufacturing process is preparing the base for applying paint, cutting out the excess part and processing the edges after trimming them.
Check out an unusual, inexpensive and very practical independent production, in a new article on our portal.
Step-by-step instructions for making a sofa from a cast-iron bath
| Illustration | Brief description of the operations performed |
|---|---|
 | In this version, for the manufacture of the sofa, an old cast-iron bathtub with legs-paws is used, which are always the decoration of this accessory, and we will not throw them away. The illustration shows that the enamel coating of the container is in a very unenviable condition. In all likelihood, she had lain in an unheated shed for more than one year, or even lay near the fence in the open. |
 | Cracked enamel and the resulting corrosion stains will definitely have to be removed from the surface of the bath. Since the cast-iron surface is not perfectly smooth, unlike a steel bathtub, you will have to work hard on it to remove all old dirt, cracked enamel residues, scale pieces from it and give it an aesthetic appearance. |
 | The legs were fastened to this model with the help of bolts, which, during the operation of the bath and waiting for its “renaissance” in the form of the original sofa, have become very rusty, and one can hardly hope that they will be unscrewed without the use of special tools. Therefore, in order not to complicate the process and not to spoil the thread, a composition (for example, WD-40) is sprayed onto the mount, which helps soften the rust. Then this area is left for some time, indicated on the cylinder by the manufacturer. After this time, the nuts from the bolts should be twisted without difficulty. Other threaded parts should be treated with the same tool, which must be removed before cleaning and painting the container. |
 | Before moving on to cleaning the surface, markings are made along which the front of the bath will be cut out. In this case, a cutout was already made in one of the edges of the bathtub, apparently, this had to be resorted to for conducting water pipes when installing the mixer. So that this man-made flaw does not spoil the entire appearance of the structure being created, the cutout is marked from this side. |
 | To mark the bath, a square and a dark marker are used, which will be clearly visible on a light surface. To begin with, the lower part of the cut is determined - for this, a square is attached to the bath, and a perpendicular line is drawn, along which it will be easier to navigate, making the slope at a greater or lesser angle. |
 | Further, the exact lines are outlined along which the cutout will be made on one and the other side of the container. Since the bathtub has a curved surface, and the cutouts must be in harmony with each other, repeating the shape of the container, it is possible to measure the required distance from the vertical line of a right angle using a tape measure or square, first in height and then to the side. One way or another, the lines on both sides will be located at different angles. |
 | Having determined the exact outer line, it must be repeated on the inner surface of the container, since when cutting, work will be done both from the outside and from the inside of the bath. From the inside of a curved surface, it is quite difficult to determine a right angle, so the transfer of the line will have to be done, so to speak, by eye. However, special accuracy is not required from the master here - the curvature of the lines is still necessary, and everything depends to a greater extent on the subsequent processing of the cut edge. |
 | The second side of the container, where the drain holes are located, is not so curved - it is closer to a right angle. But it is impossible to make a cutout exactly rectangular, otherwise the visual balance of the structure will be lost. Therefore, based on a vertical straight line, and taking into account the cutout angle that was found for the other side, the slope for the second side of the container is also determined. When the optimal slope option is found, the lower points of the lines of the two sides are connected by a horizontal line. |
 | Now the grinder comes into operation with a metal disc installed on it. There are no problems with steel, but the task of cutting cast iron is a very difficult task, one might say - delicate. It is impossible to praise the master who demonstrates cutting in these illustrations - it is imperative to fix a protective casing on the tool, since it is not known how such a heavy and fragile metal as cast iron will behave. It happens that when cutting it, the circle begins to tear, and this is very dangerous. The casing, of course, somewhat closes the view, so the cut must be done very carefully. Cast iron is cut very carefully, while it is necessary to protect the face by wearing a special mask, as the disk may be damaged or part of the metal being cut may fly off. There is no need to hurry, since it is easy during this process to overheat the grinder and completely render it unusable. So it is better to cut in small sections, 100 - 150 mm each, allowing the tool to rest and cool. First, a cut line is drawn from the inside, on the curved sides of the bath. Further, the cut is made from the outside of the container along the line drawn earlier. |
 | It is very difficult to cut high-quality bath enamel if the cut is made from the inside. So the work is best done for the most part from the outer surface of the bath. If you have to cut some area exactly along the enamel, then it is better to first install a diamond wheel and carefully clean the enamel along the cut line with it. And then proceed to work with a cutting wheel for metal. Having cut out one side of the bathtub, starting from the upper side, go to its second side, to the drawn lower horizontal line. |
 | Now it remains to make a horizontal cut, and the first, perhaps the most difficult and dangerous stage of work, will be completed. For convenience, the bath is laid on its side, and then, if necessary, props are installed under it, since when cut, it must stand very stable on the surface. Basically, this applies to steel baths, since they have less weight, while the cast-iron version usually fits snugly to the surface under its own weight. |
 | This is how the bathtub will look like, from which the fragment, which is unnecessary in this case, is cut out. Now, you can move on to a less complicated, but very dirty operation. |
 | Next, there is a mandatory process of leveling and grinding the cut, since the edge must be even and smooth, otherwise you can seriously injure yourself about its notches. The work is carried out with the same grinder. First, a cutting disc for metal is installed on it, with which the remaining metal burrs are cut off. |
 | Then, the edge is processed with a grinding disc. The cut end and its side parts are polished. If the sofa is made from a steel bath, its cut edge can be beaded down a little, since the metal is thin, and its cut will remain sharp even after grinding. |
 | Next, the outer surface of the bath is cleaned with a metal brush mounted on a grinder, and then with an emery disc. The dust formed on its surface is collected by a vacuum cleaner. After that, the outer side of the container is covered with a primer composition intended for processing metal products. The primer layer is applied carefully with a soft brush, as the substance must get into all the pores of the cast iron surface. The soil should dry well, after which the surface is again cleaned with an emery disc with a medium grain. Dust after cleaning is also collected by a vacuum cleaner. You can immediately thoroughly clean and prime the previously removed bath legs, as shown in the illustration. |
 | They proceed to the next operation - the first layer of paint of the selected color is applied to the outer surface of the bath. Paint must be chosen for external work, intended for metal. It will prevent the appearance and spread of foci of corrosion under the influence of the external environment. |
 | After applying the paint, the smudges formed on the surface of the bath must be collected with a soft cloth, leveling the paint layer with it. The napkin is applied to the desired areas of the surface and pressed against the metal, collecting excess paint. |
 | When the paint dries, another layer is applied on top of it, which will make the outer surface of the bath (that is, sorry, the sofa) smoother, which will reduce the risk of dust and dirt particles being trapped on it. This is especially important if the sofa is planned to be installed outdoors. |
 | The legs of the bathtub and their fastenings must also be well cleaned of rust - their processing, as we have already seen, is usually carried out at the stage of priming the bathtub. Cleaning, however, will have to be done manually. Then all parts are treated with a primer, dried, cleaned and painted, it is possible in a color that contrasts with the rest of the surface of the bath. After that, the legs are fixed on the bath using a threaded connection. If possible or necessary, fasteners are replaced with new ones. |
 | Now they move on to work on the inner surface of the trimmed bath. The first step is to repair the chips that formed along the edge when cutting the metal. For this purpose, an epoxy or polyurethane two-component putty is well suited, which is applied along the inner edge of the bath with a spatula. The putty is leveled and left to dry completely. |
 | When the putty dries, the area where it was applied must be well cleaned and then sanded using, for example, an eccentric sander with emery nozzles of various grits. If there is no such tool, then you will have to work manually - with sandpaper. |
 | Further, the entire inner surface after cleaning is covered with a primer and left to dry. It is very important to treat the holes that are in any bath well, as corrosive processes can begin to spread from them. In order to prevent the primer, and then the paint, from getting on the outside of the container, paper is fixed on all edges of the masking tape, which is removed only after all work is completed. |
 | When the primer is completely dry, all surfaces are cleaned with an eccentric sander with an emery nozzle. The primer should be as if rubbed into the cast iron surface. |
 | Further, the inner surface is covered with enamel on metal. It is best sprayed with a spray gun, but can also be applied with a brush. If the staining will be carried out manually, then the paint should be slightly diluted with a solvent and applied, taking a small amount of the coloring composition onto the brush. Only in this case the paint layer will be even. Some craftsmen apply the paint with a sponge that is dipped in the paint and then pressed against the surface. This process is quite lengthy, but with the help of a similar technique, original stains with color transitions can be reproduced on the surface. In addition, the inside of the bathroom will acquire a pleasant roughness. |
 | Now it is worth considering the manufacture of a mattress that will be laid on the bottom of the sofa. All such soft parts can be made both before and after painting and drying the container. But in order for the mattress to fit perfectly on the bottom of the bath, you need to measure it on the spot, that is, lay a rectangular sheet of foam rubber cut to size, and then round its corners in accordance with the shape of the bottom of the sofa. For this work, you can use a sharp clerical knife and scissors. |
 | The cut foam rubber is laid on the fabric from which the cover will be made. On the fabric, the foam rubber is outlined with a marker, and when cutting the material, 10 mm per seam is taken into account, that is, 10 mm recede from the line left on the fabric by the marker. You will need two such parts, and in addition to them, you will need a strip of the same or another material equal to the thickness of the mattress plus 10 mm on each of its sides. |
 | You also need to cut two ribbons 30 mm wide and a length that is equal to the edge of the mattress, plus 20 mm for the seam. In addition, you will need to prepare a cord that will be sewn into the tape - it is necessary to maintain the shape of the mattress. The tape is bent in half, a cord is inserted into it and fixed with sewing pins, after which the tape is sewn along the fastening line on a typewriter. |
 | Further, the resulting edges are fixed on each main fabric part of the future cover, with the same pins and stitched to them on a typewriter, after which the pins are removed. After that, the parts are combined with the front side inward. Then, first, a side tape is pinned to one part from the wrong side so that the edge of the piping with a cord sewn into it is on the front side. Then, the combined parts are sewn on a typewriter. Further, the second side of the tape is pinned to the second part of the cover and also sewn, but only from three sides. The fourth side will be sewn by hand after the cover is put on the foam. |
 | The finished mattress should fit perfectly into the bottom of the sofa made from the bathtub. |
 | If desired, the back of the bathtub can also be equipped with a soft support cushion by gluing it with polyurethane or epoxy glue. If the goal is to get a sofa with a completely soft inner surface, then it is possible to sew a removable insert from foam rubber and fabric, which will completely cover the entire structure from the inside. Here already - the widest scope for creativity. |

It remains only to note that if you turn on your imagination, then from the bath you can make not only a sofa, but also an armchair, table and other furniture accessories.
Prices for popular sofas
inexpensive sofa
Read interesting information about new life for old things in a new article -
Now that you have studied the detailed instructions for making three different types of sofas, you can decide on the choice of the desired model in accordance with the planned installation site and the intended functionality of this piece of furniture.
And at the end of the publication - a demonstration of the manufacturing process of another original and relatively simple sofa model.
Video: Self-made original sofa
The easiest way is to make a sofa, the frame of which consists of several transverse and guide bars.
If you feel sorry for giving fabulous money for a ready-made sofa in a store, then try to make it yourself.
It is quite simple to make such a design, and you only need a minimum set of tools and materials.
How to make a simple sofa with your own hands?
You will need to develop a drawing, make an accurate calculation of the amount of materials needed, purchase tools and assemble the structure. You will need the following tools:

- square;
- electric drill;
- hammer;
- electric jigsaw;
- construction stapler.
From the materials you will need to purchase:
- metal corners;
- timber;
- stain or colored glaze;
- foam rubber;
- zippers and Velcro;
- durable cord.
For a city apartment, a sofa of this design will look rough, but it is ideal for a country house or cottage. There are several reasons why you should make a sofa:
- It will be possible to significantly reduce the cost of funds. Such a design will cost many times cheaper than a product purchased at a furniture store. However, it should be remembered that savings should not be at the expense of quality.
- The possibility of obtaining a quality design.
- Possibility to choose the accessories you like.
- You can get the design of the required dimensions.
- In the future, you can by reducing the cost of cash.
This design consists of a backrest, front panel, seats and armrests. The base will be fixed on the finished frame.
Back to index
The sequence of steps for making a sofa

First of all, you need to prepare bars of suitable sizes. It is not recommended to make a structure from pine, since such wood is not able to withstand deformation and must be further processed.
After that, you need to make accurate measurements. It is necessary to mark the elements and make grooves, then drill holes for the stopper on the frame so that it is possible to install the fixing screws into the lower horizontal rail of the frame, excluding cracking of the stopper.
In the process of preparing materials, you need to pay attention to the pattern of the tree. Connections must be made so that the annual rings are located with convex sides to each other.
After assembly, all elements must be carefully sanded. After that, the base is processed with colored glaze or stain.
It is worth noting that the dimensions of the finished structure will be set by the parameters of the sofa base.
In order to make support legs, you should use a bar of solid rock with a cross section of 7x7 cm and a height of less than 10 cm. To ensure a reliable connection, you need to fix the bar on metal corners.
The back can be made with an inclination. The skeleton should consist of 2 horizontal and 4 vertical boards. The height of the back should be chosen based on the height of the user and personal preferences. Plywood must be completely applied to the back of the skeleton. From the side on which the back rests, plywood must be applied exclusively to the open part. The lower part can be closed with a seat. Examine the backrest drawing with all the dimensions you can see.
Back to index
Production of soft seats

Seats can be made of foam rubber with a density of more than 35 kg/m³. It should be laid in several layers. The base is covered with a protective sheet, which will minimize friction between the decorative coating and the sofa frame. Thus, it will be possible to exclude the formation of folds.
The back cover is made of thinner foam, so the load on the back is much less than the load on the base of the sofa. In order to sew a decorative coating, you should use a strong cord. Zippers or Velcro should be located along the rear edges of the lower part of the structure. The upper part of the seats is fixed with Velcro.
Back to index
How to make a roll-out sofa with your own hands?
There are designs that can be used as not only a sofa, but also a bed. These designs include roll-out sofas.

One of the most common types of sofas is roll-out design. In this case, the berth extends from the bottom of the structure. To push such an element, you will need to pull on a special handle or loop. Pillows are placed on the rolling out part of the sofa. These folded cushions can be used as a backrest. There is another type of roll-out design: the back in it does not consist of several pillows, but of a solid soft base. When the sofa unfolds, the backrest and seats are installed on the retractable part.
The advantages of a roll-out sofa include the following properties:
- The retractable part of the structure is large, so even several people can be accommodated on it.
- Small dimensions of the structure in the folded position.
The disadvantage is that in the unfolded position, the structure takes up a large amount of space. Therefore, it is not recommended to install it in small rooms.
Making a roll-out sofa with your own hands is not difficult if you have minimal skills. You will need the following items:
- a small number of boards 5 cm thick and 10 cm high or more;
- timber;
- backs;
- seats;
- material for sheathing the frame;
- dense foam rubber;
- door hinges.
For the construction of the structure, pine shields will be used, which will need to be further processed. After all the necessary tools and materials are prepared, work can begin.
Back to index
The procedure for making a roll-out sofa
In this case, a structure will be made with the dimensions of a bed 1140x1980 mm. Consider the drawing of the sofa.
For the construction of the structure, you must perform the following steps:

- The backrest will be made from a furniture board, on which the upper edge is marked with a pattern.
- According to the marking, a diamond-shaped gap and the upper edge of the backrest are cut out. This can be done using an electric jigsaw. Before making a diamond-shaped opening, you need to drill holes in the shield for the tool saw. You also need to make 2 holes near the non-sharp corners of the figure. In sharp corners, you do not need to turn the saw of the tool. After cutting from the edges, it is necessary to remove traces of cuts.
- After the pattern of all other elements from the shield is completed, they must be well polished. In the process of performing this operation, it is necessary to securely fix each element that needs processing. To do this, the raw surface must be fixed on the workbench.
- With the help of a router, you will need to process the edges of all workpieces, for which you should use the appropriate profile cutter. If you wish, the finished components can be additionally tinted. The color of the impregnation is selected based on the design of the room in which the structure is installed. At the end, the elements will need to be coated with a wear-resistant colorless varnish.
- After that, the support rail should be fixed to the wall. The dimensions of the roll-out sofa and the height of the fixing must be determined based on the ease of use of the structure. After determining the overall height, the height of the side supports of the folding seats must be selected. First of all, the rail is fixed in the middle so that later it can be set horizontally.
- The rail is mounted according to the level. This element must be slowly turned around the fixing screw. After that, the rail is fixed at the edges.
- Another beam should be placed on the support rail, folding seats are fixed on the hinges. After that, the beam is fixed with self-tapping screws to the bottom of the structure. All holes for self-tapping screws must first be made in the rail.
Hello. In this video tutorial you will learn step by step how to make a sofa with your own hands. This video was edited because the whole manufacturing process took a very long time.
In order to make a sofa, you first need to decide on the size and dimensions. To do this, sketches are made and the width and length are written on paper. Next, we prepare the material and tools that are needed to create a sofa. At the beginning, the frame of the sofa itself is made, then we sheathe it with foam rubber, stretch the fabric and the sofa is ready.
For the sofa you need to create a reliable frame. To do this, take a transverse beam and guide boards. Using a jigsaw, cut the plywood to length and width. We nail the frame or fasten the plywood with a screwdriver, which we initially prepare in size. The bottom of the sofa is suitable for bed linen, for these purposes you need to nail plywood or kragis.
Now the sofa stuffing remains. For these purposes, we need foam rubber, fabric. We cut the foam rubber and fabric to the desired size. We connect all this with the help of a furniture or construction stapler. That's all the sofa is ready.
Watch the video where you can see how people made their own sofa. Making a sofa takes place at home and for a very long time. In this connection, these videos were edited and compressed. Happy viewing.
If for some reason you are unable to make a sofa yourself, then you can always buy it. Most people do just that, they just look at furniture stores and online stores. You can also check out https://meblissimo.ua/divany/ and purchase a ready-made high-quality sofa on your own. Manufactured in a production way, where all the details and standards are taken into account.
Have you ever thought about whether it is possible to make an ordinary sofa at home, i.e. on your own? At first glance, such a question will seem unusual to us, since in any furniture store you can find the right sofa for every taste and color. But if you think a little about, for example, what you will have to put out of the furniture for sitting in the same rest room in the bathhouse or on the country porch, then the initial question about a home-made sofa in a country house will not seem so strange. In this article we will tell you how to make a sofa with your own hands from auxiliary material.
Sofa from a bar
One of the options for self-manufacturing a sofa in the country involves the use of timber for its construction, small trimmings of which often remain after the completion of the construction of utility rooms. In addition to these blanks, you may also need the following material for work:
- foam rubber sheets sold today in any specialized store;
- 210 cm long zipper used to make the cover;
- three zippers of 70 cm, going to the manufacture of pillows;
- any material like a tapestry;
- metal corner;
- metal mesh.

The main work on assembling the sofa at home should begin with the construction of the base (bearing frame) of the structure, for the assembly of which we use the beam mentioned above. A bar measuring 70x210 cm can be very convenient for making a frame; while the support legs for our frame can also be made from four small sections of this beam.
The second step towards achieving our goal is the manufacture of a reliable sofa back. Since initially this design option involves avoiding unnecessary complications of the design (do not try to do something like a folding system), we make the backrest according to the same scheme as the frame base of the sofa was made. Such a frame back must be sufficiently rigidly fixed to the base using thick-walled metal corners. You will choose the optimal angle of inclination of the resulting back according to your own taste, but the main thing is that it does not turn out to be very steep (to avoid discomfort).

At the next stage of our work, we will try to mount the support grid on the sofa frame, which would hold the seat cushions. For these purposes, a shell mesh from metal beds, which were used by our grandfathers, is quite suitable (I was convinced from my own experience that, if desired, it is quite possible to find such a mesh even today). After securely fastening such a grid to a wooden base (using ordinary metal staples), you get exactly what you need. Only one should not forget to insert four transverse bars into the longitudinal bars of the frame before fixing the mesh (the insert is best done using the groove-in-thorn method with landing on special glue).

We now turn to the manufacture of soft upholstery for our design.

After that, we stuff three large pillows with scraps of foam rubber, the covers for which we also make from pieces of tapestry sewn together with zippers.
Sofa from ready-made shields

In the event that you are not skilled enough in handling wood and other materials, you are offered another way to make a sofa on your own. To make it you will need:
- two old door leaves;
- metal staples;
- wood stumps;
- foam rubber;
- the cloth.
As the base and back of the proposed simplified design, two leaves of outdated wooden doors are taken. All you need to do with them is just clean them of dirt and process them using grinding.
Then you should cover them with several layers of paint, the color and texture of which are chosen arbitrarily (or under the interior of the room where your sofa will be located). It is possible to finish the surface of the doors with wood veneer.
Firmly fix one of the sashes on wooden stumps of a suitable size with nails and attach a back (second sash) to it using metal brackets.
Then you can start making a mattress, for which the foam rubber cut to the size of the seat should be sheathed with some kind of strong and coarse fabric (coarse calico or matting, for example). From above, such a seat can be covered with a high-quality fabric that has an unusual color. Then lay the finished mattress on the base of the structure and place a few small pillows on it.

An impromptu sofa of this type can fit well not only into the interior of your country veranda, but can also decorate any other country corner.
You probably paid attention to the fact that the basis for the independent arrangement of the options for sofa products we have considered is the manufacture of a reliable and strong bearing base (frame). This fact allows us to conclude that any other material that satisfies the specified basic conditions can be chosen as the basis.
An important role in the life of every man is played by a home sofa. Do not be ironic about this. A lot of creative plans and ways to implement them were conceived on this piece of home interior.
A good sofa can be bought in a store, today this is not a problem. But does a real home master miss the chance to try his hand at making upholstered furniture?
Financial incentive is another weighty argument in favor of the "couch project". If you calculate the cost of materials needed for work, and compare it with the price tags of furniture stores, then the savings will be very impressive.
In our article, we will consider the implemented options for home-made sofas and give a brief description of their manufacture. In addition, the topic of self-assembly of a corner sofa will be covered, from the drawing to the finishing sheathing.
How many sofas, beautiful and different ...
Having decided to make a sofa with your own hands, it will not be superfluous to get acquainted with ready-made samples of home “sofa” creativity.
We note the main features of this type of furniture, so as not to confuse it with an ordinary bed in the future. The main distinguishing feature of the sofa is not a soft bed, but a backrest that you can lean on. The bed does not have this element. Side railings with armrests are another classic element of sofa design.

In modern models, armrests are often abandoned, leaving only the backrest. In some designs, it can be turned on hinges and turned into a mattress.

Photo No. 2 Sofa with a swivel back
Such a system was called "Eurobook". The principle of its operation, as can be seen in photo No. 2, is very simple: a block with a seat on wheels moves forward, and the backrest turns on hinges with a slight movement of the hands and turns into an extra bed. This option can be taken into account by those who decide to make a sofa at home.
No wonder they attract the attention of home furniture makers. These are ready-made solid modules. Of these, it is possible to build an original bed with minimal cost and time. A pallet sofa made in a deliberately rough loft fashion style looks great with a dump truck wheel that doubles as a coffee table.


All you need to assemble this design is a screwdriver and a jigsaw. Having fixed the base pallets in pairs with screws, the sidewalls are attached to them. They are made from the same pallets, cut at the level of "bosses" - thick wooden inserts. This sofa does not have a back. It is replaced by two wide pillows leaning against the wall. A pleasant "softness" of the whole structure is given by two thick foam mattresses.
If you are going to make a simple sofa, try to enlist the help of your spouse. Her sewing machine will save you from having to go to a tailor shop for sewing covers. If your wife does not share your grandiose plans, then buy a construction stapler. With it, you can accurately and quickly complete the upholstery of the frame.

Someone likes wood, and someone cannot live without metal, making everything necessary from it, including a sofa. If your old cast-iron bath has not yet been scrapped, then use the original way to turn it into a comfortable bench. There is no better material than enamelled cast iron for a garden patio.

Such an outdoor sofa is not afraid of either snow or rain, regularly bringing respect to its owner from guests and neighbors.
Modellers-constructors do not only models of old ships, tanks and aircraft. Furniture items often fall into the sphere of their attention (photo No. 6).

Why don't we make such a sofa by increasing its miniature layout to the desired size? The idea of this design is simple and rational: the base is made of a profile pipe, to which thick plywood or OSB board is attached.
After practicing assembly techniques on a smaller copy, it will be easier for you to work with a full-size sofa.
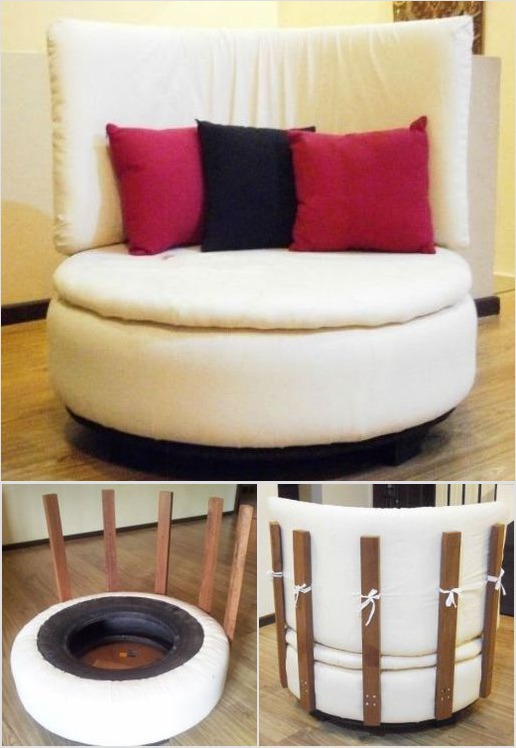
If the farm does not have an old tire, then making an original round sofa is not easy. If rubber "shoes" of the tractor are available, you can cover them with fabric and attach a high back. A stand with legs and soft foam cushions give the structure the perfect look.
How to make a corner sofa yourself?
Without a detailed assembly diagram, it is impossible to start this work. The corner sofa consists of several parts, the manufacture and docking of which requires precision. The best fastening material for a beginner is self-tapping screws. Spike joints of the frame - the level of an experienced carpenter.
So, to assemble a corner sofa, you will need the following materials:
- wooden block (section 30x50 mm);
- board (25x80 mm);
- plywood or chipboard (thickness 12 mm);
- plywood (thickness 5 mm);
- foam rubber 10 cm thick;
- thin foam rubber or batting (for making a lining for the hull skin);
- PVA glue for attaching a soft lining;
- upholstery fabric.
To work, you will need the following set of tools:
- screwdriver;
- jigsaw and hacksaw with a miter box;
- construction knife for cutting foam rubber;
- scissors for cutting furniture fabric;
- stapler;
- self-tapping screws;
- sewing machine.
Before you make a corner sofa yourself, you need to clearly define its layout and once again review all the prepared drawings.

The basis of each block of the corner sofa is a frame made of plywood or chipboard, mounted on a bar frame. If the thickness of the plate is large enough (from 16 mm), you can do without a bar. In this case, the self-tapping screws are screwed directly into the ends of the plates, having drilled guide holes of small diameter in them to prevent splitting of the material.
For the rational use of the internal space in blocks No. 1 and No. 2, removable covers can be made. To support them from the inside along the contour of the frame, it is necessary to fix a bar with a section of 2x3 cm, lowering it below the upper cut of the plates by the thickness of the cover (12 mm). In order for the lid to be easily lifted, two holes are drilled in it for fingers.

By design, blocks No. 1 and No. 2 are the same, but we will make block No. 3 with a drawer-seat that increases the useful area of \u200b\u200bthe sofa. This is the simplest option that does not require the installation of transformation mechanisms (retractable or rotary). Their correct installation and adjustment for beginners is a complex process.
We will have a drawer with a lid made of chipboard or thick plywood. It is not difficult to assemble it, but making comfortable folding legs is a problem. They will interfere when pushing the drawer into the sofa body. Instead, we will increase the height of the front plate of the box. It will play the role of a support platform when unfolding the sofa.
For easy pull-out, two wheels from office chairs can be attached to the back of the front panel of the drawer. The body of the wheel will not rest against the bottom of the sofa if a small cut is made in it in advance.

The lid on unit 3 can be made removable to store bed linen.
The dimensions of the seat cushion must be equal to the dimensions of the drawer area. Pulling out the drawer of our corner sofa, we remove the back cushion and put it in place of the mattress.
Further, our step-by-step instructions contain a description of the assembly of the backs. For all corner sofa blocks, their design is the same: vertical posts connect three boards. The two lower ones serve to fix the back to the sofa, and the upper one provides rigidity and serves as the basis for attaching the skin.

Having assembled the back frame, it must be sheathed with plywood 5 mm thick in front and behind. All sharp corners are processed with sandpaper so that there are no hooks and irregularities when installing upholstery fabric. Batting or thin foam rubber should be glued to all front and side surfaces to make the upholstery softer and more voluminous.
The last stage of manufacturing is the upholstery of the sofa with fabric. It can be bought at a specialized store, having made a preliminary calculation of the area of \u200b\u200bsheathing and not forgetting a margin of 5-10%, necessary for cutting and turning on the frame.
To do this, all the front parts of the body and back must be measured and cut out pieces of material according to the obtained dimensions. They are fastened with a stapler on the invisible ends of the panels. To prevent the fabric from wrinkling at the corners, make cuts on it and pull it tight before shooting the staples.

Cushions for the back and seat of a corner sofa are best made of foam rubber with a thickness of at least 10 cm. The optimal design of covers for them is a removable zipper. When soiled, the covers can be easily removed and sent to the wash. If you have no experience in sewing, then draw a simple pillow sketch and order the tailoring of covers in the atelier.