It is difficult to imagine a country or suburban area without garden paths. They serve not only for convenient movement between different objects, but also perform a decorative function, emphasizing the style of the territory and dividing it into zones. Those who want to improve their plot will be in for a real delight, because Lots of materials for creating garden paths: expensive and affordable, natural and artificial, purchased and improvised, of any shades and textures. There really is plenty to choose from, but don’t forget to take into account not only attractive appearance of the material, but also him performance.
Each of the numerous possible materials is used in garden plots, since everyone has different requirements for paths and their style. If the path will serve for the constant movement of people and goods, then the coating should be as strong, durable and easy to clean as possible. In other cases, you can choose less durable and more decorative materials.
No. 1. A natural stone
Natural stone can be called the most versatile material. It fits harmoniously into any garden plot and can serve as its decoration for many years.
Main advantages:
Flaws:
- heavy weight, which complicates transportation and installation;
- high price.
In addition, on some types of stone (granite, marble) In cold weather, an ice crust forms, making it difficult to move along the garden path. The only way out of this situation is to arrange construction directly under the path, but not every summer resident will decide to do this.
The surface type and color of the stone depend on the rock. Material can be rough or smooth to a shine. The color range is wide: from light breeds to dark red and almost black. Any natural stone is an expensive material, but the cost of different types varies greatly. TO the cheapest materials include sandstone and limestone. Marble, granite, basalt, porphyry are more expensive materials. 
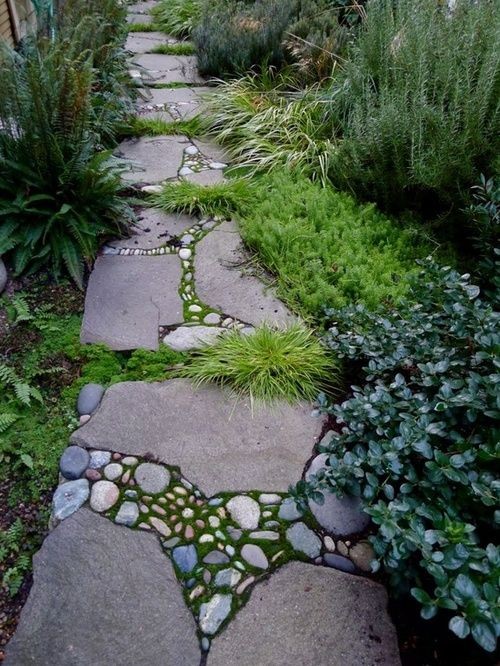
For arranging garden paths, stone can be used in natural raw form(quartzite, slate, sandstone, granite, gneiss) or give in additional processing to achieve the best performance and decorative qualities (basalt, gabbro, diabase). River and sea pebbles are also often used in their raw form.
The beautiful natural relief and roughness of the stone surface will decorate the area, but it is important to remember that it should be convenient to move along the path, so it is better to choose a stone that has at least one side is more or less flat. Porous rocks, which include tuff and limestone, can accumulate moisture, so once every 2-3 years it is better to treat their surface with water-repellent solutions. 
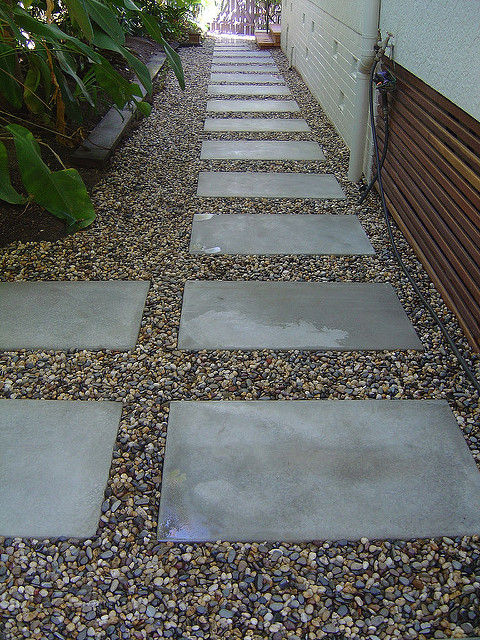
No. 2. Paving slabs and paving stones
One of the most common options for organizing a garden path remains. These two materials are similar in composition, and the difference is only in the geometric dimensions: with the same length and width, the paving stones will be thicker.
Tiles are suitable for a garden plot with a thickness of 50-60 mm, since there are no special loads on the tracks. Paving slabs can be made from different materials, and The following types are best suited for organizing a garden path:
- concrete tiles. Can be produced by vibration pressing and vibration casting. The first one turns out to be more durable, but has the simplest forms and can be used to create paths along which cars will move. Vibration-cast concrete tiles are distinguished by a wide variety of shapes and are quite slightly inferior to their vibro-pressed counterpart in terms of strength;

- clinker paving stones It is made from plastic clay, quartz and feldspar, so its strength is not inferior to natural stone. To obtain a rough, non-slip surface, sand is added to the mixture. Paths made from clinker paving stones will be durable and very beautiful;

- natural stone tiles- the most expensive and luxurious option, will complement a spacious suburban area. This is actually the same natural stone, but split into pieces of the required size, polished and polished;

- polymer sand tiles made from sand and dyes with the addition of polymers. The result is a material that is excellent in performance, but its appearance still reveals the presence of polymers in its composition, so such tiles are unlikely to be suitable for arranging a site in a classic style, but in all other cases they will allow you to obtain a durable and durable covering of paths.

Among the main advantages paving slabs durability, frost resistance, strength, resistance to negative atmospheric factors, variety of shapes, sizes and colors. You can lay tiles in a lot of different ways. This explains the wide popularity of the material.
No. 3. Concrete
No. 5. Asphalt
Due to its low aesthetics, asphalt pavement is used for those paths that lead to and are located in inconspicuous parts of the garden plot.
Advantages:
- low cost of opening;
- ease of care;
- high strength and moisture resistance;
- asphalt can be of several shades (besides dark gray, there are green and red).
The main disadvantage is not the most attractive appearance, but this disadvantage can also be overcome by rolling pebbles or other nice stones into the asphalt surface when laying. In summer, as the ambient temperature rises, asphalt may soften and emit an unpleasant odor. Cracks may appear on the coating, but this often occurs due to violations during the installation process or when installation took place under inappropriate weather conditions.
No. 6. Wood
Wood is another natural and beautiful material that can be used to create original garden paths. Wood can be used in the form or cuts . The latter option will become an original decoration of the site, especially if you use saw cuts of different diameters and arrange them in a certain order.
Advantages:

Flaws:
- low moisture resistance, high likelihood of fungus development;
- low durability and the need for constant maintenance. Not only does the wood need to be treated with antiseptic agents before installation, but during operation the material will regularly need to be treated with protective agents.
To minimize disadvantages, it is better to choose the strongest and most durable breeds. The best option -. Its wood has moisture-resistant properties, is durable, has a beautiful pattern and a pleasant smell. You can also use oak- the leader in strength, hardness and durability, but it will cost much more. As a last resort, you can use wood from cut down garden trees, but you will have to work hard to process it. 
In order for a wooden walkway to last as long as possible, you need to pay close attention to the process of its arrangement. It is recommended to lay a plastic film over the sand cushion, which will reduce contact between the wood and the soil, reducing the risk of rot. It is better to leave small gaps between the saw cuts or boards: firstly, all the water will go into them, secondly, they are needed in case the wood expands, and thirdly, if you fill the cracks with sand, grass can grow in them, and this path decoration. 
No. 7. Garden parquet
Garden parquet, often called anti-slip, is a coating that has all the benefits of wood, but due to special processing it is more resistant to negative atmospheric influences. For the production of material use hardwood, which can additionally undergo heat treatment. The finished material is square (less often rectangular) planks, divided into sections. Sections can form a specific pattern.
Garden parquet planks must have ventilation slots, the size of which ranges from 1.5 to 8 mm: the higher the humidity level during operation, the larger the gaps should be. The surface of the material has anti-slip profile, so decking can be used to arrange paths around. Installation involves the use of special supports, the height of which is adjustable, which allows smoothing out differences in elevation levels on the site. The type of fastening depends on the substrate of the garden bag. Hard parquet has a completely wooden backing made from the same species as the front part. Soft parquet It is distinguished by the presence of a soft lattice plastic backing with special fasteners, thanks to which such material is mounted very quickly and easily. 
Advantages:
- durability. By using durable wood species and treating them with special substances (sometimes heat treatment is used), a high service life of the material is achieved (up to 50 years);
- high strength;
- environmental friendliness;
- beautiful appearance, because the color and texture of the wood are preserved;
- the presence of an anti-slip profile;
- resistance to rot and moisture;
- ease of installation and maintenance;
- warm surface and quick drying.
There are not many disadvantages to the material. For longer-term preservation of appearance and performance characteristics, garden parquet is better Treat with special oil twice a year. If you choose decking made from heat-treated wood, the material will cost many times more, but will also last longer.
Can also be used to organize garden paths wood-polymer composite decking. It is made from a mixture of sawdust or wood flour with a polymer binder, to which dye is added and the material is formed into the desired shape and size. This is a less environmentally friendly, but more resistant to external factors material that does not require additional care. 
No. 8. Plastic tiles
To produce plastic tiles, polypropylene or polyvinyl chloride is used. The material usually has a square shape with dimensions of 30*30 cm and a lattice structure. It fits thanks to the presence of special grooves on each element. Some samples are even stuck into the ground, so they can be used to organize temporary paths.
Main advantages:
- ease of installation;
- resistance to moisture and sunlight;
- frost resistance;
- non-slip surface;
- light weight.
Among the disadvantages of the material low aesthetics and durability. Plastic tiles are ideal for organizing paths nearby.
No. 9. Ceramic tiles and porcelain tiles
No. 10. Gravel and tree bark paths
The easiest way to arrange a path is from bulk pavement, which include: gravel, stone chips, and tree bark. You don’t have to level or check anything - you just need to pour the material where the path should go. The gravel is laid on the prepared base in several layers, each of which is carefully compacted with a roller or vibrating plate. It would be a good idea to use it under cover to prevent grass from sprouting.
Advantages:

Flaws:
- low strength. Gravel will not withstand significant loads, but it is suitable for walking, so the material can be used for arranging secondary paths;
- difficulty in maintenance, because gradually the gravel becomes overgrown, clogged, and it is impossible to sweep it;
- At first, until the material is very compacted, it will be difficult to walk on it.
You need to be prepared that over time you will have to add new gravel, and it will be impossible to do without it, because they give shape and prevent the material from spreading throughout the entire area. To prevent grass from growing through the gravel, the soil underneath can be treated with herbicides or the soil can be covered with agrofibre.
Alternatively you can use expanded clay gravel– an environmentally friendly material obtained by processing clay rocks. It is lightweight, has good frost-resistant properties, and is inexpensive.
Bulk paths can be constructed using tree bark. This is a natural and pleasant material for walking, but it will need to be added periodically, as it is easily blown away by the wind. The same applies to pine nut shells, which have recently also begun to be used in landscape design. 
No. 11. Tennisit
The red and yellow material used on tennis courts has recently begun to be used for organizing garden paths. Tennisit consists of clay, crumbs and lime. After laying, the material absorbs water and swells, forming a dense solid structure; it must be compacted with a vibrating roller.
Main advantages:
- soft and injury-proof surface;
- high strength;
- ease of care;
- ability to absorb moisture;
- environmental friendliness.
Flaw– formation of dust and cracks during drought, so in hot weather the paths will need to be watered periodically. Sometimes you will have to add and re-compact the coating. 
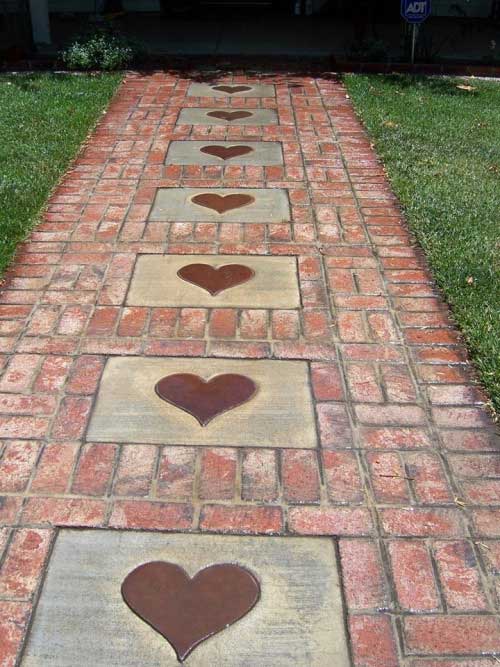
No. 12. Cobblestones
In the garden you can create a real pavement from large round smooth stones. Such a path will look excellent; laying the material is no more difficult than brick, and interesting patterns can be created from cobblestones. The material is characterized by high strength, durability, resistance to temperature changes, and is not afraid of moisture, but it is not suitable for arranging driveways. Cobblestones can be combined with pebbles. 
No. 13. Grass
A path can even be created from grass, although not ordinary, but resistant to trampling. Such a path will require additional effort to care for it, but will become a non-standard decoration of the site.
Advantages:

Minuses:
- ongoing care;
- Even the most durable coating gets trampled over time.
It is better to make grass paths wide so that they are trampled down more slowly. Of course, grass is not a material for main paths; it is better to use it where the traffic intensity is low.
No. 14. Available materials
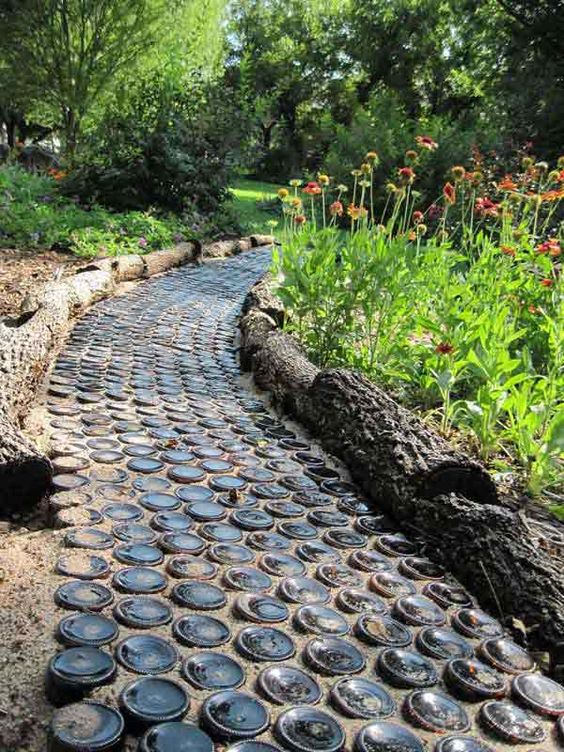
A garden path can be created at a minimum cost, and sometimes even use unnecessary materials that are usually thrown away as a base. The result is original paths, and their creation turns into an interesting creative process. You can use river pebbles, plastic bottle caps, wine corks and any other materials.
The choice of material for garden paths should be preceded by a planning stage, during which the location of the path, its shape and function are determined. Taking into account these factors, as well as climate and terrain conditions, you can proceed to choosing the most suitable material.
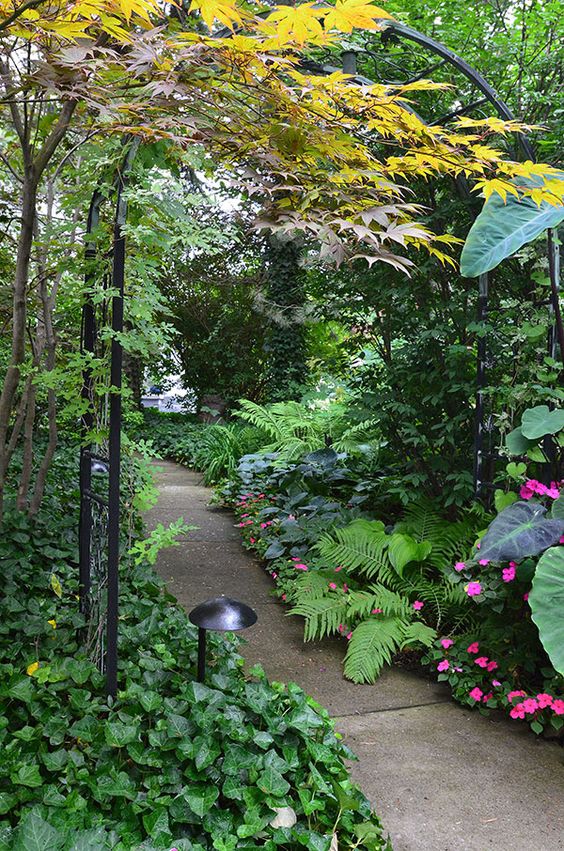
Garden paths on a dacha, personal plot or in the courtyard of a private household are not only an important element of landscape design, necessary for comfortable movement between objects of the territory, but also a way of zoning and decoration. The correct arrangement of garden paths will allow you to spend as little time and effort as possible moving between elements of landscape design, and a beautiful, practical and durable design will allow you to decorate your yard or summer cottage, create a creative design that will be the envy of your neighbors and the pride of guests of your urban or country house with an adjoining house territory. Even in a small private courtyard, paths are necessary for safe and comfortable movement between the main and secondary objects of the territory - a country or city house building, a garage, a gazebo, outbuildings, a children's corner or playground, a swing, a barbecue area, a swimming pool or a pond.

Requirements for garden paths
If we talk about physical parameters, then the main requirement for the paths of the local area and garden plot is the shortest distance from one object to another. But often this criterion runs counter to the aesthetics of landscape design - winding paths look beautiful, romantic and even mysterious, but at the same time they make up a longer path than their counterparts with clear straight lines and turns.


Conventionally, all the paths of the site are divided into main and secondary. The requirement for the width of the path also depends on the functionality of the path - the main ones are usually made with parameters of 1-1.5 m, and the secondary ones can have a width of at least half a meter. But a lot depends on the material used to make the garden path - if standard-sized pieces are used (bricks, concrete or stone slabs, “garden parquet” or any other products with non-variable dimensions), then the width of the path is determined by their quantity.


If we talk about the aesthetic qualities of garden paths, then they must externally correspond to the general design concept of the yard or site. If natural stone is used in the design of the façade of a house or other buildings, cladding areas and patios, then it would be logical to use this material or its combination with other raw materials for laying out paths.


In addition to its main function - providing the opportunity to move freely between objects of the local area and dividing the site into segments, or otherwise - zoning, garden paths also play the role of decorative elements. With the help of an original choice of material or method of execution of country paths, you can not only create an exclusive landscape design for your site, but also bring your creative abilities and design ideas to life.


Types of garden paths
According to the type of material used, all tracks can be divided into the following groups:
- concrete;
- stone (in turn divided into those made of flat stone, pebbles, paving stones and other types);
- brick;
- wooden;
- from waste material (plastic caps, parts of glass bottles, corks, etc.).


The material for the paths is selected based on the design of the main building (its facade), other large-scale buildings in the yard or on the site, the style of execution, the size of the paths themselves and the capabilities of the owners (a stone path will require financial investments, and a path made of bottle caps will only require time to collect them ).


In addition to the material, the criterion for dividing the tracks is the method of execution - they are divided into solid and non-solid. The name speaks for itself. The type of paths will depend on their length and purpose - whether the paths play an exclusively practical role or also carry a decorative function.


Also, all country and garden paths can be divided into two types - temporary and permanent. Most of the paths involved in landscape design are permanent. But in some cases there is a need to lay paths, for example, only during the summer season. Ready-made tracks are most often made of rubber or plastic and are sold by the meter or in blocks (sections, products) connected to each other like puzzles.

Preparatory work
Regardless of how long your paths will be, what material they will be made of and in what manner, any execution will require preparatory work. First of all, you need to draw up a plan for the location of the paths on the site. This can be done either on a regular sheet of paper or in a special program, which is not difficult to find on the Internet. Indicate on your plan all the elements of landscape design - not only the main buildings and sites, but also the location of flower beds, beds, and utility objects.


While laying the still drawn paths from the main objects to the secondary ones, you can optimize the location of flower beds, beds and temporary plantings, in order to reduce the distance between objects or connect some elements into zones. As you draw up the plan, it will become clear which segments can be united by a path leading to them, and for which areas of the yard you will have to use branches or pave areas. Only on paper it may seem that a rarely visited corner of the garden or yard can do without a path - imagine your reluctance to walk on the ground after rain, and you will find the resources to make even a very narrow path.
Next comes the markings on the ground. This stage should not be neglected, especially in cases where not only the length, but also the width of the paths will be clearly regulated by the parameters of the material - slabs, bricks or any other standard blanks. The easiest way to mark is using pegs with a stretched rope or cord. To make the outlines of future paths more obvious, the boundaries can be outlined with lime.


The ideal option can be obtained if, together with marking the paths, it is possible to place marks for planting trees and shrubs, plants that will frame these same paths. On the ground, everything looks a little different than in the program or on a piece of paper. You can lay out stones with inscriptions of the names of trees and shrubs or use them to indicate the layout of future flower beds.

The foundation pit for any path should be slightly wider than the path itself. In order for garden paths to last as long as possible, it is necessary to lay a border of stones or concrete along the edges.


Base for garden path
You should not neglect this stage of work if you want the path you have laid to last for many years, and not begin to crumble or sprout grass after the first season of use. When preparing the foundation for garden dredges, it is important to remember that they should have a slight slope to drain rainwater. The presence of a small drainage trench on the side of the slope of the paths will be an excellent help for the entire landscape design of the yard or area during rainy weather.


So, it is necessary to carry out the following manipulations to prepare the base for the garden path:
- remove the top fertile layer from 2 to 20 cm (it all depends on the quality of the soil, length, tires and material for laying out the paths);
- wooden boards are installed along the entire length of the walls of the resulting pit, having previously added a little sand underneath;
- if the width of the path is limited by concrete curbs, then they are leveled and fixed with reinforcing bars (to prevent shifts), which are driven inside the pit;
- if the soil on your site is very loose and the walls of the trench are uneven, you will have to drive reinforcing pins along the edges of the walls, and then install curbs;
- then fine gravel or crushed stone, previously mixed with cement or sand, is poured onto the bottom of the trench, leveled and compacted (layer thickness from 5 to 10 cm);
- For more thorough compaction of the gravel layer, it is necessary to wet it periodically.


An example of designing a beautiful and practical garden path
Let's consider the option of arranging garden paths made of brick, as the most affordable and easy-to-use material (if you have the opportunity to use used bricks rather than buy the material).


A brick garden path is a fairly durable, strong and aesthetic surface that even a homeowner without special skills and experience can make on their own. The brick path is laid out according to the same principle as paving slabs or paving stones. In order for the path to last as long as possible, choose high-quality clinker bricks and carry out all work with a high level of accuracy.


So, you need to go through the following algorithm of actions:
- the prepared base with a compacted top layer of sand must be carefully leveled using a rule (a homemade device made from a board with a perfectly equal surface);
- Next comes the installation of side bricks (in relation to the width of the path), they are mounted edgewise and driven into the sand half their width using a rubber hammer;
- if your path does not have a border, then the side bricks must be fastened with mortar (use formwork, after removing which you need to add crushed stone and compact it at the end of this part of the work);
- Next, the brick path pattern is directly laid out (it can be placed edgewise or laid wide);
- Usually, to create the most rigid and durable masonry, one row of bricks is laid along the path, and the second - across. Also, to increase the strength of the masonry, cement-based street glue is used (it will help not only hold the bricks together, but also prevent grass from growing through the products).
- You will need a little solution, because... it is necessary that it does not protrude to the surface between the bricks, but is located inside the masonry;
- upon completion of the installation of bricks, the gaps between them are filled with sand using a large brush;
- In order to add brightness to the resulting brickwork and extend its service life, the surface must be coated with a penetrating primer, and after it has completely dried, with a varnish for street stones.


And finally: some original ideas
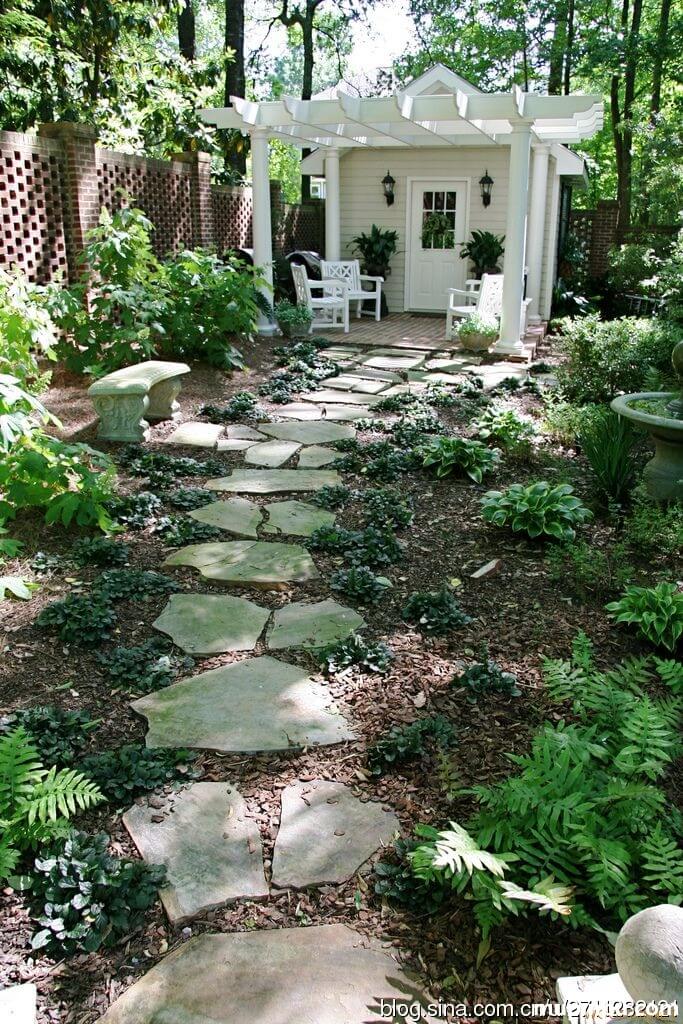
In modern landscape design projects for areas of various shapes and sizes, design styles, you can often find garden paths laid out in the style of stepping stones. It is as if you are moving along the elements of the path in the form of individual slabs, flat stones or cuts of logs that arise directly from the lawn or loose material of the path base. It’s easy to make a beautiful, modern and at the same time functional path with your own hands if you use so-called “steps” made of concrete of various shapes.


In this case, the combination of materials looks original. For example, clear edges and sharp corners of concrete square or rectangular slabs or flat stone against the background of rounded shapes of river stone - pebbles. Together, these two types of materials provide an organic and attractive alliance for creating creative, yet practical surfaces.


And “steps” made of wooden slabs look luxurious on fine decorative gravel in snow-white shades. Against the backdrop of bright green lawns, such paths will look especially impressive...

Wooden garden paths are not that uncommon. Only recently, so-called “garden parquet” is increasingly being used for modern landscape design projects. The material consists of standard-sized pieces that are very easy to connect together to create not only a durable and wear-resistant, but also an incredibly beautiful coating. “Garden parquet” is used not only to create paths, but is also laid out on open verandas, platforms, terraces and patio or barbecue areas. The wood in such products is processed in a special way - it is not affected by the usual “natural irritants” - moisture, temperature changes, direct sunlight.


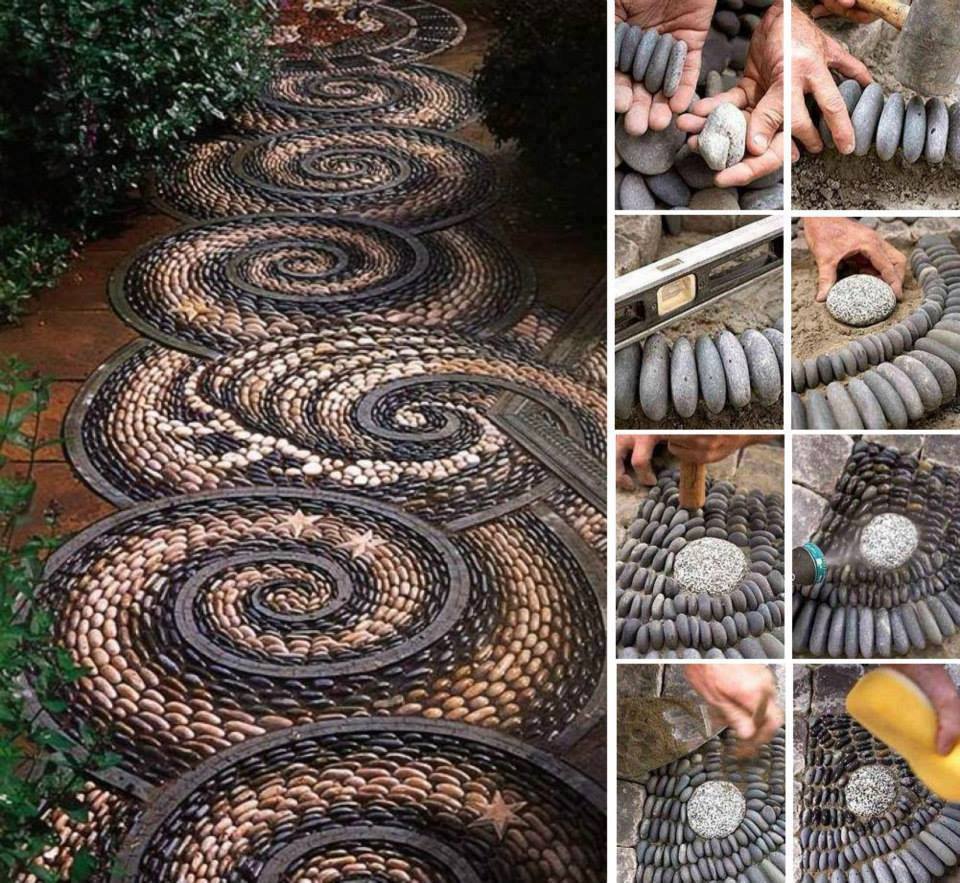
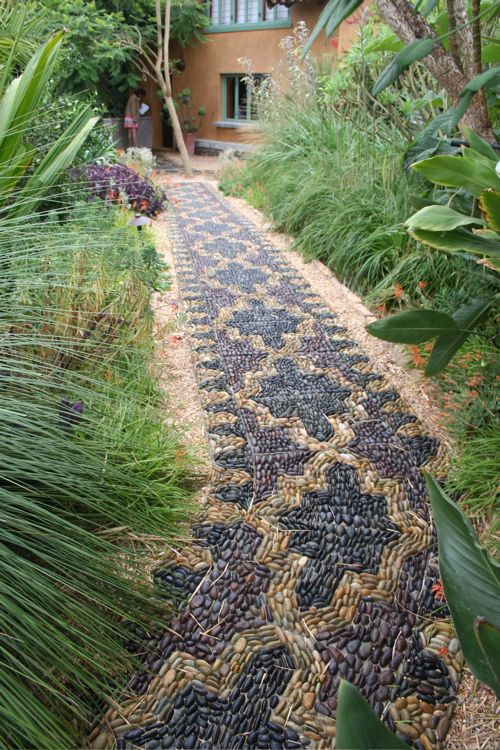
Laying out designs from round river stones (mainly Altai blue) allows you to create not only original paths, but also bring the beauty of the creative process into the design of your yard or summer cottage. Round river stones of various sizes from very light gray-blue to dark like anthracite can be laid out in fancy abstract patterns or prints with quite clear geometric patterns. Creating such a path will require not only financial, but also time, incredible accuracy and a lot of free time. But all efforts will be more than compensated by the incredible aesthetics of the paths and their uniqueness.


An equally original effect can be achieved by laying out a pattern from the remains of porcelain tiles (products for flooring, street use). The advantage of this method is not only the originality of the result and the freedom of your imagination, but also the saving of the family budget, because not only leftovers are used, but fragments from tiles of different shapes, sizes and colors.


A path created exclusively using loose gravel may not surprise your guests or neighbors, but it will help save the family budget. It is only important to install strong, solid borders that will hold small fractions of stone inside the trench.


Friends, in this photo selection of ideas for country paths, I would like to introduce you to 35 economical options for their design. Budget does not mean bad, because even without a large sum on hand, you can create an ideal plot and equally ideal paths and paths at your dacha.
We all know that old paving stones and bricks left over from buildings usually go to landfill. But if you clean them and put them in proper shape, then all the paths in your dacha can be paved with such materials.
Simple stone pebbles, found in abundance in rivers, can also become the basis of your country house path. We also add rectangular cement step slabs here and get a beautiful, gracefully curved path.
Returning to bricks, I would like to note the red clay pre-revolutionary brick, it’s just a treasure! And if you pave your paths with this material, then your path will last for centuries. Previously, bricks were made conscientiously.
Crushed stone mixed with cement rectangular stepping blocks can also be an excellent option.
The basis of a budget path can also be broken bricks, the main thing is to connect them beautifully with each other, to create some semblance of a common outline.
Round stepping blocks can also look beautiful, which can be placed as a passage through a pond or just on the lawn. The base is cement and leftover building materials.
The boundaries of brick paving can be uneven, this will give your economy path a special decorative effect.
Sometimes you can buy broken flagstone at a fairly attractive price, and use it to make a real work of country art on a cement base.
Having a grinder on hand, you can cut old bricks into squares and create a combination of rectangular and square blocks.
An original solution for the design of a path in a country house can be a brick border and a central embankment made of crushed stone.
I deliberately do not show completely dubious options for cost-effective paths made from boards; after all, there must be some kind of rationality. In areas where stone is found in abundance, even ideas such as those in the photo above can be implemented without any investment at all.
It is important to understand that even flagstone can be found at an affordable price, if you have the right attitude.
Returning to the old red brick, it can be “mined” from the ruins of former collective farms. Or you can buy it cheaply from stalkers - villagers who make their living by dismantling these buildings.
Well, river pebbles can be washed in any river or stream, not at once, but the riffles are full of such material.
And I generally consider cement walking paths made from squares to be the easiest way to create a design in a dacha.
Even an imitation of flagstone is obtained from simple cement with some artistic taste.
Various dyes mixed into cement will give your economy path completeness and attractiveness.
If you have a large tree growing on your property, then for a couple of seasons you can make paths from the cuttings of this tree. Beautiful and economical.
By combining fragments of flagstone and small crushed stone you can get this stylish country path.
You can plant lawn between the slabs to add artistic appeal to your path.
In general, I would advise you to sow all unoccupied areas on your summer cottage with a lawn. Cut grass is better than dirt, in my opinion!
An interesting idea - the base of the path is made of cement, and on top there is a decor of flat large pebbles.
In some cases, even impregnated boards can be a wonderful option for an economical country path. The same applies to timber and old logs, only they will have to be treated first.
The beauty of a suburban area is achieved through competent landscape design. One of its main elements are garden paths, which have not only a decorative, but also a utilitarian purpose. The design of paths is considered the main direction in the improvement of private territory.

Peculiarities
When wondering what type of paths to choose and what material to make them from, you should first of all figure out what the final purpose of the coating is. For your site, you can use one type, suitable for both decorative and economic purposes, or you can choose different overlapping types of paths for the entrance area, vegetable garden, recreation area and garden.

photos
The material should be selected based on the specifics of the site. If this is a large residential country house made of brick or stone, then the paths can be laid out wide, echoing the facade. At the dacha, you can get by with narrower paths made from available materials.


When creating a territory planning project, it is important to take into account a number of factors that should definitely be emphasized with the help of well-designed garden paths.
- The choice of the type of material, as well as the actual configuration of the roadway, depends on the terrain features of the site. If there are high hills, depressions or sloped areas, you should think about steps and ladders.
- It is necessary that the transition network have a complete compositional appearance. To do this, all landscape elements - ponds, alpine slides, recreation area, entrance area, vegetable garden and outbuildings must be combined into a single system.
- It’s good if the path offers an interesting view of the elements of landscape design, small architectural forms, and decor on the facade.


- The roadway should not break off or run into a fence; ideally, it has a closed system or leads to an architectural element - a bench, statue, pond or fountain.
- You should not create a plan for a network of paths with forks, nor should paths cross a large lawn sown with grass.


- The width of the pedestrian path must be at least 70 cm. The crossings in the economic zone are wider, as they must be sufficient for transporting wheelbarrows and small agricultural machinery.
- The entrance area from the gate to the porch of the house is finished with beautiful wear-resistant material due to the high operational load.

photos
- On a large area, you can pave wide paths that will diverge into narrower ones; on a small area, it is better to organize a network of paths around the perimeter and diagonally.
- A road surface with a curb looks heavy and also causes difficulties when mowing. It is best if its level coincides with the ground level.
- You should not choose slippery materials, as after rain the paths will become dangerous.

- To prevent puddles from forming on the surface, it is necessary to consider drainage using expanded clay or slopes during installation.
- It is better to provide the utility area with straight passages, and the garden with winding paths. This way you can achieve convenience in the first zone and a romantic, mysterious atmosphere in the second.
- It is important to select the type and material of transitions in harmony with the general design ideas presented on the territory. Gazebos, benches, fences, the facade of the house, outbuildings and paths - a single ensemble of a suburban area.


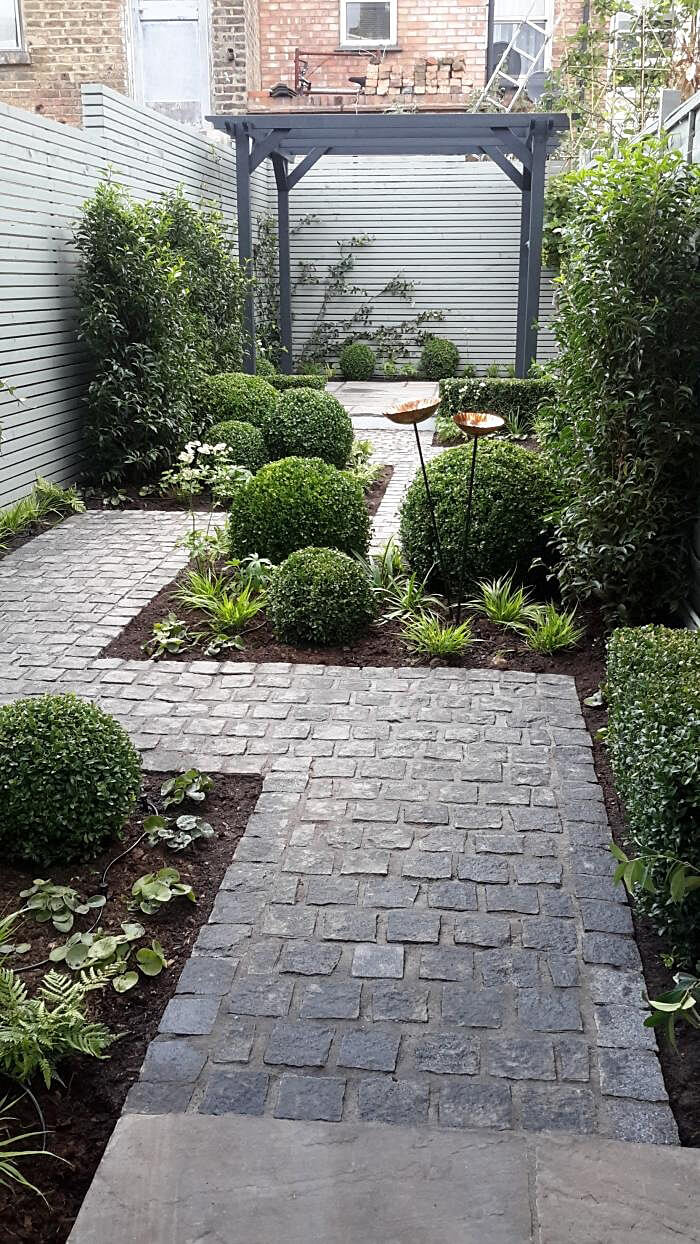
Types of masonry
The features and types of masonry largely depend on the chosen material. The shape, size, and color of a unit of the source material allow you to create a variety of patterns on the canvas. Natural stone with uneven edges and a rough surface will look as natural as possible, while brick and paving slabs are reliable and utilitarian.

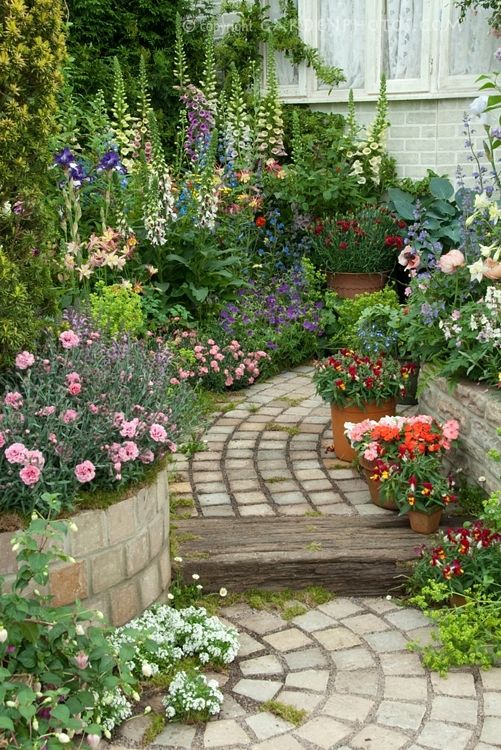
If you approach the issue of paving garden paths creatively, you can create combined solutions or options from waste material. For example, large slabs of flat natural stone or artificial tiles are laid out according to the plan of the path lines at a distance of a step from each other. The area around is covered with pebbles or crushed stone. This technique saves money on purchasing expensive stone on a large scale, but protects shoes and feet from dirt and water after rain. In addition, such paths look good.

If wide slabs are placed more compactly, the gaps can be lined with multi-colored gravel, forming interesting patterns. This road surface looks elegant and can be used both in the garden and commercial parts of the territory.


Using only pebbles, you can lay out an entire monolithic Persian carpet. This kind of work is very labor-intensive and painstaking, but the result is worth it. It is not necessary to cover the entire road surface with such a “carpet”; you can confine yourself to a recreation area or an entrance area, make special islands to place benches, or lay out an area next to a pond. Combine the remaining passages with large stone slabs.
Owners of a beautiful lawn can make the landscape design of their site as natural as possible, but at the same time avoid dirt after rain. Place large or small stones so that the grass cover breaks out between them. In places of high humidity you can even grow decorative moss. This find looks very exotic.


Mixing different textures and materials is very convenient, beautiful, and most importantly, profitable.
Remains of bricks after construction, river stones, pebbles, large flat stones, cobblestones - all this can be part of one path. The grass that comes out from the paving elements does not have to be lawn. Decorative low-growing flower plants can become part of the composition. It is unlikely that such a path can unite utility rooms or become an advantage of the entrance area, but it can lead to a secluded corner of the garden.


If after renovation there are a lot of unused or broken tiles left, this is an excellent reason to make paths with a mosaic effect. It’s good if the tiles are colored and variegated, then you can create amazing and bright carpet-paths that will enliven and ennoble your suburban area and make it cozy. If the required number of ceramic fragments is not available, then it is better to make small concrete tiles that can be placed in the garden at a distance of a step from each other.


The terrace path is gaining popularity. Even rows of wooden boards with neat joints look very original. Wood does not heat up as much in the sun as stone, concrete or asphalt paths; it is pleasant to walk on it barefoot in any weather. However, this option is not considered cheap.


Finished products, such as paving slabs or paving stones, require standard installation solutions. In this option, you can only be creative in choosing the color of the tiles. Brick is more widely used in terms of laying. It can be laid directly or offset, diagonally in relation to the main line, in a parquet way, in a circle, in a scaly way or Venetian masonry, and can also be combined with other materials.
A non-labor-intensive, and most importantly, budget-friendly type of installation is paths made of crushed stone. Such material is not afraid of any twisting turns or bizarre shapes. The path can be as wide or narrow as desired, harmoniously blending into elements of landscape design, for example, becoming part of an alpine slide.

Very often, craftsmen pave paths in their dachas with waste material. Caps from plastic bottles, bottoms of glass jars, rubber tires, sawed logs, pallets - everything can become material for a road and path network. However, you should be prepared for the fact that such tracks will not last long.


Design style
It is very important that the design of the path matches the landscape design as a whole, and also echoes the facade of the house and utility rooms. At the same time, it is important that already at the planning stage the lines of future transitions support the composition.
English
The British can rightly be considered the most rational in this regard. Gardens in Great Britain are the standard of rationalism and compliance with all proportions. English paths, as a rule, do not have straight lines. Curved, curved paths intelligently lead strollers to the most beautiful corners of the garden, while allowing them to enjoy the promenade and the best views.
The material for laying paths is usually brick or natural flat stone. The elements are laid end to end, and the gaps are filled with concrete mixture. Very often in English gardens, paths on both sides gracefully surround a flowerbed or alpine hill.

Also considered a classic example of the style is the presence of a labyrinth with hedges and a green lawn in the garden area. It is important to play up such elements using transitions.
Regular
Gardens of this type are characterized by complete symmetry and usually have a special decorative element in the center, which serves as the main attraction - a fountain, a statue, a topiary tree. Please note that this style is applicable to large areas.
Garden paths in a regular style are the main guides, which outline the entire area with straight, clear lines, defining geometry and ideal order. In the traditional sense, a garden in a regular style does not have a lawn, and it seems that there is no land on such a site. Strollers can enjoy the perfectly trimmed hedges, representing a labyrinth, as well as small architectural forms - statues, fountains.


The network of paths is an intersecting monolith. Not a single blade of grass should break through to the light. The material used is paved stone, pebbles, and modern options include paving slabs and brick.
Japanese
Garden paths in the Japanese style have various modifications; natural materials, such as large flat stones, pebbles, and wood, are best suited for their creation. The path and road network, as a rule, has a winding shape and can be interspersed with small areas with flower beds, a rock garden or alpine slides in an appropriate design.
Most often, oriental-style paths have a combined look. This idea is perfectly supported by huge boulders that can be placed on both sides of a simple pebble path. You can also include wood flooring elements.


If there is a pond on the site, a path can be laid through such a pond. This is a purely Japanese technique, it looks very impressive and atmospheric. In this case, large flat stones or wooden flooring are suitable.

Country
Rustic style involves the use of natural materials to create garden paths. Wood cuts, stone, pebbles, and crushed stone are great for this. There should be nothing complicated or pretentious in the design of a road and path network; it should be based on practicality. Flower beds and decor from peasant household items will help create coziness on the site.


Modern directions
Small-sized courtyards of urban private cottages and townhouses have become the reason for the transition of high-tech and minimalism style from interiors to exteriors. Small enclosed areas serve as an excellent basis for creating a fashionable and unusual garden near the house.
In such an area, materials with a pronounced artificial origin look best - these are large-sized porcelain stoneware slabs, concrete, and modular elements.


There are options in which the lawn is completely absent, and the diversity of the landscape is achieved by combining materials, free-standing trees, low-growing plants that seem to grow directly from concrete slabs, as well as decorative elements and small architectural forms. Thus, the road network in such courtyards acts as a whole monolith, which covers the entire area.
But the presence of a lawn in such gardens does not look ordinary. There is no road network in the usual sense; the rolled lawn takes a strictly geometric shape and is located directly on the path as a kind of flower bed.

Materials
It is very difficult to single out one universal material that would be suitable for any site. After all, the design of garden paths largely depends on the style of landscape design, the facing material of the residential building, the size of the plot, its length and width. In addition, important criteria are wear resistance, performance, safety, ease of installation, and the ability to carry out partial repairs.
The road and path network can be made of the following materials:


Paving slabs
The raw materials for the finished product are specially developed, taking into account the possible influence of various aggressive environmental factors. Thus, a path paved with paving slabs is extremely wear-resistant, is not afraid of strong temperature changes, is moisture resistant, remains strong in the scorching sun, does not emit harmful substances, and is safe for human health.
Manufacturers of such products offer various forms of elements for laying paths: brick, square, diamond, hexagon, coil. In addition, a coloring pigment is added to the mixture, which also allows you to add variety to the design of the transitions.


Tree
Paths can be made of wood that has undergone different processing methods. These include transverse log cuts or round timbers that are dug into the ground, ordinary boards laid out according to the terrace principle, timber, home-made options from pallets, bamboo stems, as well as special garden parquet.

Wood is a very delicate material; a humid climate and temperature changes can destroy it, mold can form on it, and the base can rot.
Therefore, already at the installation stage, it is worth considering a good drainage system, treating the wooden elements with an antiseptic and bitumen mastic, using metal supports, and raising the flooring itself slightly above ground level. The final stage will be coating the flooring with varnish.

A natural stone
Paths paved with natural stone look especially harmonious and elegant in the garden. This material is quite expensive, but there are options in which flagstone can be organically combined with pebbles, thereby creating unusual transitions and ensembles with flower beds or rock gardens. Also, shell rock slabs look great if they are placed at a distance of a step from each other, and lawn grass is sown around them. Thus, without disturbing the integrity of the lawn, you can lay a path to an architectural object or decorative element.

photos
Cobblestone paths allow you to create interesting patterns or imitate the streets of the old city or mountain paths. It is noteworthy that natural stone can be found in any style of garden design.


Brick
Brick itself is not considered a cheap material for laying paths on the site, however, if there is unused material left after the construction of a house or other outbuildings, it is worth using it for paths in the garden.
If you have ordinary sand-lime brick, you should prepare for the fact that it will not last long. Frequent temperature changes, periodic freezing and thawing will render the path unusable.


There is a special variety - paving clinker bricks. This type will last a long time, as it was created specifically for paving paths.

Concrete
The simplest, and most importantly, inexpensive and accessible material for creating a road and path network. Monolithic paths and platforms filled with even, smooth concrete mortar fit perfectly into minimalist designs or high-tech exteriors. For those who design their site in any other way, there are ways to diversify the gray ribbons of roads.
- You can use special forms into which the mixture is poured. This way it’s easy to imitate paving slabs or artificial stone of different types.
- You can add pigment to the solution, which will give an unusual shade and enliven the landscape.
- If you have pebbles or shells, you can also add them to the mixture. They will add texture and originality to the transitions.
- Mixing mica can create a sparkling effect underfoot. Reflecting the sun's rays, the paths will sparkle and delight the eye.
- From scrap materials you can make stamps that are imprinted into a semi-liquid solution, thereby leaving a beautiful relief imprint. Such stamps can be tree leaves or grass. The main thing is that the workpiece has a pronounced texture.
- You can lay out fragments of broken ceramic tiles and tiles on the concrete surface. The pattern can be arbitrary.
- The concrete mixture can be used to make slabs, which, after hardening, can be used to create garden pedestrian crossings. Plates can be round, square, oval.


Gravel
Gravel gravel paths are an easy-to-install way to create a road and path network on your site. In addition, the material itself is not expensive. By creating straight, strict lines, it is possible to support high-tech and minimalism trends in exterior design. Curved winding paths will undoubtedly lead to a Japanese traditional rock garden or rockery. Symmetrical paths with topiary hedges on both sides will decorate the regular style of the garden. In addition, gravel is perfectly combined with other paving materials - natural and artificial stone, cobblestones, concrete slabs, wood.


However, this material has its drawbacks. Coarse gravel has sharp edges that can hurt bare feet, while fine gravel easily spreads across the area on shoes. In addition, after rain, dirt from boots will certainly linger between the stones, and it is not easy to clean it out later.


Thanks to the variety of materials, you can apply a zoning effect on the site.
Pave the entrance front area with more expensive and noble natural flat stones, fill utility passages with concrete mixture or pave them with bricks, lay flagstone in the garden at a step distance or fill the paths with crushed stone. Such combinations will help add variety and save money without losing the beauty of the site.


Rubber mats or roll rubber coverings
The paths to the playground and the playground itself can be easily laid out with rubber mats. They prevent injuries when falling, are non-slippery, have dirt-resistant properties, water never accumulates on them, and therefore ice does not appear. Rubber crumb slabs can be used to pave the paths of the entire summer cottage. They come in different sizes and colors and are inexpensive.


Do it yourself
Before you start laying the material, it is worth drawing up a diagram of the site and drawing a plan for future paths. Based on the specifics of the terrain, the placement of a residential building, outbuildings, and the choice of material, a project is drawn up.
It is important to carry out all communications work on the site (water supply, sewerage, electrical cables) before the design of the paths begins, then you will not have to open the finished road surface.


Layout
For simplicity, convenience and clarity, you can use a computer graphics editor and see the future result in 3D mode. But a project drawn to scale on a piece of paper will help you decide how best to lay the paths.
The first step is to schematically depict a house, other buildings on the site, as well as small architectural forms that require an approach. It is important to maintain scale and take into account all sizes.

The paths with utilitarian meaning are outlined first - from the gate to the entrance to the house, from the house to outbuildings. It is worth considering that the most convenient routes are already trodden ones; major ones are routed along them.
Then there are paths from the entrance area to the recreation areas - a playground, a gazebo, benches, to the garden, and also to the vegetable garden, if there is one. The last thing you should think about is how to organize a convenient approach to the water source, to some trees, flower beds, and small architectural objects.


The width of the path should be at least 70 cm, in which case it will be convenient to walk along it. However, some agricultural equipment has wider dimensions, which should also be taken into account. If the material for the path is brick, paving slabs or any other material with clear dimensions, the width of the path will obey these parameters.


On the ground, planning can begin with a schematic representation of paths using lime. This technique will allow you to understand how much the intended width of the track meets your needs.
The next step will finally and clearly define the boundaries of the future road and path network. Pegs are driven in along the perimeter of the path, onto which the cord is pulled. The stage of preparing the base begins.


Preparing the base
Usually, before starting installation and construction work, the top layer of soil is removed from those areas where the path will lie. Thus, the future path will not rise too much above ground level and will allow you to create a harmonious landscape design, and will not interfere with mowing.
The section to be torn off should be made a little wider, since it is better to fence the path itself with a curb made of stone or concrete. This will add durability to the structure and maintain its presentable appearance for a long time.


Preparatory work is very important and cannot be neglected.
- The layer of soil that needs to be removed is approximately 15-20 cm. Be sure to control it with a ruler so that this value is the same throughout the entire path.
- Boards are installed along the perimeter, which in this case will serve as formwork. The boards must be held firmly and not loose. To do this, they can be sprinkled with sand and nailed to driven wooden stakes.
- When installing a concrete curb, no formwork is required. In order to install them evenly, use a building level. Fix the curb with reinforcing bars, driving them deep into the ground.


- The bottom of the pit is covered with a mixture of crushed stone, gravel, sand or cement and compacted. The thickness of the layer is 5-10 cm. To save money, you can also use construction waste as drainage - fragments of brick, slate, chipped gas silicate slabs, and so on. The main thing is that you then have the opportunity to compact the layer well, otherwise the base may sag over time.
- The next layer is geotextile. This material can be found on sale in rolls. It holds the shape of the top sand cushion and also prevents plant roots from growing through and destroying the garden path.
- Sand is poured so that its layer is slightly higher than the level of natural soil. If you need to add sand somewhere, then this must be done, since it is important that the surface becomes almost perfectly flat.
- To make a rule, you need a board with perfectly even and smooth ends. The length of the board is 20 cm greater than the width of the track. The lower corners are cut at right angles of 10 cm on each side to a depth equal to the thickness of the finishing material (brick, stone, tile). The formwork or curb will serve as a stop for the rule; the reduced end will help level the surface of the sand cushion without depressions or bumps at the desired depth.

When the base for the future path is ready, you can begin installing the decorative covering. The process of completing the work depends on the type of material.
To lay brick you will need a mallet with a rubber striker that will not damage the material. Installation of elements starts from the curb. The brick is placed on its edge and driven into the sand half its width. If the path option does not provide for a curb, you should dilute the concrete-cement mortar and fasten the bricks to each other. While the mixture hardens, reinforcing pins or adding and compacting crushed stone will help to securely hold the structure.
When the side bricks are able to hold the main composition, you should begin laying it out according to the diagram. It does not matter which side the decorative material will be laid on - edgewise or on the wide side.


It is necessary to continue to hammer in each brick with a rubber hammer at the level of the outer ones. This way you can achieve stability of the coating. For better adhesion, the elements can be glued together with a special stable glue for external use. This technique will also prevent the grass from sprouting. It is important that the glue is not visible from the outside and does not clog the cracks to the full depth, so the consumption will be economical.


Next, the gaps between the bricks are filled with sand, and using a garden brush, they are tightly clogged with it. The excess can be swept away. At the last stage, the formwork is dismantled, and the curb edges are covered with crushed stone, which is thoroughly compacted. The top of the canvas can be treated with a penetrating primer and a layer of varnish.


Paving slabs are laid in the same way.


A country-style log path requires dried wood of any hardwood species. It is important that all cuts are as smooth as possible, so they will have to be cut with the utmost care. The surface is sanded and rubbed.

The diameter of the logs may vary, but the more options there are, the better. This will give you a tight layer without large gaps. The height should be twice the depth of the pit without a sand cushion. Thus, the stumps should rise 10-30 cm above the ground surface.


A mandatory step in preparing the material is treating the bottom of the logs with an antiseptic, which will prevent the appearance of fungus and mold, and also slow down the rotting process.
It is necessary to pour an antiseptic into the container so that the log placed there rises 5-10 cm above the surface. Leave it for 3-4 minutes. The top is treated with a brush. You need to do this with each element, and then let it dry thoroughly.
The “Kuzbass varnish” treatment looks similar, but requires only a few seconds of dipping, and the top does not need to be treated, since this type of protective coating is not resistant to UV rays. But it will perfectly protect the part that is protected from the sun from rotting. The varnish can be replaced with heated tar.

Since the round timber is difficult to hammer into the sand due to its diameter, a sand cushion is formed along with the laying out of the logs.
When the hemp is processed and ready, you should begin installing it:
- a small amount of sand is poured around the perimeter of the pit;
- a round timber selected by diameter is firmly installed on the sand;
- it is poured between the stumps to the level of the ground surface;
- After installing the first row, you can proceed to the second and so on until the end of the track.


In order to pave the entire area in this way, a lot of wood will be required. This is not always possible, but a village path can be combined from wooden logs and crushed stone. To do this, a border is formed from round timber, and the center is filled with small pebbles.
In this case, the algorithm of actions will look like this:
- Stumps are driven in along the edge of the intended path with a prepared base and sand cushion. They can rise above the ground level, or they can go flush with it, it all depends on desire and style. Moreover, in some places the height may vary artistically.
- The central part of the path is covered with geotextile so that the edges at the level of the logs are turned up by 8-10 cm. In this case, it is better to spread this material after the layer of sand, and not before it. This technique will not allow the bulk crushed stone to mix with the sand cushion over time.
- Gravel or crushed stone is poured on top and leveled with a rake to the level of the soil surface.

Mosaic made of river stone is also an excellent option for decorating paths on the site. Such details are very small, so you will have to be patient before laying a beautiful path. Altai stone is suitable for such a path. It is smooth, comes in round and oval shapes, and has shades from light gray to dark gray.
First of all, you should sort the elements by size and color, this will help you decide on the laying pattern, and will also speed up the laying out process. You will also need a rubber hammer, water, a sponge and a level.
Garden paths are an integral attribute of any site. Without them, the surrounding area will look unkempt and unfinished. Therefore, they should never be neglected.
You can arrange the paths yourself, without involving specialists. How to make a garden path with your own hands? You will find out the answer to this question by reading this review.

Functions of garden paths and requirements
The tracks are designed to perform the following functions:
- they are needed to safely and comfortably move between all objects located on the site;
- with their help, the territory is divided into separate functional zones;
- This is another way to decorate the landscape.

As for the requirements, the main thing is that the distance between the connected objects be the smallest. At the same time, beautiful winding paths add romance and mystery to the atmosphere of the site, even if they make up a longer path.

Conventionally, all garden paths are usually divided into main (main) and secondary (auxiliary). Its parameters will depend on what type of path it is. It is believed that for secondary paths a width of 0.5 m is sufficient, and for the main paths this figure can vary from 1 to 1.5 m. However, the flooring material also affects the size of the paths.

Another requirement is that the design of the paths corresponds to the general concept of the territory. For example, if the house and other buildings are lined with natural stone, then it is advisable to make the paths with the same stone.

In addition, the country paths have the function of decoration. If you choose an unusual material or technique, you will get a unique decor that will effectively enhance your area.

Types of garden paths
It is necessary to understand the options for paths that can be created in the country. All of these types differ from each other in their characteristics, such as shape, color, appearance, material and its service life.

Unusual path made of wooden round timber
One of the simplest, but at the same time unusual materials for country paths are tree cuts. This is one of the most unusual ideas for decorating a summer cottage! The necessary raw materials can be easily obtained, either on your own site or in the nearest forest - there are plenty of old and fallen trees everywhere.

Here is a short step-by-step master class:
- Saw the tree into round timber with a diameter of 15–40 cm and a thickness of 15–25 mm.
- Remove the bark from the saw cuts and leave them to dry for 2 days.
- Impregnate the wood with special antiseptic compounds and treat it with a primer to protect it from water and harmful insects. Leave the workpieces in the sun to dry for 24 hours.
- Prepare the place for the future path by removing 5 cm of soil along the entire length and pouring a low cushion of sand.
- Lay the round timber so that large and small pieces alternate, and the seams between them are as narrow as possible. The path is ready!

Reliable stone paths
Reliability and strength are what natural stone is associated with. A rubble or cobblestone is suitable here - their service life is approximately the same. It is preferable to choose a winding shape for a garden path made of stone - this way it will look more impressive.

The path is made like this:
- We mark the future path.
- Remove the top layer of turf. The thickness of the removed layer of earth should exceed the height of the largest stone prepared for laying by 7–10 cm.
- We fill up the sand. Its layer must have a thickness of at least 10 cm. We level and thoroughly compact the resulting sand cushion.
- We lay the stones one by one and press them tightly into the base. Allowable seam sizes are up to 3 cm between small pebbles and up to 10 cm between larger stones.
- Fill the seams with cement. After it sets, fill them with soil or sand. And you can use it!

Classic made of concrete
Concrete is a classic type of road surface. Low cost and ease of further maintenance have made concrete paths especially popular. Every dacha owner can create them.

The work package consists of the following steps:
- Path markings.
- Digging a trench approximately 0.3 m deep.
- Laying layers of gravel and sand. The thickness of each layer is 5 cm.
- Laying the chain-link mesh.
- Formwork installation.
- Preparation of concrete mixture. To do this, take cement, sand, gravel and water in a ratio of 1:1.5:2:1.
- Filling the path with the prepared mixture.
- Level the surface and cover it with plastic film.

For 3–4 days, it is necessary to regularly wet the path with water - this will protect it from the formation of cracks. After the concrete has hardened, the path can be used.

Tile paths
Tiles for garden paths are used quite often. This is explained by its following advantages:
- aesthetics;
- variety of designs;
- high level of performance indicators;
- relatively low labor intensity.

The technology for creating such a path will convince you of the latter, which includes the following points:
- Marking the border of the path.
- Preparing the base. To do this, you need to remove the top 35 cm of turf.
- Laying geotextiles as a preventive measure against weeds.
- Construction of a sand cushion (10 cm). The sand must be moistened and compacted.
- Preparation of cement-sand mortar in proportions 1 to 3 to 1.
- Laying tiles. Lay out the facing material in a direction away from you, strictly following the marking cord.

After the path has dried, the surface must be rubbed and cleaned of cement residues. Don't forget to lay out a border for the garden path.

Wooden paths of different formats
Wood is a unique material for arranging country paths, since it can be used in a variety of ways. The preparatory stage is most often the same - you need:
- Mark the path and remove the top layer of soil.
- Lay geotextiles.
- Place a layer of gravel 10 cm thick on top.

Further technology varies. If you decide to make a path from boards, then you need to prepare the components. The lumber should be adjusted to size and treated with an antiseptic. Then, along the edges and in the center of the future path along its entire length, you need to install wooden supports and secure them with cement. All that remains is to nail the already prepared wooden elements to the supports and the path will be ready.

If you choose bark as a material for flooring, do not forget to make sure that the raw material is durable and does not crumble. Soak the bark with an antiseptic. Remember, such material should be laid on a sand base.

Brick garden paths
This material looks amazing in gardens designed in a modern style. There is a wide range of bricks, mostly in warm colors. In addition, clinker bricks are easy to lay and are durable.

Classic building brick, alas, cannot boast of such characteristics. It is worth noting that masonry should be carried out only on a concrete solution, otherwise the result is unlikely to please you.

Gravel as the main material
This option will allow you to experiment: narrowing and widening the path, combining different shapes and colors of gravel, creating ornate patterns and much more.

In addition, the material does not need to be laid or repaired: it is enough to simply replace the damaged part. We must not forget about the low price of the variation.

The following subtypes of gravel are distinguished: pebble, crushed gravel and traditional crushed stone.

Paths made from plastic bottle caps
Yes, garden paths can also be made from ordinary plastic corks. You will need:
- corks of different colors - a lot;
- cement, gravel and sand;
- special construction adhesive;
- lumber for formwork.

Here's a quick guide:
- Mark the boundaries of the future path and the selected ornament.
- Prepare a trench 10 cm deep.
- Install the formwork.
- Make drainage from gravel or sand.
- Prepare concrete. Add glue to the mixture in addition to cement and sand.
- Gradually fill the trench with solution, pressing the plugs in a certain order to create a pre-selected pattern. The lids should be recessed into the mixture to the same height.
- Wait for the concrete to dry. Remove any remaining solution with a stiff brush. Remove the formwork.

Such original plastic garden paths will become a bright accent in the design of the local area. They certainly won't go unnoticed.

Now we will figure out how to make paths in the country. Of course, before starting the main stage of work, you need to decide on the location of the tracks.

To do this, you need to schematically depict on a sheet of paper the paths leading from the entrance gate to the house and the main buildings. Next, you need to draw paths to other components, such as a house or playground.

The garden path should lead to the main objects in such a way that you do not have to move on “bare” soil, as this is not only unpleasant, but also detrimental to the seedlings.

Original ideas for arranging garden paths
The use of non-standard materials is an excellent solution in cases where you want to create an original landscape element at minimal cost. So, you can use bottles, fragments of ceramic tiles, round sections of trees, caps from plastic bottles, and this is just a small part of the materials for this.

In the latter case, it is necessary to collect a large number of lids and paint them in different colors. This option will allow the homeowner to experiment with colors and patterns that can be made from bright caps.

There are many variations of garden paths that you can place on your site. A wide range of products will allow the average buyer to choose a product based on his preferences and the amount of money he has at his disposal.

Budget track variations are not always inferior in their characteristics to expensive options. We must not forget about one more method - creating a path from improvised means. This method will allow you to originally arrange the site in such a way that staying on it is not only comfortable, but also enjoyable.
Photo ideas for DIY garden paths


What are the characteristics of rubber garden tracks?
Rubber tiles are made from recycled car tires. In terms of its characteristics and appearance, the material is in no way inferior to its competitors: the rough surface performs well in winter, preventing slipping. Another advantage is the possibility of sound insulation, which is why such tiles are often used on basketball and playgrounds. In addition, the material prevents the formation of puddles, and, very importantly, does not emit toxic substances. And the abundance of shades of the paths will help create a neat and beautiful path.
What are the features of paths made of plastic slabs?
Mobile walkways made of plastic are very easy to install and do not require covering underneath. The material is collected using fasteners, by adjusting which you can create a path of different widths and shapes. The connecting elements at the bottom of the slabs are quite large and firmly connect the elements, in addition, serving as a support.
The material has excellent characteristics: it prevents slipping and can withstand high and low temperatures. Since there are many holes on the surface of the tile, water flows directly into them, preventing the formation of puddles. In addition to being simple to lay, the slab is easy to assemble in winter and place in any outbuilding. By the way, several tiles can be laid in front of the front door in winter: the corrugated surface will prevent you from slipping and falling.
Ask your question