Hello, Dear friends! Today I will tell you how to make a bottle cutter for cutting tape from plastic bottles. For this homemade product you will need a piece of chipboard with holes drilled and two M6 bolts inserted.
We put three washers on each bolt.

The blade from a construction knife is the most important part of a bottle cutter.


Put on the washers and tighten the nuts. If you want to increase or decrease the width of the cutting tape, simply place it under the blade required quantity adjusting washers.

Secure the bottle cutter to the table top with a clamp.

First cut off the bottom of the bottle and make the beginning of the ribbon. Insert the bottle into the bottle cutter.

With your left hand, press the bottle down, and with your right, pull the tape without jerking.

From one bottle, it is possible to cut up to ten meters, very durable and useful in the household. plastic tape. The length depends on the size of the bottle and the width of the tape being cut.

Friends, I advise you to make this very simple and useful device for cutting plastic tape.
See you in new articles!
Many fans of making fishing tackle have already realized that plastic bottles are a good, and most importantly, affordable material for realizing their ideas.
I bring to the attention of readers a few more designs that I have come up with or seen from other fishermen, and I hope that they will be useful to many.Some of them can be done in a home workshop, others will help out if for some reason you find yourself on a pond without gear. Making them in hiking conditions it won’t take much time, and there are much more empty bottles on the banks of our reservoirs than we would like.
VERSHA-MALYAVACHNITSTA
It is intended mainly for catching minnows and other types of fish.
You will need two empty bottles with a capacity of two liters, sharp knife, scissors, awl or nail. To solder plastic parts, it is convenient to use an electric stove, but if you don’t have one, prepare a knife or scissors to cut the bottles for this operation.
The cutting lines should be as straight as possible. We will need parts I and II from one bottle, and part III from the other. In part II, using a metal tube 0 3-5 mm with a sharply sharpened edge, punch perforations on the entire side surface. Similar holes can also be burned with a hot nail or copper wire, wound around the soldering iron tip.
Insert part I into II, as shown in Fig. 2. The outer diameter of the part I must be equal to internal diameter details II. If necessary, trim any protruding edges with scissors.
Connect the parts by inserting a disc liner made of corrugated packaging cardboard between them, the diameter of which is equal to their internal diameter.
Press their edge against a heated electric stove burner, frying pan, etc. and, slowly rotating, achieve soldering of the edges, then remove the liner - this is not difficult to do, since it has three holes for fingers.
The hole in the center of the disk will help fix part I during the most important technological operation - forming the edge, providing the necessary rigidity.
Lightly melt the edge of part III so that it acquires additional rigidity, and connect it to the prefabricated part 1+11 (Fig. 3).

In camping conditions, you can simply sew the parts together using a needle and a piece of fishing line f6 0.3-0.4. In the upper edge of parts I and II, use an awl or nail to pierce three holes for attaching the bridle (Fig. 2), which is fixed with a rubber ring installed on the top.
Figure 3 shows the assembly and installation of the top. Don’t forget to put a piece of bread inside it - it will be washed away by the current, and it will attract potential baitfish from afar.
FLOATING JERRY
In Fig. 4 you can see that this is one of the varieties of the well-known circle, although I don’t dare call it that - it’s still the same plastic bottle. To make such equipment, you will need a bottle with a groove on its side surface. It works no worse than a traditional circle, and in some cases it even has some advantages: it has greater windage, and therefore speed of movement across a body of water.
A rubber ring serves as a clamp for the fishing line.
To prevent it from flying off during a bite, secure it with strips of tape in two or three places. A flag spring (for example, from an old alarm clock) is also attached to the bottle using adhesive tape. The flag can be made of any bright, quick-drying, or even better, waterproof material (a piece of Mylar cookie film is ideal).
Tie the main fishing line to the neck of the bottle and wind it into a groove on its surface. Press the flag against the bottle and secure it in this position with several turns of the main fishing line, which, in turn, is pressed with a rubber ring.
When bitten, the fishing line is pulled out from under the elastic band and unwinds from the bottle, releasing the spring of the flag, which signals that the predator has taken the bait.
Further actions are known to every fisherman. Assembly and installation of gear are shown in Fig. 5.
CASE FOR FLOATS
The case body is assembled from parts III and VI (Fig. 6). Its dimensions can be varied using bottles of different capacities.

Insert a foam insert with holes for the floats into part III; it should fit snugly into the body of the pencil case. The edges of parts III and VI must be given additional rigidity (see technology for making the top).
Two pieces of elastic attached to the body and lid will serve as a simple and convenient lock for your pencil case.
You can make a pencil case with lids on top and bottom. This will allow for more efficient use of its internal volume.
FEEDER
A plastic bottle feeder can be successfully used for both winter and summer fishing (for example, when fishing from a boat).
For the feeder you will need parts IV and V from the bottle of your chosen capacity. The body must be given additional lateral rigidity in the same way as when making the top (by slightly melting the edge). Among the diverse plastic containers you can sometimes find a suitable bottle that already has the required hardness and does not require additional processing, then it will be enough just to cut it to the required size and make holes on the side surface.
Cut the bottom from a sunflower oil bottle. You can make it flat by taking any suitable (not cracking in the cold!) material with a thickness of 2-3 mm.
Attach the lead weight to the bottom using a rivet, which can be made from a piece of ballpoint pen refill by flaring its edges with a soldering iron. Connect the bottom to the body through the winding ring.
Attach a swivel with a clasp to the screw cap of the bottle. To do this, insert the swivel into the hole made in the lid and secure it from the inside with a copper pin, as shown in Fig. 7. The winding ring 8 of the body can also be made from wire, and the clasp 7 from the first guitar string. Tie the fastener with fishing line to the body of the feeder.
In Fig. Figure 8 shows how easily you can attach the feeder to a winter fishing rod with a jig. You just need to make sure that the jig has a larger diameter than the eye of the swivel fastener.
In conclusion - a few more tips on the use of plastic bottles.
Two plastic bottles tied with a rope, or even better - with a wide ribbon, will help you stay on the water more confidently while swimming. They will also come in handy when teaching children to swim. Pass the bottles under your arms so that the tape goes around your chest, and calmly lie down on the water. Pre-adjust the length of the tape.
There is no need to talk in detail about how to make a buoy from a bottle and a cord with a load. On a clear day it sparkles with sunbeams and is very visible.
In cloudy weather, such a buoy will become more noticeable if a sheet of paper or mylar yellow or orange film is placed inside it.
When traveling, it’s convenient to store bulk products in plastic bottles - it’s hermetically sealed, and mice won’t get into them.
And if you are used to cooking with a primus stove, the bottle will serve as a light and odorless container for fuel. This is especially important for tourist fishermen who are looking for luck in hard-to-reach reservoirs and carry everything they need on their shoulders.
There is no need to bring the empty container back at all - it will burn in the farewell bonfire along with other garbage.
In this video, lawyer Egorov will demonstrate the capabilities of a fishing line made from a plastic bottle; his catch was trout. Pet tape is quite durable and big fish it won't break. The author of the video review treats this fishing as an interesting experiment and has no doubt that it is better to use purchased fishing line.
If possible, caught fish should be eaten on the spot - right while fishing. In nature, by the fire, everything looks more appetizing, and you will agree that the pestle tastes better the faster you cook it. The ribbon from the plastic bottle that was used was taken in such a bright color for greater clarity. It is probably better to use a transparent bottle, but as practice has shown, the bright colors of the tape hardly scare away the fish. In any case, this is just an experiment and of course it is better to use commercial fishing line.

So, using his hand, Egorov cut the bottle into strips into three-meter sections. He tied a hook to one end of the ribbon. Polyethylene terephthalate is not fluorocarbon and he recommends a regular bayonet assembly. You can attach a hook half the size to such a ribbon, but on the stream he always uses a large hook so that small trout cannot swallow it. After installation, the sinker is ready.
Many users of mowers, both electric and gasoline engines, some time after using a purchased fishing line, they wonder: what can replace it? If we exclude dangerous options (chainsaw chain, hacksaw blade, wire, cable, string, etc.) that can cause serious injuries to the user and others, then the best way out of the situation is considered to be a homemade fishing line from a plastic bottle.
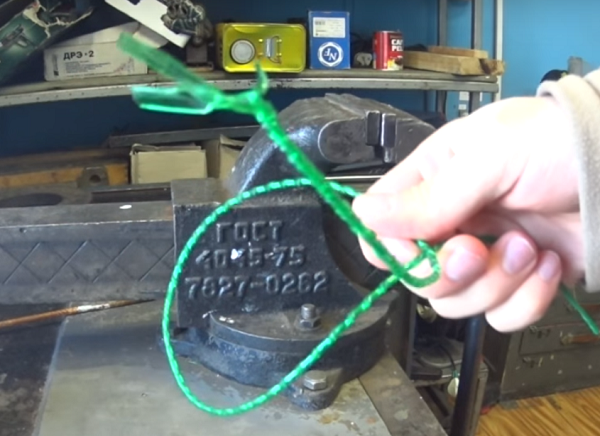
Before you start making a homemade cord, you will need to prepare the material itself, namely a plastic tape of the required width and length. To unravel a PET bottle onto a ribbon, various devices are used, the manufacturing algorithm for which can be found on the Internet. If you are going to mow large plots, overgrown with grass, and you will need a lot of homemade cord, then, of course, it makes sense to make a more complex bottle cutter from a corner or U-shaped aluminum profile . The process of making a bottle cutter is shown in this video.
But if mass production of plastic tape does not interest you, then from time to time you can dissolve the bottle into strips in a simple way.
Thus, all plastic container will unravel into a ribbon of equal width.
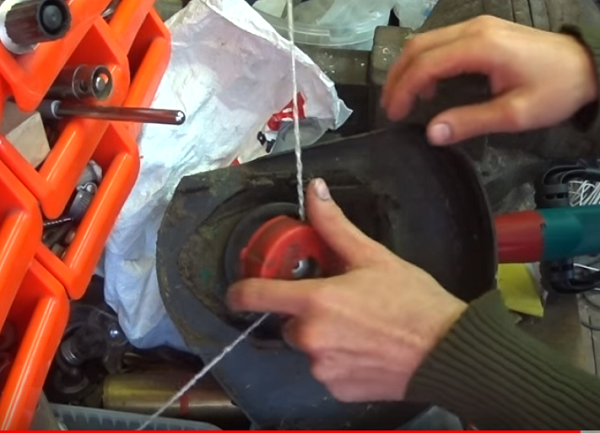
A pocket version of a bottle cutter, which you will always have at hand, can be made from ordinary pencil sharpeners, preferably made of aluminum. How to make it is shown in detail in this video.
How to make trimmer line
A cut tape made from PET bottles, if wound around a trimmer, will mow, but not for long, since it is fragile and breaks quickly. It needs to be improved a little, and for this you need to do the following.

As practice shows, a trimmer line made by hand from one twisted strip mows the grass well, but if stones or branches get in its way, it quickly wears out. To eliminate this disadvantage, recommended weave a plastic rope from several ribbons, for example, from two or three. The following picture shows a homemade cord woven from three plastic strips. Although it differs in thickness from a single cord, it is much stronger than the first and lasts longer.
Next, as usual, the trimmer line is inserted into the mowing head or wound onto a reel and then inserted into the head, after which the protruding ends are trimmed so that they do not touch the protective guard.


Thus, literally from scrap materials you get a free line for a trimmer, which can be made in unlimited quantities.
As a business person, I was fascinated by the topic of making rope from plastic bottles. A cool thing is to get a fairly strong rope (or rather PET tape) from an unnecessary plastic bottle, which is free and is the only way it is used in the household, and many people make all sorts of crafts from it, not just decorative ones. PET tape also has heat-shrinkable properties, which allows you to make strong connections and minor repairs, for example, repairing your wife’s mop and your own chair. Sometimes it replaces the irreplaceable blue electrical tape :)
Summer is coming, and you may need this free rope for household purposes. Moreover, it is very easy and simple to obtain shrink tape (rope) from an unnecessary plastic bottle.
I'll start by using the resulting PET tape from the bottle. I hope that Lawyer Egorov’s video will be inserted in the first comments; if you haven’t seen it, I recommend watching it, and this is where my acquaintance with PET tape began. I’ll describe where I personally used it, and who else has used PET tape, add it in the comments, it’s interesting.
In the apartment:
I fixed the mop - metal pipe type of joint cracked and came apart, I had to wrap it with a strip from a bottle and wrap it with PET tape and sit it on gas stove, it turned out neat and durable.
I repaired my chair - I wrapped it well where it was cracked and sat it down with a lighter. Save blue tape! 🙂
Classic - handles on pliers, wrapped and seated.
Instead of tape, I packed the wires into bundles and tied them cardboard boxes. Sometimes the tape runs out at the wrong time.
The pipe was leaking - the tap under the thread was cracked, took rubber glove cut it into tape, wrapped it tightly, then wrapped it with PET tape, waited for the plumber and he already turned off the water in the house and changed the tap.
Homestead farming:
This is not a plowed field, parallel to the garden twine, something to tie, tie, hang, pull, even used instead of nails when I ran out - I made a temporary greenhouse. We cleaned the young garden, made stools for resting in a couple of minutes, dragged branches and logs with an improvised thick rope made of PET tape, in any way easier than with our hands.
I like to go to the forest for picnics and just spontaneous walks with a group:
The bottles themselves were brought with water and or other liquids, they were emptied and used. Hang a washbasin from the same bottle from which you got the ribbon, tie stools or even benches and chairs, pull up an improvised awning from a raincoat or polyethylene film, collecting and carrying branches and logs is easier with a rope. While fishing, I set up an improvised sun awning from a blanket - I forgot my umbrella :) It’s natural to clean up trash after yourself.
In short, I don’t fanatically run with PET tape as an advantage, but I use it where there are unnecessary plastic bottles and no ropes, or it’s not rational and a pity to waste a normal rope, and PET tape will solve these problems. I don’t do mountaineering with such a rope. Waste household rope that you don’t mind, it’s also heat shrink and reuse plastic.
It is easier and faster to make a rope from a plastic bottle using a device or tool such as a bottle cutter. I will dwell on it in more detail.
I became infected with the idea after Lawyer Egorov’s video. But he didn’t make his bottle cutter, like other options from corners, washers, meat grinders, bars and pipes, etc. I don’t have a workshop or a garage, I don’t have such materials and tools, I have an electric meat grinder, I’m too lazy to make them, and I don’t really need a machine for cutting bottles. Therefore, I decided not to repeat it, but to make it even simpler, the most important thing available materials and more compact (manual), so that bottles can be cut into strips at the point where the rope is used. I have made many versions of bottle cutters, ranging from mini and micro to an ax bottle cutter. In order not to bore you, I will demonstrate the simplest ones to choose from...
The very first was a bottle cutter made from a pencil sharpener. It's very simple to do - unscrew the blade, turn the blade over, insert it into the sharpener at a slightly angle, screw it on without fanaticism, and you're done. Well, 20 seconds maximum. It is advisable to use aluminum pencil sharpeners, although I have already seen pictures on the Internet with plastic sharpeners; the blade was soldered into the body with a soldering iron.
I immediately noticed that a sharpener is not a bad tool when hiking - you can easily get shavings from a dry stick and use it as kindling for a fire or even tinder. Therefore, this option began to be positioned for me as a hiking, lightweight and compact one. And so began the modernization of this bottle cutter, sharpening it for hiking - cuts on the screw so that you can unscrew it with a coin and use the blade to prepare the bottle (the knife is no longer needed), for convenience, I added a mini knife to the sharpener body and additional cuts for making ribbons different widths. This is cool, but it tends to become more complicated, although it turned out to be multifunctional and most often I use it and am satisfied.

Two sections of a stationery or construction knife. The bottle itself is prepared with this blade, a bottle cutter is made from a bottle cap, and this blade almost replaces stationery knife if necessary (open the parcel, etc.), and in itself is compact. I made a simple envelope out of a bottle and threw it in my wallet as a NAZ, now I always have a small household blade with me.

It is better to use this option, it is a little more complicated but also easier to use.
And for dessert - bottle cutter scissors. Just scissors and the bottle itself, and that’s it. We prepare the bottle with scissors, remove the ring from the neck, make a guide from the ring and then cut the tape, you just have to see it. The scissors should preferably be sharp and without play. If there is play and the bottle is biting, then you need to pull the tape out from above the scissors.
I tested it on small scissors (Swiss knife), it’s not very convenient and flimsy, but it works. The test on the pruning shears (the lower half with the serrations) failed, but there are pruning shears that are also used as scissors. I also changed the width of the resulting tape, fishing line and did not try to cut it, but the width turned out to be 2mm, preparation of the bottle is important. The principle itself is very workable and can be developed - instead of the neck ring, use other materials.
Cool way.

When designing these bottle cutters, I was guided by the following principles: the use of available materials, simplicity, ease of manufacture, repeatability, and cutting at an angle.
The bottle cutters provided in this post are manual (these are not machines); therefore, when used, they require some experience, dexterity and safety measures. You can cut yourself on paper, not to mention tape, and it’s very painful and unpleasant and unnecessary. Try to work with gloves, carefully, safely, etc.. The quality of the cut is greatly influenced by the preparation of the bottle; for wide tapes you need a smooth start, although bottle cutters will still straighten the tape but you will end up with a piece with waves. It is recommended to pull the tape, trying to press it slightly against the blade, this way the bottle is pressed harder against the stop and is directed to be captured by the blade, which makes it more accurate.
I don’t have such obvious preferences when choosing bottle cutters; I use what I have on hand at the moment and with which there is less fuss - usually an improved sharpener, scissors, a blade or knife and a lid; if I find a meat grinder, that will do. I demonstrated for your reference the simplest, most repeatable and compact ones. I think you will find a sharpener, a stationery knife, scissors, gloves, a bottle and quickly get tape from a bottle, and you don’t have to go to hardware stores for rope. There are many other different bottle cutters online, ranging from simple ones to machine tools.
Total
An unnecessary plastic bottle can also serve as PET tape (rope) and heat shrink.
Naturally, you shouldn’t treat this with fanaticism, but it’s also useful to just know that this is possible and PET tape from a plastic bottle is very easy to obtain and can help out.