Making door slopes is an obligatory part of a major overhaul or decoration of a newly built house. Plastering can be considered a classic design today. This method, although it takes a lot of time, is the most reliable: with such a finish, there are no voids left. Although this is not an easy task, but, subject to technology, do-it-yourself plastering of slopes can also be done at a good level. In any case, you can prepare the surface for wallpapering yourself.
How to plaster slopes

What plaster is better to plaster slopes? It is easier to work with Knauf compounds, cheaper - cement-sand. Which is better for you is up to you.
Technology
Plastering slopes begins after the surface of the main walls is leveled. The work to be done is dirty, therefore it is desirable to close the door leaf, floor and door frame with film, oilcloth or other similar materials. The jamb can be pasted over with masking tape - it will be easier to clean.
Training
The first stage of work is the preparation of surfaces. First, poorly adhering plaster, pieces of brick, and other building material are removed. If the doors have been changed, the old plaster can stick out a lot. In this case, even if it holds up well, it is beaten.

Then, grease or oil stains, if any, are treated with neutralizers. Old paint is also cleaned off: plaster does not adhere well to it. After that, dust and dirt are removed.
If the cracks didn't foam when you installed the door, you'll need to do it now. Mounting foam is applied to the wetted surface in volume - no more than 1/3 of the required amount. First, all the dust is cleaned, then moistened with a spray bottle. After a few minutes, it will greatly increase in size, filling in all the empty gaps. After waiting for the foam to polymerize (harden), the excess is cut off with a knife. It is more convenient to do this with ordinary stationery for paper.

If plastering will be a cement-sand mortar, the surface is moistened. This can be done from the same spray gun or with a brush, roller.
We expose the guides
Plastering slopes with your own hands, as well as walls, is more convenient along the guides. Outside the doorway, in order to obtain a smooth and rigid edge, a perforated paint corner is usually placed. Well fixed, it can be used as a guide.
It is cut to the height of the doorway. The upper edge of the corner, which will be adjacent to the main wall, is cut down at an angle of 45 °. It is better to do this, because for some reason this edge always lifts up during work and causes a lot of inconvenience.
You can fix the corner in several ways:

Having pressed the corner well, it is leveled so that its edge is flush with the main wall. The solution that has come out through the holes is removed with a spatula. Then they take an even bar (you can use a building level or a rule), apply it to the corner, checking how evenly the corner is set. They check both from the side of the main wall and from the side of the slope.
The procedure is repeated on the other side, and then on top. At the junction of the corners, the absence of drops can be checked by running a finger along the junction.
There is another way to fasten the corners - on nails or on self-tapping screws. This method is good when working with drywall, but it is not used for plastering: the hats interfere.

The second guide is the door jamb. When installing the door, they were set exactly, so this is a good guideline. But since the solution should not cover the entire surface of the jamb, a template is cut out of some dense material, with which the solution is then leveled. It is better to cut it out of a piece of plastic: the edge is even, and it glides well, and is quite dense. You can use a piece of flat wooden plank. Only the edge that will cut off the excess solution should be perfectly flat. The part of the template that will slide along the jamb is made in the form of a step. This protrusion will remove excess solution.
You can work with a spatula or a rule, but then a beacon is installed and fixed along the jamb at the required distance. The tool rests on it when cutting off excess mortar.

In this video tutorial on plastering slopes, the technology for attaching perforated corners is explained in detail, explanations are given regarding the technique of applying putty during a fine finish.
Do-it-yourself rough plastering of slopes
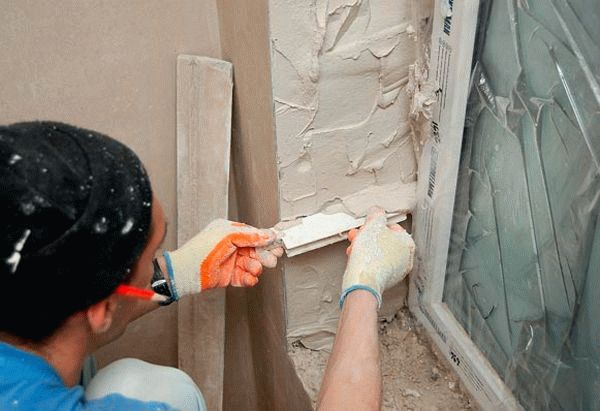
The process of applying plaster to a slope is no different: a solution is thrown onto a dust-free and wetted surface. They do this with a wide spatula or a paint bucket - whoever is used to it. It is more convenient to start from the bottom, moving up.
Leading the rule or template along the guides, shaking from side to side, the solution is leveled, the excess is removed back into the container. For the first penetration, you can not achieve a particularly flat surface, but be sure to monitor the condition of the corners - remove excess mortar regularly.

Plaster slopes are made in two stages: the first is rough, the second is finishing.
Some problems may arise when plastering the upper slope: it is more difficult to apply the mortar here. It is taken with a wide trowel (spatula) and slightly pressed, applied with a small broach. If the surface is rough, there is usually no problem. They can occur if a concrete beam is installed on top. To such a surface, the solution, especially cement-sand, “sticks” badly. In this case, it is necessary to pre-impregnate it with a primer, which serves to improve adhesion (adhesion) with finishing materials.
It may also be necessary to process if the surface on which the DSP plaster is applied strongly absorbs water (silicate and clinker bricks, for example). Only in this case, the primer should still reduce the absorption of moisture. The second way out is to use special Knauf formulations - they do not react so sharply to a lack of fluid. And the third way is to apply a layer of tile adhesive to the surface treated with primers, forming a wave with a notched trowel. Tile adhesive remarkably "clings" to the most difficult surfaces, and itself serves as a wonderful base.
If all this seems very complicated to you, read the article on how. Everything is extremely simple there. No mortars and spatulas, and the result is excellent. Or you can do. The view is almost the same, but done faster. After you can.
Finishing layer
After some time, or the next day, the dried plaster is leveled, applying a second finishing layer. It is impossible to start leveling too early - the solution “floats”, loses its shape. Touch the plastered surface: the mortar should crumble, but not “float”.
For fine alignment, the solution is made a little more liquid. It is also applied and stretched. Only this time you need to make sure that the surface is even. If necessary, the solution is re-added to the voids, filling even minor pits.

Grout
This step creates a perfectly flat surface. You can overwrite the plaster only after the mortar has set. This should take at least 16-24 hours (depending on humidity and temperature). To determine if you can start grouting, take a little grout from the wall in your fingers and rub it. If it crumbles - you can work, if it is smeared - we are waiting for more.
The solution is made even more liquid. It is no longer applied, but rather poured onto the surface. And it is distributed not with a spatula or template, but with a grater - a foam surface with a handle. With this grater, the solution is distributed over the surface in a circular motion. At the same time, the plaster becomes even, monophonic. This procedure is optional, especially if then everything will be puttied. But this is how your do-it-yourself plastering of slopes takes on a finished look. But again, this is not necessary.
This video shows how to plaster door slopes with cement-sand plaster. The case is not easy, the explanations are detailed, only in some places the sound is not the best.
Finishing of plastered slopes
If further the slope is painted, the putty is perfectly leveled. To do this, apply two layers: starting and finishing. The starting putty has a larger grain, it can be laid in a layer up to 1 cm. With its help, all flaws that are difficult to remove with cement mortar are eliminated. After the finishing putty dries, all the bumps and protrusions are polished with a special mesh. After that, a layer of finishing plaster is applied. It is even more plastic than the starting one, and it can be applied in a very thin layer. With its help, you can achieve perfect smoothness.
For a beginner plasterer, getting a perfectly flat surface for painting is very difficult. It is much easier to level the slope for wallpapering. In this case, you can stop at the starting putty.
If the old slopes were slightly damaged during the installation of the door and they can simply be restored, there will be less work. It will only be necessary to throw a cavity with a solution and level it with a long trowel (trowel).
Stucco doorway
Sometimes doors are not placed in the opening, but in this case, the doorway requires finishing. And the easiest way to do this is with plaster. The technology of the plaster itself is similar, but the guides and their installation methods are different.
The plastering of the doorway begins only after both adjoining walls have already been plastered. The opening itself is covered with a primer (the principle of selection is the same).
Guides are installed from the sides. These can be boards, metal profiles, two rules, pieces of plastic, fiberboard, etc. One is installed on the right, the second - on the left, they are fixed. The easiest way to fix them is with clamps. If there are no clamps, you can use nails or screws - the remaining holes will then need to be carefully repaired.

The leading edges of the guides will serve as the basis on which the rule or wide spatula will move. The sequence of actions is the same: the first layer is rough, the second is finishing, if it is necessary to bring it to an ideal state, grout is done. For more information on how to putty a doorway, see the video.
Plastering slopes is one of the oldest repair procedures, differing markedly from the creation of an even coating on larger surfaces (walls, ceilings, partitions, etc.). Beautifully and firmly “brought out” slope gives the door and window openings a finished appearance and contributes to their long service life.
When and how to plaster slopes on windows and doors?
If you have replaced windows or doors (which is already worthy of special congratulations), their installation must be completed with a beautiful frame. For this, not only the classic technique of plastered slopes is suitable. The wall sections on the balcony adjacent to the window or door can be trim with siding or special panels that come with PVC windows. Wooden paneling of openings is often used, it is functional and beautiful.
However, plastering slopes - with your own hands or with the help of craftsmen - makes it possible to subsequently repair the room to your own taste, without "binding" to the color and texture of plastic or wooden inserts. The plastered slope is performed with different geometry, it can visually push the boundaries of the room, improve its lighting. In addition, plastered slopes are much easier to repair - if special (and expensive!) Panels are damaged, it will be difficult to purchase a replacement for them. Especially if a dent in a plastic slope or a crack in a wooden plank formed a few years after the repair.
Step by step instructions with exclusive photo and video materials.
Plastering slopes with your own hands - high-quality preparation
The most important preparatory procedure before the design of the slopes is the smooth and accurate installation of windows and doors.. If the door / window structure is exposed with the slightest deviation from a strict vertical position, no slope will help it, everything will have to be redone again. Yes, yes, with the removal of glass, the dismantling of the frame and fragments of plaster throughout the room! No less important is the accuracy of installing new doors and windows in depth. The fact is that the size of the openings is usually several times the thickness of the most representative doors, not to mention the windows.
That is, there are constructive possibilities to “move” the boundaries of the room in one direction or another. This sets the dimensions of both the slopes themselves and the window sills.
Of course, you can not expose the windows "flush" with the facade wall, otherwise their glass will always be in rain streams and dirt stains. Inside the room, the frames also do not slide all the way in, who will like the reduction in internal space. Therefore, the installation of new frames and doors at the middle point of the opening is so common - but their strict intermediate position does not have any repair need. It is quite acceptable to install windows "with a shift" from the midpoint, in accordance with their own ideas about their finished appearance.
The window sill is always installed before the plastering begins. Strict horizontality of the window sill is obligatory, up to the “glass of water” test - spilled liquid should not drain in any direction, moving doors should open freely and easily. The platbands on the doors, on the contrary, are mounted on an already plastered surface - then they will fit snugly against the jamb, their adjustment will be minimal
The composition of the plaster when working indoors and outdoors is significantly different. Internal slopes can be plastered with a mixture of alabaster and sand (in a ratio of 1: 2), sand and cement (1: 3), cement with alabaster and sand (1: 1: 2). If you decide to use special dry mixes, it has proven itself best Rotaban It glides on easier and dries faster.
External slopes (from the outside of windows and doors) are plastered exclusively with cement compositions. They are exposed to precipitation and strong temperature changes - therefore, an additive to the solution of liquid glass and astringent additives will be required to give it additional durability. External plastering of windows is associated with work at height and must be completely safe - broken legs are not worth all the slopes of our world.
Plastering on windows - step by step instructions
Plastering window slopes with your own hands requires a considerable amount of tools and materials. Repair skills will need even more - if for you difference between plaster and putty unknown, it is better to hire craftsmen and pay them for quality work. The first steps in mastering the intricacies of plastering are best done not on slopes..
Plastering on windows - step by step diagram
Step 1: Opening Calculation
So, we have a brand new and precisely installed window, a comfortable and wide window sill - and the ruins of the walls around all this beauty. You can plaster the opening at right angles to the plane of the window, using the technology of the Middle Ages (then the very presence of windows in the room was a feat). But it is much more interesting to learn how to plaster slopes on windows and doors with an increase in the illumination of the room.
This repair technique has a special name "dawn angle", in fact, it means the expansion of a window (less often a door) opening into the room. Thus, there is more light in the room, as well as difficulties in plastering. But the result obtained in the form of strict lines of an enlarged opening is worth it.
Step 2: Marking and preparing the opening
The angle from the frame to the edge of the slope is set by a protractor, its value should be the same on the sides of the window. Do not determine this angle "by eye", otherwise the repair result is unlikely to please your eyes upon completion of work. The expansion value is from 1 to 2.5 cm for every 10 cm of the opening thickness. If the distance from the window to the inner wall is 25 cm, then the "expansion displacement" will be from 2.5 to 6.5 cm. These points are fixed at the bottom and top of the opening with deep risks.
It is necessary to prepare the base of the slope for plastering. To do this, all layers of old paint, previous putty and other contaminants are removed. Do not be afraid of deep removal of previous building layers - the cement-sand mortar needs space for strong adhesion to the surface. Cement and sand plaster fits well on all common building materials - concrete, brick, aerated concrete. But the composition of the preliminary primer, which is treated with walls before plastering, must necessarily take into account the specifics of their material.
Step 3: Internal vapor barrier
The joint between the window (door) frame and the slope is already insulated with mounting foam or rough plaster. It is necessary to cut off excess foam and carefully treat the entire joint line with a vapor barrier film or silicone-based sealant. Internal vapor barrier will prevent windows from fogging during strong temperature changes - it is done in just 5 minutes, it is inexpensive, and it brings benefits for years.
Step 4: Beacons as the basis of flawless accuracy
When plastering slopes, the exposed beacons are very different from their counterparts used in concreting floors or laying bricks. In fact, these are rather limiters from straight and wide rails. They are tightly nailed (screwed) to the surface of the inner wall - exactly according to the risks made after the goniometer. The edges of the laths create the border of the future plaster and protect the corner from accidental damage until the mortar has dried.
Precise installation of beacons is the basis of a quality slope. It is better to nail the rail again than to get an opening with a deviation from the desired values. After the installation of the beacons, the integrity of the vapor barrier layer is checked, the surface to be plastered is once again treated with a primer for proper adhesion (adhesion) with the solution. It is better to apply the primer not with a spray gun, but with a brush, this increases the coverage of hard-to-reach areas.
Step 5: Directly plaster
The slope solution is first applied in small portions along the perimeter of the lighthouse rails, with strong movements of the spatula. Next, we begin filling the opening, and the procedure depends on its depth. For a cement-sand mortar, a layer of up to 5-6 cm is optimal, if the depth of the opening is greater, the solution is thrown in several steps.
When the slope is filled with "heaped" mortar, its excess is removed with a precise and single movement of the aluminum rule. The apparent simplicity of such a "stroke" requires a lot of experience. After leveling the solution exactly along the beacons on all three sides to be plastered, you must wait until it dries. Next, the beacon rails are removed, their installation sites are leveled with a solution. The remains of the plaster mixture are diluted to a semi-liquid state and rubbed into the surface of a slightly hardened slope with gentle movements of the grater. This reduces the risk of cracking of the new plaster when it dries completely.
After the installation of windows or doors, the obligatory stage is the plastering of the slopes. Its task is to give them a neat, finished look, to prepare for subsequent operation. Plastering is a traditional way of finishing with cement or gypsum mortars. It allows you to eliminate damage to the walls resulting from installation.
- improve heat and sound insulation;
- protect the premises from external factors;
- give an aesthetic appearance.
Applying plaster is a time-consuming process that requires the person performing it to have certain skills. In addition, you need to stock up on a set of tools. It includes a level, a tape measure, a ruler, a rule, a trowel or a trowel. To prepare the solution, a dry mixture is used. Laths, perforated corners, profiles will help to achieve the desired layer thickness. If the plaster layer is more than 30 mm, then a reinforcing mesh is used. It is best to use a steel mesh with 50 by 50 mm cells, fixing it with dowel-nails.
Preparation for work
More and more owners of apartments and houses are seeking to replace old wooden windows with new ones. But as a result of the installation of window blocks, the integrity of the slopes is violated, cracks and damage appear. Before plastering, it becomes necessary to perform a number of preparatory work.
Upon completion of the installation of the window block, it is required to cut off the excess mounting foam so that it does not go beyond the plane of the window. It should be noted that the polyurethane foam used for sealing cracks is a vapor-permeable material. To prevent it from becoming a source of condensate, it is necessary to isolate it with acrylic sealant or a vapor barrier film. A thin layer of sealant is applied to the foam located indoors, allowed to dry well. After that, you can move on.

Plastering window slopes is a dirty job, accompanied by dust. Therefore, it is recommended to cover the radiator and part of the window block with cardboard or plastic wrap. The most difficult thing will be to wash the fittings, so it is closed especially carefully.
The surface of the slope must be cleaned of debris, dust. To remove particles of old plaster, mortar, weak areas, a stiff brush is passed along the slope. The final stage is priming, a means of deep penetration.
Slope plastering is traditionally performed with a sand-cement or gypsum mixture. The stores offer different types, the choice is up to the customer. For finishing external slopes, it is recommended to give preference to a cement mortar with a ratio of 1 part of cement to 3 parts of sand. The sand should not contain clay impurities, it is better to use washed river sand.

The gypsum mixture does not tolerate high humidity, which is typical for areas near the window. It is well suited for interior decoration: it dries quickly, acquiring a beautiful white color. An ideal option for plastering internal surfaces is a cement-sand mixture with a small addition of alabaster, which will speed up setting.
Slope angle
It is necessary to pay attention to the position of the internal slopes in relation to the plane of the window. This angle is greater than 90 degrees. This arrangement improves the efficiency of the passage of light through the opening. Usually the deviation is 5-6 degrees, but it can be more. It all depends on the thickness of the walls and the design solution. The lower, upper and outer slopes can be done at right angles.
To form a corner, you will need a pencil and a ruler. First, calculate the distance at which the edge of the slope should be located. The calculation is carried out on the basis that for every 10 cm of the slope from the edge of the window block, you need to retreat 1 cm. The resulting value is set aside on the windowsill.
Often the nearest edge does not fall on this line. This means that you need to make a thicker layer. To set its thickness, wooden slats are stuffed on the inside of the slope. Then a beacon profile is installed on the solution, setting it according to the level and setting the required angle.

When creating door slopes, the angle can be exactly 90 degrees. Therefore, no special preparations are required.
Solution application
Do-it-yourself plastering of slopes is most often performed in a common way “under the rule”. It is good in that it allows you to return the slopes to a neat appearance, regardless of whether major repairs were carried out or only replacement of windows.
To align the slope plane, a beacon is installed in the corner. First, a solution is thrown into the recess, then I press the beacon into it, controlling the depth by level. The rule will help to limit the outer corner. It is installed vertically, making a protrusion towards the window to the distance required to form the thickness of the slope. Then fix with dowels or screws. You can use a metal profile by leveling it and fixing it. Also prepare the upper slope.
Before applying the solution, you need to make sure that all the elements are located correctly. The plaster is performed in three layers: spray, primer, coating. The application of the solution begins with the upper slope, moving from its edge to the window. It is recommended to install a reinforcing mesh on the upper slope. The solution is applied to it by pressing and simultaneously gluing the mesh to the base.

A liquid solution is used for spraying. Its task is to create a reliable basis for the base layer and firmly tie it to the wall. The main layer - the soil - is performed with a solution, the density of which is similar to the density of good sour cream. They throw him on the spray and give him time to grab. Then the excess solution is removed, moving from the bottom up, with a trowel or a rule.
After finishing applying the primer, it is given time to dry. Carefully remove the rule, shifting it not on itself, but to the side. The remaining sections are rubbed with a solution, the corners are plastered. They can be started after the layer on the slope itself has dried. To do this, use the same solution, applying it with a trowel or trowel on a pre-moistened surface. The leveling of the mixture is carried out from the bottom up and to the sides, creating a single surface. The dried plaster is primed, puttied, using it instead of covering.
Plastering of external slopes is carried out similarly, and even a little easier. Usually the outer part is damaged much less than the inside. Therefore, first check the quality of sealing cracks, cut off the foam. After moistening it, cover the slope with a layer of plaster. Finishes painting.
Slope putty
The task of putty is to eliminate small scratches, cracks. Before puttying, the surface must be primed. The first layer is performed with a starting mixture. It contains larger particles that will fill in the bumps. After drying, it is sanded, primed again.

Finish the putty with the finishing mixture. It will create a perfectly even and smooth coating, which, after grouting with sanding paper and applying a primer, can be pasted over with wallpaper or painted.
How long does plaster take to dry?
This is far from an idle question, since it depends on how quickly you can move on to the final finish. The simplest way to calculate the drying rate takes into account that 1 mm of the plaster layer will dry for 1 day. This formula does not work for gypsum plaster. If an ideal temperature and humidity regime is created, then they take 2 mm per day. Ideal conditions include conditions under which the temperature is maintained within 10-25 degrees, and humidity - up to 8%.
It is impossible to accelerate drying artificially by increasing heating or ventilation. This will definitely lead to cracking of the surface. High humidity and low temperatures slow drying. Therefore, in rainy weather and a frosty day, it is better not to open the windows. But moderate ventilation does not hurt.
The drying time of the outer layer of plaster is not much different from the inner one. For a cement-sand mixture, it will take almost a month to dry completely. A reasonable question arises, but how then to withstand the gap between the application of several layers? The answer is quite simple: you do not need to wait for complete drying before the next layer. It is enough to wait a day, and you can continue to work.

It is difficult to give an exact drying time. Visually, you can navigate by several indicators:
- wet spots begin to fade;
- the surface of the wall brightens.
Of course, you should pay attention to the standards specified by the manufacturer. They can be found on the packaging of the mixture.
After installing door and window structures, it becomes necessary to carry out additional finishing work that is associated with slope plastering. This work is easy to carry out on your own, without the involvement of specialists and the use of complex tools. Naturally, there are numerous rules that help create a really beautiful surface.
Strange, but very little importance is given to the finishing of slopes. It is believed that this structural element does not carry a special interior design. Therefore, very often you can see how, next to a new and beautiful window (door), a rather curved and primitive surface is made, which completely eliminates any efforts. Although various materials have now appeared to hide any flaws, they require installation skills.
But there is a very simple way, namely, plastering slopes. Despite its simplicity, it has a lot of advantages:
- Low material cost.
- Simplicity. All work is done independently.
- The ability to create a harmonious part of the interior.
And, despite the fact that this option has been used for many decades, it still enjoys due popularity.
 Plastering slopes - an easy and cheap way to strengthen the wall
Why you need to plaster slopes
When it comes to stucco slopes? This happens when a new window or door (most often the entrance) appears in the room. Due to the ongoing work, a part of the wall adjacent to the object being installed is being destroyed. Therefore, this area must be brought into aesthetic conformity. But, in addition to purely decorative functions, slopes also have a number of important purposes:
- Hiding mounting elements.
- Improving the thermal insulation of the room.
- Protection against moisture ingress.
- Protection from extraneous noise.
It is worth noting that the plastering of window slopes and doorways is similar in technology to operations, but with some differences. This is very important to consider, otherwise some difficulties may arise.
 Plastering of doorways and window slopes - processes similar in technique
 Tools and materials for work
Before wondering how to plaster slopes, you need to prepare the necessary tools and purchase materials. For all types of work, they will be identical.
You will need the following:
- Level. Immediately it should be borne in mind that its size should be at least 1m.
- Rule. It must be checked that it has no curvature or damage on the ribs. Otherwise, it will take a very long time to level the applied solution.
- Roulette. This device should always be at hand.
- Bucket for mixing. In general, any convenient container will do.
- Spatulas - wide, medium and small (trowel). They are convenient to scoop up the mixture and throw it on the desired area. And also quickly align small imperfections.
- Large and small ironing board. Will distribute the composition and create a flat surface.
- Grater. It is better to choose based on the plaster used.
- Construction knife. For cutting foam.
- Tube gun. Required for sealant application.
- Pencil. It is better not to take a felt-tip pen or a marker, they can leave their mark noticeable.
- Brushes and roller. For priming and painting.
Advice! The work is going to be top notch. Doing them standing or on a stepladder is not very convenient. If possible, it is better to make a design like a goat. This will allow you to immediately capture a large area and not constantly rearrange the support.
 For the convenience of plastering, you can use the construction "goat"
 You need to be very careful when buying materials. It is important to consider that different types of premises will require a different mixture. How to choose the right plaster?
- For objects with high humidity, as well as for outdoor work - use compositions that are made on the basis of cement.
- Do-it-yourself plastering of slopes inside rooms - made with mixtures of gypsum.
On a note! There is a more modern, acrylic material, but it is quite expensive and cannot compete with the above products in this indicator. But this does not mean that it cannot be used for slopes. On the contrary, it is universal.
Additionally prepared:
- Mounting foam. In fact, it is usually not spared by window and door installers themselves, but the opposite also happens.
- Sealant in tubes. It will be needed for better sealing of cracks and cut sections of foam.
- Primer. Bonding and pore-closing solution.
- Corner or wooden planks. They serve as beacons.
Problems that may arise
Everything is prepared and waiting in the wings, but there are many nuances that prevent finishing work from being completed. What are the main reasons?
- Installation of the structure itself (windows, doors) - performed poorly. Therefore, all the work that third-party specialists do must be carefully accepted, and independent ones must be done conscientiously from the very beginning. Otherwise, it will turn out that the plastered areas will have to be broken in order to correct the original defects.
- The electrical cable was not taken into account. Few people pay attention, but in old houses the electric wire starts under the frame of the front door. Just in the corner of the slopes. It is easily damaged.
- Temperature indicators do not correspond to the necessary:
- for cement mortars - above five degrees;
- for gypsum mixtures - from ten degrees.
Therefore, you should eliminate all side causes, and then get to work.
Window slope plastering
Do-it-yourself plastering of window slopes will require a number of interrelated steps. Each must be completed in full and on time. This affects the final quality.
Training
Before making slopes on plaster windows, a number of the following manipulations are required:
- The desired mixture is selected. Purchase the required quantity.
- Everything superfluous is removed. The mounting foam is cut off. This is done flush with the window frame.
- The old composition is uprooted. Better to take it off completely. So, less risk of voids and cracks.
- All dust and dirt is removed. You can carry out wet cleaning, but then everything should dry well. It is very convenient to use a vacuum cleaner.
- Two coats of primer are applied. The solution is selected based on the material of the wall. Often this is a concrete slab or brick.
- A vapor barrier is created. This is done in two ways:
- The film is laid. It is fixed with screws or glued. It is important to achieve full contact with the surface.
- Lubricate with sealant. It's much more convenient. Do not forget that the cut foam is completely covered with silicone.
On a note! Sealant needs to be worked quickly. Surplus is immediately removed. The composition must be initially frost-resistant.
There is another problem with balcony window blocks. It consists in the fact that the upper part was originally made with a bend. Therefore, you will have to knock down a large area or apply a thick leveling layer (reinforcing it).
 Balcony block plaster often requires reinforcement of the upper part
 Start of main works
The sequence of general actions looks like this:
- Conduct preparatory work.
- The window and its elements are completely covered with plastic wrap. This is done to protect against dirt and accidental damage.
- Install pre-prepared corners. They will serve as additional reinforcement, as well as beacons. They are measured with a level. This must be done carefully.
- A bar is attached, which will determine the plane of application of the composition.
 Installing a rail and a beacon on the window allows you to complete the work according to all the rules
 Advice! For more convenience, you can make a template. It will take into account the width of the slopes, which will make it possible to carry out work faster.
Plastering
You can plaster the slopes on the windows according to the following instructions:
A rule regarding plastic windows should be added:
- The initial work is carried out according to the instructions, but then they do the following: they draw the angle of the spatula between the slope and the frame. A shallow groove appears.
- It is filled with sealant. This is done in order to avoid cracks.
Following such a simple technology, it is possible to answer an exciting question: how to plaster slopes on windows. For a more complete picture of this process, we recommend watching the video:
Features of plastering door slopes
How to plaster door slopes? This activity is different from working with windows. And it has the following features:
- For high-quality performance, two rules are used.
- The mixture is applied according to the scheme that is used for window structures.
- It is required to install the door correctly - keeping parallel to the floor. This will make it possible to get a more even slope.
- Be sure to install perforated corners.
 Do-it-yourself rules for plastering door slopes
 Due to the fact that work is often carried out at the entrance to the apartment, one problem arises - most of the wall surface will interact with the box (metal or wood), which will be exposed to different temperatures. This is prevented as follows (the method is similar to that used in window blocks):
- Plastering door slopes begins with the complete removal of the old layer (next to the box).
- Take a construction knife. It is placed at an angle of five degrees in the upper corner. And pressing down, lowered to the very bottom.
- The entire treated area is primed.
- The surface is slightly cleaned and filled with sealant. He is immediately thrashed.
Surface work
Due to the fact that you have to work with large surfaces, which are often damaged quite badly, the plastering of door slopes is divided into two stages.
1. Starting coverage is done:
- a preparatory stage is underway;
- a layer of plaster is applied, which is rubbed off.
 Large damage to slopes requires the application of a starting layer of plaster
 2. The final layer is formed. Putty is perfect for this. Do the following:
- allocate time for complete drying of the first layer;
- apply a layer of primer;
- knead putty;
- apply a layer up to 2-3 mm thick;
- it is rubbed with a wet spatula;
- internal and external corners - grind, chamfer;
- color.
 Finishing of door slopes
 From the foregoing, it follows that the plastering of doorways is complemented by small nuances. Indeed, it may seem that they are completely insignificant, but it is their observance that allows you to create exactly what will meet the expectation.
Outcome
Now it is completely clear: how to plaster and how to plaster slopes. It is following the rules presented that will make the work quick and easy, and most importantly - high-quality.
Understanding how to plaster slopes is easy. However, this work requires maximum responsibility and a competent approach. You will be able to properly plaster window slopes only after a detailed study of the basics of plastering other, simpler surfaces (for example, ceilings and walls). Therefore, it is advisable to pre-train, and only then plaster the slopes of the windows. A few simple and intelligible, but very useful recommendations will help you do this in the best possible way.
Preparation of tools and materials for work
Any repair work requires the use of appropriate tools and materials. And is no exception. The specific set of tools depends on what materials you will be doing the work with. However, without the following devices, you will not be able to do in any situation.

Plastering window and door slopes with bevels: 1 - wall; 2 - solution; 3 - rail; 4 - the position of the bevel when plastering the slope; 5 - box; 6 - small.
Prepare:
- aluminum rule;
- building level;
- measuring tape and pencil;
- Malka;
- several spatulas (must be 5 cm);
- containers for water and solution;
- Master OK;
- hammer-pick.
It is not enough to just know the list of tools. In order to properly plaster the window slopes, it is necessary to use the most suitable fixtures for this particular process. For example, a level that is too long in such work will not help you. It may not fit in the space between the window sill and the lintel and become completely useless. However, even using an overly short tool, plastering the window slopes will not work - it will be very inconvenient. Therefore, the best option is a level 100 cm long. Auxiliary tools such as a knife and a sealant gun will not interfere.
When working, you may need a bottle of mounting foam. Carefully examine the condition of the window before going to the store. If there is a gap between the window opening and the frame, then the balloon will be needed.

If you use ready-made cement mortar for plastering, you will additionally need a trowel and a grater. If you use other solutions, then prepare trowels of different sizes, a sponge grater and a medium spatula. In most cases, a spatula of 45 cm is sufficient.
Prepare good protective clothing and footwear. They should be comfortable for you. Be sure to choose a suitable headgear so that the plaster does not fall on your head when processing the window slope. Due to the fact that in the process of working with plaster you will have to contact with your hands, it is best to buy sealed nitrile gloves.
A plaster goat will be a very good helper. You can make it yourself, buy it or borrow it from someone. It is more convenient and safer to work with it. Plastering a window slope from a stool or ladder is not a good idea. Firstly, it is less safe, secondly, it takes longer, and thirdly, it is not very convenient.
Back to index
Preparing for processing window slopes

Before the plastering of the window will begin directly, you will need to perform a number of preparatory measures. Not only the convenience of further work, but also the quality and durability of the finish directly depend on how thoroughly and carefully you approach the preparatory process.
Before work, it is recommended to install a window sill. So you will avoid further work on sealing the gaps between the window sill and the side slopes, and further increase the strength of the installation. In such a situation, the window sill will need to be protected from mortar and mechanical damage. To do this, cover it with thick paper. If after the repair you have unnecessary pieces of drywall, use them - it's even better.
If there are traces of old plaster and other unnecessary dirt on the window, be sure to remove them. A high-quality finish will be obtained only when laying plaster on a solid and well-prepared surface. Any dirt, dust, paint, etc. significantly worsen the final result.
The window block itself is recommended to be carefully closed with a film. It will be enough to stick it to the window with masking tape. Batteries, pens and other items that may “suffer” from plaster during operation, wrap with thick paper.

Cross-section of a wall with high-quality plaster: 1 - spray; 2 - soil; 3 - covering; 4 - brick wall.
Remove excess mounting foam with a knife if you used it to seal gaps. To improve the setting of the plaster mortar with the base, it is necessary to pre-treat the surface with a deep primer. When choosing a specific primer in the store, be sure to inform the consultant about what the base is made of.
In the next step, you will need to work on the vapor barrier device. To do this, the inner wall is sealed with a vapor barrier film. It can be sealed with foam or treated with a special frost-resistant silicone sealant. Make sure the surface is dry before applying the sealant. Otherwise, the composition will not stick. Remove excess sealant immediately. The solidified substance is very difficult to wash off.
If you do not vaporize the foam seal from the inside, then after some time the foam will get wet under the influence of condensate and lose its original properties as a heater. In some cases, it may completely collapse. As a result, the windows will begin to sweat, and drafts will be pulled from the street.

In the next step, you need to make a Malka. It is a template according to which you will plaster. Look at the slopes of your window. You will notice that they do not have a perfectly straight shape, but rather expand inwards. As a result of this, in fact, a window clearance is formed. In most cases, a piece of plywood is used to make malki. It should be 5-10 cm longer than the window slope. The width will be about 15 cm enough to make the template comfortable to hold with your hand during work. A cutout is made on 1 side of the bevel. During the plastering process, the side with the cutout will move along the slope. On the 2nd side, you will move along a pre-installed beacon. Malka will provide the most even windows. Additionally, it is necessary to make a cutout for window hinges.
Approach the manufacture of the template as responsibly as possible. Keep work surfaces as level as possible. If possible, remove a small chamfer (round the surfaces with a file). This will prevent chips from appearing on the plywood during operation.
Professional craftsmen use aluminum bevels for work. They are made to order. However, if you do not plan to professionally plaster slopes, it is quite possible to get by with an ordinary wooden template.