A gable roof occupies a middle position between a single-slope and a multi-slope roof in terms of complexity and ease of use. Reliable protection of the house from rain, wind and snow, a wide variety of shapes and simple installation - these factors have made the gable roof the most popular in our country. Its assembly can be carried out by both professional craftsmen and novice builders. The design is used in the construction of permanent structures and for small architectural forms - gazebos, bathhouses and tourist houses in campsites.
The structure and main elements of a gable roof
A gable roof is considered to be a roof consisting of two rectangular planes located above the walls of the building and connected at an angle from above.
The popularity of the gable roof is due to the ease of its manufacture.
The supporting structure of the roof is the rafter system, the purpose of which is to:
- retention of external and internal roof coverings;
- uniform distribution of load on load-bearing walls;
- forming the roof frame necessary to level the plane of the slopes.
To understand and successfully apply in practice the principles of a gable roof, let’s take a closer look at the main elements of its design. In any case, knowledge of accepted professional terminology will help in the selection and calculations of materials.
- Mauerlat. Support beam installed on the wall. It is made from timber and coniferous logs. The purpose of the Mauerlat is to evenly distribute the weight of the roof onto the load-bearing wall. The cross-sectional dimensions of the beam are determined in accordance with the overall dimensions of the roof; as a rule, it is from 10 to 25 cm in cross section. Fastening is carried out with anchor bolts, metal threaded rods, staples or wire. A waterproofing material is placed between the Mauerlat and the wall surface to prevent contact between hygroscopic stone and wood. The Mauerlat can be made from solid wood, sewn boards or laminated veneer lumber.
To attach the Mauerlat to the wall, you can use anchors, threaded rods, staples or wire
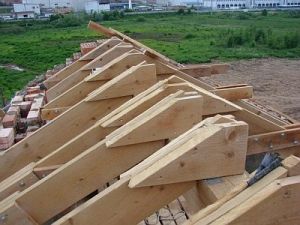
- Roof trusses. The rafters can be assembled both on the ground and directly on the roof. The truss is a triangle with given dimensions. It is assembled from boards or timber with a thickness of 50 mm and a width of 150 mm. It is important to observe technological tolerances when installing trusses, since the final configuration of the slope plane depends on them. An error of 1 cm at a distance of 0.6 m is considered unacceptable: the roof will be wavy and the fit of the roofing material will be uneven. The installation pitch of the rafters varies from 0.6 to 1.2 m.
Assembly of trusses can be done both on the ground and directly on the roof
- Sill. This part is used in layered structures. Just like the Mauerlat, it is installed on the supporting (internal) wall and serves to distribute the load from the racks under the ridge girder. The dimensions of the bench usually do not differ from the dimensions of the mauerlat, but there are exceptions (depending on the thickness of the wall).
In the design of a gable roof, the roof is located on the middle support of the house
- Racks. An element used to compensate for vertical loads. Racks connect the ridge and horizontal girders with the beams and load-bearing beams. The thickness of the beam is selected depending on the overall roof structure. It is secured with nails, screws and metal brackets.
Racks prevent rafters from bending under load
- Crossbars (tightenings). They enhance the rigidity of the triangular structure of the rafters and connect the rafter joists together into a single frame.
The crossbar connects the rafter joists and enhances the strength of the truss structure
- Ridge (or ridge girder) is the upper horizontal part of the roof, located at the intersection of two planes of the slopes. The purlin is a solid massive beam connecting the slopes along the entire length.
All upper points of the trusses are connected by a ridge beam
- Overhang. The part of the roof protruding 40–50 cm beyond the Mauerlat. Designed to protect the walls from getting wet. Gutters are installed under the eaves.
The overhang performs protective functions, covering the walls from dampness
- Lathing. The outer part of the structure, which is laid over the rafter legs. It is made of wooden slats or (in the case of a soft roof) plywood, chipboard or OSB. The function of the lathing is not only to fix the roofing material, but also to enhance the rigidity of the frame as a whole. Edged or unedged debarked boards impregnated with antibacterial compounds are used. The thickness of the sheathing varies from 22 to 30 mm.
Before installing the roof covering, sheathing is installed on the rafters
- Fillies. An additional element that is used in cases where the rafter joists are not long enough to provide a full overhang. To build up rafters, use boards or timber of the same or slightly smaller size. They are fixed with nails and screws.
The fillies can be attached to the rafters with bolts or nailed
- Rafter legs (struts). Spacers that act as a connecting link between the load-bearing beams and the rafter legs. They are made locally from boards and timber. In country house construction, poles of small diameter (up to 14 mm) with turned flat ends are used.
The main function of the rafter legs (struts) is to increase the rigidity of the rafter system
Video: stages of construction of a truss structure
Options for the rafter system
Depending on the location of the load-bearing walls of the building, one of the possible types of rafter system is selected:
- layered;
- hanging.
Layered rafters
The layer fastening system assumes the presence of an additional supporting wall of the house, onto which the weight of the roof is transferred. For this purpose, a ridge girder and a bench are used, connected to each other by vertical posts. This type of structural reinforcement is simple and effective, but it interferes with the arrangement of the attic space as a living area. The usable area is reduced and additional finishing costs arise. A good solution to the problem in this case is a male gable (which is a continuation of the wall and erected before the formation of the roofing system), which takes on the weight of the roof structure. In addition, the disadvantages of layered technology include the need for long elements. It is extremely problematic to transport and install purlins longer than 6 m without lifting equipment. There are four types of layered structures.
- Unbraced rafters. There are three types of assembly of this design:
- with rigid fastening to the mauerlat (the ridge girder is connected to the top of the rafters using a sliding fastening with additional fixation with metal strips);
The rigidity of fixing the rafters to the mauerlat is provided by metal brackets
- with a slider fastening to the Mauerlat (the floating connection is duplicated by a flexible plate, the upper parts of the rafters are attached to the purlin or to each other in pairs);
Slider fastening is provided by a flexible plate installed at the top of the trusses
- with rigid fastening of the rafter legs and the roof ridge into a single whole (using additional boards).
In this option, all elements of the truss are connected into a rigid triangle
- with rigid fastening to the mauerlat (the ridge girder is connected to the top of the rafters using a sliding fastening with additional fixation with metal strips);
- Expansion rafters. The fastening of the rafter legs to the mauerlat is rigid, but a horizontal girder is added between the rafter legs. This design is intermediate between a layered structure and a hanging one. It is used in cases where the load-bearing wall is strong enough and can withstand the bursting pressure from the roof. Sometimes for this purpose a reinforced concrete belt is installed along the entire perimeter of the roof.
Expansion rafters transfer thrust loads from the roof to the Mauerlat, so they are used only in cases where sufficient strength of the walls can be ensured
- Rafters with braces. The brace serves as additional support; it is often called the third rafter leg or the rafter leg. It is installed at an angle of 45–50° and does not allow the main rafters to sag. With the help of struts it is possible to cover spans with large distances (up to 15 m). The main thing during assembly is the accuracy in cutting the corners of the struts in accordance with the inclination of the rafter leg. No other calculations are required. The strut is nailed to the load-bearing elements on both sides.
Rafters with struts allow you to span long spans
- Rafters on sub-rafter beams. An additional beam is laid along the length of the roof, on which the racks supporting the rafters rest. The same function is performed by the bench and other walls of the house. If there are no purlins, a separate stand is installed under each rafter leg. The tightening is installed below the purlin, thus eliminating the expansion. With the help of contractions installed in the lower part, the load from the weight of the upper part of the rafters is compensated. Additional joints connected crosswise fix the position of the scrum.
To strengthen the structure of the rafters in a scheme with a sub-rafter beam, additional elements are used: tie-rods, crossbars, ties and joints
Hanging rafters
The hanging scheme is used in the absence of a middle support. The rigidity of the roof is enhanced by installing ties and crossbars between adjacent roof trusses. Often this is the only way to arrange a roof, especially in cases with small floor sizes.
One of the significant advantages of this type of construction is the high strength and rigidity of the frame. When installing a hanging rafter system, there is no need to attach the Mauerlat.
Hanging systems, as well as layered ones, are divided into 5 types, each of which is three-hinged.
- Triangular three-hinged arch. The least expensive option for installing a roof. It is a triangle with a limited degree of load. There are two options for attaching the rafters to the tie - an orthogonal frontal notch and a tie using plate fasteners.
The rafters and tie are fastened by cutting or using rigid plates made of wood or metal
- Three-joint arch with raised drawstring. It is used in the construction of attic spaces that are planned as an attic. The transverse tie is installed at the top of the truss. The fastening to the Mauerlat is a slider type. For proper operation of the system, it is recommended to extend the rafters long beyond the boundaries of the walls. To compensate for possible sagging of the tightening, hangers are used (one or more - depending on the circumstances). If the tightening length is large, it is possible to splice two beams using clamps.
The floating fastening to the Mauerlat relieves tension from the rafters, and the installation location of the tie determines the height of the attic space
- Triangular arch with headstock and struts. In the case where the rafters are very long, additional struts are used to strengthen them. They reduce the likelihood of sagging under the influence of external loads and transfer the weight of the roof to the lower puff. In addition, a headstock is suspended from the ridge girder on clamps, which supports the ridge, and therefore helps to increase the rigidity of the entire structure.
A triangular arch with a headstock and struts is used for very long rafters, when it is necessary to relieve the ridge assembly and increase the rigidity of the entire system
- Three-hinged arch, reinforced with a suspension or headstock. This type of truss structure is used for roofs with large (more than 6 m) spans. Its essence is that the weight of the tightening is transferred to the ridge run. They are connected to each other by pendants, the ends of which are clamped into clamps. A pendant made of wooden beams is called a headstock, and an iron pendant is called a cord. Using the clamp bolts, you can adjust the degree of tension, which is especially important in case of sagging tightening.
Suspensions and headstocks prevent deflection of the tightening, and the degree of tension of the fastening unit can be adjusted
- Triangular arch with crossbar. For high thrust loads, a crossbar is added at the top of the triangle. It, unlike tightening, compensates for compression stress. The fastening of the crossbar does not allow a hinged connection with the rafters. The tie is installed at the base of the structure.
To compensate for thrust loads, a horizontal crossbar is installed in the upper part of the truss
Video: installation of rafters for a garage and bathhouse
What determines the height of the ridge of a gable roof?
As noted above, the ridge is the upper horizontal part of the roof, formed by the intersection of the slopes. Determining the height of the ridge is one of the key tasks when designing a roof. An incorrect decision entails a number of problems associated with further operation.
- Climatic conditions of the region. These include the average annual precipitation level, wind load and snow depth. Each factor makes its own adjustments when choosing the roof height. Thus, prolonged snow drifts and heavy rains require a slope slope of more than 45 degrees, while precipitation leaves the roof quite quickly, without having time to cause damage. In steppe zones, where steady winds prevail, it is customary to erect flat roofs with slopes of no more than 10–12 degrees. Here, a roof with a low-pitched design will last longer and will be more effective at retaining heat in the house.
- The presence or absence of an attic space in the structure of the house. Since gable roofs come in two types - with or without an attic, when choosing the angle of inclination, further stages of operation must be taken into account. One of the most common options for arranging an attic space is the attic. To do this, they use a special gable roof design, which is called a broken roof and expands the usable area of the attic. The option without an attic is more often used in the construction of garages, warehouse hangars and similar structures.
A roof without an attic increases the volume of the room, but has large heat losses
- Type of roofing material. Knowledge of the properties of the outer covering influences the optimal choice of the slope of the slopes and the height of the ridge. Here are some basic rules:

It should also be taken into account that raising the ridge is accompanied by additional financial costs. For example, a structure with a slope of 40–45 degrees will cost 1.5–2 times more than a roof with a slope of 10–12 degrees. As the angle of inclination increases further, the cost increases exponentially.
The importance of correctly determining the height of the roof ridge in each specific situation cannot be overestimated. Nor did it go unnoticed by regulatory construction documents.
The collection of rules and tables SNiP 01/23/99 and SP 20.13330.2011 detail the requirements for the construction of roofs in various climatic zones.
The minimum dimensions of exploitable attics (residential attics) are also regulated there. Not only the convenience of the room for human activity is taken into account, but also fire safety standards. The dimensions of the attic should not be less than the minimum required for the prevention and maintenance of the roof - 1.5 m in height and 1.2 m in length. Narrowing of passages in complex composite structures by 35–40 cm is allowed.
There are two ways to determine the height of the ridge:
- Graphic, which uses an accurate drawing to a given scale.
- Mathematical - using geometric formulas expressing the dependence of the height of the ridge on the length of the roof base and the angle of inclination.
The third can be called an automatic method of calculation using online calculators, which abound on the Internet today. But with all due respect to modern computer technology, you need to be aware that in the event of an error or inaccuracy of calculations, no one will be held responsible for wasted money.
Therefore, it is better to perform the calculations yourself. Geometric calculations are made using the formula H = L ∙ tg A, where H is the height of the ridge, L is half the span length, and tg A is the tangent of the slope angle, the value of which can be taken from reference tables.
To determine the height of the ridge, you need to know the size of the base and the tangent of the slope angle.
Table: tangent values of different angles for calculating a gable roof
Types of gable roofs
Above we looked at the options for gable roofs from the point of view of the internal structure of the structure. Now let's look at their external structure.
Roof with different slope angles
Roofs with different slopes are also called asymmetrical. More often they are used in small architectural forms, but there are also cases of permanent buildings with such roofs. The bottom line is that the building is covered with a roof with different lengths of slopes. The number of slopes does not change - there are also two of them, but the perception of the building as a whole changes significantly. The building becomes unusual, stylish in its own way, acquires uniqueness and attracts people's attention.
An extended roof slope can be used to organize an additional functional extension, for example, a garage
Despite the additional difficulties in constructing such a roof, the popularity of the design does not decrease. On the contrary, developers strive to give houses unusual, original shapes. To do this, they use various architectural techniques, including roofs with different lengths of slopes.
Roof with dormer window
Dormer windows add a unique flavor to the exterior of a building and are very useful in a practical sense. With their help, the problem of attic lighting is solved, as well as natural ventilation without the use of additional technical means. Installing dormer windows is not an easy task, requiring knowledge and skills. Initially, a dormer window was considered a glazed hole in the gable of the roof, but today the range has expanded; windows built into the slopes also belong to this category. Based on their appearance, dormer windows are divided into:
- attic;
- single-pitched;
- gable;
- arched;
- hip;
- French flat;
- with side walls in the plane of the house;
- without side walls in the plane of the house;
- with side walls not in the plane of the house.
Each type of dormer window is installed using its own technology
Of all the listed categories, only roof windows can be installed both at the time of roof construction and after construction is completed. The rest are constructed simultaneously with the assembly of the truss structure. This is due to the need to organically integrate a window into the support system, which must withstand climatic loads and not cause leaks or distortions of the roof.
The dormer window must fit into the overall support system of the rafters and withstand all loads acting on the roof
Installation of dormer windows is carried out in accordance with regulatory documents SNiP 11–26 and SNiP 21–01.
They stipulate the conditions under which a dormer window can be installed:
- permissible slope slope - not less than 35 o;
- the maximum permissible size of a window with opening sashes is 1.2x0.8 m;
- a dormer window on a roof with a hip structure and a rectangular facade cannot be in the same plane as the walls of the building;
- For the external cladding of the window, tiles, copper, and sheet steel can be used.
You can install a dormer window yourself or turn to professionals for help. But in any case, it is necessary to comply with general construction rules developed by specialized organizations.
Cuckoo roofs
“Cuckoo” is a structure built into the main rafter system in the form of a protruding window or balcony. The appearance of such a building compares favorably with the houses surrounding it, and the interior space of the attic is transformed and becomes more interesting. In addition to aesthetic advantages, the “cuckoo” increases the usable volume and area of the living floor, and increases the level of natural light. A window located on the south side of the roof allows direct sunlight to penetrate into the attic. Room ventilation improves.
The “cuckoo” design creates an original appearance and increases the lighting area of the attic, but requires careful calculation to maintain the load-bearing capacity of the roof
But the “cuckoo” also has disadvantages, mainly of a financial nature:
- the complexity of installation work increases;
- the overall estimate for roof construction increases;
- there is a need to use the services of qualified designers and builders.
Improper installation of a remote window (or balcony) on a gable roof can cause damage to the roof and the formation of leaks.
Roof with large overhangs
A roof that extends far beyond the house is called a chalet roof. The technology was borrowed from Europe - from the mountainous alpine regions of France and Switzerland.
One of the features of the “chalet” roof is the increased size of the roof overhangs
The distinctive features are the first floor, made of stone, and the second floor, entirely made of wood with a voluminous, flat gable roof and large overhangs. The originality of the exterior is combined with practicality due to the formation of a large area around the house, protected from snow and rain. This solution reliably protects the walls of the house from getting wet and increases sound insulation indoors. The facade side is often equipped with full-length windows and balconies. Despite the impressive dimensions, the roof practically does not weigh down the building. If the roof extension exceeds 3 m, its edge is additionally supported by columns or walls. There are numerous projects in which the rafters smoothly descend to the ground. An additional isolated area is formed next to the building, which is used for auxiliary purposes, as car parking, etc.
Traditionally, chalet roofs are covered with shingles, but for our latitudes this is a very expensive material (oak split into tile plates). Therefore, today modern natural and synthetic materials are used for such roofs, including:
- straw or reeds;
- flexible or ceramic tiles;
- composite stylized roofing;
- larch shingles or shingles.
Off-center roofs
The avant-garde trend in architecture includes roofs designed according to the principle of asymmetry. The ridge moves away from the central axis of the building, due to which the roof sometimes takes on the most fantastic shapes.
Despite their bizarre shape, roofs with an offset center regularly perform their functions
Formally, such a sophistication can be considered one of the varieties of roofs with different slope angles. In practice, this technique is used in cases where the internal supporting walls are not in the middle of the building. The displacement is due to the designer’s desire to support the truss structure in the most reliable way and to reduce the cost of reinforcing the suspended span.
Selection of roofing materials
Of all the possible roofing options, the most common today are materials of artificial origin. The table below provides comparative characteristics of the main coatings available on the construction market.
Table: properties of roofing materials
| Name of material | Slope angle | Fire resistance level | Soundproofing properties | Specific gravity, kg/m2 | Service life, years | Price | Assembly difficulty level | Difficulty in repair and replacement | Disadvantages of the material |
| Corrugated sheet | 12–90 o | High | 5,7–9,4 | 30–35 | Low | Noisy, susceptible to corrosion, large waste on roofs of complex shapes | |||
| Asbestos cement slate | 12–60 o | High | Average (but higher than metal roofing types) | 10–15 | 25–30 | Low | Average | Easy, replacing the damaged area | Contains asbestos, which is harmful to humans. Fragile, covered with moss. |
| Ondulin | 15–90 o | Short | High | 6–6,5 | 35–50 | Low | Easy installation that does not require high qualifications | Easy, replacing the damaged area | The color is guaranteed for 5 years, low decorative properties. |
| Ceramic tiles | 15–60 o | High | Good | 40–100 | up to 100 | Very high | Easy, replacing the damaged area | The only drawback is the fragility of the material to fracture | |
| Cement-sand tiles | 15–60 o | High | Good | 18–30 | up to 100 | High | Difficult, requires qualifications | Easy, replacing the damaged area | No |
| Metal tiles | from 14 o | High | Low (especially if assembled incorrectly) | 3,5–5 | 40–50 | Low | Easy installation that does not require high qualifications | Easy, replacing the damaged area | Large waste of material when installing a complex roof. Subject to corrosion. |
| Soft (bitumen) tiles | from 15 o | High | Good | 3–4 | 30–40 | Average | Easy installation that does not require high qualifications | Easy, replacing the damaged area | The composition contains bitumen, a carcinogenic substance. |
In addition, when constructing roofs, non-standard types of coverings such as straw, reeds or turf are sometimes used. But this phenomenon can rather be called an exception to the rule and a tribute to ancient traditions; these materials are not widely used.
Laying a reed roof requires a lot of painstaking work and is more of an exotic option.
Projects of houses with a gable roof
Most developers, when choosing a ready-made house or cottage project, pay attention to the functional features of the structure and the shape of the roof. And this is no coincidence. The cost of the roof can be up to 30% of the total estimate. But the budget can be significantly reduced if you change the shape and choose inexpensive roofing materials. In this regard, the gable roof has a clear advantage over the others. And that is why today it is the most popular. Here is a far from complete list of the advantages of a gable roof:
- any building, including complex multi-level buildings, can be covered with a roof with two slopes (without compromising the appearance and internal comfort);
- roof installation work will cost much less due to the ease of installation and availability of materials (without compromising strength and reliability);
- when covered with metal tiles, the amount of waste will be minimal (for example, in a hip roof, waste can be up to 30%).
Architectural and construction organizations have a huge number of ready-made projects, and for little money they modify them to suit the customers’ conditions.
Photo gallery: ready-made designs for houses with a gable roof
 A one-story economy-class house, covered with a gable roof, is one of the most inexpensive and popular options for country housing
  Dormer windows partially replace artificial lighting in the attic floor
  In a two-story house you can make a low ridge and a small attic space
  The high gable roof allows you to organize full-fledged living quarters on the attic floor
Individual design (including independent design) is mainly carried out for the construction of houses with gable roofs and an improved layout, such as:
- one-story residential buildings with increased dimensions of the roof space;
- attic houses with and without hatches;
- two-story houses with attic and attic spaces.
Having decided on the necessary housing parameters and financial capabilities, you can independently or with the help of specialists create your own project for your dream home.
Gable roof for gazebo
A wonderful invention of our ancestors is the gazebo. Rest outside the city, family celebrations, meeting guests at their summer cottage and picnics - this is just a short listing of the functions that are associated with the gazebo. Perhaps this is why such a structure is present in almost every suburban area. One of the main components of a gazebo is the roof.
The gable roof reliably protects the gazebo from rain, dust and falling leaves and gives it the appearance of a fairy-tale tower.
Gazebos are built with different types of roofs, but the most popular are gable roofs.
Photo gallery: gazebos with gable roofs
 The gable roof of the summer gazebo will reliably protect camping visitors from rain or direct sunlight
  The offset of the ridge is used so that additional supports can be installed under the rafters, which will not interfere with the entrance and exit
  The stove built into the gazebo turns it into a small summer cafe
  Gazebos can be used in parks and recreation areas to shelter visitors from snow, rain or heat
The principles of constructing a roof over a gazebo are in many ways identical to those used in the construction of residential buildings. The only difference is in the structure of the supports: the roof does not stand on the walls, but on columns or vertically installed bars.
Types of gable roofs for gazebos are identical in design to the roofs of ordinary houses
Building a gazebo can serve as good experience before building a large gable roof on your own.
Assembling a pitched roof is, of course, faster and easier. But by giving preference to a classic gable roof, the owner of the building simultaneously acquires a more durable covering and an attic space, which over time can be turned into a residential attic. The initial costs will more than pay off, and the house will acquire a distinctive and at the same time attractive appearance.
It’s not for nothing that we so often use the expression “roof over our heads,” because without in any way detracting from the importance of strong walls, it’s hard to imagine a house without this element. What else but a durable roof will become a shield between you and bad weather, protecting you from precipitation and wind. Only after construction they talk about the full completion of construction and the transition to the interior decoration of the house. High-quality roof installation determines the comfort of the future home.
A do-it-yourself gable roof is a popular design in private construction, which is used in the construction of houses from the following materials: timber, logs, bricks, blocks, even concrete. You can easily recognize a gable roof among other design solutions thanks to the appearance of the house, reminiscent of a triangle.
The choice of this type of roof is explained by the availability of the materials used and the relative ease of installation, which even a novice house builder can perform.
Device
A gable roof, regardless of whether it is simple or mansard, consists of several structural elements shown in the schematic diagram:
Diagram of the arrangement of elements of the roof truss system


Types of rafter systems
There are several ways to make a gable roof for a private house. Their differences can be explained by the use of different types of rafter systems, of which there are only two:

Both of these systems are equally reliable; attic roofing involves their joint use when hanging and layered rafters are combined. Before carrying out work, professional roofing craftsmen create a drawing of a gable roof - a plan that reflects the location of all roof elements, according to which the necessary materials are calculated.
Roof calculation
Like any construction process, the roof structure of a house must be created with your own hands based on engineering calculations. For the convenience of its implementation, before building a gable roof, you need to sketch out a rough plan, which must indicate the length of the roof along the ridge, the exact length of the slopes, taking into account plumb lines. At this stage, the slope of the future roof should already be determined:
- If the main aggressive factor in the construction area is wind, then it should be 10-10 o so that its gusts do not tear off the roofing material.
- If construction is started in an area with a large amount of winter precipitation, a slope of 35-45 o is more advisable, which does not make it difficult for snow to slide off the roof.
When calculating the required material, it is better to round the obtained values up, without complicating the calculations by deducting holes for chimneys or roof windows, in order to avoid confusion.
The necessary calculations do not require knowledge of complex formulas, so anyone who has completed a school mathematics course can perform them. However, the more sophisticated and complex the gable roof of a house, the higher the complexity of the calculations and the design of the rafter system.
Mauerlat installation
If the calculations have been completed and the materials have been purchased, you can install the Mauerlat and then create the sheathing. Mauerlat is a kind of foundation for the future roof. Only this structure is not made of concrete, like the foundation for a house, but of pine timber.
Softwood is an ideal material for this, strong and light enough to distribute the weight of the roof evenly around the perimeter of the supporting elements of the house. It is placed along the roof slopes, between the rafters and the top of the wall.

Attaching the rafter legs to the mauerlat
To ensure greater safety of the Mauerlat and a long service life, a layer of waterproofing is laid between it and the wall, which is most often roofing felt. Depending on the material from which the house is built, the installation of the Mauerlat is carried out using various methods.
Do-it-yourself construction involves checking the reliability of the connection. If we are talking about a wooden house, fastenings can be done using pins or bars; in a brick house, metal wire and reinforcement are used; in buildings made of foam blocks, gas silicate, a concrete screed is used.
Sequence of work
If there were step-by-step instructions on how to build a gable roof, it would start with how. Hanging ones should be assembled in advance using metal corners and bolts. The outer structures are installed first, and only then those located inside.
To create a layered system, you must first set up a bed on which the supports will be installed. The assembly can be considered complete after all rafter legs are secured as shown in the drawing. If their length is not enough to create an overhang, it is increased by attaching fillies.
The next stage is installation of the sheathing . Since its purpose is purely practical, the simplest, cheapest material is used, for example, an unedged board or even a slab. However, you should not neglect removing bark from the surface of the tree; this simple operation will increase its service life. Depending on what you plan to cover the roof of the house with, there are two types of sheathing:

The final stage of work and subsequent operation
Construction ends with laying of roofing material. It will be difficult to describe step-by-step the installation of each material, of which there are a lot on the construction market.
The gable roof design guarantees:
- Excellent resistance to gusts of wind;
- Light snow falling off the slopes;
- Protection from rain and cold;
- Durability and reliability.
If the installation was carried out with high quality using modern materials, then the roof will last for decades without requiring repairs or complex maintenance. Therefore, you should not save on roofing work, since a reliable roof is a long-term investment in your comfortable life!
Video instruction
A roof with two slopes is the most common option for completing the box of a private house. When manufacturing it, it is important to correctly select the sections of the load-bearing elements, securely fasten the nodes and choose the right type of structure. The rafter system of a gable roof is not very complicated and can easily be made with your own hands.
Classification of rafter systems according to the method of support
The design can be classified according to two criteria. The first of them is the method of supporting load-bearing elements. The gable roof truss system of the house in this case includes the following types:
- with layered rafters;
- with hanging rafters.
The construction of a roof using layered rafters involves supporting them at two points. The design in this case avoids the occurrence of serious expansion. To do the installation yourself, you will need the following basic elements:
- rafter legs;
- Mauerlat;
- crossbar;
- intermediate posts and struts for large spans of load-bearing beams;
- sheathing and counter-lattice;
- lining thrust bars.
At the top point, installation involves resting on the crossbar. The installation also provides support at the lowest point - the Mauerlat. You can assemble such a structure for your home with your own hands only in two cases:

- A layered system is possible if the distance between the gables is not large. That is, such installation is suitable for a small house with your own hands. The greatest length of the structure, which allows the installation of a wooden crossbar without additional reinforcements, is 6 m. For large spans, it will be necessary to install metal beams as a crossbar. When using wooden beams, it will be necessary to provide intermediate posts, which are placed on average every 2 meters. This can only be avoided by using laminated veneer lumber of a sufficiently large cross-section as a crossbar. In this case, a free layout of the space becomes impossible - the racks in the middle of the room cannot be removed.
- The second option, when it is possible to install a layered gable roof system with your own hands, is to have a wall in the middle of the house. The device in this case provides that the beam on which the rafters will rest at the top point will transfer the load to the inner wall. In this case, the supporting structure should not be confused with the partition. The partition rests on the floors, and installing the wall of the house with your own hands involves resting it directly on the foundations. This device is suitable for buildings with sufficient width, where it makes sense to install a wall fence in the middle.
The second option is hanging rafters. They are more complex to calculate, but allow installation in the under-roof space of a free-plan house. The design assumes the absence of a supporting wooden or metal beam in the upper part. Installation involves supporting the rafters only at the lowest point. At the top, the supporting beams are securely connected to each other. Installing such a system resembles a farm. The structure works under tension, so it is important to prevent excessive horizontal load on the walls of the house. This can be accomplished by performing the following activities:
- installation of a monolithic belt along the edge of the walls;
- it is necessary to securely fasten the gable roof mauerlat to the wall of the house with your own hands;
- To eliminate the thrust, a contraction is established.

The screed or screed becomes one of the significant elements of the gable roof of a house. It prevents the walls from expanding under the influence of thrust. The following types of fights can be distinguished:
- located in the attic floor level;
- located at the attic ceiling level.
It is worth noting that the second option provides less reliability, since the higher the element is mounted, the stronger the impact the rafters have on it. If the contraction turns out to be too long, you need to strengthen it with your own hands. To do this, additional elements of the gable roof of the house are installed - pendants. They connect the ridge to the middle of the puff, which prevents it from sagging.
The rafter system of a gable roof with hanging rafters allows installation with pre-assembly of trusses on the ground, after which they are lifted onto the roof and secured.
This option is suitable only if you have lifting equipment, since the finished gable roofs of the house will become too large and heavy to lift with your own hands.
Classification by type of stingray
The second division can be made depending on how the ramp line is designed. The views here suggest two options:

- With straight slopes. The easiest way to do it. Allows you to get the job done without major difficulties. The disadvantage of this do-it-yourself roofing option is the reduction in attic space.
- With broken slopes. These types of roofing are more difficult to implement. It is assumed that there is a line along which the angle of inclination changes. The angle of inclination of the lower part of the slope must be made larger than that of the upper one. This way you can raise the attic ceiling and increase the free space. The roof is installed with the installation of an additional crossbar at the fracture site.
These types require a choice between them depending on the wishes of the future owner of the building.
Basic roof elements
The rafter system of the gable final part of the building consists of many elements. Installation should begin with a detailed study of each of them and the selection of their sections.
Mauerlat
When installing elements under metal tiles or other coverings, it is necessary to use timber with a cross-section of 150x150 or 200x200 mm. It is this size that allows for the most optimal distribution of the load. Next, you will need to choose a fastening method; it depends on the material of the walls. There are several options:

- Frame, timber or log walls do not require the installation of a Mauerlat. In the case of a frame building, the support for the rafter legs is the upper frame of the walls. When building fences from timber or logs, the upper crown becomes the Mauerlat. It is important to properly secure these elements in the wall structure.
- When using lightweight concrete for construction, additional reinforcement will be required. Lightweight concrete includes materials such as foam concrete, slag concrete, and expanded clay concrete. They can collapse if the roof is not placed centrally on them. To distribute the load evenly, a monolithic reinforced concrete belt is poured along the edge of the walls. During work, special wire, pins or bolts are placed in it, onto which the Mauerlat will be attached.
- For brick structures, a reinforced concrete belt may not be required.. In this case, to connect to the strapping beam, a wire is inserted into the masonry, which is then wrapped around the mauerlat and twisted. The second option is to place wooden blocks impregnated with an antiseptic into the masonry from the outside one row before the walls are cut. Such plugs and Mauerlat are fastened with staples. It is also possible to use studs and bolts, the fastening of which will require pouring a monolithic belt.
An important point is waterproofing.
When installing, it is important to provide roofing felt, linochrome or waterproofing at the junction of concrete or brick with wood. This is required to prevent wood from rotting upon contact with material of a different moisture content.
Rafters
After securing the Mauerlat, the rafter legs are installed. Their cross-section is selected depending on the pitch of the load-bearing beams, their span, snow load and type of coating. When installing a frame under metal tiles at a pitch of 60 cm, it is recommended to follow the following recommendations depending on the span:
- 3 m – 4x15 cm;
- 4 m – 5=15 cm;
- 5 m – 5x17.5 cm;
- 6 m – 5x20 cm.
 Table of average values of rafter legs
 These are average values; to perform a more accurate calculation, it is better to contact a specialist or study additional literature.
There are two ways to attach the rafter legs to the mauerlat:
- with a notch;
- without her.
 Attaching rafter legs to the mauerlat with and without a notch
 In the first case, a cut is made on the strapping beam, in the second, a special board is nailed to the rafters, which becomes a thrust block. Further, for both methods, the work is performed in the same way. Using metal corners, the inclined beam is fixed so that it does not move relative to the design position along the mauerlat. Additionally, nails are driven in at an angle.
 Scheme of fastening rafters using wire and staples
 In addition, you will need to fasten the rafter to the wall. The implementation of this activity is provided for in regulatory documents. You can do this in two ways:
- on brackets (suitable for wooden buildings);
- using twisted wire (a more labor-intensive option, but the only one possible for stone houses).
You can perform fastening according to the norms through one leg. This is necessary to more securely attach the roof to the frame of the house.
If the work is done correctly, you won’t have to worry about its condition even in the strongest winds.
Racks, ties, struts
Such elements are most often made from boards. The optimal thickness is in the range of 32-50 mm. The exception is racks. Here you can use boards with a thickness of 50-100mm. Fastening is carried out on studs or using support bars.
The rafter system is the roof frame, which is the basis for laying roof coverings.
The rafter system is designed to withstand the load of the roof, taking into account natural loads: winds, snow, rain.
The roof option is approved at the design stage.
The purpose of the roof includes several functions: warmth in the house, protection of the premises from natural phenomena, therefore The rafter system needs to be given special attention.
You can read how to calculate the rafter system.
It is customary to classify rafter systems so that the task of choosing a future roofing option is solved easier:
- Single-pitch. The simplest ones. More suitable for utility rooms, bathhouses, small private houses, gazebos. Provides for an inclined position of the structure at a slight angle (no more than 25°);
- Gable. Used for small houses and country houses. They have the form of a triangle, in which the rafter boards are connected by a beam and are at a certain angle;
- Gable broken lines. They have two slopes with a fracture, thanks to which there is an opportunity to increase the attic area;
- Three-slope (half-hip). They have two trapezoid-shaped slopes, which are connected by one end triangular slope (hip);
- Four-slope (hip). Used for residential buildings, require significant labor costs. They have two end triangular slopes and two trapezoidal ones;
- Tent. Used for square-shaped buildings. They consist of four triangular slopes, the upper corner of which is connected in the center of the roof;
- Multi-pincer. Consist of trapezoidal or other slopes of various shapes, connected to each other.
The most suitable designs for - and broken gable. There are others, but they are less common and not as practical as the above.
Rafter structures are also classified into:
- Hanging. With this type of roof frame due to the lack of load-bearing walls in the room;
- Layered. Rafter installation option, providing support on a load-bearing internal wall or support in a building.
When designing a building, the material for the roof frame is calculated based on the intended configuration and load. It’s not difficult to make rafters for yourself, it’s important to approach the matter wisely.

Rafter systems of layered and hanging type
Calculation of the load on the rafters
To correctly calculate the load on the rafters, it is necessary to take into account many factors that can affect the weight of the structure.
Important indicators to consider:
- Constant load: includes the mass of the roofing pie and covering material;
- The load is temporary: constant and maximum amount of snow, rain, intensity of wind gusts, and in areas with high seismic activity - the effect of storm winds, tornadoes, hurricanes.
In addition, you should keep in mind the weight and strength of the rafter legs, and also pay attention to the fastening of the gable roof rafters and the installation option.

Scheme of rafter systems
The distance between the rafters of a gable roof and the thickness of the rafters
 The rafter pitch of a gable roof is the empty space between the rafters. The functionality of the roof depends on the correct calculation of the pitch. As a rule, the step is about a meter.
To more accurately calculate the distance between rafter boards, there is a specific calculation scheme:
- Determine the length of the slope.
- The length of the slope is divided by the distance between the rafters.
- To determine the number of rafters, one is added to the resulting value and rounded up. This is how they determine how many boards are needed for the slope.
- The length of the slope is divided by the number of boards to obtain the distance between the rafters.
This calculation is not always final.
Additionally, you should take into account the load of the roofing (its weight), the thickness of the rafters, as well as the dimensions of the rafters for a gable roof.
The thickness of the rafter board largely depends on the covering material:
- . Boards are used with a cross-section of 5x20 cm at a pitch of 60 to 90 cm with a sheathing section of 4x5 cm;
- . Rafter boards - 5x15 cm, pitch - from 60 cm to 95 cm;
- . The section of the board is 6x18 cm or 5x15 cm, the distance between the bars is from 80 cm to 130 cm;
- . Rafter cross-section - 5x15 cm, 5x10 cm with pitches from 60 cm to 90 cm;
- . The cross-section of the beam is the same as for corrugated sheeting at a pitch of 60-80 cm.
All indicators should be taken into account and the thickness of the rafters should be accurately calculated so that there is no excessive load on the foundation.
Incorrect calculation of the length of the gable roof rafters, as well as incorrect calculation of the pitch indicators, can lead to sagging of the roof.
Installing the rafters of a gable roof with your own hands requires taking into account the weight of the rafter board and all additional fastenings of the structure.

What does the rafter system consist of?
Rafter structure - a complex system and installing a gable roof rafter system is not an easy task. Rafter system consists not only of rafter boards, but also of other additional elements:
- Mauerlat. An element that distributes the entire load evenly across the supports;
- Run. Boards holding the legs of the rafters together: at the top - a ridge, at the side - a side girder;
- Puffs. A connecting beam that prevents the rafter legs from diverging;
- Struts, racks. The bars, which fix the stability of the rafters, resting on the bed;
- . A lattice made of bars, which is applied perpendicular to the rafters. Transfers the load of the covering material to the rafter frame;
- . A connecting beam that serves as a connection between the roof slopes;
- Fillies. If the length of the rafter legs is insufficient, they are mounted to form an overhang;
- Roof overhang. Extends beyond the bottom line of the slope to prevent precipitation from entering the walls.
The rafter system involves rafters, braces, braces and racks located in the same plane. They are located in such a way that the main load of the roof structure falls vertically on the external load-bearing walls. Therefore, the manufacture of gable roof rafters is a very important process.

What does a gable roof truss system consist of?
Installation of a rafter system with layered rafters
A layered rafter system is used when the span length does not exceed 6.5 meters.
If there are load-bearing structures inside the building, it is possible to install additional racks.
The main support of the rafter legs is the mauerlat.
Mauerlat installation
Before installing the Mauerlat, it is necessary to install an armored belt. It consists of formwork, into which reinforcement is laid and filled with concrete. At the base, when the concrete has not yet hardened, studs are installed, to which the Mauerlat is then attached.
Mauerlat is a beam that is laid on a support (load-bearing wall) and is the base of the rafter frame. A layer of waterproofing material is pre-laid. If the length of the beam is not enough to cover the length of the wall, then it is extended.
- Check the equality of the diagonals. A discrepancy of a few centimeters can lead to refurbishment of the frame;
- Secure the corners of the Mauerlat;
- Attach the Mauerlat using pins or wire. The studs are tightened in two steps, having previously drilled holes for them.
The stability of the roof structure depends on how firmly the Mauerlat is installed.
Therefore, it is necessary to take seriously the attachment of the Mauerlat to the supporting support.

Mauerlat installation
Sill
After the Mauerlat has dried (after 5 days), mark the installation of the plank on the Mauerlat timber: its axis should be equally spaced on each side of the mauerlat beam. The bed is attached to a two-layer waterproofing layer with anchor bolts. The bench should be secured to the wall from the inside with twisted wire or staples. Next, markings are made for installing the rafters.

Installation of a gable roof rafter system
The supporting points of layered rafters are the walls and racks inside the frame. The rafters are mounted with hinged fastening units. When using sliders for fastening, a slight lowering of the roof frame is ensured in the first years of the roof's service.
This installation method is necessary to prevent distortions, since in the first years the building settles a little.
The rafter beams should be secured either by installing them in prepared grooves and strengthening them with fasteners, or by attaching board overlays.

Installation of rafters
Ridge knot
The rafters are connected end-to-end by cutting the edge of the beam so that the angle when connecting the opposite beams corresponds to the angle of the slope. They hammer the rafters under the ridge with nails. An option is possible in which the beams are connected with bolts, nails or pins, that is, with an overlap.
If necessary (if provided for by the project), a cut is made in the rafter beams to attach the ridge beam (purlin).

Ridge knot
Racks
The racks are attached with a short span - in the center, on the sides and in the center - with a wider roof base. The fastening is carried out vertically from the ridge to the inner wall.

Run
Purlin - a connecting beam for securing rafter legs. Attaches with bolts or brackets to the rack.

Filly installation
The final stage of installation of the layered system is the installation of fillets with a short length of rafter legs for the overhang. To install the canopy, it is necessary to install additional small rafter boards.


Installation of a rafter system with layered rafters
DIY gable roof rafter system: installation with hanging rafters
Rafter system, equipped with hanging rafters, is a triangular structure, where the sides are rafters, and the base is a tie connected to the lower heels of the rafters.
Installation of a hanging type rafter frame can be done without installing a Mauerlat: a board that is fixed to a two-layer waterproofing can replace it.
If the structure has a large span, then struts, headstocks, and crossbars are attached to it.
There are no racks in the hanging system.
Puffs
The tie is the longest beam of the roof frame. To prevent it from sagging, it is necessary to attach headstocks - boards that are attached to the top of the structure on one side, and to the tie on the other. Fastened with bolts or wooden plates. Using threaded clamps, you can adjust the sagging tightening.

Construction of the rafter system
Installation of strut beams
The headstock can be complemented by strutted beams, forming a rhombus, where two struts are the lower sides, and the rafter boards are the upper ones, the upper corner being the ridge. Thus, the struts rest against the headstock, distributing the load.

Strut beams
Rafters
The rafters of a hanging structure are mounted similarly to a layered structure. When installing attics, the tie is installed closer to the ridge, providing more space under the ceiling. In this case, the tightening is secured by cutting and bolting.
ATTENTION!
When installing a hanging system, a prerequisite for installation is the accuracy of calculations and the strength of the rafters and tightening.
The presence of errors leads to displacement of the axes of system elements, which ensures distortion of the structure.
This photo will tell you how to install rafters for a gable roof:

Installation of rafters

Hanging rafters
How to strengthen the rafters of a gable roof
 It is necessary to strengthen the rafters of a gable roof when the load calculation is incorrect or frame defects are detected.
Strengthening can be done using:
- Beams, which are installed to transfer the load to them;
- Installation of struts with an inclined mount with an emphasis on the bed;
- Application of double-sided slats;
- Increasing the cross-section of rafter beams in the place of supports on the strut by applying sheathing from boards with nails or bolts;
- Wall made of boards, which are attached to the rafters in places where snow accumulation is expected to increase the load-bearing capacity of the rafters.
You can resort to strengthening the mauerlat beam and the base of the rafter beam. Due to increased humidity and reduced ventilation, these parts of the frame are more susceptible to rotting, so when arranging the roof special attention needs to be paid
A gable roof is rightfully considered one of the simplest roofing structures; moreover, it perfectly protects from snowfall, heavy rain and sharp gusts of wind. You can make such a gable roof yourself.
Building a gable roof doesn't require any special skills from you, but there are a few key points to consider. Recommendations for the materials used are given in the tables below. 
So, what do you need to know in order to build a reliable gable roof structure yourself? Naturally, you need to start with a support on which the entire structure will rest.
Mauerlat
Mauerlat is a wooden beam, most often square in shape, securely fastened to a load-bearing wall. It is this that is the foundation of the roof and the rafters already rest on it. 
Rafters
For the ridge, it is recommended to choose timber made of durable wood, because it connects the structure into a single whole and affects its reliability. In order to reduce the harmful effects of precipitation on the walls of the house, the rafters are made longer with the help of additional sections, creating an overhang. This makes it possible to avoid problems such as severe wetting of the walls.
The slope angle of the gable roof is recommended to be 30 degrees. This slope simultaneously reduces the likelihood of snow accumulation on the roof and reliably protects against strong gusts of wind. 
Sill
Another way to fasten parts to each other is to fix them using metal plates and corners. Its disadvantage is that the screws tend to come out of the base under angular loads, thereby depriving the roof structure of reliability and stability.