To choose the right porch design for a private house, you need to evaluate your budget and needs, and also consider photos of various ready-made solutions. Dekorin completed the last task for you: in this article you will find out what a porch for a private house can be like in terms of its shape, materials and finishing with examples in 40 photos.
Porch in a private house - beautiful options with photos
The size and shape of the porch to the house, as a rule, are dictated by the architectural features and dimensions of the building itself, as well as the personal preferences of its owners. In particular, designers agree that the canopy and porch railings should be made in the same style as the roof and balconies of a private house. For example, if the roof of the house is gable, the canopy over the porch should be the same. And if you ordered forged balconies or window bars, then at the same time worry about the railings - so that they have the same forging patterns. The design of columns, arches and other decorative elements should be selected in the same way.
However, in the photos below you will see that the most interesting facades with a porch to the house were made precisely in deviation from these general rules. But first, let's look at the main porch design options:
- Open is the most common type of entrance to a house; may have a canopy and railings, and also be decorated with decor that is brought into the house in winter;
- Closed - has transparent or translucent walls made of glass, polycarbonate or a simple mosquito net; designed to decorate the entrance to the house, relaxation at any time of the year or use as a preliminary hallway;
- Mounted - made when a private house has a basement or when its need is justified by the landscape around the building; its design is often similar to a balcony;
- Porch-terrace - an extended version of the porch, used for outdoor recreation;
- Protrusion shape: round and rectangular.


Finally, you also have to choose the materials from which the porch for a private house will be made. Today, most porch designs are made of concrete, which can then be painted, tile, stone, wood, etc. Other common materials include wood, metal, stone and brick. Let's take a closer look at them!
Wooden porch to the house - ecology and comfort
The most common option today is wood porch decks, which are installed on a concrete, brick or metal base. In 80% of cases, a wooden porch is made of pine, as the most common and cheapest material. When properly sealed, varnished and stained, a wood porch will look good for many years to come. In the following photos you will see options on how to make a porch for a private house from wood.


Concrete porch - strength and variety
Concrete is the cheapest, most versatile and reliable material for making a porch. Firstly, the concrete porch is monolithic and does not loosen over time, as happens with wooden structures. Secondly, it can be easily repaired and decorated with any decor. And finally, it can be given absolutely any shape, and it will not particularly affect the cost and duration of the project.
Most often, a concrete porch is finished with clinker or other tiles, less often with stone, paint and other materials. In modern homes with wood, brick and siding exteriors, it is often left bare to highlight the color and texture of the walls and the surrounding environment. Let's look at the photo to see what a concrete porch might look like.


Brick porch - reliability and unpretentiousness
A brick porch will be more expensive, but also a very attractive and reliable solution for a private home. Its installation will take quite a lot of time and labor, but in the long run it will fully pay off due to its ease of maintenance. Note that quite often a brick porch has a concrete base and/or covering steps.


Chic stone porch - an expressive classic
Natural stone is a very strong, durable and beautiful material for decorating a porch. There are many different types of stone, some of which are used to create a base, others for decorative finishing. Accordingly, the first of them are more expensive and reliable than the others. In general, any stone can withstand any weather conditions well and does not require maintenance over a long period of time.


Wrought iron trim and metal porch
As a rule, a metal or wrought iron porch refers to the decorative elements of the porch - the roof, steps and railings made of metal. However, sometimes you can see a completely metal porch for a private house, as in the following photo.


The main advantages of such a metal porch are its high strength and durability. The only point: you will have to spend extra money on painting it and treating it against corrosion. In addition, metal floors are quite cold, which is why this material is not used for terraces intended for relaxation. In them, the metal base is covered with wood or a concrete base is used.


Decorating the porch of a house with tiles and polycarbonate
The tiles can be installed on a concrete and brick porch when it is necessary to increase its attractiveness or equip it as a recreation area. The modern selection of tiles allows you to find very stylish models in wood, stone and other effects. Particularly popular today are clinker tiles for outdoor porches and bright tile designs with patterns in Moroccan and geometric styles.


Canopy over the porch made of polycarbonate
Polycarbonate is an inexpensive, very flexible and lightweight material used to decorate the walls and canopies over the porch. Usually it is mounted on a metal base and covered with sun protection film. The most economical and simple way to create a canopy over the porch of a private house of all those available for 2016! And it looks decent:


You have looked through 40 photos on the topic of what a porch for a private home could be like. We hope you enjoyed it. Leave your comment below so that we can improve our articles and delight you with even more interesting materials!
Beautiful porch for a private house - 40 photos updated: May 31, 2018 by: Margarita Glushko
A porch that is correctly chosen in style and constructed gives the house a completed look. You can build a porch for a wooden house with your own hands only when its external design is taken into account and its appearance matches the exterior of the house itself.
Naturally, no matter how beautiful the porch is, it is important that it is functional and easy to use. Therefore, we will consider the options available to each private developer for a porch for a wooden house, what the design should be in a particular case, and also what the main stages of its construction consist of.
Before starting construction, it is logical to first consider the most suitable porch samples for a wooden house. And only after careful consideration and weighing of all their pros and cons, can you proceed directly to the construction of the chosen structure.
Note! If the house is built from timber, solid logs or has a wooden frame structure, then it is better to choose wood as the main material. This will preserve the general style of the entire architectural composition, and will not cause difficulties if it is necessary to connect the extension to the main structure.


Porch modification table:
| View | Properties |
| Open
|
This is a simple platform with steps. It is a small extension necessary for a comfortable transition from the surface of the earth to the house and back. May have railings and fences.
|
| With canopy
|
A covered wooden porch for a house implies in its design the presence of a canopy or a full roof. Unlike the option described above, it is more difficult to manufacture and requires more effort, time and financial expenses. However, along with this, it has the following advantages:
|
| Fully enclosed
|
The porch of a wooden house is closed and has in its structure not only the necessary steps and platform, but also a roof, walls, windows and doors. In fact, this is no longer a porch, but a real veranda. If you insulate it, you will get a full-fledged winter room. The disadvantage of such a structure is the maximum monetary cost of all the above options. In addition, such a porch can no longer be used as a small terrace. |


External parameters
From the table above it can be seen that a porch for a wooden private house can be made in three main modifications.
However, in addition to this, each of the presented options is characterized by a set of external parameters, such as:
- Height. As a rule, the height of the porch at the house coincides with a similar parameter of the living space. At the same time, it is possible that a balcony for the second floor could become an extension of the porch. In this case, the porch and balcony are built in a single structure.
- Dimensions. The area of the door area must be such that the doors open without interference. Based on this, the minimum width of the platform is 2-1.5 times the value of the door itself.
- Stair type. The length of the flight of stairs is selected individually - depending on the conditions and the distance to the ground from the front door. Its width, optimally, should be at least 120 cm.
For maximum comfort, treads or steps should be at least 180-200 mm wide, and their height should be no more than 120-150 mm. The height of the railing is about 80-90 cm.
- Form. A wooden porch for a private house can have any shape. However, you need to take into account and not forget about its stylistic combination with the design of the house. The porch extension can be in the shape of a semicircle, rectangle and adjacent to the house directly or from the side - the main thing is that the architectural harmony is not disturbed.


Construction technology
Perhaps everyone who has at least a little construction experience can make a porch for a house out of wood. However, its quality and functionality will directly depend on how competent the approach was to its planning, preparation, selection of materials and implementation of all stages of construction. Therefore, we will consider the main stages of creating a porch made of wood.
Stage 1 – design
The ease of completing all stages of construction will depend on how carefully and taking into account all the features the porch to the house is designed. Of course, a homemade porch design does not have to be a professional document presented to the district architect for signature. However, it should be easy to understand for the developer himself.
It is best to draw a sketch of the porch showing all its main/supporting elements, their sizes, indicating the type of materials used and, if necessary, the features of working with them.
In the project - a porch for a wooden house - it is necessary to reflect:
- Dimensions of the porch area and its position in relation to the front door.
- Type of steps and their characteristics (number, height, width).
- Design and main parameters of the porch canopy.
- Dimensions and structure of the enclosing elements of the porch - railings, handrails.
- Type of connection to the house.
- Types of materials used, their quantities and the required set of tools.


Stage 2 – marking, preparing and pouring the foundation

- Marking
Once the plan has been drawn up, you can begin marking the future structure. Marking is a clear definition on the ground of the contours of the future structure. This can be done, for example, by driving pegs into the ground at the corners of the perimeter at the site of the planned structure next to the front door.
In this case, it is imperative to follow the “skew” markings. Its parameters must strictly correspond to the given geometric figure.

If it is a rectangle, its corners should not deviate from 90 degrees. more than 1 degree. Determination of parameters is carried out either manually or using special construction measuring devices.
- Formwork
To create a foundation for the porch, you need to prepare the formwork. As a rule, a porch made of wood is not heavy. Therefore, it is possible to use a shallow columnar foundation in the corners and perimeter of the structure.
The distance between the pillars should be no more than 1.5 meters. Dimensions of concrete pillars - width and length - 20-30 cm, height - 40-50 cm, depth - 20-30 cm.
The formwork for such a foundation is a small hole, about 30 cm deep (up to the clay layer). If the soil is loose/free-flowing, you can make a thin backfill of small crushed stone, up to 20 cm thick.

The upper part of the formwork consists of a box knocked together in the form of a square or rectangle without a bottom, corresponding to the size of the pit and installed on top of it. If the porch is made of timber/logs, that is, it has a lot of weight, it is better to make the foundation strip, but also shallow, having previously prepared the appropriate formwork for it.
However, the depth of the foundation, as well as its type, completely depends on the terrain conditions, soil type and groundwater level. We are considering the best option - on hard ground, a straight section and groundwater that does not come close to the surface.
- Foundation
When the formwork is ready, you can begin filling it with pre-prepared concrete mortar. Due to the fact that the volume of the foundation is small, concrete can be prepared independently, although if you have free resources, you can also use custom-made concrete.
The grade of concrete you need to select is strong, but not very high grade. For example, for a frame porch made of pine boards with a light canopy, concrete grade M100 - M150 will be sufficient for the foundation.
It is not necessary to reinforce a columnar foundation. On the other hand, if the foundation is made in the form of a monolithic strip under a heavy porch made of timber or round timber, it is better to make a full-fledged reinforcing frame for it.

Note! Alternatively, a shallow columnar porch foundation can be made from standard building bricks or small concrete blocks, stacked into appropriately sized columns using mortar.
The foundation will be ready for loading after pouring after 3 weeks. At the end of this period, the formwork can be dismantled and beams installed on the concrete columns.
- Foundation for stairs
The foundation is needed not only for the porch area, but also for the stairs. It can also be made in the form of small columns with a depth of 20-30 cm into the ground.
The columns formed to support the bottom of the stairs should not be too high - ideally they should be equal to the height of one step, that is, no more than 15-20 cm.
Stage 3 - construction of the porch
To make a porch with your own hands for a wooden house, you will need to purchase a sufficient amount of lumber and, of course, choose the right tool for processing it.
The construction of a porch includes the following operations:
- First you need to install custom-sized beams - the base for the porch platform. A beam with a height of 150-180 mm and a width of 100 mm is best suited for this purpose. After installation, the pieces of timber need to be connected to each other.
To do this, you can use the method of connecting crowns, used in the construction of houses made of timber - “tenon and groove”, or connect them using metal corners. Or, as the simplest option, just nail the corners with large nails.
- When the base for the platform is ready, you can immediately make the floor to make it more convenient to work in the future. For this purpose, edged boards with a thickness of at least 40 mm are used.
Note! If the porch area is wide, the floor boards may sag. Therefore, if the distance between the edges of the support of the boards exceeds 100-120 cm, you can install a beam in the middle from the same timber that is used in the base, or from across the installed board with a thickness of 40-50 mm.
- Bowstrings are attached to the base of the porch platform at the required angle - the sides of the stairs, onto which the steps are subsequently mounted. The lower edge of the bowstring is installed on a pre-prepared low-height foundation, which can also serve as the basis for the first step from below.
Bowstrings can have different designs - it all depends on the capabilities and desires of the developer himself. For example, the string can be a 150 by 100 mm beam with grooves sawn at an angle for attaching steps. Bowstrings are usually nailed to the base of the porch deck using large nails.
Note! The height of the porch platform with the floor must be made exactly under the threshold of the front door and coincide with the floor level in the house. This must be taken into account at the stage of pouring the foundation.
- Once the strings are nailed, you can also nail the steps. By the way, for the installation of steps the same rule applies as for the platform - if the span is too large, that is, more than 120 cm, you can install another string in the middle.


Stage 4 - installation of canopy and railings
So, when moving to this stage, the porch to the house made of wood with your own hands is almost ready. All that remains is to make the roof and barriers on the site, that is, railings.
This stage is performed in several stages:
- First you need to decide on the shape of the porch canopy and the roofing material. Next is the frame. For corner supports, you can take a square beam with a side of 10 cm, although you can also use boards with a thickness of at least 40 mm.
- The supports must be installed strictly at a vertical level, and secured at the bottom with metal corners, or simply by nailing them diagonally to the base of the porch area, but also by temporarily securing them to the crossbars and nailing them to the wall of the house.
- When all the supports are installed, it is necessary to fasten them along the upper edge with a frame. Again, light, dry pine boards are suitable for this purpose. In this case, the thickness can be less - from 25 cm. This will be the basis for the canopy.
- Next, depending on the design, rafters are attached to the base, always connecting them with the other end to the house. A sheathing is made on the rafters, on which the roof is in turn laid.
Note! To prevent precipitation from accumulating on the roof of the porch, its angle should be at least 20 degrees.


So, the roof/canopy for the porch for a wooden house is ready. Next you can make the railing. Their horizontal elements are simply attached in any convenient but reliable way to the supports for the canopy, and the vertical ones are fixed between them and the base for the porch area.
The wooden porch for a private house is ready. All that remains is to prime it and paint it. The artistic design must necessarily match the style of the interior of the house itself, so as not to create an architectural imbalance in the structure.
In this case, the porch can be made of different materials and have a variety of shapes. In the article we will talk about how to make a wooden porch with your own hands, show diagrams, drawings, photos and video materials.
Perhaps, even at the design stage, you should think about what kind of porch to make for your house. There are several types:
- Regular (simple) porch. It consists of a small number of steps, and the risers can be either open or closed. This porch can be built with or without railings. It has a simple appearance, there is no wide flooring.
- Porch - patio. It has an original appearance and is characterized by beautiful shapes. Such a porch has a special platform on which flowers or other elements of decorative structures are installed. A small recreation area may be provided.

- Porch - terrace or veranda has a rather complex shape. It connects to the open part of the house and has a seating area.
- Built-in porch. It is built together with the house and has a common foundation with it. This type of porch is designed together with the building, every element of the building is thought through.
- Attached (attached) porch. It is being built separately from the building itself. Can be done while using the house. It is a separate structure that is connected to the house in a certain way.

Anyone can build a porch. When carrying out construction work, it is important to follow safety rules and regulations.
Independent construction of a porch includes the following steps:
- First of all, you need to make a drawing of the future structure. You can make the drawing yourself or order it from specialists.
- The drawing of the porch should have a general view, the dimensions of the flight of stairs, landing, railings and flights of stairs.
- When designing, you must immediately think about what material will be used. If the porch will have a lot of traffic, then it is better to use stronger types of wood. For a small family, you can make a porch from pine.
- It is important to consider what kind of protection from precipitation will be provided, for example, you can use a roof or canopy.
- The construction site should not interfere with the opening and closing of doors, while there should be enough space for several people to move around.
- Before starting construction work, it is worth deciding what height of steps is best to use.
- Consider the design and appearance of the porch. This design should fit harmoniously into the exterior of the house.
After the preparatory work has been carried out, you can safely begin building the porch.


To make a wooden porch you will need to select the following building material:
- Beam with a section of 10×20 cm for supports. Although in most cases the size of the support beam is selected individually. The choice depends on the degree of load on the structure. As for the wood itself, it is preferable to choose larch or pine. They contain resins that allow the wood to withstand adverse environmental conditions.
- Boards 3–5 cm thick for decking the platform.
- Blanks for balusters and railings. If there are none, then you should purchase a beam/batten for their manufacture. Dimensions depend on design parameters.
- Impregnations, solutions and special compositions for wood impregnation.
- Concrete for pouring supports.

We invite you to familiarize yourself with the technology of making a wooden porch on wooden posts. Building a porch on a foundation in the form of a support cushion will be justified if the following rules are observed:
- The base of the stringer must necessarily have an emphasis on waterproofing, which is located between the wood of the stringer and the foundation.
- It is better to use coniferous wood for supports, especially if you live in an area with high humidity.

- The support pillars should be treated with an antiseptic against rotting. It is not recommended to use roofing felt in this case, since it does not allow air to pass through, and this leads to rotting of the wood. Therefore, it is better to use waste oil or drying oil for processing.
- The installation depth of the pole is up to 80 cm. On average, the depth of digging a support can be equal to 1/3 of its length.
- If the design is quite massive according to plan, then more supports should be installed for better stability.
- Each support must be poured with concrete. Once it's dry, check the height between all the posts. If there is a difference, then it is necessary to eliminate it by filing.

- After this, you can lay the lag on the supports.
- If possible, secure the upper edge of the stringer to a railway sleeper.
The principle of building a porch to a brick or wooden house is identical. In any case, it is worth making a high-quality connection of the porch to the building.

As for the steps, everything is very simple here. The boards are laid on logs and fixed with nails or screws. The method of installing them may vary. For example, boards are fitted close to each other so that there are no gaps between them. In this case, the slope of the porch will be from 1.5 to 2°. This will be enough so that the water does not accumulate, but drains. Another installation method is to leave gaps of up to 3 mm between the boards. This will allow the water to immediately flow down without lingering on the surface of the porch.
The latter method of laying flooring has its disadvantages, which is associated with the risk of injury. This applies to cases where the fair half of the house wears stilettos.

If we talk about steps, they can be purchased ready-made. But if you want to save your family budget, you can make them yourself:
- It is necessary to start installing the steps from the bottom of the bowstring/stringer. For fastening, self-tapping screws are used, the heads of which are recessed into the wood.
- First of all, the risers are installed, and then the steps themselves.
- If your steps are on a stringer, then the fastening is carried out directly to it.
When the steps are ready, you should worry about safe movement on the porch by building railings. They can also be made from wood. Guardrails on steps are especially necessary if there are more than three steps.

The porch fence can be made of forging, stone or brick. In this case, it will look more monumental.
Be sure to provide additional safety features. This includes an anti-slip coating, which can be made of rubber, rubber, etc. This is very important, because frozen water makes movement on the porch and steps unsafe.

So, making a porch out of wood is one thing. Providing it with a long service life is quite another. We will talk further about the means of protecting a wooden porch.

To organize the protection of the porch and steps, it is worth making a canopy. It will prevent snow, rain and direct sunlight from entering. All this negatively affects wood, especially with constant exposure. If the porch is small, then it will be enough to build a small canopy. For the roof of a canopy/canopy, you can use different materials: corrugated sheets, polycarbonate, tiles, etc.
When arranging a canopy or canopy, it is important to ensure that the support pillars do not interfere with movement.

This is the principle used to make a wooden porch. If you already have experience in making such a design, then leave comments at the end of this article. If you are a beginner, then the provided diagrams and photographs will help you design and do all the work yourself. We also invite you to watch the prepared video material.
Video
In the video provided, you can clearly see the technology for making a wooden porch:
Photo
In the photographs you can see different options for making a wooden porch:


Scheme
If you decide to make a wooden porch yourself, then the proposed diagrams can help you develop your own project:


If you want to build a porch for your house with your own hands, then we have great news for you - it can be done with your own hands! In fact, you can even choose from several available options – concrete, wood or metal porches! Moreover, in the latter version, the structure will be equipped with a beautiful polycarbonate canopy.
Let's take a closer look at each of the available options. First, let's take a look at the instructions for making a concrete porch for your house.
Option one. Concrete porch
The strongest and most durable design, which also looks quite solid. First, decide on the size of the porch.

Stage No. 1. How to calculate the dimensions of the porch

In most cases, the porch of a house is just a few steps. You are obliged to choose the optimal dimensions of this design. Ideally, the width of the stairs should be from 0.8 to 1 meter. If possible, you can make it even wider - this will make the entire porch look more attractive and comfortable. Making the width smaller is highly not recommended.
As for the angle of inclination of the stairs, it should be within 28-45 degrees. The table below shows the optimal dimensions of this design.

The width of all porch steps should be the same and be approximately 25 centimeters, while the optimal height is from 12 to 20 centimeters (it all depends on who exactly the porch is intended for).
Note! When arranging the upper platform, try to keep it about 5 centimeters below the front door.

Stage No. 2. How to make a foundation for a porch
First, dig a pit according to the dimensions of the future structure (at least half a meter deep). Build formwork around the perimeter.

Then take crushed stone and fill the bottom of the resulting pit with it (the thickness of the layer should be approximately 20 centimeters). Thoroughly compact the crushed stone, then pour a 10-centimeter layer of sand on top of it. It is advisable to pour the sand with cold water to make it easier to compact it.
Cover the resulting area with roofing felt. Lay a reinforcing mesh with 100x100 millimeter cells on top, then fill everything with concrete mixture. You can easily prepare the latter yourself; to do this, adhere to the following proportions:
- one part cement;
- five pieces of crushed stone;
- three parts sand.
After pouring is completed, level the surface of the concrete and pierce it in some places with a reinforcing rod to remove air. Now all that remains is to wait a few days for the initial strength gain of concrete to occur.

Stage No. 3. How to build formwork for steps

To build the formwork for the steps, you will need thick plywood. It is important that the height of such formwork be 20 centimeters greater than the height of the porch itself. The construction process itself is not complicated: cut out all the formwork parts from plywood (in accordance with the height of each step), and then install them in the right places. To tighten the shields together, use metal plates, wooden blocks or any other suitable fasteners.

Note! Shields located on the sides must be strengthened with additional stiffening ribs.
In addition, reinforce all steps, and lay the reinforcement in such a way that it is located in all 3 planes at once. As an option, you can weld an iron frame, the shape of which corresponds to the planned staircase, and build the formwork around it. It will be even more convenient. In a word, do what is most convenient for you.


Stage No. 4. How to fill porch steps with your own hands
First, lubricate, using oil, all the internal surfaces of the formwork. This is necessary so that you can later remove the structure without much effort. As for the filling solution, prepare it in the same way as before.

Start pouring in stages, starting with the first step. After pouring each new step, take a short break to let it dry a little, then proceed to fill the next one. This way, your DIY home porch will be as strong and durable as possible. As the pour progresses, attach additional formwork pieces to the front of each step. The height should be the same as that of the first step.
Note! The surface of the formwork that will come into contact with the mortar should be as smooth as possible.
After pouring, carefully level the concrete, then pierce it with reinforcing bars.

The formwork can be dismantled no earlier than after a week, or even better after 10 days. At the end, finish the structure. For cladding you can use tiles or natural stone, boards or, alternatively, any other finishing material (decide for yourself).

Installing railings is not at all necessary, do it at your own discretion. If you decide to install it, please note that the height of the handrails must be at least 0.9 meters. As an example, we give an option that is equally suitable for metal/wood structures. Install support posts made from metal pipes at the top and bottom of the porch. In this case, the length should be such that the angle of inclination of the railing is similar to the inclination of the stairs. Connect the ends of the racks to each other using iron pipes, but of a smaller diameter. Use a welding machine to make the connection.
The top tube will serve as a handrail for you. To fill the space between the pipes, you can use absolutely any rolled product. When installing an element, the gap can also be any - here everything will depend solely on your personal preferences.

Upon completion of installation, thoroughly clean all metal parts and coat them with two layers of primer mixture. Thanks to this treatment, the service life of the railings will significantly increase.
Video - Constructing a concrete porch for a house with your own hands
Option two. DIY metal porch (with polycarbonate roof)
Let’s immediately make a reservation that the option described below is successfully combined with almost all types of private houses. The process consists of several stages; let’s get acquainted with the features of each of them.


In this case, there are no fundamental differences from the foundation that we previously created for the concrete porch, the only exception being the fact that the support posts for the future canopy must be installed at this stage. We recommend installing supports in each corner of the structure - this will make the structure more stable. If the dimensions of the porch are large enough, make several supports along its length in increments of 2 meters.
First, dig holes about 1.5 meters deep for supports (by the way, steel pipes can be used as the latter). Place each pipe in the appropriate hole, then fill it with concrete mortar.
Note! Wooden blocks can also serve as supports. The sequence of actions here is the same, only the lower parts of the beams should first be tarred or wrapped in roofing felt, and also treated with an antiseptic drug.
Also install supports under the stairs. Also dig holes, place metal posts in them, and then fill them with concrete mortar. The length of the staircase is unlikely to be too long, therefore, supports at the top and bottom of the structure will be sufficient. Although, for greater reliability, you can additionally place supports in the middle of the flight of stairs.
When pouring concrete mortar, make sure that the stairs are somewhat recessed in it. Do not pour concrete to the very top of the site - leave a small gap (within 10-30 centimeters, the specific figure depends on the current dimensions of the structure). Later, when the assembly of the metal structure is completed, you can fill the pit to the top.


Stage No. 2. How to weld a ladder

To get started, take a couple of metal channels. Weld them to the supports that were installed and poured with concrete at the previous stage of work. Later, steps will be welded to these channels. Take an iron corner (necessarily equal flange), cut it in accordance with the length of the steps, adding the width of the weld. After this, weld this corner along the contour.

Take the second piece of the corner and weld it in the same way, only this time to the attached corner. At the next stage, it is necessary to weld the second corner to the channel. As a result, you should end up with something like this.


The result is a kind of L-shaped product, you have to connect them together. For the top connection, use an equal-flange angle - weld it along the contour to both elements so that the shelves are placed inward. Make the bottom connection using the same angle, but the shelves should “look” outward.


To fill the steps of the staircase that will decorate the future porch of the house with your own hands, you can use any materials - for example, plywood or wood. To fix, use self-tapping screws, screwing them in from the bottom. To further secure the wooden elements, use glue or, alternatively, a silicone-based sealant.


In principle, you can perform further finishing at your own discretion. If you want, you don’t have to cover the horizontal openings with anything at all - in this case, the casing will be mounted directly on the steps.
Stage No. 3. How to make a canopy over a porch with your own hands

So, we installed the racks at the stage of pouring the base, so the further algorithm of actions should look something like this.

Take the cross supports and install them in accordance with the dimensions of the frame. If you want, your future canopy can have a curved shape. To achieve this, cut the profile every 4 centimeters and bend it as needed. The advantage of canopies with a curved shape is that precipitation and all kinds of debris will slide off them without hindrance.


Take the polycarbonate, install it on the frame and secure it with self-tapping screws (we recommend using special thermal washers). The fastening step in this case should be 30 centimeters. Seal the edges with glue. That's it, the canopy can be considered ready!

Video - Do-it-yourself porch to a house made of a profile pipe under polycarbonate
Option three. Wooden porch
You can see the diagram of a porch made of wood below.


The work consists of several stages; let’s get acquainted with the features of each of them.

Stage No. 1. How to build a foundation
The best option in this case is a pile foundation. The fact is that such a base is extremely simple and quick to install, but its reliability is at a fairly high level.
First, dig holes where the piles will be located - not only in the corners of the future structure, but also along the length of its sides (the step should be from 0.8 to 1 meter). It will be great if you do this below the soil freezing level. After this, take the support beams and treat them with an antiseptic, and wrap the lower parts with roofing felt for waterproofing. After this, insert the beams into the holes. Align them vertically, and then fill them with concrete mortar.
After the concrete has hardened thoroughly, you can proceed to the next stage.
Stage No. 2. How to install joists
If necessary, trim the tops of the beams so that all supports are at the same level. It is worth noting that when calculating the height of the piles, it is necessary to act in such a way that upon completion of installation of the platform, a 5-centimeter height difference remains between the entrance door and it.
Stage No. 3. How to make a bowstring (kosour)


Now start making the load-bearing part of the staircase structure. It is to this part that the steps will subsequently be attached. In other words, the stringer is like the side edge of the steps.
To make a bowstring, you will need boards whose thickness is 50 millimeters. Take one of them, draw steps on it and cut them out using a saw or jigsaw. Finally, connect the stringer to the joists using a tongue-and-groove connection.
Stage No. 4. How to design steps and landing

This is the last stage, after which the porch to the house with your own hands can be considered completely finished. First, attach the sheathing boards to the joists (you can either nail them or screw them). If you want, you can also lay some kind of finishing coating on the boards (everything here, again, depends only on your personal preferences).
Attach treads and risers to the stringer, and you need to start working only from the bottom step. The sequence of actions is as follows: fix the riser, install a tread on top of it, and so on. Fasten it using a tongue-and-groove connection or self-tapping screws.


As for the arrangement of the canopy and railings, there are no special restrictions. We provided step-by-step instructions for installing these elements above. The algorithm itself is the same, only instead of the sheathing elements and supports you need to use similar wooden parts (you can use any other material you like).

Video - Original do-it-yourself wooden porch
Common mistakes in the process of building a porch to a house
There are several mistakes that are made most often at work. Let's get to know them.
- Mistake #1. The construction of the porch is carried out after the construction of the house itself is completed. In such cases, the depth of the foundation is not significant; moreover, it is not associated with the foundation of the house. Consequently, the foundation is affected by groundwater, soil heaving, as well as a number of other factors that lead to cracks appearing between the porch and the house.
- Mistake #2. Wooden support posts, which are used in the case of a wooden porch, are not treated with antiseptic preparations. The result of such an error is obvious - after some time the structure has to be rebuilt.
- Mistake #3. The height of the platform is the same as the height of the entrance to the house. In winter, when the soil rises, the height of the porch increases, which can cause the front door to jam.
- Mistake #4. There is no vapor barrier or it is of poor quality. As a result, moisture will seep through the structure and reach the cladding, which does not allow steam to pass through. Next, this steam will turn into water and simply remain under this material. With the onset of cold weather, moisture will begin to expand, which will lead to failure of the finish.
Do-it-yourself porch made of stone or brick
We left this option to the very end, since it is perhaps the most complex and time-consuming, so not everyone is able to do everything with their own hands. And it’s not surprising, because building a foundation out of brick, where there is absolutely no special need, is one thing, but laying it out perfectly evenly is quite another.

It's no secret that professional masons lay bricks only if they have several helpers, whose job is to prepare the cement mortar and supply it in a timely manner. As for the stone, things are somewhat more difficult with it, because the uneven edges are extremely reluctant to fit together. In a word, if you do not have experience and a couple of assistants, then it is better to immediately forget about a porch made of stone or brick, otherwise you will simply waste your time and money.

It is much easier to build a concrete staircase, and then select a facing stone or tile for the steps, the size of which is as close as possible to the natural one. After this, you can easily cover the entire structure. Among other things, this method is attractive because even if you make some mistake, you can then easily chop off the desired piece of cladding and repeat the finishing.
What about the canopy over the porch?
If we talk about the canopy, it will serve not only to protect the porch and the staircase itself from rain or snow, but also as a decorative element of the design of the structure. On the Internet you can find a lot of different visor options, in addition, there are photographs in printed publications specializing in country construction.

Note! In most cases, canopies are made of a frame - metal or coniferous wood - and polycarbonate / plexiglass as a cladding material.
Typically, canopies made of wood must be tinted every few years or, alternatively, coated with special compounds, otherwise the wood will dry out and begin to crack along the grain. The thickness of the polycarbonate used here should be 7 millimeters, and it is recommended to lay the material in spans of a maximum of 0.7 square meters. You should not use glass for this, since in winter it may not withstand the weight of the snow cover and simply crack (another reason for this may be deformation of the wood).

Note! The canopy should have a larger area than the entire porch to the house with your own hands, approximately 50 centimeters. Otherwise, you can forget about performing the main function - protective.

In the instructions for pouring the base, we already mentioned that it is preferable to install support pillars under the canopy during the formation of the foundation. It is better to install your visor on such supports. In addition, this option will allow in the future (if such a need arises) to equip a closed glazed veranda in literally two to three hours.
As for the coating, they can serve as sheet metal, on top of which beautiful tiles are laid, but it is still better to use polycarbonate or plexiglass, which we just mentioned.

Note! To protect the metal that covers the visor from corrosion, paint it with two or three layers of suitable paint.
It is also important that the canopy is pitched, and there is a metal gutter on it, installed at a slight slope. We also recommend attaching a chain almost to the ground to the end of this gutter so that water does not splash around during rain. And in this case, it will flow smoothly along the chain. To avoid the appearance of puddles near the porch, you can install drainage at the drainage point.

Glazed porch - is it possible?
A solution such as a closed porch has become increasingly popular in recent years. Transparent glass structures look extremely attractive, which is why many people are eager to build something similar next to their home.

What is a glass porch? In essence, it is a simple foundation made of stone or concrete with a staircase and a canopy (the latter must be on stilts). Using corners, the length of which corresponds to the height of the piles, a frame is created.

Note! The sheets can be of any height, while the width should be a maximum of 1.2 meters. If the sheet is wider, then its windage will be so strong that a wind with a speed of 30 meters per second can easily break 5 mm glass.
If the distance between the piles is more than 1 meter, then it is better to break them with pseudo-piles. In a similar way, you can divide the height using a pair of double corners. Thanks to this, you will reduce the load on the sheets of glass, and the porch itself to the house with your own hands will still be light and transparent.
As you can see, you don’t need any specific skills or knowledge to build a porch yourself, since even the most complex options can be handled with your own hands. Each of the described operations is basic for the construction industry, and a person with skillful hands will perform them without problems.
That's all, good luck with your work and have a warm winter! And for a more detailed understanding of the issue, we recommend watching the thematic video below.
Video - Making a porch with your own hands
The owners underestimate the porch of the house, but in vain, it can be significantly transformed with your own hands, as in the photo. The porch is an important element of the facade of a country house, which is the face of the owners. The front entrance emphasizes the architecture and appearance of a country house. You won’t surprise anyone with buildings of the same type, so everyone wants to highlight their own structure. There are ideas that will make it beautiful, cozy for relaxing in the fresh air. We will talk about interesting design ideas - shapes, finishes, materials used, design ideas.
Projects
The choice of size and shape depends on:
- architectural features;
- the size of the house itself;
- owner's personal tastes.
Designers believe that the canopy and railings should be made in the same style as the roof and balcony of the house.
Let's take an example: a house with a gable roof requires a similar porch canopy, but if there are bars on the windows, the railings should have a similar wrought iron pattern. The type of columns, arches, and other decorative details is no exception.
Let us note several main types of projects and design:
- Openings are a popular type; most often has a canopy and railings; decorated with decorations that are carried into the house in winter.
- Closed - has transparent or translucent walls made of materials: glass, polycarbonate, mosquito net. Such canopies decorate the entrance, hallway, and provide a place to rest in any weather.
- Wall-mounted - this type is built if the house has a basement floor, as well as if such a need is required by the area near the house; the structure resembles a balcony.
- Terrace - an extended porch used as a place to relax.
In addition, it is worth noting the possible types of protrusions - round or rectangular.
The closed porch has a high level of heat and sound insulation. Glazing is recommended to be done using a composite.
To create a project, you first need to measure the area in front of the house. Of course, if you have a large space, it is better to make a porch-veranda, which will become an excellent protector from rain, snow, and will also play the role of a family resting place. If there is not as much space as you would like, a semicircular veranda is an excellent option. If you do not overload the interior with decor, a monochrome structure will visually expand the space.
Important points:
For a wooden house
A wooden house is characterized by comfort and complete safety for the human body. The most used materials for constructing a porch to a wooden house are timber and boards.
Advice
If you want to insulate it, you will additionally need siding. To make the extension look cozy, you can use clapboard.
You cannot ignore the presence of railings if the entrance has several steps. This element is not only practical, but also perfectly decorates the decoration. Our advice is to spend a little time decorating the railings with carvings.
Wood is an inexpensive but whimsical material. Be sure to cover it with paint or varnish to avoid rotting and deformation. It is also recommended to coat the material with a special composition against various beetles. If this technology is followed, the structure will last for decades.
Using logs is a creative process. Here you need to adhere to the basic rule - we compact the site before construction. The rest is in the hands of the owner.
The porch and the house are one ensemble, but you shouldn’t limit your imagination when decorating. Want to make it sophisticated? Add a few lanterns, hanging flower pots, paintings.
If you like luxury and aristocracy, then your option is artistic forging, sculptures near the entrance, a small fountain. An artificial fireplace will look great, adding warmth and comfort to a family vacation in the fresh air.
Varieties of porch
Porch: awnings
Every porch requires a canopy, because it not only protects from precipitation, but also protects from injuries in winter. If the canopy is being erected only for protection, then a conventional design with a simple, expensive structure will do.
The main principle in this case is neatness and cleanliness. Suitable materials for this:
- polycarbonate;
- metallic profile;
- metal tiles;
- soft tiles;
- corrugated sheets;
- slate.
You should adhere to the same style of house and shed.
Some people prefer more original canopies, for example:
- in Russian;
- classic;
- modern styles.
In this case, the selection of appropriate materials for the frame and flooring is required. For example, a house made of timber requires a wooden structure and an opaque roof.
The forged type canopy looks great. Unfortunately, there is little in-house power here; you will need to order the product from special workshops. Such a canopy not only performs a protective function, but is already a significant part of the design. The finishing corresponds to the uniform design of the railings, landing, and stairs. You can add sophistication to the canopy with the help of lanterns and hanging flowerpots.
Advice
A forged canopy goes well with polycarbonate. Transparency makes it possible to appreciate the luxury of a forged product.
Speaking about the material, it is better to choose metal, as it is characterized by:
- High strength - metal supports can withstand any weight of the roof.
- Possibility to build a structure of any size.
- Fire resistance.
- Availability, wide range of materials in stores.
- Easy installation.
- Wide range of modeling capabilities.
- Easy to maintain.
Wood is slightly inferior to the above-mentioned material in terms of technical characteristics. But it is suitable for covering a small porch, and will please you with its low price and aesthetic appearance.
Polycarbonate
A porch that is made entirely of polycarbonate is rare. Most often, this is just a canopy. In the case of using polycarbonate, the visor acquires several advantages:
- Originality, completeness of appearance.
- Protection of entrance doors from sunlight and heavy rain.
- Practicality, originality, low price of the material.
- Characterized by excellent flexibility, stability, and reliability.
It is not recommended to make the entire terrace from polycarbonate, as it is not very beautiful. It is better to combine it with wood and natural stones. It looks quite stylish and unusual.
A small summer cottage, modest houses look good with a regular polycarbonate canopy. Wood combined with polycarbonate will add sophistication. A steel frame is suitable for mansions - original, solid. Dark shades will give maximum style.
Want more bright colors? Then flowerpots with cute flowers placed on a frame are an excellent design element that adds coziness. Chairs and sofas can be decorated with bright pillows to match the main color.
Closed
An enclosed porch is an extension that is protected on each side. Essentially this is a separate room. The type of structure must correspond to the general appearance of the house. Is the aesthetic aspect important to you? Then combine these two elements with something common, for example:
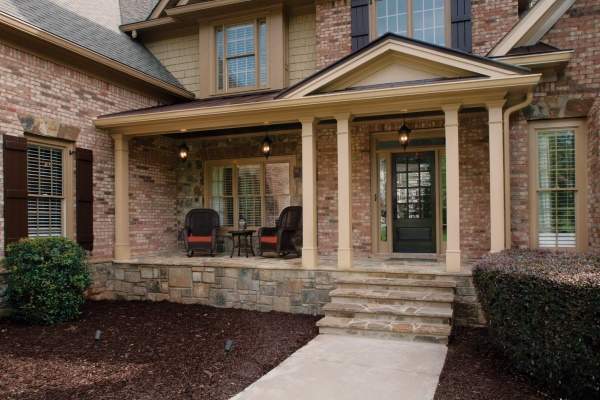
For lovers of bold solutions, you will like the combination of a wooden extension and a brick / stone facade - suitable if the house has any wooden element - shutters, a balcony.
Often there are extensions to private houses that have glazing and polycarbonate frames.
Visor
The canopy is an architectural facade structure that performs decorative and protective functions. It can be performed in the following forms:
- Modular – consists of prefabricated parts; easy to install.
- Monolithic - a single element along with the walls; as strong and durable as possible.
A canopy is an architectural façade structure
The choice of material depends on your taste, but still pay attention to the harmony of the overall style. This also applies to the shape; if you have imagination, it can even have unusual curves.
Visors are divided according to the method of fastening:
- Suspended – small in size, made from lightweight materials, hangers are used for installation.
- Supports – supports are used.
A canopy can give a building a unique look, which is why we pay maximum attention to this issue. Let's look at a few design solutions:
- The beams holding the structure can be made in the form of antique-style columns - this gives an elegant, luxurious look.
- Wooden supports can be stylized as antique, and a classic gable canopy will add a fairytale-like quality to the building; Don't forget about other decorative aspects in the landscape to complete the picture.
- Do you like brevity? Then your option is a monolithic canopy with the style of finishing the entire house - strictly but solidly.
- By using the same architectural details, you will definitely win, for example, it could be a veranda or a roof slope.
- The arched canopy is particularly impressive; it softens the shape of the facade and makes the house visually more comfortable.
The level of protection and visual effect depend on the size of the canopy. Small canopies are suitable for small houses. Large is most likely the necessary protection for solid buildings.
Lighting
The important part is the choice of lighting. If the canopy has a strict shape, it is better to choose built-in lamps, they will not disrupt the overall composition. The same lighting is ideal for highlighting active decor, drawing attention to the desired accents.
Lighting is an important part when planning a porch
For classic extensions, it is better to choose small pendant chandeliers. A universal idea - wall sconces. Neon lights and figures with artificial light look unusual.
Stylistics, textures
- façade;
- fencing;
- gate.
The following basic styles can be identified; design solutions will be outlined below. But the combination of different textures looks interesting.
For example, a path that smoothly turns into brick railings with wooden balusters. Try to smooth out the sharp roof with the smooth shapes of the path, and connect the round balcony and rectangular steps with the sidewalk.
Classical
Characteristic features: strict, seasoned, moderate style. The extension is equipped with a gable roof, which can be supplemented with beautiful columns and railings with rounded balusters. Facing materials suitable for classicism - natural stones, ceramics, painted wood.
Russian style
The entrance has long been distinguished by its sophistication. The extension is decorated:
- carved elements;
- turned balusters;
- pillars made in complex shapes;
- various ornate patterns.
Now the Russian style is especially popular. It involves the use of natural materials and handmade decor.
Middle Ages
Quite a modern style. This veranda is similar to ancient fortresses, which are decorated with natural stone. You can decorate the front entrance with torch lamps, forged gratings, and rough-hewn logs.
This type will attract the attention of others with its luxury.
Country
A wooden structure with carved pillars and railings. For decoration, you should use the maximum number of colors in a variety of readings:
European
Distinctive features - the presence of regular shapes, restrained lines. The extension has the appearance of a small, discreet structure, for the cladding of which natural stones and ceramic tiles are used. Figurines and flower pots are used for decoration.
Mediterranean
Has two readings:
Combines Greek and Roman culture. A characteristic feature is a stone courtyard, complemented by multi-tiered steps. Sandstone is used for finishing, and metal elements are used for decoration.
A combination of Italian, Spanish, French style. The difference is maximum unevenness and relief. Exterior – open terrace, located in several tiers. The floor area is covered with paving stones, sometimes with clinker. The flooring near the house is made of deck boards. The canopy is built on columns. Concrete balusters are placed throughout the veranda. Fountains, flower tubs, and sculptures are used as decoration.
French
One of the varieties of European style with charm. The highlight is the presence of a glass door with an openwork grille. The structure should be decorated with figured elements, beautiful wicker furniture, and a variety of fresh flowers (pots on the floor, hanging vases).
House-fortress
Massive veranda, decorated with natural stones. Relevant details are the presence of forged grilles and torch lamps. The trellises can be decorated with flower pots.
"Gingerbread"
Combines metal gratings and decorative brick elements. Covered with a gable roof. The decoration is made up of climbing plants. Izre In this case, wooden parts are used, which are painted in natural shades.
Patio
A patio is an open terrace that is adjacent to the house. There is a table and benches on it. In such an area you can happily receive guests in the summer. The only difference is the absence of a canopy or roof. Most often, the patio combines a porch and a garden gazebo in its functionality.
Material of construction
Made of metal
Most often, metal elements are:
- roof;
- steps;
- railing
But you can find completely metal buildings. The main advantages of such visors are high levels of strength and durability.
This design requires additional expenses for painting and coating with a special composition to avoid the appearance of corrosion and rust. A metal floor is a very bold decision, because it is cold. Terraces extra They are completely covered with wooden beams and concrete.
Metal construction - high strength
The design of this veranda is simple but stylish. To dilute the cold shades, we recommend adding interesting decor, bright colors, and installing more light sources.
Made from concrete
Concrete construction is considered the cheapest, most versatile, but at the same time reliable material. The main advantage is a long service life, since the monolithic structure is resistant to various factors. We note simple repairs and finishing. In addition, with the help of concrete you can create any shape, and this will not increase the price or construction time.
Concrete construction is the cheapest and most versatile option
For finishing it is good to use clinker tiles, natural stones and paint look good. If you are a supporter of the modern style, then leave the siding facade without finishing - this will emphasize the texture of the walls.
Made of brick
Reliable, unpretentious variation. A veranda made of such material is a little more expensive than those suggested, but it is quite an attractive solution. Although construction takes a long time and requires a lot of effort, in the future the owners will be pleased with the ease of maintenance. Let us immediately note that the floor and steps should be additionally covered with concrete.
Made from natural stone
Natural stones are a strong, durable, beautiful material. This design has several variations. An excellent design solution is the use of two types of stones, one of which is for the base (more expensive, more reliable), the second for decoration. This extension is resistant to bad weather and does not require special maintenance.
Natural stones are a durable material
steps
Now let's look at the options for steps:
- Concrete stairs should be lined with ceramics, natural or artificial stones; the latter option will save money. An excellent option for concrete and brick buildings. It is recommended to finish treads with rough tiles (without relief or pattern).
- Wooden steps can be decorated using completely different methods. Of course, you don’t want to hide the natural texture of the wood, so you can cover them with oil or varnish.
You can paint the steps. An elegant, cheerful option is alternating shades. But it is better to choose dark colors.
Wood finishing using the firing method looks good.
Metal steps are most often finished with wood, but there are stairs made from tin sheets. Although this looks aesthetically pleasing and elegant, it is not the best option, since wet or icy material can lead to injury.
The steps will be completed with original railings, which can become a highlight. For decoration, vertical type balusters and horizontal crossbars are used, the main thing is an interesting shape that suits the style.
Ideas:
- For metal - use openwork forging.
- Wood – through carving.
For handrails, you should use wood (chopped, cobblestone, frame stairs) or plastic (concrete, brick). The parapet of the steps can be laid out with beautiful facing bricks of a suitable shade.
It is recommended to install heated steps. Harsh winter climates turn your porch into an icy patch. If concrete was chosen as the base, a heating cable can be laid under it. For wooden buildings, a special anti-icing system is provided.
Country ideas
Here are some interesting ideas regarding the design of a country terrace:
- Lots of space? Then add a small table and a few stools with cushions.
- Place flower pots on the steps and walls.
- A woven or knitted rug will add warmth.
- Climbing plants are a natural decoration for the veranda.
- You can hang compositions of dried fruits, plants, and flowers on the walls.
- An unusual idea for autumn is to use an old watering can and rubber boots for planting flowers.
- Home furnishings are provided with a carpet, a wicker table, and small rocking chairs.
- You can make a small rug from shells with your own hands.
- Dim, light-colored curtains will save you on a hot day.
Furniture
Decorating and landscaping the veranda requires the correct selection of furniture. Garden furniture is suitable for this:
