When it comes to furniture intended for children, First of all, you need to take care of her convenience, reliability, strength and security, including environmental ones.
The best option - wooden chair. Of course, modern wooden chairs available for sale are different high cost if they are made from really valuable and high quality breeds wood
Why not do DIY chair for a child? With the help of this article you can choose the best materials for a children's high chair, get detailed instructions and recommendations for its production and decoration
Types of children's high chairs
What are there chairs for children? Modern manufacturers offer a wide range of chairs designed for children of different ages.
They may differ in purpose, design used material and other criteria.
Many models can be manufacture on one's own.
The most common and practical Highchairs for children include the following: kinds:
- Simple chair - an ordinary children's highchair with a backrest, instructions for making which are available in this article.
- Folding chair - A universal chair with rich functionality. It is assumed that you can change the angle of the backrest, adjust the footrests, attach a table top, etc.
- Swing chair – The name of the chair speaks for itself. All children, without exception, enjoy swinging on such a chair. Modern models provide the ability to use the seat as a rocking chair.
- Transformer – This is a chair and table set that can be installed and used in different ways. When assembled, the transformer is convenient when disassembled - it functions as a simple chair and table, standing separately.
Some models provide regulation leg heights and backrest position, and high chair "grows up" together with the baby.
If you have small experience in the field of carpentry, it is better to limit ourselves to manufacturing ordinary highchair without additional functions. Main - understand the basics and the principle of operation, and in the future you can start creating more complex models chairs.
What material is it made from?
- natural tree;
- plywood;
- Chipboard.
Very widespread is the creation of children's furniture (chairs, cribs, tables, etc.) from plastic pipes After assembly and decoration you get enough attractive and unusual designs, but their reliability and durability is highly doubtful.
It is recommended to choose wood as the main material for the children's chair, plywood or chipboard, since these materials are absolutely safe for a child, are characterized long lasting operational life and others positive properties. With the help of this article you can make a high chair from tree.
Important! Before you begin assembling the chair, the ends of all chipboard parts should be covered with furniture edge. It not only performs a decorative function, but also prevents the release of formaldehyde.
Dimensions and drawing
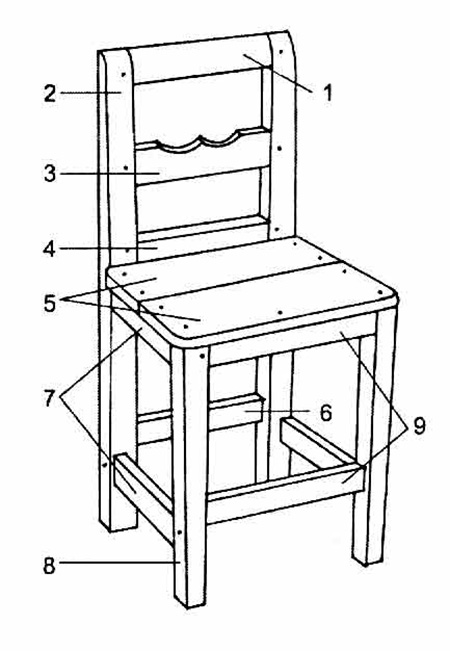
For manufacturing chair according to this drawing, it is necessary to prepare the following elements designs:
- 1 – top crossbar(1.9 x 4.1 x 16.5 cm);
- 2 – two rear legs (3 x 3 x 55 cm);
- 3 – crossbar carved type (1.4 x 4.1 x 16.5 cm);
- 4, 6 – planks, located in the middle and bottom (1.4 x 2.9 x 16.5 cm);
- 5 – seat from two boards (1.4 x 10.5 x 26.3 cm);
- 7 – two kings and two strips located On the sides(1.4 x 2.9 x 17.7 cm);
- 8 – two front legs (3 x 3 x 30.5 cm);
- 9 – two kings and two planks, located at the front (1.4 x 2.9 x 19.5 cm).
The legs of the chair should gradually become narrower: rear – up to 1.9 cm, starting from the middle of the chair to the top, anterior – up to 2.4 cm, starting from the middle of the chair to the bottom.
Advice: To make it as easy as possible to mount the strips and drawers, only the outer edges of the parts should be reduced. Thus, the internal edges will be parallel to each other.
Description of work stages
 At manufacturing child's highchair, it is important to pay attention to it security: avoid the formation of sharp corners, cracks, cracks cracks, gaps between structural elements, as well as roughness and other defects.
To give attractive appearance of the top crossbar, it can be rounded. carved the crossbar can be designed in any way with all sorts of patterns, but without sharp corners.
Fastening parts in this case will be made using wooden thorns and glue, but you can use other methods using nails, furniture dowels or self-tapping screws.
In the case of spikes, the most durable ones are used secret rectangular elements that are inserted into holes pre-treated with glue.
To further secure the studs, you can use through pins (6–35 mm in diameter).
Chair assembly:
Step 1. First of all, you need to fasten the rear legs chairs and adjacent crossbars.
Step 2. Attach the remaining front legs to the structure crossbars and kings.

Step 3. Attach the upper one to the rear legs, carved and the middle crossbar (attached at the same level as the seat).
Step 4. So that all places where parts are connected are glued together as much as possible durable, use a special tool - carpentry clamp. It is designed to press the parts tightly against each other.
Step 5. When all bottom slats and legs are firmly connected together, attach to the base of the chair seat, consisting of two planks. For added security and strength, secure the boards after the glue has dried. dowels, pre-drilling holes for them. If the seat boards partially protrude beyond the base, the excess ends must be removed using chisels.

Important! Using a clamp, be careful to ensure that the parts are connected at right angles. You can control this moment using a carpenter's square.
How to decorate a chair
 New furniture, even the highest quality, made by your own hands, is unlikely to attract the attention of a child without interesting registration There are tons of options decorate children's chair made of wood.
To do some methods decoration you can even attract the future owner of the chair. For example, you can paint a chair together with the child at his discretion.
Most common ideas staining:
- Using multiple bright shades;
- Imitation rainbows;
- Application patterns;
- Picture of loved ones characters from fairy tales, cartoons, etc.
The second option for decorating a chair is special case, which you can purchase or also make yourself. There are no restrictions in this regard either. The cover can be the most ordinary - from fabric plain or with drawings and other decorative elements. You can also imagine in the form of a bird, animal, flowers, cars, and also make original ones.
Another idea - gluing on the sides of the seat there are bright strips of fabric, decoration backrests with all kinds of elements ( ribbons, artificial flowers, beads, etc.). Show fantasy, and most importantly, don’t forget to ask for opinions child.
And for inspiration - a few examples design children's chairs:


For more information on how to make a children's chair out of wood with your own hands, see video:
The difficulties in caring for children are largely due to the fact that buying everything necessary can be quite a task for the family budget. Another question is whether parents manage to find exactly what they would like in stores, or whether there is actually nothing ideal among the assortment. Both reasons that prevent you from purchasing this or that product, one way or another suggest the idea that it would be nice to make it yourself. For example, a children's high chair - if dad has enough experience working with various tools, he can easily make it with his own hands.

Peculiarities
Contrary to its apparent simplicity, a DIY high chair is not such a simple task that you can complete it without any preparation. Do not start work until you have a clear understanding of what the end result should look like and what operations will need to be performed to achieve it.


Also, don't ignore calculations. Any chair must be strong enough to support its “passenger”, and a child, although not heavy, will not sit neatly on it, especially since the dimensions of such furniture are also small.

Strength requirements are relevant not only for basic materials, but also for fasteners, be they self-tapping screws, glue or grooves. In addition, the baby is constantly growing, and it makes sense to make a high chair with a reserve for at least a couple of years in advance. For all its strength, the product should be comfortable, that is, approximately correspond to the dimensions of the owner.

Also try to ensure the proper lightness of the furniture being manufactured - it should be convenient for the owner to independently move his chair to where he wants to sit at the moment.

Don't forget to stay safe. Furniture, in any case, cannot be traumatic, and children's furniture - even more so. The presence of any sharp edges is not allowed, and if the main material is wood, as happens in most cases, then it must be carefully sanded to prevent splinters from peeling off. When covering the finished product with varnish or paint, give preference to natural ones - children tend to put everything in their mouths and can be poisoned by the toxic coating.

Finally, remember that this chair is for a child. In addition to suitable sizes, it is desirable for a piece of furniture to also be beautiful. If complex decor is not a task for you, at least try to paint it in bright colors.

Drawings, dimensions, diagrams
Before proceeding directly to the manufacture of parts, it is necessary to draw up a drawing with dimensions - this is the only way that all components will ideally fit one another. You can use one of those ready-made options that are already posted on the World Wide Web, or draw up a diagram yourself. It is important to note here that there are drawings and instructions on the Internet that explain how to make a standard table and chair, so they are usually not suitable for those who want to create something original - for example, an elephant chair.

- Drawing the table and chairs, which can be made in the form of a kit, do not have to strictly follow the principles of drawing: they do not have so many details that they cannot be kept in mind. The main thing for us is to make sure that all the dimensions match, and the parts fit perfectly together, but the methods for connecting individual parts must be present in the drawing. In general, it can be presented schematically, without high precision of the drawing.
- Think over the dimensions (or choose ready-made drawings based on them), starting from the comfort of the child. Chairs whose seat is at knee level or slightly below are considered comfortable. In the case of a highchair, it is recommended to make the seat a little higher, because the child will probably still grow. At the same time, do not overdo it: if it is difficult for the baby to climb onto the seat, then the product can be considered a failure.


- Determining the size of the seat itself, keep in mind that the owner should fit comfortably on it, but do not make it too large - this will make the chair heavier and difficult to carry. The normal height of the backrest is approximately two-thirds or three-quarters of the owner's back; making it higher than the neck is no longer practical. When determining the thickness of future parts, rely only on the strength of the selected material and the weight of the child.

Materials
In terms of ease of processing and environmental friendliness, among materials for the manufacture of children's furniture, wood and its derivatives undoubtedly hold the palm. Therefore, you can most often find a wooden high chair. However, you cannot choose just any tree - this is also worth thinking about before starting to make it. The most popular among all types of wood is beech. It has the strength of oak, but it is easier to process and costs less. In general, it is deciduous trees that are considered priority. Among inexpensive options, birch is often chosen; linden can also be considered.


Spruce and pine are suitable for making furniture from coniferous wood, but the resin contained in any such wood is dangerous - it can stain clothes, and it can also pose a health hazard. Regardless of the specific species, choose a uniform tree, without knots or cracks, with an even texture.

The seat material may be similar to the body material, or it may be fundamentally different. In order to save money and achieve greater flexibility, the seat is also made of plywood, and even chipboard. When choosing them, give preference only to the most durable types, but remember that in any case they are inferior in durability to solid natural wood.


For increased softness, the seat can be additionally equipped with a small foam cushion covered with a fabric that is pleasant to the touch.
There is also a seating option made from plastic bottles - both whole and cut. Harmful plastic, present as garbage in any apartment and polluting the environment, could get a second life, especially since its strength and durability are very high. This option is still much less common due to the difficulty of securely fastening individual parts, as well as the not very attractive appearance of the finished product.

Colors and decor
For all its practicality and convenience, the baby will definitely not like the chair if it cannot be described with the word “beautiful”. Nobody makes any special chairs for teenagers, but brightness and attractiveness are very important for younger children. Therefore, do not limit yourself to just clear varnish or discreet monochromatic solutions. A single-color color is generally acceptable only if a light or very bright shade is chosen - often red or yellow, the so-called “warm” tones.


If drawing is not alien to you, please your child with interesting design solutions. You can go the “adult” route by painting the frame one color, and the seat and back in another, or you can focus on the child’s desire for something bright and defiant. The simplest option is “rings” on the legs of the chair; any patterns and even just blots are also acceptable, provided that it looks cute and positive. Regardless of how much and what kind of paint you used, do not forget - it should not be toxic.


If you have a creative streak and a desire to complicate the task a little for the overall benefit of the matter, you can create more complex decor. Another option is to decorate the legs or back of the chair with carvings, but adults would like this solution more. But for a child, a chic solution would be decoration in the form of one or another animal. The classic version is when the back is cut out to resemble an elephant, or any other animal cute to a child, and then painted to look more like a “cartoon” character.


Covers can also become a unique type of decoration. In addition to their typical functions, such as simplifying the cleaning of furniture and increasing the comfort of its use, they can also decorate the back of the chair. Ideally, they should depict the child’s favorite hero, characters from popular fairy tales, or the same animals. Mom can help dad make a cover, especially if she knows how to embroider or has fabric appliqué skills. If your mother does not have such talents, you can simply alter the cover from clothes on which the necessary pictures were applied at the factory.


For the youngest children
Children of the youngest age still sit on a high chair for only one single activity - eating food. Teaching a child to eat while sitting, and to sit in general, particularly at the table, is important and necessary. However, the peculiarities of its development at this stage do not allow the use of ordinary chairs for this. The problem lies in the fact that a simple chair does not have a back with arms, and a tiny child himself will not yet be able to sit on it straightly and will simply fall.


As for children's high chairs, their sizes usually do not allow you to choose a normal table for them. In this situation, a special high chair would be an excellent solution.
Such furniture should be comfortable for both the child and his mother - for now the child cannot eat on his own, so the mother will have to feed him with a spoon. For the convenience of this operation, the chair is made at a normal height, or even a little higher - so that the mother does not bend over. The actual lifespan of such a chair is about a year, so if you have one child and the family is not planning a second one at all, you can choose not the most durable materials for manufacturing.


In terms of manufacturing, a high chair is perhaps the most complex - it has the largest number of parts. The relatively small seat is raised high above the floor, which forces the installation of additional stiffening ribs between the legs for improved stability of the structure.


Taking into account the specifics of a child of the appropriate age, both the backrest and railings are simply necessary - they must completely exclude the possibility of the baby falling. Moreover, there should be a barrier in front, although it also has another useful function - it plays the role of a countertop on which food will be placed. The space under the tabletop is left free - the baby will stick his feet there.

Cutting and assembling such a chair is quite simple. First, two identical side halves are cut out according to the drawing, which are then connected to each other by the seat, back and stiffeners using grooves, glue or self-tapping screws. Before assembly, all individual parts should be sanded to a perfectly smooth state, the finished product is varnished or painted - ready.

Models for older children
The peculiarity of high chairs for children who have finally left infancy lies in the significant variety of design options, limited only by the imagination of the creator. The backrest is still considered a mandatory attribute, but the railing is no longer there, as are the front barriers. There is no point in saving on materials in this situation - if the furniture is made with a margin of size, then the child will be able to use his high chair for many years.


The manufacturing process consists of a few simple steps:
- Think through the design down to the smallest detail and draw up a drawing. Decide on the number of parts of the body - will it simply consist of two solid halves or of separate legs and separate supports for the seat, will the backrest base be a continuation of the rear legs or will it be attached separately, and so on. Calculate everything, including the thickness of the seat and legs, provide stiffening ribs and additional supports for the seat in advance. Provide grooves and mark places for screws.
- If doubts about the correctness of the selected parameters still remain, try to assemble a temporary chair from cardboard according to the drawing. Unfortunately, it does not have the same strength to test the product from all sides, and it differs in thickness from wood or plywood, which also needs to be taken into account when specifying the dimensions, but you will get a visual idea of the future product.

- Start cutting out individual parts from wood or plywood. It is recommended to start with the body. It’s good if there are a lot of identical parts in the set - then the subsequent ones can be cut out by simply tracing the finished first one. If the design allows, do not delay assembly until you have cut everything out - start as soon as you have at least two parts that need to be connected. This will help you immediately notice any design flaws, if any. Once the pieces are ready, sand them smooth.
- When all the elements are ready, proceed to the final assembly. Do not limit yourself to one type of fastener; in particular, glue the grooves - this will significantly strengthen the product and increase its durability. Ensure that the grooves fit as deep as possible - tap the joints with a hammer to make the fastening more secure.
- The last step is varnishing and painting.

No matter how detailed and intelligible a theoretical explanation is, it is unlikely to compare in terms of information content with a clear example, because it is better to see once than to hear a hundred times.
N and the video is one of the best examples of how you can make a highchair with your own hands. The master talks about literally everything, including the dimensions of the parts he used, so you can even do without a drawing, simply repeating what he says. The resulting chair is quite simple in design, but easy to make. You can find many other similar videos on the Internet, but the models there are always approximately the same, but here the process is shown in great detail and clearly.
Watch a master class on making a highchair with your own hands:
The principle of making a children's high chair is generally similar, but it is worth studying in more detail both because of the increased complexity of the design, and simply because it is being told by another master who can reveal some new points.
How to make a baby high chair, watch the video:
With a large number of modern materials, wood still does not lose its relevance. This is especially true for furniture for children. Of course, you can buy a children's wooden chair in a store, but they are often made of plywood and are not of high quality. And children's wooden adjustable chairs made from good hardwood are very expensive. To give your child a durable, beautiful and comfortable high chair without spending a lot of money, you should make it yourself. There is a wide variety of models, but the article will discuss three main ones: a regular high chair, a transformer and a high chair for feeding.
DIY wooden children's chair
Before you start manufacturing, you must remember that children's furniture must be safe for health. It should not have sharp corners, have a perfectly smooth surface, without cracks, cracks or gaps, and should also be durable and reliable.
The optimal height of the back of a children's high chair is 55 cm, the seat - 32 cm. The parts can be fastened in different ways: with self-tapping screws, nails, dowels (at least 2 pieces for each joint) or wooden tenons. Let's consider the last option.
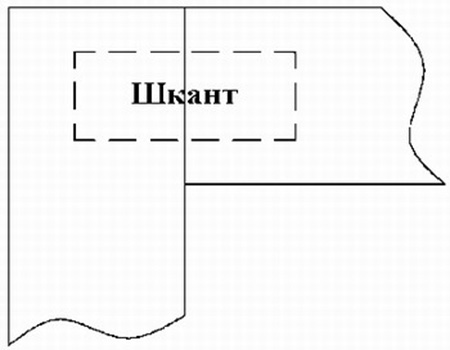
To fasten the structure, strong hidden rectangular tenons are used, which are placed in the grooves with glue. For maximum reliability, the tenons, in addition to glue, are fixed in the grooves with through dowels with a diameter of 6 to 35 mm.
List of parts and materials
- Top crossbar(1) 1.9x4.1x16.5 cm - 1 pc.
- Back leg(2) 3x3x55 cm - 2 pcs.
- Carved crossbar(3) 1.4x4.1x16.5 cm - 1 pc.
- Middle crossbar (4) 1.4x2.9x16.5 cm - 1 pc.
- Boards for the seat (5) 1.4x10.5x26.3 cm - 2 pcs.
- Bottom crossbar(6) 1.4x2.9x16.5 cm - 1 pc.
- Side crossbar and drawer (7) 1.4x2.9x17.7 cm - 4 pcs.
- Front leg (8) 3x3x30.5 cm - 2 pcs.
- Front crossbar and drawer (9) 1.4x2.9x19.5 cm - 2 pcs.
For the rear and front legs, straight-layered pine bars with a cross-section of 3x3 cm are used. Starting from the seat upward, the rear legs should narrow to 1.9 cm. And the front legs - from the seat to the bottom to 2.4x2.4 cm.
Important! Only the outer edges can be planed. This is necessary so that the inner edges of all legs remain parallel to each other, which will ensure easy installation of the drawers and crossbars.
The front edge of the top crossbar should be rounded, and the carved edge can have any pattern, but it is advisable to avoid sharp corners.
The middle crossbar is installed so that its lower edge is flush with the seat.
First of all, the back pair of legs is glued together, as well as all the crossbars. Next, a pair of front legs and a crossbar are connected, after which they are connected to each other by drawers and crossbars.

All gluing points are compressed with clamps, but with obligatory control of right angles. To do this, you can use a carpenter's square. The seat planks are attached last. Their reliability is especially important, therefore, after the glue has completely dried, they are additionally strengthened with wooden dowels, for which holes must be drilled. The protruding ends are removed with a chisel.

Children's wooden transforming chair
It is a set of children's table and chair that can be transformed into different positions. This is a single desk for studying and a comfortable chair for feeding. It folds up quite compactly, which is especially important for small apartments.

Necessary parts for the high chair:
- legs 39 cm - 4 pcs.;
- rounded corners - 4 pcs.;
- upper crossbars 22 cm - 2 pcs.;
- crossbars 34 cm - 2 pcs.;
- diameter 30 cm - 3 pcs.;
- seat base 20x30 cm - 1 pc.
Details for the table:
- legs 50 cm - 4 pcs.;
- strips 41 cm - 4 pcs.;
- diameter 34 cm - 4 pcs.;
- table top 45x38 cm - 1 piece.
For legs, slats, crossbars and crossbars, it is best to use timber with a section of 2x4 cm, and for the tabletop and seat, plywood 1.8 cm thick is suitable. Rounded corners are cut from boards 2 cm thick. As mentioned above, the wood must be well dried and have no knots or cracks.
Making a chair frame
All parts will be attached to each other with glue, but to ensure higher strength, wooden dowels measuring 2x5 cm should also be used. They can be easily made with your own hands from plywood 8 mm thick.
For each dowel, a special groove is made at the connection points. First, using a drill (6 mm drill), the ends are drilled in the place where the dowel will be laid, and then the groove is directly selected with a chisel 8 mm thick. But before installing it, all connections must be coated with glue.
Thus, the side parts of the future chair are assembled, tightened with clamps (making sure that the angle is exactly 90 degrees) and left until the glue dries completely. Below is a drawing of a children's wooden chair.

After this, they must be sanded well until the surface is smooth.
Making the back and seat
The back and seat are made of 25x30 cm in size from 2-3 sheets of plywood glued together. It is advisable to round all corners. Foam rubber is glued to them and everything is covered with a fabric cover. Before installing them on the chair frame, they are fastened together with metal brackets.
Now let's start assembling the chair. First, two finished sidewalls are connected using planks. Fastening is carried out using the technology already described. The seat itself rests on slats, and to secure it you will need cylindrical dowels or screws. Then the lower strips and the back strip are installed on which the backrest will be mounted. After all work has been completed, the chair should be left to dry.
In addition to the main table, you can also make a small tabletop. It is especially convenient for feeding or playing with small children. To make it, you will need a plywood sheet, from which a tabletop of the required size is cut. It is attached to the armrests using glue and dowels. But it makes more sense to attach it with self-tapping screws; this will allow you to easily dismantle it if desired.
Making a table
The technology for assembling the table is absolutely identical to assembling the chair. Therefore, there is no need to describe it in detail; you just need to focus on the main stages. First, the side parts of the table are assembled and sanded, then they are connected by transverse strips and sanded again.

When the children's wooden transformable chair is ready, it is coated with several layers of varnish.
High children's wooden feeding chair
Making furniture with your own hands is a labor-intensive process. Nowadays it’s easier to buy ready-made or order it than to make it yourself. But there are times when an item is needed for a short time or there is no way to pay a lot of money for it. One option is a high chair for feeding your baby. The tip below will tell you how to make one from an old chair with your own hands.
Children's wooden chair assembly diagram

To make it you need the simplest chair with a backrest. It is very good if it has. It is important that it has crossbars between the legs and is strong and reliable. In the future, turning it over, the back will serve as the front legs of the future chair. Next, you will need strong wooden slats the size of the height of the chair; we fix them as shown in the figure. So, we get a back pair of legs, which are fastened together with a strap. To achieve maximum stability, the rear legs must be attached at an angle that is selected individually. Then all the legs are fastened together with horizontal strips.
The frame of the future chair is ready. You can make it more convenient to use by attaching smoothly sanded boards or a sheet of plywood as a seat. A soft seat is placed on top of it. Small smooth boards are used for the back and table top.
That's all, the chair is ready.
It doesn’t matter how the children’s wooden highchair is assembled, the main thing is that it should be comfortable and safe for the child. To ensure that the finished chair and table have an aesthetic appearance and last as long as possible, they are coated with a protective paint and varnish composition in several layers. In addition, all wooden parts can be decorated with bright patterns, which are applied with a simple brush or sponge through a stencil.
It is optimal to use artificial leather for seat upholstery, because it is easy to clean. This is especially true for young children. It is desirable that the back of the chair have soft upholstery made of waterproof fabric.
Before assembly, all wooden parts must be carefully sanded with sandpaper, first coarse-grained, then fine-grained, until a perfectly smooth surface is obtained.
If the chair is assembled with self-tapping screws, their caps are recessed and closed with plastic plugs matched to the color.
In addition, you can get creative and make the chair colorful and interesting for your child by choosing bright upholstery fabric and painting all wooden parts with oil paint in bright colors.
Or you can entrust the design to the future owner of the chair itself.

Children's wooden chairs photo


Purchased furniture for a child’s room, especially made from natural materials, can be quite expensive. In a store or online, you don’t always find exactly the option you like. You can create a children's high chair and table from wood yourself. The work will not be difficult if you prepare all the necessary parts and tools, use your ingenuity and imagination. The reward for the work is a unique product, as comfortable as possible for the baby and practical in home life.
You can create a children's high chair and table from wood yourself.
A DIY chair will cost much less, and one made according to your own sketch will meet the intended parameters and the required degree of comfort for the baby.

The reward for the work is a unique product, as comfortable as possible for the baby and practical in home life.
All natural wood parts can be purchased in specialized departments of construction stores. They will select boards and bars of the required sizes for you.

A DIY chair will cost much less.
A child's high chair, created with one's own hands, is high-quality furniture for a child. In the process of work, you take into account the dimensions of the seat and backrest, which are as comfortable as possible for a growing baby, and check the strength of the structure directly at home.

All natural wood parts can be purchased in specialized departments of construction stores.
A wooden chair you create with your own hands can be decorated to your liking, rather than being satisfied with a ready-made solution for purchased furniture.

They will select boards and bars of the required sizes for you.
Required materials and tools
To create a chair you will need various materials. Individual parts will be made from them. First of all, these are wooden blocks and boards from which the frame, seat and back are assembled. Instead of natural solid wood, you can use chipboard or plywood, but these materials are not durable. For fastenings, take sufficient self-tapping screws. You will need medium-hard sandpaper.

A child's high chair, created with one's own hands, is high-quality furniture for a child.
Dimensions of bars (length):
- support legs – up to 20 cm;
- seat frame connecting strips – up to 20 cm;
- backrest lintels – up to 20 cm.

A wooden chair made by yourself can be decorated to your liking.
During the manufacturing process, the thickest bars with a cross-section of 5x5 cm are used for the legs. For the planks, parts are taken with a diameter half the size of the supporting ones.

For the planks, take parts with a diameter half the size of the supporting ones.
The parameters of the seat board (height and width) should also not exceed 20 cm. The back part may be slightly higher, but preferably no more than 30 cm.
- they are less durable;
- The environmental friendliness of such products has not been 100% proven.

The parameters of the seat board (height and width) should also not exceed 20 cm.
To make a chair with your own hands, you need the right tools:
- screwdriver;
- screwdriver;
- jigsaw;
- hacksaw for wood.

The dorsal part may be slightly higher, but preferably no more than 30 cm.
The assembled chair will “require” original decor. In addition to the carved option, you can use paint or other materials to apply a design or appliqué. To accurately apply the image you will need a stencil.

The assembled chair will “require” original decor.
Deciding on design and construction
For a wooden product, you can come up with any option. A highchair is usually made with straight supports and the following forms of the back structure:
- solid square or rectangular;
- wide truncated cone;
- straight through (with jumper bar).

To accurately apply the image you will need a stencil.
Creating a product with your own hands requires careful preparation. You must first make a sketch of the project. Visually draw a diagram of the connections of all parts separately with calculations of sections and lengths. Following the sketches, you will recreate the model in reality with exact parameters. A chair that has all the right dimensions will fit the baby and will not create any inconvenience.

For a wooden product, you can come up with any option.
Certain models are created with the expectation that the child will sit at a common table with other family members. In this case, high legs are chosen for the product, which are not attached exactly vertically in relation to the seat and floor, but more widely. The lower part of such a chair will look like a truncated cone, connected for stability by wooden blocks around the perimeter. The top part will be approximately 30-35 cm below the table level.

A children's high chair is usually made with straight supports and the following forms of the back structure
If you have certain skills, you can assemble a folding product. Such items can be easily removed if necessary into storage areas.

For the chosen design solution, the parts are processed in accordance with it.
Manufacturing process: step-by-step instructions
After preparing a drawing with exact parameters, we begin to assemble a simple children's high chair.
- Calculate the length of the legs exactly according to the diagram, saw off the excess with a hacksaw.
- Cut out the jumper bars to size that will secure the frame in the seat area.
- Connect them to the supporting structure. Add furniture glue for reinforcement.
- Attach the pre-sized back and seat using self-tapping screws.
- All wood parts must be cleaned with sandpaper to avoid roughness and burrs.

A chair that has all the right dimensions will fit the baby and will not create any inconvenience.
If the parts are disproportionate, “adjust” them according to the design diagram using a hacksaw. To make the chair you created with your own hands comfortable, ask your baby to sit on it, ask how comfortable he is.
If all dimensions were determined correctly, the child will love the new furniture. To ensure the parts are smooth, sand the surface again.

Certain models are created with the expectation that the child will sit at a common table with other family members.
To varnish the product, use only safe compounds - a special coating for children's furniture, environmentally friendly and having the appropriate certificate.

The top part will be approximately 30-35 cm below the table level.
After finishing the exterior with varnish, let the chair dry thoroughly for a day or two. Then you can begin decorative finishing, if any is planned. If it involves carving, then varnishing is done after finishing the artistic treatment and sanding the parts.
Decorating a chair
Use a jigsaw for carving. You can make a decoration in the form of a flower, cutting it out in the center of the back, or any geometric shape. First, mark the area of the future decoration with a pencil so that the carving is even. Parts such as legs and back can be carved. The corners of the seat can be rounded using a jigsaw and sandpaper.

During the manufacturing process, the thickest bars with a cross section of 5x5 cm are used for the legs.
The top can also be made not strictly rectangular, but a truncated cone, rounded, compound. In the latter option, you will need additional bars and cross bars - one or two. They are secured using special holes at the junction with the dorsal frame. This is a rather labor-intensive process, but if you wish, you can choose this option.

For fastenings, take sufficient self-tapping screws.
All steps for processing parts must be performed before the chair is assembled - this way the work process will be faster, more convenient and neater.

If you have certain skills, you can assemble a folding product.
To make a home-made piece of children's furniture look more interesting, you can apply a design to the back and seat. To do this you need to use safe paints. The color scheme should be bright and cheerful. Simple ornaments, floral patterns, and imitation of children's toys, such as cars, look great on wooden furniture.

Instead of natural solid wood, you can use chipboard or plywood, but these materials are not durable.
Due to the fact that the size of the product is small, a large pattern will become a kind of accent that attracts the child’s attention - he will like to sit on such a beautiful chair, play games or have breakfast.

You can use appliqués for decoration – there are plenty of adhesive bright films on sale.
The image will turn out smooth if you use a stencil pre-cut from paper or thick plastic.
You can use appliqués for decoration – there are plenty of adhesive bright films on sale. Whether the image will be monochromatic or multi-colored depends on your imagination.

First of all, these are wooden blocks and boards from which the frame, seat and back are assembled.
It is not recommended to use bulky (protruding) parts, both small and large, in finishing the seat or back of a children's chair. Firstly, it is inconvenient for the child, and secondly, they quickly fall off with frequent use of the product.

To create a chair you will need various materials.
VIDEO: DIY high chair
To make the baby's life more comfortable, many parents purchase special furniture for all life situations. For example, a children's high chair is used to decorate a play area, a workplace, and is a necessary piece of children's furniture that is also used for feeding the baby. The cost of such a device is quite high, and the choice among materials and models is even greater. But there is a solution to this situation - a children's chair made of plywood or boards. The material, tools and fasteners for making this product are quite accessible - they can be found in any hardware store or even at home. Particular attention should be paid to this question: how to make a highchair with your own hands?
The easiest way is to build a wooden chair. This option has many advantages that relate specifically to the type of material:
- The material is easy to process
- The cost of wood is not that high
- The aesthetic appearance of a product made from this material is initially acceptable without additional coloring or decoration
- Wood product is completely environmentally friendly

Let's consider what components and consumables you need to make a children's wooden highchair with your own hands. In addition to the main material, you will need additional elements, without the use of which a high-quality product simply cannot be made:
- Fastening of parts can be done using furniture glue, carpentry nails or small self-tapping screws
- Sometimes metal corners are used to strengthen the structure
- Often the seat and back are upholstered with foam rubber, which is covered with fabric
- To hide the places where parts are fastened using self-tapping screws, you need to buy special plastic covers
- There are also rubber and plastic pads for the legs so that they do not scratch the flooring

For processing, you may need wood stain or varnish. Sometimes a wooden chair is painted with eco-friendly paint. Such measures are not necessary, the main thing is that the baby does not get hurt due to a poorly treated surface of the product.
What parts need to be made
First, sketches and drawings are prepared, regardless of whether the chair for the child will be made of plywood, chipboard or wooden boards. Only then, using a jigsaw, are the parts cut out from which the product itself will be created. There are not so many of them, but without one of them, the made chair will not be so strong:
- Required to have top, bottom, front and side bars
- Four legs
- Middle crossbar
- Seating surface
If one of the parts is missing, the product will not be reliable and will not last long or will be completely unusable. You can think over your own option for arranging the chair. The same presence of parts is required to construct a high chair. A distinctive feature of this product is that the chair can be combined with a table, that is, it turns out to be transformable furniture.
Plywood construction
A children's high chair made of plywood is the most affordable material. In addition, it is much easier to make a plywood chair with your own hands, even if the master is new to this business. The main thing is to clearly formulate a sequence of actions and carry out preparatory measures:
- At the very beginning, it is important to prepare drawings and connection diagrams. With their help, the type of future product, as well as the dimensions, are determined.
- It is also important for a highchair to ensure comfort of use, so you need to determine the possibilities for its further use.
- First, the base is made, that is, the stool, and then all other parts are attached to it.
- You should cut plywood very carefully, as it tends to tear or break. At the same time, it is not enough to simply cut out the parts - their edges need to be properly processed.
- Any small chair requires specific handling measures so that the child does not get hurt during use.
A constructed chair can be considered ready only when all stages are fully completed. The finished product is processed according to all requirements, strength and reliability are tested. Additional finishing may be present, especially if it is a high chair.

In any case, a self-made chair made of wood, as well as its derivative materials, can be further modernized and remodeled. The cost of such a product will be much lower than in the store. You can choose the design yourself, using all kinds of materials for decoration. Such a product will last for many years, while parents will not worry about the health of the baby’s posture, and the child himself will have his own place to study.