Plastic bottles are currently the most common container in which water, kvass, beer, juices and other drinks are sold. In any home, these bottles accumulate from time to time, after which they are thrown away. But it turns out that this used container can become useful material for use on the farm. Without much difficulty, by carefully cutting the bottle, you can get strong shrink tape. But it is absolutely impossible to complete this process with scissors; you need to build a bottle cutter for plastic bottles, the drawing and design of which is completely simple and can be done very quickly.
Using a bottle cutter, you can efficiently cut shrink tape from plastic bottles in a short period of time. She in household, will be simply irreplaceable at the dacha. Thanks to excellent properties plastic, we came up with the idea of using the bottle again - in the form of a ribbon. When heated, it melts, shrinks, becomes very strong, and is almost impossible to tear.
The tape can be cut to any size: from thin as a fishing line to one centimeter wide. And it can be even wider, if desired. After being tied with tape various elements, it is enough to warm up the place of the ligament with a hairdryer for a few seconds, and the effect of shrinkage and tightening of the tape will be visible right before your eyes. The structure becomes very durable.
Home, base part the entire structure has a sharp blade, it can be easily removed from stationery knife. The cutting surface of the knife is quite sharp. It does not require additional sharpening. The gap, on the side of the cutting surface, will coordinate the dimensions of the strips being cut.
The resulting heat-resistant tape is used for:
- tool handle windings;
- weaving panicles, brushes, fishing rods;
- used as a rope for tying various elements during household work, gartering plants in the garden;
- for decorative purposes, making spiral garlands.
When using a 2 liter bottle for cutting, about 35 meters of tape, 1.5 mm thick, comes out.

DIY manufacturing steps
The device can be made simple manual or complicated with fixation. Before cutting, the bottle is freed from the bottom and a small incision is made in the lower part. Next, from this cut, the ribbons are cut to the desired size. Only the bottom and neck will become waste.
The production of a bottle cutter can be divided into several stages:
- design choice;
- purchasing materials, preparing the necessary tools;
- drawing up a device drawing;
- production and further use.
Preparation of materials and tools
Bottle cutter can be designed different ways, depending on this, you will also need various materials. For the first method, which is easier, the set of materials and tools is as follows:
- laminate board 30 x 20;
- washers different sizes: big, small;
- bolts and nuts;
- blade from a stationery knife;
- drill with drills;
- pencil;
- screwdriver and wrench.
Before starting work on the second type of bottle cutter, which is more complex, you need to prepare materials and tools in the following sequence:
- a metal section of a channel or an aluminum corner;
- blade from a stationery knife, pencil;
- nuts, M5 or M6 studs, washers, bolts, wooden block spacer;
- metal plate;
- drill, screwdriver, ruler;
- hacksaw for metal.
If more thin tape is required, then it is better to make the machine according to the developed drawing so that all the working elements match perfectly.
Drawing development
Bottle cutter can be made different types. To ensure that the entire design is accurate, it is better to first draw up a drawing of the selected model. Below is a finished welding drawing of a bottle cutter for plastic bottles by Advokat Egorov.
It is clear from the drawing that the structure is not stationary. It can be used both indoors and outdoors. She small sizes, very easy to use.
Universal bottle cutter drawing. Thanks to this design, it is possible to cut strips of any size, in large quantities. The structure cannot be broken.
The drawing can be simplified; if you don’t want to mess with metal, you can make a simple version of a bottle cutter from a stationery knife and a wooden block or laminate. The drawing will only contain markings for attaching washers and blades at the base of the laminate.
But there is also a complicated form of the device, for the manufacture of which a drawing is extremely necessary. A drawing of the handle design is shown below. With this design it turns out very a large number of tapes, different sizes in a short period of time.
Assembling parts based on the product
Depending on the chosen bottle cutter design, the assembly will differ from one another. But in any case, it will not take much time and labor.
Based on a stationery knife
Assembling a simplified model consists of the following steps:
- Prepare the material: a piece of laminate, washers, nuts and bolts, a blade and all the necessary tools.
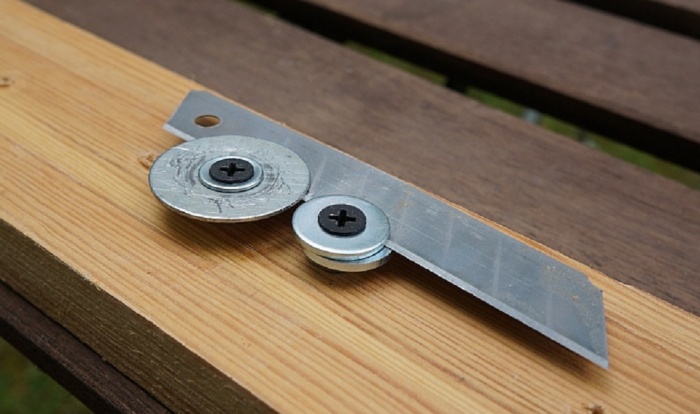
- Place two washers side by side in the middle of the laminate board, mark the locations for the holes with a pencil, and drill.
- Place 2 bolts and secure them, they should be “sunk”.
- To cut the tape to size with the thickness of two washers, place two washers on both bolts.
- The blade is placed on any of the bolts.
- Place one washer on the bolts again.
- The blade is adjusted so that a noticeable part of the cutting edge is located in the area of the shortest path from one washer to another.
- The washers are aligned and the nuts are tightened. The bottle cutter is ready. It can be secured on the table for convenience with self-tapping screws.


We put three washers on each bolt.

The blade from a construction knife is the most important part of a bottle cutter.

Insert the blade from a construction knife.

Put on the washers and tighten the nuts.
Secure the bottle cutter to the table top with a clamp.

First cut off the bottom of the bottle and make the beginning of the ribbon. Insert the bottle into the bottle cutter.

With your left hand, press the bottle down, and with your right, pull the tape without jerking.
Egorova model
The improved design of Egorov’s homemade bottle cutter is metal corner or channel on which it is fixed cutting part. The manufacturing stages are as follows:
- Prepare the material with the tool.
- On metal channel or drill a corner through hole for the M5 bolt so that it coincides with the hole in the blade.
- Retreat from the hole by the width of the nut.
- They make cuts of different sizes - depths at a distance. The depth of each cut is the width of the future tape. The cuts are cleaned sandpaper from unevenness and burrs.
- Inside the angle, at the level of the cuts, a stationery blade is attached using bolts and nuts (in drilled holes). To prevent it from moving to the sides, you can add a stop to it in the form of a bracket or bar if desired.
- The rod is also secured with bolts and nuts.
- For the axle, you can use a pin or an ordinary nail. A thread of up to 20 mm is made on it, the edge of the thread is bent. The axis will feed a small angle to cut the tape and feed the bottle. The structure is ready.
Some nuances during assembly:
- despite the fact that the blade of the structure will be located inside, the markings must be carried out from the outside;
- it is important not to forget to make a hole for the pin;
- on the adjacent side, the cuts should be slightly wider so that the bottle fits more tightly to the blade.
The blade must be positioned in the corner so that it is directed towards the bottle for the correct slope of cutting the tape. Plastic bottles for cutting into ribbons should be smooth, without raised bends, as this may degrade the quality of the ribbon. It is very important at the very beginning of work, after removing the bottom, to make an even, perfect cut on the bottle.
Making the design yourself is very simple and necessary. Will appear in the household for many years useful tool, with the help of which you can constantly supply yourself with useful materials at hand.

Video
Scope of application plastic containers extensive. In addition to whole containers, tape cut from bottles is actively used in everyday life. It is impractical to do all the work manually; it is much more practical to quickly build a bottle cutter with your own hands. Depending on the chosen design, the operation of the bottle cutter differs. One machine provides hand holding plastic bottle, in another design this is not required. There is a manual compact bottle cutter that is convenient to take with you outdoors. A description of the assembly process and a video will help you easily make a bottle cutter with your own hands.
Everything ingenious is simple
It is possible to assemble a primitive machine in 10 minutes; the main parts for assembly are a 20 mm piece of board, washers with nuts, self-tapping screws and a blade from a stationery knife. Required amount and dimensions are shown in the photo.
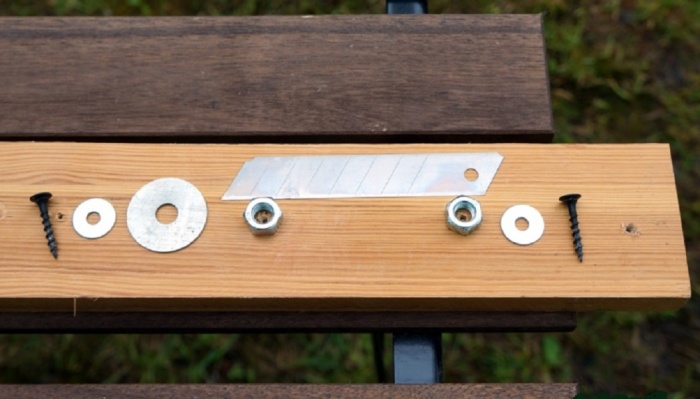
The process is extremely simple:
- two holes are drilled in the board for self-tapping screws at a distance equal to the radius of two washers;
- nuts are placed above the holes;
- washers are placed on top;
- then comes the turn of the stationery knife blade;
- Covering it with washers, the entire structure is fixed with self-tapping screws.
In the end it turns out the simplest machine for cutting tape from a plastic bottle, the principle of its operation is demonstrated in the video:
Practical use of the bottle cutter led to a number of comments:
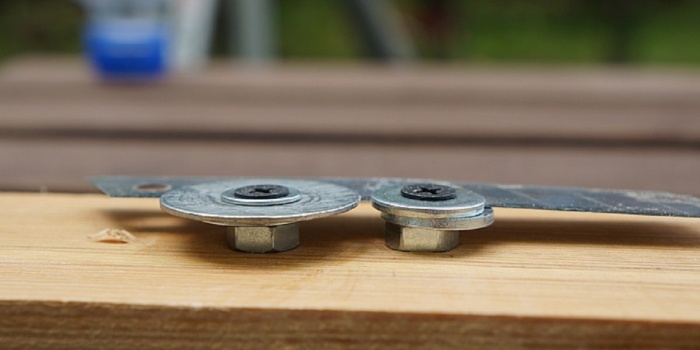
- It is preferable to replace the nuts with stacks of washers. In this case, it is advisable to select parts of a larger diameter, at least at the location of the plastic bottle. The large washer of the bottle cutter successfully serves as a guide for the bottle.
- A uniform and fast cutting process for plastic bottles is ensured by the correctly selected distance between two stacks of machine parts. The optimal value is the wall thickness of the plastic container.
- To adjust the thickness of the tape being cut, it is enough to change the place where the blade is fixed between the washers of the bottle cutter.
Comment! The thinner the tape, the more precise the movements must be, otherwise premature cutting will occur.
Convenient operation will be ensured by fixing the bottle cutter to the table with self-tapping screws or a clamp. The regular need for thin strip forces the machine to be equipped according to an improved drawing. When cutting a 2 liter plastic bottle, you can get 35 m of tape with a thickness of 1.5 mm.
Options for using durable tape in everyday life and the process of making a bottle cutter with your own hands in the video:
Improved model
To make a more practical bottle cutter, you will need the following set of materials:
- aluminum channel 2x3x3 cm;
- pin with a cross section of 6 mm, length 0.5 m;
- 6 mm nuts, bolts and washers;
- blade from a stationery knife;
- set of bits, screwdriver;
- metal file, tape measure and marker.
The operating principle of the bottle cutter is as follows: a blade is installed inside an aluminum channel, which is pressed against the wall of the part using a wooden block. Detailed diagram The machine is shown below:
Proof of ease of installation and efficient work The following video serves as a guide to the device:
Assembling a bottle cutter with your own hands is not enough; it is important to correctly determine its location. Two guidelines will help in resolving the issue:
- ease of holding the channel by hand;
- possibility to screw the machine to wooden base to easily cut the tape.
Despite the internal location of the blade, markings are carried out outside. It is necessary to make 7 cuts. The depth of the cut corresponds to the thickness of the future tape from the bottle. You will also need a hole for the pin. When the marking is completed, the slots are made with a hacksaw. First, the smallest slot is made, then the slots are gradually enlarged in increments of about 2 mm. The following photo shows the finished channel.

A second hole for the pin is drilled on the parallel side of the aluminum part, after which the two elements are connected.
Comment! On the side where the width of the PET tape will be adjusted, the cuts are made strictly in accordance with the desired dimensions. On the adjacent side, the cuts are made wider so that the bottle fits as tightly as possible to the blade.
The bottle cutter for plastic bottles can be fixed anywhere: screwed with self-tapping screws to wooden post, clamped with a clamp on carpenter's table or any other used convenient option. Way to do it manual machine, suggested in the following video:
Plastic containers intended for cutting tape are selected without a relief pattern. Otherwise, the quality of the cut tape will be poor. It is important to make the initial cut on the plastic bottle perfectly even.
Where to use such a reliable long strip? Lots of application options:
- enthusiastic fishermen weave donks;
- home craftsmen restore the handles of worn-out tools;
- as a connection wooden elements (homemade chair or a tripod for cutting wood).

Heating the tape from a plastic container will help to make the most reliable fixation, after which it is heat-shrinkable.
There are many ways to make a bottle cutter. Depending on the frequency of use, thickness and volume of workpieces, the design can be extremely simple or an advanced model. A complex version of the bottle cutter is presented in the following video:
Today we will make a simple mobile bottle cutter for cutting tape from plastic bottles. What is it for? This one has homemade tape a lot of applications. It can be used in the garden for tying up bushes, at home as a clothesline, in the workshop for strong connections. Using it as heat shrink, you can restore almost any tool handle simply and complex shape. The big advantage of this tape is that when heated, it takes the shape of the object on which it is wound. It fits tightly to the object and is held on it.
The strength of the tape is surprising. With a thickness of 1.2 mm, it can easily withstand dynamic loads from a 2 kg dumbbell. In static mode, it should withstand up to 5 kg of load. It cracked on an 8 kg dumbbell.
Now about making a bottle cutter. An aluminum corner with a side of 25 cm and a thickness of 2 millimeters was used. Secure the corner in a vice, make slots in it for different widths tapes. In this way, a machine was obtained that can produce tapes of different widths.
Next you need to make two holes for mounting the blade. One of the bolts for attaching the blade serves as a guide for holding the bottle. The guide is removable, made from a pin from an old engine, a bolt and two M6 nuts. It does not go perpendicular to the corner, it is slightly curved. This shape makes it possible to cut the tape to any width without special effort. Of course, it’s easier to make a guide from a rod by cutting a couple of centimeters of thread on it. But there was neither a rod nor a die at hand.
Now let's see what a bottle cutter for plastic bottles can do. The thinnest tape he cut was 1.2 millimeters wide. To obtain a thin ribbon, you first need to cut the eggplant perfectly evenly. This is very important point, because only if you manage to make a very even edge of the eggplant, will you be able to make a thin ribbon later. If you need a wider ribbon, you can cut it somehow.
A simple bottle cutter.
The author of this video decided to make a simple one for himself and show how to make it for those who do not want or do not have the opportunity to make a more complex device. Perhaps you will like this method and you will also want to make yourself the same mini-machine for plastic rope.
To do this, we take any pipe convenient size taking into account that part of it was allocated for the working unit, and the second part became the handle. You will also need a triple blade from a stationery knife and 2 screws.
First you need to make a longitudinal cut about 5 cm using a hacksaw. You also need to make a perpendicular cut for the knife. Using a one and a half millimeter drill, we will make 2 holes for the screws. The device is almost ready. To use it, you need to make a cut on a plastic bottle and insert the tape and blade into the cuts. You can start cutting the tape. It is important to make an even cut at the bottom of the bottle from the very beginning.
It has long been known that plastic can lie in the ground for many years without decomposing and thereby causing severe harm. environment. To recycle such waste that can later be found useful application, enterprising people came up with a bottle cutter. It cuts plastic bottles into narrow strips, which are used as a strong fastening and shrinking material. You can learn how to make a bottle cutter with your own hands from the information below.
Tape made from plastic bottles is widely used in everyday life and households:
- In the manufacture of brooms and brushes.
- For use as heat shrink tape on personal plot for tying up plants during the construction of greenhouses.
- As a fishing line
- For the manufacture of wicker furniture, bags, baskets.
You can make two types of bottle cutters with your own hands: manual or locking. Its basis is a blade, usually from a stationery knife. It is inexpensive, very sharp, and does not require sharpening. Very helpful hiking option devices for cutting plastic bottles, because as a result you can get a strong rope, fishing line, tape for wrapping the handles of any tools, weaving nets and other items necessary for survival. The advantage of such a tape is that when heated, it shrinks several times, tightening and securely securing what is wrapped in it.
DIY plastic bottle cutter

The simplest option, a camping bottle cutter can be made with your own hands as follows:
- You will need a wooden block measuring 2.5x2.5x12-15 cm. At one end, cuts are made with a depth corresponding to the thickness of the tape being cut. You can make several of them so that each one cuts the tape to a different width.
- The blade from a stationery knife is attached to the top of the block above the cuts. This can be done using hot melt glue so that hiking conditions it was possible to remove the knife by heating adhesive layer to replace the blade or sharpen it.
- The bottom of the bottle is cut off, a small incision is made, and it is pulled through a cut of the required width. Now you need to pull the cut end, cutting the bottle to the very neck.
The video clearly shows the manufacturing process of this simple device.
DIY bottle cutter: drawings

A more complex option for making a device for cutting bottles with your own hands requires more thorough preparation.
To make such a bottle cutter you will need:
- Aluminum corner with a thickness of at least 2 mm.
- Nails, die M6
- Construction knife blade
- Fasteners
- Drill with 6 and 3 mm drill bits.
- Bulgarian
- Sandpaper, file.
Before making a bottle cutter, it is better to draw up a detailed drawing of the device and its fastening. Thanks to the drawing, it will be clearly visible at what angle the knife blade should be attached, since without tilting the correct cut will not be possible.
The blade is placed on a metal corner so that the sharpening fits tightly into the corner, and a drilling location for fasteners is marked. Along the length of the blade, a cutting line is marked on the corner. A hole is drilled with a 6mm drill, the workpiece is cut off with a grinder. Next, you need to make markings for cuts in increments of 5 mm from the very edge of the hole. On one side of the corner, the depth of the cuts should correspond to the approximate width of the tape being cut, and on the other, a cut is made to almost the entire width of the corner, not reaching 1-2 mm of the jumper. All cuts are processed with sandpaper or a file so that no snags are created while pulling the tape.
All holes are processed, metal dust is removed with a brush. It is recommended to remove the rounding inside the corner with a grinder so that the knife blade does not rest against it.
Next, an axle with a diameter of 6 mm is made from a 200 mm nail and a 15-20 mm thread is cut with a die. The tip is ground down and the axis is bent slightly to set the cutting angle. After this, the axis is fixed in a vice. The video shows how the device works.
Another view simple device, which can be screwed to a table or other surface, and removed if necessary:
- To make it you will need a blade from a stationery knife, double-sided tape, a piece of linoleum, a 30 cm din rail, a metal plate, studs, 6mm screws and nuts.
- You need to make a clamp from the slats, in the middle of which make two cuts with a distance of 2 cm between them. Bend the slats so that the shape of the letter P is formed. In order to ensure that the clamp does not leave marks when attaching to furniture, you need to make linings from linoleum, gluing them with double-sided tape.
- You need to make two holes in the plates - for fastening for a bolt to a clamp and for a bolt without a nut. The second hole will prevent the plates from moving.
- The blade is secured with nuts and washers. The thickness of the resulting plate is 1.5 mm; with one similar attachment, a tape 1.5 mm wide is obtained. To cut a wider strip, you can simply add more strips.
Fastening to a table or other support is done using a wing nut, and the pin serves as a guide. It is secured through an adapter nut for quick disassembly when the device is not in use.
A simpler device, attached to the table surface, consists of pressing the knife blade with a clamp. A piece of plywood or wood of a certain thickness is placed between the table and the blade, which will determine the width of the tape being cut. Some kind of material is also placed between the clamp and the blade. flat material to avoid damaging the knife blade. This type of bottle cutter has its disadvantages: you need to hold the bottle with one hand and pull the tape with the other. In addition, it is cut unevenly, since there is no reliable fixation of the size. Therefore, it will not be possible to produce a thin and even line using this type of bottle cutter, unlike more complex devices.
Rope, which is obtained from ordinary plastic bottles - indispensable assistant in the household: with the thinnest one you can go fishing, with the wider one you can wrap tools, as well as tie and lace anything. And you can get it in a handicraft way.
Today's material is devoted, as you probably guessed from the title, to the creation of a bottle cutter. I must admit that this invention is not mine, and I was very skeptical about it when I first saw a short video on YouTube, where a certain Advocate Egorov demonstrated his design of this invention. I remember I even wanted to dislike it, but out of respect for the author I didn’t do it. Time passed, winter began to give way to spring, and there was a lot of work in the yard, as usual at this time of year. And then I needed a rope or wire, but I couldn’t find anything like that in the cluttered barn. At that moment I remembered that short video. I didn’t intend to run to the store, since it is located quite far from home, but the Internet is very close. Literally a couple of minutes later, I found required material and began to create a bottle cutter based on the design of Advocate Egorov. I would like to point out right away that nothing worked for me. The tape was torn and it was impossible to cut a piece that would exceed at least 1 meter. The debriefing began and the search for errors began. The answer was found quite soon in the comments under the video itself. It turns out I’m not the first to come there with such problems. The reason was the thin-walled profile. Lawyer Egorov recommended taking a profile or corner with a thickness of at least 2 mm, and in my case the profile was from a PVC window with a wall thickness of 0.5 mm.
However, he still had no intention of giving up. And after making one minor design change, I finally achieved my goal. At the moment, my bottle cutter easily cuts tape from any plastic bottle, including those with complex surface geography. I would also like to note that with this design I can easily obtain a ribbon of the width I need. The minimum width I cut was 1.5 mm, the maximum was 15 mm. I did not try to cut ribbon of other sizes, since I did not have this need.
What is the tape for? This question often arises under a video about this device. I cannot answer this unequivocally. But the scope of use is very large. Tape can replace rope or wire. At the same time, it has very high strength and is easily deformable. In addition, it is resistant to various weather conditions: It easily tolerates both frost and heat, dampness and moisture are also not scary for it. The only thing this tape is afraid of is ultraviolet radiation. But even with a direct hit sun rays easily withstands 5-6 years. Another area of use is winding tool handles. Using tape, for example, you can easily increase the strength of the butt of an ax, as well as improve its ergonomic properties. In any case, the scope of use is limited only by your imagination. When using tape, I also recommend remembering its shrink properties, thanks to which you will increase its strength and give it the desired shape.
It's time to get down to business. First we need a profile or corner. In my case, the profile is taken from metal-plastic window. We will also need a blade from a stationery knife, a hacksaw for metal, an M6 hairpin, and 10 nuts.

Making a bottle cutter
Using a hacksaw, we make neat cuts for different widths of the tape. These cuts should be cleaned with sandpaper or a needle file, or anything else, as long as there are no burrs or sharp edges.

How to make a bottle cutter
Now, below under the cuts, using a drill we make holes with a diameter of 6 mm. It should be taken into account that the hole must coincide with the hole in our blade, and the blade must rest closely against the inner wall of the profile.

DIY bottle cutter
On next stage bend the pin as shown in next photo. The most convenient way to do this is with a vice.

Now we insert the pin into the holes, having previously installed the blade, after which we fix the entire structure with nuts.