The cost of building a sandbox is minimal, and children will enjoy it immensely. Of course, you can buy a ready-made structure and simply fill it with sand, but a sandbox made by yourself is much more interesting and convenient.


Selecting a location
Before you start building a sandbox, you need to find the most suitable place for it, because the comfort and safety of the baby depends on it. There are several rules for sandbox placement:

To protect from the sun, you can place a sandbox under a small strong tree or build one. But you shouldn’t do this under old trees: at any time a heavy branch can fall from a tree onto a child.
Prices for children's sandboxes
Children's sandboxes
Sandbox construction

If a place for the sandbox has been chosen, you can begin the main process. First you need to calculate the dimensions of the structure, choose a shape, and properly prepare the base. The size of the sandbox depends on the age and number of children who will play in it. For three children aged 1-3 years, an area of 1.5x1.5 m is sufficient; for older children, it is recommended to make sandboxes 2x2 m, and standard designs have dimensions of 1.7x1.7 m.
Most often, the sandbox has a rectangular or square shape, but sometimes round and hexagonal designs are found. Here a lot depends on the imagination of the master and his skills; if your experience in such matters is minimal, it is better to stick to the standard square shape. Wood is used as a building material, namely pine boards.

Additionally you will need:
- shovel;
- roulette;
- pegs and rope;
- geotextiles;
- sand;
- tamping;
- timber 50x50 mm;
- hacksaw;
- antiseptic impregnation;
- liquid bitumen;
- sander
Step 1. Site preparation
The selected area is cleared of stones, branches, weeds, and the surface is leveled. If the dimensions of the sandbox are 1.5x1.5 m, then the cleaned area should be 10-15 cm larger on each side - this is necessary for more accurate marking.
Step 2. Marking

Now you will need 4 pegs, a tape measure and a long rope. Visually determine the location of one of the corners of the structure, drive in a peg, draw two perpendicular lines from it, and mark the location of the last corner. A rope is pulled between the pegs and the length of the diagonals inside the markings is checked. They must be absolutely the same.
Step 3. Preparing the base
Inside the fence, a layer of soil is selected to a depth of at least 20-25 cm. The walls of the pit must be leveled so that they are strictly vertical. When all the soil has been removed, the bottom is trimmed and compacted. Sprinkle sifted fine sand on top in a 5 cm layer and compact it well.
Step 4. Making the frame

The timber is sawn into pieces 45 cm long, the lower ends are sharpened, ground, treated with impregnation and coated halfway with liquid bitumen. Now you need to install them at the corners of the perimeter and bury them 15 cm into the soil. The next stage is attaching the boards: they are knocked down in pairs and screwed to the bars with self-tapping screws. You can do it another way: first, completely assemble the frame, and then install it above the pit.


The boards can be narrow or wide, the main thing is that the width of the walls is at least 30 cm. Be sure to treat the surface of each board with a sanding attachment on both sides, then soak and dry. After this, the boards are knocked down into a square box and reinforced at the corners with bars, which on one side should protrude beyond the perimeter of the box by 15 cm.


Step 5. Installation of sides
For the convenience of the child, small sides need to be made around the perimeter of the frame. To do this, take 4 boards 20cm wide, sand them very well, coat them with an antiseptic and cut the edges at an angle of 45 degrees. Lay the boards on top of the walls, align and align the joints, and screw tightly with self-tapping screws. The heads of the screws should be well sunk into the wood so that the child does not get hurt. Sometimes, instead of sides, they make corner benches: they take a board of short length, process it well, lay it on two adjacent walls, stepping back a few centimeters from the corner. After this, the board is nailed on both sides, and the edges protruding beyond the perimeter are cut off.
Step 6. Finishing the structure

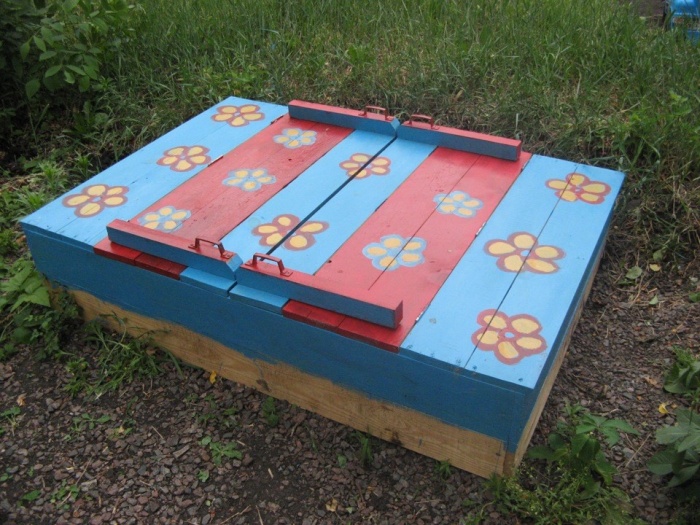
Now the sandbox needs to be painted correctly. To do this, choose paints of 2-4 colors, always bright and contrasting. The sides or benches can be not just painted, but painted with ornaments, images of animals, flowers. As soon as the paint has dried, the structure is filled with sand.
Prices for various types of construction boards
Construction boards
Making a lid for a sandbox
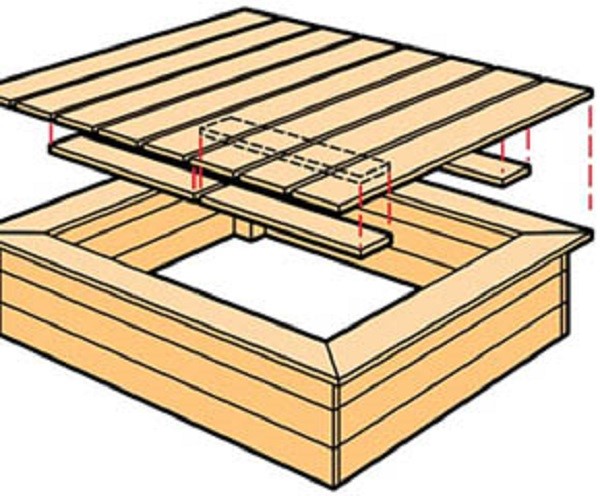
An open sandbox gets clogged very quickly, so you have to periodically sift the sand or change it altogether. To avoid such problems, it is recommended to install a wooden cover. It’s not difficult to make, and the result is not only good protection from debris, but also comfortable benches. It is best to install the cover before installing the frame in a permanent place.
To work you will need:
- pine boards 25 mm thick;
- jigsaw;
- long loops;
- bolts with nuts;
- self-tapping screws;
- timber with a section of 30x50 mm;
- primer;
- dye;
- drill.
Step 1. Preparing the material
The boards are cut to the width of the sandbox, and all surfaces and edges are treated with a sanding attachment. After this, it is primed, dried and covered with two layers of paint. The hinges also need to be painted, otherwise traces of corrosion will appear after the first rain.
Step 2: Assembling the first half of the cover
 Assembly of the first half


On one side, two boards are screwed onto the sandbox frame with self-tapping screws. Two more boards are connected with bars and attached with hinges to the first ones. In this case, the bars should be at the bottom, and the hinges should be on top of the lid. They take two more boards and connect them with bars, the length of which exceeds the width of the shield. That is, on one side the bars protrude beyond the edge of the board by a third. This shield is also connected to the previous one using loops, only this time the loops should be at the bottom and the bars at the top. The hinges are screwed to the wood using bolts, since the screws quickly become loose.

Step 3. Assembling the second half

This half can be made without a backrest, which makes the process a little easier. On the free side of the frame, not 2, but 3 boards are stuffed, then a shield of two boards is knocked down and secured with loops, as in the previous case. To prevent the lid from bending under the weight of children, it is reinforced in the middle with a block. Now, when opened, the first half folds into a comfortable bench with a backrest, and the second simply reclines to half its width.


Frame installation
For installation, you will need an assistant: the structure is lifted, turned over with the protruding bars down and carefully lowered into the pit. The edges of the frame must coincide with the edges of the pit. To ensure that the sandbox stands level, you should check the location of the walls with a building level. If necessary, remove excess soil or add more, leveling the frame horizontally. After this, cover the bottom of the future sandbox so that its edges extend 3-5 cm onto the walls on each side. Dense material will protect the sand from erosion, will not allow moisture to accumulate, and will not allow insects and moles to crawl through from underneath. Finally, the soil is compacted from the outside and backfilled with gravel or sand.


The layer of sand for playing should be about 15 cm thick; To fill a standard sandbox you will need about a ton of it. It is recommended to choose river sand or quartz sand, which does not caking. Before filling, it must be sifted through a fine sieve to remove debris, plant impurities, and insects.

Canopy installation
Canopies for sandboxes can have a variety of shapes and are made of different materials. The most common option is fungus. To make it, you will need a beam 3 m long and a cross-section of 100x100 mm, boards and plywood. This fungus is installed at the stage of preparing the base, since it needs to be dug in the center of the sandbox to a depth of 1 m.
The manufacturing process is very simple:
- the timber is polished and treated with an antiseptic;
- the lower part is coated with bitumen mastic to a height of at least a meter;
- 4 triangles are knocked out of boards and covered with plywood;
- connect the triangles together and attach them to the top of the beam using spacers;
- in the center of the pit they dig a hole 1 m deep;
- insert the beam, level it using a plumb line;
- fill the hole with crushed stone and soil, compact it.
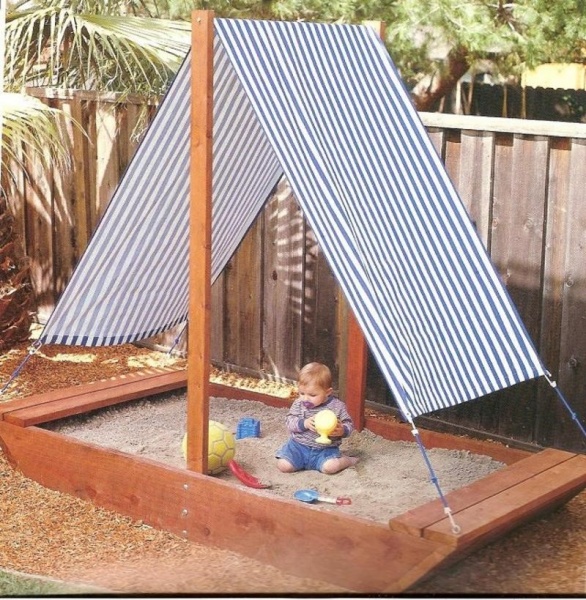
There is another canopy option: vertical posts are bolted in the center of two opposite walls of the frame. Height of racks 2 m; in the upper part, the supports are connected by a horizontal rail, over which a rectangular piece of dense fabric or a special canopy is thrown. The ends of the canopy on each side are fixed with metal hooks to the walls of the sandbox.

The described options are the simplest and most popular; if desired, they can be supplemented at your discretion. The most important thing is that the structure is as safe as possible, then the baby will be happy to play in it, and the parents will be able to relax a little.
Video - DIY sandbox
18.07.2016
It's the middle of summer. Tired of the heat and bustle of the city, we try to get out of the city more often, and on weekends we head to the dacha to have a good rest in nature. Many people plan to spend their entire vacation there. And if there is a small child in the family, then this is one of the best vacation options, because doctors do not recommend abruptly changing the climate and time zone for children under three or four years old. Therefore, many parents spend the whole summer at the dacha, enjoying the picturesque landscapes, silence and fresh air.
At the dacha you can organize a useful and enjoyable holiday for the whole family - the main thing is that everyone’s interests are taken into account. Therefore, when planning a recreation area, make sure that older family members can sit comfortably in a gazebo or sit on a comfortable bench, read a book while lying in a hammock, and set a table in the fresh air. However, this is clearly not enough for kids - after all, they love to play most of all and they always need something to do. Therefore, little fidgets simply need a children's sandbox!
Experts have long agreed that playing with sand is not only interesting, but also useful. This develops children's creative abilities, eye and fine motor skills, makes kids more patient and balanced, because it is not always possible to build a beautiful tower or sculpt the perfect Easter cake the first time. In addition, the sandbox can be called a real school of friendship, because it is here that children gain their first experience of interpersonal communication. Playing with sand has a beneficial effect on the baby, and sand heated by the sun has a healing effect and improves health.
In this article we will tell you how to make a children's sandbox yourself. And aerosol paints from the Motip Dupli Group will help it become a real decoration of your garden plot - bright, durable and extremely easy to use. In the rich color palette of aerosols, Crafts Spray, Trendy Specials, you can easily find not only popular shades, but also quite rare colors, as well as paints with various special effects.

Of course, you can buy a ready-made plastic sandbox in the store, but its size will most likely be small. It is inconvenient for even one child to play in a standard sandbox - there is simply nowhere for him to turn around. What if you need to call your mom, older brother or sister for help? And I would also like to invite friends to visit, because together it is much more fun and interesting to sculpt Easter cakes, build entire cities out of sand and pave a road through the entire sandbox.
It is also important that high-quality sandboxes are quite expensive, especially considering that you will only use it for a few months a year. Therefore, a DIY sandbox for children will help not only diversify your holiday, but also save your budget. In addition, an older child can be periodically involved in the creative process. He will be happy to help you do the simplest work, and then proudly tell everyone about what a beautiful sandbox you were able to build together. Well, in the eyes of your baby you will look like a real wizard!
The main thing to remember is that any place for children's games should be environmentally friendly and safe. And by choosing the shape and appearance of the sandbox, you can show all your architectural and artistic abilities and completely give free rein to your imagination. For example, you can complement the sandbox with various decorative elements.
Choosing the classics
The simplest and easiest option to implement is a rectangular or square open sandbox made of wood, which can be made in a few hours.
Where to place the sandbox?
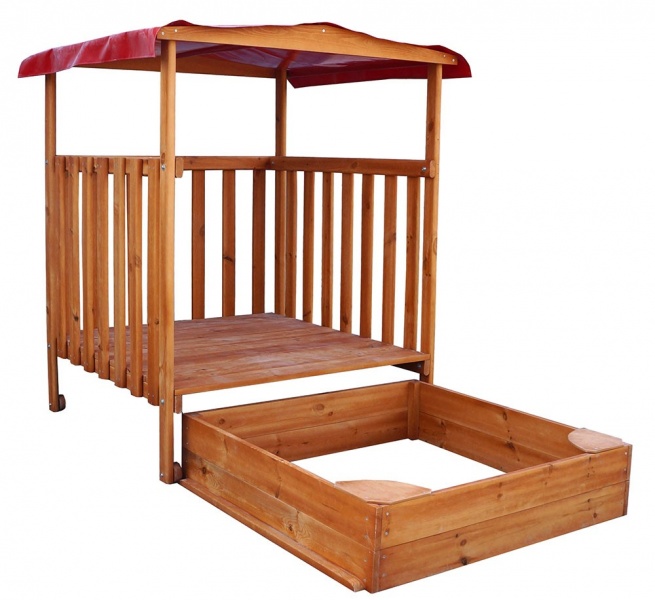
Children should always be visible, so do not hide the sandbox in the corner of your summer cottage, behind bushes, tall grass or outbuildings. It should be clearly visible even from the window of the house. Try to find a place that will be in the shade during the midday heat, but do not place the sandbox near fruit trees - fallen fruits and bird droppings should not fall into the sand. If you can’t find a suitable flat area, you can make a sandbox with a roof for protection from the sun, install a mushroom umbrella there, or use a removable awning.
Preparing the surface
So that the poured sand does not mix with the ground, and the remains of grass do not interfere with your baby’s games, the surface on which the sandbox will be located must be carefully prepared. First you need to mark the boundaries of the planned sandbox and remove the top layer of soil inside.

Making the base and benches
In each corner you need to dig holes for the racks with a depth of 35–40 cm. Since the racks will be partially underground, they must be treated with an antiseptic solution and covered with bitumen.
The racks are buried in the ground, and the sidewalls are nailed to them. They can be made from one wide board or several narrow ones knocked into a shield. You can determine the height of the side yourself; usually it is about 30 cm.
Important: the boards must be carefully processed and sanded so that the child does not get hurt or get a splinter.
We nail horizontal boards at the corners. These sides can be used not only as benches, but also as stands for molds, and also as a “table” for making shortbread cakes.
Painting the sandbox
Of course, the sandbox needs to be painted - as your imagination dictates. This will completely transform the sandbox, and will also protect the wood and allow it to last for many years. Motip aerosol paints will help you with this - you can find cans of paint in all the colors of the rainbow, as well as the rarest and most unusual shades!
Apply several thin layers from a distance of 20–30 cm, choosing paints in your child’s favorite colors. If desired, you can decorate the surface with various designs and patterns using a stencil. These can be not only flowers, animals or funny fairy-tale characters, but also numbers, letters, and various geometric shapes.
Finishing touch
Before pouring sand, we recommend laying paving slabs on the bottom of the future sandbox or filling it with cement mortar. For children's games in the sandbox, it is better to choose river sand - it is much cleaner and does not contain clay, but you can also use ordinary sand from a quarry. However, in any case, it must first be sifted.
Sandbox with lid
The sandbox can be equipped with a lid to close it at night or during rain, protecting the sand from getting wet and dirty.

The easiest way to do this is to use a regular shield, which can be easily put together from the remaining boards or plywood. But the main drawback here is that the baby will not be able to remove such a cover on his own. Therefore, if you have some experience, it is better to build a transforming lid with hinged door hinges. The child will be able to open and close it independently, and during games such a lid will turn into a bench.

Sandboxes made from scrap materials
A sandbox at the dacha can be built from the remains of wooden posts, old car tires, plastic bottles and many other unnecessary things, painting them with aerosol paints. And with a creative approach to business, it will not only serve as a place for children’s games, but also act as a decorative element.
To find the right material, it is often enough just to go out onto the site and look around. And we invite you to look at photos that will inspire you to create your own unique sandbox! After all, it’s not difficult at all – you just need to show your imagination and stock up on Motip aerosol paints!


The kids' favorite pastime is to tinker in the sand, building castles, digging passages, building Easter cakes. At this time, parents can relax on a bench or go about their business.
Not everyone can afford to buy a sandbox in a store. Many people are put off by the high price. It is much cheaper to build a cozy play area yourself. This way you can take into account all the wishes of the child and successfully fit the design into the surrounding environment.

Planning the sandbox wisely
The construction of a children's sandbox should be approached very responsibly, carefully thinking through the smallest details. After all, children are often defenseless and unaware of the impending danger. Keep a few things in mind:
- The building must be safe. No nicks or sharp edges. Remember that sand is an excellent reservoir of infections.
- Therefore, provide protective covers against birds and animals.
- Convenience has not yet been canceled. The dimensions of the box should correspond to the number and age of the players.

The location must be visible. In an open space without obstructions it is easier to keep an eye on the children.


Where should you not place the building?
It is not advisable to establish a children's area in low-lying areas. The soil in them retains moisture for a long time after rain or during snow melting. Sitting on unheated, cold sand, a child can catch a cold.

At the same time, it is undesirable to install the structure in open sunny places. The baby may get heatstroke. Shading can be created using a permanent canopy or a quick-release awning.

There should be no old, neglected trees around the sandbox. Otherwise, there is a risk that a strong gust of wind will bring down branches on the heads of small players.

If, however, the site is located near green spaces, constantly check their condition, trim the crown, and cut down the shoots.

Choosing material
You can create a sandbox with your own hands from both new and “junk” blanks. The most common material is natural wood. It is environmentally friendly, affordable, easy to process, and does not overheat in the sun. Edged boards, beams, and small-diameter logs are used.

Metal frames are labor-intensive to manufacture, get hot in the sun and are prone to corrosion. Therefore, this option practically does not occur.

As for plywood and OSB boards, you can cut out shaped sides from them, turning the sandbox into a car, a ship, or a steam locomotive. But due to the presence of glue, formaldehyde evaporates, which is harmful to children's health. In addition, the material quickly swells from moisture.

Car tires can be used as improvised means. To do this, 3-4 tires are cut in half. The resulting halves are laid flat to each other, forming a closed figure.

Don't rush to get rid of plastic bottles. They are also suitable for work. For stability, bottle caps are nailed to the support board at a certain pitch. Bottles are screwed on top, tied together with wire passed in the forward and reverse directions. The finished sidewalls are dug into a small recess.


Determining the dimensions
The size of the sand clearing should be such that nothing interferes with the children while playing. You should focus on the number of children and their age:
- It will be difficult for children under 3 years old to step over a side with a height of 20 cm. If the child has already crossed this threshold, then the sides can be made a little higher - 30 cm.
- For one child, an area of 1.2 x 1.2 m is quite enough. If friends join him, then there may not be enough space. In such cases, it is better to expand the area to 1.7x1.7 m. The volume of backfill is chosen so that the child cannot reach the soil. On average, 1 ton of sand is consumed per standard box.

Preparing the foundation
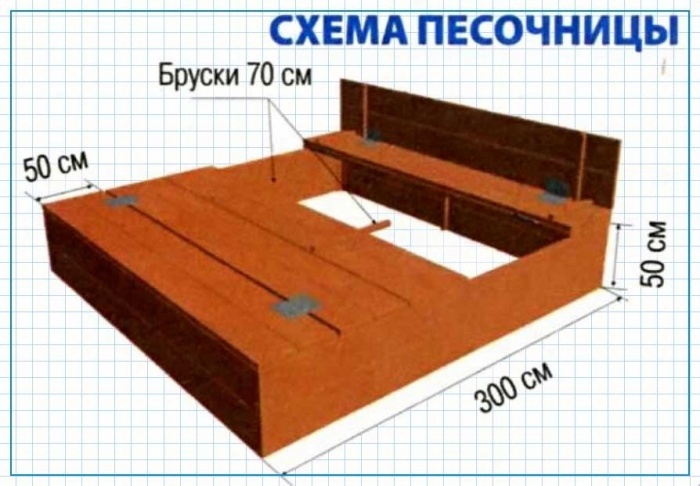
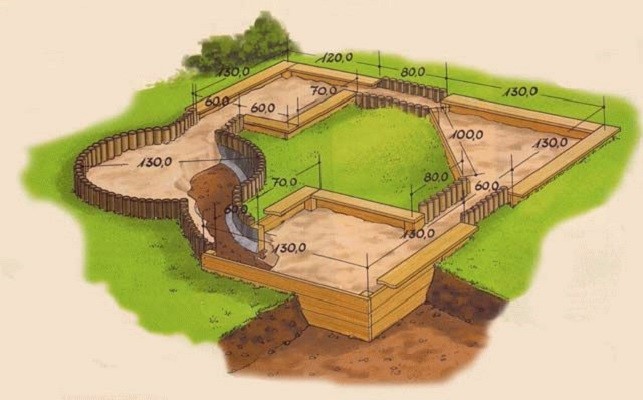
Have an idea, but don't know how to make a sandbox? We offer a simple solution to the problem - an analysis of the main stages of construction. Suppose you need to get a sandbox 170x170x30 cm, where the last number means the height of the sides.

Work begins with preparing the base. Using pegs driven into the ground and a rope stretched along them, the perimeter of the site is placed. Armed with a shovel, dig a hole 25-30 cm deep. A depression of up to 70 cm is made within a radius of 25 cm from the center, which is covered with gravel, crushed stone and sand. This is a drainage well to remove excess moisture.


For the same purpose, the slopes of the pit should have slight slopes towards the central part. Polyethylene and geotextiles with drainage holes can be laid on the bottom.

We build the sides
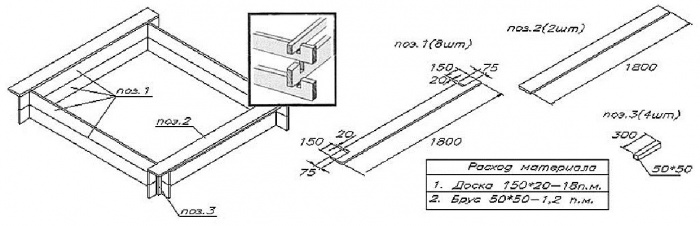
To build the frame, you will need 4 boards 170x30x2.5 cm and 4 beams 5x5x45 cm. The lumber must be sanded and treated with impregnations to prevent rotting. Each block is dug 15-20 cm into the ground. Boards are nailed to the resulting marks with nails or self-tapping screws. That's it, the outline is ready!

To allow children to sit down, a bench made of boards attached flat to the sides is installed around the perimeter of the sandbox. You can also nail the seats into the corners of the sandbox.


Do you need a lid?
You can cover the structure from bad weather or animals with a tarpaulin, awning, or film. But a sandbox with a wooden lid looks more aesthetically pleasing. Even those who have no construction experience can do it themselves.

1 or 2 shields are assembled from the boards (single- and double-leaf varieties). The dimensions must match the dimensions of the structure. Door hinges are used to secure the doors to the frame, and handles are attached for ease of opening.

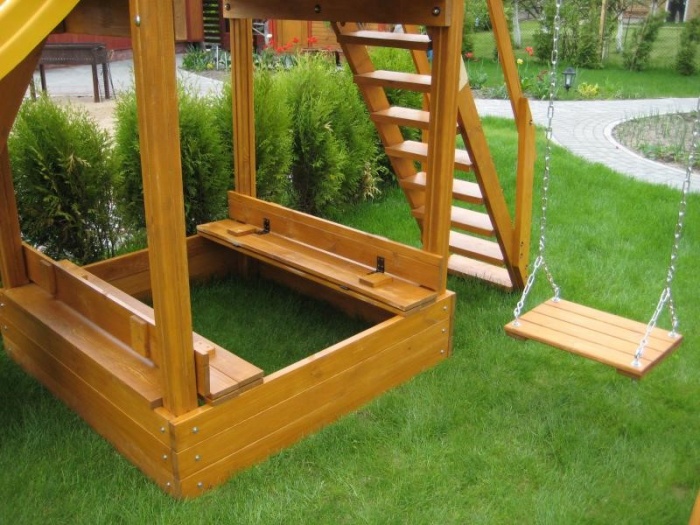
When open, the lid can serve as a convenient bench. This device can be easily opened by children 4-5 years old.


Escaping from the sun
In the photo of the sandbox for children you can see wooden mushroom canopies from the sun. They are decorative and functional - under the hat you can create a small table for storing toys.

The leg is installed in the soil to a depth of 0.7-1 m, after which it is filled with concrete. At the dacha, you can get by with a less labor-intensive and more mobile option - a folding umbrella.

DIY sandbox photo


The time of a happy childhood consists of many facets. Loving parents not only strive to provide their child with healthy food and beautiful clothes, but also worry about his development. This direction includes a physical and psychological component. Equipped playgrounds contribute to a child’s pleasant pastime, while at the same time developing in him many vital inclinations. A banal children's sandbox is no exception: patience, spatial thinking and the ability to communicate with peers are not the entire list of character traits developed during the game. Often, children's holidays in the summer take place outside the city limits, far from prepared sites. Therefore, you will have to make a convenient sandbox yourself. We will tell you in detail which version of the children's design scheme to choose and how to properly organize the whole process.
Determining the place
In addition to studying possible schemes and preparing your own drawing, you should wisely choose a place to install a children's sandbox. There are many factors to consider when considering this issue. The priority direction for placing a children's sandbox is the sector between the northern and southeastern parts of the site. The logical explanation is due to the influence of ultraviolet rays. The first half of the day is characterized by clear air and soft UV radiation, after lunch the picture changes, the ultraviolet becomes harsher, so the formation of a shadow over the children's sandbox is mandatory. The diagram below clearly demonstrates the idea presented.
In addition to the reference point to the sun, there are several other factors that determine the location of the children's sandbox:
- Good visibility from the window of the house and the most visited points of the site. Children's unpredictability is a common phenomenon, so the sandbox should always be in the field of view of the older generation.
- Setting up a children's sandbox in the shade of trees is not recommended. At best, it will become contaminated with bird droppings and other debris; at worst, a caterpillar will fall on the child.
- It is also not recommended to draw up a drawing of a children's sandbox, focusing on the nearest location of sources of moisture; this could be an artificial pond or a regularly irrigated bed. Spiders may favor such places, and meeting them in a children's sandbox will not seem pleasant to a child.
- The northern side of housing construction will also have to be excluded - constant exposure to the shade prevents high-quality heating of the sand.
Note! In addition to installing the structure itself, the design should include the arrangement of the area around it. To avoid mass transfer of sand into the house or onto the garden path, there should be a lawn within a radius of one and a half meters. In its absence, it is recommended to make a blind area around the sandbox.
Having decided on the location, they proceed directly to drawing up a diagram of the children's sandbox.
Design stages
The work of drawing up a diagram includes several stages: designing the box, starting from its shape, the drawing is supplemented with a design for the lid and canopy. What the base of a children's sandbox will be depends on many factors:
- Is it planned to purchase new material or will remnants from previous construction be used?
- Your professional skills when working with wooden structures.
- How much time can you devote to creating a children's sandbox?
The most common version of the scheme is a standard square shape, with a side size from 1.2 to 3.0 m. The height of a children's sandbox varies between 25-30 cm, it can be equipped with a bottom. To fill a structure measuring 2x2 m you will need about 1 m 3 of sand. Having completed the drawing of the base, we move on to designing the lid.

Cap options
It is foolish to doubt the need to install a protective element for a children's sandbox. The reasons why the diagram should include a cover design are as follows:
- It is attractive for dogs and cats to set up a latrine there. To ensure that children's holiday does not end in treatment, hygiene standards should be observed at all times, and the sandbox is no exception. Purchasing expensive mixtures containing fragrances to repel animals does not always solve the problem for a long period. Firstly, the substance quickly evaporates, and secondly, the harmlessness of its effect on the child’s body is questionable.
- During periods of heavy rain, the cover will protect against excessive absorption of moisture by the sand, and as soon as the weather improves, the child will be able to begin his favorite games in the children's sandbox.
- You can save money and not include the installation of a cover in the scheme, but protection in the form of polyethylene pressed down with pipes or bricks is not aesthetically pleasing. In addition, a child cannot independently remove such protection from a children's sandbox.
Let's leave the variants of drawings with complex structures in the form of a lid that opens like a fan or equipped with a lifting mechanism aside. The simplest option for a children's sandbox is an ordinary removable board made of boards, shown in the drawing below:
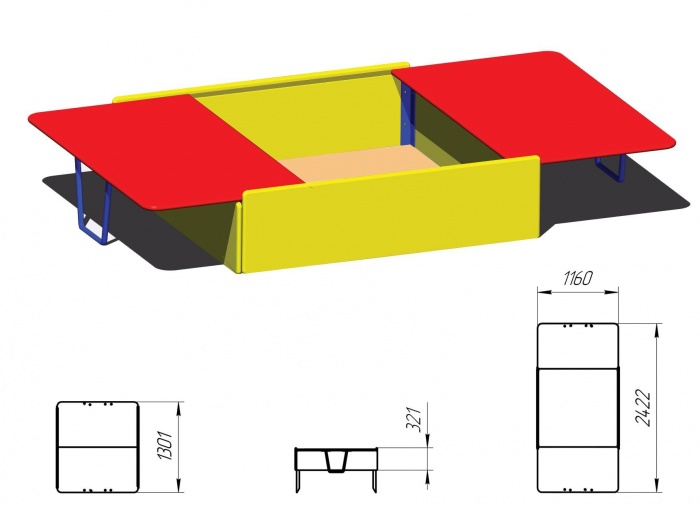
But this is not a very good solution to the problem, due to possible child injuries if you want to remove it yourself. Recently, models of children's sandboxes equipped with a folding lid that can easily be converted into a bench have become very popular. A design option is shown in the following diagram:
For ease of opening, it is equipped with handles, as in the photo below:
For a children's sandbox, you can use a design with a sliding lid, which later plays the role of a shelf or bench without a back. Convenient lower stands provide ease of opening and contribute to the stability of the structure.
Canopy equipment
The canopy design also has many variations. Depending on the planned life of the children's sandbox, thick fabric, plywood or thin boards can be used as material. The mount is selected based on the overall dimensions of the structure:
- For small children's structures, two poles with a crossbar and a stretched awning are sufficient.
- You can stick to an option familiar from childhood and create a drawing with a fungus. But it is better to leave such sun protection as a last resort, because a pillar in the middle of a children's sandbox often brings complete inconvenience, and the shadow moves to the side.
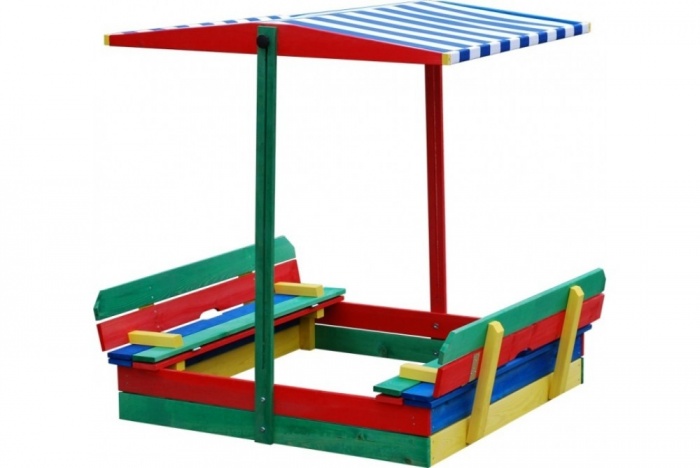
- For volumetric structures, it is recommended to install four support pillars. The canopy can be flat or in the form of a gable roof.
The drawings and photos presented below will help you decide on the canopy shape required for your children's sandbox design.
Preparing the site
It is extremely rare to use designs that are removed for the winter or equipped with rollers for movement around the site. In most cases, a children's sandbox is installed on a permanent basis, so care should be taken to prepare the site first. The process consists of the following steps:
- The area for the future children's sandbox is deepened by 20 cm.
- After leveling the soil, it is covered with sand to a depth of 5 cm and treated with a rake.
- It is optimal to use geotextiles or agrofibre as a drainage base for a children's sandbox. If you have a modest budget, thick polyethylene or propylene matting is suitable, which is spread with a margin of 30 cm along the border. This will prevent the germination of weeds and the penetration of pests, while at the same time speeding up the process of drying the sand.
- After installing the box, the unoccupied recess around the children's sandbox is filled with soil and compacted, and the excess edges of the film are trimmed.
See the photo below for an approximate work plan:

Nuances of the construction process
Having carefully double-checked the drawing of the children's design, according to the chosen scheme, they proceed to the purchase, cutting and preliminary preparation of the material.
Material
Wood is the most commonly used material for the manufacture of children's structures. With proper treatment and timely preventive maintenance, a wooden sandbox will last more than 10 years. Parts cut according to prepared drawings are coated twice with a water-polymer emulsion.
Note! Elements of the children's sandbox that will be in the soil are treated with bitumen mastic.
If you do not plan to use the children's sandbox for a long time, you can use aspen or alder to make it. Coniferous trees will help increase the service life. For construction it is convenient to use quarter or tongue and groove boards. How to assemble a box from them is clearly shown in the following diagram:
Box assembly
Based on the drawing, the children's sandbox box is assembled together. The boards are attached to 50x50 pieces of timber using self-tapping screws. If the side of the structure exceeds 1.8 m, the design must provide for additional fastening of the beam in the middle of the wall. The height of the beam for a permanent children's structure, according to the drawing, should be 30-40 cm. The corners of the children's sandbox need additional reinforcement. How to do this correctly, see the diagram below:

Advice ! All wooden parts should be sanded thoroughly to avoid injury to the child. Pay special attention to the corners, which should be slightly rounded.
We looked at the simplest version of the sandbox box. Having experience and free time allows you to improve the design. After the base, they move on to equipping the cover and canopy according to the prepared drawing. The diagram below will allow you to set up a miniature sandbox house that your child will love:


The children's structure, where the sandbox is connected together with a slide, also looks interesting:

And finally, a few more interesting ideas that will be useful when creating your own drawing:


Good luck in your work and creative inspiration!
It is very difficult to meet a child who does not like to play in the sand. To give the child the opportunity to fully enjoy his favorite activity, caring parents install sandboxes in the countryside or simply in the courtyard of their home. You can easily find ready-made designs on sale, but you will have to pay quite a lot of money. The best option is to make a sandbox with your own hands. In this case, all the needs and desires of your child will certainly be taken into account, and the price will be several times lower.
What can you make a sandbox out of?
Wood has always been considered the most popular material for creating a children's sandbox with your own hands. Boards, logs, beams or block houses are well suited for these purposes. They are the main materials for the production of sandboxes. To make the final result pleasing with its appearance, it is better to choose sanded wood. It costs a little more, but the result of the work is worth it. If the construction budget is small, you can save money and sand the existing material yourself.
You can also use moisture-resistant plywood. But this type of building material is best used in extreme cases, since the presence of glue and formaldehyde in its composition does not have a very good effect on human health. But it is worth noting that plywood is the easiest to work with. It is easily cut with a jigsaw and assembled with a screwdriver. And after assembly, it’s enough to simply sand the ends of the structure and coat the sides with paint.

If you want to make a sandbox with your own hands at the dacha, you can use any available material. For example, empty plastic water bottles can be used. To make a strong wall, the caps are screwed into a wooden base with self-tapping screws, and then the bottle is screwed in. Also, using thick wire, additional strength is added to the walls of the sandbox. To do this, sharp wire is used to pierce the bottles through the top and bottom. The ends of the wire must be twisted well, and the dangerous ends are hidden.
The twist is located on one side only. When installing the side of the sandbox, try to make it inaccessible to the child. The finished structure for sand is mounted in a shallow ditch and well sprinkled with sand and soil, and then compacted very carefully. Plywood is laid at the bottom of the sandbox and then filled with sand.

Another very popular material for making a children's sandbox with your own hands is car tires. They are great for this kind of thing. To quickly make a place for playing with pitch, one sidewall of the tire is removed. The result is quite high sides. Then you can go in two ways:
- cover the hole with plywood and screw it to the second side;
- cut off the second part and get just a side.
Attention ! Regardless of the choice, the cuts must be secured. If the reinforcing fiber is plastic, then it is enough to simply sand it, but if it is made of metal, it must be covered with something.

The main stages of making a sandbox
In order to understand how to make a sandbox with your own hands, we will consider in detail the main stages of its construction. Regardless of the type of construction, all steps will be repeated.
Choosing a location
It is better to choose a site for placing the structure so that part of it is located in the sun and part in the shade. If this is not possible, then it is better to make a sandbox in the sun and make a good awning. It is important to ensure that tall trees and bushes do not grow near the place where children play. Plants, of course, provide shade, but, firstly, branches sometimes fall from the trees, which can injure a child, and constantly dropping leaves in the fall add work for adults.
Never make a sandbox in hot sun or in a place where there is no air movement. Avoid drafts. There is also another important factor that needs to be remembered. Place the sandbox in a place that is very clearly visible from the window of the house, so you can be sure of the child’s safety.

Making the markings
If the structure has a rectangular shape, then wooden pegs and threads stretched between them are used for marking. The stakes are driven in after measuring the required parameters. Traditionally, the size of handmade children's sandboxes is 2*2m. A rope, twine or metal cord is pulled between the stakes. Check the corners. They should be exactly 90°C.
If the design provides for rounded edges or sides, then sand will help to make the arc correctly. You need to pour it into a bag, make a small hole in it and draw the desired shape.

Digging a pit
To do this, first remove the top layer of soil and remove the soil. It is important to clear all roots, rocks and other debris. The foundation pit for a children's sandbox should be made about 30 cm deep. In the middle of the dug rectangle or square, make a hole smaller in size, but deeper. Pour crushed stone into it. This is how a system for draining melt or rain water is set up.
Advice ! If you provide a slight slope from the edges of the sandbox, the sand will always be dry.

Mounting the base
We fill the bottom of the resulting pit with a small layer of sand, no more than 5 cm, after which we compact it well. Only after this can the base be laid. The best option for these purposes is geotextiles. It is a special non-woven material that is characterized by increased strength and wear resistance. It does not allow grass to grow, and will not allow the soil and sand to combine. If, during installation, the geotextile is wrapped over the edges of the pit, it will still hold the ground, preventing it from getting wet during heavy rain. In cases where geotextiles are not available, you can make a base from plywood or linoleum. Only then do you need to make several holes in the material so that water does not accumulate at the bottom of the sandbox.

Construction of a seasonal sandbox
The seasonal sandbox is a box with sides. The height of the box is approximately three boards (depending on their width). The frame is assembled by attaching boards with self-tapping screws to vertical beams mounted at the corners of the sandbox perimeter. If the board is about 10 cm wide, then two fastening points are required, in the case when the board is 15 cm wide - 3 points. If the sidewall is made of an ordinary edged board over 1.8 m long, then another additional vertical element is attached in the middle of the sidewall.
The corners of the sandbox must be additionally strengthened. To do this, the corner posts are mounted outside, and the boards, which represent the walls of the sandbox, are connected together into half a tree.

We mount the sides
The sides of the sandbox are a frame made of boards. It serves for additional rigidity of the box and can look like a seat or shelf for toys. In order for the sides to connect securely, they need to be cut at an angle of 45°C. It is very important to ensure that the angles coincide clearly.
Important ! The outer edge of the corner is very sharp and grassy. Children very often scratch themselves on it and get splinters. To avoid injury, it is better to make the corners semicircular; to do this, you need to cut them down, and sand all kinds of flaws and edges.
During installation, the sides are laid on the box and secured with corner and intermediate posts. Attaching the sides to the edge of the box board is not very reliable. The backing block will also not save the situation, because children love to hide toys under the side. The best method for attaching the sides of a sandbox is to cut pieces of plinth with a cross-section of at least 4 cm. A cut of 30 cm long will be sufficient per meter of side. Self-tapping screws are attached in those places in increments of about 10 cm. Also, if the supports are mounted under the outer edge of the side, then its fasteners must be made hidden.

We arrange the roof
Since the sandbox is located in the open air, it simply needs a roof. The traditional roof model is a mushroom. But everyone who has ever played in a sandbox understands that such a roof will cover few people. It is better to make a fungus separately, for quiet, relaxing games in the yard. But it is better to equip the sandbox with a different type of roof.

The best, simplest and most reliable roof option is a surface on four pillars. The only disadvantage of such a roof is that it is very dangerous for restless children.
An equally good roof option for a sandbox would be a surface on two pillars. They are attached to the sides of the box. If the roof is heavy or complex in design, the pillars are reinforced with struts.

It is better to make the roof of the sandbox soft or tension. The latter option is very profitable, as it minimizes the cost of materials. Remember, whatever you choose for the sandbox roof, the materials must be safe for life and health.
Advice ! If polycarbonate remains from the construction of a greenhouse, gazebo or porch, then it may be the best option for covering the roof.

How to fill the sandbox
What kind of sand is best for children to play with? White and small will definitely not work. Such sand does not mold well, generates dust, gets into your eyes and ears, and is also an allergen. Even adults, when working with such sand, wear masks and respirators to protect themselves.
White or gray quartz sand is also not suitable. It doesn't get dusty, but it doesn't stick either. But this sand injures the delicate skin of a child very quickly. The thing is that quartz is a very hard mineral and its particles cannot be polished to complete roundness.

Red or gully sand. Of course, it molds well, but it’s not at all suitable for children. This sand contains a lot of clay, in which bacteria and microorganisms multiply very quickly.
The best option for a children's sandbox is yellow sand of medium fraction. It is very suitable for good sculpting, and the special layer that envelops the grains of sand reliably protects the sand from the growth of bacteria.

If sand is reused up to 2-4 times, then it requires special handling:
- During the winter, sand must be stored properly. The best way is to store in bags in a dry, unheated room. If sand is stored outside, it must be covered with film.
- As the weather warms up, the sandbox is filled with sand. If sand has been in it all winter, then it must be ventilated and sifted.
- The sandbox is filled in layers of 10 cm. Each layer of sand is dried in the sun for at least twenty-four hours.

Requirements for the playing area
After the sandbox is made, you need to pay special attention to its strength and safety. Therefore, it is very important to secure everything well and polish all the corners and roughness with a grinding machine.
After the sandbox is made, it is painted. On the one hand, a sandbox painted with bright colors is very attractive to children, on the other hand, wood impregnated with paints significantly increases its service life.