For many people, a magnet is still a mystery, although in principle people became acquainted with this metal and phenomenon a very long time ago. Even then, a whole system for the production of various magnets was developed. Today this is far from uncommon, and even powerful magnets can be made at home.
Making a magnet using improvised materials
Of course, for many this will even seem like something supernatural and may even be a shock, but even now, sitting at home, most people can make a magnet with their own hands. Below are four methods that describe how to do powerful magnet at home.
Method No. 1
The first and probably therefore the simplest method: to implement it, you just need to take any object that can be magnetized (the object must be metal) and move it several times along a permanent magnet, and this should be done only in one direction. But, unfortunately, such a magnet will be short-lived and will very quickly lose its magnetic properties.
Method No. 2
This magnetization method is performed using a 5 or 12 volt battery or accumulator. Most often it is used for magnetizing screwdrivers and is performed as follows:
Taken copper wire a certain length, which will be enough to wrap the screwdriver shaft 280 - 350 times. The wire from transformers, or the one intended for their production, is best suited.
The object is isolated in in this case, using electrical tape, wrap the entire shaft of the screwdriver.
The winding itself is carried out and connected to the battery. One end is to the plus, the other to the minus. The winding should be carried out turn to turn, evenly. The insulation must also be tight.
As a result of these manipulations, it will be much more pleasant to work with a screwdriver. This operation can turn any old unnecessary screwdrivers into a truly convenient tool.
Method No. 3
This option describes how to make a powerful magnet quite in a simple way. In fact, it has already been fully described above, but this particular method involves a different material. In this case, ordinary metal will be used, or rather a small piece of it, preferably cubic in shape, and a more powerful coil. Now the number of turns needs to be increased 2-3 times for magnetization to be successful.
Method No. 4
This method is very dangerous and is strictly prohibited for use by people who are not electrical professionals. It is carried out strictly in compliance with safety precautions, the main thing is to remember that only you and no one else bears responsibility for life and health.
He talks about how to make a strong magnet at home, while spending a small amount of money. In this case, an even more powerful coil, wound exclusively from copper, will be used, as well as a fuse for a 220-volt network.
The fuse is needed so that the coil can be turned off in time. Immediately after connecting to the network, it will burn out, but during this period of time it will have time to go through the magnetization process. The current strength in this case will be maximum for the network and the magnet will be quite powerful.
DIY powerful electromagnet
First, you need to figure out what it is. An electromagnet is a whole device that, when a certain current is supplied to it, works like a regular magnet. Immediately after cessation, it loses these properties. How to make a powerful magnet from an ordinary coil and iron was described above. So, if you use a magnetic circuit instead of iron, then you will get exactly the same electromagnet.
In order to figure out how to make a strong magnet at home that will work from the network, you just need to remember a little information from the course school physics and understand that as the coil, as well as the magnetic circuit, increases, the power of the magnet will also increase. But this will require more current to reveal the full potential of the magnet.
But neodymium remains the most powerful; they have all the most desirable properties and, despite their strength, are small in size and weight. How to make neodymium magnets with my own hands and whether this is even possible and will be discussed further.
Making a neodymium magnet
Due to the complex composition and special technique production, the question is how to make Neodymium magnet with your own hands at home disappears by itself. But many are still interested in how to make neodymium magnets, because it would seem that if you can make an ordinary magnet, then it is also quite possible to make a neodymium one.
But everything is not as simple as it seems in reality. Serious companies are engaged in the production of such magnets; they use special technologies very powerful magnetization of the material. And this is in addition to the fact that an alloy that is quite difficult to extract and produce is used. Therefore, the answer to this question can be clearly - no way. If someone manages to do this, then he can easily open his own production, since necessary equipment he will already have it.
Application of created magnets
Application for industrial and economic purposes
Used in various electrical appliances. They are especially common in devices equipped with speakers. Any dynamic head includes a magnet, ferrite or neodymium; in rare cases, others are also used. Magnets are also used in furniture production, toys. In production, when filtering bulk materials.
Use at home
Refrigerator magnets are one of the most common uses of magnets. Also, some use them to stop meters in order to reduce the fee by public utilities, but doing so is strictly prohibited, and even impractical.
Conclusion
Based on this article, you can understand how to make a powerful magnet at home, without spending any money on it. special effort and material resources. But people who do not understand electricity and generally have no idea how it works should not experiment with a powerful network, because it is serious and very dangerous for human life.
Do you want to create magnets from scrap materials, but don’t know where to start? In this article you will find many ideas and plans that can be implemented.
This article is intended for persons over 18 years of age
Have you already turned 18?
How to make a magnet?
As you know, it is quite possible to make a magnet with your own hands, and even at home. Such a skill will definitely not be superfluous, because in this way you can make souvenirs for the New Year. It is important to remember that by making a magnet yourself at home, you get an absolutely unique thing and precious experience! In this article you will also learn whether it is possible to make a magnet from wood and how to paint a magnet from plywood.
In fact, making such a magnet is very simple. You just need to put in a little effort and show your imagination properly. By making magnets yourself, you will have a good time and get a wonderful souvenir, as well as a skill that will allow you to create things with magnetic properties literally from the materials at hand.
How to make refrigerator magnets with your own hands: ideas
Fridge door magnets are a great design solution if you want to give your kitchen a homely atmosphere.
IN This list presents the most interesting solutions that can be implemented:
- a magnet with a photo will bring a feeling of comfort, because in the photo slot you can put photos of loved ones, children or even pets (besides, all the above categories will be very pleased);
- topiary - a cute craft in the shape of a tree or bush will fit perfectly into the overall outline of the refrigerator;
- notepad - will help you take various notes or leave messages at home, and you can also write down the names of products that you need to buy;
- Christmas tree is a design element inherent to the New Year holiday, which can hang on the refrigerator at any other time.
For many centuries, the dog has been a faithful friend and travel companion of man on his life path. Therefore, a magnet with a picture of a dog placed on the surface of the refrigerator (or any other) will become a wonderful aesthetic decoration. You will find templates for making a dog below.
Regarding materials: the dog’s fur can be made from felt, and the ears can be made from nylon tights. In addition, the puppy can be made from papier-mâché. Such a product can be decorated and diversified with various design solutions, which will add realism to the decoration.
Coffee beans have always been an excellent material to use in fine arts. They have an attractive appearance and a pleasant smell. Coffee beans can also be used to create magnets, because with their help you can create absolutely extraordinary sculptures. From them you can glue topiary, which will complement the interior favorably. You can also use them to create a sculpture of a dog. In addition, you can create a coffee heart that will look perfect as a design solution for kitchen.
We will show you how to make a cat magnet with your own hands.
For this craft you will need:
- coffee beans;
- thick cardboard;
- brush:
- scissors;
- PVA glue;
- jute twine;
- glue gun
Manufacturing
1. Take the cat template you like and cut it out of paper.
2. Transfer the image to cardboard and cut it out.
3. Cover the top with burlap (from the wrong side of our craft!) and leave under pressure for several hours so that the glue dries thoroughly. The burlap will make our magnet more dense.
4. Trim the excess fabric along the contour.

5. Front side We cover the cat magnet with brown paint so that there are no white spaces in the future.
6. Wait for the paint to dry. Then we glue the end part of the workpiece with twine using hot glue from a glue gun.
7. Glue the cat with coffee beans, also using a glue gun.
8. We fix the magnetic tape on the back side.
9. Make antennae from twine. Eyes can be taken from old toy or use small buttons. You can tie a bow around the cat's neck.

How to make a search magnet with your own hands?
Create search magnet, which will always point in a northerly direction, which coincides with the Earth's magnetic field, quite easily. To do this you will need a needle, a stopper and a bowl of water. Through all the simple manipulations you will get a device that will involuntarily move parallel to the magnetic field.
You can also create it yourself:
- electric magnet. It is created by passing current through a piece of metal. This is done for the purpose of creating magnetic field. To do this you will need a nail, wire, adhesive tape and battery;
- Neodymium magnet. Creating it at home is problematic, because you will need many complex units, but it’s worth a try in any case;
- a levitating magnet is a spectacular design that can decorate any interior with its mystery;
- magnet for needles on canvas - extremely convenient thing, which will save you from having to look for needles, since they will all be collected in one visible place;
- A magnet for non-ferrous metals is a thing that will significantly help in finding non-ferrous metals, regardless of the location of the search.
How to make a magnet for welding with your own hands?
Magnetic corner is one of the the most important conditions quality welding, because it allows welding work as accurately and efficiently as possible. This complex process itself is simplified with such a part, because welding magnet allows you to fix the parts to be welded in the desired way. Creating similar device to weld it yourself, it is necessary that it does not need to be literally torn away from the object. It is desirable that it be “switchable”, that is, it comes unstuck without external influence. For greater clarity, when creating such a device, you should prepare drawings in advance that will take into account all proportions.
How to make magnets for curtains with your own hands?
Magnetic curtain ties are a device that can make your life much easier. Using magnetic surfaces in your home simplifies many things that you never thought could become even simpler. For example, a magnetic surface for knives on the wall will save you from the need to constantly reach into a desk drawer; you just need to remove the right knife from a magnetic board. The main thing is to properly calibrate the magnetic field of this device so that it holds the knives vertically, but not strong enough to tear them off.
Making New Year's magnets with your own hands
Decorating the apartment for New Year(on NG), you can also use magnets. The symbol of 2018 is a yellow dog, which, as we know from one of the previous paragraphs, can be depicted from papier-mâché, as well as felt and nylon. This way you will have interesting craft for decoration that can hang all year for obvious symbolism. In addition, using magnets you can make new Year decoration from satin ribbons, which do not need additional fastening, because the magnetic field itself will hold them in the place you need. Such a designer find will look extremely impressive and will be appreciated by your guests and family.
Making your own salt dough magnets
Salt dough is an extremely cheap, accessible and extremely flexible material.
To prepare the test you will need:
- 2 tbsp. l. flour;
- 1 tbsp. l. salt;
- a little water and PVA glue.
1. Mix all the ingredients, knead thoroughly with your hands until it stops sticking to your hands.
2. Cover a baking sheet with foil or parchment and place directly on it. Using the stacks we sculpt the necessary figure (for us it will be a heart).
3. Smooth out any unevenness with a wet brush. Place in a cold oven, gradually raising the temperature to 130 degrees. The product must dry completely.
4. Turn off the oven and let the product cool. We paint it in any color. You can use watercolor or gouache. Reverse side paint it black and glue it with magnetic tape. The magnet is ready!

A here from What other materials can magnets be made from?
- from polymer clay. An extremely effective material for modeling, which is ideal for realizing your wildest creative fantasies;
- made of plaster - perfect for creating small objects;
- made of felt - patterns can be found in the public domain;
- from beads. This material has enough options to realize creative potential;
- from foamiran. Plastic suede is gaining popularity in craft circles, and this material is also extremely easy to use;
- from a battery - discharged batteries can be given a second life in this interesting way;
- from clay - classic material for needlework. Perfect for creating magnets.
How to make a strong magnet at home?
Like other types of magnets, creating a powerful magnet at home requires a little more effort. As you know, objects are magnetized by friction against other magnets to produce a magnetic field, so in order to create something more powerful, you just need to apply friction more times.
Fridge magnets are pleasing to the eye and keep our lists, photos, postcards, business cards and coupons visible. Making them with your own hands for yourself or as a gift is very interesting and easy. After all, if you think about it, to make magnetic crafts you can use almost everything that is at hand, just use your imagination, stock up on glue and mini-magnets. In this article, we have presented 70 inspiring photo ideas, as well as 5 step by step lessons, how to make cool refrigerator magnets (and not only) from improvised, natural and even waste materials.
- To make refrigerator magnets, you can use three types: ferrite, neodymium (super magnets) and vinyl (rubber).
- If you want your magnetic crafts to hold only light and small sheets of paper, business cards, etc., then you can use ferrite (regular graphite-colored magnets, which are most often used for souvenirs) or vinyl. The latter is flexible vinyl material with an adhesive base, which has a low adhesive force, but can be cut into segments different forms and sizes. An example of the use of a flexible magnet is presented below.
- If you want a magnet to hold heavier things, then to make crafts you need to use neodymium magnets (super magnets), which have 10 times greater adhesion force. So, for example, to make a magnetic hook for a ladle or cutting board You will need one magnet the size of a 1-kopeck coin. Keep in mind that ideally the adhesive force of the magnet should be 2 times the weight of the craft and the object it will hold.
By the way, a neodymium magnet, unlike a ferrite one, does not lose magnetic properties. Ferrite steel turns into a useless piece of iron after 8-10 years.
- Where to get or buy magnets for making crafts? They can be peeled off from souvenir products or bought/ordered in construction markets, craft stores, as well as in specialized online stores.
- When working with neodymium magnets, take precautions and do not involve children in making crafts. Keep in mind that two magnets attached to each other can even pinch your finger.
- In most cases, superglue, universal Moment glue and its analogues, as well as a hot glue gun are suitable for gluing a magnet to a craft. If your craft is intended to hold really heavy things, then it is best to use a neodymium magnet with a countersink and a screw for fastening.
- Magnets that look best on the refrigerator are those made in the same style and combined by theme, color or shape.

- Magnets can be hung not only on the refrigerator, but also on any metal surfaces, for example, on a magnetic organizing board, hood or geyser .

In turn, the magnetic organizing board can be installed anywhere, for example, on a cabinet door
Master Class. 1. Hook magnets made from branches
You can hang keys, towels, ladles and other things on these branch hooks.

Materials and tools:
- A dry small but strong branch with a branch;
- Hand saw or jigsaw;
- Small neodymium magnets;
- Glue;
- Drill and drill bit equal to the diameter of the magnets;
- Acrylic paint (optional).
Instructions:
- Using a saw, cut the branch so that it looks like a hook. Then cut the branch lengthwise so that the back side is flat as shown in the photo below on the left.

- In this flat back of the branch, drill a recessed hole the size of your magnet.
- Glue the magnet into the resulting cell.

- If desired, paint the craft and cover it with matte varnish. Ready!

Master class 2. Magnetic storage jars
If you have some nice tin or glass jars, put them to work by turning your refrigerator door or magnetic board into an organizer.


Glass baby food jars are great for storing spices on the refrigerator or hood.


Materials and tools:
- Small aluminum cans(jars like in our master class can be ordered on Aliexpress for 300 rubles/10 pcs.). Replace cans You can use glass jars or small plastic containers;
- Paint of the desired color (it is more convenient to use spray paint) and matte varnish (not necessary, but desirable to protect the coating);
- Neodymium plate magnets (especially if you want to use large jars and store heavy items in them) or 0.6mm thick magnetic vinyl self-adhesive sheets;
- Superglue “Moment” (needed if you use neodymium magnets).
Instructions:
- Make sure the prepared jars are clean and dry. Paint them, as well as their lids, in 2-3 layers, allowing each layer to dry thoroughly. Next, coat the jars with varnish, if any.
- If you are using jars with glass insert on the lid, then before painting it must be removed or sealed with masking tape.

- Cut circles from a magnetic sheet; their diameter should be slightly smaller than the diameter of the cans. If you use neodymium magnets, then glue them with superglue.

- Glue the cut out circles to the bottom of the jar, removing the protective backing.

- If desired, the lids of the jars can be further decorated. For example, as shown in the photo below.

Master class 3. Magnets from tin caps (crown caps)
Idea reuse caps from soda or beer bottles as refrigerator magnets will appeal not only to environmentalists, but also to decorators. After all, they cost nothing at all, but provide a lot of opportunities for decoration.
So, for example, you can paste family photos or just nice paper (card scraps, magazine clippings, etc.) inside the lids.

Homemade photo frame magnets


You can paint the lids, fill the insides with hot glue or cork, and then glue magnets to them.


Sometimes bottle caps don’t need to be decorated at all.
Instead of beer caps, you can use larger caps, such as Nutella jars or baby food caps, to make refrigerator magnets.


Materials and tools:
- Scissors, or better yet, a hole punch for scrapbooking for cutting out circles with a diameter of 2.5 cm (sold in craft stores and costs 200-300 rubles);
- Epoxy resin, a container for preparing the solution and a stirring stick;
- PVA glue, as well as superglue;
- Small magnets;
- Photos that are suitable in size or any other pictures, for example, from a magazine;
- Beer caps (it's best to use bottles with screw caps rather than pop caps).
Instructions:
- Using a hole punch or scissors, cut round fragments with a diameter of 2.5 cm from the photographs. Of course, if you use scissors, you must first make a mark using one of the covers (or plastic cover from a plastic bottle).
- Glue the pictures to the inside of each lid using PVA glue (the glue must be applied on top of the picture as well). Let the glue dry completely (!).

- Prepare according to the manufacturer's instructions epoxy resin in the quantity you need. To find out exactly how much resin you will need, pour water into one of the lids, then multiply the resulting volume by the number of lids. Cover work surface to protect it from spills, then fill each cap to the brim. Let the crafts dry overnight.
- Glue magnets to the blanks. Ready!
Master class 4. Magnets from plastic mini-toys
The most stylish magnets are easy to make from plastic toys, namely animal figurines.


Materials and tools:
- Scissors or sharp knife;
- Thermal glue in a gun;
- Paint and brush if necessary;
- Small magnets;
- Plastic animal figurines.
Instructions:
- Cut the toy in half or lengthwise.
- Pour hot glue into the inside of the resulting workpiece to the very edges and leave to dry.

- When the glue has hardened, start painting the craft (including the “filling”) in 1-3 layers. At the end it can be additionally varnished.
- Now just glue the magnet to the figure and enjoy the result!
Master class 5. Magnets from clothespins
Let us reveal a little life hack - magnets made from clothespins can not only store lists and bills, but also clamp bags of food as shown in the photo below. It turns out to be very convenient - I took the clothespin off the refrigerator and immediately fixed the opened bag with it.

Wooden clothespins can also hold a piece of paper on the refrigerator door and at the same time clamp something between the teeth.


Clothespins can be painted, decorated with glitter, covered with colored tape or appliques, or decorated using decoupage technique, following the following simple instructions.

In this article I want to tell you how you can make a cute magnet with a photo for your refrigerator. And not only produce it, but also sell it profitably.
My site was originally dedicated sublimation printing. But this does not mean at all that you can make money only by selling mugs, plates, puzzles and other sublimation products. There are a lot of ideas! This includes thermal transfer and the production of watches with a photographic portrait and the printing of various calendars and much, much more.
The first article is about magnets.
What attracts me most about making vinyl magnets is the simplicity (no equipment needed) and the amazing price tag. Judge for yourself - a magnet measuring 65 x 90 mm costs me less than 5 rubles. I sell it in kindergartens for 120 rubles!
There are different magnets - plastic, metal, sunset ones. We will make a magnet based on magnetic vinyl. It looks like this:

In a nutshell, this is the most ordinary photograph pasted onto magnetic vinyl.
Choose any photo frame and insert a photo of the child. You can draw a photo frame yourself or download it from the Internet. Just don't forget about copyrights. Not all authors allow you to make money from their frameworks and templates.
To make a magnet we need the simplest tools:

This is a small piece of glass stationery knife and a metal ruler. And it's all? - you ask! Yes, this is enough to make good money. You don't even have to have your own printer. You can always order photo printing on the side. And your magnets will not become much more expensive. We'll calculate everything later.
A few words about magnetic vinyl. It is sold in rolls, usually 30 meters. Such a roll is not only quite expensive, but also very heavy. And this increases the cost of delivery for those who order vinyl by mail or through transport company. Those who have the Zenon company nearby are luckier - they will sell at least half a meter of magnetic vinyl. Agree, this is very convenient.
Magnetic vinyl is available different thicknesses. I recommend purchasing vinyl no thinner than 0.7 mm to make magnets. Magnets made from thinner vinyl look cheap and not solid.
Magnetic vinyl also comes with adhesive layer and without an adhesive layer. Has an adhesive layer protective film and with equal thickness it costs a little more.

All you have to do is choose a link:
Magnetic vinyl with adhesive layer + regular photo on paper
Magnetic vinyl without adhesive layer + photo on self-adhesive photo paper.
I'll use the second option. I have 0.75mm glueless and inkjet vinyl on hand from Privision.
So, let's start making our magnets.
I think finding a cute photo frame won't be too difficult for you. We will assume that you already have it. Adjust the photo frame to the size you need - mine is 65 x 90 mm. With this size, 9 magnets fit on an A4 sheet. Of course, you can choose absolutely any size.
You also photographed the children. All that remains is to insert the photos into the frame. This can be easily done using or.
By the way, a large section will soon appear on the site about how to photograph children in kindergartens and schools and process photographs. Don't forget to not miss the announcement.
The photos have been inserted, now they need to be placed on a sheet of paper and printed. You can use Photoshop for this, but I like CorelDraw. I import one photo frame at a time and place it on A4 sheet. If you order more than one magnet, I duplicate it required quantity once.

All photo frames are placed, self-adhesive photo paper is inserted into the printer. We send the sheet for printing! We print with regular water-based ink.
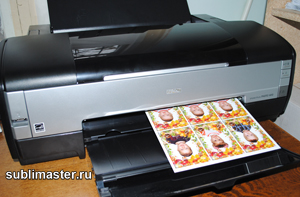
Now we will stick the photo paper onto the magnetic vinyl. I first cut it into A4 sheets. More precisely, they turn out to be a little smaller - 20.5 x 29 cm. The width of the magnetic vinyl roll is 61.5 cm. I cut it equally into three parts. And I deliberately reduce the length a little; with my size of magnets this is quite enough. You also try to calculate everything so that there is less waste.
To ensure that the photo paper lays flat on the vinyl without bubbles or creases, just watch me do it and repeat.
First, turn the sheet face down and bend the backing paper about 15mm along the short edge of the self-adhesive.

Now we turn the sheet over and, holding the edge with the folded paper (not letting it stick), place the sheet exactly on the magnetic vinyl.

Having positioned the sheet as needed, carefully glue the edge of the sheet to the vinyl and iron it well with a dry soft cloth.
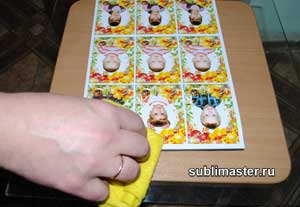
Now our sheet is securely attached to the magnetic vinyl and will not move anywhere. Left hand place it under the sheet, grab the edge of the protective paper and begin to smoothly pull it to the side, exposing the adhesive layer, and right hand using a rag forward movements Smooth the sheet up and down onto the vinyl.

So we smooth it to the end.

Set the resulting sandwich aside for 15 - 20 minutes so that the adhesive layer sets well. Now the magnets can be cut. A reciprocating cutter is ideal for this purpose, but you can do just fine without it.
A metal ruler and a utility knife are what you need. To ensure that the knife cuts rather than tears the paper on the vinyl, keep the angle of the knife as small as possible to the surface.
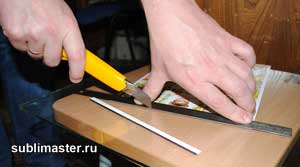
Renew the knife blade by breaking off the dull part. I usually do this after cutting the next A4 sheet.
Here are the first nine magnets ready.

I put each magnet in a separate bag. I have them 75 x 120 mm. This bag costs pennies, and parents really like the individual packaging.

That's the whole process. As you can see, nothing complicated. Now let's do some math.
I bought magnetic vinyl without glue 0.75 mm thick for 310 rubles for linear meter(width 0.61 cm), which is 504 rubles per square meter or 30.3 rubles per A4 sheet (rounded to 31 rubles).
I bought self-adhesive for 100 rubles for 20 A4 sheets. This means one sheet costs 5 rubles.
31 + 5 = 36 rubles.
36 rubles: 9 magnets = 4 rubles per piece!
Let me remind you that I sell them for 120 rubles. I know that some people sell similar magnets for 150 rubles.
Now a few words about quality. Water-based inks have a serious drawback - they fade quite quickly. Particularly compatible inks. If your customers' refrigerator is located near a window, the magnet on its door may fade within a year. In this case, I will advise you to print the photos in a darkroom and glue them onto vinyl with an adhesive layer. In this situation, the cost of your magnet will increase by 2 - 3 rubles, but it will not fade over the years.
Alternatively, the magnet can be covered with a thin cold laminate (laminating film). This makes the process a little more complicated, but the magnet looks great!
You can also purchase an inexpensive corner cutter and beautifully trim the corners of your magnets.
In a word, I gave you an idea. How you put it into practice is entirely up to you. Now you know how to make a magnet with a photo. Take my word for it, such magnets are in constant demand in kindergartens and schools!


Make a couple of dancing robots using magnets!
Instead of just playing with magnets I bought on Ebay, I came up with something really cool. If you place a small washer on flat surface and move the magnet in a circle under the washer, it will suddenly change the direction of rotation.
As soon as I saw this, I simply had to create some new invention. As a result, these robotic dancers appeared - the idea is not entirely easy to implement, but the end result is simply wonderful! The robots really look like dancing people, and what’s good is that the mechanism that sets them in motion is not visible at all.
I chose a book as a dance floor for the robots because I wanted a book as a stand. You can take wooden box or cardboard box, in which the motor will be hidden. But for me the book seemed the best option.
This is how the robots look “in action”:
And here's how they are made...
Step 1: Collecting spare parts


Materials
- hardcover book
- gear motor 3V, 15 rpm
- white LED switch
- 2 holders for LEDs
- old fuse
- copper tube - copper wire(thin)
- wire
- 2 magnets
- battery holder
- lever switch
- old electrical parts: resistors, transistors, potentiometers - everything that is available. From all this we solder our robots.
- 2 washers, as thin and shiny as possible.
Tools:
- hot glue
- soldering iron and solder
- pliers
- construction knife
Step 2: Making the robot - legs


What parts the robot should consist of is up to you to decide. Look at what there is in the house that could be used to solder it - old electrical parts, spare parts from the radio, everything that is not needed from the like can be used in this project.
To begin, gather together all the parts that you think will be suitable for assembling the robot. Experiment with these details to find the best one.
I had an old amplifier that I found in one of my neighbors trash, and it had everything the robots needed.
Steps:
1. Collect spare parts in one place
2. For the legs I used a couple of transistors which I soldered to the switch as shown in the photo above.
3. After that, I bent the transistors outward a little to give it a more leg-like shape.
Step 3: Attach the arms and torso


Steps:
1. I took an old potentiometer as the body. I took out the insides and used the body as a torso.
2. I attached a couple of resistors to the “torso” as arms. I had to tinker with soldering the arms to the body, but I finally achieved my goal. For better soldering, heat the case with a soldering iron and add a ball of solder to it before attempting to attach the resistor. This should help.
3. I soldered an old diode on the front because I wanted retro style robots. I simply soldered the diode contacts to the body and cut off the excess.
Step 4: Add the remaining details.


Steps:
1. Then I made the heads of the robots. I thought for a long time about what to use as a head, and in the end I chose an old phototransistor (I think this is it!).
2. I cut the wires and attached the phototransistor to the body using hot glue.
3. Then I glued the legs and torso in the same way.
4. Finally, I soldered a small washer to the legs. This is the most important part, since the puck is what will make our robots dancers!
Note: The washers I used were very thin and well polished. This is really important, use the thinnest washers possible. Thicker washers, which I also tried, gave a worse effect and did not work as intended.
5. I resoldered the legs to give the robot the effect of a moving man, you can see these changes in the photos from this step.
Step 5: Preparing the book - making the first cut


The next step is to find a suitable book to build in the battery, motor and magnets. Here is the most important point- thickness of the book. It should be large enough to fit all these parts inside. I have a lot of books, so it wasn’t difficult to find the right one (the hardest part was just cutting out blanks from the book for all the spare parts!)
Steps:
1. First draw a square in the center of the book. This is where we will then place the motor and magnets.
2. Start cutting out pages in sections and stop when you reach a depth of approximately 10mm.
3. In the center of the cut out square, measure another 15x15 mm square. Use a utility knife and cut this smaller square all the way down to the back cover.
Step 6: Stuffing the book - installing the battery


Steps:
1. Mark a location for the batteries.
2. Cut a notch in the pages so that the batteries fit completely inside.
3. Cut a small “channel” in the book to connect to the motor, as shown in the photo above. This channel will contain the wires from the battery to the motor.
4. It's time to connect the battery. You will need 3 wires. I used a computer cable and tied 3 wires together as shown in the photo. I connected one wire at a time to
- switch
- to the motor
- diode
Step 7: Stuffing the Book - Adding a Light and a Switch


Now we need to add an on/off switch and a light. Actually, lighting is an optional component, so it's up to you whether to do it or not.
Steps:
1. Bend the copper tube as shown in the picture.
2. Pull the wire through it, making sure there is some wire left at both ends.
3. I attached a holder for the diode to the flat end of the tube. This is needed to attach the tube to the book.
4. At the other end I also attached the holder for the diode, but in reverse. I also attached the fuse to the tip of the holder after cutting off one of the metal tips. I just put it in glass tube fuse into the diode holder.
5. Then you need to connect the diode to the end copper tube, close it all with a diode holder with a fuse at the end.
7. Again make two channels in the wire book as shown in the photo.
Step 8: Stuff the book - build in the motor