These products allow not only frying, but also smoking. To make such a barbecue, it must be equipped with a tight lid and shelves in which the grill will be installed. The principle by which this design “works” is very simple:
- It is necessary to lay thin branches at the bottom of the structure - preferably apple or cherry trees;
- The food you are going to cook is placed on the grill;
- The device is covered with a lid, meanwhile, a fire is lit under it;
- The branches that are inside smolder from the elevated temperature;
- Ultimately, it turns out that the products are baked and at the same time smoked from the branches.
The disadvantage of such a product is that it is difficult to find it on sale, and if it is found, the price seems rather high. Thus, barbecues with a metal roof, photos of which are presented in a wide variety, as well as products with a smokehouse, are the best solution for a successful picnic in any weather.
American barbecue grills
These types of barbecues are often round and not rectangular, as we are used to seeing them. The main difference between this design and a barbecue is that frying is done on a grate. Not only coals, but also open fires can be used. Therefore, the sides of this grill are higher than those of other products. The cost of “American barbecue” exceeds the cost of many similar products, but many people who bought such a product consider this fact to be completely justified. They are especially popular.
Location of the device: features of choice
In this case, it is worth taking into account a few tips from professionals.
- The grill should not be located under trees or near bushes.
- for adaptation should not be made of film or fabric.
- Consider the wind rose so that when frying, smoke does not enter the windows of the house.
- Equip a special area for the installation of a barbecue - a recreation area.
If the barbecue is placed on the ground, then the platform under it must be made of a special material -, tiles, during the rains this will make for a great picnic.
Making a barbecue with your own hands
Do-it-yourself barbecues made of metal (dimensions, photos are presented below), as we have already noted, are different, in practice we will consider an example of constructing the simplest structure (for 8 skewers). Skewers should not interfere with one another, but there should not be too large gaps between them. A classic skewer can accommodate about 5 pieces of meat products, and the depth is determined using practical methods. Food should not be located far from the coals, but not too close, otherwise burning will occur. It is most convenient to determine the distance from the top of the product to the ground based on the height of the cook.
Drawing
It is best to choose an element such as a diagram of a metal grill - photo. You can use ready-made schematic solutions for standard projects, this will save time and greatly simplify your task. The drawing of the barbecue should be simple; according to the markings, the front and back walls can be 70*20 cm, the bottom – 70*28 cm, the walls – 28*20 cm. Next, the elements are cut using a grinder; small slits made in advance will allow you to fix the skewers. Holes are made for air flow.
It’s hard to imagine outdoor recreation without barbecue, and therefore barbecue. A simple factory design is unreasonably expensive. Therefore, it is better to learn how to make a barbecue with your own hands and make it yourself. If you have the equipment and skills, you can cook a barbecue at home. If not, making a grill without welding is also easy. Despite their simplicity, such designs are quite durable.
To make cooking barbecue less of a burden, you need to know how to properly cook a barbecue. The optimal height is determined by the distance from the ground to the palm of the arm bent at the elbow. The length depends on the number of skewers placed simultaneously. So that guests do not have to wait long for the delicacy, the required number of servings must be prepared in three sittings. For good roasting of meat, the distance between the skewers should be 8 - 10 cm. However, the length should not be more than 1 m, as this will create problems with maintaining uniform heat.

The width is determined by the length of the existing skewers, the standard is 40 cm. The height of the walls should not exceed 20 cm. Taking into account the thickness of the coal layer, this will allow the meat to be placed at a height of 10 cm from their surface. At a shorter distance, the kebab will burn; at a larger distance, it will not be cooked through. The thicker the metal chosen for manufacturing, the longer the service life. Usually choose between 3 and 7 mm.
Stationary models
These are massive metal barbecues mounted on a brick base. But it is possible to use pipes or corners dug into the ground. In addition to rectangular ones, they come in round, oval and other shapes. Stationary models are usually installed under a canopy or manufactured with a canopy. In the second case, you will have to make additional drawings and calculations to confirm the ability of the base to withstand additional weight. If the racks for the canopy are made from corners, and the roof is made from corrugated sheets, then welding the barbecue with your own hands is carried out with an assistant.

The simplest option
To quickly make a regular barbecue, you will need a sheet of metal 2 mm thick. You also need to prepare the necessary tools and materials:
- corner with shelf 40 mm;
- pipe scraps for legs;
- grinder with a set of attachments;
- electric drill;
- welding machine;
- ruler;
- scribe;
- construction square.
To perform sequential operations, step-by-step instructions are used:
- a drawing layout is applied to the sheet;
- using a grinder, the workpiece is cut out;
- the side petals are bent at right angles to the bottom;
- joints are boiled;
- holes with a diameter of at least 12 mm are drilled in the lower part of the long walls for air flow;
- slits are made on the top for skewers;
- The seams are cleaned with an abrasive wheel.
The legs are welded to the finished grill. They can be made removable if you plan to go outdoors. To do this, short pipes with a diameter of 25 mm are welded in the corners, into which 20 mm tubes will be inserted.
Frame using corners
This option is chosen when it is necessary to make a durable structure from thin iron. A frame made of corners will not allow the walls to sag. Its corner posts are used as legs. The bottom and walls are cut out separately and welded to the prepared frame. If you drill holes in the bottom from below, you should weld a shelf to place a container for collecting ash on it.

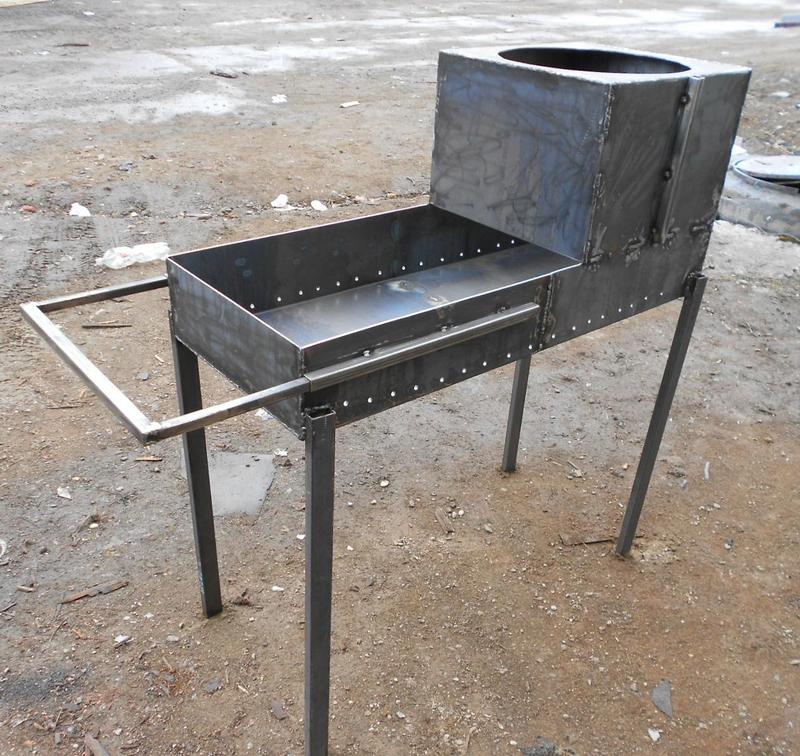
With space for a cauldron
This type of grill has an elongated structure, part of which is covered with a metal sheet with a place for a cauldron in the form of a round hole. Its diameter is made such that 2/3 of the tank is in the firebox, otherwise the pilaf or other dish will not heat up evenly. During production, it should be taken into account that a high position of the cauldron is fraught with burns, and if it is low, the cook will have to work bending over.

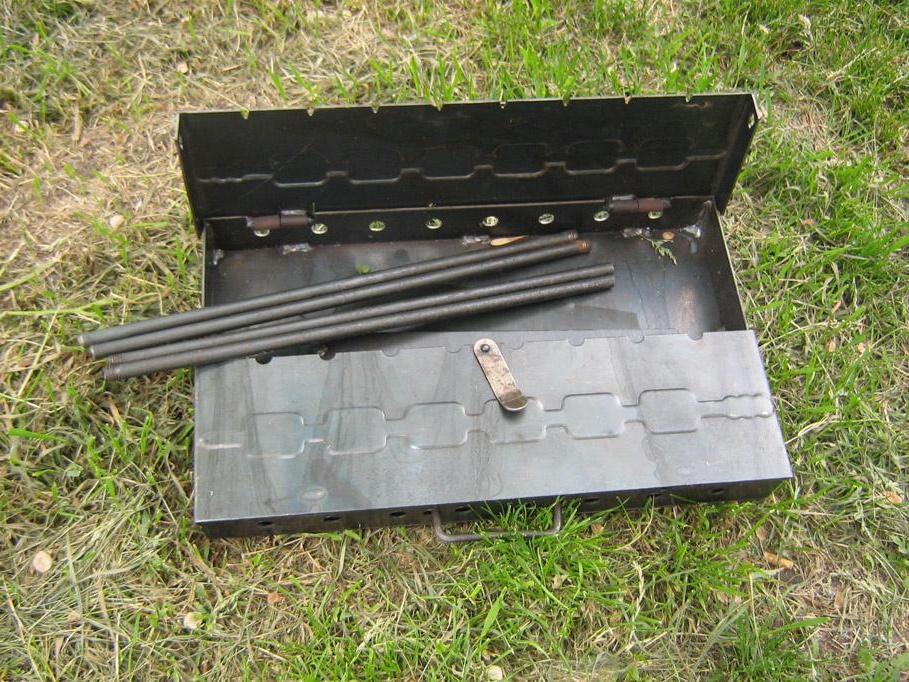
Collapsible metal grill without welding

Such structures are made when transporting an all-metal box is difficult. A dismountable barbecue, made by hand from metal, is assembled upon arrival at the site in a few minutes. The basis of the design is a frame made of corners. To secure the bottom, holes are drilled for bolts. On the long sidewalls, rods with threads at the ends are welded or fastened with horseshoe-shaped bolts at the bottom and top, which, during assembly, are inserted into the holes on the end walls. For removable legs, pipes are installed in the corners of the frame.
DIY folding barbecue

It is made in the form of a suitcase with handles or a carrying case is used. The walls are attached to the bottom using hinges. If you have to make such a grill yourself, you can use door hinges from cabinets. In another option, a box is installed on the bottom with folding legs, the walls of which are connected using slots on them directed in different directions. When disassembled, all parts are put into a case or suitcase. Options with grooves are more durable, but difficult to manufacture.
DIY barbecue from a gas cylinder or barrel
The options for making barbecues from these containers are varied, including those with a lid and handles. All gas is released from the cylinder. To check, the hole of the open valve is moistened with a soap solution. If it doesn't bubble, there is no gas. After this, after removing the valve, you need to turn the cylinder over and remove the condensate. To be on the safe side, it doesn’t hurt to fill it with water and leave it for a couple of days.

Manufacturing begins with the cylinder or barrel being cut in height into two halves or only a part being cut out, leaving the ends intact. The lid is then made from it. The stand is made of a pipe bent in an arc with legs welded to it. Or two racks in the shape of the letter M are assembled from the corners and connected with rods. The resulting shelf is used to store firewood and accessories.

After installing the container on the racks, the cut points are covered with corners on which the skewers will be placed. If the future barbecue is intended to be used as a grill, then racks are attached to the sides under it. To prepare a barbecue, brackets for the grill are welded inside.
The cover from the cut out sector is attached on hinges. Its presence allows you to use the grill as a smokehouse if you install a chimney at the end. If the barrel is cut correctly, it can be connected to the filler neck. The cylinder uses the hole where the valve was installed. To prevent all the coals from rolling into the central part, it is recommended to weld two corners to the bottom, lengthwise.
Grill painting and anti-corrosion treatment
Making a barbecue with your own hands is completed by finishing it. The compositions used for painting must be heat-resistant, not crack due to temperature changes, and not release harmful substances when heated. Silicone-based enamels, compositions with titanium dioxide, and powder paints have these qualities. The last option is the best, but it is unrealistic to implement it at home, since polymerization of the applied coating requires heating to 650⁰C. However, if you wish, you can contact a car repair shop where this technology is used to paint bodies. Since the operation of the barbecue is associated with soot and soot, it is recommended to choose a black color, on which the coating is invisible.
There is no point in painting the inside, since any coating will quickly peel off under the influence of high temperature.
To ensure that the paint holds firmly, the outer surface is cleaned of dirt and rust with a wire brush and sandpaper. The operation will be speeded up if you use a grinder or drill with an abrasive attachment. Then degrease with white spirit, acetone or gasoline.
Liquid compositions are applied with a brush or roller in 2 layers. Spray paint is sprayed from a distance of at least 20 cm from the surface in 3 layers. The subsequent coating is applied after the previous coating has completely dried.
To protect against corrosion, oxidation is often used, also known as bluing, which forms a heat-resistant black film on the surface. It will protect the grill inside and outside from corrosion for the entire period of use. For bluing you need to prepare:
- caustic soda;
- sulfuric acid diluted to 5% concentration;
- laundry soap.
A container of a suitable size is filled with acid, and the grill parts are immersed in it. It will be difficult to process large non-dismountable products at home using this method. After a five-minute soak, they are transferred to a container with a soap solution (50 g/1 l) and boiled for 10 minutes. At the final stage, the parts are placed in a caustic soda solution (50 g/1 l of water) heated to a temperature of 140⁰C. After 1.5 hours, take it out and wash it with water.

The durability of the barbecue depends on the type of metal you choose. Therefore, experts recommend using heat-resistant steel. Cast iron meets all requirements in terms of durability, reliability, and ability to retain heat, but working with it requires professional skills. There is no clear opinion regarding galvanized steel. Some believe that it is dangerous, since at high temperatures it can release harmful substances. Others believe that it is impossible to heat a brazier with wood to such an extent. Everyone agrees that stainless steel is the best material. A brazier made from it will last for several decades.
You need to remove dry grass, branches and other flammable debris from the place where the grill is installed, and place a box of sand nearby. If wooden parts are used in the design, they must be located at a distance of at least 20 cm from the body. To prevent smoke from interfering with your rest, it is recommended to install a hood with a short pipe. It is equal in area to the barbecue and is attached to its body.
When caring for the grill, you must follow the following rules:
- Do not fill the coals with water, as this will lead to deformation of the metal;
- grease drips are removed with a rag and sand;
- To protect against adverse weather influences, the grill should be regularly lubricated with vegetable oil.
To make a metal barbecue, the highest qualifications and scarce materials are not required. It is possible that the first copy will turn out lopsided, but don’t give up. The next grill will turn out no worse than the factory one.
Drawings of barbecues


We will send the material to you by e-mail
During the holidays, barbecues are in constant demand. Even avid residents of big cities barbecue at least once a year. Do-it-yourself metal barbecues remain a budget option for the home and a convenient way for a country trip. The dimensions, photos and instructions below will help you make a hearth of any type with minimal budget costs. More about all this in our review today.
Homemade metal grill
Types of barbecues, materials, characteristics
A metal hearth is built faster than a brick barbecue oven and does not require the delivery of building materials or special skills. There are various DIY metal barbecues. Dimensions, photos and design may vary significantly. Since equipment for preparing hot dishes in a hurry is built for long-term operation, you should take seriously the choice of materials and dimensions of a stationary or mobile fireplace.
Classification
Steel barbecues are traditionally distinguished according to several criteria, the main of which are:
- mobility – stationary, mobile or portable;

- configuration - barrel, classic rectangular box, complex shape;

- Dimensions – for a large company, family gatherings;

- functionality - covers to protect coals, a compartment for firebrands on the side, a folding roof.

Decorative elements are usually present in mobile or stationary modifications. The operational life of the fireplace depends on the thickness of the casing. Portable barbecues are divided into collapsible and transformable (“suitcase”).

Related article:
What can it be made from?
A budget option is designs made from used industrially produced products. For example, a propane cylinder or a 20 liter barrel are almost ready-made bodies, to which you only need to weld the legs.

Old coffee tables and sewing machines, on the contrary, provide the craftsman with cast legs of an original shape; all you need to do is add side walls to the structure. Classic barbecues are constructed from sheet steel, rolled metal (angle or profile pipe).

Grill dimensions
- the length of a standard skewer with 6 pieces of meat is 25 cm, so the width of the grill should be increased to 30 cm;
- the simplest option without a side compartment for coals has a length of 0.7 - 1 m for a family, receiving guests, respectively, based on the fact that for normal frying of the skewer the distance should be 10 cm;
- a depth of 20 - 25 cm allows you to cook meat faster, but there is a risk of burning, so we recommend 30 cm from the skewer to the coals;
- depending on the height of the chef, 0.5 - 0.7 m legs for mobile fireplaces, 0.8 - 1.2 m for stationary structures are more convenient.

Helpful information! If the barbecue is made from a barrel, the coals are located unevenly inside it, the structure is complemented by a hearth - a steel sheet at a specified depth.
Do-it-yourself permanent grill, manufacturing instructions, drawings, photos
The easiest way is to choose a thick-walled (2 mm minimum) barrel or a large propane cylinder for a metal barbecue with your own hands. Dimensions and photos explain the process of constructing a stationary fireplace. It is important to take into account the height of the hearth when making the legs/stand, and add a pipe to the side of the design.

Cut of materials
A barrel (cylinder) can be cut in two ways:
- cut out a hatch to provide access to the interior of the firebox;

- completely cut off the top part (1/3 - 1/2 of the cylinder).

Hinges will be needed in any case to close the top for quick cooking or during bad weather. The barrel can rest on cross-welded racks, ordinary legs made of a profile pipe, a corner, or a special frame into which the barbecue is placed.

The “under” is cut out of the sheet, taking into account the distance from it to the skewers of 30 cm. To reliably position the fryer inside the barrel, two corners are welded at the ends of the cylinder.
Assembly
To assemble the grill, just screw the hinges and place a sheet of brazier inside the lower compartment. The side chimney pipe is necessary for the normal combustion of firewood when the hatch is closed in bad weather or windy weather. To prevent the lid from spontaneously closing due to wind, a latch is installed.

The skewers are placed in the cuts made by the angle grinder. Holes are drilled at the ends of the barrel below the fryer to provide draft. Operation with a closed hatch is possible without a pipe - to do this, just add holes in the upper part (checkerboard pattern, diameter from 1 cm).

Helpful information! Decorating (painting) of external surfaces is carried out with Certa, Elcon paints or similar heat-resistant paints and varnishes.
Related article:
Review of beautiful and functional gazebos with the organization of a barbecue area in different styles from different materials in a special publication of our online magazine.
Do-it-yourself camp collapsible grill, drawings, photos
There are mobile barbecues made of metal with your own hands, the size of the hearths and the design can vary significantly. As an example, we will consider two modifications leading in the rating - a transformable “suitcase” type and a completely collapsible classic barbecue.

Moreover, a home craftsman can use a dozen variants of components in his design - hinged fastening of parts or their complete disassembly, removable, screw-in, folding legs at his discretion.
"Suitcase"
Do-it-yourself metal barbecues that can be transformed into a portable suitcase are constructed from blanks of the following configuration and size:
- bottom – 2 – 3 mm sheet 0.3 x 0.9 m;
- walls – side (long) 0.15 x 0.9 m, end (short) 0.15 x 0.3 m;
- racks – round or profile pipe 0.6 – 08 m;
- corner - 5 cm shelf, length 2.2 m.

A frame 0.3 x 0.9 m is welded from the corner, the bottom is placed inside it, and secured with tacks. The long side walls are hinged to the frame (2 hinges on each side), have two rows of holes in the bottom for traction, and slots in the top for skewers. They fold up during transportation and fold out when cooking.

The end walls are removable, put away inside the suitcase when carried, and put on the corner of the frame while preparing barbecue. To do this, a rod is welded onto each of them, firmly pinching them inside the structure.

The legs are either screwed into nuts welded to the corners at the corners, or inserted inside square tubes 3 cm long. For carrying, an articulated handle made of a rod is attached to the side; to ensure the immobility of the long walls, a bolt can be passed through the suitcase into special holes, secured on the reverse side with a nut.
Collapsible grill
The design of this portable hearth is slightly different from the previous version:
- the rigid angle frame required for laying the brazier has been replaced by 2 cm shelves bent 90 degrees on the long, short side walls;
- the legs are made of bent lightweight corner.

To fix the barbecue elements relative to each other in the legs and side walls, a V-shaped perforation is created, bent outward (made with a chisel, bent with pliers). The side sheets are alternately inserted with perforated bent clamps into the legs of the barbecue. The final rigidity of the structure is achieved only after laying the brazier.
Article
Shish kebab cooked in nature is a delicious dish. If desired, you can fry it on stones, but it is much more convenient to use an iron grill - the meat does not burn, and the coals are slowly fanned by air entering through special holes. Thanks to the high location of the roasting pan above it, there is no need to bend over or squat next to it while cooking. If you have not yet acquired this useful device, then from this article you can learn how to make a barbecue from sheet metal with your own hands, so as not to buy it ready-made.
Schemes and sizes of barbecues
Homemade devices for frying kebabs are divided into 2 groups - stationary and collapsible. The first ones are made for home or country use and are distinguished by a more massive design, the second ones are lightweight folding models for outdoor picnics.
Metal kebab grills installed in the courtyard of a house come in several varieties:
- a simple open-type outdoor grill on legs;
- a multifunctional device that includes a barbecue, an oven, a stove for a cauldron and even a smokehouse;
- garden options, equipped with a roof and sometimes with a natural hood.

Multifunctional grill
Reference. When making barbecue grills, some craftsmen not only combine them with various stoves, but also place an electric spit over the brazier, as shown in the drawing below. Thanks to this, the poultry is cooked automatically, like on an industrial grill.

There are two types of camping structures - collapsible and folding. The difference between them is compactness and weight. In the first case, the grill is made with removable legs and a disassembling body so that it can easily fit into a car trunk. The design of the second type of kebab makers allows them to be folded into a suitcase or briefcase for manual carrying. An example of such an original homemade product is shown in the photo.

The next step after choosing a design is drawing a sketch and determining the dimensions of the structure. To make your homemade grill easy to use and spacious enough, consider the following points:
- Select the width of the product according to the length of the existing skewers; usually it lies in the range of 250-400 mm. If you don’t have skewers yet, then make the stationary version as wide as possible, and it’s better to make the portable model small.
- Estimate how many servings of shish kebab will have to be cooked at the same time and calculate the length of the roasting pan, observing the condition: the distance between the skewers should be at least 60 mm.
- Select the height of your homemade barbecue to suit your height for ease of frying and rotating skewers.
Advice. In order to properly make a barbecue with a metal canopy, when choosing sizes you should take care of the stability of the structure. It is not advisable to design the Dutch oven too narrow or long, unless you are embedding the stand into concrete. Projects of beautiful barbecues with a roof made of forged elements are presented in the photo.

If you plan to build a gazebo where the barbecue grill will subsequently be located, then you need to provide an exhaust hood with a chimney pipe and maintain a distance of 1 m from the firebox to the wooden structures.
Preparation of materials
Depending on the purpose and design of the barbecue, sheet iron of various thicknesses is used for manufacturing:
- yard braziers, which are constantly located on the street, are usually built from ordinary steel with a thickness of 2 to 3 mm;
- for a prefabricated structure designed for transportation, it is better to take metal no more than 1.5 mm;
- Products that fold into a suitcase or briefcase must be assembled from stainless steel 0.8-1 mm thick.
A house barbecue can also be made from an old gas cylinder or a 200-liter barrel. You receive a ready-made round-shaped firebox, where all that remains is to cut out the lid, install the door and weld the chimney pipe so that the kebab maker can simultaneously serve as a smokehouse. How this unusual solution was implemented, look at the photo:

The legs of the structure are made from any available materials - profile and round pipes, angles and channels. There is only one requirement for them: the supports must ensure the stability of the structure.
Simple stationary model - assembly order
As a rule, a yard barbecue is made with your own hands from metal joined by welding. First, the iron sheets need to be marked and cut into blanks in accordance with the drawing. For further actions, we offer the following step-by-step instructions:
- Take the side wall blanks and drill 5 holes with a diameter of 15 mm in them at a height of 8 cm from the bottom.
- Now you need to weld a metal box - the future brazier. A double bottom can be formed in two ways: by welding a perforated steel sheet over the side holes, or by placing a mesh and laying the bottom with ceramic solid bricks.
- Weld the frame with crossbars between the legs and attach it to the finished firebox.
- To install and rotate the skewers, cut grooves at the ends of the side walls at intervals of at least 6 cm.
- Attach carrying handles to the end walls.

Important point. The correct placement of welds is on the outside, not inside the firebox, so that they do not burn out. This way the product will last longer.
If a propane cylinder or barrel is used to make a barbecue, then you need to cut out the lid and put a mesh inside. The latter can be bought or welded yourself from steel wire. Make the lid hinged by attaching it to hinges. When you need to make a smokehouse, instead of the semicircular bottom of the cylinder, an iron disk with an opening for the door is welded, and a chimney is installed on the other side. More information about making a barbecue at home is described in the video:
Upon completion of the assembly work, improve the appearance of the product by painting it with heat-resistant enamel of the KO series or special paint from an aerosol can.
Collapsible metal grill
The manufacture of a disassembled structure is carried out in the same order as a welded brazier, but with some differences:
- The cutting of metal parts is done with allowance for bends along the edges, with the help of which the walls are attached to each other with bolts.
- The ends of each element must be bent at an angle of 90° and holes drilled in them.
- The legs are also attached to the body using bolts.

Advice. When assembling, make sure that the nut and part of the thread are on the outside, and the bolt head is inside the firebox, as shown in the drawing.
There is a simpler option for joining parts without threaded connections. The fastening elements are the legs themselves, made of profile pipes with longitudinal cuts. The bent ends of the walls are inserted into these slots, and the bottom is simply laid on the bends. The essence of the idea is shown in the next video:
A brazier in the shape of a diplomat is somewhat more difficult to make. You will have to work with stainless steel, which is harder to drill and bend. You shouldn't use regular iron; a sheet 0.8 mm thick will burn out pretty quickly, and thicker steel will make the suitcase too heavy. The second difficulty, noticeable in the assembly drawing, is the installation of hinges on the side walls so that they fold inward. The end sides are simply welded to the bottom, and the legs are inserted into special sockets.

Conclusion
For a skilled owner, making a barbecue from metal is not a problem. Even in the absence of welding and the skills to work with it, a stationary kebab maker can be bolted together. The main thing is not to make a mistake with the size of the product and not to make it too small. If you have time and desire, you can expand the functionality of the barbecue - weld shelves for firewood and stringing meat, and also make a canopy so that the occasional rain does not cover you.

Design engineer with more than 8 years of experience in construction.
Graduated from the East Ukrainian National University. Vladimir Dal with a degree in Electronics Industry Equipment in 2011.
Related posts:

One of the attributes of a suburban area is metal barbecues. Such designs can be made with your own hands if desired. By creating your own drawing, you can make a unique design that will be used not only for its intended purpose, but will also decorate the site. To understand which design is suitable for installation on your site, you should look at photos of similar products.
Types of barbecues
The simplest metal structures are rectangular in shape and small in size. Coals are placed inside the metal barbecue body, creating the heat necessary for cooking meat. All barbecues can be divided into several main types:
- Stationary structures. Such products are large in size and are installed on a foundation. Stationary barbecues are durable and reliable.
- Portable products. Braziers of the described type are lighter and can be easily transported in a car. They can be made of thin metal that deforms under physical impact. Such products are convenient and often taken on vacation by many car owners.
- Mobile barbecues made of metal, made by yourself. Such structures are large in size, but are equipped with wheels, thanks to which they can move around the site. Such barbecues are purchased by land owners who do not want to create a stationary structure for various reasons. An example is a situation where the area is small and a metal grill will not fit harmoniously into the landscape.
You can also find electrical products that have the function of automatically moving the skewers. Thanks to this, you don’t have to worry about the uniform roasting of the meat. In such devices, spiral heating elements are used instead of coals.
Advantages of metal barbecues
When choosing the type of barbecue, you should first decide whether the structure will be stationary or portable. Stationary ones can be made of metal or brick. But most often, site owners purchase portable structures, as they perform their functions and do not take up much space.

Structures made of metal have the following advantages:
- Possibility of movement on the site. If the grill is foldable, you can take it with you even without a car (provided that the resting place is nearby).
- Uniform cooking of meat. The metal retains heat well, so the meat cooks fairly quickly.
- Possibility of creating a design with your own hands. If you have a welding machine, you can make a metal grill yourself.
When creating a metal grill, you can make a structure of any shape and paint it in the desired shade. If you don’t have a welding machine, you can purchase a ready-made metal grill. Such products are usually sold in garden supply stores. It is worth noting that in the absence of a welding machine, you can connect the elements of the barbecue using bolts.

Simple collapsible barbecues
The simplest barbecues are products that consist of two racks in the shape of the letter P. To cook meat, the racks are stuck into the ground, after which coals are placed between them. It is worth remembering that due to the small height of such products, it will not be possible to fry meat while standing. In this case, due to the lack of walls of the grill, heat loss occurs.

But if you are going on a hiking trip, you should take just such a grill. Such products are not heavy and therefore cannot cause fatigue during a hike. To determine which design will be more convenient for you, you need to look at various photos of the products being described. It is also important to determine the optimal location of the product.
Non-removable metal grill
Before creating a barbecue, you need to think in advance about what materials and tools will be needed for the work and make a list. To build a metal barbecue you must have:
- reinforcement and metal corner for creating racks;
- Bulgarian;
- drill
- steel sheet needed to create the main part of the barbecue;
- welding machine
Some site owners do without a welding machine, connecting metal elements with bolts. In this case, it is worth preparing a drawing of the barbecue with dimensions in advance. You can also take ready-made diagrams. The drawing should show the height, length and other design parameters. It is important to indicate the distance between the perforation slots and the chamfers for the skewers.

The distance between the ventilation slots in barbecues is usually about 7 cm. The length of the structure should be calculated taking into account the fact that there should be 8 skewers on the barbecue.
It is important to choose the right metal sheets to create a barbecue. These products must have a thickness of at least 2 mm. The higher this indicator, the more durable the entire structure will be. That is why many people choose sheets with a thickness of 5 mm.
Grill dimensions
When creating a drawing, it is important to accurately indicate the dimensions of each part of the structure. When determining the optimal parameters, you should focus on standard products with a height of 95 cm and a length of legs of about 70 cm. The depth of the roasting pan in this case will be 25 cm, which is quite enough for efficient roasting of meat.
The width of many metal grills is approximately 28 cm. The length of the structure should be about 54 cm. With these parameters, you can freely place 9 servings of shish kebab on the grill. When creating a drawing, you should focus on the number of people who will relax near the grill. If the design is created for a large family, then the dimensions can be increased. If the grill will be used for cooking meat for only 2-3 people, you can create a small structure.

On the top of the structure it is necessary to make gaps for skewers. Thanks to them, you can evenly distribute the meat over the coals. The distance between the gaps should be about 6 cm. In this case, you need to leave space between the outer walls and the gaps. If this is not done, the meat may touch the metal and burn.
It is important to remember that the entire structure must be well ventilated. To do this, holes are created on the side walls of the grill. Their diameter should be about 15 mm. It is important to make them at the bottom of the grill and arrange them in a checkerboard pattern. There is no need to make holes on the end walls.
Having indicated all the dimensions in the drawing, it is necessary to re-check it in order to avoid mistakes when connecting parts of the structure.

Creating a barbecue from several sheets of metal
Most often, a barbecue is created from several sheets of metal, which are connected to each other by welding. For the work you will need 2 sheets 28 cm long and 25 cm wide. You also need to prepare sheets 24x25 cm. In addition, you will need another sheet of metal (54x28 cm), which is needed to create the bottom of the grill.
You can use metal pipes or corners for the legs of the grill. Their length should be 70 cm. To create a barbecue, you need to prepare a welding machine, tape measure and drill in advance. You should also prepare a metal saw or grinder.
The metal structure can be equipped with carrying handles and other parts. For example, many people attach a canopy over the barbecue. This allows you to cook meat even in the rain. Before carrying out work, you need to take measurements again and mark the joints of the sheets. Gaps for skewers are made using a metal saw or grinder.
Important! It is best to make barbecue legs from metal corners. This is justified by the fact that the reinforcement is not reliable and the structure may wobble under load.
Barbecue made of a whole sheet of metal
To simplify the process of building a barbecue, you can make it from one steel sheet. To do this, it is enough to make cuts in certain places, then bend the parts of the sheet and connect them using a welding machine.
The assembly proceeds as follows:
- First, marks are created on a metal sheet.
- After this, the future shape is cut out along the marked lines.
- In the next step, the edges are bent, resulting in a metal box. At this stage, the bent parts of the metal sheet are connected to each other.
- Then perforations are made in the lower part of the structure. Their diameter should be about 15 mm.
- After this, chamfers are made on the side walls.
- At the last stage, the legs are created and welded to the resulting metal box. It is best to make legs from angle iron, as they are more stable than products made from reinforcement.
The brazier obtained in this way will be more durable than one assembled from several metal sheets. To make the structure more stable, the legs should be secured not vertically, but with a slight slope.

Barbecue from a barrel or gas cylinder
If you wish, you can create a barbecue from a barrel or an old gas cylinder. To do this, it is enough to cut such products lengthwise. To maintain the integrity of the structure, the ends should not be cut.
The legs for such a barbecue can also be made from a metal corner. These structural elements are welded to the ends of the barrel. At the last stage, chamfers are cut to accommodate the skewers.

Features of manufacturing a collapsible roaster
Collapsible Dutch ovens are usually designed to be used during road trips. They can also be used when there is a small free space near the house that you don’t want to occupy with a bulky, non-demountable structure.
To assemble the described products, it is not necessary to have welding equipment, since all elements are connected using bolts. Just as when creating a stationary fryer, you first need to make a drawing that will indicate the dimensions of each part. The layout of a collapsible product is more complex, so it is important to carefully make calculations and draw each element correctly.
After preparing each frame element, they are connected using bolts. To make the connections more durable, you should use Grover washers. At the next stage, the legs are fixed to the base. Thanks to the use of bolts, the structure can be quickly disassembled if it needs to be moved. Many collapsible braziers are complemented by forged elements. To make the structure convenient to carry, it is worth attaching the handles to the body.

How to protect a grill from corrosion
When creating any metal product, it is worth remembering that it must be protected from corrosion. Various paints are often used. But when choosing such a composition, it is worth remembering that it must be resistant to high temperatures. You can also use a method such as bluing. After processing, a film is formed on the surface of the material, which helps protect it.
Burnishing is performed as follows:
- First, the metal is degreased and cleaned;
- After this, the material is kept in a sodium hydroxide solution. It is necessary to immerse the metal in this composition for one and a half hours.
If you choose paint to protect your fryer, you need to determine the most suitable type of composition. Silver paint is often used for barbecues - a paint that contains aluminum powder.
Heat-resistant powder paints are often used. But it is worth noting that after applying such a dye, it is necessary to process the structure in a drying oven. Before painting the grill, you need to remove any dirt from the surface, as their presence can lead to peeling of the coloring matter. Before choosing a specific shade, you can look at photos showing similar products.
To avoid spending money on purchasing sheet metal, you can use an old gas cylinder. Such products are made from fairly durable and thick material. In this case, a compact fryer is obtained from a gas cylinder. But before use, such products must be burned to get rid of gas condensate.
To create a durable structure, you must follow a few simple rules:
- Metal cutting should be done as accurately as possible. The tolerance can be no more than 0.5 mm.
- The workpieces must be secured to the table using clamps. If this is not done, cutting the material straight will be quite difficult.
- When cutting metal, it is worth using a large angle grinder, as this allows you to make a more even cut.
- Before performing work, you must find protective clothing, gloves and safety glasses. Failure to follow safety rules can result in serious injury.
Having created a drawing of the future design in advance, you can do all the work yourself and create a reliable roaster.
Metal barbecues with canopy
To be able to cook meat on a roasting pan in any weather, you can make a roasting pan with a canopy. It's important to decide. Will you create a canopy separately from the metal structure or will you attach it to the grill?
The first option is optimal, as it will allow you to comfortably grill kebabs during the rain. At the same time, installation of such a design is simpler. If the second option is chosen, it should be taken into account that the canopy will create additional load on the structure. That is why it is important to make a calculation before starting work.
The canopy should be secured using metal corners. This makes assembly of the product much easier. The canopy canvas should be made of fire-resistant material that is light in weight. Corrugated sheeting is best suited. It can withstand temperature changes and is lightweight.
When drawing up a building plan, you should think about the location of the supports. If they are placed on the corners of the roasting pan, they will interfere with the cooking of the kebab. If you attach additional elements for fastenings, this can lead to a confusion of the center of gravity of the entire structure.

If a canopy is created for a ready-made roaster, it is important to make calculations and determine how additional elements will affect stability. If necessary, it is worth adding additional legs. Structures with canopies are often additionally decorated with forged elements.
Original ideas
Before making a roaster, you should consider several original types of such products. This will help make the grill not only functional, but also a beautiful design.
Some property owners create braziers from old metal barrels. Such products can be with or without a lid. When choosing the first option, the cut out part of the barrel is secured on hinges and equipped with a handle. The lid remains open while the meat is cooking. The legs are welded to the edges of such a kebab maker. They should be positioned in such a way that the entire structure is stable and cannot fall from strong winds.
In some cases, the barrel is designed in such a way that the entire structure looks like a steam locomotive. To do this, just weld metal wheels to the supports and add sheets of metal similar to parts of a locomotive.
You can also style the kebab maker as a metal chest. In this case, the grill is created wider and equipped with a lid with handles. At the same time, corners and rivets are added. Also, such roasters are often equipped with forged elements.

By looking at the photos depicting the products described, you can understand which design would look better on your site. The choice of a specific option should be made only after determining the style of the site.
Many people complement kebab makers with shelves, stands and wheels, which can be seen when looking at the photo. If desired, you can create a brazier in the form of a small car, carriage and other similar structures. Such metal barbecues can significantly change the appearance of the area.
Having made a beautiful metal structure, you can invite guests to a barbecue without hesitation.