


Having built a house and utility rooms on a suburban area, and planted trees and flowers pleasing to the eye, it is necessary to take care of laying communication lines between them. The article contains information about wooden paths for summer cottages, gardens and cottages - their advantages, disadvantages and features. You will learn what kind of wood is used for the paths, what other materials can be used and what care is required for wooden paths.

Garden paths from tree cuts are unusual and original Source dp32.ru
Advantages and disadvantages of using wood for walkways
One of the criteria for choosing a site design is the material from which the paths are to be made. Using a tree for these purposes is a good idea, because wooden paths look organic, are comfortable for walking, and do not require large expenses for their manufacture.
But before considering specific types of wooden garden paths, it is worth evaluating the pros and cons of using any tree as a building material for paths.
Pros:
Original appearance. On some types of tracks, you can view the unique pattern of the tree structure.
Full environmental friendliness of the material
Cheapness. Many creation options involve the use of wood, which you can get yourself or use wood waste.
Relative ease of creation
Room for creative and design solutions
Minuses:
fragility. It is necessary to treat the tree laid in the ground with special compounds against decay.
After rain, untreated wood becomes slippery
The need for periodic repairs
The use of wooden saw cuts
Perhaps the most original and catchy way is a path made of tree cuts.
Outwardly, it looks like paving stones. Only each wooden "kruglyash" differs from the neighboring one in size and pattern, which gives the entire path a unique flavor.

Scheme for creating a track from saw cuts source seattlehelpers.org
The species of wood from which the rounds are sawn can be any, but it is better to give preference to solid hardwoods - oak, larch or beech. Coniferous cuts, despite the presence of resin in them, are looser and rot faster. There is evidence that hardwood saw cuts, with proper processing and care, can last more than 20 years. Pine will last several times less.
But the beauty of such a paving requires careful preparation of the tree before laying and following certain rules when laying. Preparation consists in processing each saw cut before laying and creating a pit along the entire length of the track, into which wooden saw cuts will be laid.
On our website you can find contacts of construction companies that offer the service of project development and turnkey landscaping of any complexity. You can directly communicate with representatives by visiting the exhibition of houses "Low-Rise Country".
saw cut processing
The height of wooden rings should not be less than 10 cm, otherwise they will crack under load. Cracked saw cuts are best discarded.
Each cut must be cleaned of bark, which is difficult to process and promotes decay.
The upper part of the saw cut is processed against decay. An economical option is used oil or drying oil. But it is better to use special compositions, which are full on sale.
The lower part of the cut, which will be in the ground, is recommended to be treated with bitumen.
You can specifically give the tree a dark beautiful color by pre-treating it with copper sulphate.

Before laying on the track, saw cuts undergo mandatory processing. Source induced.info
Land preparation for the path
A trench for a wooden walkway is dug to its full length and width, and it should be 10–15 cm deeper than the height of the harvested cuts.
The bottom of the trench is lined with a waterproofing film, on which a sand or gravel cushion is poured.

Curbs to protect the path from the ground Source decoratorist.com
Installation of cuts
To densely fill the entire area of \u200b\u200bthe track, it is necessary to prepare saw cuts of different diameters.
A prerequisite is that the surface of the installed saw cuts should be 2 - 3 cm above the backfill layer.
Backfilling of voids between logs can be carried out with sand or gravel. The path of saw cuts with gaps between them, sown with grass, looks beautiful. But the grass will need additional care.
There are options for paths where the gaps between the cuts are filled with concrete. But the combination of wood and concrete does not look quite natural.
In general, it is these wooden paths that give room for imagination. You can vary both the size and shape of the dug-in dies, and their grouping in different places on the path. They can be placed evenly, in a herringbone pattern, or in groups to create the illusion of islands on the road.

You can decorate the paths with tree cuts in different ways. Source rem-stroitelstvo.ru
The use of boards
The first thing that comes to mind is to arrange garden paths from boards. A fairly simple option that does not require searches and painstaking preparation of the material. But, unlike saw cuts, preparation of the base is required, on which the boards will be stuffed. You can't just lay the boards on the ground. Loose they will disperse, and rot quickly. The simplest basis is long logs made of timber, installed along the entire length of the track being arranged.

Wooden path made of boards on a slight rise Source houzz.es
Most of the proposed garden plank options are characterized by a transverse arrangement of the boards. But it is worth considering the longitudinal "deck" flooring. Yes, they look not so stylish, but they also have their advantages:
Possibility to use long boards, without sawing them to the width of the track
But for the base on which the boards are stuffed, you can take short bars from waste
Such floorings are more convenient when cleaning them, especially in winter from snow.

Longitudinal arrangement of boards in a garden path on a hill Source tripcarta.com
The use of timber
You can lay out the entire track from a thick wooden beam. The device of such a flooring will cost more in terms of material, but it will last much longer. In addition, it is not required to install any base on which the bars must be attached.
Of course, you will have to level the ground along the entire length of the path, and gravel bedding will not be superfluous at all.

Beams laid on gravel bed Source centr-sadovoda.ru
The anti-rot treatment of timber is the same as for plank decking. There are suggestions to use railway sleepers for timber flooring, but this is not recommended. The sleepers are treated with creosote, and it causes burns if it comes into contact with the skin. And on a hot day, evaporation from such a “path” is unlikely to be pleasant.
Video description
Interesting ideas for creating tree tracks in videos:
Application of prefabricated pallets
When planning wooden paths in the country, you can consider using already knocked down pallets, especially if you can buy them inexpensively. Such pallets can be found at construction sites and warehouses where various materials are stored on them.
Each pallet is a finished structure with a base on which the boardwalk is already fixed. They differ only in the density of the boards. If there is no desire to mess with additional processing, then you need to choose those in which the gaps between the boards are minimal. It remains only to remove the bumps in the places along which the path will pass, and lay the pallets on the ground one by one.
This is the most suitable option for temporary paths to any places in the summer cottage.

Design of the site and approach to the pool with pallets Source br.pinterest.com
The purchase of pallets will also be justified for the plank flooring option. Boards already sawn to size are knocked off pallets, damaged ones are rejected. Then they are treated with a protective compound and the required flooring is knocked down from them. Any pallets are suitable for this application.
Application of mulch
Garden paths can be built using shredded wood shavings, tree bark, and other tree waste called mulch. To do this, you only need to remove the top layer of the earth, lay out a small border around the edges, and fill the mulch into the prepared trench. On sandy soils, where water does not stagnate, it is even possible not to lay out a trench with waterproofing.
But as a temporary path or a decorative path, they are quite suitable.

Mulch garden paths source seattlehelpers.org
Application of garden parquet
Modern material for landscaping is decking - garden or terraced parquet. These are ready-made tiled modules with a surface made of various types of wood. WPC boards are also produced - a wood-polymer composite, in the manufacture of which a mixture of wood and polymers is used. Strictly speaking, such material cannot be called a tree, but outwardly it is hardly distinguishable.
It is necessary to lay such parquet on a prepared hard surface in order to exclude its deflection. Various options for the external design of parquet modules allow you to create real compositions when arranging paths and areas on the site.

Video description
Creating a garden path from tree cuts in the video:
Maintenance of wooden paths
Any wooden garden paths require maintenance. Wooden elements can break, the tree begins to rot over time. Therefore, about once a year, it is necessary to carry out a routine inspection and restore the damaged one.
Cleaning the paths from the applied debris and reclaimed earth
Applying a new protective layer of antiseptic
Replacement of damaged or beginning to rot elements. When arranging a wooden path, it is recommended to leave a part of the finished material “in reserve” so that you do not have to hastily prepare a replacement of the required size and quality.
Conclusion
Despite the instability of wood compared to other materials, with the right arrangement of wooden paths and proper care, they will please the eye for more than one year. But considering the options for garden wooden paths, one should take into account the features of their creation and preparatory work when laying them. Such work requires knowledge of many nuances, and it is better to trust them to professionals.
Decorating your yard is not just for the summer or spring season. You can do this in the winter, and then put your plans into action when the snow melts. The main thing is to show a little imagination and get hold of materials. All this applies to garden paths, which are an important part of garden design. Today we’ll talk about how you can create garden paths from wood - the most environmentally friendly material with your own hands.
Beauty in simplicity
Already from the name of this type of track it becomes clear how successful this solution looks.
The tree itself is the most environmentally friendly material, and its use in the house looks natural, and what can we say about the site.
To pave a path with saw cuts of a tree is not such a difficult task, but quite laborious. Therefore, if you chose wood as the material, be prepared for the fact that you will have to sweat a lot.
No wonder these paths have become so popular in landscape design. They are refined, practical and quite economical in comparison with the same marble or. Is it difficult to get saw cuts when there are so many trees growing around (unless, of course, your site is in an open field). However, here I will explain that it is not necessary to cut down the first tree that comes across, not to face a person - one of the creatures of nature, to destroy another creation of nature. But what exactly can be suitable for a saw cut is:
Old fruit trees on the site, due to their age, do not produce a crop or produce it in a meager amount and at the same time occupy a usable area;
Old deciduous or coniferous trees that once hesitated to cut down, and they have grown to an adult stage and now take up a lot of space. Unless of course this tree is a family heirloom, with which many memories are associated, it can be safely transformed into man-made beauty;
Dried or damaged trees, which either have already ceased to be covered with greenery or, for obvious reasons, they do not have a chance for a full life. Sometimes such trees on saw cuts give a much prettier pattern than simple, even trunks;
If none of the above is available on your site, take a walk into the nearest forest and look for a tree that is not too bad to cut down. Or maybe it is already lying, tumbled down by the wind, and it remains only to saw it up and drag it in parts to your site.
In many garden cooperatives, standing next to the forest, one can observe such a picture when, after strong winds, especially strong thunderstorms and hurricanes, over the next two to three years, local gardeners peacefully drag hemp and saw cuts from the forest on their wheelbarrows. It is not at all necessary that for the path, but they still find trees, moreover, most likely just fallen by the wind.
What is required for the track
It's great when a gardener's hands grow from the right place, and next to these hands there is a set of serviceable good tools. Then it remains for me only to list what exactly will be required when arranging the track. However, everyone needs to know this.
Bubble level, which can be combined with an eye gauge;
Rubber mallet;
Metal container;
Brush for painting, better painting;
A saw or a chainsaw could be added to this list, but since we are talking about creating a path, it means that we already have the material ready for this moment, sawn and cleaned. Of the materials, in addition to sawing wood, you will need sand, crushed stone, gravel, drying oil, pegs, plastic wrap and red clay. For what all this you will learn further.
Set up according to the rules
1. Marking will be your first step in creating a track. Moreover, if you choose simple architectural forms, then it will be much easier for you than if you decide to make your path winding or curly. The second option will bring more trouble, but at the same time it will significantly increase the attractiveness of the idea. You need to mark the edges of the track with pegs.
2. Your next step will be to remove the layer of earth. Usually, for this case, a depth equal to the height of the blade of a conventional shovel is enough. You stick it into the ground and immerse it up to the very foot rests - that's the depth for you. In digital terms, this is 20-25 cm.
3. Dug out a layer, tamp the bottom. The trench must be completely cleaned and compacted walls and bottom. It's also a good idea to maintain the topography of the landscape and keep a slight slope to create drainage. You can control the slope with the help of a bubble level, or simply by placing a bet on your eye.
4. So that your path does not “float” during rains or snowmelt, create a drainage layer 5-10 cm thick, using sand with gravel or fine gravel for this purpose. Clay and even plastic wrap will do. And their combination is even better.
5. After creating a waterproofing pad, you can proceed with the installation of saw cuts. To make the path fairly even, you can use a rubber mallet, which, with light movements of your hand, will equalize the height of all the laid cuts.
This is useful to know
Of course, there are some nuances and individual moments that necessarily arise when laying a path from wooden saw cuts - it is important not to miss them, and then the path will be a feast for the eyes.
First of all, you should remember about the filler, which will fill the space between the cuts, at the same time being a good fixer. As a filler, you can use a mixture of sand and gravel or something else that is free-flowing. It is necessary to fill up the filler as the installed saw cuts will shrink in depth.
To achieve the greatest decorative effect, choose those cuts on which the pattern of annual rings is more clearly expressed.
Photo-processing of cuts or stumps
For those who have better access to materials, it makes sense to advise bitumen, which is melted in metal containers, usually larger and more powerful than drying oil. They are treated with the lower part of the cuts, as it will more often deal with moisture. The upper part is covered with varnishes that are not afraid of temperature changes and are resistant to abrasion and humidity.
A wooden walkway is the most environmentally friendly solution, closest to nature. Therefore, if her environment also begins to resemble nature, do not rush into decisions. We are talking about weeds, which, surrounded by a tree, feel in their element. Often it is the blades of grass and blades of grass that make their way between the saw cuts that give the path an even greater natural look. If you prefer a more cultured setting, use seeds that are easy to trample on and make excellent soft bedding. On such a road as along a forest one can walk barefoot, and I don’t even speak about the mood from such a walk. One “but” - you will have to constantly monitor the height of the grass, otherwise a pleasant flowering view may soon turn into an abandoned one. Although this may appeal to someone.
We build a path from stumps (video)
As the main element, in addition to saw cuts, they are also used. With their help, you can create truly amazing work. To make the track even more spectacular, it is recommended to use stumps of different diameters, which will make the track look like a mosaic. Stock up on stumps, based on the intended length of the future path, and proceed with laying. Its technology does not differ from that used when laying saw cuts. Unless the depth of the trench will be different. If the height of the stumps used is 15 cm, then the depth of the trench will be no less.
You can arrange the track in a variety of ways. You can use both large and small stumps. You are required to harmoniously combine these dimensions so that the whole track looks organic.
If you are against greenery among saw cuts, then it is better to process the space between them with a special mixture that will prevent weeds from growing - this way you will get an absolutely clean path.
You can generally move away from using round shapes and use ordinary boards instead of stumps. They can be of different sizes, both medium and long. It is only important to observe a thickness of at least 5 cm, so as not to worry about the safety of the track after the spring snowmelt.
The easiest option, of course, is a straight path from the boards. The very shape of the board greatly simplifies the construction of such track geometry. But why do we need simplicity, if we suddenly want something more sophisticated? After all, winding boardwalks are a strong design move, albeit requiring more effort.
Adding entourage
In many cases, it is important not only to create an object, but also to decorate it. If your design fantasy does not want to calm down after the completion of construction work, take on the design ones.
For example, decorative stones or pegs will help to revive the newly built path. Stones can be used in the same size, or you can combine large with small, adhering to the same principle of alternation as when laying different-sized stumps. And if you add small ones here, you will achieve good juiciness and brightness of the composition.
Pegs can also diversify the overall appearance of the track. Their height is in the range of 10-15 cm, and they are especially well combined with flat boards equipping the track. Tie them with a rope or wire, and they will immediately look advantageous. And if you want to add colors and diversify the color - decorate the rope with artificial flowers.
When you complete the construction of the track, you will feel like a real creator. In addition to you, this work will be admired by your relatives and friends, as well as friends and neighbors who will come to visit for tea, and maybe they will come again and again to admire the fruits of your efforts. One way or another, the result is clearly worth the effort.
One can only envy those who have the opportunity to make paths out of wood. Wooden paths attract the eye even in the most prestigious property. Walking barefoot on them is an inexpressible pleasure: there are pleasant tactile sensations both in the heat and in the cold. Of course, the paths must be suitable for the landscape and be suitable for the conditions of use.
Saw path in the gardenFeatures of wooden paths.
We have already noticed that, unlike other materials for paths, wood has a low thermal conductivity, and it is pleasant to walk on it barefoot. We note other positive qualities of country paths of this kind:
- available material in some cases;
- ecological cleanliness;
- low complexity and labor intensity in manufacturing;
- unique appearance of each track;
- available and limited list of necessary tools.
Unfortunately, there are also disadvantages:
- sun cracking;
- rotting under the influence of moisture;
- destruction by insects;
- instability to fire;
- wet surfaces become slippery.
Note that the fragility of the tree is balanced by the ease of repair. Of course, wooden country and garden paths will last longer in a dry climate and subject to the laying technology.
Walkways made of sawn wood
 Options for laying wood saw cuts
 Garden paths made of sawn wood are popular and attract attention with their unusualness. When using this technology with your own hands, you can easily create variations with a change in width and direction, and without the use of a border. Saw cut paths are especially appropriate in a rustic and eco-style landscape.
As you can see, the gaps between the wood can be filled with fine gravel, gravel, soil, covered with pine needles or be planted with grass. On a decorative path, as well as when it is rarely used, saw cuts are laid at a step distance.
Wooden paths can have steps and serve as retaining walls when the ground level changes.
Material preparation
When preparing wood and paving the path, you will need the following tool.
 For a track from saw cuts, it is recommended to use the following wood:
- larch;
- pine;
- Birch.
 Preparation of saw cuts for the track
 If possible, it is best to use larch as the most durable option. It can last thirty years. The service life of pine is 5-10 years. Small-diameter saw cuts are placed between large-diameter workpieces, ensuring maximum web density. Logs are sawn into pieces 10-20 cm high. The path of stumps, peeled from the bark, will last longer. If the cut surface is perpendicular to the log, the installation of the coating will be easier.
 Saw cuts processed and ready for installation
 To protect against decay, the blanks are processed in two stages. First, they are impregnated with hot drying oil or a special ready-made antifungal impregnation. Dipping saw cuts in boiling drying oil is cheaper, but more dangerous than treating with an antiseptic. After complete drying, the lower parts of the pieces of wood are covered with hot resin. In this case, it is also more convenient to use bitumen diluted in gasoline, which is called automobile anticorrosive. The upper planes of the cuts can be forcibly "aged" by treating with copper sulfate.
Track laying
 Trench ready for paving
 Before paving a path from slices, it is necessary to carry out preparatory work on the site:
- perform track marking;
- remove the fertile layer and dig a trench;
- equip waterproofing and foundation.
It is convenient to mark the contours of the path with pegs and a cord, or fill it with sand. A groove is dug in depth 10 cm more than the height of wooden blanks.
 Geotextiles, crushed stone and sand are laid in the trench
 The bottom of the trench is leveled and geotextiles are laid on it, which allows water to pass from the upper layers, but does not allow crushed stone to mix with the ground. Then they fall asleep and lay a layer of crushed stone 5-10 cm high. On top of the gravel, 5-10 cm of sand is poured, which is moistened and rammed. Ideally, another layer of geotextile should be laid between the sand and gravel.
 Saw cuts are set according to the level
 Pieces of logs are sequentially placed on a sand bed and hammered into it a little with a rubber mallet. From saw cuts, you can draw a picture or mount them, focusing on ease of installation. The work is easier to do, starting with larger elements. The upper planes of the pieces of wood are set according to the level. The gaps between the tree are filled with fine gravel, gravel, soil or sand.

Plank paths
A wooden path in the country can be made with your own hands using an edged board. This work is much easier than laying saw cuts. At the same time, the quality of the material used and the level of its processing determine whether it will be the simplest paths or paths with high decorative properties.
As in the case of saw cuts, larch is the best wood, and pine is the most popular option. Timber flooring can be made above the ground at a height of about 10 cm, laid on the surface of the ground, or it is in the ground. The recommended coating thickness is at least 40mm.
 Winding boardwalk
 To extend the service life, the flooring material is first treated with an antiseptic and then painted. If you want to preserve the structure of the tree, the wood is covered with stain and yacht varnish. To organize paths in a cottage of complex shape, boards of different lengths and with a variable width of one element are used.
Experienced builders must leave a gap of 5-10 mm between the boards to compensate for the expansion of the material when wet.
 Flooring and logs from the same boards
 Before installing the flooring, it is recommended to equip the base for water drainage. To do this, a trench about 15 cm deep is opened, into which geotextiles, 5-10 cm of crushed stone and 5-10 cm of sand are successively laid. Crushed stone and sand are compacted in turn. The frame for flooring above the ground is mounted on logs made of timber or boards. They must be sequentially treated with an antiseptic and resin, they can be wrapped with roofing material.
Between the lags of the boards, crossbars are installed through each running meter. This will not allow the lags to fall to the side. The flooring is attached to the supports with nails or screws. To ensure the same gap of 5-10 mm between the boards, bookmarks from thin rails are used.
 The path is laid directly on the ground
 Wood flooring is easier to lay directly on the base. To mount the track, the boards are put on two cables through pre-drilled holes. Between the individual elements, pieces of plastic pipe are put on the cable to ensure the same gap.
 The path from the boards is convenient to use on the sand
 The decking elements can be attached to a fire hose or garden edging. In this case, the screws are screwed in from the side of the tape, and then the finished track is turned over. Such a path can be rolled up and hidden from the weather for the winter.
 Easy to walk on buried wood
 The path made of boards laid at the level of the soil surface looks original and easy to use. In this embodiment, the material is in conditions of high humidity. This means that it is imperative to arrange the above-mentioned preparation of sand and gravel. The gaps between the individual elements are covered with rubble. Wood must be preliminarily and carefully treated with protective impregnations and coatings.
Decking laying
Wooden paths are very attractive in appearance, but short-lived. To solve this problem, a synthetic material has been developed - decking. It is made up of shredded wood and plastic. A terrace board made of such material is very stable in atmospheric conditions and does not need additional coating. Of course, decking is much more expensive than regular lumber, but its appearance and reliability are worth it.
 Decking looks great on the lawn
 Note that with noticeable bends, the terrace board may crack, so for laying the decking, you will have to equip a fairly even and reliable base. It is best to prepare in the form of a cement screed. The installation of the coating is carried out on logs made of the same material, with a step of 0.2-0.3 m. When laying them, it is necessary to provide a gap between the individual elements of 3-10 mm for water to drain.
 The appearance and stability of the decking is undeniable
 Along with decking, you should purchase all the necessary components for assembly: corners, plugs, connecting brackets, end strips and hardware. Self-tapping screws should be tightened with sufficient force, however, excessive diligence can lead to the destruction of the material. Fasteners are closed with plugs or painted. In the case of a closed connection, no mounting elements are visible. The material must be unpacked the day before use. Do-it-yourself decking from decking is assembled only at a positive temperature.
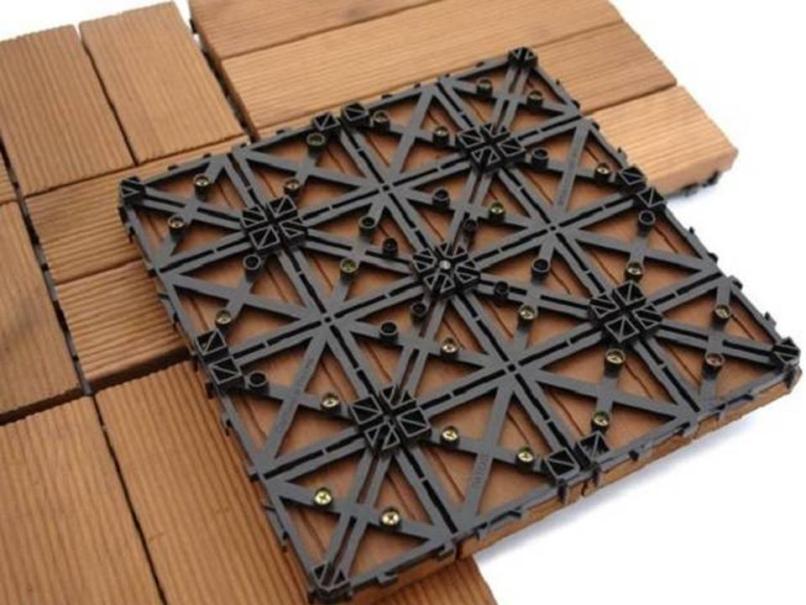
There is a decking option in the form of tiles for garden paths. Such elements consist of several boards fixed with screws to a plastic base. Separate tiles are fastened together with the help of special locks on a plastic grid.
 Tiled flooring is eye-catching
 A tile garden path looks flawless, but is even more expensive than regular decking. Plastic locks will fail with significant distortions, so it is necessary to prepare a fairly even base for the flooring.
Photos and examples
Of course, any work is easier to do with interesting role models in front of your eyes. Sometimes it's better to see once than hear a hundred times. We have tried to find for you the most interesting examples of photos with comments.

Often, saw cuts are laid without removing the bark. From a perfectly even calibrated log, you can make paths of geometrically regular shape. The path of stumps in the garden makes it surprisingly cozy. The path of wooden saw cuts organically fits into the surface of the lawn.

Any gardener wants to walk on his site along beautiful and well-groomed paths. Given the desire of most people to be as close to nature as possible, the choice of environmentally friendly natural materials does not seem surprising. A path made of wooden saw cuts fits into almost any landscape in the best possible way. When making it with your own hands, it is important to take into account some of the nuances.
Path from wooden saw cuts: pros and cons
Of course, a saw cut path will look spectacular on a garden plot, but before deciding on this choice, be sure to weigh all the pros and cons of this option.
Advantages
- The use of natural material is a top ten for eco-style lovers and just for those who know a lot about landscape design.
- You can create a drawing from saw cuts solely according to the will of your imagination, and it will be completely unique. Width, distance between saw cuts, voids between them or filling with soil / small gravel, pebbles - all this is up to you to choose.
- A saw cut track is made much easier than many other options, and often cheaper. After all, you can get saw cuts yourself if you have a quality tool.
- Actually, tools: they are usually used by a summer resident, and in principle it is not difficult to get them.
Difficulties
- Unfortunately, for all its environmental friendliness and attractiveness, wood is not the most durable material. Of course, you can take measures to make it last longer, but still the average life of such a track is less than other options.
- The second point, in general, explains the first. These are bacteria and mold, which gradually slowly begin to reach the wood surface and sooner or later will lead to the fact that your path will lose both strength and beautiful appearance.
- The wood burns well. This is not news to anyone. If you are a fan of burning fires and having picnics with barbecue right on the site, try to do this as far as possible from the wooden path.
In fact, there are few negative points here, as you can see. And the main one is the fragility of wood as a material. But gardeners are not repelled by this quality of the chosen path, especially given the simplicity and ease of its creation.
Video: wooden garden paths (including saw cuts)
Track options
In fact, there is no strict classification and a certain amount. Everything is limited by your imagination. However, many of the existing tracks can be combined into certain types according to the presence of similar external features.
With randomly laid cuts
One of the most free interpretations of such a track. Group saw cuts by size, arrange them in groups of three, four, five elements, and so on - this option is often chosen by people with a designer vein. If you don’t have a clear idea in your head about how your saw cut path should look like, place them as you like and don’t regret what you did.
Smooth layout
Here, too, only you set the rules. You can lay it in strips using only a certain diameter, create a certain rhythm based on the alternation of the selected sizes, or you can create a beautiful mosaic, turning the track into a work of art. If your imagination is completely subordinate to you and gushing with ideas, it will not be difficult to come up with your own version.
Ribbon
The narrowest of all options, based on the choice of one strip of saw cuts of a certain diameter. The tape saves space in width and at the same time is the simplest choice when you do not want to spend a lot of time and money.
Stairs
A wonderful solution in those areas where there is a level difference that you want to decorate beautifully. Climbing such an impromptu staircase, you become even closer to heaven and nature itself.
Border
Saw cuts are used only as a frame for the track, but nevertheless, this option looks impressive and often looks even more appropriate if chosen in accordance with the style on the site.
According to the type of execution, the path of saw cuts is divided into the one with filling the voids between them and the one without filling. Of course, filling makes the perception of the image of the track whole and gives it more strength. But not everyone wants to use something other than wood in the path and prefers to leave free space, which will very soon be overgrown with grass, which will also look very nice.
Photo gallery: various types of saw cut tracks
Saw cuts can be useful for creating borders - an attractive element of garden design.  A vivid example of an arbitrary arrangement of saw cuts with gravel filling of voids
  Rhythm in the track gives more order
  The stairway makes the transition between levels very picturesque.
  Tape track - the simplest option, often serving as a purely symbolic track designation
Selection and preparation of materials
If you are preparing cuts for the path with your own hands, choose only well-dried logs for sawing. To work, you will need a high-quality chainsaw (well, or an electric one, if only it was, otherwise you will sweat much longer with a regular saw).
Remember: the saw cuts must initially be dry, and not dry already being laid out on the track - in this case they will quickly deteriorate and lose their whole appearance.
The type of wood has a direct impact on the durability of the track. It is clear that conditional oak will serve for several years longer than pine, but at the same time, the cost of such material will be incomparably higher. In reality, a person simply takes what is closer to the point, what turned out to be nearby at the right moment. And let some element of the track quickly fail and rot - it can easily be replaced by another.
When cutting saw cuts, make them at least 10 cm thick so that they are not pancakes, but saw cuts, part of the height of which will play a kind of foundation role. Ideally, their thickness should be in the range of 20 - 25 cm. The strength of the track is simply necessary, and the longer the saw cuts are, the less likely it is that the stumps will fly out of the track or stagger. Not only trunks will go into action, but also thick branches - their diameter is smaller, and they will fit perfectly into the space between large elements.
The bottom layer, located in the ground, must be impregnated with a protective compound, because it accounts for the most aggressive environmental impact.
It is very important to protect the tree from premature decay. To do this, the entire bark is removed from the cuts, since it is she who begins to rot faster than anything else. The lower part of the cuts is impregnated with bitumen. It is the part that will be in the ground, and which needs additional protection. Instead of bitumen, you can use hot drying oil. However, both of these materials are quite dangerous when heated, and if you are unsure of yourself, you can resort to the help of modern antiseptic compounds that impregnate the tree, extending its service life, and at the same time protecting it from insects.
Video: how to make a saw cut tree
Step-by-step instructions for creating a track and border
The process of laying a path from wooden saw cuts is quite simple, but it must be treated with all the attention. It is carried out in several stages.
- Marking is the very first of all stages, the moment when you determine where and how the track will run. It can be straight or with curves, reduce the distance to the nearest objects or, conversely, increase it. Its minimum comfortable width for one person is 35 cm. For marking, place pegs with a stretched rope along the edges of the future path and evaluate your idea from the side, coming from several angles. This is the stage when everything can change.
- Foundation preparation is the future fixation of wooden saw cuts. The strength of the track depends on it, including its durability. Dig a trench where the path will be. Its depth is easily calculated - 5-10 cm are added to the saw cut length (the softer the soil and the greater the impact on the track, the greater the depth). With the width, everything is much simpler - it is equal to the width of the track.
- The bottom of the trench is covered with a protective material, whether it be a simple film or a geotextile. The next layer is small crushed stone or gravel, which will act as a drainage and protect the saw cuts from moisture. This layer is usually half of the specified height (i.e. somewhere between 2.5 - 5 cm) and requires good compaction. If you want to achieve the most even layer, use the building level.
- Creating a border. This stage is one of the others if you are planning to make a border out of saw cuts. It is erected even before the main part of the track is laid. The border is especially necessary in areas with loose and sandy soil.
- Now it's time to lay the second layer, which will consist of a sand cushion 5 - 10 cm thick. It also needs to be compacted, so to achieve maximum effect, periodically moisten the sand with water.
- Installation of cuts. Create distances between elements or leave no free space at all, filling it with cuts of small diameters. Alternate, set the rhythm, create a pattern - everything is up to you. The main thing for the track is a flat surface, the stumps should not vary in height, so that you do not have to stumble over them later. To do this, they need to be slightly imbedded and match the level.
- The last step is decoration. The space between the cuts can be left empty, or you can fill it with fine gravel, sand, or even earth with grass seeds, which will nicely make its way among the path. The saw cuts themselves are sometimes painted to give the track brightness.
Photo gallery: stages of work
Crushed stone or gravel can be used to fill the voids between the cuts, depending on their area Using a sledgehammer or hammer, you can carefully align the cuts
 Care
Without care, even the most beautiful path will quickly lose its attractive appearance and quickly fall into disrepair. Every year, do not forget to clean the surface of the saw cuts with a metal scraper and treat it with a protective compound in combination with drying oil or paint.
Do not forget to leave a few saw cuts in reserve while laying the track, so that if necessary, you can quickly replace the failed element.
A wooden walkway can become slippery after rain. To avoid this, treat saw cuts with a special compound and do not pay much attention to their polishing.
Video instruction: how to make a path from saw cuts with your own hands
A path made of wooden cuts is the best option when there is a desire to save money and at the same time work with your own hands, turning another corner of the garden into a work of art. Gardeners often opt for a tree despite its relatively short service life, because a saw cut path looks very impressive, especially in the first years of its service, and it is not difficult to update it.
What to make from tree cuts? Of course, garden paths, which you can even walk barefoot on, if you prepare everything correctly. The process of work is quite laborious, but even a novice builder can cope with it.
- Logs or ready-made cuts that can be bought at the store.
- A large wooden hammer (mallet) for leveling saw cuts in height.
- Shovel and brushes.
- Gravel, sand and river pebbles.
- Chainsaw.
- Level.
- bituminous mixture.
- Geotextile.
- Drive in pegs around the perimeter, marking out the width and direction of your paths.
- Stretch a rope between them so as not to deviate from the boundaries when excavating the earth.
- Go through the markup to determine if you have set enough width.
- Stage 1- impregnate logs with an antiseptic that prevents rotting. Or - as an option, a solution of copper sulfate and water in proportions of 1:10. The vitriol will change the color of the wood and make it look like a moraine. It will turn out beautiful.
- Stage 2- dry the saw cuts, making sure that the solution is absorbed properly.
- Stage 3- dip the bottom of the logs into the bituminous mixture and leave them to dry completely.
- Lay gravel on the bottom - this will be a drainage layer that prevents stagnant water.
- Cover the gravel layer with geotextile.
- Pour sand on top in thin layers, pouring water over each layer and tamping it down. You need to ensure that the layer is maximally compacted and the logs do not fall into it at the slightest pressure. Cushion height - 10-12 cm.
- Wood. Ready-made bars or logs, cut lengthwise.
- Brick. Convenient - just lay it with the end around the perimeter.
- Stone. Free option. Just pre-select river boulders that will frame your path from wooden cuts.
Show all
Tools and materials
For work you will need:
The list is small and quite accessible even to pensioners.
Plan-scheme
Before taking on the main work, outline the location of the track from the cuts. Do not expect that you can make a path by eye. It will be crooked, oblique and completely ugly, so pick up pegs and ropes and mark the territory, paving the route between flower beds and flowers.
Only after marking the garden path from the saw cuts of the tree, you can take on the next stage of work.
Cooking cuts
A tree cut is a log cut into logs of a certain size. The height of the log block is from 10 to 20 cm. If you do more, you will have to dig a deep trench. If less, then the saw cuts will not hold well in their nests. Cut them with a regular chainsaw and try not to warp the cut - walking along such paths will be extremely inconvenient. To bark saw cuts or not - it's up to you. Everything depends on your desire. But it is necessary to process the saw cuts of the tree before laying.

Garden paths made of wood prepared according to the rules will last several times longer. Therefore, do not neglect the preparatory work.
trench preparation
Dig a trench, focusing on the markup. Depth - 25-35 cm (depending on the height of the cuts that you have prepared for laying).
![]()
After preparing the trench, you can proceed to further work on the construction of a garden path from saw cuts with your own hands.
With or without a border?
If you decide to make paths in the country from wooden saw cuts with curbs, then you need to install them before you start laying logs in the trench. You can use for these purposes:
Which border you prefer - decide for yourself. It all depends on your taste and general concept.

Proper styling
When laying logs in a trench, try to place them as close to each other as possible. If there are both large and small in diameter, then combine them, assembling them as a constructor. If you want to make a pattern of wood cuts on the path, then place them in a certain order. As you lay out, tap the logs on top so that they are on the same level. That's what the wooden mallet is for - use it. Fill gaps and gaps with river pebbles - it will turn out beautifully and neatly.
Another way to fill gaps is to mix sand with clay and fill in all the gaps. Then you can sow grass or plant moss in this mixture to make the wooden path look more elegant.
Aftercare
Garden paths need to be looked after. Otherwise, they will look abandoned and sloppy. Of course, this does not mean that you need to clean them every day armed with a mop and a broom - but once a year it is necessary to do this.