) is a device whose main function is to transfer paints, primers and various water-chalk solutions to the surface by spraying. A torch of tiny paint particles moving with high speed, is formed due to the fact that in a special chamber liquid paint mixes with air and is pushed out of the nozzle under pressure. The spray gun has compact dimensions and is easy to use.
Homemade spray gun. Click on photo to enlarge.
If you have to paint a small car part one time, then it is not at all necessary to purchase an expensive factory-made sprayer. A little patience and skill - and you have a homemade spray gun in your hands. Such a device can be used not only for painting cars, but also when carrying out repair and finishing works in an apartment or when restoring furniture.
Those who already have experience with a homemade sprayer say that this is not just saving money on the purchase of professional equipment, but an opportunity to improve the quality of car painting, since a homemade device can be customized as much as possible, which is not always possible achieved when using factory spray guns. But first of all, the sprayer must be manufactured, and manufactured correctly and conscientiously. We present to your attention several ways.
Method one
You can make it yourself if you have a piece of foam on hand, unnecessary plastic container with a wide neck and the most ordinary fountain pen. It is better if the foam is compacted, for example, such as is used for thermal insulation of a balcony or sound insulation of plasterboard partitions.
It is necessary to cut a blank from foam plastic whose lower end will fit tightly into the container. Try to find a bottle with as wide a neck as possible. Make several holes in the upper part of the foam blank, preferably using a drill, so that they are neat:

A piece of an empty pen refill is inserted into the vertical hole, and the body of the same pen is inserted into the horizontal hole. At this point, the assembly of the spray gun can be considered complete.
The process of painting a car using such a device is as follows: you hold the bottle so that the paint flows out through the rod, and blow into the tube (the body of the pen). The intensity of the paint spray on the car body will depend on how much you exhale into the tube. Before you start painting, it is better to practice on some other surface. Move your homemade spray gun carefully and slowly, and you will definitely succeed.
The main thing in this matter is patience and a certain supply of consumables. Of course, without sufficient experience in the field painting works and using a homemade spray gun, you will not be able to immediately achieve the appearance on the car body paint coating premium. But with the creation of a dense layer of large drops of paint on the surface large area you will surely succeed.
How can you improve your homemade spray gun?

"Upgraded" spray gun. Click on photo to enlarge.
If you want to use a homemade spray gun for finer, more delicate painting, it will need to be modified. Arm yourself with the drill again and make a couple more holes: one vertically and one in the handle body.
Another rod is inserted into the new vertical hole, and not necessarily the same diameter as the first. You can use a thinner one. This move is made to create more pressure in the paint bottle with less air being blown into the tube. Thus, the paint flow will be more intense, and your effort to pump air will be reduced.
Another rod is inserted into the hole that you made in the body of the pen, inserted horizontally. After these simple manipulations, you will have a full-fledged spray gun for painting a car. With its help you can form quite high-quality coatings, and also use a thicker working mixture.
Note!
Some components of paints and solvents used in car repairs are aggressive and therefore incompatible with polystyrene foam. In this regard, it is advisable to use homemade spray guns made using polystyrene foam in the process of applying paint and varnish materials for cars on water based. If you have to work with more caustic compounds, foam can be replaced with rubber.
Method two
Using this algorithm, you can make a more reliable universal spray gun with your own hands.

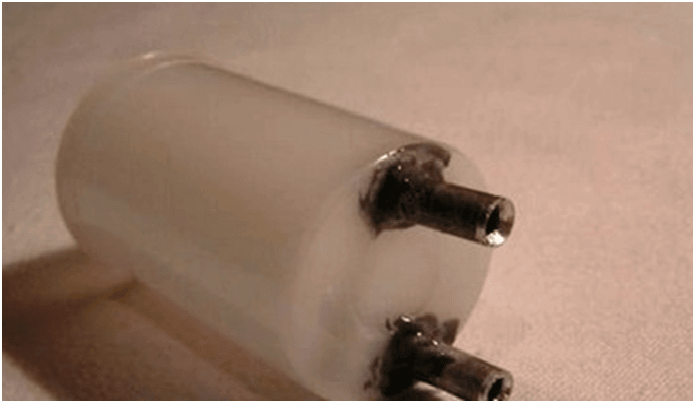
The device of a spray gun made of glass jar(scheme). Click on photo to enlarge.
Prepare a plastic or glass bottle with a working screw neck having a diameter of at least 20-25 mm.
The second device is a tube made of copper or aluminum with a diameter of about 4 mm and a length of 20 cm. It should be bent and fixed at one end (lower) with a tip for a hairdressing spray bottle or a vacuum cleaner hose, and at the other (upper) with a nozzle made of brass rod .
The bakelite handle can be used as a handle. If it is thick enough, then a groove is cut along the profile of the tube that you bent before, into which the handle is attached with screws.
Select a tube with a diameter of 2 mm, preferably made of copper. It will be used as a suction tube, so its length should match the height of the paint container. The top edge of the tube should be tapered and thoroughly cleaned. Insert this tube into the socket from the plug connector, made of brass.
From steel sheet make a bracket with a hole shaped to match the dimensions of the socket.
Assemble the prepared parts so that the tapered end of the suction tube is at the level of the nozzle. Make a few test sprays to check and adjust the spray quality if necessary.
The suction tube should be fixed with glue or soldering in the socket, which, in turn, is glued to the lid of the container.
Tighten the nuts to the desired position of the paint container relative to the nozzle.


Do everything carefully and consistently, and you will have a complete tool for high-quality painting car. In the future, it can be used for other purposes, for example, for restoring furniture or even for spraying large indoor plants.
Method three: DIY mini spray gun
This spray gun is suitable for painting small areas of a car, since it does not require a large container of paint. The main “spare parts” for such a small spray gun are a medical syringe and a pen.

Construction of a homemade mini-spray gun (diagram). Click on photo to enlarge.
The point of the syringe needle should be ground off and the chamfer should be carefully removed. We remove the ball from the tip of the pen, and shorten the rod so that the part is 0.5 mm shorter than the needle, because in the future the rod will be put on the needle, and the latter should protrude slightly from the hole where the ball was. The end of the rod that was cut needs to be slightly flared so that it fits better onto the base of the needle.
In the middle of the rod, make a hole for a piece of the same rod, which is soldered at an angle of 45°.
Another one important detail– this is the source compressed air. We propose to use as such a siphon for soda, preserved from Soviet times. We solder a tube into the spout of the siphon, onto which you can put a red medical hose, and solder a nipple from a bicycle wheel into the body, so that you can then use a pump to pump air into the siphon.
So, all the details are prepared, you can start testing the spray gun. We disconnect the needle and other “equipment” from the syringe and fill up half of the liquid filtered paint. The second half of the syringe volume should be filled with air. We put a needle and a rod with a connected hose onto the syringe. The spray gun must be kept in right hand so that you can press the rod with your thumb. At this time, use your left hand to operate the siphon lever to open the compressed air supply.
Be careful, as the paint may splatter in large drops at the very beginning, so it’s better to do a few test spritzes on another surface, and then move on to painting the car body.
If you need to paint small area, there is no need to press on the rod, since the paint will be pushed out of the syringe under the influence of air expanding from the heat of your hands.
Addition: "blower" from the refrigerator compressor

Construction of a homemade “blower” (diagram). Click on photo to enlarge.
A device for supplying air to a homemade spray gun can also be made from a compressor from a faulty refrigerator. The compressor must be cut, the rotor and windings removed, and a pulley from washing machine. The structure is installed on wooden base and secured with steel tape.
On the same basis we attach an electric motor with a power of about 50 W with a handle from some radio device as a pulley. The diameter of the handle should be about 3 cm. Instead of a drive belt, we use a belt from a sewing machine.
Thus, after spending a few hours of free time, you get a complete tool for painting a car. This is a direct way to save money on the purchase of an expensive professional spray gun, as well as the opportunity to reduce the consumption of car paint, which is also expensive. However, do not forget that a homemade spray gun made to last is only half the success. The second half is the ability to use it. Don't be afraid to experiment, and good luck with your renovation!
Are you still painting with a brush? Then we go to you! Let's go tell you how to make a spray gun with your own hands and paint quickly and without smudges. The device is completely simple, and using ingenuity and imagination, you can make the unit no worse than the factory one!
How to make a spray bottle with your own hands from a ballpoint pen?
We're not kidding at all - a spray gun can be made from an ordinary ballpoint pen in a matter of minutes. The mini spray bottle will work from a small glass or plastic bottle. You will spend too much time painting a large amount of work with such a device, but for small crafts or painting small parts, the device is quite justified, moreover, it even has some advantages. So, you will need a square piece of plastic, rubber or foam and, of course, a ballpoint pen. In principle, any one will do, either collapsible or solid, from which only the tip is unscrewed.
First, you need to disassemble the handle - remove the paste and unscrew or cut off the end part. In short, you should have a hollow tube through which you can blow freely. We warn you in advance that this tool will work from your “traction”, however, below we will consider automated options, the main thing is to understand the principle! The cone-shaped tip (the one at the bottom of the handle) needs to be cut off a little to create a wider hole. You can experiment with its diameter - written ballpoint pens are found in every home much more often than writing pens, right?
The removed rod also needs to be disassembled and cleaned of any remaining paste with alcohol. We don't need the writing ballpoint tip; you can throw it away right away. Now let’s look at the “body”: you need to cut a corner out of a piece of plastic (rubber, foam). In both walls of the corner you need to carefully drill or pierce holes for the rod and tube. They should hold tightly in the holes; if the holes come out a little larger, it makes sense to lubricate them with glue.
We come to the most important thing - the rod, which is from the paste, should slightly extend into the hole of the tube, only 2-3 millimeters. When you align the rods in correct position, you will actually have in your hands a ready-made paint sprayer, created with your own hands. Test it in action - dip the rod into a bottle of paint diluted to a liquid state and blow into the tube. At the junction of the rods, a vortex of air is formed, which lifts and sprays the paint. If the paint doesn't lift, it's too thick.
How to make a spray gun with your own hands - complicate the design!
If you are the happy owner of a compressor, then why not make a spray gun that is inexpensive, convenient and functional. Of course, you can’t paint a car like this, but for many less painstaking jobs, such as painting furniture or walls, it will pay off. Plus homemade apparatus The fact is that its simple design does not require as much care as a factory one, and you will save a lot of money on solvents.
In addition, the spray gun you made will work even with a weak compressor producing 150-200 liters of air per minute, while professional devices require more powerful compressors.
You can make it in a couple of hours maximum. From Supplies you will need three gel pen refills, empty of course, the pen body itself and half a meter of thin hose. To make a convenient pistol-shaped case, you will need two blocks, seven self-tapping screws to fasten the parts, the most commonplace cover from plastic bottle soda bottle and three strips of thin sheet metal.
How to make a spray gun with your own hands - step-by-step diagram
Step 1: Screw on the lid
We screw the lid of a plastic bottle onto the edge of the block with the back side using two self-tapping screws. The screws need to be screwed in so that a hole can be drilled between them, exactly in the center of the lid. This is what you will do once it is secured. For the hole you will need a thin drill, just the diameter of the gel pen refill.
Step 2: Rod with tip
The rod through which the paint will flow should protrude from the bar with a metal tip a few millimeters. The tip is needed to ensure that the coloring composition flows evenly. Use the remaining rods to extend the main one.
Step 3: Air Tube
We attach the body from the handle from the end to the hose and fasten it on the side where the rod comes out with a metal tip. The cone-shaped end of the handle body should be in contact with the tip so that the latter protrudes slightly above the lower edge of the cone hole.
Step 4: Shut off the air
Of course, no one will turn the compressor on and off every time in order to take a second pause in applying paint. To do this, just pinch the hose. And to make it possible to do this with one hand, we will drill two holes in the block. The hose will go into the hole that is closer to the tip, and out into the next hole, forming a loop. By carefully placing a handle near the loop to hold the entire structure, you can pinch the hose with your fingers. Of course, you can come up with a more complex design by attaching an air supply regulator - it’s up to you!
All that remains is to screw the paint container to the lid and connect the hose to the compressor to get the job started! For such a sprayer to operate, a pressure of one and a half to two atmospheres is sufficient. If we classify the tool, then we have it. This means that the material will be used sparingly, and the quality of painting or varnishing will be at its best!
Why do vacuum cleaners need reverse draft - the answer to the secret!
Many owners of vintage “Rocket” type vacuum cleaners for the most part have no idea why such units have the ability to switch the motor not only for air suction, but also for blowing. IN modern units You won’t see such a function anymore, so why was this done in Soviet products? In fact, if by some miracle the box with components has been preserved, you may well be able to find a ready-made nozzle for a spray gun among them! If it is lost in the years, it will not be difficult to make a spray gun with your own hands from a vacuum cleaner.
For successful work The device must meet one condition - constant pressure. For this, a receiver is used - don’t be afraid of this word, it could very well be an ordinary soccer ball or a car wheel. Pressure reducing valve will help you control throughput unit. Otherwise, the design repeats the previous version!
Having built a housing into which you can screw a paint tank, set up a vacuum cleaner and made a receiver, all that remains is to tightly connect all the parts. Tightness is the main condition, because only if it is observed will it be possible to achieve constant pressure. So yours turned out great! You can check the work at water-based paint or lime milk on a simple object. For example, try whitewashing trees!
Motorists can tell about a car body in terrible condition that it was painted with their own hands with a brush. They, like no one else, know that the only way to properly apply paint, especially on metal and plastic, is with a spray gun. Every craftsman can design and create a spray gun with his own hands from scrap materials. All you have to do is go to the forum and evaluate the mini device and find out how it works. In the simplest model used for airbrushing, the designer itself serves as a compressor. When you are renovating an apartment, the amount of work is much larger. It is necessary to use a spray gun for a vacuum cleaner. An electric low-pressure sprayer, a mechanical sprayer, and a cordless spray gun are suitable for small volumes.
DIY spray gun
Benefits of spray painting

Spray gun
I do construction and renovation professionally. In my company I have high and low pressure compressors, electric and pneumatic spray gun for painting walls, an HVLP gun to cover large areas, a mini diffuser for airbrushing. When pouring the floor, my team uses a paint sprayer based on a plastering machine, converted with their own hands, and the guys put on paint shoes. A professional approach requires having a large list of equipment and the ability to work with it. Despite this, I know how to make a spray gun with my own hands practically from waste and unnecessary parts.
My first whitewash spray gun was made from a domestic electric vacuum cleaner. In Europe they don’t know how to adapt objects and mechanisms with their own hands. Their dust collection equipment does not have a return line. For us, an attachment in the form of a lid with tubes was often included in the kit. You can put it on a jar of chalk or lime mortar and make repairs. The pressure was created by a compressor, or rather a vacuum cleaner engine. The pressure gauge and regulator were missing, as was the pistol. If you had to work upstairs, then an assistant stood below and pressed the “start” button. All the same, whitewashing with lime turned out better and faster than with brushes.
The next whitewash sprayer had a pressure gauge and a fishing rod with a large tank. The mini gun had a switch handle and a long tube leading to the nozzle. I adapted a garden sprayer for repairs. He applied the whitewash well. It still works, I use it under Pinotex. There is no regulator on it, but the pressure gauge shows the pressure.
Repair using a spray gun has advantages over classic brushes:
- the coating layer is thinner;
- the paint goes on smoothly;
- drying time is reduced;
- finishing occurs faster;
- saves time and material.
Even a homemade spray gun paints faster. You just need to set it up correctly and adjust the pressure.
Which spray gun to choose

Spray gun for painting surfaces
My friend had completed the house and was now doing the finishing, or rather asking me a bunch of questions while he was my assistant. He knew how to use a spray gun. Together we decorated the dacha with Pinotex. He asked how to choose a spray gun, and what the hvlp marking means.
Depending on the location of the repair, the presence of a compressor and the size of the area to be treated, the choice of spray gun is made based on the drive:
- pneumatic;
- electric;
- rechargeable.
Each paint sprayer has its own advantages in certain conditions, you need to choose the right one. A battery-powered one can be considered electric, only it works on DC 20V.
Pneumatic sprayers are classified by pressure and volume of work performed per shift. The main types of spray guns used in industry and on construction sites:
- the very first HP - high pressure, big losses;
- environmentally friendly and economical HVLP - low pressure, large volume;
- mini LVLP gun for cars and airbrushing – small volume, low pressure.
There are several more types, but they are used much less frequently and are powered by a compressor high power, the air supply is regulated by a pressure gauge.
For household use and car tuning, mini sprayers - airbrushes are used. They can be easily connected to the machine’s compressor via an adapter and a pressure gauge. With their help, you can create coatings for mini surfaces of parts, do car painting and airbrushing.
The design of the spray gun differs in the tank for the composition and its location. He can be:
- top;
- bottom;
- free-standing, connected via a hose.
Different types of spray guns are used to work with paint, chalk, and lime. The following types of work can be distinguished for application:
- spray gun for whitewashing;
- painting;
- airbrushing.
What all models of sprayers have in common is that the paint for the spray gun must be filtered and it is better to make the composition more liquid - add a solvent or dilute it with water.
Based on size and performance, they are distinguished:
- Hand-held spray gun for airbrushing and covering small areas. It is used by motorists when painting rims, bumpers and other parts. Designers use it for painting. These also include an airless spray gun, capable of applying a high-quality layer at close range, and a low-pressure mini gun. A small compressor and a pressure of 2 atm are enough for its operation.
- It is better to carry out repairs of houses and apartments with an electric low-pressure mini sprayer with top tank. You can use a 20V battery sprayer.
- For painting large areas, metal structures, tanks and vehicles, an HVLP and HP gun is used. Their nozzle produces a wide spray and high coverage speed. The equipment operates from a powerful compressor, on which there is a pressure gauge and an air supply regulator.
Now my friend knew how to choose a spray gun, and that the HVLP gun is not suitable for airbrushing and mini parts.
Lime whitening requires special sprayers. Mini gaskets should be rubber. Conventional paint and pinotex guns are corroded by lime. The nozzle must allow larger fractions to pass through. You can use battery-powered models if minor repairs are needed, and mini seals are in stock. The coating application scheme is simple, from top to bottom and each plane from the corner.
Air flow, paint and torch shape - setting up the gun

Making your own spray gun
The choice of spray gun was made correctly. HVLP pistol, with a powerful one I brought electric compressor. Now my friend was interested in setting up the spray gun. We had to start with wooden structure, and Vadik prepared Pinotex to cover it. On my advice, he chose Finnish. The composition is ready for use. Regular paint for a spray gun you need to dilute it. The solvent indicated on the package is suitable for this.
Before setting up the spray gun, I told my friend how it works.
- Air from the compressor is supplied to the gun. The supply can be bottom or side.
- The fast flow creates a vacuum in the paint tube and the liquid rises up.
- The paint picked up by the air passes through the nozzle, is sprayed, forms a conical torch and flies to the surface to be treated.
For adjustment, the gun has regulators:
- air supply;
- amount of incoming paint;
- width and shape of the torch.
To pre-set it yourself, you can take a solvent and pour it into the tank. At the same time, wash the gun from paint residues. The compressor has a pressure gauge, but the air regulator is on the handle.
The paint supply regulator is located on the side under the tank. The nozzle not only allows you to change the size of the mini output hole, but also make the torch flat horizontally or vertically, and change the angle of the cone. Typically, the gun has a screw in the front that regulates the closing of the wide air tube opening by the capillary with paint.
Then we filled the tank with Pinotex and Vadik began repairing the wooden house with his own hands. He applied the primer evenly. I started correctly, from the upper left corner and gradually moved sideways to the right. Strips 2 meters wide were covered from top to bottom, one after another with an overlap. When they moved to the south side, he added solvent. He did it correctly, since light volatile substances partially evaporated without reaching the logs.
Simplicity of design bordering on genius

We make a spray gun for painting surfaces ourselves
I found my father's homemade spray gun in the garage. There weren't even ballpoint pens back then. It was a wide bronze tube with a diameter of 10 mm for air, with a rolled end to reduce the hole. They blew air into it. The creator of the instrument was a compressor, a regulator and a painter at the same time.
A thin copper mini tube was attached to the bottom, the free end of which was lowered into a jar of paint. The ends of the tubes are located close and in the axis of each other. Such sprayers were used not only for airbrushing. Some even painted their cars when doing repairs. A primitive airbrush will paint small details better than a brush
When I made the first paint sprayer, I took my father’s spray gun device as a basis. I made my own airbrush from a ballpoint pen. Only the rod was inserted without a tip into the body, and through drilled hole I brought the vinyl tube into the paint tank. Over time, I connected a compressor from a car to it and even installed a pressure gauge.
The spray gun is convenient device For self-painting walls and ceilings, as well as any other surfaces. The advantage of use is the uniformity of coverage, the elimination of drips and uneven strokes. The paint layer is thin and even. And most importantly, the spray gun is not difficult to make with your own hands.
The principle of operation of a spray gun is similar to an aerosol can or spray gun. The paint is sprayed from the nozzle under pressure. The spray gun consists of a container, a spray gun and a device for pumping air. To supply the coloring composition, you need to press the device lever.
Advantages of the device:
- Painting hard-to-reach and large surfaces.
- Whitewashing with minimal spattering.
- Use for applying stencils.
- Covering surfaces of any shape.
- Precision paint application.
- Speed of application of the composition.
- Painting in several layers with minimal thickness.
- Ease of work.
- Saving coloring matter.
Types of sprayers for painting
Spray guns can be distinguished by the method of supplying the coloring solution:
- Suction. This feed is used in homemade devices based on a vacuum cleaner.
- Gravity flow. The container with the solution is located above the nozzle, the paint is sprayed due to gravity.
- Pressure. The air stream presses on the paint, which is sprayed through the nozzle.
The types of spray guns are:
- Mechanical. The device is useful for painting large surfaces and spraying. Sprays water-chalk and water-based compositions with a density of 1.3 cm 3. It is a metal body with a handle, to which a hose with a spray nozzle is connected. The paint is poured into the body, the handle is designed like a pump. By manually pumping air, the coloring composition is fed into the hose and sprayed over the surface.
- Pneumatic. Air is supplied through a compressor and mixed with the dye. The device resembles a household spray bottle. Can spray paint of different thicknesses due to different nozzle diameters. The spraying method forms tiny particles of the substance that cover the required surface with an even, uniform layer.
- Electric. The air version can be produced with lower and upper containers. The composition is sprayed by discharging the air in the presence of an upper container. The spray gun works like a pump if it has a lower container. The dye is supplied under air pressure of about 8 atmospheres.
Homemade electrical devices have a volume of no more than 1.5 liters, industrial units are produced stationary with a large volume of paint supply.
The advantage of such devices is that they can spray a composition of any density.
- Combined devices combine air and airless operating principles. Two hoses are connected to the spray gun. It moves from the pump along the first hose coloring material. The spray force is adjustable. The inside of the high-pressure hose is coated with a special protection that protects it from compressed air and caustic paints and varnishes. The second hose supplies air to the spray gun. Simultaneous exposure leads to the opening of the spray gun and the solution entering the nozzle. At the exit, the spraying composition takes the form of a torch. Injecting air from another hose helps reduce paint molecules, resulting in a better application.
- Airless. This modification of the spray gun is based on spraying the composition under high pressure of about 500 atmospheres. The device is equipped with a high-pressure hose and a fine-section nozzle. This spray gun is characterized by precise painting without the formation of suspension.
When choosing a ready-made device or creating one yourself, you need to take into account the thickness of the paint. If you plan to apply a thick composition, then the spray gun should be with a container located at the bottom; compressed air will be supplied to it.
You can make a spray gun with your own hands at home different sizes– from a mini spray gun to a device for large-scale construction work.
Making a spray gun using a vacuum cleaner
Materials and tools: household vacuum cleaner old model, paint container, polystyrene foam, pressure reducing valve and fasteners.
Procedure:
- It is necessary to change the direction of traction in the vacuum cleaner by changing the position of the terminals on the rotor and starter. The thrust should be reversed.
- Take a two-liter paint can.
- You need to make a stopper for the container. Styrofoam is suitable for this. The stopper should fit the diameter of the container. The construction of the plug must include a protrusion.
- Two holes are made in the cork. They need to be drilled, not pierced or pierced with a screwdriver. Drilling will not damage the foam. The first hole serves to supply air, the other will supply the coloring composition.
- They make a second plug; it is needed to connect the hose from the vacuum cleaner and the sprayer.
- The pressure reducing valve can be a nozzle from an old spray gun.
- The hose from the vacuum cleaner must be connected to a container for the coloring composition. Fix the pressure reducing valve in it.
- When you turn on the vacuum cleaner, pressurized air flows into the can of paint solution.
- Pressing the valve causes splashing.

Making a spray gun from an aerosol can
Materials and tools: aerosol can, bicycle wheel nipple, plastic container, bicycle pump, cold welding, hacksaw.
Operating procedure:
- The nipple is separated from the wheel. It allows air to pass in one direction - this property is useful when building a spray gun yourself.
- A plastic bottle will act as a container for the dye. It must have a lid.
- The top part of the can is sawed off - this is the spray module. The selection of an aerosol can is determined so that its top matches the diameter of the bottle cap.
- The bottle will be used as a storage unit for pouring the coloring composition. A hole is made in the side of it, which coincides with the size of the nipple. It must be sealed tightly using cold welding.
- The cut-out spray module is hermetically connected to the plug.
- Using a bicycle pump, air is passed through the nipple into the paint container and sprayed.
DIY spray gun from a car camera
Materials and tools: bicycle or car pump, tube, pressure gauge, nipple from an old car tube, two fittings, universal glue.
Manufacturing procedure:
- Checking the integrity of the camera. She needs to be pumped up. If an air leak is detected, it is sealed with a rubber patch.
- You need to make a small hole in the car inner tube. An additional nipple is attached to it, which is needed to release compressed air.
- A fitting is inserted into the resulting hole and fixed with glue.
- The second fitting is connected to the sprayer (from an old sprayer or sprayer).
- You need to try to unscrew the nipple from the chamber. The air should come out evenly.
- The nipple must be attached to the nipple on the camera (not an additional one, but your own). It will serve as a valve to lower overpressure in the cell.
- You need to use a pressure gauge to determine the pressure in the chamber. It should be smooth, not jerky.
- Air is supplied by the pump, and the solution comes out under pressure through the sprayer.
Features of manufacturing a mini spray gun
Materials and tools: gel pen, small paint bottle.
Sequence of work:
- Disassemble the helium pen into its component parts. For a mini spray gun you need a hollow container for air supply, which will serve as the handle.
- The end of the handle must be cut off.
- Rinse the empty rod to remove any traces of gel.
- Drill a hole in the bottle cap for the rod.
- A second hole is made for the hollow container of the housing. It should be perpendicular to the first one.
- The shaft and body of the pen are fixed in the bottle.
- Air will have to be supplied by inhalation.
In this way, a powerful device is obtained, suitable for working on large surfaces.
Materials and tools: compressor from an old refrigerator, hoses, self-tapping screws, several 20 mm clamps, pressure gauge, metal container for the receiver, board, auto filter, drill, screwdriver. The receiver must withstand high pressure, so it can be a fire extinguisher, gas cylinder, of course, empty.

Manufacturing sequence:
- We attach the compressor to a board of a suitable size.
- Connect to the network to determine the air outlet pipe. One will be the exit and the other will be the entrance.
- Hoses are attached to the nozzles and tightened with clamps. A smaller hose is attached to the outlet pipe, and a large hose is attached to the inlet pipe.
- IN metal container(receiver) drill two holes for the hoses.
- To control the air pressure, attach a pressure gauge to the receiver.
- The receiver and compressor are connected with a hose.
- The second hose is connected to the autofilter.
- The assembled unit can be tested.
The nuances of operating a homemade spray gun
- When painting a large area, ventilation must be provided.
- The air temperature in the room should be from 15 to 30 degrees.
- When using varnishes and caustic paints, you must use a respirator.
- It is better to cover the floor surface with film or newspaper.
- The spray gun should be kept at the same distance from the surface, not tilted.
- It is important that the sprayer is positioned perpendicular to the surface to be painted.
- If an unpainted spot is found during application, you need to spray a little of the composition. It needs to be applied quickly to avoid overlapping layers of paint.
- It is better to apply the coating in a thin layer, repeat if necessary.
- Before using a homemade device, you need to test it on an unnecessary board or an inconspicuous part of the wall.
- If you need to use varnish or enamel composition, then the device can only be used once. For homemade devices such substances are too heavy.
- It is preferable to use for self-made devices aqueous solutions. This can be lime, water-based or diluted acrylic paint.
- After completing the repair, you need to rinse the nozzle and container with water, gasoline or solvent. This depends on the composition of the coloring agent.
- Dry unassembled.
- After reassembly, you need to check the quality of work by filling the container with water. Only then can you pour paint into it. If any defects in the paint or the device are found, it must be repaired or any parts replaced.
Making a spray gun at home will save you from extra costs and quite accessible from scrap materials. You can choose the option that the best way will solve problems with painting any area. A mini spray gun is suitable for painting any part. You can paint a radiator, door or window with a device made from an aerosol can. A spray gun from a car camera can be used for garage work. This type of device is also useful for applying thick paint. A unit made from a vacuum cleaner or refrigerator is suitable for covering walls and ceilings.
Sometimes there are situations in everyday life when applying an even and neat layer of stain, varnish or paint becomes impossible. The reason lies both in uneven surface textures (carvings and patterns) and in the unsuitable quality of paints and varnishes. IN in this case A spray gun will come to the rescue. You can make it from scrap items in a couple of hours.
Advantages of a DIY spray gun
In addition to the fact that you will save a couple of thousand rubles, there are a number of other advantages of a homemade spray gun:
- Saving paint and varnish materials;
- Smooth coverage, no bald spots, no hairs from a brush or roller;
- Less labor costs and wasted time;
- Lightness and simplicity of the device.
In everyday life, such a tool can be used to paint fences, furniture, gazebos, and cars. Attention: before performing work on a car, you must understand the technology of applying paint and varnish.
Making your own spray gun
You can make a spray gun at home in the shortest possible time by finding only the necessary components, namely: a body from a marker, flexible hoses, and a spray bottle from a flower sprayer. You will also need a drill with thin drill, glue and a stationery knife.
1. Take a small jar of vitamins, gouache or film. It is important that the jar has a lid; it will prevent the paint from spilling out during operation. In the bottom near the walls, drill two holes with a diameter of no more than 4-5 mm.
2. Take two pieces of metal or plastic straw, which would be suitable in diameter for the drilled holes. Using glue, attach the tubes at different levels inside the container (one is located at the very bottom, the other almost under the lid), and on the outside their ends should be the same.

Cut the big one plastic casing, freeing up the one we need cylindrical part with a nozzle, then drill a hole in the side of the spray bottle that is suitable in diameter for the plastic tube from the dropper. Attach this tube using glue.


5. The next step is one of the most difficult. You need to drill two holes in the marker body, which must be located at an angle of 10-15° to the central axis. The first hole is made at the very edge of the body, and the other almost in the center. To obtain correct angle start drilling perpendicular to the wall of the marker, and then (as soon as the drill goes a little deeper into the plastic) position the drill closer to the product.

6. Now let's start assembling the future spray gun. To ensure that the tool works flawlessly, it is better to use specialized glue for installation. Place the container for future paint on top of the body of the prepared marker exactly in the middle so that the metal tubes are on opposite sides of it. Attach the modified part from the flower sprayer to the marker on the side indicated by the arrow.

Select three pieces of plastic or flexible rubber drip hoses that match the diameter of the tubes.
Connect the first hose to the glued tube of the sprayer, pass it through the central hole in the marker body from bottom to top (the hose goes inside the body) and bring it out. This way the air supply will be organized.

Attach another piece of plastic hose with one end to the sprayer and the other to the container tube (the shorter one). The paint will be supplied through this hose.
And the last piece of hose is connected to the long tube of the container and brought out next to the first.
The schematic location of the hoses is shown in the figure.

A hand-held spray gun made using this technology looks like the photo below:

To get started, you need to pour required amount paint into a container (the paint should not be very thick), and then, taking the two tubes coming out of the marker body into your mouth, begin to carefully and evenly blow out air. It is advisable to connect these two outlet tubes with a tee so that the flow of exhaled air is smoother. In addition, it is more convenient to work with one tube. Also, as an experiment, you can connect the spray gun to a vacuum cleaner, hand pump, inflated chamber. The manual version is ideal for small jobs.
Foam spray gun
Make a spray gun with my own hands You can do it another way, using regular polystyrene foam. By the way, this option may seem much easier to implement for some. Moreover, for global large-scale work, as well as car painting, a foam spray gun is suitable.
Styrofoam will do not any, but only dense. For example, the one that is used to insulate walls, loggias and balconies. From this material, cut out a part that resembles the shape of a pistol (see picture). The lower part of the part must tightly cover the neck of the paint container. In this spray gun model, use large bottles.
Drill two holes perpendicular to the plane: one vertically (diameter = the diameter of the shaft of a regular pen), and the other horizontally (diameter = the diameter of the pen body).

This is one of the most simple ways make a spray gun. It also works from exhaled air into the pen body, but here too the process can be automated using injection by selecting suitable adapters and hoses.
Secrets of an even coating
Even when working with a spray gun, it is necessary to follow some rules so that the painted surface looks smooth and the consumption of paint and varnish materials is minimal.
It is very important to prepare the surface to be painted - sand it if necessary, remove dust and debris, and degrease it if the technology requires it.
To prevent the paint from peeling off over time, apply thin layer. It is better to move the tool in a circular motion without pausing in any areas.
To prevent paint from escaping into the air (there is no overspray), hold the spray gun at an angle of 90 degrees relative to the surface to be painted.
Apply the second layer only after the first has dried!