We will send the material to you by e-mail
Regardless of what guarantee the knife manufacturer gives that they will not require sharpening during use, sooner or later this question will still arise before the user. It doesn’t matter whether this applies to kitchen utensils or camping accessories, because... A sharp knife is the key to success in fishing and hunting, while traveling and when cooking. Devices for sharpening knives - types and rules of use, as well as how to make them yourself - this is the topic of today’s review by the site’s editors.
The simplest device for sharpening a cutting tool is a block, and the device for its use is a clamp for the angle of the surface being sharpened
Knives can be classified according to the following indicators:
Whetstones and whetstones
A whetstone (sharpening stone) is an abrasive tool used for sharpening the cutting edges of household appliances and kitchen utensils, carpentry and plumbing tools.
The industry produces four types of stones for sharpening knives:
- natural– novaculite and Japanese water stone, which are expensive and difficult to use;
- diamond– the most popular type of product, it is distinguished by its diversity both in geometric dimensions and grain size. They are characterized by wear resistance and efficiency of use, as well as low cost;
- ceramic– a modern type of sharpening tool, characterized by a combination of the positive qualities of natural and diamond analogues;
- artificial– well-known types of electrocorundum or carbide are low in cost, but during use they crumble and are not suitable for finishing cutting edges.

Hand tools
- Must for sharpening knives.
Almost everyone knows what musat is, but many don’t even suspect that this is the name of this product. The reason for this is that musat, as a rule, comes with sets of knives offered for sale through trade organizations.
Musat is a rod made of various materials, equipped with a handle and characterized by the roughness of the working surface.

The roughness of the drawing is the size of the notch applied to the rod, and it is this that determines the degree of roughness of the cutting surface of the knife after processing. The musat is equipped with a rod that has a certain degree of magnetization, which ensures that metal particles formed during use reach food and kitchen utensils. Musats are classified according to:
- rod shape– round and oval, flat and tetrahedral;
- materials used– ceramics and metal, diamond and mixed designs.
Each type has certain advantages and disadvantages that determine the possibilities of using the device and its purpose.

- Manual machines.
Household manual sharpening machines for sharpening knives vary in their design, but in any of them a whetstone or whetstone acts as the main element. The impact of the abrasive tool on the cutting surface is carried out using the efforts exerted by the user. The main task performed by a manual machine is to create and maintain an optimal sharpening angle of cutting edges for the entire period of work, which is achieved by rigidly fixing the knife in a given plane. The industry produces various models of such equipment, differing in size and methods of fastening abrasives and processed knives, as well as the materials used and cost.

Household electric sharpeners do not take up much space and are very functional, because... their design, as a rule, provides for different fixed sharpening angles for different types of knives and other cutting tools (scissors, screwdrivers, etc.). The ability to quickly and efficiently sharpen the cutting edges of knives is very important for catering establishments, where the speed and quality of cooking depends on sharpening. Professional knife sharpening machines are functional devices equipped with high-quality abrasive tools that allow not only rough sharpening, but also fine-tuning the cutting edges of knives for various purposes.

Professional models, in addition, as a rule, have several operating modes that allow sharpening with different efficiency, necessary for knives made of different metals or ceramics.
How to properly sharpen a knife at home
Everyone knows that a knife must be sharp, and for this it needs to be sharpened, but how to do it correctly is often not known to every user. It should be noted right away that in order to carry out the work correctly it is necessary:
- Know the sharpening angles for each type of knives and other cutting tools.
- Be able to work on a variety of equipment or using available tools.
Sharpening angle of knives for various purposes
For knives used for various purposes, the sharpening angles of the cutting edges are different, which is determined by their purpose and nature of use.

This value is for:
- table knives - 55–60˚, because ready-made dishes are quite soft and cut easily; moreover, with a smaller sharpening angle, there is a possibility of damaging the dishes during eating;
- hunting and folding models – 40−45˚, which is explained by their versatility;
- kitchen knives – 30−35˚;
- used for professional cutting of vegetables - 35˚;
- used for professional cutting and deboning of meat – 25−30˚;
- used for professional fish cutting - 25˚.
Some types of knives are sharpened with different sharpening angles, such as those intended for slicing bread (the angle is 15˚), but this is a narrowly targeted use in which sharpening must be done quite often, because with a decrease in this indicator, the durability of the cutting edges decreases.

How to sharpen a knife at home with a whetstone
In order to properly sharpen a knife using a whetstone, you must follow several rules for performing the work:
- it is necessary to select the optimal sharpening angle corresponding to the purpose of the knife;
- the blade must be positioned in relation to the plane of the block strictly within the specified sharpening angle parameters for the entire period of work;
- Sharp and jerky movements should not be allowed, they should be smooth and sliding;
- When performing work, the block should be moistened generously with water diluted with soap or detergent.
How to sharpen using musat
The process of sharpening a knife using musat is shown in the following figure.

The work is carried out as follows:
- The musat is installed on a flat surface strictly in a vertical plane;
- the upper part of the device is combined with the sharpened edge of the knife near its handle, after which the knife moves along the rod of the grinder in an arcuate movement directed from top to bottom;
- the movements are repeated several times on both edges of the knife.
I would like to note that experienced users can perform this operation in weight, without rigidly fixing the rod of the device used.
How to properly sharpen a knife on an electric sharpener
When using models equipped with an electric drive, the basic requirements for performing the work to ensure proper sharpening are the same as in the case of using a whetstone or whetstone.

But, besides this, there are additional requirements that can be formulated as follows:
- It is not the abrasive that should be moistened with water, but the surface of the knife being processed, which is explained by the fact that water is not retained on a rapidly rotating wheel;
- the blade must not be allowed to overheat, which can lead to its damage, which occurs when the edges being processed are strongly pressed against the abrasive surface;
- to rigidly fix the sharpening angle, additional devices can be used that are mounted rigidly to the body of the sharpening machine or are in the user’s hands;
- When working on industrial sharpening machines, it is necessary to use personal protective equipment, such as gloves and safety glasses.
In the case of using small devices intended for home use, the main requirement for sharpening is the time required to complete the operation; all the rest (fixing the sharpening angle, protection, etc.) are performed by the machine itself, according to its design.

Typical mistakes when doing DIY work
When sharpening knives on their own, many users make typical mistakes, which can be formulated as follows:
- Creating an incorrect sharpening angle prevents the knife from being used for its intended purpose or reduces its functionality.
- Excessive pressure when working on electric models or incorrect direction and nature of movements when using a whetstone or sharpening stone contribute to damage to the surface of the knife and destruction of its edge.
- Sharpening the cutting surface without first cleaning it from dirt and foreign substances leads to the abrasive becoming washed out and damaged.
- Using only one grinding stone when sharpening cutting edges. This device is intended only for finishing or straightening knife blades; it is not intended for basic sharpening.
- Failure to complete the sharpening operation again leads to rapid dulling of the cutting edges.
- Using an abrasive (whet stone or whetstone) of only one grit size.

Making a machine for sharpening knives with your own hands
Although nowadays you can easily buy the necessary tools and equipment designed for sharpening knives and other cutting tools, nevertheless, handicraft citizens continue to make knifes with their own hands in their free time. When making a knife sharpener with your own hands, you need to decide on its type (manual or electric) and the type of abrasive materials used (block, wheel, sanding belt), as well as the available materials that will be used to make the body of the assembled device and its frame. Consider the option of a manual sharpener using an abrasive stone and plywood as a structure frame. The appearance of the assembled device is shown in the following figure.

Currently, there are several types: a machine for sharpening knives, a machine for a hairdressing machine, and others. This article talks about how to make a machine for sharpening knives at home: detailed drawings with dimensions, photos and videos (2-3 videos) are presented.
Often, when sharpening knives at home, household members use abrasive whetstones. However, in order to use them in practice, you need the necessary skills and experience working with them. After all, if the knife is sharpened at the wrong angle, the blade remains dull.
Layout of the block to the blade.
Before actually manufacturing the machine, you need to listen to the advice of sharpeners.
When sharpening a knife, the master performs the following actions:
Defines the angle between the working area of the blade and the block. Moreover, for each model the angles are different;
The knife is located at an angle of 90 degrees to the direction of the block. The grooves that are formed when the razor blade of the knife rubs against the block should be at 90 degrees to the knife line. The angle in such a situation is equal to half the sharpening;
Typically the angle is 25 degrees;
The mechanic begins processing from the beginning of the foot blade;
When adjusting the sharpening angle, the master paints over part of the foot blade with any marker. As a result, the mechanic directly controls the work area.
As a rule, after sharpening the working blade has non-uniform deformations. Therefore, when processing independently, the “point of reference” should not be the sharp part of the knife.
Choosing whetstones for sharpening a knife

The main indicator of a block is its grain size.
The whetstone is the main component that makes the blade thin and sharp. As a result, before choosing a design, you need to select the necessary blocks.
When sharpening knives on their own, household members use these types of whetstones
which have a high grain size. Using such bars, the shape of the leg blade is corrected.
having medium grain size. With the help of such bars, the mechanic removes the grooves that are formed during the initial processing of the knife
whetstone, which is covered with GOM paste. In such a situation, the mechanic polishes the blade.
When processing knives for the kitchen, you can use two types - with medium and high grain. And also in this case it is necessary to use a touchstone.
Base
When making a sharpening machine at home, you can use various parts. In particular, you can use laminated box plywood 12 mm thick, which was previously used to create radio equipment housings.
When constructing a machine at home, a household member performs the following actions:
Selects a base for such an installation, which must weigh at least 5 kg. Otherwise, it will be impossible to sharpen chopping devices and tools on the machine. Therefore, in the manufacture of such equipment, the tenant uses various steel angles measuring 20x20 mm;
Next, 2 parts are cut out of plywood with a jigsaw, which have a trapezoidal shape, the base is 170 by 60 mm, and the height is 230 mm. When cutting, the mechanic makes an allowance of 0.7 mm for sharpening the ends: they end up straight and fit according to the markings;

Installs 3 parts between the inclined walls on the sides - an inclined surface made of plywood with dimensions of 230 x 150 mm.
In such a situation, the trapezoidal sides are located laterally on a rectangular surface.
The result is a base - a wedge. In such a situation, a protrusion of an inclined surface measuring 40 mm is formed in the front part;
Then, along the side wall ends, the mechanic marks 2 lines with a thicknesser. At the same time, it retreats by half the thickness of the plywood;
Drills the ends of the inclined surface and connects the base parts for a while;

At the back of the structure, the mechanic connects the side walls using a 60x60 mm block, which is attached to the end with two screws on both sides; - makes a 10 mm gap in the block.
In such a situation, it retreats 50 mm from the center - 25 mm from the edge. To maintain a vertical position, first drill with a thin drill from 2 edges, and then expand;

Then, at the top and bottom, two threaded fittings are screwed into the slot, and in the fittings - a 10 mm pin, the length of which is 250 mm.
If the threads do not match the studs, the lower fitting is adjusted.
Tool support device
When making a handhold device, the following steps are performed:
Removes the flat inclined part from the base, modifies it and installs a fixation device on it, as well as the clamp of the device used;
Measures 40 mm from the edge in front and at this mark, using a garden hacksaw, cuts out a groove, the depth of which is 2 mm;
Using a shoemaker's knife, chip off the top 2 veneer layers from the end of the board. The result is a sample into which the mechanic inserts a 2 mm steel plate at the same level as the general surface;

The tool rest consists of 2 steel strips measuring 170x60 mm and 150x40 mm. The machine operator connects them along the large end, which has equal edge indentations, and makes 3 through slots of 6 mm.
Using bolts, tighten the planks along the cracks made. In such a situation, the machine operator leaves the bolt heads on the side of the large top plate;
Then he removes metal defects of the weld in the form of beads and grinds the plate to give it a smooth surface;

Applies a small striker plate to the edge recess, moves the slots with a drill and secures the support with bolts.
Fixation device

The second important part of the tool rest is the clamping bar. It can be made from 2 parts.
L-shaped plank measuring 150x180 mm, the width of the shelves is 50 mm (top);
A rectangle-shaped strike plate measuring 50x100 mm (bottom).
When making a clamping bar, the machine operator performs the following actions:
Places the bottom bar on the far edge of the top bar;
Makes 2 holes in the center and retreats 25 mm from the edges of the part, connects the parts through the holes with two 8 mm bolts;
Screws in 8 mm bolts on 2 sides. In such a situation, the head of the nearest bolt is located near the top bar;
Welds the bolt heads to the plates and grinds them in advance until roundness is formed;
Yes, the inclined board retreats 40 mm from the edge and draws a line with a thicknesser;
Makes one 8 mm 25 mm gap at the bottom and top edges;
Using markings, he connects the edges of the slots and uses a jigsaw to make a cut with an allowance. Use a file to expand the groove to a width of 8.5 mm;

It fastens the planks using a groove that is in the board; the top bolt is tightened with a nut and thus firmly fastens the plank.
Then tightens connection 2 with nut;
When pressing the bottom bar (in the niche of the base), screw a wing nut onto the second bolt.
Sharpening angle control
When adjusting the sharpening angle, the mechanic performs the following actions:
Throw a large washer onto the pin, which is located in the block of the machine base, and tighten the nut.

The rod does not rotate in the foot; the block for adjusting the sharpening angle is made from a small carbolite block, the dimensions of which are 20x40x80 mm.
15 mm from the block edge, drill a 20 mm end on both sides, widen the gap to 9 mm, then make a thread inside;
He steps back 50 mm from the axis of the new slot and drills another one in the flat part of the workpiece - 90 degrees to the previous one. Such a slot has a diameter of 14 mm. In such a situation, the mechanic strongly flares the hole using a round rasp;
Screws the block onto the pin - sets the desired height of the eye without using fixing screws;
Secures the block on both sides with M10 hex nuts.
Using replaceable blocks and making a carriage
When making a sharpening carriage, the machine operator performs the following actions:
Welds 30 cm M10 threaded rods with a smooth rod whose thickness is 10 mm;
Uses 2 solid bars 50x80 mm and the thickness is 20 mm. In all blocks, in the center and on top, 20 mm is retreated from the edge, and then a gap is made 10 mm wide;
Screws a wing nut onto the rod, then a large washer and 2 bars, then a nut and washer;

Clamps rectangular sharpening stones between the stones or makes several replaceable sharpening stones.
As a timber base, the machine operator uses a rectangular tube from a profile or a piece of cornice, the width of which is 50 mm;

He sands the flat machine part and cleans it of grease, and glues strips of sandpaper with a grain size of up to 1200 grit using Super Moment glue.
The sandpaper should have a fabric base, and on 1 of the blocks you need to glue a strip of suede to apply polish to the blades.
Simple homemade machine
The most common type of machine design is considered to be 2 pairs of wooden slats, which are fastened together with screws. The machine operator installs a block between such parts.
The main reason for the popularity of usemanual homemade machine for sharpening various knives is its stability. During operation, the machine structure does not move in any way on the workbench.

When fixing the block, the mechanic uses support strips that are located between the wooden elements.
However, such a homemade machine has the following disadvantages:
The master positions the blade to the stone manually. When working for a long time, it is difficult to keep track of the sharpening angle;
When making such an installation, it is necessary to use a fixing unit. The machine structure must be stable, so it must be firmly mounted on the workbench;
During the work, the ties loosen and the location of the block changes.
Another advantage of such a scheme is ease of manufacture. This machine design is most often used when sharpening knives for jointers and for the kitchen.
Wood slats can be of different thicknesses. When making a simple sharpening machine yourself, you can use various available components.
When first studying all the nuances of manufacturing, you need to watch thematic videos that describe in detail how to make a machine at home.
Every housewife sooner or later begins to get dull knives with which she cuts bread, vegetables or cuts meat. Using a dull knife is not only inconvenient, but also unsafe. It can fall off the product being cut at any time and cause injury. Therefore, the tool should be periodically sharpened using a special device for sharpening knives.
A wide range of such sharpening devices are offered in stores. But for one reason or another, they do not always suit the consumer. In this case, you can make a device for sharpening knives with your own hands, having previously studied the types of sharpening stones, the features of the tool and the proposed drawings.
Sharpening knives - necessary conditions
For efficient and long-term operation of a knife, the most important factor when sharpening it is angle between blade edges. During the sharpening process, it is necessary to restore the previously specified angle, which will fully comply with technological standards and quickly, freely and efficiently cut the material.
Each blade has its own optimal angle:
- for a razor and scalpel, the sharpening angle should be 10–15 degrees;
- knives for cutting bread, fruits and vegetables are sharpened at an angle of 15–20 degrees;
- multifunctional knives for various products are processed at an angle of 20–25 degrees;
- hunting and camping knives - at an angle of 25–30 degrees;
- knives for cutting hard materials - 30–40 degrees.
Without a special device, it is difficult to sharpen the blade at the desired angle. While holding the knife with your hands, it is quite difficult to ensure required tilt angle cutting tool. To facilitate this process, there are special devices that you can make with your own hands. Their designs are quite simple, and the manufacturing itself does not take much time.
There are many types of knife sharpeners, from which you can choose the one that best suits your needs.
All devices consist of two parts:
- a block of abrasive material;
- stop for attaching the knife.
You can use ready-made special stones as a bar or make it yourself.
Sharpening stones - types and manufacture
There are several types of stones on sale:
Water tools. When working with them, water is used, which saves the surface of the stone.
Oil The structure and shape of the stone resembles that of water, but its surface is the most oily.
Natural instruments are made from natural stones that undergo industrial processing.
Artificial stones are made from non-natural components.
Rubber tools can also be found on sale, but working with them is not very convenient.
To make your own abrasive bar, you can use small rectangular glass plates with a thickness of 4–5 millimeters. Sandpaper of different grits should be glued to the surface of the plates using double-sided tape. The cost of such bars will be quite small, and the sandpaper can be replaced at any time.
However, when using a glass bar, you should be very careful carefully tighten the nuts, otherwise the glass may crack. In addition, no water is used when using it, so the abrasive wears out quickly. For the same reason, when sharpening knives, you should avoid rapid movements, which can lead to overheating of the material, and, therefore, to the loss of the properties of the blade.
Device for sharpening from wooden blocks
It is enough to simply make a sharpening tool from two wooden and two abrasive bars, which should be the same size.

For greater stability of the sharpening device to its lower surface, it is recommended attach a piece of rubber.
Do-it-yourself sharpener from mounting corners
The basis for this device is a Lansky sharpener, drawings of which can be easily found on the Internet.
- metal plates measuring 4x11 centimeters;
- standard aluminum corners;
- metal rods about 15 centimeters long;
- set of nuts and bolts;
- a sharpening machine with a vice or a file;
- needle file
Instead of a sharpening machine, you can use a file, since this tool is only needed for grinding off sharp corners and cleaning the metal cutting areas.
Stages of making a sharpener:
- According to the drawing, markings are made for future holes in the plates.
- The holes are drilled and threaded.
- Using a file, all sharp corners and edges are rounded. This will allow you to comfortably use the made knife.
- Holes are made in the corner in accordance with the drawing.
- The hole for the spoke support is expanded using a needle file.
- The holes for the studs are threaded.
- The rods are inserted into the outer holes and secured with nuts of the appropriate diameter (M6).
- An M8 bolt is screwed into the wider hole, the length of which should be about 14 centimeters. A wing nut must first be screwed onto it, on top of which two ordinary nuts are screwed. The bolt in the structure will be used as a support post.
- Bolts are attached to the remaining holes, with which the knife will be clamped.
- Nuts are screwed onto the ends of the rods, a corner is threaded, which is fixed with the help of nuts. By lowering or raising the rods, you can adjust the sharpening angle.
- A thin metal rod in the shape of the letter L, a rod with an M6 thread, two holders and a wing nut are used to assemble a device that will hold the sharpening stone. The outermost holder must have a through hole for the knitting needle.
This knife sharpening device has a fairly wide range of pressing angle degrees and is most convenient to use.
Massive sharpener with stand
With your own hands, you can imitate a knife sharpening device from Apex, the drawings of which are easy to find on the Internet. Such a knife is presented in the form of a stand, on which a platform is installed at an angle, and on the side there is a support for the end of the nozzle in the form of a rod. This is a very convenient device with which you can sharpen any cutting tools very efficiently.
Required materials and tools:

Stages of work:

The sharpening angle on such a device adjustable using bar and thumb, which fixes the part at the desired height.
Each of the described devices has its own advantages and disadvantages. When choosing the appropriate option, you need to proceed from your needs and skills in such work that you will need to do with your own hands.
Sharpening a knife is a task that every man has to face from time to time. In almost every home now you can find the familiar sanding block. However, this simple tool is not the only (and not the most convenient) way to sharpen kitchen knives.
If you don’t want to buy a professional tool, you can make a simple but more effective sharpening machine yourself if you wish.
1 About the design of knife sharpening machines
The main nuance that distinguishes a professional tool from a regular whetstone is more precise work with the sharpening angle. It is the angle at which the cutting edge is sharpened that is the main requirement that affects the sharpness of the blade. If you correctly calculate and achieve this angle, even a homemade sharpening machine will allow you to sharpen knives to razor sharpness.
A handheld benchtop tool of this type looks something like this:
Support part. “Sole”, which is firmly attached to the table, and on which other elements of the machine are located.
Place for attaching a knife.Made in the form of a clamp.
Movable rack with attached sanding block. The stroke of the bar must be limited so that the movement occurs in one plane, sharpening the knife at the desired angle.
A mechanism for adjusting the angle at which the block can move.
Such devices (with fixation of blades of knives or scissors) are more convenient. You can apply more force in them, since it is more convenient to move the block than the knife.
Some machines are designed the other way around - they do not hold a knife, but a sharpening stone, the angle of which can (or cannot) be changed. Such models are simpler in design, and essentially differ from a regular sharpening stone lying on a table only in the ability to accurately adjust and maintain the desired angle of inclination.
Such installations are suitable not only for knives - they can also be used to sharpen straight scissors.
1.1 Brief overview of models
Before you figure out how to createDIY knife sharpening machine -Let's look at what models you can buy:
- Lansky. Costs about 6 5-80 $. Has a clamp for knives (scissors), the bar is movable. Angle adjustment - from 17° up to 30 ° .
- SpitJack. Costs about $40.
- Aligner AKEFC. Costs about $90.
- Ganzo Touch Pro. Costs about 90-100 $.
- Apex 4 Kit Edge. Costs about 200-220 $. Suitable not only for kitchen knives and scissors, but also for hunting knives.
- Ruixin ( Korean copies of the above Apex). They cost about 30-40 $.
In addition to the listed models, there is a considerable selection of other similar installations. The approximate price range of mid-level sharpening machines is around $30.

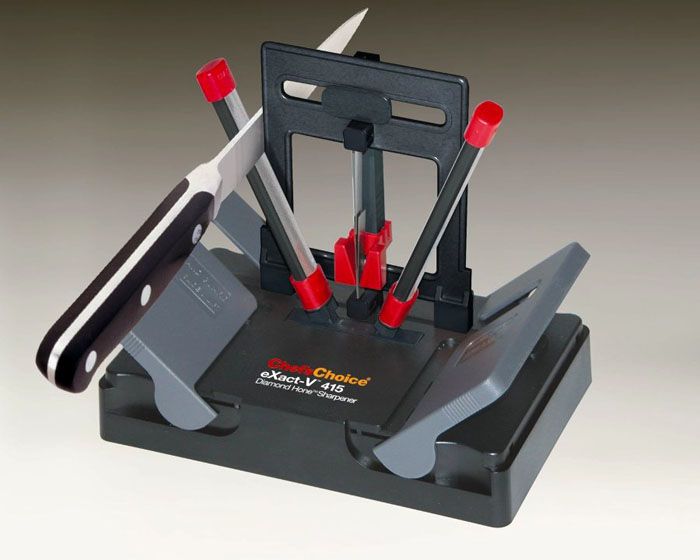
Chief's Choice knife sharpening machine
You can also find more convenient (but also more expensive) electric sharpening devices. These include compact devices Chief's Choice (models 312, 320, CH-310, 1520). They cost from 120 to 250-300 $, and allow sharpening at an angle of 20°. The power consumption of the units is up to 150 W. Such an electric sharpening machine for flat knives is used mainly in the restaurant business.For other products (scissors, hunting knives, etc.) such models are naturally not suitable.
In addition to electric models, Chief's Choice has similar mechanical devices. They are a sharpening stone installed at a given angle in the body. The user just needs to slide the knife through a special slot - and that’s it. Similar models are cheaper than electric ones (about $40-50 ), and are also used mainly in the restaurant business, for kitchen knives.
2 Basic information for creating a homemade machine
Making an electric machine correctly is not a task for an amateur. But making a desktop manual version is quite possible.
There are many options for creating it, so we will consider only a few of them.
The most important requirement for the machine being created will be the selected angle - this directly determines how sharp the cutting edge will be and how long it will last.
The thinner it is (i.e., the smaller the sharpening angle), the sharper the knife will be, but also the less it will last. In addition, it is not recommended to cut hard products with a knife sharpened too sharply (at an angle of less than 15-20º: it will become dull faster).
Specific figures include:
sharpening angle of knives (kitchen, hunting) - 15-30º (or better - 20-30º);
The sharpening angle of scissors (hard) is about 50º.
2.1 First method
First, let's look at the simplest option.
To create the machine we need:
2 wooden corners (optimal side length - 20-30 cm).
6-8 screws with clamping nuts.
Sharpening stone.
Trance Portir to set the angle correctly.

The design is done like this:
3-4 holes are drilled in both corners -so as to fasten them together.
The block is installed between the corners at the desired angle.
The corners are tightened with screws, securing the block in the desired position.
For sharpening knives (kitchen, hunting - it doesn’t matter) or scissorsyou just need to slide the blade down along the block. The blade must be strictly vertical.
If necessary, marks with corners can be applied to the corners. To change the angle (or to replace the bar), you just need to loosen the screws that tighten the corners and move the bar. After which the screws are tightened again.
This device is good because it allows you to change the angle. Among its disadvantages, we can note the fact that it is, in fact, not much more convenient than working with a conventional sharpening stone.
2.2 Option two
Now let’s complicate the task: we will make a sharpening machine that is more convenient to use.
For this you will need:

A piece of laminate (chipboard, plywood).
Wooden slats (length - approx. 1 meter, thickness and height - approx. 2 -4 cm), or two slats - one 50-70 cm long, the second up to 40.
Sandpaper.
2 bolts with tightening nuts.
Wood saw.
Protractor.
Marker (pencil, pen, felt-tip pen - any marking tool).
The process itself looks like this:

Now - need to make a stand, which will allow you to drive the block at the same angle. For this:

Now it remains make a sandpaper holder(which will be used instead of a sharpening stone). To do this you need:
Take the second rail and place it on the U-shaped stand and knife holder.
Cut off the required part (the one that goes from the holder to the stand, +5-10 cm of margin).
On one edge we glue sandpaper.

The optimal abrasive is from P600 to P2000.
AND The disadvantages of this design can be noted:
inability to adjust the angle: the product allows you to work only at one angle, chosen initially (this is not a disadvantage if the machine needs to be made for the kitchen);
To use sandpaper of different abrasives, you will have to make a separate strip for each.

As an option, in order not to make several slats, you can stick 4 pieces of sandpaper with different abrasives onto one slatted surface.
When working (sharpening), such a machine is placed on the edge of the table. The bolts protruding from below will rest against it, due to which the machine will stand in one place when the rack with sandpaper moves.
2.3 How to make a homemade knife sharpening machine? (video)
2.4 How to sharpen?
H so as not to spoilknife sharpening machine must be used correctly:
The movements of the knife along the block should be smooth, without jerking, and not very fast.
The pressure on the blade should be even. The pressure force is selected individually.
The blade must be sharpened evenly along its entire length.
If necessary, you need to cool the knife by lowering it into water.
After sharpening is completed, it is advisable to sand the blade with sandpaper up to 800 grit.
To check the quality of sharpening, you can place a sheet of paper on a suitable surface (for example, a cutting board) and run a knife along it. A well-sharpened blade will cut paper. If sharpened poorly, the sheet will wrinkle or tear.
I made this sharpening machine entirely from materials that were lying around in my garage.
The only thing I bought was a new abrasive wheel for the grinder. To make the machine you will need the actual angle grinder or grinder, some chipboard or plywood, self-tapping screws, a screwdriver or drill and a hacksaw for wood..

Here is a diagram of a homemade sharpening machine.
Actually, it all consists of one frame, the base of which I made from a piece of chipboard, and on top I attached several boards of the same size, so that the circle of the grinder did not touch the lower part. The grinder has holes on both sides for attaching the handle; choosing the right size bolt is not difficult.
A hole is drilled in the top board with a diameter equal to the diameter of the bolt, and in all the lower ones with a larger diameter, sufficient to allow the bolt to be tightened.

Having already bolted the grinder to the plank, I made side supports from two bars.

The bed of a homemade sharpening machine in assembled form.

Now all that remains is to make the support table and the machine will be almost ready.

I made the side walls of the machine’s support table in such a size that there was a little more than 1/3 of the disk above the table.

Everything is secured with a screwdriver using regular self-tapping screws.

In the rear part, I additionally secured the angle grinder to the frame with a clamp made of a metal strip.

Chipboard easily crumbles when cut, so I sealed all the corners, as well as all the places where sparks would fall, with aluminum tape.
The homemade sharpening machine is ready.
A small bonus for all blog visitors, a funny video:
Sharpening machine (part-1)
The power bracket of the sharpening machine (Fig. 7) is welded in the form of a half-box made of steel sheets of different thicknesses.
On its rear wall there are, as already mentioned, lugs for the adjusting screw and knurled nut of the mechanism for vertical “guidance” of the pendulum, as well as a bracket for the mechanism for fixing it in the non-working position. At the front, the power bracket has an elongated console with a bent end, reinforced with gussets. At the end is a knurled nut, the sleeve of which, after being inserted into the hole, is flared so that it does not fall out.
This nut, together with the loop bolt and spring, constitute the pendulum balancing mechanism. In the bottom of the half-box there is a hole with a thread M 14×1.5, into which the threaded end of the vertical axis is screwed in and secured with a nut, intended for rotating the power bracket. There is also a circular scale with a division value of 3° - the angle of this rotation is measured using it. The machine control panel housing, welded from sheet steel, is attached to the rear wall of the half-box with three M6 screws.
On the right side of the remote control there is a niche that protects a socket with an indicator lamp, a holder with a fuse, and toggle switches for power on and motor reverse from mechanical damage. The sharpening machine bed (Fig. 9) is made from a piece of rectangular pipe. A transverse plate with different holes is welded to its front end: the central threaded hole is intended for fastening replaceable devices, six side ones are for stepwise adjustment of the position of the intermediate flange.
On the workbench, the bed is supported by side legs and a rubber cushion and is securely held with a screw clamp.
A bushing with a fluoroplastic insert is also welded into the frame for the vertical axis of rotation of the power bracket. The specified position of the latter is easily fixed, since the bushing is equipped with a special wedge clamp for its axis. An intermediate flange is attached to the front of the frame. It has threaded and grooved holes: the first for the screws for fastening the rotary console of the attachment intended for sharpening saw chains, the second for the screws for stepwise adjustment of the position of the intermediate flange.
The angle of inclination of the flange can be assessed by a dial with a division value of 1.5°, applied on top of its edge. The most commonly used ultrasonics tool is an abrasive wheel (Fig. 10). In working condition, it is securely covered with a protective casing (Fig. 11), which lies with its cutout on the left housing of the working shaft bearing, which is at the end of the pendulum, and is attached to the flange of this housing with just one M6 screw.
In case of replacing the abrasive wheel, it is easy to unscrew the screw, tilt the casing on the rotary axis back until it comes into contact with the electric motor and thereby open free access to the working shaft. The casing has a rubber apron that protects the control panel from bombardment with sawdust and particles of the abrasive wheel.
In the gap between the casing and the pendulum, an electric lamp is installed on a combined bracket (Fig. 8, 12). This place is the most convenient: the lamp, without blinding the operator, well illuminates the treatment area. Now about some accessories for the machine. The main one is a telescopic attachment for sharpening saw chains (Fig.
15). It is attached to the frame through an intermediate flange with two screws. The attachment consists of a rotary console with a simple clamping device, a rod, upper and lower rods, a spring and a guide pulley.
The most complex units here are the bar (Fig.
14), riveted from a welded bracket, cylinder and liner, and a rotary console. In addition, the attachment is equipped with a holder (a clamp from a motorcycle handlebar) and a hook, which are necessary for putting on and removing saw chains (the design of the puller is shown in a separate figure). The rod is welded from three parts: a horizontal bushing, a vertical cup and a wall connecting them.
The horizontal bushing contains unique roller bearings (Fig. 15), consisting only of outer races (pipe sections) and a set of rollers.
The inner diameter of the races and the diameter of the rollers are designed so that the shaft with the handle mounted on it rotates in the bearings.
The glass (also a turned part) is designed to be clamped into the hole in the rotary console, which is why it has such thick walls. A thin-walled cylinder with an insert riveted into it is fixed in the glass.
The dial on the rim of the glass allows you to install the bar (and therefore the saw chain) at the angle required for sharpening. A smooth cylindrical section of the shaft with a handle, rotating in the roller bearings of the sleeve, is fitted with two friction flanges and a spring compressing them.
One of the flanges is the drive one, since it is connected to the shaft with a short pin, which is pressed into the radial hole of the shaft (after inserting the latter into the bearings).
The second, driven flange is connected to the leading flange with its three spikes. The compression force of the spring is regulated by a sleeve-nut, fixed with a locknut. Friction flanges are named because the ridges of the saw chain worn for sharpening fall between them and are held due to frictional forces caused by spring compression.
Therefore, with any turn of the handle, the saw chain rotates, substituting each tooth under the abrasive wheel, which is what is required.
This simple solution allows you to sharpen chains of different pitches with high quality and do without a whole set of additional removable sprockets.
In addition to the pitch, saw chains of different brands also differ in length. But a solution has been found here: the main rod of the attachment can be extended by 100 mm using an additional rod and a connecting threaded rod (tightened by hand). The saw chain is put on and removed from the attachment with the same tool - a special puller (Fig. 13).
There is no need to describe its structure, since everything is clear from the figure. The set of electrical equipment of the machine (electrical diagram - in Fig.
16) includes an ABE-0.71-4C type motor with a distribution box (Fig. 18) and a control panel (Fig. 17). On the right front panel of the remote control there are START and STOP buttons, and on the left there is a socket for additional consumers with a power of no more than 20 W, powered by an alternating electrical voltage of 12 V.
Since the remote control is attached to the power bracket, it automatically repeats its circular movements. Therefore, access to control buttons is always convenient.
Readers who want to reproduce the design of the proposed machine will undoubtedly appreciate its capabilities not only for sharpening saw chains, but also for other operations.
For example, another device, or rather a whole set of devices, is designed for sharpening metalworking and carpentry tools, drills, wood and metal cutters, as well as for cutting metals and processing wood (Fig. 21). The set is based on a rotary table with a vertical axis inserted into the rotary console (with the attachment for sharpening saw chains removed), on which various holders are attached with two bolts with shaped heads.
For example, to fix the metal and wooden parts being processed, a vice is installed on the rotary table; and for sharpening tools - an angular flange with a T-shaped tool rest, which can be rotated to the required angle to the vertical.
Either the tool to be sharpened is placed on the tool rest, for example, a plane piece of iron (pressed to the tool rest with a special holder with wing screws), or an angle stop with a groove in which drills are placed.
Unfortunately, the power of the AVE-0.71-4C electric motor (180 W) is sometimes not enough to process massive wooden parts.
However, if you use an electric motor of the AOL-21-2 type (400 W at 2800 rpm), given that the ABE and AOL motors have the same shaft diameters, the dimensions of the mounting pins and the distance between them, then processing wood on a machine will no longer be problematic. ATTENTION! To ensure worker safety, the components and parts of the machine do not have sharp edges or corners. For the same purpose, it is painted with bright alkyd enamel PF-115.
In conclusion, I’ll tell you where some of the components and parts of the machine were borrowed from. The electric motor, driving and driven pulleys are from the SMR-1.5 “Snezhinka” washing machine. The cylindrical tension spring used in the pendulum balancing mechanism is from the hood hinge of the ZIL-130 car.
As for the attachment for sharpening saw chains, its shaft with handle is nothing more than one of the screws securing the cylinder head cover of the KDM diesel engine.
The quick-release clamp on the rod is part of the motorcycle handlebar bracket. All of the following parts are from a decommissioned D6 marine diesel engine. The main and additional rods are modified parts of the intake valves; connecting pin - a piece of thread from the plate of the same valves; Bearing rollers are elements of a high pressure fuel pump.

7. Power bracket: 1 - side (steel, sheet s5); 2 - console (steel, sheet s5); 3 - axis (steel, rod 025); 4 - gusset (steel, sheet s2.2 pcs.); 5 - platform (steel, sheet s10); 6 - bracket for the pendulum fixing mechanism (steel, rod 04); 7.8 - loop bolt and knurled nut M6 of the pendulum balancing mechanism; 9,10 - M8 nut and screw for the mechanism for adjusting the position of the pendulum in the non-working position; 11-loop (steel, sheet s4, 2 pcs.); 12 - rivet (steel, diameter 4, 3 pcs.)

Local lighting electric lamp assembly: 1 - electrical connector plug; 2 - combined bracket; 3 - insulating sleeve; 4 - electric cartridge; 5 - electric lamp; 6 - reflector

Rice. 9. Sharpening machine bed: 1 - clamp plate; 2 - M8 screw of the clamp; 3 - clamp (steel, sheet s8, rod with a diameter of 24); 4 - transverse plate (steel, sheet s8); 5 - side leg (steel, sheet s5.2 pcs.); 6 - wall (steel, sheet s3.2 pcs.); 7 - body (steel, pipe 60x30x3); 8 - liner (fluoroplastic); 9 - bushing (steel)

10. Fastening abrasive wheels of different thicknesses (A - 2...6 mm, B - 20...25 mm): 1 - nut; 2 - washer; 3 - pressure flange; 4 - abrasive wheel; 5 - paronite washer (2 pcs.); 6 - hub; 7 - parallel key; 8 - working shaft of the machine

Rice. 11. Protective casing of the sharpening machine: 1 - arch (steel, sheet s1.5); 2.4 - side walls (steel, sheet s1.5); 3 - rivet with diameter 2 (22 pcs.); 5 - rivet 03 (7 pcs.); 6 - overlay (steel, sheet s5); 7.8 - rivet with diameter 3 (6 pcs.); 9 - bracket (steel, sheet s2)

12. Combined bracket assembly: 1.- shaped plate (steel, sheet s2.5); 2 - support washer for the compression spring; 3 - axis of the protective casing (steel, rod with a diameter of 5)

how to make a knife sharpening machine with your own hands
Saw chain remover: 1 - main rod of the attachment for sharpening saw chains; 2 - guide pulley; 3 - puller lever; 4 - chain PR-15 or PR-12.7; 5 - hook

14. Attachment bar for sharpening saw chains: 1 - welded bracket (steel); 2 - cylinder (steel, pipe 22×2); 3 - rivet (steel, diameter 3.3 pcs.); 4 - liner (steel)

Rice. 15. Attachment for sharpening saw chains: 1 - handle with shaft; 2 - fluoroplastic washer (s2); 3 - roller bearings; 4 - leading flange; 5 - spacer washer (s1, 3 pcs.); 6 - driven flange; 7.13 - compression springs; 8 - adjusting sleeve-nut M10; 9 - lock nut M10; 10 - pin (diameter 3, L19.5); 11 - rod; 12 - wedge bushing; 14 - hook for saw chain remover (steel, sheet s2); 15 - clamp, hook holder (from a motorcycle); 16 - additional rod; 17 - M14 pin; 18 - main rod; 19-spacer washer (s1, 2 pcs.); 20 - finger; 21 - guide pulley; 22 - bolt M12; 23 - wedge nut Ml2; 24 - rotary console

16. Elements of the electrical equipment circuit of the sharpening machine: EL1 - electric lamp brand A12-21; EM1 - electric motor brand ABE-0.71-4C (180 W, 1350 rpm); RO - working winding; PO - starting winding; KT1 - thermal relay brand RT-10; ХТ1 - detachable connection block; T1 - transformer brand TBK-110JIM; XS1 - socket (12 V, 20 W); C1 - capacitor brand KBG; K1 - electromagnetic relay brand P36; ХР1 - power supply cord brand PRS-VP; HL1 - indicator neon lamp brand TN-0.2; FU1 - fuse; SA1, SA2-toggle switches brand TP1-2; SB1, SB2 - KE brand buttons

17. Layout of electrical devices in the control panel housing: 1 - 220 V power cord plug; 2 - 12 V socket; 3 - transformer; 4 - outline of the remote control body; 5 - common cable outlet; 6.8 - insulating bushings; 7 - capacitor; 9 - indicator lamp cap; 10 - fuse; 11,12 - toggle switches; 13,14 - control buttons; 15 - electromagnetic relay; 16 - transformer mounting bracket

18. Position of the distribution box on the electric motor: 1.7 - coupling bolts of the electric motor housing; 2- box mounting bracket; 3 - electric lamp power cable; 4 - distribution box; 5 - electric motor power cable; 6 - common cable

19. Control panel housing (steel, sheet s2; all holes are drilled in place)

Rice. 20. Attaching the remote control body to the power bracket: 1 - power bracket; 2.4 - short M6 screws (4 pcs.); 3 - spacer sleeve M6 (2 pcs.); 5 - remote control body; 6 - long M6 screw

21. A set of devices for dissolving lumber and sharpening metalwork and carpentry cutting tools: 1 - rotary console; 2 - M8 bolt with shaped head (2 pcs.); 3 - rotary table; 4 - angular flange; 5 - M8 nut (2 pcs.); 6 - locking screw M5; 7 - tool rest; 8 - corner stop; 9.22 - sharpen the tools (drill and plane iron); 10 - dissolving lumber; 11 - circular saw; 12 - shield; 13.20 - M8 wing screws (3 pcs.); 14 - desktop; 15-movable guide; 16 - axis of rotation of the desktop; 17-screw M6 for fixing the desktop; 18-pendulum of the machine; 19 - locking screw M8; 21 - holder; 23 - vice
DIY sharpening machine for flat knives video
Buyers thoroughly study equipment or special equipment required for work through manufacturer catalogs in advance. First, they find out the technical characteristics, are interested in the operating features, operating mode, as well as power and other important indicators, including available options and provided functionality.
Now not only production equipment and installations, but also machine tools have built-in automation, which is very beneficial for the manufacturer and does not have to use the services of a shift operator.
Basically, everything is done by technology, the production of which uses know-how, a sharpening machine for flat knives with your own hands, video, the latest developments and special “tricks” known only to designers, engineers and planners.
Look for a sharpening machine for flat knives with your own hands video
Highly qualified specialists invariably make sure that machine tools and other mechanized and automated installations, entire complexes work properly and are equipped with special protection, which will protect against accidents and emergencies.
All branded special equipment is comfortable to use, allowing you to constantly expand production capacity and eliminate manual labor as much as possible.
Proper sharpening of knives - making a machine with your own hands
All that remains is to train the operators in the entire simple procedure for handling machinery and universal equipment so that they can easily perform all operations on several machines, conveyor lines or other systematized units.
Compare also the purchase of commercial equipment in Yekaterinburg, equipment for restaurant kitchens at low prices, promash machines, safety precautions on technological equipment, bending machine 5, equipment for tapping, STS from a milling machine, rolling machine for sale, gas equipment installer vacancies in St. Petersburg, equipment for gas stations Kirov.
Like any equipment, special equipment ordered through the catalog requires the prevention and repair of failed parts, assemblies or other components of the mechanical part or electronics.
Therefore, when ordering the models required for operation through the manufacturer’s catalog, you will have to check in advance about the possibility of supplying the necessary spare parts.
Experienced consultants who are well aware of the availability of a particular model in the store’s warehouse, as well as its factory configuration and everything related to placing an order, specific delivery times and calculating the exact cost of total delivery and installation will help you in choosing the necessary equipment or machines.
Suppliers will help in the correct configuration of special equipment, and will competently advise on all questions that arise regarding the assembly and installation directly on site of the supplied equipment, machines or automated complexes.
For smooth and uninterrupted operation, subsequent maintenance of the equipment will also be required, where expert diagnostics and modernization of completely outdated models of machines and all kinds of automated devices are often carried out.
How to make a manual knife sharpening machine with your own hands
Related materials:
Operating principle and design of sharpening machines
To sharpen the teeth of band saws along the profile, special sharpening equipment is used. The operating principle of most sharpening equipment is the same. The teeth are sharpened with an abrasive wheel, which rotates and makes translational movements up and down at the required angle.

Sharpening machine device:
To sharpen the teeth of band saws along the profile, special sharpening equipment is used. The operating principle of most sharpening equipment is the same.
The teeth are sharpened with an abrasive wheel, which rotates and makes translational movements up and down at the required angle. The movements of the abrasive wheel are in a certain way combined with the movement of the saw in the direction transverse to the grinding wheel.
The movement of the saw is carried out by translational return movements of the pusher, directly to the lower part of the front corner of each tooth. The pusher moves the front corner of the tooth directly under the grinding wheel. As the sharpening wheel descends, it sharpens the front angle, and the pusher returns and falls into the next tooth. At the moment the pusher moves the next tooth, the grinding wheel moves at a certain speed - a little down and up until it is completely raised.
The combination of the speed of raising the abrasive wheel and the movement of the saw creates a tooth profile.
The tooth profile of different band saws differs and is determined by the type of band saw equipment and cutting conditions. To change the profile, it is necessary to coordinate the speed of lowering and raising the grinding wheel with the movement of the saw.
The speed of lowering and raising the wheel is ensured by supporting the grinding wheel guide on the profile cam. The profile cam performs rotational movements. Let's imagine that the profile cam has just a diameter (does not have a profile). In this case, it is obvious that when the cam rotates, the grinding wheel, resting on the surface of the diameter, will not move up or down. Deviations of the profile surface of the cam in the required sequence from the diameter in one direction or another ensure the required speed and amplitude of translational movements of the grinding wheel.
If it is necessary to change the profile of the saw teeth (changes in sawing conditions), the shaping cam is replaced (for most machines, the time for replacing the cam is from 5 to 15 minutes).
The speed of raising the abrasive wheel changes depending on the profile of the cam, and the speed of movement of the saw under the wheel remains constant. The pusher that moves the saw is installed directly on the forming cam.
This kinematic scheme is the simplest. Equipment built according to this scheme also falls into the category of simple equipment.
The use of uncomplicated, simple equipment does not allow flexible changes in the outline of the tooth profile, which, when producing various saws in series or servicing saws of various consumers, makes it very difficult to change the setting of the sharpening machine to the tooth profile, in each specific case, and requires a large number of profile cams. During operation, band saws are sharpened every 2; 3 hours of sawing. Frequent sharpening of the teeth of band saws is necessary to remove microcracks in the stress concentrators (radius of the cavities) that appear as a result of fatigue of the surface layers of the metal (regardless of the amount of tooth wear).
Frequent sharpening of the profile of the teeth of band saws requires that the sharpening area be located in close proximity to the sawing area. Each specific consumer uses one or two types of band saw equipment at the sawing site (more rarely), therefore, as a rule, changing the settings of sharpening equipment occurs twice a year (autumn-winter, winter-spring).
Homemade sharpening machine
For a long time, throughout the season, sharpening equipment is required to strictly maintain the profile shape and angular values of the teeth of all saws in operation. The use of simple sharpening equipment in these specific conditions, to perform a minimum of specific tasks, has a number of undeniable advantages. The simple design contains a minimum number of moving joints, which ensures a minimum amount of play in these joints.
The minimum amount of backlash increases the accuracy of the machine and reliability (nothing to break). Simple equipment allows for daily maintenance by lower-level specialists. Simple sharpening equipment, as a result of a fixed setting, allows you to sharpen teeth by controlling feeds in the vertical and transverse directions.
By maintaining the profile of the abrasive wheel, complete similarity of all teeth on all saws is achieved. The high precision of the sharpening machine, combined with the similarity of the teeth of all saws, during sharpening allows for a minimum amount of metal removal from all teeth.
Metal removal (feed) at a time is in the range of 0.01 - 0.05 mm. Stable provision of minimal removal increases the number of sharpenings of finished teeth, which greatly affects the life of the tool and the cost of its maintenance, as well as the quality of sharpening in all respects.

An important advantage of simple equipment is its low cost, which allows a wide range of consumers to purchase such equipment and use it successfully.
When using saws of various designs (band, frame, round) in one production, it is necessary to equip the sharpening section with appropriate sharpening equipment.
As practice shows, the use of universal sharpening equipment for sharpening various tools used at one wood processing enterprise is not profitable. Frequent readjustment of the machine takes a lot of working time and requires maintenance by a highly qualified specialist.
The complexity of the design of universal sharpening machines places the highest demands on the quality of execution and manufacturing of such equipment. The use of complex structures and high-tech components determines the final cost of the equipment. The use of several simple sharpening machines for sharpening each type of saw allows you to better control and ensure the quality of sharpening in a short time, under real operating conditions.
The total cost of several simple machines is several times lower than the cost of one high-quality universal machine.
The operating principle of complex sharpening equipment is largely similar to simple equipment and is subject to the same conditions. Re-adjustment of both complex and simple sharpening equipment is almost the same and also obeys the same laws. Over the years of operation of frame, circular and band saws, the sharpening areas of wood processing enterprises are increasingly equipped with sophisticated sharpening equipment from domestic and foreign manufacturers.
In this regard (without fail), we will consider the kinematic diagram of complex sharpening equipment and in the future we will rely on it as the main one (we will pay special attention to the difference in maintenance of structures).
More complex sharpening equipment is based on the same principle - the grinding wheel is lowered - raised and in a certain way combined with the transverse movement of the saw by a pusher.
The difference between a more complex design and a simple one is that to create a tooth profile, the speed of movement of the saw changes, and the translational movements of the grinding wheel remain constant.
In order to change the speed of movement of the saw, the pusher rests on the forming cam through a system of levers. The complex design consists of two profile cams mounted on one rotating shaft. The cam that raises and lowers the sharpening stone is permanently installed, and the cam that provides different speeds of movement of the pusher is replaced if necessary.
Any sharpening equipment has four main adjustments. Two adjustments are used to organize the flow of metal removal from the profile of the saw teeth (under the abrasive wheel and the wheel onto the saw).
The other two adjustments are to change the pitch of the pusher and the height of the teeth (adjustment to the tooth profile). Let's consider how the constructive method ensures a change in the height of the teeth and the pitch of the pusher, since the supply of the wheel to the saw is carried out by changing the length of the screws, the support of the grinding wheel and the position of the pusher (the screws for feeding the wheel and the position of the pusher must necessarily be spring-loaded in order to select the backlash of the thread and in during operation of the machine there was no random unwinding).

The designs of the units that provide the required height of the teeth and the pitch of the pusher are similar, or although they differ, they still work on the same principle.
The kinematic diagram basically contains a lever with an axis of rotation.