The summer heat forces you to look for options for escape. You won’t be able to carry an air conditioner with you; sitting in the refrigerator all day is also not an option. If there is not even a slight breeze outside, then moving away from the fan is akin to disaster. Fortunately, many centuries ago a fan was invented, which became the best friend in the summer heat for many women. How to make a fan with your own hands, let's look at step-by-step instructions.
How to make a fan with your own hands?
It is better to master the master class immediately while working - it’s more effective and interesting. Conventionally, fans are divided into three categories:
- Chinese;
- Japanese;
- European.
A Chinese fan is not difficult to make. Peacock feathers were usually tied together for this purpose. But finding them on sale, and even at an affordable price, is more difficult. Therefore, it is better to stock up on disposable forks and make a fan with your own hands from them.
When finished, it will be European. You will need:
- 23 forks;
- any ribbons you like;
- lace;
- artificial flowers;
- glue moment;
- cardboard;
- disk;
- scissors;
- pencil.

A circle is drawn on a piece of cardboard. The easiest way is to trace the disc with a pencil. Now it needs to be cut out and cut into equal halves. Forks are laid out on half of the cardboard and glued with handles 2 cm long. At the top, the teeth of the forks should touch. When all the forks are glued, the second part of the circle is glued on top.
All that remains is to decorate the fan, but it is better to do this when the glue has already set on all sides. A ribbon is pulled through the tines of the forks - this is clearly visible in the photo.

In fact, instead of one wide ribbon, you can use several thin ribbons of different colors, or make a two-color checkerboard. There are enough options. The ends of the tapes are attached with glue along the edge of the teeth.
The middle of the product will look more impressive if you complement it with an artificial flower, which is secured with tape or a bow. That's all.
How to make Japanese fans?
Children love Japanese fans and enjoy making them from ordinary sheets of paper. True, it does not last long, so it is better to improve the craft a little and calmly use it as needed with the whole family. You will need:
- sheet A4;
- two flat sticks;
- pencils or paints;
- scotch;
- rubber band or rubber thread;
- beads.
Master class on how to make wind out of paper?
A4 sheet is cut in half lengthwise. On each half you can draw anything, not necessarily Japanese. Each strip folds like an accordion. The width of the accordion is no more than about 1 centimeter. We use tape to turn both strips into one. Then you need to fold the accordion and in this state wrap one end to a height of 2 cm.
Now one stick is glued to each side of the fan using tape. You can attach another strip of tape to the top of the sticks for security. To prevent it from closing on its own, you will have to secure it with an elastic band. Here you can decorate it with beads to make it beautiful and decorative, which will hold the fan open or closed.

You already know how to make a fan with your own hands. This simple and convenient little thing will always come in handy. These crafts can be done with children. They will definitely like both the work process and its result.
The heat and flies forced a person to fan himself with branches, a bunch of feathers or a large leaf. This is how the idea of creating a fan came about. Fans were brought to Europe in the 17th century and became an integral accessory of the aristocracy. Today fan can be a beautiful piece of decor or a real salvation on a hot summer day. You don’t have to buy it in a store, but you can do it in a fairly simple way.
To make a fan craft you will need:
- pages from a glossy magazine or newspaper;
- a knitting needle or a thin bamboo stick;
- any glue, but one you trust and super glue;
- threads;
- decorative ribbons;
- beads;
- lace;
- decorative flowers;
- scissors;
- a simple pencil;
- a sheet of thick cardboard.
DIY fan craft
Fan making process

1) On a sheet of cardboard, draw a circle with a pencil with a diameter of at least 10 centimeters. Then we cut it out and carefully fold it in half - this is the base.

2) Then we start twisting the tubes. At least 31 pieces are required. To do this, we cut the pages of a magazine or newspaper into strips. Then we twist them into tubes, winding them on a stick or knitting needle. Be sure to glue the tip of the tube with glue.

3) Now we insert the resulting tubes evenly inside the base folded in half and fix them with glue. When all the tubes are glued, we glue our base too.


5) In addition to threads, you can use ribbons as decoration, then the fan will be more durable and beautiful. If you have lace, beads, dried or decorative flowers, then decorate the resulting fan with them, without being afraid to experiment.

Here's a simple way to make it DIY fans from old newspapers or magazines.

You can use a can of spray paint and blow out the fan with the color that best suits the interior.
Hairspray with glitter will add a unique shine to the product in the light of the sun's rays. the fan will delight the eyes of those around you and, of course, will not leave children indifferent. So get creative and let working with your hands bring you pleasure.
The fan came to us from the East. The first mention of it dates back to China in the 8th-2nd centuries BC. It appeared in Europe at the beginning of the 17th century thanks to the Jesuits and traders who collaborated with China. And it gained unprecedented popularity and significance at the courts of European emperors. It got to the point that during the Baroque and Rococo periods, the fan was part of ceremonial actions and communication between aristocrats. For example, ladies could open their fans only in the presence of the queen. As for communication between people, if a woman touched her lips and heart with an open fan, then she told her chosen one that he was her ideal. If you wanted to show the suitor that he was not suitable at all, then the fan was applied with your right hand to your left cheek. We invite you to plunge into this world and learn how to make a fan with your own hands.
Paper version
There are several options here. The first one that comes to mind is a method from childhood. Namely, we take any paper, fold it into an accordion, tie it at the base, open it, and now the fan is ready. However, if you want a more convenient and reliable design, then you can make this option from paper and ice cream sticks:
To do this, we simply glue the sticks along the fold line, and at the other end we make a hole and tie a thread. Making such a fan can be used as fun for children.
However, we offer you a slightly more interesting option. Namely, a fan made of paper tubes. For it we will need:
- cardboard;
- newspapers or office paper;
- PVA glue;
- stationery knife;
- pen or pencil;
- acrylic paints;
- ruler;
- ribbons, beads and decor at your discretion.
Cut out two bases from cardboard. To do this, draw semicircles, as shown in the images below. If you have a compass, it will speed up your work.


Now, using a stationery knife, we cut out our parts.

Let's put the basics aside for now. We cut strips of newspaper or paper about 6-7 cm wide. Take a knitting needle and, starting from the corner, twist the tube. At the end we fix it with glue. It is better to prepare more straws in advance.


We glue an odd number of tubes onto one base, as shown below.

Cover with the other half of the base. We cut off the ends of the tubes that stick out from the top.

We also cover all the sides with tubes using glue.


We take a new tube, fold it in half and go around the first post of the fan, thus weaving it to the base of the fan.


When everything is ready, paint the entire fan with acrylic paint.

We decorate according to the idea, as in the photo below.

You can paint the fan with stain and then, looking at it, people will get the feeling that it is made of twigs.

Knitted fan
For those craftswomen who have crocheting or knitting skills, we offer diagrams describing how you can create a fan using your skills.

Such fans can suit you not only on a weekday, but also, for example, for a masquerade ball. You just need to choose a different thread color and use decor.

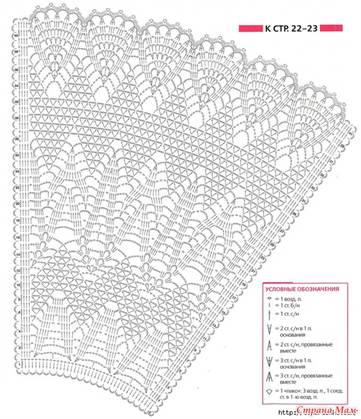
Moreover, according to these patterns, you can knit a fan not only with crochet, but also with knitting needles.
From wooden skewers
This accessory can serve not only as an addition to an outfit, but also, for example, as room decor. We offer you a master class on creating just such a fan. Prepare skewers, jute rope, glue and scissors.
Take 10 skewers and place them on the work surface. The outer ones should be single, but we put the sticks in the middle in pairs, and also fasten them.
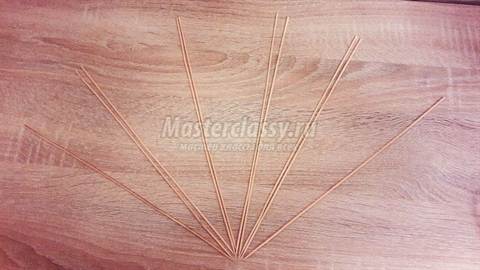
Using jute thread, we twist circles of different diameters in a spiral and fasten them with glue. And place them between the skewers.


When all the segments are ready, we fasten them together using glue and the same jute thread.

We also put a thread on top. At the base we glue several jute spirals.

Such a fan will decorate an interior in eco-style, Provence, etc.
Other options and materials
It is also very popular to create fans from non-standard materials. For example, from disposable forks or spoons, as in the video below.
Handmade or handmade jewelry is gaining more and more popularity all over the world. Now you can easily purchase them in specialized craft stores or make them yourself. This article will present the last option, because hand-made accessories and jewelry will perfectly highlight a fashionable look, and will also fully meet the requirements of their owner. How to make a beautiful and bright fan quickly and easily with your own hands is described in detail in our article.
How to make a fan with your own hands: diagram with detailed description
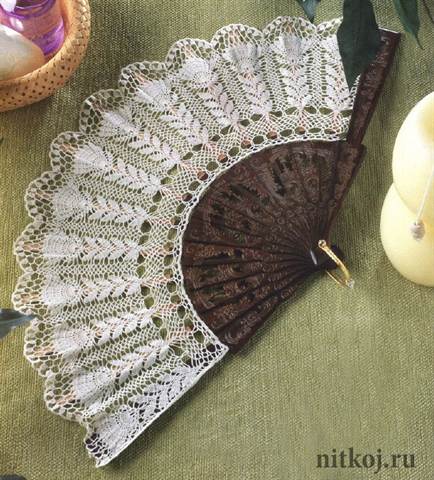
We invite you to make a delicate openwork fan, crocheted, which is perfect for going to the theater. You will learn how to make a fan with your own hands simply and easily from this master class with step-by-step photos and diagrams with descriptions.

To make such beauty we need:
- Mercerized cotton yarn in white or cream color;
- Hook No. 2.5 for knitting;
- Fan base;

- Such a fan is knitted from the bottom up, gradually adding loops in accordance with the pattern given above;
- When the knitted part of the fan is completed, it will be necessary to wet it and straighten it thoroughly so that the loops lie evenly and correctly;
- Next, the openwork part of the fan needs to be starched a little using regular potato starch, sugar syrup or PVA glue;
- After these steps, the fan part must be immediately pulled onto the base and left to dry;
That's all. Our exquisite openwork fan is completely ready.
Making a charming lace fan for a bride for a photo shoot
Every bride dreams of beautiful wedding photos. And to make them unforgettable, you can make a fan with your own hands as an additional accessory. How to do this is described in detail in our master class.
You don’t need many items for such an interesting craft. The most difficult thing here is to choose the right lace and not to overdo it with decoration.
To create a fan for a wedding photo shoot we will need:
- Plastic or bamboo fan;
- Lace, ribbons, rhinestones;
- Glue.
A fan purchased in a store must be disassembled into parts, separating the plastic base and the fabric. The next step is to gather the lace a little, place it on the fan and attach it with thread. You need to start from the top row, carefully securing them to the plastic base.
Next you need to apply a second layer of lace, securing it to the base with a glue gun and aligning the clamps along the way. When the product is ready, you can start decorating with rhinestones. To complete the look, you need to thread a thin satin ribbon in the middle and tie it on the wrong side.

Making a chic Japanese fan from fabric with your own hands

Required tools and materials:
- A piece of cloth;
- Thin plywood of small sizes;
- Awl, paper, pencil, glue, stationery knife;
- Thin ribbon;
- Strip of lace;
Stages of making a Japanese fan:
- The first step is to make the base of our fan. To do this, you need to cut ten to fifteen strips of plywood forty centimeters long and one and a half to two thick. Next they need to be painted and allowed to dry completely.
- Now you need to fold all the strips and make a hole on the bottom edge of each of them using an awl.
- Using a needle, push the braid into these holes, tie a tight knot, and then a beautiful bow.
- The base of the fan must be laid out on the sheet so that it forms a semicircle, and the plates must be spaced evenly from each other. With a pencil on paper you need to mark the upper outline, and draw a line below, connecting the edges of this outline.
- Under the top outline you need to draw a small semicircle to make an arc and cut it out.
- This paper template should be applied to the fabric and cut out. It is advisable to buy fabric with Japanese patterns.
- Now you can start gluing the fabric onto the plates. You need to start with the one that is folded at the very bottom of the product. The last plate is placed over the fabric and glued to its front part. Otherwise the fan will not close.
- Now you can decorate our accessory with stones, beads or rhinestones, but it is best to leave it as it is, because Japanese women prefer modesty and minimalism in everything.
To create such a creative and unusual accessory we need:
- Cardboard;
- Fabric, lace;
- Feathers;
- Pencil, compass, scissors, glue.
The first step is to measure the bare base of all the feathers. This will serve as the radius of the base. Next, using a compass, you should draw a semicircle that will be equal to the size of the base of the feathers. You need two such parts. Using cardboard semicircles as templates, you need to cut the same ones from fabric.
One semicircle of cardboard should be turned over with the back side up and all the feathers should be glued to it, placing them side by side. On top you need to attach another semicircle of cardboard with glue so that the reverse side is inside. You need to glue fabric parts to these paper bases, then attach the lace.

Video on the topic of the article
At the end of this article there is a small thematic selection of videos on various methods of making fans: from paper, cardboard, knitting.
This unusual accessory is perfect for any themed ball and will be a great activity for young children.
Summer- the hottest time of the year. To feel good and comfortable in the hot season, we suggest you make a fan with your own hands. It’s quite easy to make, and the pleasure you get from it in the summer is indescribable! This is a great accessory that will easily help you get rid of the annoying heat. Also, the fan can be used as a decoration for your home! You've probably noticed it on your apartment walls more than once. Indeed, it looks decent and beautiful. The fan is good for both children and adults. An irreplaceable thing in summer!
How to make a fan with your own hands?
A fan can be made from a wide variety of materials. Experimenters are welcome here! You can even make a fan using ordinary plastic forks! And you definitely have forks at home. Therefore, to make such a beautiful thing, all you need is desire! Today we will make a very beautiful and elegant fan using paper.
So, the first thing you need to do is buy a sheet of paper about a meter long and 14-15 centimeters wide. This will be quite enough. If you cannot find a sheet of this size, you should simply glue together 4 ordinary A4 sheets, and then trim off all the excess. You can do it this way.

To secure the fan you need to purchase tape.
Let's start creating!
1. The very first step is the most interesting. You need to take a piece of paper and paint it however you want. For example, you can draw flowers. animals, stars, shells, toys. Color it with pencils and markers as soon as your heart desires. This is your future fan! Create it!

2 . A beautifully painted sheet of paper will need to be folded like an accordion. The main thing here is not to rush, but to fold it neatly and beautifully. The width of the folds of the future fan should be approximately 1.5 - 2 centimeters. You will need to fold the fan like an accordion carefully along the fold lines. You will succeed!

3. Now we will need the chopsticks that we put aside! You need to attach them on both sides so that they extend about 2 cm beyond the paper edges. And then glue it on.

4. The bottom edge of the paper should be collected and wrapped with tape!

Your origami paper fan is ready! If you bring two sticks together, it will open!
In addition to popsicle sticks, you can also use coffee sticks. They will need to be purchased in quantities equal to the number of fold lines formed. Afterwards you just need to glue them, you should do this carefully and carefully. To make the future fan longer, you can place the sticks not at the very edge of the paper.
Well, making a fan is easy and simple! And the most important thing is that it can be made from available materials. To achieve the best option, you can experiment with the width of the screen, as well as with the sticks. Wish you luck!
VIDEO. How to make a fan at home?