By definition, a porch is an external extension to a building through which one enters and exits a living space. A modern cottage or house without a porch will look like unfinished buildings.
The purpose of the porch is not only aesthetic, it also performs practical functions. In winter, it protects the entrance to the house from skidding and performs additional thermal insulation functions. There are three main types - simplified, attached and built-in.
The design of the porch may be more original. For example, in recent years you can often see a porch-patio, the fashion for which came to us from Western Europe.
This porch is a kind of intermediate option between a classic platform and an open terrace. The video gives the most complete idea of how to build a porch with your own hands (see).

This new product has become popular due to its undeniable advantages - simplicity of design and functionality. Building a porch of this design will not be a problem. If you have the necessary tools and materials at hand, you can begin construction.
Drawing of a wooden porch
Even a simple (standard) drawing, drawn independently, will help to avoid difficulties during its construction.
The porch drawing must contain the following information:
- appearance of the porch. Makes it possible to visualize the final appearance of the structure;
- width of the porch - should be one and a half times wider than the doorway (you can calculate how wide the porch should be this way: 1.5 times the width of the door, this will be the minimum allowable width). This width will allow you to open the door while on the porch area;
- The width of the stairs to the porch (flight of stairs) must be at least 700 mm. Otherwise, difficulties will arise when moving people and objects along the steps;
- location of the porch platform (flooring). The porch floor should be 30-50 mm below the threshold (doorway). A lowered porch platform will prevent the doors from blocking due to snow or lifting of the porch structure;
- porch angle;
Note. Professionals advise sloping the porch area and steps by 2-3° to avoid water accumulation. An alternative would be to install deck boards with a gap of 2-3 mm.
- foundation. Types, depth, characteristics of the soil underneath;
- number and size of porch steps. The standard recommends adhering to the following dimensions of steps: height – 170-180 mm, step depth (tread) – 300-350 mm. It is desirable that the number of steps be odd. These dimensions will make movement along the steps comfortable;
- presence and installation location of fencing (balusters and railings).
Note. In construction practice, there are no norms and rules regulating the parameters of the porch. The recommendations concern only the parameters of the steps.
Drawing of a wooden porch, as an illustrative example:

Scheme of a wooden porch
It’s convenient when working when the diagram of a wooden porch is made on a large sheet of paper and is always in front of your eyes.
A good alternative would be a life-size cardboard template. A paper template is indispensable when making a flight of stairs on a bowstring.

How to build a structure step by step
Materials required for construction
So, we build with our own hands.
To do this you will need:
- Pine beams or pine logs for making floor beams and rafters (pine beams 100 x 200 mm)
- Boards for steps and landings, railings and side posts
- Several boards for a canopy (50x150 mm or 50x200 mm thick).
Foundation structure
Like any other capital building, the porch needs a foundation. For a porch, the best option is a pile foundation. Its advantages are simplicity and low cost. In addition, you can build such a foundation with your own hands in a short time, without resorting to the help of specialists.

The second stage of work begins with the bowstring. In the case of making a porch-patio, you also need to build two medium stringers.
The bowstring can be of two types - the choice is up to the home owner. A simpler and more affordable option is a bowstring with cut-out ledges. A slightly more complex option is a bowstring with embedded steps.
In order to prepare the bowstring you will need the following tools and materials:
- Thick board of the required size
- Pattern in the form of a triangle
The procedure and rules for making steps
So:
Tip: In order to better understand how to build a porch with your own hands, video tutorials will clearly show you the entire installation process. To do this, just go to the Internet and ask the search engine the appropriate question.

Installation of the platform (wooden porch floor)
This stage of building a wooden porch is simple, and can be performed even by a beginner who has no experience in carrying out such work. Over time, the boards from which the flooring is made begin to dry out.
As a result, gaps are formed between the boards, which can be quite wide. Such flooring becomes unaesthetic and unsafe.
To avoid the appearance of large gaps as a result of wood drying, it is necessary to lay the floor boards as closely as possible to each other.
When the flooring is almost ready, and the stringers and bowstrings are securely fastened to the joists, it’s time for the next stage - installing risers and treads. The riser and treads are connected in the same “tenon-to-groove” manner, and the strings from the risers are attached to each other in the same way.
The opinion that elements can be fastened together using screws and nails alone is erroneous. This design will not have sufficient strength.
The construction of the porch with your own hands is completed - everything is ready. Compliance with building codes ensures that the porch will be secure and durable. However, it needs to be taken into account. That it is not only the quality of joinery and carpentry that matters.
The durability of any wooden building, including a porch, largely depends on how correctly the wood was prepared and processed. Before starting work, it is advisable to ensure that the wood is properly dried. And in order to prevent rotting and pest infestation, the wood must be treated with appropriate chemical compounds.
How to build a porch with your own hands: video.
Mistakes when making a wooden porch
The most common mistakes when building a porch are:
- The installation of the attached staircase is too close to. In winter, the ground will freeze and the ladder may rise several centimeters. As a result, the door will open with great difficulty or become jammed.
- Another common mistake is building a porch on an insufficiently deep foundation. It should also be taken into account that if waterproofing is not carried out, moisture will sooner or later lead to swelling and damage to the wood.
Tip: The problems listed above can be avoided. To do this, you can make a threshold in the doorway. You can also avoid such difficulties by installing an extension ladder 15 centimeters below the level of the doorway.
But it must be taken into account that in both cases a step is formed that may be unsafe. You can trip over it, so this design also has a drawback.
After the wooden porch is almost ready, you can think about decorative elements. If the porch has three steps or more, installing a railing would be advisable.
If desired, you can make a canopy from wood or other materials (see), as well as other details to decorate the product and give it the appearance of a finished architectural element.
If you have built a wooden house on your site, then the absolutely logical solution would be to build a porch to a wooden house with your own hands. Despite the apparent complexity, this task is by no means so impossible, and almost every master with head and hands can do it.
In addition to the aesthetic load, what is primarily remarkable about a good porch is that this façade element has specific functional purposes:
- Protection of the entrance to the house from precipitation in the form of rain, snow and hail;
- Creating a canopy that creates comfortable shade and protects the canopy from heat and heat in the warm season;
- It is possible to create a recreation area if a large porch is arranged in the form of a veranda.
- Well, and the most important thing is the flight of stairs along which we will climb to our cozy home.

Therefore, before picking up a hammer and chisel, you need to think carefully about the above and take into account all the nuances, making the necessary amendments to the construction plan.
Proportions and sizes
We think that it is no secret to anyone that from time immemorial man has built residential buildings, taking as a basis the dimensions of the human body and his psychological perception of the surrounding space. The porch is no exception, as it must meet certain requirements of human physiology.
All the dimensions given below are generally accepted and are used everywhere in construction. If necessary, you are free to change the basic proportions according to your preferences and requirements, but do not forget about the reliability of the design.

Now let's take a closer look:
- To create a free approach to the door, you need to provide an open space that will allow you to open the door without interfering with the person standing in front of it;
- If you rely on building codes, then the width of the porch in front of a single-leaf door should not be less than 1 m 60 cm - this value is the minimum;
- For a double-leaf version of the door leaf, the norm regulates a distance of 2 meters;
- The distance from the doorway to the first step starts at 1 meter: this value should be adjusted by looking at the width of the doorway - the wider, the greater the distance;
- To protect the steps and platform from direct sunlight and precipitation, the length of the porch canopy should extend beyond the boundaries of these elements. Usually a protrusion of 30 centimeters is left.

Now, as for human physiology. There are also certain laws expressed in specific formulas and meanings:
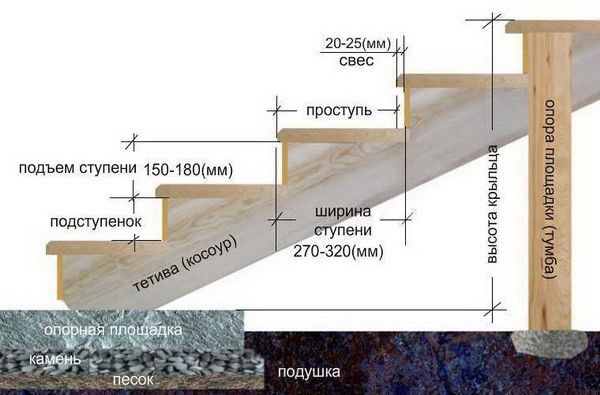
- The average step length for an adult is about 63 cm. Based on this, the optimal values for the height and depth of steps were derived. They are 16 -19 cm and 25 - 33 cm, respectively;
- If nature has endowed you with non-standard dimensions, then when designing a porch you can use the formula presented in the picture above. Its essence is that the width of your step should proportionally fit two heights and one depth of steps. In this case, the height should be one and a half to two times less than the depth.
- The projection of the stair cover from the riser should not be more than five centimeters, otherwise when walking you will constantly trip over them, risking injury, especially in winter, when the surface of the stairs is covered with a layer of ice or frost.
Advice! Of course, the best way to protect yourself from winter is to attach a closed porch to a wooden house, but this is not always feasible. Therefore, take care in advance about installing an anti-slip coating and remove ice from the steps in a timely manner.

To ensure safe movement along the stairs in the winter season and beyond, it is necessary to equip the passage with handrails. The instructions stipulate that any staircase with three or more steps must have this element.
The standard height of handrails varies from 80 to 90 centimeters.
The following requirement is mandatory in design, but is not always feasible in practice when building a porch with your own hands - a person moves in space in such a way that when climbing a flight of stairs, he starts and ends it with one foot. Therefore, the correct staircase should consist of an odd number of steps (in apartment buildings with a floor height of 2.5 meters, the number of steps in a flight is 9).

What else should you consider before you start building the porch of a wooden house?
The level of the platform in front of the door should be located below the border of the door leaf by 5 or even 10 centimeters. Otherwise, you risk that, as a result of seasonal soil fluctuations, the raised porch will block the door and prevent it from opening freely.
Foundation and place for it
Like any other construction, the construction of a porch begins with the foundation. You must check all dimensions and heights at the design stage - ideally, you should have a full-fledged drawing. If you do not have enough skills in carrying out such work, we recommend that you hire a third-party specialist who will cope with such a simple task in a very short time.
Advice! It's better to be an inexperienced builder with the right blueprint than a jack-of-all-trades who has little idea of the final result.
The designer will indicate in the drawings a complete layout of the porch along with the foundation. He will determine the type of soil and give the necessary recommendations so that the structure is reliable and lasts as long as possible.
Among other data, the depth of soil freezing will be indicated (this is extremely important information when laying a foundation), below which you will need to dig trenches for the foundation or drill wells. If you have refused the services of a professional, then you will have to look for this data on the “net”, where the limit values for each of the regions of our vast homeland are posted.
The foundation for a wooden porch can be of three types:
- Wooden piles– the most common, inexpensive and simple solution for such purposes. This is exactly what we will describe in this article.

- Metal piles– form a strong and even frame with horizontal jumpers, sheathed on the outside with wood. The price of such a solution will be higher, and besides, you will need to hire a craftsman who will reliably strengthen and weld the frame into a single structure. The disadvantages include the fact that the metal has a considerable weight, and for work you will need at least three people, sometimes with the help of lifting equipment.
It is better to use such a solution if you want to make a terrace from synthetic composite materials, which are very demanding on the evenness of the base, and are laid on special profiles, or, conversely, the size of the porch is small in size, and it consists only of steps that will contrast with the main one facade of the building.

- Concrete or block- These are permanent foundations for a porch, which require compliance with certain standards when adding to a wooden house. There are a great many types of concrete foundations, but the main requirement for their construction is that between it and the house, or rather its foundation, it is imperative to provide an expansion joint.

What is it for? During seasonal ground movements, due to the difference in the loads experienced by the structures, the foundations at their joints may crack.
Expansion joints are filled with elastic materials to prevent moisture from entering. Rubber gaskets or mineral wool are excellent for these purposes, which are subsequently covered with a special cover.

Let’s finish our preparations here and begin to look at the construction process.
We do it ourselves
As already mentioned, we build a porch for a wooden house only from wood, so that it fits most harmoniously into the overall picture of the facade. Next, let's talk about everything in order.
Porch base
Well, now let's take a closer look at the construction of a foundation made of wooden beams. And we'll start by marking out the area using a string and a tape measure.

This is done approximately as shown in the photo above.
- The wall and doorway are the main landmarks from which you need to measure all the necessary distances, not forgetting to maintain right angles at the intersections of the lines.
- To do this, check the lengths of the segments to the nearest millimeter. Draw both diagonals in the resulting rectangle, which should be equal to each other.
- If right angles are alien to you, and you have chosen a porch of an unusual shape, for example, a pentagram, then focus on the geometric features of the figure you are planning to build.
- Next, we determine the location of the piles - usually these are the corners of the terrace, including those adjacent to the house, and the corners of the first step. If the porch and flight of stairs have significant dimensions, then increase the number of piles at the rate of 2 piles per 1 - 1.2 meters of free span. This value can vary greatly depending on the thickness of the beams of the lower trim of the veranda, and reach 2.4 m with a cross-section of 100 * 150 mm.
- Now it is necessary to drill wells at these points with a depth exceeding the depth of soil freezing by 15 - 30 centimeters.
- To better remove moisture from wooden piles, it is necessary to make a drainage cushion from medium-fraction river sand and gravel, which are poured into the holes alternately in small layers.

- Next, piles are installed in the holes, the recessed ends of which are pre-treated with waterproofing material (bitumen), or burned over a fire for the same purposes. This treatment will protect the wood from premature rotting and damage.
- If the size of the terrace has impressive dimensions, or the piles go up, forming the basis for the porch canopy, then before installing them, asbestos-cement pipes are placed in the holes, into which concrete is poured to three-quarters of the depth of the well. But first they are aligned vertically, compacted around with crushed stone and soil, and a reinforcing belt is made inside.
- This design will secure the pile more reliably and protect the wood.

- Next, piles are installed (in holes or asbestos-cement pipes, after the concrete has hardened), which must be aligned strictly in a plane and vertical, and firmly fixed for a while. Use rough sheathing, guy lines and wedges for this, setting up the structure like a tent.
- After fixing, we fill the space around with concrete mixed with screenings and small crushed stone - such concrete will be much stronger. Don't forget that we have to make a rather impressive layer.
- Piles adjacent to the house are attached to the wall using long screws, anchors or nails.
All further work is carried out only after the concrete has completely hardened.
Installation of stringers
Steps on a flight of stairs can be attached in various ways, but most often craftsmen use structures on bowstrings. The bowstring is an inclined guide support that ensures reliable fixation of the steps.

You can attach the step to the bowstring by inserting it into a groove, or using self-tapping screws, nails, pins, dowels or special steel fasteners for fixation. But most often they use bowstrings that have cutouts for steps that are laid on top. Such bowstrings are called stringers.

Making a stringer yourself is not such a difficult task. You just need to accurately mark the boards and make straight cuts along all the marks, for which a pre-prepared drawing of the stairs will be very useful to you.
Tools you will need:
- A circular saw;
- Square and pencil;
- Meter;
- Wood saw.
The number of stringers to be prepared is, first of all, determined by the shape of the staircase and its width. Sometimes you can find options on one stringer, but such work is the privilege of qualified specialists. We will need at least two supports, the number of which will increase depending on the width of the passage.

Stringers can be divided into two main types, differing not only in shape, but also in the complexity of manufacturing:
- Stepped ones - we showed them in the photo above. They have triangular cutouts placed at equal distances from each other along the entire length of the part. This design has one drawback - the beam, after cutting slits in its body, becomes thinner and greatly loses strength.
- Stringers with “fillies” - have smaller slots, and are equipped with additional elements, the “fillies” themselves, and dowels for fixing them. This design can only be done by an experienced carpenter, so we will not recommend it to beginners.
Stringers are the most labor-intensive and complex parts of the porch being built. When marking and cutting boards, be especially thorough, checking often and comparing the result with the parts already cut.
Advice! To make several stringers of the same shape, use a stencil that you first cut out of plywood, thick cardboard or a piece of MDF.
- If the width of the tread in the stringer may be less than the actual step (laying with release), then the height of the riser must exactly correspond to the height of the cladding part of the same name.
- Do not forget to take into account that the upper step of the stringer should become a continuation of the main platform of the porch. Please take this into account when marking this element.
- To ensure that the supports are strong and do not bend under the weight of people walking on the porch, boards with an end section of at least 60*300 mm should be used as the material. This way you guarantee yourself the quality of the future product.
- For these purposes, use boards that do not have cracks or falling knots. Beware of overdried wood, which has greatly lost its strength.
- Since our structure is external, contact of the stairs with moisture and ultraviolet radiation is ensured. Of course, you can buy boards cheaper, from soft wood (pine, spruce, etc.), and treat them with special impregnations, but it would be better to immediately take hard wood, which is not only more resistant to the above-mentioned troubles, but also has a good density, making them resistant to mechanical loads.
The leaders among such species are oak, Siberian larch, beech or maple. The price of lumber will be higher, but such a porch will last much longer.
Before you begin assembling all the elements into a single structure, you need to treat the wood with antibacterial impregnations and fire retardants - substances that protect the wood from fire.

After the impregnations have completely dried, you can begin installation:
- We install the beams of the lower frame on the strengthened piles - they are attached from the outside with nails or long self-tapping screws.
- Waterproofing can be laid around the pile at the attachment point.
- We cut grooves in the horizontal beam for placing the upper edge of bowstrings or stringers in them.
- The lower part of the stringer is laid on a supporting horizontal plate in the form of a beam. At the same time, the cut can be done both in the beam and in the stringer. In the first case, it is better to tie the elements with steel corners, and in the second, with studs.

- Next, we install logs, forming the basis of the future site. They are placed flush with the bottom trim and secured using special stainless steel brackets.

- The thickness of the logs should not be less than 5 centimeters, as it must withstand the weight of people walking on it without deflection.
- Lay them perpendicular to the direction of laying the decking boards that will subsequently cover the floor. The laying distance is 50 cm.
- Next, the deck board is laid, which is laid with a adjusted gap for water drainage.
- Laying the steps starts from the bottom - first the riser is installed, then the tread.
- Fastening is done with galvanized self-tapping screws with a wide head, which needs to be recessed a little. To do this, first drill a narrow hole for the self-tapping screw, and slightly widen its edge with a wider drill, creating a countersunk hole.
- In the future, you will need to hide the holes using wood putty.
- To avoid this, you can purchase special staples and use wood glue.

This concludes our review, in which we examined the construction of a wooden porch for a house with our own hands. As you can see, the process is very exciting, and many of us can do it. You can get more information about it from the video in this article, where an experienced master performs similar work.
The most correct version of the porch is when its foundation is cast along with the house. In this case, there are practically no problems. Sometimes when planning a building it is forgotten. Then a porch is added to the house. An extension is made mainly from three materials: wood, metal and concrete. If the house is brick, they can build it out of brick. Another option is to make it from building blocks and then finish it. In any case, when planning to make a porch with your own hands, you must immediately decide what kind of foundation to make and whether or not to connect it with the base of the building.
How to calculate parameters
First you need to decide which way the steps will go. They can be on one, two or three sides. You determine this based on personal preferences and the finances that you can/want to allocate for construction. The height of the porch depends on the height of the plinth and should be 50-70 mm below the edge of the door leaf. This small step prevents precipitation from getting inside the house. Perhaps more importantly, it prevents the doors from becoming blocked if the porch rises up due to frost heaving (if the doors open outward).
Determining the dimensions of the upper platform
The layout of the porch begins with determining the size of the upper platform. If the doors open outward, you should be able to stand on the landing to open the doors. That is, its depth should be 30-40 cm greater than the width of the door leaf. According to GOST recommendations, the dimensions of the platform should be 1.5 times the width of the doorway. More is possible - less - undesirable - inconvenient.
If your doors are 80 cm wide, then the depth of the upper platform at the very minimum is 120 cm. Its width is determined based on the tastes and proportions of the house, but it should definitely be greater than the width of the doorway.
We count the number and sizes of steps
You know the height of the porch: 50-60 mm below the door leaf. The recommended height of the step (riser) is 15-20 cm. Divide the height of the porch by the height of the steps, you get the approximate number of steps. The number rarely turns out to be a whole number. The remaining centimeters can be divided between all steps or one of them can be made higher. Another option is to create a small step at the bottom, although this may be awkward.

The optimal width of the step (tread) is 25-30 cm. Knowing the number of steps, the depth of the upper platform, the depth of the steps, you can calculate the full dimensions of the porch. Using them you can already develop the foundation for the porch.
When choosing the parameters of the steps, you must adhere to the recommendations of SNiP: the sum of the tread and double riser should be in the range of 600-640 mm. For example, you calculated that the height of the step (riser) is 17 cm, the tread (depth) is 280 mm. After performing the calculations we get: 170 mm * 2+280 mm = 620 mm. We fit into the recommended parameters, which means there is no need to change anything.
What kind of foundation is needed?
If the porch is planned to be light - wooden or metal - the foundation is most often made of piles or columns. Specifically chosen based on geological conditions. On well-draining soils with low groundwater levels, it is sufficient; if there is a tendency to heave, it may be necessary.
For a heavy porch - made of brick or monolithic concrete - a strip foundation is made or. The type of foundation is most often similar to the one on which the house is built.

Next, you need to decide whether you will connect the porch foundation to the house foundation or not. Decisions are made based on the planned mass of the extension and the type of soil. Both options have disadvantages. If there is no connection, cracks often form at the junction of the porch and the house; due to frost heaving, the porch may become warped. Owners of dacha plots often face this problem - usually the porch to the dachas is made of wood and is disconnected. After the ground thaws, it may “sit” in place on its own, or it may require some additional measures.
When installing connections, it is also possible for cracks to form, but not only at the joint, but also in the “body” of the extension. This happens if the reinforced connections installed cannot compensate for the uneven load created by the house and the extension. Therefore, a connected foundation for a porch is made if it is attached to a heavy house and is itself heavy and massive, made of reinforced concrete. The second difficulty with this decision is to make the connection high-quality. To do this, use ribbed reinforcement with a diameter of 12-16 mm, for which holes are drilled in the foundation with a given diameter. Reinforcement is hammered into them and a frame for the porch is knitted on its basis.
There are two main designs of stairs: on bowstrings and on stringers. They can be made of wood or metal. There are also combined options - metal + wooden steps or metal + concrete steps.

Staircase designs - on bowstrings and on stringers
On the bowstrings
Stairs on bowstrings are the simplest. For a porch - a good option, especially if the house is wooden or a small country house. Support bars are attached to the inside of the bowstring. If you are working with metal, the bars are welded horizontally (with a minimum slope of 1-2° to allow water to drain from the steps). In the case of wood, support bars can either be nailed to which the step will then be attached, or recesses can be cut into the string (no more than 1/2 the thickness of the board), into which the step boards are inserted.
On the stringers
A staircase on stringers can also be of a simple design - with open supports. In this case, triangles are cut at the required angle in the upper part of the board. Their lower part serves as a support for the steps.

When cutting the stringer, set aside the height of the step and the width of the tread. They are connected at right angles. Using the applied markings, a template is made, with which all steps are marked.

The number of stringers in a staircase depends on its width and the thickness of the boards used for the steps. The thinner the board for the steps, the more often you need to install stringers. If you use 25 mm boards, then there should be a distance of no more than 50-60 cm between the two supports. If you need a larger staircase width and don’t want to install three stringers, use thicker boards. It is important that they do not bend under your feet.

If you decide to weld a ladder on stringers from metal, you will need to be patient: you will have to weld many small sections, but the formation principle is the same.

Methods of fastening parts
The lower edge of the porch stairs can sometimes rest directly on the ground. This option is simple, but unreliable. Firstly, the soil may settle and the stairs will begin to collapse. Secondly, upon contact with the ground, both wood and metal are destroyed faster. There are special impregnations for wood (Senezh and Senezh Ultra, for example), and metal is well prepared with a primer and painted in several layers. However, it is better to make a base - pour a shallow tape on which the bowstrings or stringers will rest.

There are two ways to attach a porch ladder to a reinforced concrete base - to a beam - a beam with a cross-section of at least 75 * 75 mm or to an embedded beam of a smaller cross-section (pictured on the left).
Difficulties may also arise with the installation of porch posts. There are several ways. There is one very simple and effective one that works great even on heaving soils (clays and loams). Holes 50-60 cm deep are dug under the pillars. A bucket and a half of sand is poured into them at the bottom and compacted well. Half a bucket of crushed stone is poured on top of the sand and compacted too. They put up a pole, level it, put spacers that will hold it in a given position. The space between the wall of the hole and the pillar is gradually filled with crushed stone, tamping it thoroughly. The hole is filled flush with the ground, the top can be concreted (so that precipitation does not drain), but not spilled to the very bottom. Pillars installed in this way do not lead even with severe heaving. A significant part of the water goes into the sand, and the remaining forces of frost heaving are absorbed by the rubble, neutralizing them.

If piles, a strip foundation or a monolithic slab are poured under the pillars of the porch, or a columnar base is laid, then studs or special glasses are walled into the concrete to secure the wooden posts. After the concrete has matured, the rack bars are attached to them with wood grouse or bolts.
If the racks are metal, a corner with a wall thickness of at least 3-4 mm is placed in the concrete so that it can be easily welded to it later.
When building a wooden porch with your own hands, questions may arise about attaching the railings and balusters. They can be assembled using ordinary nails, but if desired, you can use bolts or wood grouse. In this case, holes are pre-drilled, then fasteners are installed in them and tightened using an angle wrench. Such a connection is certainly more reliable than simply using nails.

If the porch is attached to a freshly cut wooden house, in which the shrinkage has not yet been completed, and the design of the porch provides for a canopy, the posts must be attached to special adjustable plates.


Please note that both the metal and wood that you will use to build the porch require careful processing. The porch is exposed to all climatic influences and the materials require good protection.
Monolithic concrete stairs
The most durable stairs are made of monolithic concrete. They take longer to manufacture than metal or wood ones, but their service life is calculated in decades. The types of concrete stairs are described in detail in the video. The basics of calculation are also given.
How to make a concrete staircase on stringers with your own hands, see the following video.
Wooden porch
A wooden porch is one of the most common options in our country. Wood is plastic, easy to process, costs relatively little (in our country), and forgives many mistakes. That is why it is a favorite building material.
It also has disadvantages: it requires good protection before construction begins (antibacterial impregnations and fire retardants), as well as regular maintenance - updating the protective paint coating. Then it looks attractive for a long time, otherwise it quickly loses its decorative effect.
One of the options for building a wooden porch with a ladder on bowstrings can be seen in the video. Please note that the porch is being built on sandy soil, so the method used to install the pillars is not suitable for everyone. Everything else is clear.
Brick porch
Since brick is a dense and heavy material, a brick porch requires a serious foundation. Usually this is a monolithic slab, with double reinforcement and it is better if it is larger in size than the planned porch.
When calculating the parameters of the steps, it is necessary to take into account the dimensions of the brick and the thickness of the seam between them. Then the laying work will be easier - no need to cut the brick. If you are not going to cover the porch, use high-quality material for the outer rows. The inner rows - backfilling - can be made from scrap or building blocks and their remains.

Brick porch with wooden steps
If the house is on a high base, making a monolithic brick porch is too expensive. Then the columns or walls are folded, leaving empty space inside. It can then be used for household purposes or covered with decorative panels. If an upper platform is needed, these columns/walls are covered from above with a concrete slab - homemade or ready-made - this is your choice. Then a staircase is attached to the resulting base. It doesn't have to be brick. It can be metal, concrete or a combination.
Photo report: wooden porch on a metal frame
A theory is just a theory, and in construction too. You always understand the essence of the matter better if you observe the process yourself, because you can see how others do it and learn something for yourself.
At the request of the parents, an exact copy of the old porch was made. The only difference is that the new one has a welded metal frame.

In place of the demolished porch, a pit with a depth of 25 cm was dug. Sand was poured and compacted into layers at the bottom, crushed stone was placed on it - 10 cm each. A metal mesh with a mesh of 10 cm was laid on top and the whole thing was filled with concrete.

A metal frame was welded according to the previous dimensions of the porch (from a 70*5 mm corner). The sidewalls are set vertically and secured with studs. Next, the base for the benches is welded to them. All metal is treated with a rust converter, primed and painted twice.

The wood used for construction was dry. Planed boards were cut to size (the width of the porch) and treated with impregnation for direct contact with the ground.

We lay the dried boards on the frame. You have to drill a hole for each fastener - you can’t just take a corner.

At this stage, two mistakes were made at once. The first is that the sheathing did not start from the sides. They immediately began laying the steps. As a result, water constantly flows into the joints of the side paneling and steps and warps the wood. It is necessary to start the cladding from the sides, and make the steps a little longer so that they protrude beyond the side cladding by at least a couple of centimeters. The second mistake is that the boards on the porch are laid close to each other. With high humidity they swell and the surface becomes uneven. When laying porch sheathing, make gaps of at least 5-8 mm.

After all the boards are secured, they are sanded. First, with a belt sander with a coarse grain, then with a disk sander with a fine grain. The process is long. At the same time, the task of removing the green color of the impregnation is being solved. It is not covered even by three layers of tint.

After sanding, we begin painting. We apply it three times. Each layer after the previous one has completely dried. The resulting color is dark mahogany.


While the paint dries completely, we begin making the benches. We cut boards for them, grind down an oblique chamfer (for beauty), and cover them with impregnation.

We make the backs with a small decor - roundings at the edges.

We saw along the marked lines with a jigsaw, then sanded to a smooth edge.

The sides are covered with plywood, which was painted the same color. The porch is ready.

Do-it-yourself finished wooden porch - side view
DIY brick and concrete porch: photo
The walls of the staircase landing were pre-built from brick, on top of which a monolithic concrete slab was poured. Along the edge, a frame of corners is embedded into it so that the stairs and railings can be welded.

Porch plan: how everything should look

From a corner 70*70*5 mm we cut blanks of the required length. After which we treat them with a rust converter. We start cooking after the reaction has stopped and the metal has dried.


We welded the first metal string.

The finished sidewall was attached to the concrete base with two pins.

Attaching to a concrete support support
We cook the second string in the same way and secure it. When working, make sure that the two bowstrings are in the same plane.

We begin to weld the support bars. Here it is important to constantly monitor the horizontality so that the steps are not oblique.


We weld transverse pieces of the corner to the support bars to form a shelf.

The corners are welded so that they form a frame. We put a piece of slate sheet in it. We lay out a reinforcing metal mesh on the slate. We weld the edges of the mesh to the frame.

We pour concrete into the prepared steps. We make it high-quality so that the steps do not wear out longer.

While the concrete gains strength, we begin to work on the posts that will support the canopy over the porch. For them we take a profiled pipe 70*40*3 mm. We cut four columns from it. Two are slightly longer - they will be near the wall of the house, two are 15 cm shorter - they stand on the outer edge of the porch, creating the necessary slope - so that the water and snow melt off normally. For railings and crossbars we use profiled pipe 40*40 mm.

All metal is also treated with a rust converter.

First we set up the racks, grab them, install temporary stops
To avoid lateral stresses, it is important to position the racks strictly vertically. We set them up, grab them, use short seams in several places, and check again whether they are positioned correctly. We weld the temporary stops and only after the next check we weld them according to all the rules.

Once all the posts are aligned and welded, you can assemble the railings. At the required height they are fixed strictly horizontally.


Then we proceed to install the roof. We also cook it from a 40*40 mm profile pipe. First, strapping around the perimeter - at the level of the shorter posts, then - the rest of the structure. It's not complicated, but it takes a lot of time - a lot of intersections.

Then it was time to do the railings and decorations. And again, there are no difficulties, it can be done easily if desired.

That's it, the porch is ready for finishing work. Rough tiles for outdoor use were purchased for the steps and landing. The sidewall of the monolithic slab was also trimmed with it.

The metal was painted with paint that matched the tone, and the corrugated sheeting left over from the installation of the roof was used on the roof. The DIY porch turned out pretty good.

Photo ideas for porch design


Porch to a wooden bathhouse or cottage - a staircase made of logs

Porch covered with WPC - wood-polymer composite


The porch of a private house or country house is a kind of “face” of the structure. The design of the porch, which attracts attention and serves as a reliable support, allows you not only to get inside the house, but also to spend your free time, sitting comfortably in the air.


Features and building codes
Essentially, the porch is a kind of extension with steps to the building, with the help of which you can enter or exit the room. It is quite important for giving a finished, neat look to a private or country house, and also protects the building from snow and rain. Most often, the design parameters are thought out at the design stage, but one of its features is the possibility of an extension after the building itself has been erected.
Traditionally, the material that is used to build the home itself is also used to construct the porch or veranda. Therefore, a wooden house should have a porch made of wood, and a brick house should have a porch made of brick. However, most often even a wooden veranda with steps is added to a brick house, since this material is cheaper and easier to work with.


Before starting construction, it is necessary not only to choose the design you like and make all the calculations, but also to familiarize yourself with the basic building codes.
- The area for the porch must be made large enough, since it is recommended to choose the width of the structure so that two people can easily separate on it (at least 1.5 m).
- The door should open outward without obstruction, allowing people standing on the porch to avoid colliding with it. The platform itself can be attached to the facade wall or rest on separate pillars, the main thing is that it is 3-5 cm below the edge of the front door. This is quite important, since in the winter season the porch will rise and can block the entrance to the room.


- The width of the stairs, according to the standards, must be at least 1 m, and the height of the steps should not be less than 16 and more than 20 cm for comfortable descent and ascent. The most comfortable depth would be a step of 25-30 cm. The overall steepness (slope) of the flight of stairs depends on the size of the steps: the smaller it is, the more comfortable it is to climb. To prevent water from accumulating on the platform or steps during precipitation and damaging them, it is necessary either to leave small gaps between adjacent boards or bricks, or to install the platform and steps at a slight slope.
- It is best to install a separate foundation for the porch; there is no need to attach it to the already finished foundation under the house itself. It is recommended to build two types of foundations for the porch: poured or columnar. If possible, you can build a frame system from reinforcing bars, which will increase the reliability and durability of the structure.


Types of structures
Depending on the type of structure, the porch can be:
- open;
- closed;
- on two sides;
- in the form of a vestibule, terrace and even a gazebo.


The closed design has greater protection from wind and precipitation. In summer, you can hide under it from the scorching sun, and in winter, even the heaviest snowfall will not cover the front door or block it. However, this design is not easy to install and is quite expensive. The porch area is completely covered with a canopy, there may be a canopy over the stairs, the sides are covered with fences to the height of the railing or completely. This design is perfect for any home with the right selection of design and materials.


An open small porch is much cheaper and easier to build. It only has railings and a small canopy, which sometimes does not even cover the entire area. In the simplest case, the canopy and railings at the porch may also be absent, but if the extension is high enough, the absence of a fence poses a certain danger. Most often, such simple attached structures are erected near country houses, which are simply not used in winter. The small foundation of such a porch is attached to the outer wall, and the extension itself consists of only a couple of steps and a small platform near the door and is not able to protect it from rain and snow.


The design of the vestibule is a small closed buffer zone, which reduces the temperature difference between indoors and outdoors. The vestibule also reduces heat loss in the winter and increases the coolness inside the house in the summer.


A porch with a staircase descending on two sides is erected when the construction of an ordinary staircase is impossible due to the presence of outbuildings. The layout of such an entrance allows you to go down in the direction you need, and go up from any side without going around the porch. Before building it, it is better to consider other options, since the design is quite complex and expensive.
The terrace is often mistakenly called a "veranda". Their main difference is that the veranda is located under the same roof as the main building and stands on the same foundation, while the terrace is built close to the house. Most often, the porch-terrace is an open structure with or without a large canopy. On the terrace you can place outdoor furniture or beautiful vases with flowers.


A porch-gazebo looks like an open veranda and is usually built of wood. Instead of a roof, you can put a mesh frame over such a gazebo, which in the summer will be covered with wild grapes or rose hips.


Sizes and shapes
The first thing you should pay attention to when designing a porch structure is its size.
- They depend on the dimensions of the country building itself: for a small two-room country house it is not practical to build a large covered terrace, and a small extension staircase will look strange near a chic country mansion.
- Dimensions must not contradict building regulations. If the house is built on uneven terrain, it is more convenient to build a porch with a high base, stairs and railings. To support a heavy canopy over a large porch, beautiful columns can be erected around the perimeter.


The shape of the porch may depend on the configuration of the street staircase and be:
- rectangular;
- angular;
- in the shape of a trapezoid;
- radial: semicircular, oval, round;
- asymmetrical.


There are no strict regulations in choosing the shape of the porch; it is selected in accordance with the design of the site and the house itself. Rectangular and square designs add a certain severity and weight. Round ones, on the contrary, soften the overall appearance of the structure. The design does not have to be a perfect circle; it is enough to just outline a small circle and remove sharp corners.
An original solution would be a corner porch, which can be of absolutely any shape. You can build a trapezoidal platform, a triangular and even a completely asymmetrical complex structure. The main thing is that the porch harmoniously complements the single design idea and does not introduce dissonance.


Material selection
Natural and artificial stone are well suited for the construction of large monolithic structures. Granite is durable and wear-resistant, but its price on the building materials market is quite high and it is used in the construction of luxury real estate. For more economical options, sandstone is used, which is easy to process yourself and will fit perfectly into any design.


The finished stone porch can be faced with clinker tiles or porcelain stoneware.
There are special sets on sale that include three types of tiles:
- for facing steps;
- standard product in various sizes;
- corner for steps.


With all the elegance and beauty of stone structures, wood remains the most popular material for the construction of stairs and platforms. It is best to choose hardwood, such as oak or alder. A more economical option is linden and larch boards. Before installation, the wood must be treated with a special solution containing an antiseptic, which protects the wood fibers from rotting processes. To prevent wooden steps from being slippery, small grooves can be cut along the edges.


You can also build a structure from brick or a metal profile, or install a forged ladder.


Foundation
The optimal foundation option for a wooden porch area is piles. This design is economical and can be easily erected on the site with your own hands in a short period of time. In addition, the columnar foundation allows you to make the porch high enough and install it on an uneven surface.
It is advisable to do strip and slab foundations if you plan to build a large veranda or patio. The slab foundation is tied to the foundation of the house, which allows you to install the porch even on moving soil.


Manufacturing stages
Since the most popular option is the construction of a porch made of wood, it would be advisable to consider all stages of manufacturing using its example.
- Design. Before you start building anything with your own hands, you need to think through and calculate everything. The design of the porch, the width and length of the platform and stairs are selected. The number of steps is calculated so that a person steps onto the landing with the same foot with which he began climbing the stairs. It is advisable to provide fencing, a canopy and railings. It is not recommended to attach the structure to the building itself with a monolithic connection, as cracks may occur due to different shrinkage into the ground. Based on the selected parameters, a general design drawing is created, as well as small diagrams of individual fasteners and elements, which you can take with you when purchasing materials or quickly view when performing construction work.


- Preparation of materials, construction of the foundation. It is necessary to purchase timber for the installation of support pillars with a cross-section of 100x200 mm, boards of the selected material 30 mm thick, slats 50 mm thick for railings and fences. Additionally, antiseptics for wood processing and cement are purchased to secure the support pillars.


Tools you may need include various fasteners (screws, nails), a shovel, a saw. For measurements, it is most convenient to use a construction tape and a level, and fasten the parts with a screwdriver or hammer.


Unlike a strip or slab foundation, a pile foundation does not require large financial and time investments. The beams must be pre-treated with an antiseptic and allowed to dry completely. Then mark the installation locations of the support and dig holes 70-80 cm deep in the places. It is necessary to lay sand and gravel at the bottom of such pits to increase the stability of the foundation pillars.
The piles are lowered into the hole and leveled; only after this can they be filled with concrete. After complete drying, the supports that are adjacent to the wall of the house can be screwed to it using self-tapping screws. This will add strength to the resulting structure.


- Making stringers, fastening steps. The stringer (or bowstring) of a staircase is a side element that holds the steps. All stairs have such an element in their design and differ only in the way the steps are attached: with mortise, sliding and attached corners. To mark the recesses on the stringer, you need to make a small template, one side of which corresponds to the size of the horizontal part of the step (tread), and the second to the vertical part (riser). The string is cut using a saw along the marked lines, and a concrete support platform is formed at the point where it connects to the ground.


- Assembly of the structure. After the concrete has completely dried on the supporting platform, you can proceed directly to the installation of the entire structure. The finished stringers are attached to the supports with the upper edge and to the joists of the support platform with the lower edge either by sawing or using the tongue-and-groove method. Then the wooden floor of the site is installed, the boards are tightly fitted and connected using nails or self-tapping screws. It is important to leave a few gaps so that water does not accumulate on the porch during rain.
- Laying steps, installing railings and canopy. Laying begins from the bottom, the steps are attached using the tongue-and-groove method and additionally secured with small self-tapping screws. The riser is attached first, and the tread is already fixed onto it. Lastly, the railings and canopy are installed, if planned.


What to paint with?
A finished wood porch can be treated in a variety of ways to maintain or enhance its appearance. Using wax, you can protect wood fibers from moisture and dirt, which negatively affects its strength. A carved wooden porch can be varnished, which will not only protect the material, but also make numerous edges and cuts sparkle in the sun, revealing the master’s idea. However, the easiest way to finish wooden structures located on the street is painting.
It is difficult to imagine a private house without a porch. The process of its construction may vary. The best option is to cast the foundations of the house and the porch at the same time. However, steps are often thought about after the building is built.
In this case, the porch is attached, for which three types of materials are used - wood, metal, concrete.

How to build a porch correctly
Attaching a porch to a house with our own hands is within the capabilities of many of us. Once you decide on the direction of the steps (they can go in one, two or three directions at the same time), you need to choose the height of the porch. It is desirable that it be lowered by 50-70 mm in relation to the border of the doorway.

There are two points to consider here:
- eliminating blocking of the door leaf opening outwards;
- preventing water from entering the house after precipitation


Calculation of the dimensions of the upper platform
For doors oriented outward, you should prepare an upper platform with a depth that is 300-400 mm greater than the width of the door leaf. At the same time, there are GOST requirements - the size of the site must be at least 1.5 times larger than the opening. For example, you installed a door whose width is 900 mm, then the size of the platform should be over 1350 mm.

Design of steps
When determining the parameters of the stairs, you can focus on the recommended step size of 15-20 cm. If you divide the height of the porch by this size, you can get the required number of steps.

Of course, you're unlikely to get an integer. Therefore, you can vary the height of the steps within the recommended limit, distributing the excess between them. Or provide a small step at the very beginning of the stairs. But the width of each segment can be within 30-40 cm.

There are also the following recommendations: if you sum up the tread size with twice the step value, then the result obtained should be 600-640 mm. For example, when designing steps with a height of 175 mm and a tread of 280 mm, the resulting value will be 170*2+280=630 mm, which fully complies with the criterion under consideration.

Selection of base
The heavier the designed porch for a private house is, the more powerful the foundation is required. If for relatively light wooden and metal structures you can limit yourself to a pile or columnar foundation, then a concrete or brick structure will require a strip foundation or a monolithic slab.


It is also important to understand whether you will connect the foundations of the house and the porch. You need to focus on the characteristics of the extension itself and the characteristics of the soil. If you don’t tie, you need to be prepared for cracks to form at the joint, for example due to frost, which will cause the structure to warp. Repairs may be required in the future.

A bound base also does not guarantee the absence of cracks. They may appear in the mass of the porch itself. Because reinforced reinforcement cannot always cover the difference in loads between the house and the extension.

This base option is recommended if the structure of the house and porch are quite massive. For example, when the latter is made of reinforced concrete. This requires a high-quality bond using reinforcement with a diameter of 12-16 mm, driven into pre-made holes in the foundation. Then the frame is built.

Selection of staircase design
Stairs can be built on bowstrings or stringers. Wood, metal or combinations, including with concrete, are used for manufacturing.

The bowstring option is suitable for a wooden or small house. The fastening goes like this. The inner surface of the bowstring is connected to the support bars.

For metal parts, welding in a horizontal plane is used, and for wood, simply nailing bars and then attaching a step is suitable. It is also permissible to cut notches in the bowstring to install steps.

The use of stringers may involve the use of open supports. To do this, you need to cut triangles at the top of the board, the base of which will be the support for the step.


If you choose the method of cutting the stringer, you will need to orientate yourself by the height of the step and the width of the tread. It is advisable to connect them at an angle of 90 degrees. Many experienced craftsmen recommend first making a general template, which you can use in subsequent work.


Remember you need to choose the right number of stringers. This depends on the parameters of the staircase itself and the thickness of the board.

Thin boards will require more frequent installation of stringers. For example, a 25 mm board requires a distance between supports of up to 60 mm. Deflection should be avoided.

Porch structures made of different materials
There are several options for choosing material for the extension. You must decide on the porch design yourself, based on the type of house, soil characteristics and your own preferences.


Wooden porch
This is a fairly popular material for making an extension of this type. It is recommended to use hardwood, such as oak. Larch, spruce and other conifers will also suit you. True, special impregnation will be required.

First, the load-bearing beam is installed. Teeth are pre-cut in it, and steps are placed on the horizontal ribs. This beam is called a stringer and serves as additional support. A distance of 500 mm is left between the stringers. Their number will depend on the intervals specified by the project.


To arrange the bowstring, take a thicker board. The two strings must be held together by crossbars. In between, stringers are attached to the beams.

Cutting out the ribs on which the steps will be fixed is done using a square. Mistakes can lead to sagging and swelling of the steps.

The width of the steps should ensure comfort for residents. And their number is preferably odd - this way you will get an additional stiffener. Well, don't forget about the railings. Their presence is desirable if the number of steps is more than three.

The presence of an overhang is determined by the overall design. If you have glazing or reliable weather protection, then its presence is not necessary. But at the same time, the overhang itself allows water to flow onto the plane of the lower step, preventing it from getting into the grooves after rolling down the riser.


When you mount the porch to a wooden house on the foundation, you can form a small trench by applying pressure to the lower beam of the stringer. Of course, if the concrete has not yet hardened. This will increase the strength of the ladder. To arrange the upper platform, take a board that has convenient dimensions. It is necessary to accurately adjust the joints to prevent the occurrence of deformations in the future.

Metal construction
This extension looks quite elegant. But you will need the ability to work with welding equipment and use standard parts. Moreover, the cost will not be too high. Although the use of forged parts will increase the cost and will require pre-ordering forging elements.


A simplified version of the design is mounted using channels and corners. And then the filling material is installed, for example, wooden boards or high-strength chipboard.

The channels are fixed parallel to each other. The distance is selected in accordance with the designed length of the steps. A corner is made to fit the size of the steps. It is advisable to provide an additional margin of up to 1 cm at the edges for the seam.

Similarly, the part of the corner corresponding to the height between the steps is cut off. Then they are connected in the shape of the letter “G” by welding and attached to the channel. The output is metal obliques, which are connected in pairs with corners.

Use of concrete
The structure being manufactured will be connected directly to the foundation. Each step requires high-quality reinforcement to avoid destruction of the material. First, a formwork is created for the bottom step. It is recommended to make the height of the first step 15-20 mm higher than the others.

Subsequent elements are done in the same way as laying the foundation. Each of them is securely reinforced with a mesh, and the transition to the next level is carried out after the concrete has dried at the previous level. Then rough tiles or stone are laid on top of the concrete.

You can evaluate the benefits of using each type of material from a photo of the porch. Appearance, quality of construction and durability in operation are important factors in choosing a design solution.


Arrangement of the canopy
The owner of a country house can decorate his home if he builds a canopy over the porch of the house. This element will be an excellent protection from bad weather. You can use metal pipes and wooden beams for the frame. The casing is also made of metal, wood and plexiglass.

The canopy is mounted on piles pre-installed into the base. Tiles or metal sheets are often used for covering, although polycarbonate is now gaining popularity. Be sure to provide a slope, on the lower edge of which a gutter is attached by welding.

Even a novice master can make a porch with his own hands. It is necessary to properly design this structure and carry out the work in stages, adhering to basic instructions.

Photo of the porch to the house
