The efficiency of its operation depends on where and how the heating battery is installed. If you do not follow the installation rules, then heat losses can reach from 5 to 20%, which will affect the microclimate in the room. To avoid this, you should know the main sources of heat loss and how to properly install a bimetallic heating radiator.
Basic requirements for room insulation
Few people think about why heating radiators are most often installed under windows, and even more people would be surprised to learn that a deviation of 2-3 centimeters can affect their efficiency. Sometimes heat losses are 20% only due to the fact that the heater installation parameters were not observed.
Bimetal radiators are by far not only the most expensive in the thermal technology market, but also the most durable, reliable and durable. Therefore, it will be doubly insulting, having invested a lot of money for their purchase and connection, as a result, you will get a cold room, the heating of which takes a lot of energy.
Since, in terms of their parameters, bimetallic batteries are ideal for a “not ideal” city heating network, their positive qualities should be used to the maximum.
Before installing bimetallic heating radiators, heat loss should be minimized:
- Up to 50% of heat escapes through non-insulated walls.
- Windows "eat" 20%.
- An unheated basement or attic adds 10% of heat loss.
If you do not carry out preliminary work on the insulation of the room, then even the highest quality radiators will not be able to withstand such losses, or the cost of heating it will be too high.
Not all consumers know that the elementary installation of a foil screen behind the battery will reduce heat loss by 30%. If it is not possible to fully insulate the outer walls, it is enough to make such a reflector to reduce damage.
After conducting a complete "revision" of heat losses and eliminating at least some of them, you can begin to calculate how many sections will be required for the room, and where bimetallic radiators will be installed.
Choosing a place for a radiator
When the battery is mounted under a window, the laws of physics about air circulation are taken into account. They claim that cold air sinks to the floor because it is heavier than warm air. So the air flow from the window initially goes down, as it is cold, but when heated, it also rises. The larger the window, the more cold air comes from it, which means that efforts and an increase in energy costs will be required to heat it.
If the heater is mounted under the window, then the cold stream simply does not have time to spread around the room, as it meets the hot air emanating from it. At the same time, it is important that some rules are observed, which are especially important when installing bimetallic heating radiators with your own hands:
- If there are several windows in the room, then the batteries will have to be mounted under each of them. This will reduce heat loss and create proper air circulation.
- It is known that 2 radiators with a small number of sections have a greater heat transfer than one with numerous elements.
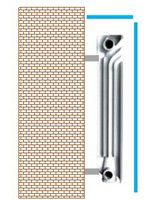
- The distance from the wall to the back of the radiator must be at least 3 cm.
- The fastening of bimetallic radiators to the wall under the window must maintain a distance of at least 10 cm from it to the floor and the window sill.
- There should be enough space on the sides of the radiator for easy access to it.
People would be surprised if they knew that deviations up or down affect the quality of the radiator and the amount of heat it produces.
When installing brackets for the battery under the windowsill, you should use a plumb line to ensure that the structure is horizontal. This will protect the system from the formation of air jams in the future.
Battery installation
Do-it-yourself installation of a bimetallic radiator is not an easy task, as it requires not only attention and tools, but also elementary knowledge of the sequence of actions.
- If it is planned to connect new batteries to the existing heating system in place of the old ones, then the pipes should first be flushed and cleaned of rust, scale and debris.
- At the end of the supply pipe, you must either clean the existing thread, and if it is worn out, then cut a new one and screw bronze or brass tees onto it.
- It is necessary to screw ball valves into the straight part of the tee, and connect the rest with a pipe segment to each other so that a bypass is obtained.
- Adapters of the appropriate size are installed in the inlet and outlet holes of the battery.
- Prepare and install brackets on the wall, which should be included in the mounting kit for the radiator.
- Hang the heating battery on the mounts.
- Install a Mayevsky valve in one of the side holes to bleed air from the system in the future.
- If the type of connection allows, then install a thermostat to control the heating of the coolant.
- After the battery is connected to the pipes of the system, a test should be carried out. To do this, it is necessary to create increased pressure in it. This will allow you to see possible defects in the work and make sure that there is no leakage, and the integrity of the entire structure is not violated.
As can be seen from the above, there is nothing complicated in this work if you do everything sequentially.
Battery wall mount
Before fixing the bimetallic radiator to the wall, you should carefully check the correctness and reliability of mounting the brackets. This affects the efficiency of the entire system.
When installing fasteners, the weight of the assembled heating battery should be taken into account. Bimetallic radiators are the second heaviest after cast iron ones due to steel or copper collectors built into them.
The correct placement of the radiator is considered when the brackets are hung so that they provide:
- The distance from it to the wall is at least 5 cm.
- The radiator weighs with a slight tilt forward, which will protect it from the formation of air bubbles.
- The battery plugs must be flush with the heating pipes.
The number of brackets directly depends on the size of the radiator. So for a six-section design, you will need one mount at the bottom and two at the top, while for 10 sections you will need 2 on each side.
A properly fixed bracket must support the weight of the radiator and not sag under its weight. To do this, all fasteners are checked manually. If they move at least a millimeter, then it is better to remove the dowels and carry out the installation again.
Only after the fasteners have been checked can radiators be hung on them and connected to the heating system.
As can be seen from the foregoing, there is nothing complicated in installing bimetallic radiators on your own. The main thing is not to rush anywhere and stick to the sequence of actions.
Any heating system is a rather complex “organism”, in which each of the “organs” performs a strictly assigned role. And one of the most important elements are heat exchange devices - it is they who are entrusted with the ultimate task of transferring thermal energy or to the premises of the house. In this capacity, familiar radiators, convectors of open or hidden installation, gaining popularity of water floor heating systems can act - pipe circuits laid in accordance with certain rules.
You may be interested in information about what is
This article will focus on heating radiators. We will not be distracted by their diversity, device and technical characteristics: on our portal on these topics there is enough comprehensive information. Now we are interested in another block of questions: connecting heating radiators, wiring diagrams, installing batteries. Proper installation of heat exchange devices, rational use of the technical capabilities inherent in them is the key to the efficiency of the entire heating system. Even from the most expensive modern radiator there will be a low return if you do not listen to the recommendations for its installation.
What should be considered when choosing radiator piping schemes?
If you take a simplified look at most heating radiators, then their hydraulic design is a fairly simple, understandable diagram. These are two horizontal collectors, which are interconnected by vertical jumper channels through which the coolant moves. This entire system is either made of metal that provides the necessary high heat transfer (a striking example is), or “dressed” in a special casing, the design of which assumes the maximum contact area with air (for example, bimetallic radiators).

1 - Upper manifold;
2 - Lower collector;
3 - Vertical channels in the radiator sections;
4 - Heat exchanger case (casing) of the radiator.
Both collectors, upper and lower, have outlets on both sides (respectively, in the diagram, the upper pair B1-B2, and the lower B3-B4). It is clear that when a radiator is connected to the pipes of the heating circuit, only two out of four outlets are connected, and the remaining two are muffled. And now, the efficiency of the installed battery largely depends on the connection scheme, that is, on the relative position of the coolant supply pipe and the outlet to the "return".
And first of all, when planning the installation of radiators, the owner must figure out exactly what kind of heating system is functioning or will be created in his house or apartment. That is, he must clearly understand where the coolant comes from and in which direction its flow is directed.
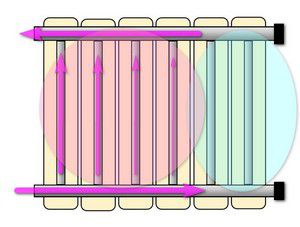
Single pipe heating system
In multi-storey buildings, a single-pipe system is most often used. In this scheme, each radiator is, as it were, inserted into the “gap” of a single pipe, through which both the coolant is supplied and its removal to the “return” side.

The coolant passes successively all the radiators installed in the riser, gradually wasting heat. It is clear that in the initial section of the riser, its temperature will always be higher - this must also be taken into account when planning the installation of radiators.
There is another important point here. Such a one-pipe system of an apartment building can be organized according to the principle of top and bottom feed lira.
- On the left (item 1) the upper supply is shown - the coolant is transferred through a straight pipe to the upper point of the riser, and then sequentially passes through all the radiators on the floors. This means that the flow direction is from top to bottom.
- In order to simplify the system and save consumables, another scheme is often organized - with a bottom feed (pos. 2). In this case, radiators are installed in the same series on the pipe ascending to the upper floor, as well as on the pipe descending. This means that the direction of the coolant flow in these "branches" of one loop is reversed. Obviously, the temperature difference in the first and last radiator of such a circuit will be even more noticeable.
It is important to deal with this issue - on which pipe of such a single-pipe system your radiator is installed - the optimal tie-in scheme depends on the flow direction.
A prerequisite for piping a radiator in a single-pipe riser is a bypass
The name “bypass”, which is not entirely clear to some, refers to a jumper that connects the pipes connecting the radiator to the riser in a single-pipe system. What is needed for, what rules are followed when installing it - read in a special publication of our portal.
The single-pipe system is also widely used in private one-story houses, if only for reasons of saving materials for its installation. In this case, it is easier for the owner to figure out the direction of the coolant flow, that is, from which side he will be supplied to the radiator, and from which side he will exit.

Advantages and disadvantages of a single-pipe heating system
Attracting with the simplicity of its device, such a system is still somewhat alarming due to the difficulty of ensuring uniform heating on different radiators of house wiring. What is important to know about how to mount it with your own hands - read in a separate publication of our portal.
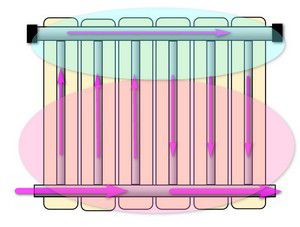
Two-pipe system
Already on the basis of the name, it becomes clear that each of the radiators in such a scheme "relies" on two pipes - separately for supply and return.
If you look at the two-pipe wiring diagram in a multi-storey building, you can immediately see the differences.

It is clear that the dependence of the heating temperature on the location of the radiator in the heating system is minimized. The direction of the flow is determined only by the relative position of the branch pipes cut into the risers. The only thing you need to know is which particular riser acts as a supply, and which one is the “return” - but this, as a rule, is easily determined even by the temperature of the pipe.
Some apartment residents may be misled by the presence of two risers, in which the system will not cease to be one-pipe. Look at the illustration below:

On the left, although there seem to be two risers, a single-pipe system is shown. Just one pipe is the upper supply of coolant. But on the right - a typical case of two different risers - supply and return.
The dependence of the efficiency of the radiator on the scheme of its insertion into the system
Why was it all said. what is placed in the previous sections of the article? But the fact is that the heat transfer of the heating radiator very seriously depends on the relative position of the supply and return pipes.
| Scheme of inserting a radiator into a circuit | Direction of coolant flows |
|---|---|
| Diagonal radiator connection on both sides, top inlet | |
 |  |
| Such a scheme is considered the most effective. In principle, it is she who is taken as the basis for calculating the heat transfer of a specific radiator model, that is, the battery power for such a connection is taken as a unit. The coolant, without encountering any resistance, completely passes through the upper collector, through all vertical channels, ensuring maximum heat transfer. The entire radiator warms up evenly over its entire area. | |
 |  |
| Such a scheme is one of the most common in multi-storey building heating systems, as the most compact in vertical risers. It is used on risers with an upper supply of coolant, as well as on return, descending - with a lower supply. It is quite effective for small radiators. However, if the number of sections is large, then the heating may be uneven. The kinetic energy of the flow becomes insufficient to propagate the coolant to the very end of the upper supply manifold - the liquid tends to pass along the path of least resistance, that is, through the vertical channels closest to the entrance. Thus, in the part of the battery farthest from the entrance, stagnant zones are not excluded, which will be much colder than the opposite ones. When calculating the system, it is usually assumed that even with the optimal length of the battery, its overall heat transfer efficiency is reduced by 3–5%. Well, with long radiators, such a scheme becomes inefficient or will require some optimization (this will be discussed below) / | |
| One-way radiator connection with top inlet | |
 |  |
| A scheme similar to the previous one, and largely repeating and even reinforcing its inherent shortcomings. It is used in the same risers of single-pipe systems, but only in schemes with a bottom supply - on an ascending pipe, so the coolant is supplied from below. Losses in the total heat transfer with such a connection can be even higher - up to 20 ÷ 22%. This is due to the fact that the difference in density will also contribute to closing the movement of the coolant through the near vertical channels - the hot liquid tends upwards, and therefore it is harder to pass to the remote edge of the lower radiator supply manifold. Sometimes this is the only connection option. The losses are compensated to some extent by the fact that in the ascending pipe the general level of the coolant temperature is always higher. The circuit can be optimized by installing special devices. | |
| Double-sided connection with bottom connection of both connections | |
 |  |
| The scheme of the lower, or as it is often called the “saddle” connection, is extremely popular in autonomous systems of private houses because of the wide possibilities to hide the pipes of the heating circuit under the decorative floor surface or make them as invisible as possible. However, in terms of heat transfer, such a scheme is far from optimal, and possible efficiency losses are estimated at 10–15%. The most accessible path for the coolant in this case is the lower collector, and distribution along the vertical channels is largely due to the difference in density. As a result, the upper part of the heating battery can warm up much less than the lower one. There are certain methods and means to minimize this disadvantage. | |
| Diagonal radiator connection on both sides, bottom inlet | |
 |  |
| Despite the apparent similarity with the first, most optimal scheme, the difference between them is very large. Efficiency losses with such a connection reach up to 20%. This is explained quite simply. The coolant has no incentives to freely penetrate to the far section of the lower radiator supply manifold - due to the difference in density, it selects the vertical channels closest to the battery inlet. As a result, with a sufficiently evenly heated top, in the lower corner opposite to the entrance, stagnation often forms, that is, the surface temperature of the battery in this area will be lower. Such a scheme is used extremely rarely in practice - it is even difficult to imagine a situation where it is absolutely necessary to resort to it, rejecting other, more optimal solutions. | |
The table deliberately does not mention the lower one-sided connection of the batteries. With him - the question is ambiguous, as in many radiators that suggest the possibility of such a tie-in, special adapters are provided, which essentially turn the bottom connection into one of the options discussed in the table. In addition, even for ordinary radiators, you can purchase additional equipment, in which the lower one-sided eyeliner will be structurally modified to another, more optimal option.
I must say that there are also more “exotic” tie-in schemes, for example, for high-height vertical radiators - some models from this series require a two-way connection with both connections from above. But the very design of such batteries is thought out in such a way that the heat transfer from them is maximum.
The dependence of the heat transfer efficiency of the radiator on the place of its installation in the room
In addition to the scheme for connecting radiators to the pipes of the heating circuit, the place of their installation also seriously affects the efficiency of these heat exchange devices.
First of all, certain rules for placing the radiator on the wall with respect to the adjacent structures and interior elements of the room must be observed.
The most typical location of the radiator is under the window opening. In addition to the general heat transfer, the ascending convection flow creates a kind of "thermal curtain" that prevents colder air from freely penetrating from the windows.

- The radiator in this place will show maximum efficiency if its total length is about 75% of the width of the window opening. In this case, it is necessary to try to install the battery exactly in the center of the window, with a minimum deviation not exceeding 20 mm in one direction or another.
- The distance from the lower plane of the window sill (or other obstacle located on top - a shelf, a horizontal wall of a niche, etc.) should be about 100 mm. In any case, it should never be less than 75% of the depth of the radiator itself. Otherwise, an insurmountable barrier to convection currents is created, and the battery efficiency drops sharply.
- The height of the lower edge of the radiator above the floor surface should also be about 100÷120 mm. With a clearance of less than 100 mm, firstly, considerable difficulties are artificially created in carrying out regular cleaning under the battery (and this is a traditional place for the accumulation of dust carried by convection air currents). And secondly, convection itself will be difficult. At the same time, it is also completely useless to “pull up” the radiator too high, with a clearance from the floor surface of 150 mm or more, since this leads to uneven distribution of heat in the room: a pronounced cold layer may remain in the area bordering the floor surface air.
- Finally, the radiator must be at least 20 mm away from the wall with brackets. A decrease in this gap is a violation of normal air convection, and in addition, clearly visible dust marks may soon appear on the wall.
These are indicative indicators that should be followed. However, for some radiators, there are also recommendations developed by the manufacturer on the linear parameters of the installation - they are indicated in the product manuals.

It is probably unnecessary to explain that a radiator located openly on the wall will show heat transfer much higher than one that is completely or partially covered by certain interior items. Even a window sill that is too wide can already reduce the heating efficiency by several percent. And if we take into account that many owners cannot do without thick curtains on the windows, or, for the sake of interior design, they try to cover up unsightly, or their eyes, radiators with the help of facade decorative screens or even completely closed casings, then the calculated battery power may not enough to fully heat the room.

Heat transfer losses, depending on the installation of a heating radiator on the walls, are shown in the table below.
| Illustration | The influence of the shown placement on the heat transfer of the radiator |
|---|---|
 | The radiator is located on the wall completely open, or installed under the window sill, which covers no more than 75% of the depth of the battery. In this case, both main heat transfer paths - both convection and thermal radiation - are completely preserved. Efficiency can be taken as a unit. |
 | A window sill or shelf completely covers the radiator from above. For infrared radiation, this does not matter, but the convection flow is already facing a serious obstacle. Losses can be estimated at 3 ÷ 5% of the total thermal power of the battery. |
 | In this case, not a window sill or shelf on top, but the upper wall of a wall niche. At first glance, everything is the same, but the losses are already somewhat greater - up to 7 ÷ 8%, since part of the energy will be wasted on heating the very heat-intensive material of the wall. |
 | The radiator from the front is covered with a decorative screen, but the clearance for air convection is sufficient. The loss is precisely in thermal infrared radiation, which especially affects the efficiency of cast iron and bimetallic batteries. Heat transfer losses with such an installation reach 10÷12%. |
 | The heating radiator is covered with a decorative casing completely, from all sides. It is clear that in such a casing there are gratings or slot-like holes for air circulation, but both convection and direct thermal radiation are sharply reduced. Losses can reach up to 20 - 25% of the calculated battery power. |
So, it is obvious that the owners are free to change some of the nuances of installing heating radiators in the direction of increasing the efficiency of heat transfer. However, sometimes the space is so limited that you have to put up with the existing conditions regarding both the location of the pipes of the heating circuit and the free area on the surface of the walls. Another option - the desire to hide the batteries from the eyes prevails over common sense, and the installation of screens or decorative casings is a matter already decided. This means that in any case, it will be necessary to make adjustments for the total power of the radiators in order to guarantee the required level of heating in the room. Correctly make the appropriate adjustments will help the calculator below.
Installing and replacing a heating radiator at first glance does not seem like a very difficult task. However, this is not so - any mistakes made in the process of work will inevitably cause consequences, probably quite severe. In order not to have to restore repairs in the apartment after flooding with hot water or other unforeseen problems, it is recommended to contact plumbers for installation and replacement of parts of the heating system. However, this still does not mean that installing a heating radiator with your own hands is not feasible.
For success you need:
- Enough free time.
- To study the theoretical base: ways to connect batteries and rules.
- Measure the area carefully.
- Find the tools you need to do the job.
Installing a heating radiator
First of all, of course, you need to choose a radiator that you need in your particular apartment or private house. The choice of a radiator should be determined by its technical characteristics and your needs. What qualities of the battery influence the choice? Mainly it is:
- Wear resistance.
- Price.
- Clearance diameter for water circulation.
- Resistance to aggressive environments.
Important! If you want to install heating radiators with your own hands, you also need to consider the materials from which they are made. So, aluminum radiators are easy to install, do not require special skills, knowledge and tools. And when installing cast iron batteries, welding is required. It is worth deciding in advance on the resources available to you and objectively assess your capabilities.

Checking the bleed valve
In preparation for work, first of all, you need to find out the type of wiring for your heating system. It can be single or double sided.
- A single-pipe heating system is most often performed in apartments of multi-storey buildings. With this type of organization, hot water flows through pipes from the upper floor to the lower ones. Of the disadvantages of such wiring, it is worth noting that in this case you cannot regulate the temperature without installing additional devices. In addition, the water on the upper floors is much hotter than on the lower ones.
- A two-pipe heating system is more common in cottages and country houses. Water circulates through two systems: hot - one, cooled - the other. This wiring is devoid of the disadvantages of a single-pipe version: the temperature of the heaters always remains constant, and is also adjustable.
Options for connecting heating systems
In addition to choosing the radiator itself, during installation you will also need to decide how to connect it to a centralized network. There are several different options available to you, each of which has its own scope of use:
- diagonal connection. This scheme is the best choice for long multi-section heating radiators. It is distinguished by the fact that the water supply pipe is attached to the pipe from above on one edge of the radiator, while the outlet pipe is attached to the lower pipe on the other side. Among the disadvantages of such a system are heavy repairs in case of malfunctions: the scheme does not imply removing the battery without completely turning off the heating.

Radiator connection options
Important! When supplying water from below, you will lose about 10% of the possible heat.
- Bottom connection. This wiring diagram looks the most inconspicuous. It is used if the pipes are located inside the floor or hidden under skirting boards. The inlet and outlet pipes are directed perpendicular to the floor surface. The main disadvantage is that this system involves the largest possible amount of heat loss.
- Lateral one-way connection. It is the most common and effective. Maximum heat transfer is ensured by connecting the inlet pipe from above, and the outlet pipe - from below on the same side of the battery. When inverted, the heating power is significantly reduced, so it is not recommended to change the pipes in places.
Important! In case of insufficient heating of the far sections of the battery, an extension of the water flow is used.
- Parallel connection. It occurs through a heat pipe built into the heating system. The withdrawal is implemented in the same way. Such a system allows you to replace batteries without turning off the central heating, but the main disadvantage is that with insufficient pressure in the system, the batteries do not warm up well.
Important! Connecting a heating radiator with your own hands in this way is quite difficult; it would be better to entrust this work to experienced installers.
- Serial connection. In this case, the heat transfer through the system occurs due to the air pressure in it. Excess air descends with the Mayevsky crane. The main disadvantage of such a system is also the impossibility of repair without shutting down the entire heating system.
Rules for connecting a radiator
There are no minor nuances in the installation of the heating system, it is necessary to follow all the rules in order for the work to be efficient and safe. So how to install heating radiators with your own hands? It is worth considering the following points:
- the distance from the top of the battery to the window sill should be more than 5 cm;
- from the bottom of the battery to the floor, the distance must be at least 10 cm;
- the distance from the wall to the battery should be from 2 to 5 cm. If the standard fasteners are too short, you need to buy others of a suitable length.

Installing a radiator in confined spaces
These rules will allow air to circulate normally around the heater, preventing unnecessary heat loss.
Important! The battery installation rules are the same for all their varieties, whether it be aluminum or cast iron radiators.
Before installing the radiator, you need to decide how many sections it should have. This can be done on the basis that in a standard room no more than 2.7 meters high, one section heats two square meters of area. Of course, such a calculation is quite rough, to get the best result, you should entrust this to professionals.
Important! You can also use the formula: for 1 kW of radiator power, there is 1 square meter of room. In the case when there are several windows in it, you need to increase the resulting value by 1.3 times.
Required Tools
Do-it-yourself installation of heating radiators in an apartment, as in a private house, requires a certain number of tools, without which this process is simply impossible.

Be sure to align the radiator vertically
To be successful, you will need:
- impact drill with a drill bit;
- a set of torque wrenches;
- screwdriver or screwdriver;
- pliers;
- roulette;
- building level;
- pencil and ruler.
Installation process
The installation process is nothing too complicated if it is carried out according to the plan in stages and without error.
- First, you need to turn off the heating system and drain the water from it. In a private house, this can be done with a pump, in an apartment building, you will have to contact the ZhEK. Then you need to dismantle the used radiators.
- Mark the wall for mounting new heating devices. In this case, it is advisable to use a level in order to install the battery as evenly as possible, eliminating distortions. It is important that the battery is installed strictly horizontally or with a minimum deviation towards the pipe. This will allow the water to drain completely by the end of the heating season.
- Install the brackets, check them for strength by pressing on them with all your weight. If they withstand - hang up the battery. For a cast-iron and aluminum battery, two fasteners are usually sufficient; for plastic pipes, more are needed. The walls must be cleaned, leveled and plastered before installing the fasteners.
- Install shut-off valves, paying special attention to the reliability and watertightness of threaded connections. Connect pipeline.
Important! To prevent the battery from leaking, it is advisable to use appropriate torque wrenches. Especially if you are installing an aluminum radiator, you will inevitably need to mount an air valve with it, through which air will be bled. The force of the torque wrench used during installation must not exceed 12 kg.
The arrangement of your personal home, as a rule, is not complete without installing an autonomous heating system. Someone uses a water-heated floor system as a building heating, while others prefer the installation of radiators. This article will discuss how to independently install heating radiators correctly.
First of all, it is worth paying attention to the fact that this type of work requires a careful approach. Even the smallest mistakes can lead to accidents. Depending on where exactly you have to replace the heating batteries (in an apartment or a private house), the approach to choosing a master should be different.
For example, if we are talking about apartments in multi-storey buildings, then in this case it is best to call a professional plumber who has access to all the necessary valves and, of course, sufficient work experience. If you need to replace radiators in a private house, then it will be within the power of any owner, provided that all types of work are correctly performed.
Self-installation of heating radiators: preparation
The first thing you should pay attention to is the type of wiring. It can be single pipe or double pipe. The number of parts used and, of course, the complexity of the work depends on what kind of wiring in the house.
Differences between a single-pipe heating system and a two-pipe one
To distinguish a single-pipe heating system from a two-pipe one, it is necessary to be guided by the following criteria:
- if the pipeline leaving one battery is simultaneously supplying for the subsequent heating radiator, such wiring is called single-pipe;
- if separate supply and return pipelines are equipped for each battery, such wiring is called two-pipe.

Selection of components
For each type of wiring, the details and their number will be different. For example, if you install a single-pipe heating system, you will definitely need to provide for the arrangement of a bypass. It is necessary to turn off the heater in case of damage to it without stopping the functioning of the entire system. This is of particular importance when operating at low ambient temperatures.
Read also: How to arrange drainage around the house?
As for the type of radiators and the connection scheme, the number of different fittings, adapters, taps, thermostatic heads, etc. depends on them.
Separately, it should be noted that in order to perform the types of work related to connecting various shaped parts to heaters and ensuring the sealing of the entire heating system, experience will be required. You need to know how to properly use tow or FUM tape. If there is no such experience, you will have to consult with a specialist or entrust him with this task.
 In addition to the various fittings necessary to properly connect the radiators to the heating system, it is imperative to install a Mayevsky crane on each battery. It is designed to release air. Without the presence of such a detail, it will not be easy to eliminate such a problem. The Mayevsky crane is installed in the upper place with a threaded connection not connected to the pipeline. In modern radiators, a similar product is included in the basic package.
The fact is that, according to physical processes, the air in the system is collected in the upper part of the heating battery. By unscrewing the Mayevsky tap screw, you can completely bleed this air and fill the heater with a coolant one hundred percent, which will contribute to maximum heat transfer and, accordingly, better and faster heating of all rooms in the building.

Location calculation
In order for the coolant to circulate without undue resistance, it is necessary to observe the slopes of the pipelines connected to each radiator:
- supply pipelines must have an inclination towards the heating battery;
- for return, the slope should be from the battery to the pipeline.
Such an arrangement of pipes will make it possible to minimize the resistance to the passage of the coolant through the heating batteries, which, in turn, will contribute to the uniform distribution of heat between the premises of the building.
If the above requirements are not followed during installation work (for example, install the supply and return pipelines strictly horizontally or with a negative slope), this can significantly reduce the efficiency of the entire heating system.
Read also: Choosing a pellet boiler Advantages and disadvantages of a pellet boiler

To achieve maximum results, you must follow these rules:
1) supply pipelines must have a slope towards the radiator from 0.5 to 1 cm per meter of length;
2) for return pipelines, the numerical values \u200b\u200bshould be similar, only in this case the slope should be from the battery;
3) for good air circulation through the heat-releasing walls of the battery, its lower part should be located at a height of at least 60 mm from the floor;
4) the distance from the top of the radiator to the bottom of the window sill should be between 50 and 100 mm;
5) and from the battery to the wall - approximately 30–50 mm.
 The requirements for compliance with slopes for supply and return pipelines do not in any way apply to the radiator. It must be installed strictly horizontally.
In order for the heater to be able to give off heat energy to the air in the room as much as possible, before installing it, it is necessary to paste over the adjacent section of the wall with foil insulation (this is a roll-type heat-reflecting material). The area of this material must match the dimensions of the radiator. If you install without foil isol, part of the heat will be spent on heating the wall and the efficiency of the heating battery will decrease.

We install heating radiators correctly: markup
For the correct location of the radiators, it is necessary to mark up, following all the recommendations set out in the instructions for installing such heaters. The bottom line is this:
1) first you just need to attach the radiator to the wall, observing its horizontal position and the required distances from the floor and window sill;
2) after that, mark its outline with a simple pencil on the wall;
3) then set the battery aside and draw two horizontal lines that will serve as axes for the location of the upper and lower rows of brackets;
 4) at the required distance, drill the required number of holes in the wall on each of the lines (as a rule, if the heater is of small length, it is enough to make 2 holes on the upper and lower axis);
In the old days, it was problematic to install heating radiators on your own due to welding, which was an integral part of the installation. Modern materials make it possible to do without special devices, which makes it possible to install heating radiators in the house with your own hands.
To carry out similar activities in the apartment, it is recommended to involve plumbers of the service company, as it will be necessary to completely disconnect the system from the main line and drain the water. Not everyone knows how to do it right, and a poor-quality connection can turn into a flood of hot water.
If we are talking about replacing old structures with new ones, then the question of location disappears by itself. In the case of planning a circuit diagram, it is necessary to take into account important factors according to which batteries must create reliable thermal protection. No matter how high-quality modern double-glazed windows are, they are still sources of cold air flow.
The diagonal method involves connecting the supply pipe to the upper part of the heater, and the return pipe from below, but located on the other side;
The bottom connection is made at the bottom of the battery on opposite sides;
The side or one-way method is more often used with a vertical wiring diagram with connection to the right or left side of the radiator.
1. Preparatory work involves the dismantling of old structures, if necessary. The system must first be completely drained of water. On the wall, you will need to install special fasteners for batteries or check the strength and correct installation of existing hooks. You should also do a study of the wall surface for integrity.
Often cracks and gaps form under the windowsill over time. They must be sealed with cement mortar, and a foil insulation must be fixed on a dry surface. Among other options for finishing the wall: plaster with a special insulating composition, plasterboard sheathing with an insulating layer, etc.
To increase heat transfer and save thermal resources, it is worth fixing a sheet of foil insulation to the wall on the back of the radiator. Penny costs will save up to 10% on heating.
High-quality heating is the key to a favorable climate in the house and the absence of cold weather even in the most severe frosts. Therefore, if you have an old and already inefficient radiator in your apartment or cottage, then it should be replaced. At first glance, this seems to be a very difficult job, available only to specialized specialists with significant experience. But with the proper attitude to business and the availability of some tools, installing heating batteries with your own hands does not pose a serious problem.
In addition to the characteristics of the radiator itself and the literacy of its connection, one of the most important factors affecting the efficiency of the heating system is choosing the right place to locate the product. True, in most cases it is predetermined in advance - the new battery, most likely, will stand in place of the old cast-iron one, which has been there since the building was built. But still, here are a few recommendations for the proper placement of the radiator.
How to install a radiator with your own hands
Firstly, it is desirable to place the battery under the window. The fact is that it is a “bridge” through which cold from the street enters an apartment or cottage. The presence of a radiator under the window forms a kind of "thermal curtain" that interferes with the process described above. In this case, the battery should be placed strictly in the middle of the window, and, preferably, occupy up to 70-80% of its width.
Secondly, from the floor to the radiator should be at least 80-120 mm. If there is less, then it will be inconvenient to clean under the battery, a huge amount of dust and debris will accumulate there. And if the radiator is located higher, a certain amount of cold air will collect under it, which requires warming up and, as a result, worsens the operation of the heating system. In addition, a too small distance to the window sill negatively affects the battery efficiency.
Thirdly, a distance of 2.5-3 cm is allowed between the back of the radiator and the wall. If it is less, the processes of convection and the movement of warm air flows are disturbed, and, as a result, the battery works less efficiently and wastes part of the heat in vain.
All of the above principles for placing a heating battery are presented in the diagram above.

Table. Standard schemes for connecting heating batteries.
Liquid fuel boilers - an overview of models and choosing the best For a comfortable stay in a private house in a temperate or northern climate, it is necessary to equip.
Which boiler is better for a private house? A heating boiler will provide housing with heat without the need to connect to central communications, thanks to which.
The heating system Leningradka Leningradka, that is, the most economical of the existing heating systems, has appeared for several decades.
Water heating convectors: selection, principle of operation, installation Water heating convectors are increasingly being installed in modern houses and apartments. High heating efficiency.
home » Heating » Do-it-yourself installation and connection of heating radiators
The device or reconstruction of the heating system involves the installation or replacement of heating devices. The good news is that if you wish, you can do it yourself without involving specialists. How should the installation of heating radiators take place, where and how to locate them, what is needed for the work - all this is in the article.
It is possible to install heating radiators with your own hands
If you install radiators with a bottom connection, you have no choice. Each manufacturer strictly ties the supply and return, and its recommendations must be strictly followed, because otherwise you simply won’t get heat. There are more options with lateral connection (read more about them here).
One-way connection is most often used in apartments. It can be two-pipe or one-pipe (the most common option). Metal pipes are still used in apartments, so we will consider the option of tying the radiator with steel pipes on the spurs. In addition to pipes of suitable diameter, two ball valves, two tees and two spurs are needed - parts with external threads at both ends.
Side connection with bypass (one-pipe system)
All this is connected as shown in the photo. With a single-pipe system, a bypass is required - it allows you to turn off the radiator without stopping or lowering the system. You can’t put a tap on the bypass - you will block the movement of the coolant along the riser with it, which is unlikely to please the neighbors and, most likely, you will fall under a fine.
Hooks for cast iron batteries are thicker. This is fasteners for aluminum and bimetallic
When installing hooks for heating radiators, please note that the main load falls on the top fasteners. The lower one serves only for fixing in a given position relative to the wall and it is installed 1-1.5 cm lower than the lower collector. Otherwise, you simply will not be able to hang the radiator.
One of the brackets
When installing the brackets, they are applied to the wall in the place where they will be mounted. To do this, first attach the battery to the installation site, look where the bracket will “fit”, mark the place on the wall. After putting the battery, you can attach the bracket to the wall and mark the location of the fasteners on it. In these places, holes are drilled, dowels are inserted, the bracket is screwed onto the screws. Having installed all the fasteners, the heater is hung on them.
Floor fixing
Not all walls can hold even light aluminum batteries. If the walls are made of lightweight concrete or sheathed with drywall, floor installation is required. Some types of cast-iron and steel radiators come with legs right away, but they do not suit everyone in terms of appearance or characteristics.
Legs for installing aluminum and bimetal radiators on the floor
Floor installation of radiators from aluminum and bimetallic is possible. There are special brackets for them. They are attached to the floor, then a heater is installed, the lower collector is fixed with an arc on the installed legs. Similar legs are available with adjustable height, there are fixed ones. The method of fastening to the floor is standard - on nails or dowels, depending on the material.

In the installation of each type of battery has its own nuances.
Cast iron
The difference from the standard scheme is that sections are initially formed for batteries of this type using a radiator key.
The nipples are impregnated with drying oil and manually fixed with 2 threads. In this case, a gasket must be used. Then the radiator keys are inserted into the nipple holes and twisted.
Important! The collection of sections must be carried out with an assistant, since the simultaneous rotation of the nipples can lead to skew.
After crimping the battery, a layer of primer is applied to it and painted.
Aluminum

Passes according to the standard scheme of one of the three connection options.
The only caveat is that aluminum batteries are fixed both on the wall and on the floor. For the latter option, special clamping rings on the legs are used.
By adjusting the indentation of the radiator from the wall, floor and window sill, you can increase or decrease the level of heat transfer from the battery.
When installing aluminum heating sources, they are guided by the attached instructions. If the recommendations indicate the use of a coolant, then it must be used exclusively.
Mounting the screen in front of the radiator will increase the degree of efficiency.
Such batteries are suitable for installation in private houses with autonomous heating.
Steel
An important point in the connection is to check the horizontal position of the battery. Any deviation will reduce work efficiency.