Wood and sheets (plates) based on it are one of the cheapest and most pliable materials. For those who like to work with a jigsaw, plywood is primarily of interest.
It is precisely this that home craftsmen most often choose to make various crafts. If you organize your work correctly, you can create real masterpieces.
Crafts made from this material are made for various purposes, but basically they can be divided into two groups - for decorating rooms or areas (for example, fencing on the inside, garden plot, and so on).
Type of plywood
If you focus on the optimal combination of indicators such as quality and price, then FSF or FC products are selected. It is characterized by resistance to dampness and temperature changes. This alone is enough to ensure the durability of a handmade craft. But there is a fundamental difference between these types of plywood - in the component composition of the glue that holds the veneer layers together.
In the first case, it is toxic, so FSF sheets are used only for outdoor work. But for crafts intended to be placed in the house, FC plywood is quite suitable. Its analogues are much more expensive, and therefore are not considered as a material for simple, easy-to-make crafts.

Type of sheet sanding
It’s not difficult to figure it out: Ш1 and Ш2 – respectively, one- and two-sided; NSh – rough-processed plywood. That is, the craft will still have to be “brought to mind” and polished. The choice of this parameter depends on how it is planned to be designed and placed in the future. A sample mounted on the wall and, for example, a figurine (stand, vase, toy, or other) that is visible from all sides are different things.

Plywood texture
A lot depends on personal preference here. If you plan to preserve the natural appearance of the wood when applying a protective coating to the craft, then it is better to purchase birch veneer plywood for varnish. But for subsequent painting it is advisable to choose pine.
For various crafts made from plywood, it is advisable to focus on oil or acrylic based ones. The explanation is simple - they are less susceptible to fading in the sun, so you won’t have to frequently renew the outer coating; it will not change its original appearance for several years.
Plywood grade
When choosing a sheet for crafts, you must first inspect it for knots and inclusions. Significant defects will not only complicate the cutting of the material, but also initiate the appearance of cracks or “holes” (as a result of the same knots falling out). Next is an inspection of the end surfaces. During the cutting process, plywood is subjected to dynamic loads (vibrations). If at least signs of veneer peeling are noticeable on the side parts, you should not purchase such material, even if its price is too tempting.

In the future, in the process of making crafts, many problems will arise. As a result, plywood is rejected and its consumption increases. In total terms, the money will be approximately the same compared to purchasing high-grade material, but in terms of time spent and quality of work, it will be a big minus.
Sheet thickness
If crafts are cut out with an electric tool, then it is limited to 30 mm. For a hand jigsaw, it is advisable to use relatively thin plywood; maximum three layers. That is, no more than 9 mm thick.
What you need for work
Jigsaw
This is a priori, since we are talking about making crafts using such a tool. The question is different - which one is better to work with. Electric models are much more expensive than their manual counterparts, but have many advantages. About in .

For example, high speed and cutting accuracy, clean edges, the ability to change cutting parameters and a number of others. If crafting from plywood is not a one-time, short-term hobby, then it’s worth spending money on an electric jigsaw. It is universal and will come in handy on the farm more than once, since depending on the type of file it can “work” not only with wood, but also with non-ferrous metals, plastics, and plexiglass.
It is somewhat more difficult with a hand jigsaw. Its design is quite simple - a frame with screw clamps and a handle + a file.

The nuance is that cutting blades break quite easily (from excessive pressure, changing the position of a hand tool), and therefore it is advisable to purchase them with a reserve; Fortunately, they are cheap.
Hacksaw
It is needed only at one stage - when cutting a dimensional sheet into separate fragments. Doing this with a hand jigsaw is an unpromising and unprofitable activity; A lot of time and files will be wasted.
Stand
No one will cut plywood by weight; It's clear. Cutting out parts by laying the sheet on the tabletop risks damaging it. It is precisely in order to ensure the “safety” of the latter that the stand is needed. You can make it yourself from scrap boards. What such a device looks like (one of the options) can be seen in the figure.

The stand is fixed to the base using clamps (on a non-working table) or self-tapping screws (if there is a carpentry workbench in the outbuilding, shed, or garage). Although these are not the only mounting options. It is not difficult to understand what to do, depending on local conditions.

Skin
The ideal tool for fine woodworking is the . But for crafts made from plywood that do not have large areas, it is not suitable. Therefore, only sandpaper; medium-fraction - for primary grinding of workpieces and with fine grain - for finishing.
Additionally
- Files and needle files.
- Awl.
- A simple pencil and carbon paper.
- Glue, if the craft is created as a composite or multi-level one, that is, with the fixation of two or more shaped fragments in separate areas.
- Varnishes, paints, stains.
Examples of drawings and sketches of plywood crafts


Copying “one to one” in this case is hardly advisable. Any work done with your own hands is a process with a creative component. That is why the dimensions should be determined independently, depending on where you intend to place (or how to use) the craft. For example, will it “look” in a particular place, will it fit organically into the interior of the room.
Even if you liked the drawing, it is not difficult to change the geometry of the figure by applying the scaling rules. Especially when it comes to drawing a contour on plywood with a simple pencil; It’s quite easy to correct any mistake, or to correct anything in certain areas. It is not much more difficult to modify any sketch, introducing something of your own, original into the sample.


There is another solution - you can download any picture you like from the Internet. Printing it to the required scale is not a problem. All that remains is to transfer it onto the plywood using carbon paper and shade the areas that need to be cut out. This is if we are talking about figurative crafts. It's even easier with a contour pattern; cut exactly along the line - and that's it, ready. All that remains is to work on the artistic design of the product.


Basic rules for cutting with a jigsaw
- Laying under a sheet of rigid backing. It is to ensure the hardness of the surface under the plywood that a stand is used. A sheet, even a small one, bends quite easily (under pressure), so without this device a high-quality cut, strictly along the line, will not work.
- The working body of the jigsaw (file) must be strictly perpendicular to the end of the sheet. And constantly, throughout the entire process of cutting the material.
- The tool is fed along the line in a forward motion, but without effort. Otherwise, the file will break immediately. The same goes for when it deviates from the “vertical”.
- Sawing out “blind” holes, that is, somewhere along a sheet of plywood, indented from its edge, is done as follows. A “hole” is drilled at any point on the outlined contour with a slight offset towards the center of the fragment. The diameter is chosen so that the file can easily fit into it. After attaching it to the tool frame, you can cut in any convenient direction.
- A figured cut in plywood involves sharp turns, smooth bends, and so on. First, at the point of change of direction with a jigsaw, without changing its position, you need to make a small hole in the material. To do this, you need to continue cutting with a file, strictly maintaining the orientation of the tool, and at the same time rotate the piece of plywood. As soon as the plane of the cutting part coincides with the required direction for further cutting, it can be carried out along the intended line.
Having mastered the production of fairly simple crafts from plywood, you can take on more complex options. As an example, self-assembly of furniture (shelves, bookcases, original hanging shelves). With a skillful approach to business, plywood makes excellent countertops, cutting boards, window trim, and so on. It’s easy to make a folding chair from this material, in various modifications. Who is interested in this?
Plywood also makes excellent frames for paintings and photographs. Those who have a plot of land will be able to engage in artistic design of outbuildings; the same gazebo, a house over a well or something else. There are many options. The main thing is to want to learn.
In the process of preparing for cutting with a jigsaw, you should not forget that all drawings and drawings are nothing more than the basis for developing your project. A little imagination, time, effort, and you can make a truly real masterpiece from plywood.
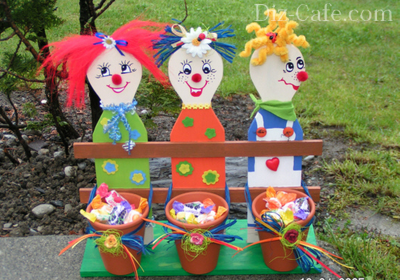
How nice it is to stroll through your own garden, enjoying the enchanting nature and stunning fresh air. When thinking through the design of a country plot, each owner tries to make it special by adding color and creating a positive mood. Garden figurines made of plywood can successfully complement plant compositions and amazingly transform the area, making it a nice and cozy corner conducive to a pleasant rest. Anyone can make such funny figures from plywood. To create such a decoration, it is not at all necessary to have the skills of an artist; you just need to show your imagination and put in a minimum of effort.
Such figures are designed to emphasize certain places on the site, making them more elegant and attractive. Thanks to their natural nature, decorations made of wood and plywood fit most harmoniously into landscape design.
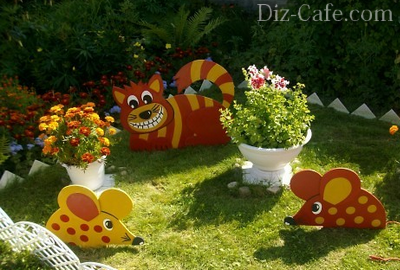
Figures cut out of plywood in garden plots look extraordinary
You can make many interesting functional decorations for your garden using plywood. It can be:
- Funny figures;
- Containers for flowers;
- Bird feeders;
- Decorative fences.
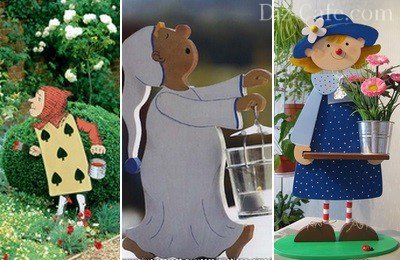
There are a great many options for plywood figures, and each of them is distinguished by its originality and expressiveness.
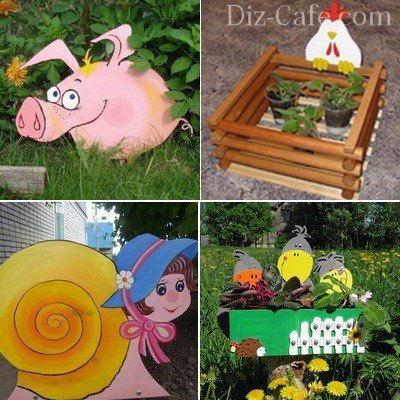
Miniature toy houses, animal figurines, whimsical fairy-tale sculptures and cartoon characters decorate many suburban areas today
Plywood is one of the lightest and most convenient materials for creating crafts. It is so easy to work with that figures can be made from it quite quickly, and most importantly, it is interesting.
Plywood is sheets of wood veneer fastened together in several layers using glue or a synthetic compound. The strength and thickness of the material directly depends on the number of these layers. The thickness range of plywood sheets ranges from 3 to 30 mm. The material can have a completely different texture, which can affect the color and structure of the finished craft. For example: thanks to its beautiful structure and warm shades, birch plywood looks very aesthetically pleasing, while coniferous plywood is more suitable for painting.
For creating garden decorations, sheets of plywood are excellent, the material for which was: poplar, alder, aspen, pine, birch, spruce
The main advantages of plywood:
- Environmental friendliness;
- Strength and durability;
- Waterproof;
- Good flexibility;
- Compatibility with other materials;
- Ease of processing.
But since plywood is still a tree, which by its nature is susceptible to environmental influences, a number of points should be taken into account when choosing a material:
- Moisture resistance. To decorate outdoor spaces and decorate your backyard, you can use plywood sheets marked FKM and FSF. In their production, melamine and phenolic resins are used, which have a moisture-repellent effect.
- Sanded finish. On sale you can find sheets that are sanded on one side (Sh1), processed on both sides (Sh2) and not sanded at all (NS). This point is very important only when you do not have time for additional processing.
Oil and acrylic paints are ideal for creating expressive and colorful garden decorations. They fit perfectly on a wooden surface, creating rich color combinations. The paints are resistant to ultraviolet rays, maintaining their attractiveness for several years.
When choosing materials for making jewelry, it is important not only to pay careful attention to the quality characteristics of plywood. It is also important to choose paints for decoration that will maintain color saturation for several seasons.
We create figures with our own hands
Most often, dachas are decorated with flat figures cut from moisture-resistant plywood sheets. To create an original decoration we will need:
- Moisture-resistant plywood 2 cm thick;
- Stencil;
- Jigsaw;
- Simple pencil;
- Fine-grained sandpaper;
- Screwdriver and screws;
- Acrylic paints, brushes and varnish.
If you plan to install the figure without resting it on any support in the garden, you must also consider making pegs for its base. Their size depends on the dimensions of the figure itself. But, in any case, expect that the pegs should go at least 50 cm into the ground.
We invite you to remember a forgotten form of creativity - sawing with a jigsaw, making an unusual decoration for the garden with your own hands
You can decorate any corner in the garden with a plywood figurine, hanging it on a rope, fixing it to a support with nails and placing it on stands.
You can also make a stencil for making a figure yourself. To do this, you need to draw the design you like on a sheet of paper, formatting it in the form of a drawing or silhouette, and then simply cut it out.
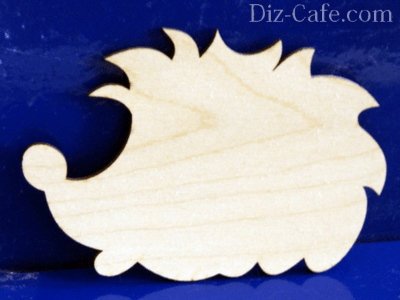
Master class #1 – curious snail
This cute plywood figurine is so easy to make that anyone can make it. Little helpers will happily respond to adults’ invitation to participate in the exciting process.
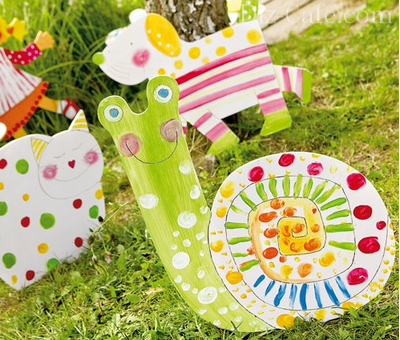
The charming snail will surely appeal not only to little fidgets, but also to adult guests of the site, becoming an elegant decoration for the playground and a favorite character in exciting games.

On a sheet of paper we make a sketch of the future figure, the image of which is subsequently transferred to a plywood base
If you are confident in your abilities, you can do without a paper template by drawing a snail directly on a sheet of plywood. For safety reasons, you will have to do it yourself when cutting out the shape with a jigsaw. But you can safely entrust the drawing of the contours and coloring of the snail to impatient little helpers.
Using a felt-tip pen or burner, we draw the contours of the snail so that even after covering with paint they remain bright and expressive
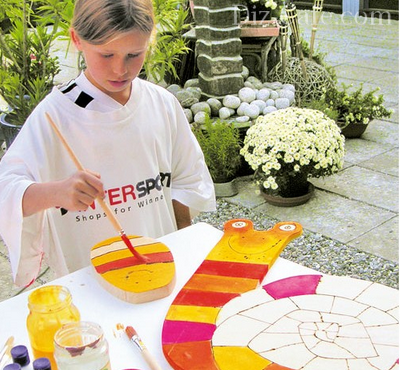
We paint the blank with acrylic paints, choosing effective contrasting combinations. To get rich colors, it is better to apply acrylic paints in 2 layers
The snail is ready. Let the paints dry a little, and you can safely plant the cute character in any place you like in the garden.
The material on how to make garden figures for your dacha with your own hands will also be useful:
Master class #2 – charming Scarecrow
By allocating just a couple of hours of free time to make the Scarecrow, you can make a funny figurine with your own hands that will bring a touch of sincerity and warmth to the site.
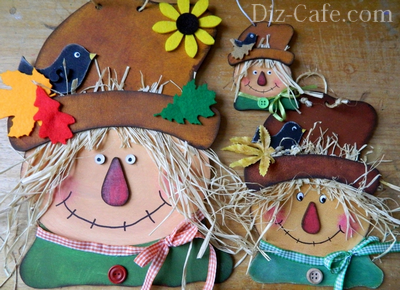
This incredibly cute and charming fairy-tale character Scarecrow from the fairy tale “The Wizard of the Emerald City” can live on your property
We will make the figurine in several stages. First, we take a sheet of plywood, onto which we apply the outline of the future character using a stencil. The finished drawing can be transferred to plywood using regular tracing paper.
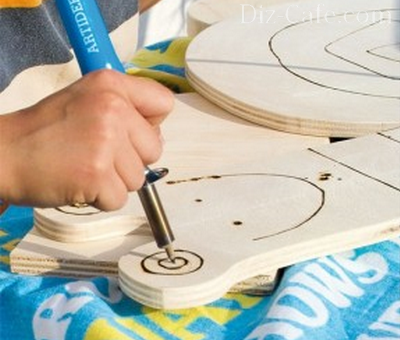
If we make a figure that will rest on pegs, we immediately attach them. To do this, we drill paired holes in the body of the figure, the diameter of which corresponds to the size of the pegs.
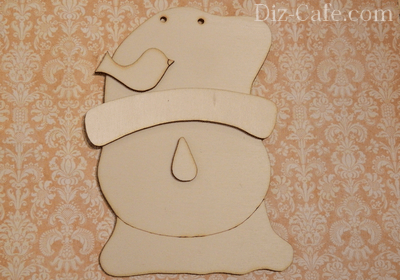
Using a jigsaw, cut out the shape along the outlined contour. We carefully sand its edges with sandpaper, giving them smoothness.
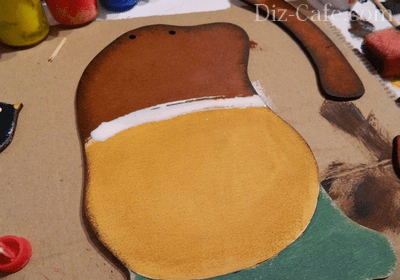
We design the figure: we draw the elements of the character on the blank with a simple pencil and paint them with acrylic paints
Having painted the front part of the workpiece, we paint the end faces. When the paints have dried, coat the figure with varnish.

To decorate the figure, we used dried grass to decorate the scarecrow’s hair, a button and a satin ribbon to make the character’s collar.
Our cute fairy tale character is ready. All that remains is to stretch the wire through the holes in the hat and secure it to a tree branch or fence.
A little secret: if during cutting with a jigsaw a sheet of plywood begins to delaminate, it is necessary to saturate it with a solution prepared from PVA glue and water, taken in a 1:1 ratio. The plywood is impregnated 2-3 times, applying each subsequent layer after the previous one has completely dried.
Since such crafts turn out to be quite light, the finished products should be securely fixed, partially buried in the ground, covered with sand or glued to the base.
Using the same principle, you can make themed plywood structures, for example: a miniature fairy-tale forest with fancy trees lost in a flower garden or a pretty clearing by a pond filled with funny figures of animals. Do-it-yourself plywood structures will decorate your site, making it attractive and unique.
Plywood. Friends, do you know what is hidden under this word? So I'll tell you. This is a wooden laminated board. And it turns out as a result of gluing an odd amount of veneer. To make the material different, glue it so that the fibers are perpendicular to the previous layer.
What can be made from plywood?
Beginning craftsmen with “golden hands” are recommended to start their work from this material. This versatile material is famous for its versatility and ease of processing. Photos of plywood crafts for clarity. With the help of this material we have new furniture and children's environmentally friendly toys. After all, what do people value? That's right - health! With such material there is no need to think about the harm to the human body.

How wonderful it is to walk in the fresh air while in a country house. But every owner dreams that the home is much more comfortable and looks more promising than the neighbor’s!

All this is real, don’t be lazy, take the design of the site into your own hands. A little creativity, imagination, patience and your home or cottage will become the center of the universe!


Perhaps you already have some ideas for beautiful plywood crafts that you once read in your favorite magazine. And you are ready now to bring them to life. For such work you don’t need to be a famous master, the main thing is to have your own opinion, different views on some things, and a little imagination.

We decided to make the job easier; in this article we have collected for you the easiest plywood crafts for beginners. At the beginning, I would like to note that once you have decided on the type of work you want to do, you should pay attention to the quality of the purchased material.

So, for a workpiece that will later be painted, varnished or other type of processing, you can take a cheaper variety. After all, all the “jambs” will be hidden under makeup. And if you really want to leave the product its original appearance, you will have to spend a little of your savings.


Having studied this material in detail, you can also find drawings of crafts made from plywood for making the desired item.

Curly shelf for small items
We are creating an image, and we will then work on it in detail. The next step is to apply this data onto a piece of wood with a simple pencil. If the diagram is very complex, use a carbon copy. Mark the area that we will later delete. We make a hole for the jigsaw to start working.

Shelf manufacturing process
- After inserting the file into the hole, we clamp it with screws for precision work.
- Using light movements, move the sheet to cut the required shapes
- Move away from italics - nothing, just move the jigsaw back a little and start moving from the problem area

How to cut correctly with a jigsaw
Important! To make it easier to work with the tool, it is recommended to choose a surface that is waist-high.

garden snail
This figure is perfect for working together in a family circle. Even a child can do simple elements of the work.

- First you need a sketch of a snail on paper.
- We transfer the drawing to plywood. Or you can immediately draw what you want on the tree.
- We cut out the figure.
- Next, we give them to the children to decorate in different colors. They will be happy to complete the task.
- To brighten the colors, you can varnish the top or apply a second coat of paint.

This is what step-by-step instructions look like on how to make a craft with your own hands.

Make only children's figures of the highest category, so that the child does not get hurt or get a splinter on his arm. The finished item must be carefully processed with two different types of sandpaper.

Tree 4 seasons
The work is aimed at the development of children. By collecting everything according to the instructions, you can easily help your heir understand the quirks of our world, understand what time of year it is now, and what will happen tomorrow.

- Draw a tree template for the product in the amount of 2 pieces
- Cutting out a circle for the stand
- We carefully polish the parts
- Make a cut on one template from above, on the other from below
- Connect the parts crosswise and secure them to a round stand using self-tapping screws.

Each side symbolizes the season; we need to creatively decorate our tree with small details. The first side is summer, we glue butterflies, green leaves, sun, apples. The second is autumn, orange and red leaves, pumpkins, birds. Third winter - white snowflakes, cotton wool snow, snow woman. Fourth spring – we attach flowers, bugs, birds.


Make all the details with felt, paper, and decorative figures. It is better to attach it with double-sided tape. The result is very interesting designs for your garden plot.

- Interesting curly images
- Flower beds
- Newspaper collections
- House for tits
- A variety of fun fences

I like to update my garden with different figures made from practical wood. I take the moisture-resistant option and go!

The product must be treated with special paint or a moisture-repellent agent, otherwise you won’t be able to admire its beauty for a long time. Environmental influences are doing their job...

Here is a simple master class on crafts made from plywood.

For some reason, this unusual type of decorating one’s garden has become undeservedly forgotten. YOU will become the unique owner of a fairy-tale courtyard, for example, by decorating a small fantastic corner using this method.

Photos of plywood crafts


Before making furniture from plywood with your own hands, which can serve faithfully for a long time, you should study all the physical properties of the material and the rules for its processing.
Plywood is a material that does not require any special tricks during processing. This material, used in making furniture from plywood with your own hands, has another significant advantage - low cost.
Plywood is a material that does not require any special tricks during processing
There are a large number of drawings that allow you to make furniture from plywood with your own hands. Such drawings can be easily found on specialized websites that are dedicated to making furniture from plywood with your own hands; in addition to drawings, on such resources you can see photos of finished furniture made from this material and the corresponding description for them.
Very often, plywood is used as a material in the manufacture of furniture intended for placement in the country house or in a children's room.
Such furniture is characterized by ease of manufacture and a high degree of environmental safety, which determines its high popularity.

Such furniture is characterized by ease of manufacture and a high degree of environmental safety, which determines its high popularity.
A large number of homeowners are interested in how to make furniture from plywood with their own hands. First, you should study what types of plywood exist and how to work with them.
The production of any type of plywood is carried out from veneer, which is glued together during the production of the material with adhesive mixtures. The quality of the material obtained during production depends mainly on the adhesive composition used.

The production of any type of plywood is carried out from veneer, which is glued together during the production process of the material with adhesive mixtures
Thanks to the glue, the panel acquires:
- high strength;
- increased mechanical elasticity;
- resistance to moisture;
- high resistance to environmental influences;
- resistance to open fire.
To make plywood, domestic manufacturers use veneer made from birch or coniferous wood.
Plywood, made from coniferous wood, has a beautiful pattern and is used exclusively for the production of furniture. To reduce the cost of the material during production, hardwood veneer can be used, on which a top layer of softwood veneer is applied.
Plywood made from birch wood has a contrasting structure and is monochromatic. When using birch wood, plywood is more expensive.
Important! Birch plywood weighs more than plywood, which is made from softwood.
Depending on the degree of processing, plywood is divided into 3 categories:
- material not subject to grinding - category NSh;

Bending strength of plywood
- material processed on one side - category Ш1;
- material processed on both sides - category Ш2.
There are 6 types of plywood, which differ in the composition of the adhesive component used in production:
- FC is produced using urea glue. The material can be used to make children's furniture from plywood for dolls with your own hands.
- FSF is manufactured using phenolic resins and is used to construct furniture items that are used in rooms with high humidity.

Plywood characteristics table
- FOF is a material with a laminated film coating that is highly moisture resistant.
- BV is a type of material not used in the construction of furniture.
- FBA is a material with a low level of resistance to moisture and is not used in furniture production.
- FBS, BS, FB are produced using bakelite-based glue or varnish.
On a note! Based on the presence of defects and natural defects in the wood used, the produced material is divided into 5 grades.
Grade E material is considered to be of the highest quality.
Rules for processing materials in the manufacture of furniture
To make furniture with your own hands from plywood, you should cut the sheet before starting operations. When cutting the material, accuracy should be observed, since in the future this parameter can affect the entire furniture assembly process.

A sharp knife is used for cutting thin plywood; a jigsaw is recommended for cutting medium-thick plywood
At the same time as cutting accuracy, it is necessary to be careful when cutting and avoid the formation of chips. The absence of chips increases the design quality of the structure. To cut the material, use a jigsaw or an electric circular saw. In order to prevent chips from forming on the front side, when working with a jigsaw, it is necessary to apply a drawing to the front surface of the material, and when using a circular saw, the drawing is applied to the reverse plane.
In order to completely get rid of the slightest chips, you need to use a shoemaker's knife to cut through the top sheet of veneer to the width of a jigsaw blade or saw. To perform this operation efficiently, the first pass is made without strong pressure as a mark, and then another 2-3 passes are made with a knife with strong pressure.
Cutting and cutting plywood sheets is best done along the grain. With this cutting method, the smallest number of chips appears when all the requirements of the technological operation are met.
To cut thin plywood, a sharp knife is used, a jigsaw is recommended to be used for cutting medium-thick plywood, and if thick material is used when assembling furniture, it is recommended to use a special circular saw to cut it.
If, when constructing furniture from plywood with your own hands, plywood from soft types of wood is used, then special washers should be placed under the fastening elements, which reduce the negative impact of the fasteners on the wood. Photos of how to properly install special washers can be viewed on specialized sites dedicated to assembling furniture structures with your own hands.
When constructing children's furniture from plywood with your own hands, special attention should be paid to the processing of the end elements; this is required to minimize the likelihood of injury when children use the product.
Features of material processing in the manufacture of kitchen furniture
Designing furniture to furnish the kitchen space requires care when drawing up drawings and assembling structures.

DIY plywood set
When assembling kitchen sets, it is recommended to use moisture-resistant types of material that have high resistance rates. The fact is that the kitchen is a room with a high level of humidity, and this, in turn, can negatively affect the plywood.
When designing furniture, it should be taken into account that the kitchen room contains a room ventilation system and other utilities, which must be hidden and at the same time must have free access for repair work.
When designing floor cabinets, you should remember that their height and depth should be calculated taking into account the size of the countertops used when assembling the furniture.
When calculating the parameters of the side walls, the thickness of the doors used in the furniture design should be taken into account.

When assembling kitchen furniture, special attention should be paid to corner wall cabinets, since assembling these elements is fraught with difficulties
When assembling kitchen furniture, special attention should be paid to corner wall cabinets, since assembling these elements is fraught with difficulties.
You can see in detail how to design plywood furniture with your own hands in the video, which is easy to find on specialized websites dedicated to creating furniture yourself.
When constructing floor-standing cabinets, the best option would be to use solid thick plywood boards.
DIY furniture assembly technology
Using plywood, you can make almost any furniture for your home; it could be, for example, a bed or a rocking chair, a closet, both floor-mounted and wall-mounted.

Using plywood, you can make almost any furniture for your home, it could be, for example, a bed or a rocking chair, a closet, both floor-mounted and wall-mounted.
Such furniture is distinguished by its originality and uniqueness, which can surprise any person. Furniture made with your own hands from plywood can become the pride of the home owner.
To design a bed, you will need to prepare a drawing or sketch indicating the dimensions of all structural elements.
After preparing the sketch, it is necessary to prepare a plywood sheet with a thickness of at least 18 mm, the length of the workpiece should be 3 m and the width 1.5 m. A sheet 2 m long is cut out of a single sheet. This cut will subsequently serve as the bottom in the design of the bed. After preparing the plywood sheet that serves as the bottom of the bed, the ends of the workpiece should be thoroughly processed with sandpaper. The remaining cut from the initial blank can be used in the manufacture of such a structural element as the head of the bed.
If in the process of constructing furniture a sheet that does not have lamination is used, then after assembling the structure, the head of the bed is covered with stain or paint and left until completely dry.
Construction of a bed frame and its decoration
The construction of a frame base requires a careful approach during design and assembly. At the design stage, accurate calculations of design parameters should be carried out. The bed frame is made of timber. For assembly, you need to prepare 2 pieces, each 2 m long and 2 pieces 1.5 m long. In this case, you should take into account the width of the beam. The bars should be connected to each other using screws or nails.

The bed frame is made of timber
The previously prepared bed bottom is attached to the prepared frame. The bottom should be secured using long bolts. The bed legs are fixed to the inner corners of the structure. The legs of the bed should be made of timber.
Decorating a bed made of plywood is the last stage of DIY furniture production.

The headboard of the bed should be installed using long bolts. The headboard can be decorated using fabric intended for furniture finishing. In addition, the headboard can be finished in any convenient way. If desired, during the finishing process, fabric is used, under which foam rubber is placed; this approach to finishing the headboard makes it more contoured and embossed.
Construction of a rocking chair from plywood
Most often, furniture stores offer their consumers designs of rocking chairs designed for one person. Those who like to design their own furniture for their home can make this piece of furniture for two people.
DIY crafts have always been an exquisite decoration for a home or garden. You can make them without outside help. The success of any creative endeavor depends on how serious the preliminary preparation was. Preliminary work plan - simple and accessible diagrams that can be downloaded in finished form with an attached photo of the product or created with your own hands.
Well-designed drawings of light crafts made from plywood can turn the labor-intensive processes of creating items for home decoration into easy ones that can be accomplished in a matter of hours.
Sawing out of plywood with a jigsaw: specifics of the process


A useful leisure option that is available at any time with a minimum of tools and materials. In order to make a craft you need:
- pre-drawn drawing;
- jigsaw - a tool for cutting out material;
- sheet of plywood of any size (depending on the required dimensions of the finished product);
- mounting bolts, self-tapping screws, screws, glue (if needed).
Crafts can be for children, in the form of decorations for the home and garden, kitchen, or landscaping. It is better to carry out the work collectively, involving a child as an assistant. For him it will be educational and interesting; crafts in this case become a source of pride and are placed in a prominent place.
A hand jigsaw is a metal frame curved in the shape of the letter “P”. The files used in this tool are made of steel and are very thin and fragile. Therefore, if you plan to make several crafts from plywood in an evening, you need to take the number of removable elements with a reserve. Professionals prefer to use a jigsaw - this increases the speed of processing the material.
How to make a simple craft drawing


To do this, you need to stock up on a wide-format sheet of paper. It doesn't matter whether it's thin or cardboard. The drawing is needed in order to attach it to the plywood and cut the material along the lines. Schemes can be of two types:
- simple,
- complex.
The first type is a regular drawing drawn with a pencil or marker on paper. A complex drawing is a scaled image with symbols and markings of dotted lines (the future bend of the craft) and the indicated length of the edges.
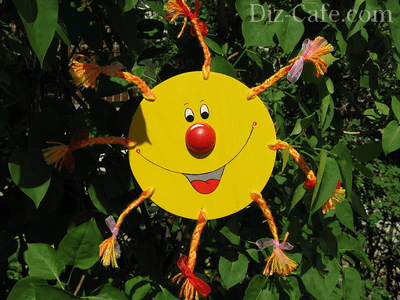
Easy crafts made from plywood take a minimum of time and effort, they are accessible even to children. Carbon paper (special paper with a layer of paint applied to one side) will be a good assistant in the implementation of the project. It lies directly on the plywood, and a drawing is placed on top. It is enough to press along the main lines once and a clear pattern will appear on the material, according to which you can cut with a jigsaw. In the photo you can see a diagram of an improvised sun for a summer residence.
Toy car - an exclusive craft for children


If you want to make a plywood craft project in the shape of a car using a jigsaw, you can take an example of a finished drawing as a basis. Artistic talents are encouraged, with light projects being DIY. The main thing is to follow the rules and proportions. To make a car craft from plywood, you need to cut out separately:
- 2 wings,
- 4 wheels,
- bottom,
- hood,
- trunk,
- top.
When creating projects and diagrams of plywood crafts that others will use, you need to number each part on paper, attaching a description of the order in which they will be connected sequentially. If drawings and future products are true to size, ensure that the dimensions match, carefully double-checking all calculations. The photo shows an example of a car made of plywood - such a craft will definitely work if the creative process is properly organized.
Easy crafts for the garden: a thoughtful approach


A dacha is a place of relaxation that the owners strive to decorate with exclusive crafts. If the plans include a makeshift garden, you can create drawings of a well and a stork attached to it. Such country crafts from plywood can be made for the site anywhere, and thanks to the minimal weight of the material, the structure can be easily transported outside the city.
These are simple product options. It is enough to cut 4 sheets of equal size from plywood, providing space for fasteners. The artificial stork should match the appearance of the bird as closely as possible. It needs to be drawn on paper and transferred using carbon paper to a plywood sheet. The finished bird is painted on both sides. These are options for easy crafts for the garden, where you do not need to make the product voluminous and use glue or bent elements. You can place such an exquisite decoration in the garden among an abundance of flowers and vegetation.
The presented plywood garden crafts in the photo will become an incentive for creativity for a novice gardener; you can borrow ideas or modify them to suit your aesthetic preferences.
Making drawings of products for a summer cottage or urban life is not only the domain of professionals, but also an unknown world for novice craftsmen. The process itself does not require significant financial costs and brings a lot of pleasure.