All photos from the article
If you are interested in interior design, then you couldn’t help but notice that many specialists very often use such a decorative option as individual letters or even entire inscriptions made from sheets of plywood. This material has a lot of advantages and is great for decorating rooms. In addition, such products have very big advantage– they are made by hand and each inscription is unique and inimitable.

The main advantages of such products
To begin with, we’ll tell you what advantages this type of product has, such as letters and inscriptions:
| Uniqueness | You can choose any font option and make it in any style, this allows you to emphasize the features of the environment and make it more comfortable and original. In addition, you can paint the elements in any color that suits your conditions best. |
| Affordable cost | The cost of the products is low, you will not spend a lot of money, since you can even use the waste remaining after finishing for the work. And if you buy the material, you won’t incur high costs, since the price of plywood is low. Options with low moisture resistance are also suitable for work. |
| Availability of plywood | You can buy the raw materials needed for work in almost any store. building materials, it is important to decide in advance optimal thickness to achieve the best result |
| Ease of processing | Most often, in order to carry out the work, you also need sandpaper to grind the surface and ends. Even those who have never performed such work can make letters or entire inscriptions. Below we will look at the whole process, and you will see for yourself that there is nothing complicated about it |
Important!
Remember, the more complex the inscription, the more time it will take to work, so for the first time it is better to choose options with a simple font with a minimum of bends and various decorative elements.

How to carry out work
Now let's figure out how to make words from plywood with your own hands. The process is quite simple, but if you have never performed such work, then familiarize yourself with them the correct sequence needed in mandatory so as not to spoil the material.
Preparation
Making words from plywood consists of two stages, and the first of them is preparatory, and the final result directly depends on it.
It is necessary to perform a number of works:
- First of all, you need to decide on the size finished product, and for this you need to know in advance where the inscription will be located and how much space it should take up. It is very important to determine all the parameters in advance in order to understand exactly what the final result will be in the future;
- Next, you need to find the font itself that is suitable for your project. You can consider the options that are available in office applications. There are also many various types inscriptions on the Internet, you can download the required package and install it; the easiest way to carry out the work is using the Photoshop program.
First, we must find somewhere the layout that we want to get in the end or draw it ourselves in a graphic editor; Photoshop is very convenient for me; if you use another program, then this is your personal convenience.
So if you found ready-made template or you have already drawn it in Photoshop, then you need to transfer the drawing to paper, I printed out various pieces of the layout at home on my personal printer, and then glued them together, if you do not have this option, then contact the printing service and they can print your template for you entirely on whatman paper, if it is large.
Making layouts, stencils, templates for inscriptions, letters and beautiful frames for cutting wood to order!
The cost of a template with an inscription is 50 rubles, a template of a beautiful frame or a composition of words from 100 rubles, the price depends on the complexity and size of the stencil.
The completed template will be provided to you in 2 formats, in Photoshop format and as a regular picture. .
Layouts of my works:


To make various inscriptions from wood with your own hands, you will need various fonts; you can choose them on a very good website - www.fonts-online.ru, where you can write the text you want and see how it will look in different fonts.
From my experience, the most popular and beautiful fonts are:
- Nautilus Pompilius
- Lobster
- Arctika Script
- Teddy Bear
- Mon Amour
So, we have received a drawn layout on paper and now we need to transfer it to plywood, for this we take copy paper, put it on the plywood, put our template on top and secure it with stationery nails (tacks), or even simple small nails. And of course, with a pen or pencil we trace all the contours of our layout, be very careful not to miss anything.
As in any other work, there are always mistakes and failures, having gained bitter experience, I want to warn you against my mistakes and give you some advice:
- When cutting out shaped parts of a product, you must use a special file for shaped carving; the file is marked T101AO- this file allows you to make a very clean cut and at the same time it is very convenient for it to turn even in the most difficult places;
- For making holes in closed circuits products, use a special wood drill, buy drills of different diameters, as sometimes closed areas have unpredictable shapes and sizes;
- I advise you to cut out the product from closed contours as in in one piece plywood puts less load on the entire contour of your workpiece, and you won’t break it.
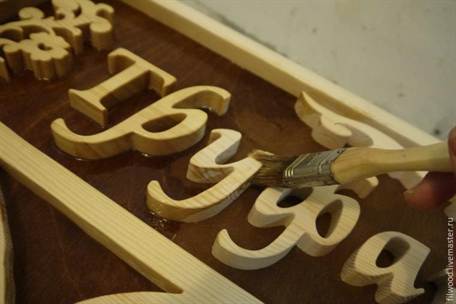
- After sanding the wooden inscription, you need to open it with varnish or paint it, and here I advise you to use varnish and paint in cans (you can use car paint, but there are universal ones), I do not advise you to paint it with regular enamel using a brush or sponge, because the appearance of the product becomes, to put it mildly, not beautiful, and you’re unlikely to be able to paint the workpiece in all places!
If you are not confident in your abilities or you do not have the necessary tool To perform such work, you can order any product you like. Just place an order on our official website.
An experienced person, of course, can quickly determine where front side plywood, for beginners I will explain. Often on the draft side there is a large number of There are significantly more knots than on the front side. On the front side the wood structure is finer than on the rough side. You can also determine by the notches on the side of the plywood; on the rough surface on the side of the plywood you will see small notches, and the front side will be clean and smooth.

What you will need to make an inscription or word from wood at home:
Plywood, Electric jigsaw, Sanding machine and sandpaper with large and fine grains (you can also use your hands), Pen or pencil, Product layout, Copy paper, Push pins (nails), Drill with wood drill, Nut file for deburring hard to reach places, Paint in cans.
So, you have all the tools and the translated workpiece on plywood. Now you need to make holes in the closed contours, after which they need to be cut out. And then start cutting out the entire outline of the inscription or frame. After painstaking and easy work you have received a finished wooden inscription, which now needs to be processed grinder and natfilem. At your request or the request of the customer, you can open the word from wood with varnish or paint, preferably in several layers!
That's all you need to know in order to make beautiful inscriptions from wood with your own hands, if you don't understand something, you can write to me at
IN Lately Various inscriptions and individual letters made of wood or plywood are becoming very popular. They are used in a wide variety of situations. You've probably seen similar products in some magazines dedicated to interior design, in gift and accessory stores, in wedding boutiques, in offices offering organization of holidays. Often such decorations appear in television projects about renovation and interior design. In addition, you may have seen similar signs in stores.
What are these letters and inscriptions?
Essentially, it’s just plywood from which words or individual letters are cut out using some tool (more on that later in the article), painted in specific color and decorated various decor(paper, rhinestones, threads, etc.). But, most often, it is just an inscription (or letter) without any additional decorations.
These products may have different formats fastenings. In order to hang them on the wall, you need to provide special hooks on the back. To be placed on a flat surface - on a table or on a shelf - they are mounted on a stand made of the same plywood or glass. In addition, they are often used without any additional fastenings. They simply place it on a flat surface, and the inscriptions or letters stand up due to their thickness. This is true for plywood products with a thickness of 12 mm or more.
Who needs such letters and words and why?
The question is correct and logical. After all, some readers might still not understand what kind of business this is. Who needs all these letters made of some kind of plywood? Where to use them? Why buy something like this at all? And who are these people - the buyers of “plywood words”? Let's look at these seven questions in order.
Where can all these words and letters made from plywood be used? Here are a few illustrative examples. And then you can figure it out for yourself.
Inscriptions for interior decoration. Despite the apparent simplicity of these products, they look simply amazing in real life. Especially if they are painted with high-quality expensive paint. Such inscriptions can be placed on a rack, on bookshelf, on the fireplace, on the desktop. They can decorate the walls of a house or apartment, giving the interior an unusual, modern and very stylish look.
Another area of application is creating a background for photo shoots. Now you can take pictures not just at home or in the park, but in a specially equipped studio. Just don’t confuse them with traditional komorkas, where they take passport photos in 5 minutes. We are talking about modern studios, where there are not only different classes and purposes, but also various decorations to create a beautiful background. Words (and other figures) made of plywood are actively used by photographers to create thematic backgrounds for photo shoots.
Need more examples? Fine. Weddings, birthdays, anniversaries, corporate events. Everywhere there are letters and words made from plywood sheets, written in fashionable fonts and painted in stylish colors, will be a wonderful holiday decoration. No worse than the already pretty boring balloons and flowers. And for the birthday boy, you can generally prepare a gift by cutting out his name and age, for example, from plywood. Such crafts are especially loved by young mothers who are happy to buy these paraphernalia to celebrate their child’s birthday.
You can also make stylish inscriptions from plywood for restaurants, bars, cafes, shops, offices, etc. if you look at the world broadly with open eyes, then you can understand that inscriptions and letters made of wood can be used almost anywhere where you want to add style, design and beauty.
How to organize a home business for making inscriptions from plywood?
This business has three components - equipment and raw materials, the manufacturing process and the search for distribution channels. That's all. It seems that everything is simple. Actually... it's simple.
Very often, such a business is organized by those people who are faced with the purchase of such accessories. When you need one such inscription, then, no problem, we order and receive it. But when a lot of letters or inscriptions are needed, many begin to think about the high cost of these products. And they are really not cheap.
Potential buyers begin to study the issue and come to the conclusion that it is more profitable (and more interesting) to make such inscriptions themselves. Right at home. Moreover, you can get by simple equipment, and the raw materials are quite inexpensive. So, step by step, buyers turn into entrepreneurs.
Let's move on to organizing a business. Let's start with equipment and raw materials.
There is only one raw material in this matter - plywood. True, sheets will be needed for different purposes different thicknesses. Just do not use plywood that is too thin (less than 6 mm) - it can quickly lose its shape, and therefore its presentation. In addition to plywood, you will need paint. You can use different types, but many “experimenters” end up choosing acrylic. This paint applies better, dries faster, holds tighter and looks very, very presentable.

Plywood costs about 500 rubles per sheet of 1.5x1.5 m format. Paint - depending on the manufacturer - from 150 rubles per liter.
Equipment. Everything here is very interesting. Each master cuts letters from plywood in the way that seems more convenient to him. Or those for which there is currently enough money. Because the price range is from several hundred rubles to hundreds of thousands.
The simplest tool is a jigsaw. Ordinary manual jigsaw. Even with its help you can cut out the most bizarre shapes. Including letters and entire inscriptions. There are a lot of advantages - accuracy, ease of use, low cost. Such a tool is worth even the most High Quality no more than 1000 rubles. And non-branded models can be purchased for 150-200 rubles. The same goes for consumables– files – they also cost 100 rubles for a whole set (expensive ones – the same price per piece).
Among the disadvantages of a manual jigsaw, the following can be noted. Firstly, the ability to work only with small inscriptions. You won't be able to cut a large surface with a jigsaw. Because it will be simply impossible to crawl up. Secondly, not every hand jigsaw can easily handle plywood with a thickness of more than 10-12 mm. It will work, of course, but it will take a lot of time. And you won't need a single spare file. Third, manual cutting with large volumes it is a very problematic task. Whatever one may say, it’s difficult to work with your hands. And it won't happen quickly.
Therefore, the second option is an electric jigsaw. Has almost all the benefits regular jigsaw, but significantly speeds up manufacturing process. In addition, it allows you to saw even very thick plywood - 30-40 mm. The disadvantage is the price. Good model(Bosh, Makita) will cost 4000-6000 rubles.
Another option is a jigsaw. There are two types. The first real machine, which is similar in size and appearance to a machine. Such units cost from 15,000 rubles or more. For those who want to save money (both money and space in their home), there are also tabletop jigsaw machines. They look like sewing machine. And in size, about the same. Prices start from 3000 rubles.
Well, the most expensive option is automated milling machine. Price tag – from 150,000 rubles and more. But it seriously saves time and performs cutting flawlessly. In addition, it can be used not only for plywood, but also for wood, glass, acrylic and even metal. All this opens up new prospects for business development.
In general, choose the option that suits you. A lot here depends on your financial capabilities, as well as on the type of home you have. Well, it is very problematic to place the machine within the confines of an ordinary apartment.
Now about the manufacturing process. It is clear that on last stage The inscription is cut out with a jigsaw or on a machine, after which it is sanded and painted. But another question arises - where does this inscription even come from?
First you need to install any graphics program on your computer. Perfect option– Photoshop. Moreover, today it has become available. The license costs about $20 per month. Next, download various fonts. Of course, we are interested in beautiful designer fonts. Just make sure that they are free (this will avoid problems in the future). Or buy good quality fonts.
The further process is simple and clear. We create an inscription in the program the right size and using the desired font. We add some elements that will become part of the composition. Be careful - the letters and all elements of the inscription must be a single whole. That is, all elements must have points of contact. Otherwise, it will be impossible to cut out a whole word.
Next, print out the resulting template. You may have to print it on several sheets if the writing is large and long. We take plywood, apply our template, after placing carbon paper. We secure everything so that the inscription does not move around on the plywood. And we transfer everything to a blank for the future inscription. We remove the stencil and carbon paper. All. The material is ready. All that remains is to cut and paint.
Now about the implementation process. Of course, at first no one knows about you. Therefore, your initial goal is to shine. Wherever possible. Make some cool signs. Take good pictures. It might be worth inviting a great photographer. Create a portfolio. And then – leave your portfolio on message boards, on thematic sites and forums, on special platforms, such as the “Masters Fair”. Take a tour of gift shops, wedding salons, and offices that organize holidays. Offer them your products. After some time, the first orders will arrive. And then word of mouth will work. This will provide you with constant orders. And a stable income. Good luck!
Today you can find everything in the store. But sometimes you often want to invent something with your own hands. In our case, these will be signs with inscriptions in the style of wood carving. The topic of today's article is: “How to cut letters from wood with your own hands.” Let's look at several master classes on how to make them.
First lesson
We will make a sign for the bathhouse, you can do it yourself without spending big money and without overpaying someone for the work.
So, to work The following tools and materials will be required:
- Wood;
- Ruler in the form of a triangle;
- Simple black pencil;
- Saw;
- Furniture varnish;
- Stain;
- Sandpaper;
- Application brush.
Step-by-step manufacturing process.
From the board rectangular shape cut out the sign as shown in the photo.
We find a sketch of the word on the Internet and redraw it on a sign.
If you are afraid to draw yourself, you can print the sketch on a printer and transfer it onto the material using carbon paper.

To make the words look more interesting, we suggest you draw leaves or, for example, brooms for them. Once the sign is made for a bathhouse.

Let's move on to wood carving. The carving technique is simple, so even a beginner can handle it. To work, you will need only three types of cutters - a joint, a cutter, and chisels. With the first type of cutter you need to make a cut along the entire contour of the word, with the second type we select the drawing, then the letters will be three-dimensional.

You can also make steam as a decoration, as shown in the picture. Sand the finished plate with sandpaper.

We cover the finished plate with stain. You can apply it in two layers, again going over the letters with sandpaper.

We varnish the finished product. We put it away in dark place until completely dry. Afterwards, you can safely use it for its intended purpose.

Creating inscriptions
To work you will need the following:
- Sketch with inscription;
- Plywood;
- carbon copy;
- Sandpaper;
- Drill;
- Jigsaw;
- Clear varnish;
- A simple black pencil.
Step-by-step process for creating an inscription.
We lay the plywood on the work table and sand it to level the surface. We transfer the finished sketch to the prepared surface.

It won't hurt if the inscription is applied again. First of all, this is necessary for your own convenience.


Using a drill, we drill out places near the letters that have a closed contour.

When working with a drill, you do not need to put pressure on it, otherwise the plywood will begin to crack, and the inscription will not work.

Now the work requires increased attention. After all, with the help of a jigsaw we produce the most complex cuts.

When working with electric jigsaw It is necessary to observe safety precautions, the most important thing is not to rush when cutting.


The finished inscription must be sanded. This process must begin with the facial and reverse side. Afterwards we sand the side parts of the inscription.


The inscription is completely ready, all that remains is to color it. But this is at your request. Required condition- When finished, coat with clear varnish. Leave until completely dry.
Here's what we get as a result of the work:

That's all, and the master class has come to an end. As you can see, you can make such an inscription yourself. The main thing is to have the necessary tools with you.
Master class No. 3
For work you will need the following tools and materials:
- Pine board, thickness 18 mm;
- Plywood sheet 6 mm and 8 mm thick;
- Stain;
- Varnish for painting;
- Jigsaw;
- Jigsaw machine;
- Drill;
- Fraser;
- Grinding machine;
- Strubnitsy.
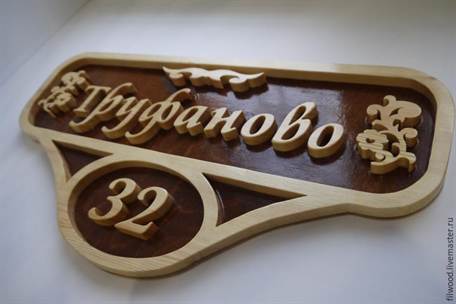
Today we will make a sign for your home. So let's get started.
In the Photoshop program we make an inscription for our home. We print it on a printer, this is how it should turn out.

The resulting sketch must be attached to the pine material.

Numbers and letters must be pasted separately, as shown in the photo.

So, let's move on to cutting out the frame. It should come out of two parts. Here's what happens:

The sawn parts must be glued together. We wait until the glue is completely dry.

In the meantime, we begin to cut out letters and numbers. In closed letters it is necessary to drill the middle.

Then we begin to cut out from the inside, and only then move on to the outside cutting.

That's it, all the components are ready.

We sand the workpieces, thereby removing the paper.

Here's what happens:

By then the frame should be completely dry. Let's start sanding.

We cut out the background of the sign from plywood 8 mm thick and begin sanding.

Cover the front side with stain.

Use sandpaper to sand down the letters and numbers.

The background part and the frame must be glued together.

It is necessary to cut off excess material from the background.
Here's what you should get:

The frame with the background is completely ready. Now we move on to gluing the inscription itself. Here's what happens:

We coat the finished sign with colorless varnish; it is advisable to do this in several layers. Remove until completely dry.
At this point our plate is completely ready. All that remains is to make places for attaching the sign itself. Feel free to take it and hang it up.
We also suggest that you watch video tutorials that will help novice craftsmen understand this craft.
Video on the topic of the article
IN modern world, when all spheres human life are subjected to merciless automation, I so want to create something with my own hands, putting my own soul into this object, and thereby please my family and close friends. One of best gifts may be a product that you personally carve from wood, carrying in itself some semantic load and individuality, suitable exactly for the person for whom this wonderful gift is being created. Today we will teach you how to cut clear letters yourself from natural wood quickly and easily with your own hands.
In this article you will learn how to create three-dimensional letters and inscriptions from wood with your own hands, which will allow you to create unique interior items and Original gifts for all occasions.
The variety of words and products carved from wood is almost limitless, from the name of the person being gifted to his life motto with places for inserting photographs. An elegant metric can be a wonderful gift for a daughter and mother! Let the memories of the most important day always be in sight! Medal holders are also becoming very popular, which will be a wonderful gift for sports man. Medals are distinguished by their incredible diversity. Color, shape, size, figure - everything changes according to your wishes! A medal holder is not just an amazing gift for an athlete, and besides beautiful decoration for home!
How to cut letters from wood with your own hands in a step-by-step lesson
What might be needed to create letters and inscriptions from a solid piece of wood:
- The first is a thoughtful stencil of letters or words if you want to cut it out entirely.
- Fulfill similar work best on plywood, 6 to 10 mm thick.
- Copy paper and pencil for transferring the drawing onto the working material.
- Convenient tools for cutting out letters. The choice of tools can be very wide - some prefer to cut with a jigsaw, others use a power tool. If you want to add texture to your product after carving, then a set of knives and chisels for wood carving will come in handy.
1. There are a great variety of different ways to transfer a picture to wooden surface. You can read about all of them on the Internet, watch videos, learn many new and interesting ways creating original paintings on wood. But, in in this case To avoid wasting effort, time and materials, use a simple pencil and carbon paper.

2.The next step is to drill holes in the cavities of the letters so that they do not extend beyond the outline and do not touch the letters themselves. We only need these holes to place the blade of a working tool (a jigsaw or jigsaw) there.

You should be very careful when performing such work. It is worth remembering that with strong pressure the plywood may begin to crack, and then the product will be damaged.
3. It will be most convenient to use a hand jigsaw to saw off the word from the rest of the plywood sheet and, perhaps, make the simplest upper and lower cuts.
4.More delicate work It is more convenient to perform on a jigsaw machine, due to the smaller size of the saw blade. Working with this machine allows you to carefully cut out the smallest and most fragile parts, but you will still need some experience and certain skills in working with this or similar
5.After the entire inscription has been properly processed, you can begin the final stages of processing wooden product- sanding the inscription, coating the finished product with varnish, or possible decoration appearance. You can decorate using decoupage techniques, the effect artificial aging, painting with any moisture-resistant paints or coating with special oils. But in any case, after all the manipulations, it is necessary to secure the work with transparent varnish.

Never forget about safety precautions when working with sharp cutting or power tools! Always work with glasses and gloves! When working with jigsaw machine The cutting blade often bursts, flying in all directions, which can be very dangerous.
On next photo you can see all the materials that were used in this work to create a beautiful three-dimensional wood inscription.

Video master classes on the topic of the article
In the following videos you can see in more detail how beautiful letters and inscriptions are created from wood, as well as what tools are used by real experienced wood carving masters.