To ensure effective use of the cellar, it is necessary to build proper ventilation in it. A well-installed ventilation system will help normalize air exchange, eliminate excess moisture and make the room suitable for storing food and preservation. We’ll look at how to make ventilation in the cellar below.
Basic requirements for carrying out work on arranging cellar ventilation
Most private houses are equipped with a basement. This premises provides its owners with additional usable area, which is often used as a storage room, sauna, work room, office, gym or rest room. The most common option is to use the basement as a cellar - a place to store food. At the same time, you do not need to go outside to get the necessary products during the cold winter months.

In order for the cellar to function correctly, when arranging it, it is necessary to observe certain requirements, namely:
1. Lack of light.
The absence of windows in the cellar is mandatory, and the inclusion of electric lighting should be periodic, only when people are present in it.
2. Defined temperature regime.
For cellar equipment, basements are used, which must have contact with one of the external walls building.
3. Availability of fresh, clean air.
This condition will help to organize a properly installed cellar ventilation system.
4. Air humidity.
The humidity in the cellar should be about ninety percent; this factor depends on properly organized ventilation.
The most important condition for the proper functioning of the cellar is the presence of a ventilation system. Properly organized ventilation creates an atmosphere that will help store food in the cellar for a long time. Lack of ventilation increases humidity, leads to the formation of fungus and mold, as well as food spoilage. Excessive ventilation will cause vegetables and fruits to dry out due to strong drafts. Therefore, the ventilation equipment must be correct so that there are optimal conditions for storing food.

To organize a proper ventilation system, two air ducts are required. The first is for supply purposes, and the second is for exhaust purposes. As a material for air duct equipment, it is allowed to use pipes made of asbestos, PVC or galvanized steel of a certain diameter. The calculation of the required diameter is made based on the relationship that for one square meter 25 square centimeters are required from overall size pipes.
We suggest that you familiarize yourself with the basic requirements for installing the main components of the exhaust system:
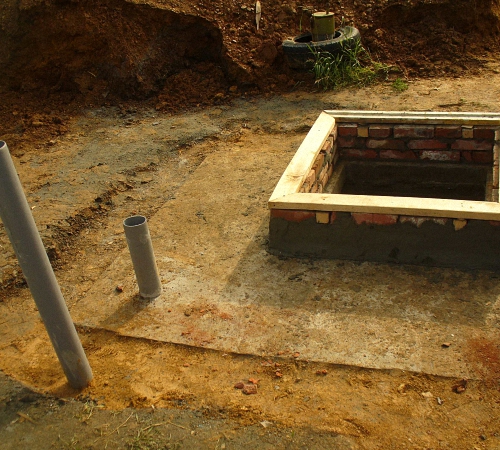
1. Exhaust pipe. Helps remove stale air from the room. Its installation is carried out in one of the corners of the cellar, while its lower part is located at the very top of the room. The passage of the air duct through all rooms is vertical, and then it rises above the ridge part by half a meter. To reduce the amount of condensation in the inside of the pipe, the air duct needs to be insulated. This procedure will help prevent the formation of frost in winter time of the year. To carry out insulation work, you will need another pipe of a larger diameter and mineral wool. The first pipe is placed in the second, and the space between them is filled with insulation.
2. The supply pipe provides the cellar with fresh street air. The pipe is installed in the corner, which is located opposite the exhaust type pipe. The height of the open end of the pipe from the floor is half a meter. This pipe passes through sections of the floors and rises thirty centimeters from the floor.
Tip: To prevent rodents or other insects from entering the cellar, upper section It is recommended to install a fine mesh in the supply pipe.
Air moves through ventilation ducts due to the difference in the specific gravity of warm and cold air masses. If the temperature difference is too large, drafts occur, and if the temperature difference is too small, air stagnation occurs. Therefore, it is necessary to install special valves that regulate the air flow on the supply and exhaust pipes.
To check the correct operation of the ventilation system, take a thin paper sheet and attach it to the opening of the ventilation pipe. If the sheet sways slightly, then the system is working properly. Another test option is to install a tank with hot coals in it in the basement. If the smoke comes out through the exhaust pipe, then the system is working.

Tip: To improve air exchange, try adjusting pre-installed dampers. To increase draft, you should increase the size of the exhaust pipe. If ventilation does not work when performing these steps, install a combined ventilation type.
To install this type of ventilation, care should be taken to install a fan whose power does not exceed 100 W in the air duct responsible for removing air from the room. This procedure will ensure the availability fresh air.
Features of arranging natural ventilation of the cellar in the house
Natural ventilation is supply and exhaust system, providing ventilation of fresh air and removal of musty air. This system requires the presence of mines, which are organized in the form of two pipes:
- supply purpose;
- exhaust purpose.
These pipes are installed on opposite sides of the cellar walls. It is recommended to maintain the greatest possible distance between the pipes. The supply shaft is installed in the lower part of the wall, and the exhaust shaft in its upper part.
This placement of pipes is explained by a physical phenomenon, which indicates that warm air is located on top, since it is lighter, and cold air is located below. Therefore, fresh air entering from the supply pipe heats up and rises to the top, where it is removed using an exhaust shaft.
In the winter season, cold air is even heavier, so ventilation occurs faster. This is associated with an increase in air exchange during the cold season. When setting up the system natural ventilation this location of the shafts in the opposite direction is mandatory. At the same time, the most the best material for the pipe there is asbestos. To create rarefied air, a reflector is attached to the pipe, which also improves ventilation. When arranging a basement that is located in a region with a warm climate, this system will not work. In this case, it is recommended to install combined ventilation systems.

Do-it-yourself combined ventilation in the cellar
This ventilation system is universal and suitable for rooms with any microclimate. It can work in both warm and cold weather. Its installation involves the installation of two shafts, the same as in the previous system:
- supply;
- exhaust
The main difference between this system and the previous version is the temperature difference that is formed when installing a small exhaust fan on the air duct pipe. In this case, air exchange increases and ventilation works in any conditions.
The cost of such fans is affordable, and energy consumption is minimal. The efficiency of its operation exceeds the cost of its purchase, so in the basement with a combined ventilation system there is a healthy microclimate that promotes year-round preservation of products.

Features of installing cellar ventilation in a garage
Owners who have an individual garage often arrange a cellar in it, since when small investments It turns out to be quite a spacious room for storing products and preserving them.
Considerable attention should be paid to the arrangement of the cellar ventilation system in the garage, since not only the food, but also the car will suffer from its improper installation. High humidity will cause corrosion and damage to all tools in the garage.
There are two types of organization of cellar ventilation in the garage:
1. Natural ventilation system - air removal based on the principle of heat exchange. Air exchange occurs due to the fact that warm air rises to the top, and cold air is located below.
2. Forced ventilation system - installation of blowers mechanical type, which help in organizing air exchange. This system is more effective, although it requires additional financial investments.

Installation of a natural ventilation system is carried out by installing two pipes for air intake and supply. To avoid the appearance of zones with stagnant air, the pipes are located in opposite corners of the room.
There are two ways to install exhaust pipes:
- through - the passage of a pipe through the entire garage and its roof;
- wall-mounted - the pipe passes through the inside of the wall and leads out.
The length of the pipe should be such that its upper part is 50-100 cm above the roof of the garage. The minimum length of an exhaust pipe is 250-300 cm. To enhance ventilation, it is recommended to install a deflector on the top of the pipe, which increases the intensity of air mass movement. In addition, the deflector will prevent dust and dirt from entering the cellar.
The most effective deflector is a diameter that is twice the diameter of the pipe. In order to save money, it is possible to self-made deflector, from a tin bucket or plastic.

Installation of the supply pipe implies its location half a meter higher from the floor and half a meter from its upper cut and ground level. A grid with a medium or small cross-section of cells is installed on the upper cut.
To calculate the diameter of the pipes, you need to know the area of the room. For example, in a cellar with an area of 15 square meters, it is necessary to install a ventilation pipe with a diameter of 22.5 cm. Since a room area measuring one square meter requires 1.5 cm of pipe diameter.
It is possible to purchase plastic pipes, since they are cheaper than asbestos, and are also lightweight, resistant to moisture, frost and mechanical damage.
Air ducts made of tin are the most irrational, although their cost is quite low, they are completely unstable to mechanical damage.
The presence of dampers will help control ventilation. Dampers can be purchased or made by yourself. The only requirement for dampers is that their size must completely cover the air duct. It is recommended to close the air ducts when severe frosts to avoid food freezing.
When installing ventilation forced type, you need to take into account electrical safety rules. Connecting the hood should only be carried out if you have special skills. Otherwise, it is better to entrust this process to professionals.
Required condition proper operation fan is the presence of waterproofing of all wiring. Since due to the formation of condensation it will quickly fail.

1. To ensure high-quality ventilation, you will need the following equipment:
- grinder - will help make air ducts;
- hammer - for knocking out walls;
- hammer drill - for drilling;
- solution - for sealing cracks after installing pipes.
2. If unpleasant odors, mold, mildew appear in the cellar - exhaust system not working correctly.
3. If the humidity in the cellar is too low, it is recommended to install a box with wet sawdust or wet sand in it.
4. If the humidity in the cellar is too high, the room must be thoroughly ventilated. In autumn, it is better to open all the valves and doors in the basement to avoid the accumulation of dampness in it.
6. If the main purpose of the cellar is to preserve wine in it, an automated climate control system should be provided. To do this, you need to purchase special equipment that will regulate the humidity and temperature conditions of the room.
7. When installing split systems in a cellar, it is recommended to seek the help of specialists who will help carry out calculations and compare the area of the room with the power of the devices necessary to create a comfortable microclimate.
8. Another way to determine the correct installation of ventilation in the cellar is a lit match; the quality of ventilation depends on how quickly it goes out.
9. Factors on which the quality of natural ventilation of the cellar depends:
- earthly entrance;
- the material from which the basement floor is made;
- basement ceiling;
- presence of a canopy on the roof.
10. Use a duct fan with low capacity; it is connected to two types of asynchronous motors:
- synchronous,
- amplitude.
The second option has a higher efficiency, although its cost is slightly higher than that of the synchronous one.

11. In addition to ensuring proper ventilation, the basement requires proper waterproofing and thermal insulation work. Even at the stage of construction of the cellar, it is necessary to provide for impregnation of the floor with the help of penetrating materials and insulation mineral wool. These works will help make the microclimate of the cellar favorable for food storage and preservation.
Cellar - useful and functional room, which can be filled not only with canned garden food, but also with fresh vegetables and fruits. We all want to eat healthy foods, how good it is to eat an apple or cabbage grown on our own in the winter season. summer cottage... So that the cellar does not interfere, but, on the contrary, helps to preserve vegetables and fruits for a long time maximum number useful substances, in this utility room it is necessary to provide high-quality ventilation.
The need for ventilation in the cellar
From time immemorial, a cellar was provided during construction residential buildings. In the absence of refrigerators, he helped long time keep food fresh. His can be roughly imagined as a covered pit with reinforced walls. Very often this is part of the basement of a building, equipped for storing agricultural products or other items.
The presence of ventilation is one of the main conditions for the long-term and uninterrupted functioning of the cellar.
Properly equipped ventilation is designed to solve the following problems:
- Helps avoid accumulation of damp air.
- Extends the useful shelf life of fresh fruits and vegetables.
- Helps establish comfortable temperature and humidity.
- Prevents the appearance of fungus and mold.
- Makes the cellar safe to use.
- Slows down the aging process of load-bearing building structures.
If there is no ventilation system in the cellar or it is installed incorrectly, then there is a possibility of spontaneous combustion due to the high concentration of carbon dioxide. This is especially true for heated rooms, in which heating devices They are most often installed in the basement. The emergence of fungi also poses a significant danger.
Moldy formations not only spoil appearance premises, they pose a threat to human health. By inhaling spores from mold or mildew that penetrate from the cellar into living spaces, a person may suffer from asthma, chronic respiratory diseases, and may experience allergic reactions that are inexplicable at first glance.
Ventilation is a whole system that includes various devices to create proper air exchange in residential and non-residential premises.
The diagram clearly demonstrates everything existing methods air aeration
Classification of ventilation systems can be carried out according to various criteria, which are based on:
- method of pressure and movement of air masses;
- purpose (inflow or outflow of air);
- coverage of air exchange area (local or general);
- component design.
Natural
Ventilation can be divided into natural and artificial. The first method of ventilating rooms is based on the simplest physical laws. Air exchange occurs as a result of the difference between the temperatures of the atmosphere and the room, as well as different pressure values.
No special equipment is needed for natural ventilation; the entire process is organized using air ducts. As a rule, not a single building construction project can be completed without taking this point into account.
Natural ventilation directly depends on the materials used in construction. Wooden and brick buildings are better ventilated naturally than concrete ones. Air permeability can be reduced by layers of paint and mortar. To aid natural ventilation, open windows and doors periodically.
The natural ventilation system can be spontaneous or organized. Holes made at different heights and different diameters cope with the air exchange system in the second case.
This type of natural ventilation option is perfect for cellars. But it has a significant disadvantage - dependence on climatic conditions.
Artificial
An artificial type of ventilation system is used when natural way There is not enough air exchange. In this situation, special devices are installed to help replace used air in the room with clean air.
Filters, heaters, dust collectors, air ducts, fans, etc. do an excellent job of cleaning the air, humidifying it, and creating a comfortable temperature.
Designing rooms with this type of ventilation involves installing these devices at the very initial stages of construction.
Positive points artificial ventilation:
- independence from external natural factors (pressure, temperature, humidity);
- the possibility of differentiated selection of the desired characteristics of the state of the room (humidity, temperature, etc.).
It is clear that the creation of artificial ventilation requires more material investments and physical costs. This option, as a rule, is not used for small cellars.
Very often builders and designers create mixed type ventilation system that combines the advantages of both natural and artificial ventilation.
Supply and exhaust
If we base the classification of ventilation on its purpose, then we can talk about supply and exhaust options.
In the first case we are talking about forced submission air into the room. Exhausted air masses exit naturally.
The exhaust ventilation system is created specifically to improve the natural one. The basis of such ventilation is made up of fans, which help remove exhaust air from the room.
For good air exchange, supply and exhaust ventilation should be used optimally. In this way, it is possible to minimize the dependence of ventilation on changes in atmospheric pressure, on the direction and speed of movement of air masses.
Comparative characteristics of different types of ventilation
The table below clearly demonstrates all the pros and cons of different ventilation systems.
Table: positive and negative points of different ventilation
| Ventilation type | pros | Minuses |
| Natural | Does not require installation of complex components. Saves energy resources. Operation does not require significant material costs. | Air exchange is directly dependent on the climate - on the direction and strength of the wind, pressure drop and other aspects of the external environment. |
| Artificial | The air exchange process can be regulated and automated by making the necessary settings. The entry of already purified air into the room. Insignificant indicators of noise “accompaniment” of ventilation operation. | Considerable cost of equipment. High price to conduct installation work. Creating this type of ventilation yourself can lead to improper operation of the system (it is better to seek the help of professionals). System devices do not always fit into the interior of the premises. |
| Combined | Independence from external factors. Work stability. | Creation complex system ventilation ducts. Energy dependence. |
| Supply and exhaust | Reducing the cost of heating premises during the cold period. Possibility of cleaning and filtering air masses. Automatic operating mode. | Complex design. Dependence on uninterrupted operation of energy sources. Costs of installation and purchase of devices included in the system. The high cost of installing a ventilation system. |
To arrange ventilation in utility rooms, the natural type is most often used, since this is a less expensive method in many respects.
When planning long-term operation of a utility room, you should take care of a reliable ventilation system. The choice of the type of structure for air exchange depends on the purpose of the cellar, material capabilities, climatic conditions and some other points.
Already at the stage of laying the foundation, channels are made in the proposed location of the cellar, into which ventilation pipes are subsequently installed.
To ensure uniform distribution of air masses, ventilation pipes must be of the same diameter. It is best to install pipes on opposite walls or corners, then the air will not stagnate inside and the circulation will be constant.
DIY natural ventilation
The advantages of self-construction of natural ventilation are low cost, no need for professional knowledge, and ease of installation.
If at the design stage a decision was made to create natural ventilation in the cellar, then special openings are installed in the base of the foundation - vents, vents. To protect against various small animals (especially rodents) entering the basement, the openings are covered with bars.
The presence of a grate will help protect the cellar from small rodents getting into it
The vents can be made adjustable by placing dampers with doors on the outlet openings.
The presence of a door will help to participate in the process of air exchange regulation
The principle of natural ventilation in the cellar dictates the installation of two openings in this room - for air access and for air outlet. The exhaust pipe is mounted in the upper part of the cellar wall, and the supply shaft is mounted in the lower part. This arrangement of pipes allows cold fresh air to enter the room through the supply duct, heat up and through exhaust pipe go outside. The distance between the supply and exhaust pipes should not be less than half a meter.
Such air exchange obeys the laws of physics - warm air rises. The lower the temperature of the incoming air, the faster the ventilation process occurs.
In warm climates, natural ventilation will be difficult.
Materials and tools
Asbestos pipes are the most suitable material for creating natural ventilation.
Such pipes are often used when installing ventilation in the cellar.
There are other popular materials for ventilation shafts - pipes made of polyvinyl chloride and galvanized sheet. All connections and transitions in plastic pipes are made using auxiliary materials: adapters, PVC corners. It's very simple and convenient.
Galvanized pipes are much more difficult to connect. When installing such pipes, there is a high probability of rusty areas forming at the joints, so galvanized pipes should be especially carefully treated with anti-corrosion agents.
In preparation for work, it is necessary to stock up on cement or similar material. When drilling a place for pipes, voids are obtained, which, after placing pipes in them, should be filled with mortar.
If a void forms between the pipe and the wall, it must be cemented
Fasteners, metal grid, protective caps for pipes will also come in handy.
Tools you will need:
- hammer;
- Bulgarian;
- drill or hammer drill;
- trowel or spatula.
Schemes and calculation options
A diagram of natural ventilation will help you understand the essence of the operation of this system and determine the location of the pipes.
Based on the diagram, you can get a visual representation of the work of natural aeration
The diameter of the ventilation pipes is an important quantity on which the efficiency of the system will largely depend.
1 cm d pipe = 13 cm² section. For 1 m² of cellar, a 26 cm² section is sufficient.
This means that in order to purchase pipes for a cellar with an area of ten square meters, you should make the following calculations:
- 10 m² multiplied by 26 cm² = 260 cm²
- The cross-sectional diameter of the pipe is calculated using the circle formula S =πR²
R² = S: π = 260:314 = 82.8 When extracting the root, we obtain a value of R = about 9 cm
D= 2R The pipe diameter should be 18 cm.
This is a simplified calculation formula for normal air exchange in the cellar, without taking into account the intensity of air mass exchange. Construction professionals install ventilation systems using more complex calculations.
Step-by-step instruction
Having determined the required pipe diameter, having prepared necessary materials and tools, you can begin to build natural ventilation.
- We place the exhaust pipe in the corner of the room. The open end of the pipe should not be too high or too low from the floor. It is optimal to place the air exhaust pipe at a distance of 140–150 cm from the floor surface. If the cellar is a separate room, then the exhaust pipe is led outside through a hole made in the ceiling. If it is built under the residential part of the building, then it is advisable to place the exhaust shaft in the place of the common building ventilation duct.
For better extraction, it is advisable to place a tip of a larger diameter at the end of the pipe.
- In the opposite corner we install a supply pipe, which we place much closer to the floor - 45–55 cm from the surface. Ventilation duct supply air supply must pass through the ceilings; it must be raised from zero level floor by 0.8 - 1 m. In a cellar built independently, this pipe is brought to the roof of the building, but it is installed below the exhaust pipe. If the utility room is located in a residential building, then the opening of the supply pipe is led outside into the wall of the building.
When constructing such a pipe, be sure to position it correctly in relation to the bottom of the cellar
- All holes and voids formed during the installation of pipes are covered with a solution; after it dries, the covered areas can be painted.
Improving the aesthetic appearance and ventilation is achieved by getting rid of holes formed during installation
- Valves are installed inside the pipes. This is done in order to influence the intensity of air mass movement by changing the clearance using a damper. Canopies are mounted on the pipes outside,
This appearance not only improves the perception of the structure, but also performs a protective function.
closing the openings with a valve to prevent precipitation or small animals from entering.
- Pipes are insulated using special materials (mineral wool, ecowool, foil penofol and others suitable materials) in order to reduce the formation of condensation. Sandwich pipes can be used = two pipes different sizes, placed one inside the other. To free the accumulation of condensate inside the pipe, taps are installed at the bottom of the outlet channel to drain the water.
In such pipes the likelihood of condensation formation is minimized
Forced ventilation
There are practically no fundamental differences between the natural type of ventilation and forced ventilation. In the forced version of the air exchange of the cellar, there is an element that forces the air masses to move.
Materials and tools
Most often, a fan acts as an air blower. This device should draw out excess moisture and unpleasant odors that may be present in the cellar with fresh fruits and vegetables.
Such tasks are easily handled by one or two medium-power fans, which are installed in the exhaust duct (very rarely - in the supply shaft).
Installing such a device will increase air exchange in the cellar
Single-pipe and double-pipe installation of fans depends on the area of the cellar. As a rule, the second option is applicable in rooms with large volumes. Fans are built in exhaust and supply shafts; they can operate in one or different modes.
Owners of buildings can independently regulate the parameters of air outflow and inflow; with such devices it is easy to control the humidity and temperature conditions in the cellar.
The choice of fan depends on taking into account a number of parameters:
- air volume;
- type of output device;
- specifications.
Fan brands from manufacturers such as Electrolux, Vents, Silent, Blauberg, Systemair are very popular among consumers. They perfectly combine low price and good quality. These devices are equipped with check valve functions, they have control units, humidity sensors, and time relays.
When using a fan, you will need reliable electrical wiring; compliance with safety rules in this case is mandatory!
In some cases, other devices - deflectors - are used for forced ventilation. This option is good because using deflectors does not require electricity.
The deflector is a special device mounted on the exhaust pipe instead of a protective cap. The operating principle of the deflector uses the power of the wind. Inside the duct with the reflector, rarefied air appears, which helps improve ventilation.
Electrical supply to improve the aeration of such a cellar is not necessary.
Deflectors are produced by industrial enterprises, but some craftsmen make such devices on their own. The effectiveness of the deflector is significantly increased if its diameter is twice the diameter of the ventilation pipe.
Necessary calculations
Diameter exhaust fan can be determined based on regulatory documents: SNiP 3.05.01–85 - Commissioning Certificate and SNiP 32–105–2004 - Acceptance Certificate for Ventilation Units.
These sources are, of course, used by designers and builders for production purposes. But calculations can also be made for small rooms Similarly.
For effective ventilation of a room with a volume of 16 to 32 m³, you will need a fan with d = 10–20 cm. In this case, the air exchange rate will be 1 cubic meter of air per hour of operation.
Pipe diameters are calculated in the same way as for natural ventilation.
Installation
The construction of a forced ventilation type is a sequence of steps that are taken in the installation of natural air exchange, with the only difference being that fans are placed in one or both pipes or deflectors are attached.
Combined cellar ventilation system
This type of air exchange is suitable for any premises with the most different characteristics. A combined ventilation system with the installation of fans in the supply and exhaust ducts is required for thorough drying of the utility room.
The system may include equipment that will provide the most acceptable “climate” in the cellar. Deals with these best automated system climate control.
This is especially true in wine cellars, which require a certain temperature and humidity to ripen and store wine.
In this case, a split system is installed, the installation of which should be entrusted to specialists.
If the humidity in the cellar increases, you can dry it using traditional methods.
The easiest method is to simply open the hatch in summer time. But the effectiveness of this method is low. It is best to use tried and true methods using:
- fryer;
- dry alcohol;
- candle;
- electrical appliances;
- box of salt, etc.
A regular metal bucket with holes can be used as a roasting pan. Burning coals or firewood placed in a brazier should be lowered into the cellar on a cable and kept burning for 10–12 hours. Compliance with safety rules is mandatory!
When using a bucket, do not forget about the holes in the bottom of it.
To create strong traction, you need holes in the bucket. Hot air will help disinfect and dry the cellar.
An iron jar with a lit candle is another option for improving the microclimate in the cellar. A jar with a candle is placed next to the ventilation exhaust pipe, without closing the hatch and front door. If possible, the exhaust pipe is extended. The flame of an ordinary candle is enough to speed up the process of aeration (air exchange) and eliminate negative aspects in the microclimate of the cellar.
The same applies when using dry alcohol or a gas burner, without forgetting maximum safety.
To remove excess moisture from the cellar, you can use a gas burner
An alternative way to dry the cellar is less dangerous, but more expensive. We are talking about the use of electrical appliances.
To distribute heat evenly in the room, place it in the center. heat gun, heater or some other device for heating the room.
A box of salt can also be an excellent way to absorb excess moisture.
You can check the quality of a ventilation system that has only been installed or has been in operation for a long time in the following ways:
- Take a piece of notebook paper or printing paper and bring it to ventilation grille. If the leaf fluctuates slightly, then everything is in order with the hood.
- Place smoldering coals in the cellar. At poor performance air exchange, an unpleasant odor and condensation may appear.
By periodically checking the ventilation, you can avoid various negative aspects in the cellar
To increase the efficiency of cellar aeration, you can “work” with the valves by adjusting the air movement. To improve exhaust, the outlet shaft pipe is lengthened.
To eliminate musty air, place a fan (with a power of at least 100 W) in the cellar and increase the speed of movement of air masses, promoting better ventilation of the cellar.
Video: principle and arrangement of the ventilation system
An air ventilation system in the cellar is necessary for long-term operation of this room. Before independent construction ventilation should be studied possible options aeration and choose an acceptable one. It is advisable to do this at the building design stage in order to immediately provide for the necessary communications. Having built reliable ventilation in the cellar, you can be sure of the safety of food and effective use this utility room.
- It’s dark inside - there are no windows, the light comes from a light bulb and only when you need to take something.
- Low temperature is mandatory for long-term storage of things and products, otherwise “the love has passed, the tomatoes have wilted.” Literally.
- Constant air circulation, influx of fresh air and removal of stale air.
- Humidity is about 90% - not too much and not too little. Enough to maintain freshness without rotting or drying out.
If the building does not meet the listed requirements, it is worth thinking about the need for high-quality ventilation. To create such an air cycle, 2 types of ventilation are used - passive and mechanical.
For small rooms
When laying the foundation, vents are left in the basement above the cellar. They are blocked iron bars– this way pets, pests and debris (leaves, branches, waste paper) will not get inside. When frost begins, thick insulating fabric is placed over the grille and pressed down with an iron sheet. With proper design, the cellar will maintain the temperature acceptable for storing food even in winter. 
This is the simplest way of arrangement, but it does not provide enough good ventilation, and precipitation (snow, rain) will in any case fall into the vents and accumulate.
If it is not possible to make two separate vents, you can split one in half. The first part with a wind deflector directs fresh air into the room, the second is slightly covered from parallel blowing and will serve as an exhaust hood.
Passive (natural) ventilation
It is no longer possible to properly ventilate large cellars with niches alone - air circulation is necessary here. But you can do it quite quickly without high costs make ventilation in the cellar with your own hands, and a full blowing system will allow you to store any things in the future without the risk of damage.
A significant disadvantage of natural ventilation is its dependence on weather conditions. In the complete absence of wind, the air flow is extremely weak, therefore it can be considered an intermediate solution and a “framework” for the mechanical one.
First you need to decide on the diameter of the pipes, calculate the volume of the chamber and required amount air for normal circulation, after which a cellar ventilation scheme is drawn up. The formula is quite simple: 1 cm of pipe diameter is 13 sq. cm. sections. For 1 sq.m of cellar you need 26 sq.cm of section. That is, with a cellar of 10 sq.m. the diameter is calculated as follows: 10 sq.m (area) * 26 (required cross-section per meter): 13 (section per 1 cm of diameter). 
Simply put, the area is multiplied by 2 - the diameter of the pipe is obtained. If the air duct rectangular shape– we take the calculation of 1 sq.m. room area = 26 sq. cm. duct area (in this case, area 230 sq.cm = duct size 10x23 cm). Ventilation of a cellar in a garage is done according to the same principle, but taking into account the design features - it cannot always be removed directly.
Since the garage is used mainly for storing products that are more resistant to temperature and moisture, there is less dependence on ventilation, but the car still needs air circulation to prevent condensation from accumulating.
After this, the required length is measured, and installation work can begin.
Installation of exhaust and supply
The air duct is led through the ceiling in the corner of the cellar to the roof, always above the level of the building - otherwise the draft will be unstable and depend on the direction of the wind. A damper is attached at the bottom for adjustment, and a mesh (from birds and debris) and a “fungus” from rain are placed on top. You cannot place it end to end, otherwise air will not flow freely, but a “mushroom” that is too high is useless by default, since rain and snow rarely fall vertically, and the wind will blow them into the pipe. If there is already a ceiling above the cellar ( concrete wall, slabs, bricks) - instead of one large passage, you can make several smaller ones, but equivalent in total area/diameter Proper ventilation cellars in winter will preserve food from icing and completely allow for “division” of pipes.
The inflow is located diametrically to the hood - in the opposite corner at a distance of at least 0.5 m from the floor. The size of the supply channel can be made slightly larger than the hood for reliability and better air supply. Similar to a hood, it is installed on the roof and is also equipped with a mesh and rain protection. It is important that supply pipe was at least 0.5 m below the hood, otherwise the system will close and air will not flow due to the same pressure in both channels. 

After installation, it is necessary to check the traction.
No sensors - just hold a burning lighter to the exhaust vent for 5-10 seconds. If the flame burns evenly and is “pulled” into the channel, everything is in order. If it goes out, it means that air is not coming in or coming out. In this case, the flame is applied to each channel in turn for testing. Near the inflow, it should tremble from the wind flow; if it burns perfectly evenly, the pipe is either clogged or incorrectly installed. Change the height, increase the diameter - this should solve the problem.
Forced (mechanical) ventilation
Unlike passive ventilation, mechanical basement ventilation in a private house does not depend on the weather, wind strength/direction and other details. Moreover, the already existing passive ventilation will serve as the basis for creating forced circulation. Actually, the basic principles of the design are no different - both pipes are located diametrically, both lead to the top, both are protected from debris and precipitation. Forced ventilation is equipped in two ways.
- Using fans
An electric fan is mounted on the hood, blowing air out of the room. As a result, a small vacuum is formed inside, which itself will draw in outside air. An alternative is an inlet fan for better air pumping, but the load on it will be slightly increased if the hood is not wide enough. Ideally, you should install speed-controlled fans on both channels and set them to the same speed. 
Since the humidity in basements is higher than under normal conditions, it is better to use low-voltage fans and additionally insulate the wires and contacts and first consult with professionals on how to make ventilation in the basement with your own hands.
- Non-mechanical
An alternative is deflectors. They are placed on the hood instead of a hood and rarefy the air in the pipe, creating increased draft. Another option is turbines. The force of the wind rotates the shaft, it transfers force to the fan, which improves the outflow of air. Both options do not require electricity, but when installing them, you need to adjust the draft. 
There is only one disadvantage of deflectors and turbines - they are also dependent on the wind and in its absence will not bring much benefit. It is better to strengthen the exhaust fan with a fan in such cases.
A DIY video of cellar ventilation will help you better understand all the details - visual perception is much more effective than any text.
People who run their own households know how much physical strength and it takes time. I want to store the rich harvest from my land carefully and for a long time, so that nothing is lost, and titanic work is not in vain. Such people are wondering how to make a hood in the cellar with their own hands. It does not require a lot of effort and money, and such a thing as a cellar is very useful on the farm.
In fact, there is nothing complicated about it. The main thing is that fresh air got into and out of the cellar, creating the necessary circulation of air masses in a confined space. Otherwise, with high humidity in the room, the products will rot, and mold, fungi and pathogenic microorganisms may appear.
Therefore, a properly functioning ventilation system in your cellar will prevent such phenomena.
Pipe placement for efficient ventilation
The supply pipe should be placed so that its end is at a distance of 20-30 centimeters from the cellar floor. The upper end of the pipe is located on the surface at the base of the soil. There is no need to raise it very high. It is important that it is located in a ventilated place and air can easily enter there.
The exhaust pipe must be placed at the other end of the cellar, the lower part of the pipe is located on the contrary at the top, 20 - 30 centimeters above the ceiling and goes out onto the roof. It is important that the exhaust pipe is insulated, as condensation can form on it, which increases the humidity in the room. This arrangement will keep the ceiling dry. And the location at different ends of the room will allow air to pass through the entire cellar. If you install the exhaust pipe below 30 cm, the ceiling will be damp and mold or mildew will form on it.

In addition, you need to fence off the pipes from the penetration of moisture, insects, rodents, birds and other debris that can enter the cellar through the pipe. To do this, the end of the supply and exhaust pipes located on the street is covered with a grill.
If desired, instead of a grille, you can use a device called a deflector. The deflector is installed at the end of the exhaust pipe facing the street and provides greater protection against moisture penetration into the cellar, and in strong winds, due to the pressure, air will come out of the pipe faster, which will enhance ventilation in the cellar.
You need to take care of how to properly make a hood in the cellar even before the start of construction in order to avoid unwanted mistakes.
If you do build using two pipes, do not place them close to each other, otherwise the air entering from one hole will immediately exit from the other and ventilation of the cellar will be minimal. Please note that both pipes are same size. Inconsistency can cause air to stagnate in the room, creating an ideal atmosphere for rotting. Before starting construction, you should have a cellar ventilation scheme in order to calculate, think through everything in advance and avoid mistakes.
Cellar ventilation with one pipe
The only conditions necessary for ventilation with one pipe are a small cellar area. A large room will not be able to be properly ventilated if there is only one pipe and problems will begin.

Scheme for organizing simple cellar ventilation: two pipes are built into one
For such ventilation, they take a pipe divided into two compartments, through which air enters from one shade and leaves from the other. It is extremely important to place the ventilation in such a place that it is well blown by the wind, otherwise even for a small cellar one pipe will not be enough. Therefore, a diagram of the hood in the cellar is needed in order to understand and measure everything in advance.
After installing the hood, air circulation is checked. For example, you can smoke a room and see how quickly the air clears. You can also attach sheets of paper to different ends of the pipe - one sheet should fit tightly, since air escapes through it and blocks the process, and the other sheet, on the contrary, will not be able to fit tightly.
Fragrance in the cellar
An exhaust hood in the cellar is capable of maintaining optimal air humidity (90%) and eliminating high humidity. But if a situation occurs when water gets inside the cellar and the humidity is increased, it is necessary to correct this.

Organization of condensate collection in the cellar ventilation system
Ventilation alone will not save the situation here. Required proper waterproofing walls and floor of the cellar. And, if necessary, install a tank with a tap on the ventilation pipe to collect condensate.
To do this, place containers in the cellar with substances that can absorb moisture from the air - rice, salt (coarsely ground), lime. Even special adsorbents for such purposes are sold. If there is a lot of water, then you must first pump it out, and only then install adsorbents to remove residual moisture in the cellar.
To control air humidity, install an alcohol thermometer. This way you will control changes in air humidity. And if the cellar with large area, place two - at different ends of the room.
Exhaust fan
The essence of its installation is to forcibly increase ventilation in the room. The fan is installed inside the exhaust duct. Thus, enhancing the removal of air to the outside and, accordingly, increasing the flow of air into the accessory pipe. A cellar hood must be effective and keep food fresh for as long as possible.

The fan power is selected according to the size of the room. A fan that is too powerful will create too much of a draft and cause food to become too cold.
You can install two fans in both pipes, but this requires consultation with a specialist, because for large and complex rooms, everything needs to be specially calculated and thought through so that the hood in the cellar is as efficient as possible.
How to determine the required pipe diameter
With a simple room design, it is possible to calculate the required diameter for cellar ventilation. You need to know that for one square meter you will need 26 square centimeters of ventilation.
Thus, we multiply the area of the room by 26 square centimeters and get a number that must be divided by 3.14. The resulting number is the pipe diameter we need.
How to install an exhaust pipe with your own hands
If the cellar was made first, and only then the exhaust device is installed in the cellar, then first you need to make a hole of the appropriate size. After this, install the pipe at the required distance from the ceiling.

Seal all gaps in the cellar ventilation pipes hermetically
Make sure that there is no excess space left after installing the hood. If this happens, seal the gap hermetically.
If the cellar is built under the house, then the hood can be installed in the fireplace chimney. Thus, the difference in temperature will increase the ventilated air output.
If the hood goes outside, it should be much higher than the supply pipe.
What kind of pipes are used for cellar ventilation?
Now there is a fairly large assortment of ventilation pipes, but asbestos-cement or polyethylene are most often used. Because of their composition, asbestos-cement ones are much heavier than polyethylene ones, but both are equally durable. When installing polyethylene pipes You may need to boil them; this may not be possible for everyone. Therefore, most often, a specialist is invited to install polyethylene pipes to do this work.
When the question arises - “how to make a hood in the cellar yourself” there is nothing complicated. It’s quite easy to do it yourself with minimal expenditure of money and time. Correct hood in the cellar will help the products to be stored for a long time and delight you on the table.
The basement is an integral part of a modern private house or cottage. It serves to house communications for heating and water supply systems, and can be used as a garage, workshop or vegetable storage. In any case, the basement needs to maintain a given level of temperature and humidity. Dampness negatively affects the safety of agricultural products, leads to the appearance of mold, destroys the walls of the house and negatively affects other objects. Properly equipped basement ventilation will help solve this problem.
Let us note the positive aspects of using ventilation systems in the basement and ground floor: 
- Comfortable microclimate in the house, there is no feeling of dampness on the ground floor;
- Possibility to arrange a storage room, in which a constant temperature and moisture content in the air is maintained;
- Increased service life load-bearing structures a residential building or cellar, especially if they are made of wood;
- Operation of gas and heating equipment is not possible in an unventilated area for safety reasons;
- A dry basement will never cause mold spores., causing ARVI, allergies and asthma.
Kinds
All types of ventilation are divided into several types, depending on its purpose, complexity of arrangement and principle of operation. But the principle of operation of any of them will be based on the laws of physics on the movement of air masses. Cold air goes down and warm air rises.
Natural supply ventilation
The simplest, vent system in the foundation or basement. It is installed during the construction of a house and consists of small holes in the upper part of the basement.
If the basement is located below ground level, then the hood is equipped with plastic or asbestos-cement pipes with a diameter of 10-15 cm. They are brought above the surface to a height of 30 cm and covered with grates to prevent debris and rodents. This method is natural and depends on fluctuations in street temperature, wind strength, and humidity.

When calculating it bandwidth 1/400 of the total area of the basement is taken - this way we get the total area of all vents.
The holes should be located on the leeward side, least susceptible to precipitation. At home with complex shape foundation and located in low-lying areas can have up to one hole every 3-4 meters. We close the vents with gratings on the outside.
This inexpensive option well suited for ventilation of garages and non-residential basements or as additional means to the main ventilation system.
Natural exhaust ventilation
Supply and exhaust type. For proper operation, you will need to install two pipes for ventilation, and the supply and exhaust ventilation device looks like this.
- The first pipe is located under the very ceiling of the basement and is designed for the outflow of warm air. We place the exhaust pipe as high as possible, preferably at the level of the roof ridge. This is necessary to ensure good traction. The part of the pipe that is located on outdoors, must be insulated to prevent freezing in winter period and covered with a visor from precipitation.
- The second pipe for the supply of fresh air is located at a height of 30-40 centimeters from the floor level, and we place its entrance on the street a meter above the ground and cover it with a grille. Convection will occur due to the temperature difference between the street and basement air. Such a system will work most effectively when the supply channels are spaced on different sides of the basement.
All natural exhaust ventilation systems have one drawback - their dependence on weather conditions and prevailing winds. It will not work if the temperature in the basement and outside are equal.
Forced
Applicable if natural forced ventilation cannot cope or is not physically able to use it. Typically used in the following cases:
- Basement area from 40 m2 or has several rooms isolated from each other;
- High humidity premises when condensate in the exhaust duct freezes in winter and impairs the permeability of air masses;
- The architecture of the house does not provide for high ventilation pipes;
- The basement is equipped with a sauna, cafe, Gym, workshop or other source of unpleasant odors.
The forced supply and exhaust ventilation device has a system of channels and fans that circulate air.
The main condition is to make the air constantly circulate, which is ensured by the synchronous operation of exhaust and supply fans. Their number is calculated depending on the volume of the cellar or basement and the throughput of the air ducts.
Supply and exhaust ventilation with heat recovery
For ground floor, in which it is planned permanent residence It’s not enough to just install the system forced ventilation. The room must be insulated and waterproofed. The issue of heating and heating is also resolved.
Increasingly, supply and exhaust with heat recovery is being built into such schemes.
Well-heated air enters the exhaust pipe, and in order not to release ready-made calories into the atmosphere, the air is passed through a special ceramic recuperator. When heated, it gives off heat to fresh air. The air flows do not intersect. The efficiency of such a device is 50-90% depending on the design of the heat exchanger. All heat recuperators are very reliable, do not require additional maintenance and can last for decades.

Equipped with moisture traps, dust filters, sensors that monitor humidity and air temperature. For a residential premises, these indicators lie in the range of 50-65% relative humidity and 18-220C. Such systems are most often found in " smart homes", and their installation is complicated and should only be carried out by professionals.
Supply and exhaust ventilation device
Now let's look at how to make ventilation in the basement. The easiest way would be to make ventilation in the cellar or basement of the supply and exhaust type or forced.
First, let's do the calculation.
For 1 m2 of area there should be 25 cm2 of the cross-section of the air duct.
As the ceiling height or humidity increases, the diameter of the duct increases. The wooden box can be divided into two halves for supply and exhaust ventilation, but it is best to use plastic pipes or metal corrugated boxes.
Wooden ventilation parts must be treated against mold and painted.
The supply and exhaust ventilation device can be supplemented with a deflector on the roof of the house. It will create additional vacuum in the pipe and improve the release of warm air. 
Managed coercive system will be much more efficient with comparable labor costs. To do this, we will need special duct fans that operate on a voltage of 36 V. This feature is associated with the category of all basements that allow the use of only such currents.
Therefore in electrical panel a transformer is installed that reduces the voltage from 220 V to 36 V. And the wiring must be laid in cable channels. These and other rules can be found in.
For small rooms, only one such fan per exhaust arm will be sufficient. The flow of fresh air will be carried out due to the vacuum in the basement. But the efficiency of the system will be much higher if you install a second supply pump and combine their work into one control panel. 
Now on sale you can find programmable control panels with temperature and humidity sensors, and the duct fans themselves are available in all sizes and are compatible with almost any ventilation ducts. For convenience, they are already built into the body, have a protective grille and replaceable filters.
As pipes for ventilation ducts in your own home it is preferable to use PVC. They are strong and lightweight enough to be attached to walls and ceilings using regular dowels. They are not afraid of moisture and temperature changes, and the cost is lower than steel structures.
Condensation will always form in the exhaust ventilation ducts, which must be removed periodically. To do this, you can provide a special hole for draining water. Excess moisture leads to corrosion metal structures and increases the likelihood of the air duct freezing in winter. If this happens, you should definitely clean and defrost the channel.
Functionality check
Determining air circulation is quite simple. You can use an open flame for this. alcohol burner or candles or attach a sheet of paper to the opening of the exhaust duct. Good hood will hold the sheet securely. A thermometer installed in the area of the supply air duct will not do any harm.

The following signs indicate poor ventilation in a basement or garage:
- The appearance of condensation on the walls, and humidity exceeds 95%. The permissible maximum humidity for storing workpieces and crops is 85-90% at a temperature of 3-40C. For residential premises and garages, humidity levels should not exceed 40-50%;
- Mold and fungal formations on the walls and ceiling;
- Unpleasant smell indoors and heavy stale air;
- Sudden changes in temperature they talk about an incorrect supply and exhaust ventilation device or errors in calculating the channel cross-section;
- In warm weather, condensation may not be noticeable, but in winter the walls will be covered abundantly with frost;
- Carbon dioxide can accumulate in the cellar with vegetables. You can identify it by a dying candle or match. In this case, it is necessary to open all the dampers and ventilate for 24 hours, without going into the room without protective equipment.
The installation of ventilation systems will be much more effective if, together with it, measures are taken to maintain the microclimate:
- Periodic ventilation with the opening of all doors and hatches. This requirement is especially relevant for cellar owners. It is best to do this in the summer, and remove all wooden objects from the cellar;
- Treat walls regularly lime or special compounds. They will protect against mold and unpleasant smell in room. An approximate recipe for this composition: 3 kg of lime and 50 g of copper sulfate per bucket of water;
- You can combat excess moisture in the air with a sandbox., sawdust, salt, quicklime. Periodically, the box is taken out and thoroughly dried in the sun. In the cellar, you can leave the hole unlocked and cover it with old blankets or mattresses to improve air circulation;
- Installing an additional heat source (small stove, brazier, air heater, lamp) or just a burning candle helps;
- Waterproof your basement or cellars with bitumen compounds;
- Install adjustable dampers for supply and exhaust ventilation. With their help, it will be possible to eliminate drafts and freezing of the basement in winter;
- If the cellar is located in a garage, then it should have a separate ventilation system. High humidity vegetable cellar contraindicated in a car;
- Install a regular home fan.
How much does it cost to do ventilation?
Providing a good microclimate in the basement is inexpensive. Simple options can be made from construction waste and scrap materials; more complex ones will require additional investments.
The cost of the entire system will be influenced by the following factors:
- The area of the basement and the height of the entire building. Using these parameters, the number and size of air ducts are calculated, which will make up a significant part of the entire project;
- Air box material. PVC is cheaper, but has limitations on the size and maximum diameter of the pipe. Galvanized steel is more reliable and allows ventilation of any degree of complexity and configuration, but is much more expensive, heavier and may require special equipment;
- Degree of automation (a simple duct fan costs from 2000 rubles, a switch from 1400 rubles);
- The presence of complex and expensive additional devices - split systems, recuperators, dehumidifiers, hygrometers and sensors (the cost of such a turnkey system can exceed 100 thousand rubles);
Ventilation in the basement is important both for the safety of the food stored there and for the well-being of the entire home. The simplest options can be made independently or laid down during the construction stage. More complex types of ventilation will require special skills and experience. In any case, this system must always be in good working order and promptly serviced.