There are many types of gate frames on the site, but many of them require bulky equipment or special equipment to install. This is often very expensive, time consuming and inconvenient, especially in small areas. In such a situation, the easiest way is to assemble a gate from a profile pipe with your own hands. For their manufacture, the participation of complex equipment is not required, besides, all consumables for such frames are cheaper than factory and bulky models.
Material selection
Profile pipes are quite versatile and are used at many stages of construction: from foundations to finishing works. Therefore, there is a huge variety of types of this material. Pipes may differ in the type of section, composition and coating of steel, etc. Pipes are made from the following types of steel:
- galvanized;
- stainless;
- carbonaceous.
The stainless steel metal profile is very light, therefore it is more often used as furniture frames. But galvanized and carbon steel are great for assembling the gate frame. In addition to the type of steel, pipes are divided according to the type of production. They are seamless and welded. The former have better resistance to adverse conditions, various vibrations and pressure. Because of their qualities, they are of great value.

Welded profiled pipes are much cheaper. They are vulnerable at the place of the weld, but this does not affect the quality of small products in any way.
Important! For the assembly of frames and similar structures, welded hot-rolled pipes are best suited.
Many hot rolled pipes can be priced differently. For gate assembly, a metal profile of the middle and low price segment is quite suitable.
Gate assembly instructions
Before work, you should prepare the necessary set of tools. The stages of manufacturing a gate frame from a profile pipe include:

If you are a car owner, then the main thing is for the car to pass freely through the future gate. The standard size for a passenger car is 3 meters long and 1.5 meters high. For a wicket, the length is the same, and the width is from 0.75 meters.
If the gate is installed on a site with a ready-made fence, their height is calculated taking into account the parameters of the fence. The difference in height between them should not exceed 30 cm. Usually, a distance between the support posts of the fence is left for the gate. The standard step between the supports is 3 meters, this should be enough to install the gate frame.
Building a drawing
Making a gate from a profile pipe with your own hands will not do without building a detailed drawing or sketch. It must indicate:
- the size of the gate itself;
- pipe thickness;
- distance from support pillars;
- dimensions of additional components of the frame.
Important! If you plan to equip the gate with automation, mark the location on the drawing for their installation. Consider that for gates with automatic controls, a much larger gap between fasteners and leaves is needed.
For massive structures, more spacers are required. If you use a metal profile or galvanized steel for door sheathing, do not skimp on additional parts of the frame. This will protect the gate from wind and temperature changes.
Required materials and equipment
After building the drawing, you can start calculating the cost and purchasing the necessary materials. To assemble a standard gate you will need:
- Metal profiles of different sizes. The frame is welded from pipes with a cross section of 50 × 50. For pillars, a profile of 100 × 100 is suitable.
- Sheathing. The leaf of the gate leaves is made of profiled sheet, wood or forged elements. To create an unusual design, materials are combined with each other.
- Fasteners. To attach the sashes to the supports, you must purchase ready-made hinges. It is most convenient to fix them with self-tapping screws.
- Paint and primer for metal. If the frame is welded from non-galvanized pipes, it must be protected from corrosion.

To work, you need the following tools:
- welding equipment (+ electrodes);
- drill;
- tape measure, level and corner;
- Bulgarian;
- grinding equipment for processing seams;
- brushes.
Most of the instruments can be rented or asked from friends. When the materials are purchased and the tools are ready to go, you can start assembling.
Assembly and installation of the frame
To assemble a gate from a profile without errors, you must adhere to a strict sequence:

After the frame has dried, you can start trimming and installing the lock.

Frame sheathing
After the frame has dried, mount the door trim. The course of work depends on what material was chosen for the leaf of the sash. Most often, the same coating is used for the gate as for the fence. Otherwise, the gate will be knocked out of the general view of the site. Sometimes this technique looks advantageous. A brick fence, complemented by a wrought-iron gate and a wicket, gives the building's architecture a sophisticated look.

Corrugated board
Metal coatings are rightfully considered the most practical. It is best to buy a pre-painted galvanized coating. You just need to attach it to the frame. Often, such products are supplemented with forged elements in the form of bolts or platbands. It looks very elegant and improves the look of the average metal profile. A photo example of a combined gate is shown below.

Tree
The material looks very attractive, and over time, its appearance gets better. However, rotting and low resistance to mechanical stress can adversely affect the appearance of such a skin. To improve the quality of wood, it is treated with fire retardants and impregnations against decay. This will extend the service life of the gate.

Note! The wooden parts of the doors can be replaced over time without damaging the frame.
Forging and metal
Often, the gate frame is sheathed with rods made of reinforcement or forged elements. With the help of a cutting machine and a welding machine, you can create interesting design gates with various patterns and nets. To give the product a complete look, it is painted in a single color with a metal coating.

Sheathing made of wood or metal profiles can be on both sides of the gate. With one-sided siding, the material is attached from the outside of the sashes. To protect the holes from corrosion, plugs are used together with self-tapping screws.
The area around your summer cottage or private house, which is fenced off, must have a gate and a wicket, you cannot do without them, and it is understandable why. A wide variety of materials for sale, from which you can build an entrance and an entrance to the courtyard with your own hands, allows you to choose between many design options. The most commonly used of these are gates made from shaped pipes.

In some cases, professional pipes are also used for the construction of the entire fence, thus creating an integral complex with the same appearance. If you have a welding machine, the necessary materials and desire, a self-made gates from a profile pipe will become the pride of the owner for many years.
Content of the article
Necessary materials
To do this, you will need three pipes with a cross section of 60x60 mm and a length of 3.3 m. They must be dug into the ground to a depth of at least one and a half meters. If the height is different, then the ratio is used - one third of the entire length of the support must be recessed. It is necessary to weld a 20x20 cm sheet metal heel to the bottom of the support pipes (this will ensure stable stability).
After checking the distances between the supports and their strict vertical position, the pits in which they are installed are poured with concrete. For additional stability, all supports are connected with a corner, which is laid between them in a shallow (up to 10 cm) trench, which can then also be concreted.
To resist corrosion, parts of the supports that will be in the ground are thoroughly cleaned and treated with bitumen mastic.
The most difficult stage of installing a gate from a profile pipe is the welding of the hinges. Before connecting the frame to the support posts through the hinges, it must be installed in the correct position and securely fixed with wedges and supports.
It makes sense to weld the sash (after installation it can be easily removed) to maintain the required geometry of the structure during installation. The frame is then also tied with metal strips to the supports. Thus, the gate is already up, but cannot open yet, because the hinges are still not welded.
Only after all the parameters of the correct position of the gate leaves and wickets between the support posts have been checked, the hinges can be welded. It is very important - two hinges of one sash must be on one axis of rotation, otherwise one of the loops will be torn out over time.
Do-it-yourself doors made of corrugated board (video)
Sheathing and locking devices
Do-it-yourself gates from a profile pipe are almost ready. It remains only to provide them with locking devices and sheathe them with corrugated board.
The locks are made from a 20 mm pipe, two lengths of which are welded horizontally to each leaf in the middle of the converging sides of the leaflets. In the lower corners (at a distance of 5-10 cm), one more same segment of the same pipe is vertically welded to fix the gate from below with metal L-shaped rods (both in the open and in the closed position of the shutters).
Above or below the horizontal lock, hinges (ears) for the padlock are welded (usually from the outside). The gates and wickets, if desired, can be equipped with do-it-yourself mortise or patch locks, which are also welded to the frame.
The next stage is cleaning from rust and anticorrosive treatment of the entire surface of the frame, followed by priming and painting. The corrugated board is cut to the required size, with obligatory fitting, and fixed with screws or rivets.
A gate and a wicket are a necessary addition to the fence of their profiled sheet. The gate provides passage to the site for cars and special equipment, and the gate is intended for those who come on foot. Unlike a fence, the design of gates and wickets turns out to be more complex, therefore a separate drawing is developed for them and a special calculation of materials is made.
We want to offer you several ready-made drawings of gates and gates made of corrugated board, which you can adjust to your conditions. The height of the fence and wicket must match the height of the fence.
The main types of gates for country and country houses
- swing doors - are two swing doors that open inward or outward. Simple and cheap to install, however, they can damage the vehicle upon entry, especially if there is strong wind. Also, for them you need to clear a significant amount of space.
- sliding or sliding gates with a guide rail - the door moves on a roller mechanism along the fence line. The complex design, special expensive fittings make such gates not the most affordable. But they provide a higher level of comfort: an automated drive makes it possible to open them without leaving the car.
Drawings of swing gates and wickets
When drawing up a drawing, it is important to determine the width of the opening of the gate and wicket, the height, as well as the model of the frame. Do not forget that when designing a gate, you need to correctly distribute the load along the sash, because it is attached to the side hinges and their weight completely falls on the pillars of the supports. For this reason, gate posts are often made from a thicker profile pipe or laid out of bricks.
The metal thickness of the profile pipe must be at least 3-4 mm. Accordingly, the foundation under the gate supports must be sufficiently reliable. Weak supports will lead to sagging of the sashes and deformation of the structure from wind loads and the force of gravity of the sashes. For the frame, you need to use a lighter profile tube in order to prevent overloading on the flaps, but a too thin frame will not withstand wind loads.
Pay attention to the choice of gate width. The optimum width is 4 meters; it allows both cars and trucks to easily enter, even from a narrow street. Remember, the wider the sash, the more load it puts on the supports (in accordance with the law of leverage).
Schemes of gates and wickets made of corrugated board with a parallel frame
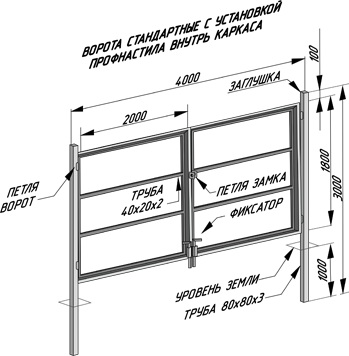
1. Before us is a "classic" and well-balanced drawing of a gate with a wicket. The height of 2 meters corresponds to the traditional height of the corrugated sheet fence. Pillars 60x60 must cope with a frame made of 40x20 pipe. The frame itself is not overloaded, easy to calculate, does not require a lot of materials. He has only one drawback - the lack of diagonal rigidity. It is compensated by the presence of two horizontal strips of the profile pipe at once, which form three sections 60-70 cm wide on the sash.

Also featured is the top bar. It gives a more balanced distribution of the load, prevents the posts from shifting towards each other, however, for a successful entry into the area of tall cars, you need to make it removable.
2. Another version of the drawing. This time without the crossbar. Please note that the support pillars have a larger diameter due to the absence of the crossbeam.
3. Swing gates with a built-in wicket. This scheme is perfect for those who have limited space to enter / enter the territory. At a width of 4 meters, both a gate and a wicket are placed. However, it should be understood that the presence of a wicket increases the mass of the sash, which means that the section of the side post should be at least 10x10 cm and it is better to place the wicket closer to the post (according to the law of the lever, it will give a lower load to the gate support).

Diagonal gate and wicket schemes
The presence of diagonal elements of the frame increases the rigidity of the structure and makes it resistant to various kinds of deformations, however, it should be remembered that additional lines are an additional load and here it is important to choose the right pattern. So instead of two horizontal strips, it is better to use one. The options for the location of the diagonal strips are shown in the drawings below. The cross-section of the support posts for the fence with diagonals must be at least 80x80.
1. Diagonals from extreme corners to the middle or vice versa. Such schemes look pretty nice. One looks like a snowflake, the other forms a diamond pattern.


Hypotenuse length:, where a and b- sides of a right-angled triangle.
2. Diagonals from one corner of the sash to the other. The scheme allows you to minimize the load on the sash and at the same time give the necessary rigidity, however, welding such a diagonal is not very convenient.

3. Small diagonals at the corners of the flaps. It looks pretty enough to create a minimum load, but such sashes have a high windage, which means they can suffer from wind loads.

In the following video, you will receive valuable tips on how to prevent the support posts from mowing under the weight of the sash:
Drawings of sliding gates from corrugated board
The best option for a sliding fence, which can be erected on your own, is a design with a guide rail. It is enough for her to simply select sets of fittings and automation systems. The gate includes a retractable leaf with a bottom rail that moves along a special roller system. In order for the structure to be balanced in closed form, an additional triangular console is welded to the side of the frame.

As you can see, the gate frame consists of a frame and a console, which are made of a thicker profile pipe (60x40). The interior of the console is also best made from this pipe. Inside the gate frame, the frame pattern can be made in different versions (with rectangles or triangles. The main thing is that the pipe is a lighter pipe (for example, 40x20). Also, do not make the lattice too frequent. The installation procedure for a sliding fence is presented in the following video:
We hope that the above drawings will help you make your own gates and wickets from corrugated board, which will be comfortable, reliable and durable.
In the article, we will consider how to properly weld a gate from a professional pipe (video tutorials), for proper welding of a 3 meter wide frame, you need to use a square pipe of at least 25x50mm. It must be at least 2 mm thick.
Each side should be cut out of the profile pipe for the future frame, so that when you connect everything into a single whole, you get a rectangular structure. After you are convinced of the straightness of the corners, the structure needs to be slightly welded, just so that it does not crumble.
Now that the structure is fixed, we measure the diagonals with a tape measure, and if they have the same length, then we can weld the structure completely. Take measurements constantly, this will save you from having to redo the structure if it is skewed and does not fit.
We weld the sashes
The sash frame is welded based on the dimensions of the finished frame of the outer frame. Make one of the flaps longer than the other, so the flaps will overlap, and this will save you from unnecessary gaps and drafts. When welding the frame, it is advisable to use metal square pipes, since they provide the required structural density and are easy to weld.
The most important thing is how to weld the loops correctly - Video
When the door frame is ready, it will need to be sheathed. For this task, you can use cut-to-size metal sheets that are welded onto the frame. Moreover, welding must be carried out from the middle to the edges so that the sheets do not swell. When the sashes are ready, you can move on to the hinges.

They are welded at a distance of approximately 30 cm from the floor and from the ceiling. You can fasten another pipe in the center, this is done already assembled, right on the gate. This operation will increase the door reliability indicators, however, it cannot be attributed to mandatory actions.
That's it for garage door welding. Yes, the completeness of the presentation of this process, you can watch the video below.
All the subtleties of preparation and welding of the gate (video)