Most children, I know this from my own experience, love toys most of all, made by their mother’s hands. Moreover, the quality of what is in stores does not always suit me personally. So today I'll tell you how to make a stove from a box for a child with your own hands. An irreplaceable thing for a little housewife!
Cardboard boxes are a real godsend for an active mother. The main advantage is accessibility and ease of processing. I went shopping and picked up as many different sized boxes as I wanted.
You can make not only toys from corrugated cardboard, but also such useful thing , How
To make a baby stove from a box, you need to prepare following materials and tools:
- carton boxes different sizes;
- self-adhesive film for decoration;
- colored paper;
- glue;
- colorless tape;
- scissors;
- stationery knife;
- Velcro fastener;
- 5 colorful bottle caps;
- 5 necks cut off plastic bottles;
- handles for oven and a box.
Everything you need to make a stove for your child with your own hands
Carefully cut off the sides that close the box. You only need to leave one “wing” on the short side of the box. Here we will have a “control panel”.
Another version of a DIY toy is wildly popular in our home.
Next you need to pick up 2 smaller boxes. The first is the oven. Selected according to the width of the base. It is desirable that their depths also coincide. The oven will fit approximately in the middle. A space is left at the top where the burner switches will be. Below you need to provide space for a drawer.

Install the oven in the central part of the box
We cover the oven cabinet with self-adhesive tape and secure it in its place inside the stove.
A drawer for dishes is made at the bottom of the stove. According to the width and height of the free compartment. From the front of the box we make a strip along the outer edge of the box. At this stage it is necessary to secure the handle.

Making a utensil drawer

Attaching the handle from the inside
To make the mount more durable, I cut a rectangle out of a plastic bottle and screwed it in with nuts from the inside. To hide the fastening, you can insert another cardboard wall and cover the entire box with decorative film.
The photo shows that the handle mount protrudes slightly through the cardboard and film.

We try to glue the film as carefully as possible
After this, handles are made to adjust the burners. We cover the control panel with film, make markings for 5 knobs - 4 for the burners and one for the oven. We cut round holes the size of the necks of plastic bottles. Insert the necks and screw in the caps. You can put them on glue so that the thread does not unwind during play.

Attaching handles for burners from the inside
It is better to take plugs for burners in primary colors; this is a learning moment for a child. Yellow, red, blue and green. White or black is suitable for the oven.

To secure the handles more evenly, you must first make markings
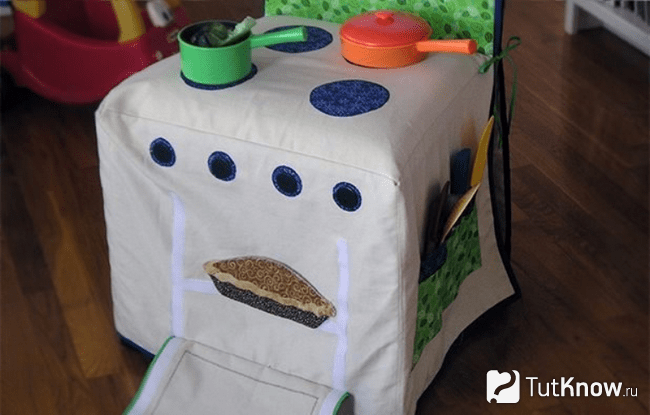
Making a door for the oven. A regular rectangle according to the size of the remaining hole. We cover it with film and secure the handle in the same way as a drawer. Using pieces of film, attach the door to the oven. WITH outside We make “glass” from black paper. To protect thin paper from destruction, cover the door with tape.
We put Velcro on the superglue to keep the door closed.

We laminate the surface with tape to protect the toy from destruction
We cover the entire slab with decorative film. On the top side we glue 4 circles of colored paper - burners. The colors, of course, must match the handles. Finishing touch– we laminate the cooking surface with tape and reinforce all corners with tape to give the toy stove made from boxes strength.

Handles and burners must match each other in color
Stove from a box for a child ready. You can begin culinary masterpieces. Now mom and dad won't go hungry. And when you get tired of the toy, you won’t mind throwing it away, because it’s made from the most waste materials.
It is said how to make a hat out of cardboard that is suitable for a New Year's costume or for a kindergarten competition.
Have you already tried making toys for children with your own hands? Share your ideas in the comments!
When playing, children love to copy their parents. Watching their mother prepare food, they dream of their own toy kitchen. Ready-made play sets are expensive. It is much cheaper and more interesting to make a kitchen set for the nursery with your own hands.
Options for children's kitchen sets
Children's homemade kitchens can be simple, from cardboard boxes and stools, or assembled from decorated wood boards. Some craftsmen create real masterpieces for their kids. It all depends on your abilities, skills and preferences, as well as the availability free space in the children's room.
Children's kitchens in the photo
DIY structures for the street or cottage
For games on fresh air can also be made Kitchen Area. Children love to play with water, so good decision- complement the design with a sink. You can wash dishes and toys in it without fear of spilling the contents or getting splashed.
It is better to make a kitchen for a summer residence from moisture-resistant materials. The design should be simple and functional. A small kitchen corner with shelves and a sink can be mounted directly on wooden wall country barn.
When building a play area with a kitchen, you can use wooden blocks and remnants of boards that were not used for their intended purpose.
Suitable materials
The simplest option is a kitchen made from cardboard boxes. Even a mother can do it, armed with tape, stationery knife, self-adhesive film, paints and, of course, imagination.
The next option, which mom can also handle on her own, is a kitchen in the form of a cover for a chair, table and other base. Sewing skills are required here.
If dad gets down to business, then the list building materials increases significantly:
- wooden boards, chocks;
- plywood;
- chipboard and fibreboard sheets;
- old furniture or parts thereof.
Be careful! The main thing when creating a kitchen is the safety of the child. The structure must be well secured, no sharp objects, exposed wires or small parts.
Making a kitchen out of cardboard boxes: step-by-step instructions
Creating such a kitchen will require a minimum amount of material and effort. Cardboard - pretty durable material, it is easy to assemble and model.
In order to make a cardboard kitchen yourself, you will need materials and tools:
- carton boxes;
- paper towel tubes;
- sheets of paper;
- disks;
- multifora;
- plastic bowl;
- towel hooks;
- stationery knife;
- crepe ribbon;
- double sided tape;
- hot glue gun;
- leg-split;
- self-adhesive film;
- oilcloth.
Stages of work.
- Outline all functional elements in advance. Place the boxes on top of each other according to the design you came up with and secure them with double-sided tape.
- Assemble the tabletop from four layers of cardboard taped with double-sided tape. Use paper towel tubes as legs. Glue them to the tabletop using a hot glue gun.
- To make it more interesting for your baby to play, add decorative and functional elements. Cover the inside of the boxes with white paper and the outside with colored self-adhesive film.
- Make four legs from rolled cardboard and secure them to the base with double-sided tape. Cover the legs and tabletop support with twine.
- For secure fixation, attach all legs to the floor with double-sided tape.
- Insert a suitable sized plastic basin into the sink hole.
- Make a frying panel from a sheet of white paper, disks and multifora.
- Cover the tabletop with oilcloth and secure it with tape on the sides.
- Fasten cabinets and towel hooks with self-tapping screws.
- A homemade kitchen made from cardboard boxes is ready to use.
Homemade cardboard set - video
Play corner made of chair and cover
The kitchen cover option is very relevant for small apartments. This design helps save space and money at the same time.
To create such a kitchen you will need:
- scissors;
- ruler;
- a sheet of thick paper or cardboard;
- cotton fabric for the base - 2 m;
- fabric for curtains - 50 cm;
- fabric for side pockets - 50 cm;
- scraps of colored material for functional elements (windows, handles, oven doors, burners);
- fabric for edging the cover - 8 m;
- hooks;
- strip of fabric with Velcro;
- large buttons - 4 pcs.;
- sewing machine;
- iron;
- pencil or felt-tip pen.
Stages of work.
- Measure the dimensions of the chair on which the cover will be placed (A - height from the floor to the seat, B - width of the chair in front, C - depth of the seat, D - width of the seat at the back, E - height of the back).
- Cut the fabric, remembering to leave some extra for the seams.
- Cut out a circle from paper and trace it on the wrong side of the material. These are stove burners. Cut out fabric blanks.
- Cut the handles for the stove from the same material as the burners, only with a smaller diameter. Sew them to the cover and glue a button in the middle.
- Sew the oven door from two pieces of fabric: white (the door itself) and black (the oven window). Sew the black piece to the white one, and on the sides make a border from a strip of fabric of a different color.
- Attach the door to the cover in the place where it will be placed. Trace around with a pencil to mark the edge to which you will later sew the lower part. Secure the sides of the door with adhesive tape.
- Make a window on a piece of fabric that will be on the back of the chair.
- If desired, sew small curtains.
- Sew a pocket to the side of the case for kitchen utensils.
- Now all the pieces of the cover need to be fastened together. First sew the window with the stove and oven, then side elements and the back of the chair. Add a border with a different color ribbon.
- Sew fastening ribbons.
- Sew felt pies and cakes that will be baked in the oven. WITH reverse side attach the toy food with Velcro.
Homemade version from a wooden bedside table
For the manufacture of wooden kitchen male strength will be required. Use an old bedside table as a base.
To work you will need:
- wood paint;
- jigsaw;
- plastic bowl;
- switches for gas burners;
- assembly adhesive;
- faucet for washing;
- curtain fabric;
- wire for fastening.
Step-by-step instruction.
Children's kitchen made of plywood
Creating a kitchen from plywood is the most labor-intensive method. Since the structure is assembled from scratch, a drawing and assembly diagram with the dimensions of the main parts are required.
Materials and tools that will be needed during the work:
- two sheets of plywood;
- self-tapping screws;
- tools: jigsaw, screwdriver, drill;
- PVA glue;
- two cans of varnish;
- accessories: magnets, hooks, handles.
I still can’t believe that I have FINALLY completed my BIGGEST unfinished construction! I was inspired by a chest of drawers from Lena Nikitina back in the fall, and I nursed my ideas for a long time and thought about where to get the material, and how to pull this whole thing off so that my husband wouldn’t kick me out onto the street with such a large-scale project. And so, somehow I was dragging myself out of the store, loaded with string bags of groceries, past the trash heap, and there was cardboard exactly like I needed - HUGE and not very wrinkled. My husband wasn’t at home, so I threw my string bag and went back to get some cardboard. The cardboard, although large, was quite thin. I glued it together into a 70x70 square and put it aside until better times, when I could get hold of more cardboard. A month later, somewhere in the store with Kristinka, they asked for several boxes, my husband stomped his feet, threw my cardboard boxes from one corner of the room to the other, so it was necessary to put this stuff into action quickly. Here's what came out of those stocks:
My cardboard something stood in this form until the new year, because 1. The cardboard ran out. 2. I was terribly unhappy with the crooked shape that turned out - there are no right angles in it! But I’m a builder, but I’m ashamed!
I wouldn’t have finished anything if it weren’t for my husband, who started stomping his feet again - “What kind of cabinet is this, it’s just taking up space! Either finish it, or I’ll throw it away!” In short, I again stocked up on materials, and firmly decided to finish my something for my youngest’s birthday. And I was hooked! I changed the technology somewhat and the upper part turned out better.
Here is the result:


The faucet - Kristinka took out the shower at the right time while bathing, the fittings were cheap - 100 rubles, self-adhesive, the cabinets inside were painted with water-based emulsion, the sink - a stainless steel bowl, the burners - metal lids from cans painted with a marker. The oven door on top is magnetized with magnets from the grower to the coins. The valves on the stove are made from corks from Agushi (with bolts - you can turn them) with acrylic paint to match, but the paint is peeling off... Another disappointment - the hinges on the stove and the drawer to the kitchen itself are screwed with self-tapping screws coated with glue and hold tolerably well, but to the doors you can’t screw the loops on, so I just sewed them on, it’s somehow unreliable, but I can’t think of anything better, can anyone tell me how to attach them?
A toy kitchen made of wood, based on a chair and cardboard boxes, is made quickly and easily. But to make a set of plywood, you need a little more skill and materials.
In the summer, many children are taken to their grandparents' dacha. Children will always have fun there if you provide them with various entertainment. Not only girls, but also boys will be able to play in the toy kitchen. And you can make it from ordinary cardboard boxes.
Toy kitchen for children - master class
To please your child with such pieces of furniture for him, take:
- carton boxes;
- sheets of cardboard;
- 2 CDs;
- stationery or breadboard knife;
- glue gun;
- textile;
- paint;
- decorative elements.
If you have a large flat box, you will make a tabletop out of it. If there is a lid from a box of this size, it will become a kitchen apron. If there are no such ready-made items, then, after familiarizing yourself with the diagram, you can make these items from cardboard or boxes yourself. The table dimensions are 40 by 90 cm. Mark such a rectangle on cardboard, cut out the corners, then connect them using glue gun to give the tabletop volume. You need to cut two corners on the top of the kitchen. The dimensions of this element are also 40 by 90 cm.

The toy kitchen will be more durable if you take a ready-made box measuring 55 by 47 cm as a base. If you don’t have one, then make this element from durable corrugated cardboard.
It's time to decorate the oven. First mark its location, then cut it out using a utility knife.

Now you need to make a slab. To make it rise slightly above the burner controls, you need to take a rectangular sheet of corrugated cardboard and glue it where it will be located hob. Now you can glue a flatter sheet of cardboard on top. Mark where the burners will be and glue them there. As you can see, the role of the burners is played by CD discs.
Make burners from bottle caps. To make them rotate, glue them on the back side along the screw, aligning the cap and the cap. Then all that remains is to screw the screw into the cardboard. To make this place more durable, glue the holes on one side and the other with a metal or plastic washer. Use a felt-tip pen to draw a heating scale.

Glue together a shelf from cardboard in which the child will put various toy kitchen utensils.

Take a plastic basin and place it on the right side of the tabletop, outline the contours. Step back 1-2 cm inward on all sides and cut out. This trick will help firmly fix this improvised sink on the table. But you can also additionally glue its edges with a hot gun.
This is how the toy kitchen will be created next. Take a piece of fabric the right size, fold it over twice at the top and stitch here. A rope is inserted into the resulting gap. Its ends are glued to the back of the tabletop. Using markers and paint, draw a semblance of tiles on the kitchen backsplash. Your child will be happy to help you do this part of the work.

He will also arrange the kitchen utensils at his own discretion and will be able to play in such an impromptu kitchen.
If you like a toy kitchen made from plywood, then check out the next tutorial. But such a craft requires more time and skills. But the child will be delighted with such a gift; he will be able to work with the spinning drum of the washing machine, rotate the burners, and admire the lit stove.
DIY children's kitchen made of plywood

To create a toy kitchen for children, take:
- plywood sheets;
- jigsaw;
- acrylic paints;
- accessories for wood;
- grinding machine;
- primer;
- sandpaper;
- stainless steel bowl;
- kitchen apron;
- kitchen accessories.
IN in this case The dimensions of the toy kitchen are:
- height - 120 cm;
- length - 146 cm;
- depth - 44 cm.
Depending on the size of the room where you will place this set, you can make your own adjustments.
Make your own sketch of a children's kitchen or redraw an existing one with your own hands.

In this case there is room for kitchen apron, the countertop, the base of the refrigerator, the washing machine, the stove and kitchen table with hob and sink. Connect the plywood parts using corners.
Sand everything down wooden items so that there are no various snags and irregularities, and the child does not prick himself on sharp edges.
Now coat these parts with primer, and when it dries, paint.
To prevent the boundaries of paint colors from being blurred, the junctions between them should be taped with masking tape.

Here is a thin plastic kitchen apron. This one can be bought at hardware store. Buy hooks there or at the market and attach them using self-tapping screws.

In a store like Leroy Merlin you can buy a cheap faucet. Attach this faucet to your kitchen. Cut holes for the sink, use a stainless steel bowl as it.

Here the stove door is attached so that it opens to the left. This is done so that the child does not climb onto this door with his feet if it opens downwards.
Screw the handle and hinges to it. In the oven on the right and left, attach plywood slats to the walls so that the baking sheet rests on them. Then it can be conveniently pulled out and put back in place.

The doors are secured with hinges.

My daughter will be very pleased if her toy kitchen also has a comfortable table. Here she can put pots for dolls, and in the top drawer- cutlery.

Paint the inside of the refrigerator with white acrylic paint in advance to make it look like the real thing. Place shelves here so that the child can put food made from fabric, papier-mâché and other materials in them. You can attach a metal box to the side; toy eggs and felt cheese will be stored here.

A children's kitchen for girls will be simply extraordinary if you have glowing burners. To make them, take this LED flashlight. Open it up and take out the two LEDs.

Glue them to the fiberboard, then connect the structure of switches to the lantern.

One button is designed to turn 1 burner on and off, and the second is for 2. The design is battery operated.

Here's what it looks like from the inside.

Here's how to do it hob. To do this, you need to take a plexiglass rectangle and round its corners by grinding them. Now you need to draw two circles on each side with a felt-tip pen on the back side of this part so that the result is rings. They are being closed masking tape, and the rest of the surface on the back side is covered with black spray paint. You need two layers. When they are dry, you need to remove this masking tape and cover these rings with red paint in 2 layers. When this paint dries, this hob is glued to the countertop.
To ensure that the burner switches don’t just spin, but also make an interesting sound, use baby rattles like these.

You need to cut off the central part of such a toy, then glue it to the plywood. In this way, as many burners as needed are connected.

To close the distance between these elements to the button, you need to glue pieces of plastic tube to these places.
The toy kitchen is very exciting. The child will spend a long time getting acquainted with its objects and playing with the washing machine. To make this item, in this case, a dial from an old telephone was glued on. It has become a kind of washing mode switch. You can also attach a single-key button to turn on the machine this way.

Attach a small drawer on the left into which the washing powder will be poured. Such pens in the shape of flowers or pandas can also be bought at Leroy Merlin.

Make the drum from a plastic colander, and the base using a lid from an old microwave oven. Borrow the motor from a broken radio-controlled car.

Then the drum of the machine will rotate. Now look at how the parts are held together. Here is a container for filling washing powder made from an ice cream carton covered with aluminum tape.

Cut a hole in the washing machine. Insert the container here, hang the lid on the small loop so that the machine closes tightly.

If you don't have a kitchen faucet, an umbrella handle will do. You need to saw off the bottom part to the required size, and then cover it with silver paint or glue aluminum foil.

This is what happens.

Take a closer look at how this washing machine works. The door is attached using a regular door magnet.

The colander is connected to the motor by a gear from a radio-controlled car. It is fixed on a board for stability. Then it's time to try it out washing machine, adding Charger from the phone, which converts the volts. In this case, you can plug it into a power outlet.

You can buy pockets for various small items or sew them yourself. Install a mirror in which the young housewife will sometimes look with pleasure.

Now let the girl arrange the doll utensils as she sees fit. Give me a dish sponge, an empty bottle detergent or pour a harmless soap solution here.

The girl will be able to learn how to run a household while playing with enthusiasm in such a kitchen.

And food can be made from various materials. Look at the lovely vegetables, fruits, cheese and bread that can be made from fabrics and soft filling.

My daughter will be able to treat her dolls by baking for them this kind of cold cuts with vegetables.

Economy kitchen for children

Such a kitchen for kids will allow you to use few materials, limited space and will help you create such entertainment in a fairly quick period of time.
To make a toy kitchen for children with your own hands, take:
- sheet of cardboard;
- curtain fabric - 0.5 m;
- fabric for pockets - 0.5 m;
- cotton fabric for the base - 2 m;
- scraps of fabric for small elements;
- scissors;
- hooks;
- four large buttons;
- ruler;
- 8 m of fabric for edging the cover;
- pencil;
- strips of fabric with Velcro;
- sewing machine;
- iron.
First you need to take stool measurements. They are shown in the following photo.

Based on these measurements, cut out rectangles from cardboard or construction paper. Place them on the fabric, cut them out, adding seam allowances.

Attach cardboard circles to the fabric and cut them out.

From the same fabric, cut out handles for the stove. Sew them on, and sew a large button in the center of each.

The oven door is made of white fabric. A black square is sewn onto it; this will be the oven window. You need to make an edging from braid or a strip of fabric of a different color.
Attach this soft oven door to the cover, outline it with a pencil so that you can sew the bottom part later, and secure the sides with adhesive tape.

On the back there will be a canvas from which you need to make a window. To do this, sew strips of white fabric crosswise to it, and make a border from the same fabric.

Sew curtains from colorful fabric.

Sew a pocket onto the cover. The child will put small kitchen utensils here.

The different parts of the case need to be connected together. First, sew the window with the oven and stove, attach the sides and the back of the kitchen. Then edge it with contrasting tape. Tie this upholstered kitchenette to a chair using ribbons.

From thick fabric you need to sew various foods, on the back of which you attach Velcro. Then the child will be able to hold pies and other baked goods at the oven level, as if they were baking there.
You can make a kitchen for children even faster. Many people have stools at home. Take an unnecessary tablecloth or light linen. Place it on a stool and secure it with a rope or elastic band. On the top, draw a stove with two burners and a cutting board.

Attach the faucet. Make a cutout at the bottom of the canvas and process it. This part will serve as an oven.
DIY kitchen set from a nightstand for children
If you have such a piece of furniture, try making a functional toy for your child from it. Have to take:
- an old nightstand;
- handles for turning on gas burners;
- paint;
- assembly adhesive;
- plastic bowl;
- faucet for washing;
- jigsaw;
- wire;
- fabric sheet.
First you need to unscrew the doors from the bedside table and remove them. Cover the product with paint. Using a jigsaw on top panel make a hole slightly smaller than the diameter of the bowl. Put it here.
Cut out rings from cardboard, place them on the surface of the stove and cover the inside with paint. You can do it smooth circles, which will become burners. Glue switches for them. Secure the faucet in place.

Tighten the self-tapping screws on the right and left under the tabletop. Stretch the wire on which the curtain is pre-assembled.

This is such a beautiful and functional toy kitchen.

So that the child has the opportunity to play with such an object on the street, we suggest making a kitchen for the dacha. Moreover, it will be attached to the wall of the barn or to wooden fence. This will save the amount of materials.

Make shelves from planks and bars. Then fix them on vertical surface. Use wooden stops to secure the horizontal board. It will play the role of a table top. Make it in advance round hole, into which you will need to insert a metal or plastic sink. But you don’t have to make such a recess, but simply place a basin on top into which the child will pour water.

If you have two pieces of wood, they will make an excellent base for a table. Attach a sheet of laminated plywood to them. In the center you need to make a recess for the sink. It will be a stainless steel bowl. Fix the faucet nearby.

The result is a comfortable toy kitchen in which the child will play with pleasure.
See how to make a kitchen for a child from scrap materials, where the main material is cardboard.
And if you need a more durable set for your child, then check out the second master class. You can learn from it interesting ideas, because such a kitchen for a baby is simply a copy of the real one.
Every parent cares about satisfying the desires of their child and providing him with a comfortable and warm atmosphere. And what is best for this? Certainly! All different play areas, where children can throw out all their imagination and fantasy! What do little girls love to play so much? But they just love to copy their mother’s behavior! Namely: cooking and raising your toy children! So give your child small kitchen! By the way, it is not at all necessary to spend a huge amount of money to meet the needs of the baby! After all, you can do all this with your own hands from scrap materials! Let's quickly take a look at our selection - a children's kitchen made from boxes with your own hands!
First, arrange all the boxes in the right order!
Making a children's kitchen out of boxes is easier than it might seem at first glance! The main thing is to think in advance about where and what you will have.
Choose cardboard boxes different sizes, the main thing is that they are of the same level, with the exception of the “refrigerator”. Cardboard boxes must also be suitable for the height of your baby.

Make cabinet doors

We draw doors on our boxes with a pencil and carefully cut out the contours with a stationery knife. By the way, so that the cardboard doors are not constantly in open position, consider the type of lock you will use for the drawers.
Decorating the kitchen

Since cardboard boxes look quite boring, prepare bright colors! By the way, we offer you two decoration options. The first is acrylic paints. They are quite easy to apply small patterns and motifs. The second one is colored adhesive tape. With this tape you can easily cover all the cabinets in the children's kitchen.
Accessories and devices
Since mom’s kitchen is full of all kinds of kitchen utensils, your baby will probably want something similar in his children’s kitchen! We already have a microwave and refrigerator! Now you need to add fine kitchen utensils. Place plastic plates, ladles, spatulas in small cabinets and add decor to your taste and color!

Children's kitchen made of cardboard with sink

Have you already noticed our sink? It's just an unnecessary iron cup and a pipe from liquid soap! You can use, for example, an old baking sheet. And the quality wall apron You can use a picture or a sticker, basically anything that comes to your mind.
Buttons
You can simply print and glue the original microwave buttons and glass. If you love creativity, then draw small details with your own hands. Add some decorations in the form of artificial flowers, paintings and enjoy your child's happy smile!

Excellent play area!
An example of a children's kitchen made from boxes was built into the mother's kitchen. If you don't have enough space, then you can of course choose your own option. A children's room would also be an excellent location.
