Experienced gardeners always monitor the level of soil fertility. After all, a depleted plot is unlikely to produce a good harvest. Do-it-yourself compost boxes will solve two problems at once - the production of humus to fertilize the site and the disposal of plant waste.
Which is better, a compost bin or a bin?
For each crop, the time of its application may differ. So, under fruit trees it is brought into the tree trunk area closer to mid-September. This must be done using half a shovel. In this case, part of the compost will already be absorbed by the plant in the fall, and it will be better prepared for winter.
In early spring, when digging is still difficult, the fruit crop will receive a new portion of nutrients, so necessary for the formation of ovaries. Ornamental perennials are fertilized in a ring or between rows.
Bulbs or plant seedlings that have not yet sprouted roots should not be placed immediately into unripe compost. After all, half-rotten organic matter is still quite “aggressive”. Continuing the “work”, it can damage the delicate roots. Therefore, seedlings and bulbous plants are isolated from contact with compost using a 5-10 cm layer of ordinary soil.
Garlic and other bulbous plants planted before winter are fertilized as follows:. The compost is placed between the rows so that its effect occurs in the spring. Under ordinary beds, this fertilizer is dug up a couple of weeks before sowing or in the fall, in October. If the ground has already been dug up, you can simply work the compost into it using a hoe.
Ornamental plants also like compost. They can mulch, for example, roses. It will not only gradually supply them with nutrients, but also inhibit the growth of weeds. Plus it will retain moisture. This is done only in spring or summer. Before winter, it is better to remove the compost so that the roots of the flowers do not rot.
Freshly made compost is always oversaturated with nitrates, so after adding it to the soil in the first year, plant it in this place
Finland is famous for its careful attitude towards nature: the country pays special attention to the processing of biological waste.
The use of composters allows you to obtain fertilizer from organic matter, thereby reducing the cost of its disposal.
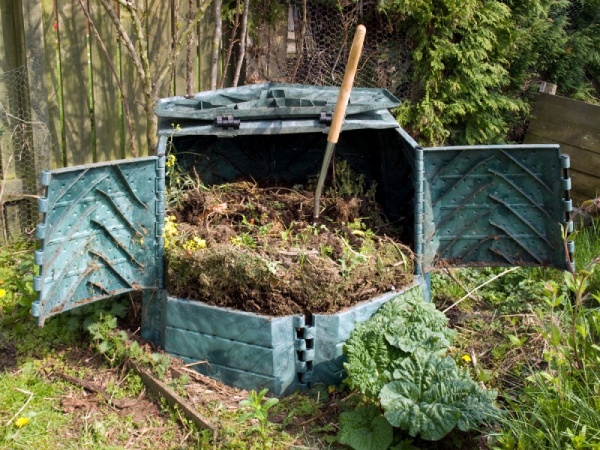
A composter using Finnish technology is a complex structure consisting of the container itself with a lid, a compost temperature sensor and an air supply system.
In Russian conditions, the device can be simplified and made by hand. The quality of the compost will not be affected.
Primary requirements
When building a Finnish composter, a number of requirements must be met
In order to make proper compost, a number of conditions must be met:
- Access of oxygen to organic matter. Bacteria that convert organic matter into fertilizer are called aerobes - they require air to function.
- The humidity of the mass in the box is 55-60%.
- The temperature at which compost ripens is 70-850C.
- The food for bacteria is nitrogen.
Gardener's advice: If the technology is followed, compost will be formed within 3-4 weeks.
The last indicator does not depend on the design of the box; nitrogen is created by the green parts of the plants. All other conditions are achieved subject to the dimensions of the bunker.
The dimensions of the compost box should be 1m-1m-1m, in other words, the volume of organic matter in the box is 1 m3.
With a smaller volume, the organic waste will simply dry out; with a larger volume, the temperature in the middle of the compost will increase and the mixture will burn.
The sanitary requirements for the location where the compost bin is installed are as follows:
- distance from residential buildings – at least 12 m;
- distance from reservoirs, wells, wells - at least 8 m.
The box should not be flooded with rain or melt water and should not be exposed to the sun.
Take note: The ideal place for a composter using Finnish technology is on a hillock in the shade of trees.
Material and design choice

It is important to decide on the material and design of the composter
When starting work, decide on the material for the box. The ideal solution is wood, the unsuccessful solution is slate.
If you decide to make a compost box using Finnish technology, stick to simple designs.
The quality of the compost will be high, and the labor intensity of preparation will not increase much.
Three-section compost bin

Construction technology of a Finnish three-section compost bin
This design is intended for garden and summer cottage plots with a total area of up to 10 acres. The features of the box allow you to obtain compost of the appropriate quality throughout the entire season.
To make a composter you will need:
- edged board 100 mm wide, 20-30 mm thick. Length 1000 mm – 50 pcs., 3000 mm – 25 pcs. The quantity is indicated with a reserve in case of damage to the material;
- board or slab on the bottom. The quantity depends on the width of the material;
- timber 50x50x1000 – 8 pcs:
- antiseptic, for example, Neomid 430 eco. This product is intended for treating wood that is in contact with the ground and is environmentally friendly;
- overhead window hinges – 12 pcs;
- screws;
- oil paint for decorating the outside of the box.
Expert advice: wood is the most successful material: it is easy to work with, after treatment with an antiseptic it lasts 10-15 years, and can be painted any color.
Sequence of work:
- Treat the boards with an antiseptic, follow the instructions from the manufacturer.
- Using screws, assemble 4 frames for the side walls.
- Sheathe the finished structures with boards, for two walls the distance between the boards is 10 mm, for the remaining two the boards should be close together (these walls will serve as internal partitions).
- Attach the boards intended for the back of the drawer, leaving a 10mm gap.
- Make the bottom from a slab, leaving gaps of 5-10 mm. The slots will ensure the drainage of excess liquid.
- Cover the front of the composter with a board, leaving a space of 20 cm underneath for the doors.
- Install the roof. Keep in mind that one of its slopes is blind, on the second there will be hatches for loading biological waste.
- Use screws to secure the bottom doors to the window hinges.
- Secure the hatches.

When making compost according to the Finnish scheme, you need to observe a number of nuances
When using a composter using Finnish technology, the process differs from ripening compost in a regular pit. There are a number of nuances:
- Weeds with seeds can be planted in the middle: high temperature will kill their germination.
- Fill the first bin first, then the subsequent ones. When you remove compost from the first compartment, space will be freed up; fill it with mass from the adjacent bin. The process is continuous, compost is available all season.
- Regularly mix the biomass in the first compartment, this will ensure even preparation of the compost.
- Don't forget to water the compost in hot weather.
- If the technology is followed, compost from such a box is rich in nitrogen, enriches the soil, and increases the productivity of vegetable and berry crops.
The better the quality of the soil, the richer the crop grown on this land will be. But it happens that the initial data is not very good, and you have to fertilize the soil. To do this, you can use various fertilizers, but it is best to make a compost pit, which will become a source of environmentally friendly material. Let's consider how to make a compost pit with your own hands: manufacturing options and materials suitable for this purpose.
In order to understand how to properly make a compost pit, you first need to understand what it is used for. Typically, a compost pit is used to dispose of organic waste, which, as a result of the rotting process, turns into organic fertilizer. There are many design options and each owner can only choose the most suitable option for himself.

A compost heap does an excellent job of disposing of mowed grass and fallen leaves. Under the influence of time, moisture and microorganisms, all this turns into fertilizer, which can be used to grow any type of crops both in gardens and in the vegetable garden.
Making a compost heap of organic fertilizers with your own hands is not at all difficult, especially since there are many ideas for independent implementation that can be used as a basis. You can make your own compost pit using pallets, which are usually used for transporting and storing building materials. They can be bought at a fairly low price, or it is quite possible to simply find them on your own site.
How to properly make a compost pit at your dacha: choosing a location
Speaking about arranging a compost heap, one cannot fail to mention the importance of its correct location. First of all, the structure must be sufficiently distant from residential buildings. In addition, the place where it is installed should be well blown by the wind to avoid stagnation of air and concentration of the unpleasant odor emanating from it. In addition, access to the compost must be ensured so that the process of adding raw materials or removing finished fertilizer is as comfortable as possible.

Helpful advice! In order for the rotting process to proceed faster, it is recommended to periodically mix the layers inside the heap. Therefore, even at the stage of planning and arrangement, it is worth considering how this can be accomplished.
In addition, the following criteria for choosing a site suitable for a compost pit must be taken into account:
- the selected location should be located at a sufficiently large distance from any sources of drinking water, for example, a well or borehole. The distance between these objects must be at least 25 m;
- if the site is not level, but on a slope, then you need to make a compost pit below the water level (preferably at the lowest point of the site). This will prevent the entry of rotting waste and clean water;
- You should inquire in advance about the most common direction of the wind, since the pit often becomes a source of a rather strong and unpleasant odor, and can cause discomfort to both you and your neighbors;
- It is worth making sure that there is not only a free approach to the pit, but also enough space to be able to bring in waste or remove finished compost using a wheelbarrow.

Helpful advice! It is advisable to choose a shaded place for the compost pit, since sunlight has a negative effect on the rotting process, significantly slowing down the composting process.
What can and cannot be put in a compost bin
In order for the fertilizer obtained as a result of rotting to be of high quality and bring benefits to the plants and not harm, each summer resident needs to familiarize himself in advance with the list of those products that can or cannot be added to the compost. So, the following are great for composting:
- grass, weeds, leaves, hay, straw, etc.;
- berries, fruits and any peelings from them (raw);
- waste from wood products that have not been painted;
- paper products (napkins, bags, cardboard) in crushed form;
- waste from the preparation of tea, coffee or cereals;
- tree branches and roots after grinding;
- needles;
- herbivore manure (biennial only);
- wood ash.

Important! The percentage of compost containing peelings from products such as potatoes and tomatoes should not exceed 15-20%.
- any plants that have been affected by pests;
- plants exposed to diseases such as powdery mildew, late blight, etc.;
- excrement of domestic animals, as they may be contaminated with helminth eggs;
- bones and leftovers from meat products. They will cause an extremely unpleasant odor and will also become food for rats;
- inorganic waste - plastic, rubber, synthetic fabrics and metal;
- plants that have been treated with herbicides;
- the remains of cabbage, the rotting of which provokes an extremely strong and unpleasant odor.
As for composting weeds, experts recommend putting them in a separate pile, which is covered with film on top. Thus, the risk that the plants will take root again is eliminated and you can count on their death with one hundred percent probability.

If you add weeds to the general pile, you often have to deal with the fact that perennial plants take root, especially if, as a result of regular watering or rain, the humidity is quite high.
Important! To speed up the decay process of waste, it is recommended to first crush it. This is especially true for items such as branches, roots and paper products.
Having figured out what can be put in the compost pit and what cannot, all that remains is to familiarize yourself with the rules for caring for waste in order to ensure that it rots as efficiently as possible. Moreover, the duration of the period during which the compost will be formed directly depends on the correctness of the care:
- Humidity is the most important indicator that affects the rotting of waste and the formation of compost. In order to maintain the desired level, it is recommended to periodically water the pile with a watering can. In this case, it is important that the end result is moist, but not wet, since the abundance of water will negatively affect the viability and activity of bacteria;
- Once a month you need to carefully stir the pile, thus ensuring access to oxygen. This allows the waste not so much to rot as to burn out. At the same time, if it is not possible to completely dig up everything, you can use a pitchfork and pierce the pile in as many places as possible;
- To speed up the process of compost maturation, the addition of nitrogen is required, which is found in large quantities in the green parts of plants, as well as in slurry.

It usually takes 1-1.5 years to form high-quality compost. During this time, almost any waste and residues will fully decompose. You can tell when the compost is ready visually and by smell. The finished mixture is a crumbly brown mass and has the smell of forest earth.
Compost pit: what is it and what is it for?
The issue of using compost is one of the most popular. After all, not every summer resident knows how and why to use the resulting mixture, and how great its benefits are. In fact, you can fertilize the soil with compost for almost any plant. Cucumbers, peppers, zucchini and pumpkin respond best to this type of feeding. The result can be seen already in the next harvest season - the fruits grow large, have a bright and rich color, the taste and aroma are well expressed.
But there are also plants for which compost is not so beneficial. For example, root vegetables, tomatoes, melons and watermelons should not be fertilized abundantly in this way, since this leads to a decrease in the yield, and on the contrary, the amount of green mass increases.
Strawberries respond well to compost, especially if you first cut them “at the root” and cover them with a semi-decomposed composition. Then all this needs to be watered, and all that remains is to wait for new fresh foliage, as well as a bountiful harvest next season.

Do-it-yourself compost pit: manufacturing options and design requirements
In order to properly build a compost pit, you need to understand how the compost heap should be structured. There are many options for making it yourself, but first of all you should pay attention to the fact that it should consist of three parts. In this case, you need to install 8 support posts, each of which must be treated with a protective agent.
Helpful advice! Machine oil, fuel oil or even tar can be used as a protective composition for posts.
A fence can be used as a fence on one side, but boards are better suited for the rest. Partitions are constructed from them, in which holes for ventilation must be left. This promotes the decay process. It is also necessary to install a door that allows access to the compost.

Setting up a compost pit at your dacha with your own hands involves ensuring the proper level of ventilation and at the same time protecting the contents from precipitation. So that the compost heap does not turn into a swamp, during rainfall it needs to be covered with a special lid of a suitable size. And if the weather conditions are not too harsh, then it is quite acceptable to use plastic film for this purpose.
Another option is to use construction pallets that are pre-disassembled. Using a circular saw, the boards can be divided into individual elements and then assembled into a suitable structure. In this case, it is better to fasten the boards vertically. The front board can be secured with adhesive. To give such a structure stability, it is necessary to use a building level and level the lower strips.
It is also important that the height of the walls of the homemade composter is such that it is convenient for a person of any height to add, stir and remove compost.
Interesting! You can pay attention to the designs of compost pits made using Finnish technology. In this case, some design features are of interest, for example, when you remove humus from one compartment, it is automatically filled with raw materials from the adjacent one.

Do-it-yourself compost pit: manufacturing options, photo examples
The type of compost pit is determined based on several factors. One of them is the installation method. Let's consider all existing options:
- allocating a specific place for organizing a compost pit. In this case, a pit is initially prepared, which is very similar to a well, but at the same time has a shallower depth. The walls of the pit are additionally strengthened to prevent the soil from shedding and are sheathed at a distance of 20-25 cm from the bottom. This distance is necessary in order to provide the microorganism with free access to the waste;
- Another option is to install a special container in the garden plot designed to collect waste and process it into compost. This method allows you to get the finished product at any time. This design is based on a pit with formwork, as well as a special box made of boards. When implementing this option, it is extremely important to pay due attention to the organization of ventilation;
- a DIY compost heap is the easiest way to solve the problem. To do this, it is enough to make a substrate consisting of sand, gravel and dry grass. Waste is simply placed on top, which will begin to rot on its own over time.
Related article:
Detailed technology for constructing structures: soil preparation, frame manufacturing, its installation and filling.

You can make your own compost bin using many different technologies and instructions. The proposed designs may differ in the materials required for work, dimensions, properties and ease of use.
Helpful advice! Regardless of the type of structure chosen, before you begin laying raw materials inside the structure, it is necessary to thoroughly loosen the bottom and install ventilation holes.

DIY compost bin: manufacturing options and instructions
Before making a compost pit with your own hands, it is advisable to consider as many options and designs as possible that can be used for this purpose. We will analyze in detail the instructions for making the most popular boxes made from various materials.
Garden compost bin: features of installation and operation
A garden composter may well be presented in the form of a large box divided into several sections. Usually they make two or three compartments, but experts strongly recommend choosing the option with three sections, since each of them has its own purpose: the first is used for storing waste, the second is for ripening waste, and the third stores finished compost.
Depending on the individual wishes of the owner, the composter can be stationary or mobile (move on wheels). In this case, the recommended height of the box should not exceed 1 meter, and the size of each section should be about 1-1.5 meters.

Important! All wooden elements must be treated with a special protective compound designed to provide the material with reliable protection from harmful insects, as well as moisture.
To make a compost bin with your own hands, you need to follow the following procedure:
- 8 wooden blocks are dug into the ground;
- Using boards, also previously opened with a protective compound, partitions are constructed. To do this, they are attached to supports at some distance from each other.
- In the front part, two compartments should be sheathed only to the middle, and only one bottom board should be nailed to the third. The first two have doors mounted on top.
- The back and end parts are completely sheathed.
- The entire structure is covered with two layers of moisture-resistant paint.
- Finally, handles, latches, etc. are attached.
At the bottom of such a box there must be drainage, which may consist, for example, of dry tree branches. Immediately after this, you can proceed directly to placing waste inside the structure.

How to make a compost pit at your dacha using wooden boards
A compost pit is an excellent solution, if necessary, without spoiling the appearance of the site with the appearance of a pile of waste. The formation of fertilizer in such a design takes much longer, and in order for the process to proceed as correctly and efficiently as possible, it is important to take care in advance about the correct arrangement and ensuring access to the required amount of oxygen.
Work order:
- First of all, you need to dig a compost pit, the width of which will be 1.5 m, length 2 m, and depth of about 1 meter.
- You need to dig wooden blocks into the corners, keeping a distance of 20 cm from the walls on each side.
- In 5 cm increments, boards are attached to these posts.
- The resulting box is divided into two parts using a wooden shield.

The bottom of the compost pit is filled with a ten-centimeter layer of tree bark, branches and straw. This mixture will take on the role of drainage, which will remove excess moisture and additionally ventilate the raw material.
Initially, only one of the compartments should be filled with waste. Then, when one is half full, the compost needs to be transferred to the second compartment. This procedure will enrich it with oxygen as much as possible.
Important! The bottom and sides of the composter do not need to be covered with anything so that earthworms, which take an active part in the waste processing process, can freely get inside.
How to make a compost bin from slate
Slate is a durable material that is great for creating a structure designed to collect and process organic waste into compost. The procedure for creating a suitable design consists of several stages:
- choosing a suitable location and taking measurements to determine the appropriate size of the pit;
- according to the marks, a not too large recess is dug, in the corners of which supports are installed, for which boards or metal pipes can be used;
- sheets of slate are installed around the perimeter of the pit;
- Using the same sheets, the resulting container is divided into several parts (two or three).

The use of this design is carried out in accordance with all the same recommendations that are given for compost pits made of wood.
How to make a concrete compost pit at your dacha
If you pay a little more time and attention to the process of arranging a compost pit, then as a result it can last several decades without problems. To do this, it is enough to concrete it. You can do this as follows:
- you need to dig a hole about 80 cm deep, 2 m wide and 3 m long;
- make formwork inside the pit;
- then you need to prepare a solution consisting of sand, gravel and cement. To do this, you need to pour 5 liters of water into a bucket and add 5 kg of sand and cement to it so that the ratio of dry components is 3:1;
- the resulting solution is poured into the formwork;
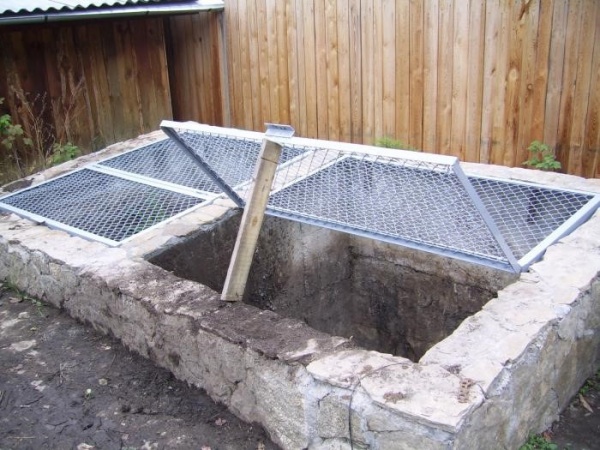
- using wooden boards and a chain-link mesh (a metal frame is also suitable), a lid is constructed for the pit.

It is very important that when using boards to mount the cover, there is a distance between the elements necessary for normal ventilation.
Compost pit using Finnish technology: secrets of installing the structure
The main requirement for structures made using Finnish technology is compliance with certain dimensions. The height and width of the box must be the same and be 1 m. This is extremely important, since in a smaller box the raw materials will simply dry out, turning not into compost, but into dust. Large sizes are unacceptable for another reason - in this case there is a risk of burning the contents from too high a temperature.
To make such a structure, it is best to use wood. Slate in this case is not a very suitable option, since structures made from it are characterized by a longer period of waste decomposition. Again, a cheap and at the same time quite convenient option is a Finnish compost pit made from pallets.

Algorithm for assembling a compost pit using Finnish technology:
- The frame of the box of the required size is assembled from wood pre-treated with antiseptic agents.
- Then the finished frame is sheathed with boards. The boards are placed tightly only on the partitions separating the compartments. On the side walls, the boards should be spaced with a 1 cm indentation.
- The rear wall of the structure is also covered with boards at a distance of 1 cm.
- The bottom of the box is covered using a slab. At the same time, it is also important to maintain some distance between the elements so that excess liquid can be effectively drained.
- A small door is installed in the lower part of the front wall of the structure, the height of which is usually 30 cm. It is secured using ordinary door hinges.
- The roof of the structure is made gable, with one of the slopes attached to hinges so that it simultaneously acts as a door, providing the opportunity to pour waste inside.
Interesting! In one box, the size of which is 1x1 m, you can prepare an amount of compost sufficient to fertilize a plot of land of 5-7 acres.

Compost pit-dry toilet: what is it?
Another special type of compost pit is a dry closet, which can also turn human waste products into compost. It is a structure consisting of two containers, each with a volume of 80 liters.
Using this type of dry closet is as follows: after visiting the toilet, you need to turn a special handle, which is responsible for supplying a portion of a special mixture consisting of peat and sawdust. Thanks to this mechanism, the mixture is distributed evenly and covers up the waste that gets inside.
It is quite possible to use such a composter-dry toilet for recycling not too much food waste, simply by throwing it inside and filling it with dry mixture. When the first container is completely filled, it must be moved away and the second one installed in its place, which can be used in the same way. At this time, the first container will contain a compost mixture, completely ready for use.
Important! The compost obtained in such a composter will be very concentrated. This must be taken into account, and before adding it to the soil, you need to dilute the mixture with soil, sand or peat.

Criteria for choosing a ready-made composter for a summer cottage
At the same time, an increasing number of owners of suburban areas are striving to move away from the use of home-made structures, giving preference to purchased models. Let's consider what advantages and disadvantages ready-made designs have, and what parameters you need to pay special attention to before making a purchase.
In most cases, preference is given to simple and convenient composters that are easy to assemble and operate independently. But since the number of offers on the modern market is extremely large, it can be really difficult to independently decide on the most suitable option. Experts recommend using certain criteria as a guide, since models can be:
- collapsible or integral;
- with temperature sensor;
- with a special device that allows you to loosen the contents;
- with a mesh instead of the bottom, which provides protection from rodents;
- various shapes and sizes.

Composters also differ in the material that was used for their manufacture. Thus, plastic is the most popular today because it is light in weight, which allows it to be moved around the site without problems, and its service life is extremely long. If the design is planned to be stationary, then you can consider purchasing a metal composter. Wooden models can also be found on sale, but they are not very common due to their short service life and exposure to external factors.
How to choose and buy a compost bin: review of the most popular brands and models
As examples, we can consider several composters that are the most popular and have received many positive reviews from users.
L&T Globe Composter: Features and Specifications
This model is highly valued by permanent residents of country houses, since it can be used throughout the year, and not every product can boast of this. The development of L&T Globe was carried out by Finnish specialists who took into account the harsh weather conditions of the local climate. This allows the composter to function without problems even in the harshest winters.

Another advantage of this model is the absence of small and heavy parts, so operating the device is quite simple. The working volume of the container is 310 liters, and durable polyethylene was used as the manufacturing material. In order for the system to function during the cold season, a 15-mm layer of thermal insulation was provided, which allows maintaining an optimal temperature inside.
Thanks to the low height of this composter, a person of absolutely any height can fill and empty it. Moreover, for even more comfort, the design includes a removable upper part.
Thus, all these design features make it possible to create the most favorable environment for effective waste composting. The microclimate maintained inside the container promotes the growth and development of microorganisms capable of processing waste. The developers did not forget about the ventilation system, which is presented in the form of drainage holes in the bottom of the composter.
Important! The ventilation system of this model can be used in two modes: summer/winter. It is important to make the switch in a timely manner using a shutter specially designed for this.

Bulbeo composter: features and benefits
This model is the development of Italian specialists, which exists on domestic markets in two modifications that differ in size (700 and 900 liters). Initially, this model was intended exclusively for processing plant waste, but, as practice shows, it also copes well with composting other organic waste.
This composter is a collapsible model and consists of separate parts that can be easily assembled and, if necessary, disassembled again. This allows you to move the container from one place to another and even transport it. Moreover, when disassembled, this design takes up very little space and can easily fit in the trunk of a regular car.
Among the main advantages of this choice are:
- the ability to gain free access to the structure from six sides;
- It is convenient to remove the finished compost thanks to the hinged doors;
- This model looks quite aesthetically pleasing on the site, since its shape resembles a blooming bud;
- the discreet dark green color allows the structure to fit organically into any landscape design.

The material used for this model is durable plastic, which provides reliable protection of the contents from wind and strong temperature changes. According to the developers, the rounded shape of the walls promotes the ripening of compost.
Of course, there are also ventilation holes to provide access to the required amount of oxygen. Anyone can easily assemble this model, because it does not require any tools or additional fasteners. The finished structure weighs only 19 kg and its height is 885 mm.
Products for compost pits: features and advantages of use
Having figured out how to make a compost heap, many expect that they will soon be able to use the nutritious fertilizer made in it. But the reality is that the natural ripening of compost can last up to 2 years. Of course, you can just be patient and wait. But you can go the other way by purchasing a special product that promotes compost maturation and speeds up this process.

Interesting! The issue of using excipients is especially relevant for those regions of the country where the warm period is short. If warm weather lasts only 2-3 months, then the compost maturation period has to be shortened artificially.
So, there are several drugs that are well suited for this purpose and are recommended not only by specialists, but also by real users. They all have different names but, in general, the principle of their operation is the same. As an example, consider the drug Tamir.
Tamir is an extremely complex drug, which includes a whole complex of microorganisms that, in the natural environment, are responsible for ensuring the decomposition of organic debris and waste. Due to the high concentration of these bacteria, the composting process occurs many times faster, and after 2-3 weeks full maturation occurs.

It is worth noting that compost obtained in this way is not completely decomposed waste and has a slightly different consistency than usual. But its final decomposition will occur directly in the soil, which will bring even greater benefits to the plants.
Important! It is believed that compost obtained as a result of exposure to auxiliary preparations, as a fertilizer, is many times more useful than that obtained naturally. Therefore, answering the common question, is it possible to use products for compost pits, the answer is unequivocal - not only is it possible, but even necessary.
All products of this type are used according to the following technology:
- if the pile has not yet been formed, then the drug is added on top of each new layer, after which the whole thing is watered;
- in the already prepared heap, you need to make a depression at full height, into which the drug and water are added.

Other ways to speed up compost heap maturation
In addition to complex preparations, you can use other methods to stimulate the processing of organic waste and the maturation of compost in the pit. Let's look at each of them in more detail:
- the use of rotted manure, which is quite capable of replacing biochemical preparations intended for composting. At the same time, it is prohibited to use fresh manure, since it can become a source of not only helminth eggs, but also weed seeds, pathogens, etc.;
- a solution made from ordinary yeast. To prepare it you will need 1 liter of water and about 1 tablespoon of dry yeast. To this add 200 grams of sugar (1 glass). This solution is poured into the depressions made in the compost heap;
- herbal infusion. To improve the effect, it is mixed with chicken droppings or slurry in a ratio of 5:2. It is important to know that the amount of nitrogen contained in fresh bird droppings is much greater than in manure, which means the ratio should be different.
Helpful advice! To ensure that bird droppings regularly fall into the compost heap naturally, you can install a feeder above it. This will greatly facilitate and speed up the process.
Methods to accelerate ripening also include artificial moistening of raw materials, turning them and other measures designed to create the most comfortable microclimate for composting.

How to make a compost pit at your dacha with your own hands
Whatever design is chosen for making compost, it is unlikely that its appearance will ultimately be attractive enough. Chances are, no one wants to look at a compost bin, so it might be helpful to think about how you can use original design to improve its appearance.
The problem of camouflaging a compost pit is especially relevant for small areas, since almost the entire territory is in plain sight. Although it happens that even for spacious areas, owners use different design strategies to give the compost pit a more attractive look. So, in order to hide such an object, you can use:
- camouflage with plants and hedges;
- artificial decorations and stationary fencing.

Work related to the manufacture of artificial fences must be carried out in an open area located at some distance from the location of the compost pit. This is necessary in order to make it more convenient to work and to be able to move freely without being exposed to discomfort from the smell emitted by the heap.
The main requirement for such a fence is that it should hide the entire site from the eyes of guests and owners. That is, the compost heap should be completely hidden behind it, and the appearance of the fence should be as attractive as possible and be in harmony with the environment.
It takes much longer and to some extent more difficult to create hedges for this purpose. But they look much more natural and elegant. The main thing is to pay attention to the choice of a suitable plant, so that in the end the hedge is not too bulky and lush, and does not break the overall structure of the site.
Helpful advice! You can use light translucent screens entwined with vines as a fence. They cope with the task perfectly, and at the same time do not take up much space, so they are quite suitable for both large and small areas.

The best ideas for decorating a silo pit
Other elements, for example, special screens or screens, can be used to disguise the place where the compost heap is located. Bamboo fences have proven themselves to be excellent. Plants also look good if you carefully plant them in a row.
At the same time, it is strictly forbidden to build a compost pit directly under fruit trees, as this can lead to their death. You need to maintain some distance between the compost and the plants.
The most popular design methods are:
- fruit trees and berry bushes planted in a row;
- potted gardens placed on several levels to hide the entire structure;
- installation of a small architectural object: a gazebo or a fenced barbecue (of course, in this case it is worth taking care that the unpleasant smell of rotting waste does not interfere);
- flower beds with tall plants;
- supporting wall.

Separately, it is worth noting the camouflage of compost heaps if a plastic container was used for them. In this case, it is not at all necessary to completely mask it. You can use it as a decoration for your area by painting it in a bright color and planting beautiful flowers around it. You can draw any design on such a container, thus giving it originality.
The easiest way to work is with small compost pits, which can be hidden with an abundance of flowers or even shrubs. By the way, a compost yard is a great place to experiment with growing new varieties of annual plants.
You can clearly see how composters for a summer residence are made and designed with your own hands by watching training lessons and detailed instructions. You just need to decide which design is best suited in a particular case, and also take into account your own individual requirements and wishes. Otherwise, no problems will arise, since there are as many options for do-it-yourself compost pits as there are ready-made models.
How to make a compost pit with your own hands: video instructions
Having a summer cottage, every owner is concerned about obtaining a rich harvest. Fertile soil is one of the conditions for achieving high performance. If the soil is not of good quality, you need to improve its properties with your own hands. To do this, it is not necessary to invest in the delivery of black soil or the purchase of ready-made organic substances. Preparing humus on your own in a garden composter will solve the problem of soil fertilization and increase crop yields.
Types of garden composters and their arrangement
There are many types of garden composter. They differ in design, size, material and shape. The most common containers are of the following types:
- wooden box;
- compost pit;
- Plastic container.
The first two versions of a garden composter can be made with your own hands, the last type can be purchased ready-made. Before you make a garden composter with your own hands, you should worry about choosing a location. It must meet the following requirements:
- It is necessary to make a garden composter with your own hands at a distance of at least 20 m from the well, otherwise rotting products can spoil the taste of the water and cause harm to health;
- for the same reason, make sure that streams of rainwater do not flow from the place where the composter is located to the well;
- It is better to make a garden composter without a bottom with your own hands away from fruit trees, otherwise their death is inevitable;
- the distance from residential buildings (including neighbors) is at least 10 m;
- take into account the direction of the wind, it is better to exclude the possibility of regular unpleasant odors in the recreation area;
- It’s optimal to make a garden composter with your own hands in the shade; the sun’s rays can constantly dry out the humus being prepared and it will need to be moistened frequently;
- It is advisable to install a garden composter out of sight of others, so as not to spoil the landscapes of your summer cottage.
Making a garden composter with your own hands is not particularly difficult. There are two main types of such structures - a compost pit or a box.
Making a compost bin
Making a garden composter with your own hands in the form of a box is the most rational option for preparing and storing compost. It is better to make a composter with 2 or 3 sections. The optimal solution is a design consisting of three compartments:
- waste storage section;
- section for “ripening” humus;
- section for finished compost.
You can make a garden composter with your own hands, stationary or equipped with wheels for moving around the site. The speed of humus maturation and its quality depend on the size of the box. The height of the composter must be at least 1 m, the length and width of one section ranges from 1.0 to 1.5 m. When planning to deepen wooden pegs into the ground, these parts are treated with tar, fuel oil or old motor oil in order to protect them from rotting.
So, how to make a garden composter with your own hands:
- Wooden blocks in the amount of 8 pieces are buried in the ground.
- Partitions are equipped with a connection between pegs and boards. They are fastened in such a way that free passage of air is ensured through the gaps left.
- The front part of the two compartments is sheathed from the bottom to the middle, the remaining space is intended for the installation of doors. The last section of the composter is equipped with a large door, so only one board is nailed to the bottom.
- Then the back wall and end parts of the garden composter are covered with boards.
- Lastly, doors are attached to the front wall - two small and one large, which simultaneously serve as a lid.
- Before making a garden composter with your own hands, in order to extend its service life, all wooden parts are pre-treated with an impregnating solution that can protect the structure from insects and moisture. When buying impregnation in a store, choose a non-toxic product.
- The finished garden composter is painted in two stages, with the next layer applied after the previous one has completely dried.
- For ease of use, handles and latches are attached to the box.

Making a garden composter is not enough; care must be taken to increase its service life. Concreting the bottom will help in this matter. To ensure good ventilation, drainage is lined on top; dry tree branches can perform this role. If desired, plastic shields are placed on the bottom.
There are several more popular solutions on how to make a garden composter with your own hands. Some equip a container without a bottom for free penetration of earthworms and microorganisms. An option is possible when the boards on the side walls are attached with gaps of 2-3 cm to improve ventilation. If the container has 2 compartments, instead of lids, pull-out strips are installed on the front wall at the bottom of the composter. In this case, the organic mass does not move from one compartment to another, but is used from below. Such a DIY garden composter must have a lid on top that protects the humus from precipitation and the penetration of animals.

Options for creating a compost pit
When you decide to make a compost pit at your dacha, you should take into account that fertilizers in such a composter take longer to mature and are more difficult to mix. However, it has a significant advantage - it is less noticeable on the site and does not overshadow its appearance.
One of the main conditions for the ripening of humus is a sufficient amount of oxygen necessary for the decomposition of organic matter. Proper arrangement of a compost pit with your own hands contributes to the correct flow of the process of humus formation. How to make a pit composter with your own hands? Let's consider two options.
Compost pit with wooden trim
In the first case, it will be a kind of box immersed in the ground. Its arrangement includes the following stages:
- A hole is dug 1.0 m deep, 1.5 m wide, 2.0 m long.
- Departing 20 cm from each wall, four columns are dug in the corners.
- The wooden blocks are connected by boards; they are fastened not tightly, but in increments of 5 cm to ensure oxygen supply.
- The resulting box is divided in half; a wooden shield is suitable for these purposes. During operation of the garden composter, only one compartment will be filled.
- A drainage 10-15 cm high is installed at the bottom using straw, bark and thick branches. Such a structure helps remove excess moisture and ensure good ventilation of raw materials.

Warning ! The sides and bottom of the composter are not covered with anything for the free penetration of earthworms, which are actively involved in the formation of humus.
Maintaining a certain level of humidity in the pit is an important condition for the maturation of organic matter. If it dries out, the heap is watered from a watering can. To create a sauna effect, it is recommended to cover the pit with film.
As one compartment of the garden composter fills with waste, it is moved to the other half to be oxygenated.
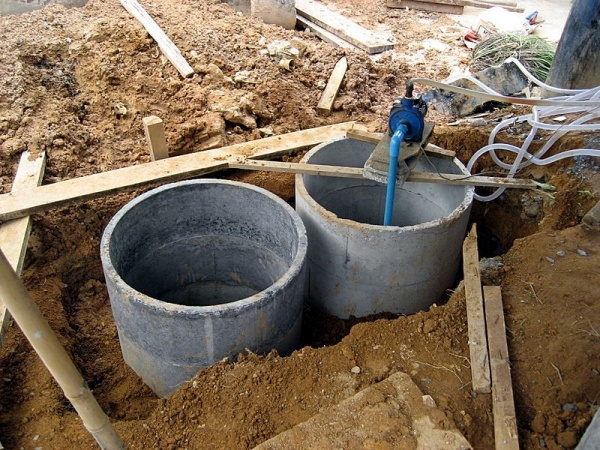
Concreted compost pit
If you want to make a garden composter with your own hands for a longer period, the pit is equipped with concrete. The cost of such a design undoubtedly increases, but the service life is also significantly extended. The procedure for concreting a garden composter is as follows:
- The top layer of soil is removed and a hole is dug 60-80 cm deep, its length is 3 m and its width is 2 m.
- make formwork and prepare a solution consisting of sand, cement and gravel. Typically, a 10-liter bucket filled with crushed stone holds 5 liters of water. In this case, add 5 kg of sand and cement in a ratio of 3:1.
- The prepared mixture is poured into the formwork.
- Do not forget to make a dividing partition that improves the operational capabilities of the compost pit.
Important ! Observe the proportions of the solution and do not allow the formation of numerous bubbles.
You can make a cover for the pit from a chain-link mesh, a metal frame or wooden boards. In the latter option, it is recommended to provide several holes to improve ventilation. The investment, time and effort to make such a garden composter with your own hands will pay off in the future, without requiring additional costs.
Earthworms can speed up the maturation of humus in a concrete pit; you should replant them yourself.
You can make a garden composter with your own hands by burying 2-3 barrels in the ground. These can be wooden products or concrete rings. In this case, you should take care of drainage at the bottom of the structure and equip a cover that provides ventilation.
Compost pit using Finnish technology
If you don’t want to make a garden composter with your own hands, you can purchase a compost bin using Finnish technology. This device in the form of a dry closet can turn waste into compost.
The design is made in the form of two containers, each with a volume of 80 liters. After visiting the toilet, a special mixture consisting of peat and sawdust is added to the container in a layer of 1-2 cm. To distribute it evenly, there is a handle on the body that must be turned several times.
In order to improve heat exchange, there is a cover on the seat of the Finnish dry closet. It is possible to recycle food waste using a composter. They also need to be covered with a dry mixture.

As the first container is filled, it is moved away using special handles, and the second is installed in its place. The compost from the filled container is ready to fertilize the garden soil. Due to its high concentration, the fertilizer should be mixed with peat, sand and soil before use. As the container is emptied, it is washed and returned to its original place.
The simplest option for equipping a garden composter can be seen in the following video: