With the arrival of cold weather, snow and frost, conscious nature lovers hang bird feeders near the tree house (or near the apartment window). These simple devices will not only delight children and the elderly, they will help many birds survive the winter. We will tell you how to make feeders and from what available materials in this article.
Variety of feeders
Human imagination is limitless. And having looked at what kind of bird feeders people come up with and from what, this fact is beyond doubt. Having analyzed the basic materials, we can divide devices for feeding birds into the following groups:
- from glass containers;
- from meshes;
- from iron cans;
- from old dishes;
- from plastic containers;
- wooden;
- from fruits;
- all kinds of garlands.
Having examined each group in detail, you can definitely find exactly the one that meets all the parameters. And most importantly, you will want to make it and hang it near your home.
Glass feeders
Jars with a volume of 1 liter to 2 liters are suitable for this. Place a plastic cap on the neck and cut a hole in it. Place food inside. Hang in a horizontal position. The advantages of such a feeder:
- snow does not fall;
- the wind does not blow;
- large birds (crows, magpies) will not be able to take food from small birds.
- Long service life.

There are also more original feeders made from cans. You can see them in the photo.


But there are also feeders made of glass bottles. They need to be secured with the neck down, placing a saucer underneath into which the food will be poured.


Alternatively, you can drill or cut a hole in the bottle into which the bird will fly for food. In this case, you must not forget about the bird's footrest.

Mesh devices
You can feed the birds in a more primitive way, the main thing is that the birds are well-fed. Nets made of polymer material with small holes need to be fastened together to form a bag into which food is poured and hung on a string near a window or on a tree. The advantage is the simplicity and speed of production.

For those who find this method too simple, there are more original and beautiful mesh feeders, but their production will take longer:
- You need to take a garden plastic mesh with small holes.
- Twist a cylinder out of it and secure it in this position.
- Take two pallets from flower pots and secure them at the top and bottom of the cylinder.
- After attaching the lower saucer, pour the food inside.
- Make fastenings in the upper saucer (or along the edges of the mesh) to hang the feeder on a branch.

Feeders made from iron cans
In this case, there are two product options:
- Vertical feeder: small cuts are made in the walls of the jar so that the birds can peck the food. Be sure to make footrests at the bottom base. The top should be closed.

- Horizontal feeder. You need to attach a footrest to the hole into which the birds will fly for food. Decorating the jar itself is at your own discretion.

The advantage of such feeders: relative speed of production, long service life, and is not afraid of impacts.
Old dishes as a bird feeder
Old ceramic dishes are suitable for creating an original feeder that will not only feed the birds, but also decorate a gloomy, cold landscape. This is the main advantage of these feeders. After all, the process of their manufacture will require some skill: making holes for fastenings without destroying the product.


Plastic feeders
Suitable for feeders:
- eggplants from 3 l to 6 l;
- bottles from 1l to 2l;
- canisters from 1 to 35 l;
- containers with lids;
- not big buckets.
How to adapt them to feeders is a matter of imagination. The main models of such bird canteens are presented in the photo.


The advantages of feeders made of plastic products are:
- ease of manufacture;
- long service life;
- not afraid of shocks and temperature changes;
- low cost of raw materials.
The main thing you need to take into account is that thin plastic from bottles and eggplants becomes sharp when cut. And it can damage the delicate legs of birds. Therefore, the part of the cut where the birds will land must either be melted over a fire, or rubber tubes must be put on.
Wooden feeders
- whole cut of the trunk (chock);
- from boards;
- from branches or sticks;
- from plywood or other wood sheet.


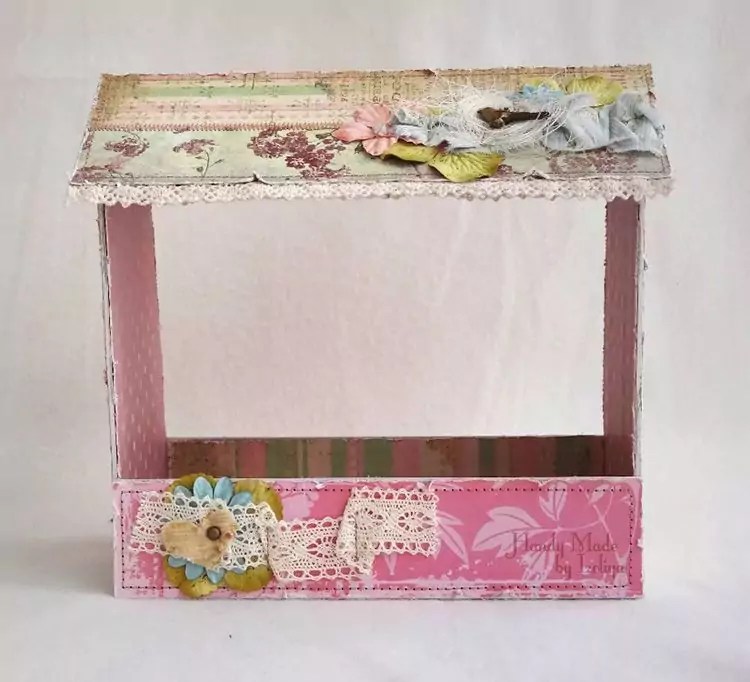
It is recommended to make feeders with a roof to provide protection from direct snow and rain getting into the feed. Wood products always attract the eye, as they show the skill and dexterity of the craftsman. Therefore, the advantage of this type of feeder is not only the environmental friendliness of the raw materials, but also its attractive appearance.
Feeders made from plant fruits
Original feeders are made from:
- pumpkins;
- coconut shells;
- orange peel.
Having cut the fruit and pulled out the pulp, you can safely add food, attach it to a rope or wire, and hang it on a branch. Original, beautiful and simple.


Winter has always been and remains a difficult time for birds. Day by day, it becomes more and more difficult for these small animals to find food. Think about the birds and place a homemade feeder in your yard, because any available materials that we usually throw in the trash are suitable for working with. The article will present ideas and photos of ready-made solutions, the implementation of which will not require either complex drawings or any special skills.
DIY birdhouse
Think for yourself, it’s impossible to imagine all the splendor of the world around us without birds and playful trills. By their nature, these animals fill everything around them with harmony and life, and therefore even a tiny garden will look much nicer if there are birds in it.
By placing a feeder in a suburban area, you can daily observe the secret life of birds and the fascinating bustle of birds. Some of them will enter into fierce competition with other species, others will try to defend their own rights in the fight against their relatives. But they all always carefully look around, so as not to miss the moment of attack by any predator.

A bird feeder can be assembled with your own hands from a variety of materials. However, there are certain general rules that must be followed during assembly:
- It is best to place the feeder on the wall of outbuildings or directly on tree branches. At the same time, the height of the placement should be at least half a meter, so that it is convenient for you to feed the birds, and so that cats cannot climb up to them.
- For small birds, the birdhouse should be made of appropriate dimensions so that larger animals cannot get inside.
- The corner walls of the finished structure should not be prickly or sharp.
- It is better if the building material from which the bird feeder is made has good resistance to adverse conditions and moisture. Otherwise, the birdhouse will not last long and will have to be replaced.
- Include special sides and a roof in the design of the feeder that will protect food and birds from wind, rain and snow.
- And most importantly, the feeder itself should always remain comfortable for the feathered animals, so that it is easy for them to remove food!


Advice! Do not forget that birds remember the place of constant feeding, and therefore are ready to fly a long distance to the desired place - in our case, a feeder. Based on this, birds must be fed daily, otherwise they may die!
Plywood bird feeder
Of course, you can always buy a feeder ready-made in a store, but it’s better to make it yourself, moreover, if it only takes a couple of hours. A plywood feeder can be made with a gable roof, a flat one, or without it at all. You can also provide a special hopper compartment if you know that you will not be able to accurately monitor the amount of feed inside. Naturally, the work will require drawings; fortunately, there are a huge number of designs on the Internet with ready-made sizes and dimensions for cutting. All you have to do is decide on the solution you like.

Important point! Do not neglect the drawing: firstly, it will significantly facilitate and speed up the work. Secondly, this approach guarantees that in the end you will get exactly what is shown in the picture.
When deciding on the appearance of the future feeder, do not forget to take into account the bird population specifically in your region. After all, for example, pigeons are able to eat all the reserves, leaving tiny tits without food. Based on this, it is recommended to make the opening in the feeder so that large birds cannot get inside.

To work you will need:
- Beam with a section of 20 by 20 mm;
- Sheets of plywood;
- Sandpaper;
- Hammer;
- Water based glue;
- Electric jigsaw;
- Nail.


Operating procedure :
- First of all, all the elements are outlined on the plywood sheets, which are then cut out with a jigsaw. A square sheet of plywood with sides of 25 by 25 cm will serve as the bottom of the feeder. In this case, the dimensions of the roof should be made a little larger in advance so that water does not flow down the walls onto the feed during rain.
- To avoid burrs, the edges of the workpieces should be pre-treated with sandpaper.
- We cut 4 posts about 30 cm long from a block.
- If you want to make the roof flat, you should shorten a couple of bars by 2-3 cm.
- We fix all the parts with waterproof glue, and then fasten the structure with nails. We attach stands to the bottom of the feeder, to which we fix the sides.
- We fasten the roof to the racks with self-tapping screws.
- We install a feed container, add food and watch the bird feast.
Wooden feeder: photos and ideas
The main advantage of a wooden bird feeder is that this design holds its shape perfectly and can serve for a long time, which in turn is explained by the low reliability and high characteristics of the wood itself. To assemble the feeder yourself, you will need drawings, as well as at least minimal experience in working with tools.

To assemble a wooden feeder you will need a board about 18-20 millimeters thick.
Next, we will consider a simple design option that you can easily do yourself, using a simple photo instead of a drawing. For work you will need: glue, timber for racks 2x4.5 cm, nails, a piece of plywood sheet measuring 25x25 centimeters for the bottom, self-tapping screws and a couple of sheets of plywood 22x35 cm for the roof.

Work order:
- The first step, of course, is to assemble the sides and bottom of the structure. The bars, adjusted to the dimensions of the lower part, are assembled for fitting, the end sides are coated with adhesive, after which we strengthen the fastening using self-tapping screws. As a result, we get a small frame. In this case, it is recommended to make two parallel sides slightly larger than the base, about 5 centimeters, so that in the future you can install perches to them.
- We fix the bottom of the feeder to the finished frame and nail it.

- We fasten 18-20 centimeter racks from the inside of the resulting structure.
- We supplement the racks with rafters. To do this, we install a pair of bars at right angles, strengthening the joint area with the help of an additional bar. As a result, you will see a right angle with equal sides. You will need another similar part.
Important point! Fasten the blocks at right angles to the table; in this case, it will be correct if the wide side is on the table, and the additional block is on top!
- Next, we fix the rafters to the racks using self-tapping screws.
- We attach sheets of plywood to the posts, which will act as a roof. If you have a wooden corner, you can use it by making a skate.
- Don’t forget about the elongated sides - glue sticks or glazing beads to them, which will play the role of perches.

This way you can easily and quickly assemble a bird feeder with your own hands. The finished structure can be hung on a wire by a hook by drilling several holes in the ridge, or placed directly on top of any pole on the site. Inside the house, the food will be perfectly protected from rain and wind, and several birds will be able to fly to the feeder at once. Birds will love this kind of cozy dining room!
Photo instructions
If you have a gazebo on your country property, then it would be a great idea to place a simple open feeder next to it. In this case, it will be sufficient to build a bottom and a side.

If you want to cover the feeder with varnish or paint, you should use water-based formulations only! This approach will protect the birds.
Birdhouse from a milk or juice box or carton
A beautiful bird feeder can be made from such simple things as a bag or box of juice or milk. Moreover, even a child can make a birdhouse. To work you will need:
- Stationery knife or scissors;
- Juice or milk box;
- Marker;
- Wire or nylon rope;
- Band-Aid.
The first step is to accurately mark and cut small holes on opposite sides of the box. The lower part of the window should be covered with adhesive tape to make it safe and convenient for the birds to fly out and take food from the feeder.

Using scissors, we make tiny holes under the holes; later here we will insert the cardboard rolled into a tube, left over from the holes made earlier. We insert a rope or wire through the holes in the bent corners of the future birdhouse and tie it to the branch. Ready!
The finished feeder can be placed on a tree branch, since the structure will not sway much in the wind. Feeding slots, which can be made on adjacent sides rather than opposite ones, will once again contribute to this. You can secure the craft more firmly if you attach a wire to one side of the feeder, tying it to a tree.

You can make a beautiful birdhouse with your own hands from several juice boxes. In this case, it is worth cutting off the third part from the first piece, cutting out a hole for the birds in the front - the element will become the bottom of the feeder or the feeding board. We cut the second blank along the sides, leaving the upper part untouched. We combine the components so that we end up with a triangle. You can connect the elements using tape or glue.
Crafts from small plastic bottles
Option 1. Simplest
We cut a couple of small holes symmetrically on both sides of the bottle. What shape is up to you to decide; they can be either rectangular or square, round or arch-shaped. Leave jumpers between the holes. The visor will cover your feathered friends from the rain; you can make it by making a cut in an inverted “P” shape, then bending the plate up.

The bottom of the hole in the new birdhouse should be covered with some material, be it fabric tape or adhesive tape - this will remove the sharp edges of the bottle, allowing the birds to sit comfortably.
We make holes at the bottom of the bottle at the same level so that later we can place the stick in a horizontal plane - a kind of perch for birds.

You can place the finished bottle feeder directly on the tree by wrapping the jumper with rope, tape or any other material, as in the photo.


Make holes in the bottle cap by inserting the ends of the twine into them and tying them into a knot, thus obtaining a loop with which you can conveniently fix the birdhouse on the branch of any tree in the yard.
Option 2. Hopper feeder
A bunker-type bird feeder is advantageous in that food can be poured into it in reserve, up to several days. At the same time, as the birds eat part of the reserves, the food will be automatically replenished.

This design will require a pair of identical bottles. The first one should be marked with a marker, then make small holes in the bottom, similar to the first feeder, and remove the top third of the bottle. We make a couple of holes at the top at the same level - later twine or tape will pass through them for hanging the feeder.

In the case of the second bottle, you need to cut several holes in the narrowest place - it is through them that the bird feed will pour out.
You should not make large holes; if necessary, they can always be expanded over time.
Finally, fill the bottle with food and screw the cap back in place, then simply place it in the rest of the first bottle. Ready!
Option 3. Spoon design
A hole is made inside the cork, where the twine is then inserted. After this, a couple more holes are made at the same level according to the dimensions of the spoon. The final hole is cut into the bottle itself, above the deep cupped area of the spoon. At the same time, it should be slightly expanded so that the birds feel comfortable eating in the feeder. At the end, all that remains is to fill the birdhouse with food.

A little advice! Moisture may accumulate inside the craft over time. You can avoid this with a simple solution: using a tiny nail or a heated needle, make several holes at the bottom of the bottle - this will allow moisture to escape as it accumulates.
Craft from a 5-liter bottle
Surely everyone has at least one 5-liter plastic bottle that lies idle. A bird feeder is quite easy to make with your own hands from this material. In addition, the volume of the bottle will allow you to place much more food inside for birds, and well-made holes will make it possible for several animals to feed at once!

Using a bottle as a birdhouse is a fairly quick and easy solution that kids can do too: just use wire or tape to place the structure on a tree and place a small supply of food inside. The only equipment you will need is a utility knife or pruning shears and, of course, the bottle itself.
It’s worth making a hole depending on how you plan to place the feeder on the tree:
- Vertically - 3 rectangles or a pair of square holes are cut at a distance of 5-7 centimeters from the bottom of the bottle;
- Horizontally - a pair of large holes are cut from the neck and bottom.

It is convenient to hang the future birdhouse from a bottle by twine or wire by the neck. When choosing a horizontal placement option, a couple of holes are made on the wall of the bottle, into which a rope is then passed for tying to a branch.
You can avoid the craft from swaying if you place a quarter of a brick inside, which will weigh down the feeder. Load the food on top and there will be no problems with rocking.
Bunker
If desired, a 5-liter bottle allows you to make a bunker feeder yourself. To do this, in addition to the mentioned bottle, you will need a couple more 1.5 liter bottles, a rope, a stationery knife and a marker.

Work order:
- First of all, we mark future holes for bird holes at the bottom of the workpiece. The ideal option is one large one and a couple of smaller holes. The first should fit a 1.5-liter bottle.
At the same time, it is better to cut a large hole in the shape of an inverted letter “P”; with this approach, the visor bent upward will cover the birds from rain and snow. As in the case of 1.5-2-liter bottles, the bottom edges of the openings should be sealed with some material, for example, adhesive tape, to avoid injuring the birds on sharp corners.
- We also make holes inside the smaller bottle in those places where it will touch the bottom of the 5-liter container. An additional hole will be required just above the indicated location. Through them, as the food is eaten, it will spill into the feeder.
- It is necessary to make a round hole inside the lid of a 5-liter container so that when fully screwed in, the thread of the neck of the second bottle is visible from above.
- Remove the top and neck of the second container to create a funnel. We put it on the neck of the bottle placed inside, and then screw it with a cork.
- This creates a beautiful and convenient bunker bird feeder. All work is done simply and quickly with your own hands. All that remains is to fill the new birdhouse with food and place it on a branch in the yard.
By showing a little imagination, you can always use the same plastic containers to make interesting and unusual crafts for birds, which will not only become a real boon for birds, but will also nicely decorate the design of your garden.


Using a shoe box
For self-assembly of a bird feeder, any material lying idle on the balcony can be used. Boxes of shoes, food and utensils can also be used!
Preference should be given to boxes and cardboard, having a laminated coating! Thanks to it, the finished feeder can last much longer.
The main advantage of a birdhouse out of the box is that the initial blank already has a roof, walls and bottom. All you have to do is make small holes on the sides of a rectangular or square shape.

For work you will need: tape, a knife or scissors, and a nylon cord. As you know, cardboard cannot be called a durable material, especially when used outdoors. Therefore, it is worth wrapping it with tape, thanks to which the feeder can last at least until the next season. After making holes on the sides and fixing the new birdhouse with a cord on the tree, fill the container with food, and the birds will not have to wait long.
To prevent the craft from being blown around too much by the wind, you should place some pebbles or sand at the bottom of the box.
You can do everything differently. The lid of the box is placed perpendicularly so as to act as a stern stand, while the second part will act as a roof and side. In this form, the structure is glued with tape for greater reliability. A pair of hooks are made from a piece of wire, with which the “ceiling” of the birdhouse is pierced. The hooks are twisted and bent from the inside. Using hooks, the bird feeder can easily be fixed on a branch, as shown in the photo. All that remains is to put down the food and wait for your feathered friends.

Video ideas
Making your own bird feeder is not difficult. In winter, birds are in great danger; they need to be fed.
This is why people create feeders and help birds survive this cold season.

Feeders can be created using any materials that are found in any home. They do not require financial investments or special knowledge, but only a good attitude towards the environment.

General rules for creating feeders:
- convenience;
- moisture resistance;
- safety (exclude sharp corners);
- walls and corners should not be sharp or prickly;
- fastening not lower than 1.5 m above the ground.
Plywood as a material for a feeder
You can make the drawings yourself, or you can find them on the Internet. When selecting or creating a drawing, take into account the features of the tiles.

If you plan to feed small birds, then plan a small opening so that large birds do not compete with them.

Prepare: plywood, hammer and nails, glue, jigsaw (electric), timber (about 20 by 20 cm) and sandpaper.

- Step 1 Mark the plywood and cut out the parts with a jigsaw. Make the square on the bottom and on the roof 5 cm larger (25x25 cm).

- Step 2 Sand the workpieces.

- Step 3 Cut out posts (up to 30 cm) from the block.

- Step 4 Connect the parts with nails (or glue), attach the posts to the bottom, and attach the sides to the posts.

- Step 5 The roof is attached with self-tapping screws.

Wooden feeder
A reliable and high-quality material for any crafts is wood.

Prepare:
- for racks a block (4.5 by 2 cm);
- for the bottom plywood (square 25 by 25 cm);
- plywood for the roof (35 by 22 - two pieces);
- glue, screws, nails.

Step 1 Frame base – assemble the bottom with the sides. Cut pieces of timber to fit the bottom and connect. Glue the ends with glue and tighten with self-tapping screws. It is recommended to make the sides (two parallel) 5 cm longer than the bottom.

Step 2 Nail the bottom to the base frame.

Step 3 Screw the racks (from 18 to 20 cm) to the inside of the box.

Step 4 Attach two bars at right angles. Secure the joints with another block. You need to make two parts in the form of a right angle.


Step 5 Attach the rafters to the posts using rafters and nail pieces of wood to them for the roof.

Step 6 Glue sticks-perches to the sides (extended).

Feeder made from a milk carton
This type of bird house is often made in kindergartens and primary schools. Prepare: milk/juice carton, scissors, wire, marker and adhesive tape.

- Step 1 Cut holes on two opposite sides of the box.
- Step 2 Glue the edges of the “windows” with adhesive tape.
- Step 3 Punch a hole under the windows and insert a cardboard tube (from the cut holes).
- Step 4 Make holes for the wire in the bent corners.

Feeder made from plastic bottles
- Step 1 Cut holes on both sides of the bottle (leave bridges between them).
- Step 2 Apply adhesive tape to the sides.
- Step 3 Make holes at the bottom for the perch stick.

Feeder made from a five-liter plastic bottle
This type of feeder holds a lot of food, which is very convenient for feeding birds in winter. It is convenient for them to eat inside such a spacious product. You can involve the whole family to create. Prepare: bottles, knife (or stationery knife).


- Step 1 Cut a hole vertically or horizontally, depending on the mounting method.
- Step 2 If the holes are made horizontally, then you need to make two holes on the side (with a knife) and pass twine through them (to tie it up).
- Step 3 Place a small stone on the bottom to avoid falling during strong winds.

Feeder out of the box
You can create a feeder from almost any cardboard box. It is better to choose thick and laminated cardboard so that it will last longer in winter moisture conditions.

Making this feeder is easy because it already has the desired shape, walls, bottom and roof. You just need to cut the holes. Prepare: tape, knife and nylon cord.

- Step 1 Wrap the box with tape.
- Step 2 Cut the side holes.
- Step 3 Attach the fastening cord.
- Step 4 Place pebbles on the bottom.

There is an alternative version of this design. The lid can be glued perpendicularly so that it serves as a stand for food.

Then the side and roof will be from the second part of the box.


This product must also be carefully taped. Next you need to make two small wire hooks and lay them on the “ceiling” (twist and bend). The hooks need to be connected to each other, and now it can be hung on a branch.

Photos of bird feeders


The kindergarten decided to hold a bird day and asked each child to make a bird feeder at home with their parents. Returning home, my mothers and I discussed for a long time what to make it from: plastic bottles, tetrapacks of juice or milk, plastic jars, etc. But when we came home, we remembered that after the renovation there were small pieces of plywood left, so we decided to use them. I offer a master class with step-by-step photos that will help you make a bird feeder from plywood with your own hands.
How to make a bird feeder from plywood with your own hands
1) The production required a little more than half a sheet of plywood (approximately 50*60 cm), glazing beads, glue, small nails, acrylic paint (the kind used to paint the ceiling), tape measure, ruler, pencil, jigsaw, sandpaper.

2) First, we created a drawing and transferred it to plywood, distributing all the details on it.


3) Our whole family was involved in making the feeder, even our pet actively took part.


4) The first part of the work was carried out by brute male force, the remaining participants in the process took their places in the auditorium and waited for their turn. All parts were cut out using a jigsaw along the drawn lines.

5) And the edges were sanded to remove burrs.

6) The bottom of the feeder turned out to be square (20*20 cm), the side walls were thin strips of plywood (20*4 cm) in the amount of 4 pieces, the roof was 2 rectangles, measuring 15*20 cm.

7) The glazing beads were also cut and the ends were sanded. Bead sizes:
- along the perimeter of the bottom - 4 pieces measuring 19 cm;
- vertical ribs - 4 pieces, 10-12 cm in size;
- roof coverings - 2 pieces, 22 cm each;
- glazing bead for strengthening the roof - 1 piece, size 24 cm.

8) We remove all sawdust and proceed to assembly. We will first glue each part and then knock it down with nails. We glue beads 19 cm long to the bottom along the perimeter, not reaching 5 mm to each edge. Then we nail them in several places from the bottom edge of the bottom.

9) We insert vertical ribs into the remaining 5 mm grooves, having previously lubricated their ends with glue, and then nail them from below.

10) In order for the roof to maintain its slope, we first glue a bead into it to strengthen the roof, and then knock it down with nails.


11) Glue and then nail the side walls. We generously fill all the cracks with glue so that in wet weather the feeder does not lose strength and does not crumble.


12) When the glue dries, we glue and nail the roof coverings onto adjacent pairs of vertical ribs, and fasten the roof onto the opposite sides and on top.


13) The feeder is ready. Now we will paint it (this job was entrusted to the mother and child).

14) Painting is also necessary to prevent the plywood from getting wet from rain and snow. For work we use acrylic paint (left over after renovation), foam rubber, and brushes. You can also use any dye to add color to the paint (to paint the pattern according to the pattern).


15) First, we paint the entire feeder with white paint: flat parts with a foam sponge, and the ribs and thin parts with a brush.


16) Now let the paint dry well. Acrylic paint dries quickly, after an hour you can continue working.


17) Drawings from the Internet were chosen as stencils. We printed them out and cut them out using scissors.

18) Now it’s time to work in pairs. The mother held the template, and the son applied the design with a brush.
Hanging homemade houses for birds to eat is a tradition that has come to us since Soviet times. Today, such bird canteens can be seen in parks, schoolyards and kindergartens. However, not everyone can withstand the vagaries of nature: wind, snowstorms and heavy rains. Agree, it’s a shame when your child, who so diligently crafted from cardboard, suddenly sees a bird’s canteen that has fallen into disrepair. Today the editors of the site will tell you how to make a bird feeder with your own hands, so that it will not be afraid of any disasters.
It is not so important whether the cat manages to catch the prey or not, you will always know that your bird feeder will withstand even an attack by a predator
Read in the article
Types of bird feeders: original ideas with photos
Choosing the right type of feeder is not an easy task. It is important to take into account many factors: the time of year, the amount of precipitation, the quality and thickness of the wood or window frame, where you plan to attach the structure, as well as which birds you are going to feed.

Someone will say that it is easier to buy a bird feeder than to make one yourself. For some, maybe yes, this is a solution, but you will lose uniqueness and communication with family members while working on the craft. You can build a homemade feeder from plastic and cardboard, wood and glass, and even clay. The main thing is to follow a few rules:
- The edges of the refectory for birds must be processed, especially if it is plastic or wood. Sharp sides can be covered with electrical tape, wooden ones can be sanded or sheathed with fabric.
- Consider in advance the stability of the structure and the perch so that the bird can calmly start eating without risking spending all the calories eaten to stay in place.
- The food should not spill onto the ground, as this will attract predators and therefore endanger the lives of the birds.
- The location of the feeder should be constant. You cannot move it from one place to another. And so that the bird notices the feeder, you can attract its attention with a bright rose hip or rowan berry. In some cases, it is even recommended to attach plastic toys or even rattles.
- The sides will be able to protect the poultry canteen from the wind, and the roof from the rain. You can put a thick magazine (or two) or a newspaper at the bottom of the structure. No, we are not trying to teach the birds to read and write, it’s just that in this way you can make the structure slightly heavier and it will sway less in the wind.
Important! For sparrows, it is better to make a smaller feeder, for example, from tetrapack; for larger birds, such as pigeons, tray structures are better suited - birds of different “calibers” will fit in them.
Let's look at the features of different designs.
Tray-type structures and platform feeders
Modern feeder trays are suspended structures that are mounted on. They are made of durable polycarbonate, with a small visor and a feed tray. In some metropolitan areas, there is a special program in which such trays are hung on some windows of businesses and buildings.


Advice! Be sure to think about how the perch will be attached to it, and what the landing site will be like.
However, not every family wants to put up with bird trills every morning, so platform feeders are more suitable for DIY construction (and for your own peace of mind).


Typically, such feeders are made from plywood and wooden boards, in rare cases - from old boxes of children's board games or candy. The advantage is that the birds can see from afar whether there is food, and do not risk falling into the clutches of a predator if it is lurking nearby. On the other hand, the structure is not protected from moisture or wind. Therefore, let’s move on to describing better quality feeders.
Bunker-type feeders and house feeders
They are convenient because the feed comes to the site automatically, under the influence of gravity.

It is important to take into account that birds will most often peck at the same point, so it is better to prepare a denser base in advance - a thick one. Cardboard may or may not withstand such a load.

A comment
Ask a Question" If you want to feed tits or woodpeckers, make a narrower area; if you want to feed sparrows (and they always move in flocks), then make a wider one.
"Hopper-type feeders can be very different. Both glass and .


Feeders in the shape of a house are a classic version of this craft. They are quite simple to make; you can use an ordinary cardboard box as a basis. Some people buy ready-made structures made of polycarbonate, however, houses made of wood or plywood are considered the classic option.


Feeders in the form of houses perfectly protect feeding from wind, snow and rain. Most often they are durable and permanently attached.
A comment
Team leader of the repair and construction company "Dom Premium"
Ask a Question" It is better to treat a wooden feeder with drying oil or varnish. So, the structure can last for many years.
"Suspended structures made of nets or peelers
An original feeder can be made in just a minute if you use a regular nylon mesh or twigs. The main thing is that the diameter of the mesh holes allows the food not to fall out, but is sufficient for the bird to be able to grab the treat.


In addition, such feeders are best used under. Otherwise, the food may get wet and rot before the bird discovers it. There are variations of these metal mesh feeders. They are more durable, they are not afraid of either the wind or sharp claws. The roof will provide reliable shelter from the rain.


How to make feeders for street birds with your own hands - description with drawings
Small birds, especially sparrows, are quite timid creatures, so when planning the design of a future dining room, it is worth considering large windows that will help provide the bird with more room to maneuver.

DIY bird feeders made of wood
The simplest wooden feeder can be built in just one hour. The following scheme is suitable for the base.

Typically, assembly begins with the platform, then the sides and roof are attached. After the wooden frame is ready, we attach the sides, slightly protruding along the edges. Protrusions 5 cm long will be used to attach the poles. Original ideas for wooden bird feeders made of wood can be seen in these photos.
1 of 9


DIY plywood bird feeders
The plywood construction is suitable for small (light) birds.


A significant advantage of plywood structures is that they are much lighter and cheaper than wooden ones. Such feeders are most often collected for small birds, for example, tits. First of all, we need to choose a scheme according to which we will mark the sheets of plywood.


Now let’s look at the sequence of actions for assembling a plywood feeder in more detail.
| Illustration | Description of action |
 | We cut out 2 blanks for the walls and base - 20x20 cm. |
 | The roof size is shown in the diagram. Partitions − 3×20 cm. |
 | We cut all the elements. |
 | We work on complex parts using a special attachment. |
 | We start the assembly from the base, gluing all the joints with special wood glue. |
 | We fasten the base with thin nails. |
 | We glue the sides, do not forget to sand them first so that the birds do not get splinters. |
 | After assembling all the elements, you can coat the plywood with varnish (in order not to harm the birds, it is recommended to use water-based compounds) and decorate your creation at your discretion. |
How to make a feeder from a box
The easiest way to make a bird feeder is to use a cardboard box as a base. The closest things to the “ideal” are tetrapacks and shoe boxes.

The main rule for creating a strong cardboard feeder is to choose a box from the most durable material. Ideally, find a box with a laminated coating (most often these are shoe boxes).
If you have a large box lying around, you can cut out a feeder like this.

Feeder made from juice or milk cartons
To create the simplest feeder, we need an empty container or tetrapack. It must first be washed and preferably dried. The first stage is to cut out a sufficiently large passage hole through two opposite sides of the bag.


Feeder made of plastic bottles - manufacturing and features
Plastic is a universal material. It does not allow moisture to pass through, which is, perhaps, the only advantage in our case. Along with this, this design has rather sharp edges and low resistance to wind. On the other hand, the material is easy to process and very cheap.


Edible bird feeder
One of the simplest, most aesthetic and unusual types of feeders. Agree, it’s nice to do something simple and useful in the winter cold for tits or sparrows deprived of food. Sometimes these are independent, separately hanging edible treats or even entire houses.


To make a simple edible feeder, let's prepare the ingredients and materials:
- A packet of birdseed or a mixture of hulled seeds and grains.
- Twine or tourniquet.
- Dry gelatin - 5−10 g.
- Bakery molds.
- Straws for drinks.
- Food grade silicone mat or parchment paper.
| Illustration | Description of action |
 | Pour in a glass of food. You can use seeds, husks, cereals, raisins, and apple pieces. |
 | Prepare a glass of water at room temperature and baking molds. |
 | Pour gelatin into a container. The greater the mass of powder, the denser the feeder will be. This substance will act as a kind of adhesive for the seeds. Fill the gelatin with water and leave to swell. |
 | Heat the gelatin in a steam bath. |
 | Add bird food to the container and mix the mixture thoroughly until it becomes a homogeneous, thick mass. |
 | Place the mixture into baking tins. |
 | To make a hole in the resulting mold, divide the drinking straw into small parts and place it in the desired part. |
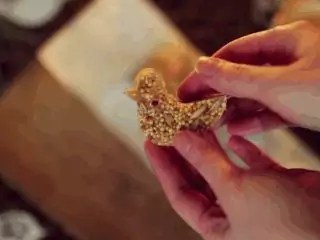 | Next, the molds must be dried for half an hour or 24 hours at room temperature so that the gelatin sets. Our delicacy is ready, all that remains is to hang it on the branches. |
How to attach a do-it-yourself bird feeder to a window - original photos
There are many options for how best to attach the feeder to the window. Let's take a quick look at photos of different fastener options.
1 of 6


The second most practical option is to come up with a special corner that will secure the base of the feeder to the wall of the house


There are also tray models, most often they are designed for feeding one type of food.

There is also a third type of do-it-yourself broiler feeders - these are grooved structures.

How to make a chicken feeder with your own hands
We have already offered you several types of poultry feeders. Let's tell you more about each of them.
Do-it-yourself bunker feeder for chickens made of plywood or wood: drawings with dimensions
For work we need plywood and sheet steel. The first stage is drawing up a drawing. All sizes are calculated based on the number of birds and the likely brood. The main thing is to take into account the consistency of the mixture, whenever possible alternating hard foods with more mushy ones.

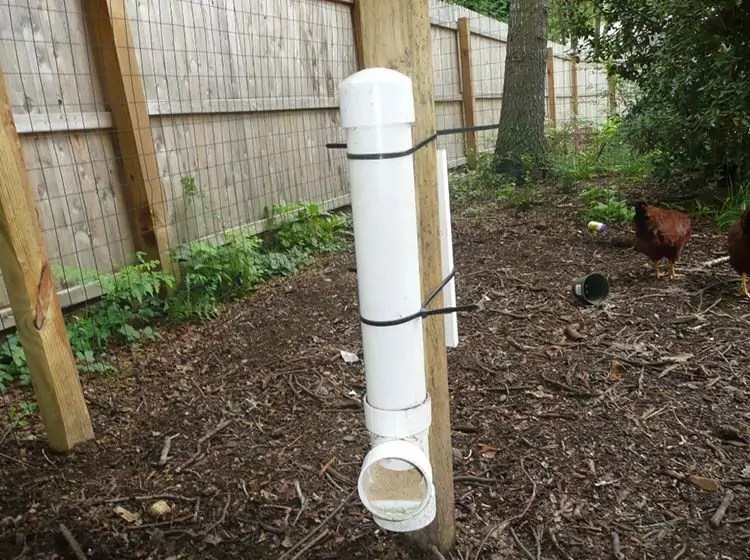
Making chicken feeders from PVC pipes
A universal material for the manufacture of both tray and bunker structures.


How to make a chicken feeder from plastic bottles
Just like for their wild counterparts, you can often find feeders made from plastic bottles in the owner’s yard. Most often, 5-liter bottles are used to make feeders; they are most suitable in volume; in bunker designs they are used as the main container that fills the tray.

Making a chicken feeder from a bucket
A bucket chicken feeder is a popular invention among farmers. There are dozens of variations of this feeder. In the photo review we will show the most common of them.


Features of making chicken feeders with your own hands

Very often, chickens get caught in a crowd at the watering bowl and feeder and die. That is why feeders for babies are usually located separately, they are lower and as stable as possible. The most important thing is to ensure access to food for all the little ones. Otherwise, weak chickens will simply die from malnutrition.


You cannot use metal structures; a fallen piece of metal or a sharp piece can be fatal for chickens.. If you have any questions for the author of the article, ask them below in the comments.