A high-quality connection of the beams to each other during the construction of a house is of no small importance. The reliability of the entire structure and the preservation of heat in the house largely depend on the method and accuracy of the connection.
The strength and thermal insulation characteristics of the future structure depend on the high-quality connection of the timber.
The construction of wooden houses with new technologies for the manufacture of timber began to gain popularity at a rapid pace. An environmentally friendly material with good thermal conductivity and an attractive appearance is great for the construction of residential buildings and other buildings in any region of our country.
The most important stage in the construction of wooden houses is the joining of the beams to each other. Highly specialized equipment for the manufacture of tenons and grooves is used only in large industries, due to the high cost and large size. However, the connections of the profiled bar can be done with your own hands.
Required tool for making connections

Figure 1. Varieties of timber connection.
When making connections yourself, you can use the usual manual mechanized tools available to the developer or specialists, such as:
- Petrol or electric chain saw. An electrically powered hand-held circular saw can be used, but the maximum allowable cutting depth of the device must be greater than half the tree.
- A set of chisels. In trade enterprises it is not always possible to find a tool of the required length and strength, so it is advisable to make it yourself or order it from a blacksmith.
- Hammer, mallet, ax.
In the old days, cutting corners was done with one ax, but this was time-consuming. A modern tool with various types of drive will greatly facilitate work and reduce the time spent on work.
The main methods of joining timber when laying
At the point of connection, a specific method must be selected that guarantees optimal strength and tightness of the joint. Corner connections can be made:
- with ends protruding beyond the main dimensions;
- without protrusions;
- butt-laying when the beams do not overlap;
- T-joint for walls inside the building.

Figure 2. Device of a rectangular root spine.
Residue process technology provides better gusset quality but requires higher material consumption. On each beam, it turns out from 0.4 to 0.6 meters of irrationally used length. With a height of 15 crowns, the total unused length will be from 20 to 36 m. With a timber length of 4 m, this will be from 5 to 9 additional products. You can see the gusset with protruding parts in Fig. 1a.
The first crown in a building usually fits into an articulation with a keyway with a specific name for the joint - "oblo". This method is used with any method of laying material, with or without protrusions. Sampling is performed at half the thickness of the product. The articulation of the corners of a house without protrusions can be seen in Fig. 1b. Subsequent rims to prevent displacement in the main planes must be docked like "root spikes" with the installation of dowels. The device of a rectangular root spine is shown in Fig. 2.
The dowel is a wooden block of circular cross-section 25 cm long and about 30 mm thick. In a bar laid on the cushioning material, a hole must be drilled with a depth exceeding the length of the dowel by 20-40 mm, and a part must be hammered into it.
Butt-joining the corners is the easiest way. The quality of such joints is extremely low; it is unrealistic to create a warm corner in this way. Fastening the timber with such a docking is performed with metal brackets with thorns nailed down. Laying the timber end-to-end is shown in Fig. 1c. How to fix the timber with a metal bracket can be seen in Fig. 1e.

Figure 3. Dovetail.
The T-shaped connection of capital and internal partitions has several options:
- joint using a keyway;
- joint "groove-thorn" in the form of a symmetrical trapezoid;
- joint "groove-thorn" in the form of an asymmetrical trapezoid with a right angle;
- use of a rectangular groove-tenon joint.
Trapezoidal spikes are designed to maintain the connection during loosening of the structure and efforts aimed at pulling in different directions. The device of such joints is a complex, but also more reliable fastening. Due to its appearance, the compound was named "dovetail". The device of such a joint can be seen in Fig. 3. Making a dovetail requires care and patience when fitting surfaces.
It is possible to assemble and disassemble the connection only by moving the product in a vertical plane.
Many craftsmen prefer to fix the walls with rectangular root spikes. Often, fastening with special brackets, long bolts with large diameter washers or nails is used on T-shaped joints. An example of a right-angle spike connection is shown in Fig. 1d.
Longitudinal material connection

Figure 4. Back-to-back and back-to-back connection.
One of the main disadvantages of the timber is its length limitation. The standard dimensions of the manufactured products are from 4 to 6 m. For long walls or when using scraps, it is necessary to make a longitudinal connection. Such connections are undesirable in the construction of solid walls due to possible deformation. If it is necessary to arrange longitudinal joints in several rims, they cannot be placed in adjacent rims along one vertical line. For internal walls, there are no restrictions on the splicing of the timber due to the more stable temperature regime.
When splicing the timber along the length, a central spike or various joints with a lock are used. Most often, a straight lock is used due to the uncomplicated manufacturing process. In the bar, samples are made in half the thickness of the bar. The resulting surfaces are available for machining and can be carefully adjusted.
Reliable to displacement connection of the bar can be obtained by using a central tenon. The socket needs to be made a little longer than the length of the thorn. The length of the spike should be twice the width of the bar. To connect more firmly, you can install two pins.
Bar extension can also be done overlay. The overlay connection can be oblique or straight. The types of connections can be seen in Fig. 4. The ends of the products must be given the desired shape and put in place. Subsequent crowns will squeeze and fix the connection with their weight. When lengthening a bar in solid walls, it is advisable to use a combination of different fasteners. Products fitted for the overlay connection must be additionally secured with one or two wedges. A view of a wall with a spliced beam can be seen in Fig. 1d. A sealing material must be installed in all joints.
Production of corner joints of a bar at an oblique angle
In the structures of buildings, there are always corner joints of the timber, the size of which does not correspond to 90 °. In most buildings, these corners are located in the attic. Their size depends on the slope of the roof. On main walls, angles of various sizes can occur when protruding or recessed elements are installed.
The device of joints at an obtuse or acute angle is desirable to perform according to the "groove-thorn" principle. The protrusions and recesses are cut at the required angle, and their surfaces are adjusted accordingly. Additional fastening with bolts, screws or nails of the required length can be used to increase the strength. If the thickness of the products is large, you need to use metal brackets of the required shape with appropriate fastening.
When making a large number of identical joints, it is advisable to make special marking templates that will speed up and facilitate the process of marking for connecting logs in a log house.
For templates, you can use tin, plywood, thick cardboard, thin plastic. When making joints, you must first make a gash in the desired position, then remove the areas inaccessible to the saw with a chisel.
Ready-made building projects offered by manufacturers of building materials are completed with profiled beams with connections. All types of pins and grooves are selected based on the required strength and are manufactured on industrial equipment with high precision.
If you are planning to build a log or log house, ask how the workers will connect the crowns to each other. If using nails or even reinforcement, consider whether you need to invite this team.
When the neighbors in the summer cottage decided to build a house from a bar, they found a company ready to fulfill their desire. There they made an estimate for them, but explained that this total cost of the work is valid if the box of the house is assembled on nails. And if the customer wishes that the crowns of the house were assembled on wooden dowels, then more than 50,000 rubles must be paid. For advice on what to do, they came to me.
Let's estimate the price
Even if a builder, disregarding common sense, decides to build a lumber or log house on nails, it will cost him more! Let me explain in more detail.
In the process of building a wooden house, boards with a thickness of 25 mm are widely used - the so-called inch. It is used for the manufacture of formwork, subfloors, battens and other purposes. From the boards inevitably remain short cuts, suitable only for firewood. Of these, it is possible to prepare dowels, as they say, for nothing.
When I was building a log house, I cut workpieces with a length of 120 mm from the accumulated scraps of inch boards on a miter saw. Then he dismissed them on a band saw lengthwise into square bars of 25 * 25 mm. Then he sharpened these blocks with a hatchet on both sides. In a few hours, I prepared more than 600 dowels - for a whole house! The purchase of the same number of 6x200 mm nails will require more than 6,000 rubles.
Assembly of a log house
Collecting crowns on such pegs is a pleasure! First, two adjacent beams are placed in a predetermined position and the location of each dowel is marked. The upper bar is turned over and, using a square and a simple template, the markings are transferred to the central axis of the upper and lower bars. It remains to drill holes in both beams and drive the pins into the lower crown. Then they lay the mezhventsovy insulation and install the upper beam with holes on the pointed pins. For settling down, you can walk on a bar and knock with a sledgehammer.
I use a cheap pen drill with a drilling depth mark. Of course, the total depth of the holes in both beams must be greater than the length of the dowel, otherwise, during shrinkage, the beams will hang on the dowels with the formation of cracks. Short pins do not interfere with the normal shrinkage of the timber box: they work to cut, fixing the position of the beams.
Driving a square dowel into a round hole is a bit unusual, but practical! If the wall is deaf, then I place the pins every 1.0-1.5 m in a checkerboard pattern. For a wall, regardless of its width, you need at least two dowels.
Once I saw a picture of how workers assembled a house from a bar on long wooden dowels, similar to rake cuttings. They lifted another heavy raw timber and drilled the wall with a long drill - not cheap, I note. Subsequently, during the shrinkage, the house hung on these sticks, huge gaps formed between the crowns. Even when assembling furniture, it is impossible to drill strictly vertically shallow holes for dowels and self-tapping screws, just holding the drill in hand. In the case of a house, deviations from the vertical are inevitable and very large!
Now about nails
As with long wooden dowels, the house can hang on the nails when it shrinks (fig. 1). It is difficult to hammer long nails into the timber without drilling. This means that the labor intensity will increase and the estimate will increase, since nails of this size are not cheap. On the market, one 6x200 mm nail costs on average more than 10 rubles apiece (I have already said about the manufacture of short nails).
But you should not completely abandon nails. For example, the topmost crown, connected to the veranda, or spacer inserts between the rafter beams can be easily fastened with nails.
Often there is a layout when a large span cannot be covered with wooden beams without an intermediate support. This support is usually a wall or column. But when you need to do without them, use a reinforced beam (Fig. 2). It is assembled from two bars, fastened precisely with nails. Moreover, if you hammer nails at an angle, then the strength of the connection will be even higher. I usually do this - I put a support under the not yet connected beams of the composite beam so that there is no sagging. Then I fasten the bars with nails, after which I remove the support.
In conclusion, I will say: each material has its own place! By using pins and nails where you need it, we get a warm and durable home at no extra cost!
How to connect the crowns of a log house: methods in the photo
- Drilling the crown under the pins.
- Installation of dowels in the crown
- To hammer a large nail into a dry board or timber, it is advisable to drill a hole using a long drill.
- Dowels sawn from board scraps.
- Rice. 1. Assembling the wall: a - on nails; 6 - on dowels. When assembling on nails, normal shrinkage of the log house is impossible, gaps will form between the crowns. The length of the dowel should be less than the total depth of the holes in the upper and lower bars of the rims.
- Securing the upper crown with a nail.
- Rice. 2. A run, knocked down with nails from two beams, serves for intermediate support of the floor beams.
- The spacers from the timber between the rafter beams can be fastened with nails.
- If the span to be overlapped is large, then a composite beam, assembled from two bars, fastened with long nails, is used as a run.
 GD900 Thermal Conductive Grease Paste Silicone Plaster Heat Sink Compound 5 ...
RUB 307.21
Free shipping★★ ★★ ★★ ★★ ★★ (4.90) | Orders (360)
The technology of assembling a frame from a bar for a house or a bath
Organization of a workplace for assembling walls
To make the work work, the beams are laid out in a pile at a distance of 5-6 meters from the building on one or better - on both sides. Each layer of beams in a stack is stacked on pads made of boards.
Next to the pile, a workplace is equipped for marking and cutting beams. A variant of the arrangement of such a workplace is shown in the figure.
It is convenient to mark the timber using a template at a height of 0.9 - 1.1 meters in the marking area, node A in the figure. After marking, the timber is lowered onto low pads in the cutting area. In this position, it is convenient and safe to cut the bar with a chain saw.
The cut timber is lifted onto the wall. To facilitate lifting, slopes are arranged - inclined beams, which with their upper end rest on the upper crown of the frame. The beam is moved along the slopes with a rope.
Wedge-shaped stops are nailed to the slopes, which make the lifting of the beam safer. In addition to safety, the stops allow small forces to be dispensed with. Even one person can, if necessary, raise the bar, fixing it with stops at intermediate points.
It is most convenient to carry out work on assembling a blockhouse from a bar with a team of four people. You can work together as well, just work will go slower.
For the installation of the upper rims of the log house and the roof, scaffolding is erected.
 Three-tiered scaffolding on the pediment of the house. 1
- extreme racks; 2
- L-shaped post of scaffolding of the first tier on the side facade; 3
- flooring; 4
- central racks; 5
- cross braces (shown conditionally); 6
- lugs
Three-tiered scaffolding on the pediment of the house. 1
- extreme racks; 2
- L-shaped post of scaffolding of the first tier on the side facade; 3
- flooring; 4
- central racks; 5
- cross braces (shown conditionally); 6
- lugs The assembly of the upper rims of the log house is carried out from the level of the first tier. The flooring of the first tier is laid on L-shaped racks, pos. 2 in the figure. Racks are installed around the walls of the house and attached to the walls using bosses, pos. 6.
At the stage of erecting the roof (attic), on the facades, where the device of gables is necessary, it is necessary to make scaffolding in three tiers. For the device of scaffolding racks, boards 50 x 150 are used mm. Flooring is made from the same boards.
It is more convenient, faster and safer to work from scaffolding than from stairs - do not forget about this.
Marking beams for wall assembly
Practical experience in construction shows that it is not realistic to keep in mind the sequence of marking the elements of corner joints.
Before starting work, a diagram of the assembly of the walls of the house is drawn, on which they indicate: the serial number of the crown, the type of connecting element at the ends of the blanks, the position of the openings in the wall.
An example of an assembly scheme for the walls of a house is shown in the figure:
 Scheme for marking the corner joints of the timber and the joints of the parts of the longitudinal walls, for a house with dimensions of 6x9 meters. A and WITH- longitudinal walls; D and B- transverse walls; E- inner wall from a bar - a partition; 1
- the joints of the bars.
Scheme for marking the corner joints of the timber and the joints of the parts of the longitudinal walls, for a house with dimensions of 6x9 meters. A and WITH- longitudinal walls; D and B- transverse walls; E- inner wall from a bar - a partition; 1
- the joints of the bars. At the house, which is shown in the diagram, each crown consists of 7 pieces of beams from 3 to 6 length m.
The crown of the longitudinal wall consists of two parts: the main bar with a standard length of 6 meters and an extension, 3 meters long. On one crown, long beams are laid on the left, and on the right - doborks. At the next crown, laying begins in a similar order, but on the right.
Details of the crown of the transverse wall and the partition are made from one bar of a standard length of 6 meters.
To exclude cold bridges in the outer walls, the joints of the beams of the longitudinal wall, pos. 1, are performed by making vertical cuts "into the floor of the tree" with an overlap of 15 - 20 cm. The bar in the corners of the crowns is connected in a ligation with a root spine (see below for more details).
How to correctly and quickly mark out spikes, grooves and other profiles, ensure identity of the sizes of timber blanks?
The easiest way to do this is with templates. The template is placed on the bar and the contour of the template profiles is transferred with a marker to the surface of the bar.
It is more convenient, faster to mark up and there will be fewer errors if the template completely repeats the contour of the part, has the same length as the part being marked. I put the template on the timber and immediately transferred all the dimensions and profiles to the workpiece.
For our example, you will need to make seven templates, according to the number of parts in the crown. Two mirrored wall details are marked with one template.
If you think about it, the number of templates can be reduced. Consider how to make universal templates for marking parts of the longitudinal walls of a house (see above for the wall assembly diagram).
 Two templates (highlighted in bright yellow) for marking the timber of longitudinal walls. 4
- groove for the root spike; 5
- groove for the spike of the inner wall; 6
- sample; 7
- a bar of additional.
Two templates (highlighted in bright yellow) for marking the timber of longitudinal walls. 4
- groove for the root spike; 5
- groove for the spike of the inner wall; 6
- sample; 7
- a bar of additional. The figure above shows the template for marking the main bar in the crown, in which the add-on is located on the right. On the wall marking scheme, these are the crowns A1, A3, A5 and C1, C3, C5.
Bottom template serves for marking the main bar in the crowns with an extension on the left - A2, A4, A6 and C2, C4, C6.
At first glance, the templates are the same, but differ in that the grooves, pos. 5, for connection with the partition, are located in different places of the templates.
The same templates are used to mark the details of the add-ons. To do this, on templates in points b and With through holes were drilled, and in points a and d incisions are made.
To mark the finish, the template is placed on the timber and dots on the surface of the workpiece are punctured through the holes and cuts.
Remember this technique with the device of the holes in the template. This will help you create generic templates in many other cases.
The templates are made of "inch" planed board.
As a result, we are able to reduce the number of templates from seven to three (2 for longitudinal walls and 1 for transverse). Two longitudinal templates (right and left) provide the ability to obtain blanks for longitudinal walls, and one transverse template allows you to harvest parts for transverse walls and partitions.
Now consider how templates are applied. To mark the first bar of the crown (for example, starting from the left), the left template is placed on the bar and the end of the template on the left is outlined with a marker, then two grooves and, finally, a selection for the connection "in the floor of the tree". The marked timber is transferred to the cutting site, where unnecessary fragments (they are better when marking out
hatching) is cut with a chain saw.
How to mark out spiked parts? Obviously, the tenon and the groove are elements of the same node, which means they must correspond to each other in size and location. In a part with a spike, a spike is marked in place of the groove.
If the groove dimensions are 5 × 5 cm, then the spike should have dimensions - 4.5 × 4.5 cm. The gap is filled with a mezhventsovy heater.
The profile of the template is transferred to the upper edge of the bar. The markings are transferred to the vertical edge of the timber using a square. These markings are used for neat cuts.
How to assemble smooth walls from a bar of different widths
Technical conditions (TU) for the manufacture of a bar allow for a deviation of the size of the bar in one direction or another from the standard value specified in the documents.
If the purchase documents indicate standard timber dimensions, for example, a section of 150x150 mm. and a length of 6 meters, the actual dimensions will be different from the standard.
Each bar in a batch of timber brought to the construction site will differ from the dimensions indicated in the documents by several millimeters. The cross-sectional dimensions and the length of the bars will be different.
Dimensional variation must be taken into account when developing templates, marking timber and assembling walls.
How to assemble smooth walls if the timber is different in width and length?
 b- the minimum width of the timber; delta b- the difference between a narrow and a wide beam.
 Obviously, from a bar of different widths, you can make only one surface of the wall even - either outside or inside the building.
If you want to make a flat wall of the house outside, then all the beams in the wall are aligned to the outer edge. Then, inside the house, wide beams will protrude from the wall by the amount of "delta b"(The difference between narrow and wide bars). Alignment to the outside edge will increase the gaps in the gusset of the beams (see illustration).
If the beams in the wall are aligned along the inner edge, then the "steps" of the protruding beams will be already on the outer surface of the wall. The outside wall is usually sheathed. And if the beams are chamfered from the outer edges, then the steps on the wall will be invisible even without sheathing. The corner joints of the beams are denser, "warmer".
How and what to connect the crowns of a log house
Each crown of a log house is connected to the lower crown with metal or wooden pins. The pins are placed at a distance of about 250-300 mm from the end of the bar and then every 1-1.5 meters of the length of the bar.
Each part of the crown is fixed with at least two pins. The length of the dowel should be at least 1.5 times greater than the height of the bar.
 cm., pos. one.
 Round steel pins with a diameter of 6-8 mm.- pins with a pointed end or nails (6x200-250 mm), just hammer into the bars of the crowns, option a on the image.
The upper ends of the pins made of any material must be buried into the timber by 2-4 cm. If this is not done, then when the timber dries and the log shrinks, the pins will be higher than the timber and raise the upper crown. A large gap forms between the crowns.
For the same reason it is impossible to make hammered pins from reinforcing steel. The corrugated surface of such dowels will keep the bars of the crowns from moving when the log shrinks, even if the dowel is buried in the timber. The crowns will simply hang on such pegs.
Small diameter steel driven pins cannot always provide the required wall stiffness, especially with long wall spans. Their use can be recommended for small buildings - for example, baths. To increase the rigidity of the walls of large buildings, it is necessary to install pins with an increased diameter.
Steel pins with a diameter of 10 millimeters or more, as well as wooden pins are inserted into holes pre-drilled in the timber. The diameter of the holes is made slightly less than the diameter of the pin.
With a tight fit of the dowel into the hole, the stiffness of the wall increases, but the risk that the dowels will interfere with the shrinkage of the frame increases.
Wooden pins with a diameter of 25-30 mm convenient to cut from round tool cuttings. These cuttings are made from hardwood. It is recommended to chamfer from the lower end of the dowel - it will be easier to drive the dowel into the hole.
Can be cut from a regular board "inches" square pins 25x25 mm. One end of the workpiece is chamfered. Such pins are driven into a hole made with a drill with a diameter of 24 mm.
The ribs of such a dowel made of relatively "soft" coniferous wood are crumpled when driven in, the wood is compacted, ensuring a sufficiently tight fit of the dowel in the hole.
How to properly drill holes in a bar for pins
The depth of the holes in the wall for installing the dowels should be at least 4 cm. the length of the dowel. Moreover, the hole should be free of chips.
To drill holes in a bar that are deep enough and of large diameter, a slow-speed electric drill (drill) is usually used. The power tool passport usually indicates what drilling diameter in a particular material the drill is designed for. Considering the large drilling depth, it is better to choose a drill with a power reserve.
To drill holes in the timber, it is convenient to equip the drill with a stop, as shown in the figure.
 The stop block is attached to the drill with steel clamps.
 An emphasis, in the form of a wooden bar, is attached to the drill, for example, with clamps. The stop stops drilling at the required depth, but the rotation of the drill does not stop after that. Continuing to rotate in one place, the drill cleans the hole from chips, rubbing in and, then, easily gets out of the deep hole.
It is convenient to drill holes for connecting the crowns in a bar that is already installed on the wall in the design position on the inter-crown insulation. But here usually a problem arises - the inter-row gasket cannot be drilled. The fibers of the spacer material are simply wrapped around the drill and clamped.
You have to install the timber on the wall in two steps. First, the timber is mounted without a gasket and temporarily fixed against displacement, for example, with nails. Drill holes for pins. Then the timber is moved from the wall and the inter-crown insulation is laid.
At drilling sites the gasket is cut with a sharp knife... Then, the removed beam is put back in place, already on the gasket, and fixed with pins.
Drilling holes in the timber laid on the wall should be done while standing on a solid foundation - scaffolding, scaffolding, flooring. Standing on a narrow wall and drilling is dangerous. The drill can "bite", the powerful drill will turn around and easily throw the worker off the wall.
How to make a flat wall from a curved bar
In the timber brought to the construction site, some of the bars may turn out to be bent. The bar can have a curvature in one plane, or it can be twisted with a screw and become diamond-shaped in cross-section.
If possible, it is better not to use curved beams for the walls of a house or a bath. Bars with curvature are recommended to be cut into smaller pieces and used in other less critical places.
A small amount of beams with curvature in one plane can be used for wall mounting. You should not lay such a beam into the wall with a bulge up or down, in the hope that it will straighten under the weight of the house - the beam will not straighten, even if it is placed in the lower rims.
The curved beam is laid in the wall, straightening it in the horizontal plane as shown in the figure.
 The curved beam is straightened sequentially by fixing it with dowels
 A curved bar is drilled, aligning it at the drilling points with a straight bar. After laying the mezhventsovy insulation, the curved bar is fixed with a dowel at one end and unbending sequentially fixed with dowels at the other points.
To unbend the bar, no great effort is required. The lever and bracket will help to facilitate the work.
Mezhventsovaya gasket - insulation, seal
For the cold, a gasket is placed between the crowns. Previously, moss or linseed tow was used for this. Currently, there are special liners on the market based on flax or flax. The material is sold as a roll of tape 20 cm.
The strip of cushioning material is laid along the entire upper edge of the timber in two or three layers and fixed with staples using a construction stapler.
If the wall is not sheathed, then from the outer edge of the timber the gasket should be 1-2 cm. otherwise it will get wet.
Some craftsmen lay the cushioning material in one layer and suggest caulking the joints after shrinkage of the log house, adding additional material to the voids of the joints. In this version, we have a lower consumption of cushioning material.
The work of caulking the joints is quite laborious and tedious. It is better to immediately lay the sealant thicker, in several layers (three layers), in order to eliminate the need for caulking the horizontal joints.
How to control the correct assembly of a log house
In the process of building a house or a bath, it is necessary to regularly check the correctness of the assembly of a log house from a bar. To do this, it is enough to control the following five parameters:
- The verticality of the corners.
- Height of corners and walls.
- The horizontality of the rims and upper edges of the timber.
- The straightness of the walls.
- The quality of the installation of the mezhventsovy insulation.
For control of verticality of corners apply the following method.
 To control the verticality of the angle, a vertical line is drawn on each side of the crown. 1
- bottom strapping; 2
- crowns; 3
- control lines; 4
- base.
To control the verticality of the angle, a vertical line is drawn on each side of the crown. 1
- bottom strapping; 2
- crowns; 3
- control lines; 4
- base. A vertical line is drawn on each side of the crown at the same distance from the corner edge.
With the correct laying of the crowns, this line should be straight and coincide with the vertical. The verticality of the line is checked with a plumb line.
If deviations are found, then the work is suspended and the cause is eliminated.
The height of the corners and walls is measured tape measure. Measurement is taken from the base horizontal line, which is applied to the strapping beam using a water level.
Horizontal crowns and top edges the timber is checked by level.
Straightness of walls determine visually by pulling a cord along the wall.
The verticality and height of the corners should be checked especially carefully and constantly. Deviations from verticality are eliminated, up to the replacement of the bar in the crown. The height of the corners is adjusted by increasing the thickness of the spacer between the crowns in the settled corners. Sometimes it helps if you knock with a sledgehammer on a bar in a high corner.
The quality and thickness of the installation of the mezhventsovy insulation is checked visually by examining the walls.
Window and door openings in a log house
From the second crown, doorways begin to form. The distance from the floor level to the window is chosen within 70 - 90 cm.
Laying timber in the crowns in the area of the openings has its own characteristics.
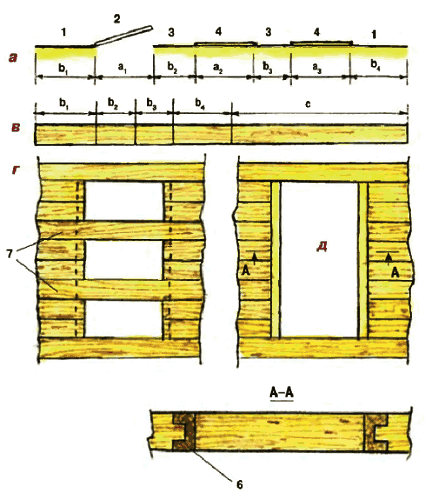 a
- layout of openings in the wall, where: 1
- wall; 2
- door opening; 3
- pier; 4
- window opening. v
- cutting diagram of a bar, where c is the remainder of the cut. G
- a variant of the device of an opening in a log house with the installation of temporary fastening beams, pos. 7. d
- the option with installation in the opening of the decks, pos. 6 - we immediately get the opening ready for the installation of a door or window.
a
- layout of openings in the wall, where: 1
- wall; 2
- door opening; 3
- pier; 4
- window opening. v
- cutting diagram of a bar, where c is the remainder of the cut. G
- a variant of the device of an opening in a log house with the installation of temporary fastening beams, pos. 7. d
- the option with installation in the opening of the decks, pos. 6 - we immediately get the opening ready for the installation of a door or window. In practice, two options are used for the formation of openings when assembling a log house.
One option is " G" on the image. The opening is done in a draft version, only preparation is made to create the opening. The opening is prepared for the installation of doors and windows not immediately during the assembly of the log house. This work is left for later - usually done after the shrinkage of the log house.
This option allows you to speed up the assembly of the log house. Beams must be installed in the opening, fastening the wall to the frame, pos. 7 in the figure. At least two such beams are installed in the doorway.
In the process of shrinkage of the log house, the walls can "take away" inward or outward. To prevent this, the timber in the walls is fastened with vertically installed boards.
In another version - “ d»In the picture, the openings are immediately prepared for the installation of doors and windows. For this, decks (windows) are installed in the openings - a vertical bar with a groove, pos. 6 in the figure. The groove includes the spike of the partition bar. In this way, the beam of the pier is fixed against displacement. In this version, the openings are immediately ready for the installation of doors and windows.
Decks (windows) traditionally serve not only to connect the timber in the opening, but also play the role of window slopes, window sills. To do this, they are carefully processed, curly chamfers are removed.
 Option for installing a window in a wall made of timber: 1 - finishing of window slopes; 2 - a board of a vertical window with a rail - a thorn, enters the groove of the wall bar; 3 - plastic window frame; 4 - PSUL sealing tape
 In modern conditions, when installing plastic windows and arranging plastic slopes and window sills, a deck (window) can be omitted. The bars in the opening are fastened like this. At the ends of the beams along the entire length of the opening, a vertical groove is cut out and a rail is inserted there, which fixes the beams of the pier from displacement.
The length of the deck (box) or slats should be 5-7 less than the opening height cm so as not to interfere with the shrinkage of the log house.
A bar for a house, a bath in your city
How to correctly install windows in a wall from a bar
If the opening in the wall was made in a rough version (see above), then the installation of the window begins with sawing out the opening to the desired size. To do this, a rail is stuffed along the border of the cut, pos. 2 in the figure, and the bars are sawn off with a chain saw along the edge of the rail.
 Correct installation of the window in the timber wall. 1
- wall; 2
- rail; 3
- platband; 4
- window; 5
- window box; 6
- wall timber above the window; 7
- mezhventsovy insulation; 8
- shrinkage gap over the window and deck; 9
- window frames; 10
- wall timber (wall); 11
- deck; 12
- nail.
Correct installation of the window in the timber wall. 1
- wall; 2
- rail; 3
- platband; 4
- window; 5
- window box; 6
- wall timber above the window; 7
- mezhventsovy insulation; 8
- shrinkage gap over the window and deck; 9
- window frames; 10
- wall timber (wall); 11
- deck; 12
- nail. Then, with a circular saw, spikes are cut out at the ends of the beams of the wall (wall). On the spikes, pos. 10, a deck is inserted with a groove, pos. 11. The joints are sealed with insulation. The deck is nailed to the wall beam with nails driven in at an angle, pos. 12. So the nails will not interfere with the shrinkage of the log house.
A window box is inserted into the opening prepared in this way, which is attached to the deck with self-tapping screws. Above the window frame be sure to leave a gap, pos. 8, to compensate for the shrinkage of the log house... Gap size 5-7 cm. The gap is filled with a soft insulating material.
The expansion gap must also be left above the top end of the deck.
In a similar way, openings are prepared and inserted into the walls from the timber of the door.
After the completion of the assembly of the first floor of the house, the blockhouse is covered with beams of interfloor or attic (if the structure is one-story) overlap.
They can be a structural element. And they can also perform an independent function.
The next page describes the construction of a broken roof of a house made of timber, where the floor beams simultaneously serve as an element of the load-bearing frame of the attic roof.
Watch the video clip, which describes and shows in some detail the technology of installing a log house from a building bar.
When building a house with your own hands using a bar, you need to know almost everything about how to attach a bar to a bar. Here are the most basic mounting methods:
- Bottom harness.
- Vertical fastening of the frame racks.
- Top harness.
- Corner posts, not corner posts.
- Fastening with corners.
- Fastening the timber by cutting.
- Strengthening the frame.
- Fastening of ceiling beams.
Before starting work with a bar, you must make sure that all materials and the territory where the construction will take place are prepared.
Features of working with a bar
- the timber for the frame must be dry, if it is not dry, then after installation, the frame is immediately sheathed from the OSB timber;
- treat all material with a special antiseptic;
- prepare the necessary fasteners in advance;
- before purchasing a timber, be sure to accurately calculate the required size of the sheathing frame, if this is not done, then with an increase in the thickness (unplanned), small details will need to be added to the frame, which is not a good start when building a frame base.
The lower strapping with a bar is made according to the principle of laying on a grillage (roofing material is pre-laid).
Before strapping, it is imperative to cover the foundation with roofing material (a cheap one is suitable) or a film, otherwise the timber will be damaged (when the construction site has been frozen for several months).

If there is no roofing material, you can cover the foundation with a regular film that will protect the concrete from moisture and the formation of concrete milk. When the foundation is ready for laying the timber, check the plane of the grillage with a level to make sure it is perfectly flat. On this surface, a beam is applied, which is necessary for the lower strapping, while the beams are joined by the sampling method at the corners.

The selection can be in half a tree or in a paw. The half-tree option implies an even cut in half the thickness of the bar (for connection with another bar). The option of fastening to the paw implies a cut at an angle of 45% from the middle of the bar to the lower end (or the upper one, depending on where one of the bars will be when fastening).

When fastening a bar according to the principle of angular fixation, one of the options is used:
- anchor connection;
- fastening with nails 150mm;
- fastening with a wooden dowel.

The dowel should be made of dried oak, with a protrusion 6-8 cm above the surface of the timber, the diameter of the dowel is always equal to the diameter of the hole for fastening. Before fastening, the bars are checked: they must be equal diagonally and at the corners.
With the lower strapping, the timber is attached to the foundation using nuts with wide washers. The washer improves anchoring to the foundation because it increases the adhesion plane of the two surfaces. The nut is selected on a turnkey basis - hex, other options are not suitable.

When the bars of the lower harness are connected with nails or dowels, the corner anchor is not required. If the corners were fixed differently, without a dowel or nails, then the first anchor is attached to the corner at the place where the beams join.
The vertical posts of the frame structure are installed after the process of lower strapping of the beams is completed. When working on installing the racks, start with the corner frames.
Mounting options

- If the bottom rail is on nails or anchors, then the corner post is attached using a steel corner.
- After attaching the lower harness with a dowel, put on the corner posts on the left 6-8 cm outlets.

Fixation of non-corner posts is done in two ways: by punching, steel corners. The corners hold the structure more reliably, they have only one drawback - the cost. The corners themselves are attached to the timber using self-tapping screws. The punching method involves fastening with a special recess, having a depth of 50% of the thickness of the lower strapping. Example: If the timber is 80 mm thick, then the cutting depth will be 40 mm.

Non-corner racks must be fastened with jibs that hold the structure and prevent it from loosening. Jibs are needed until the upper strapping of the structure with beams is made, after which the jibs can be removed.

It is more convenient to join the beams of the upper strapping at a clearing or using corners made of galvanized steel. If the cutting method is chosen, then it is necessary to make precise markings for cutting for each vertically installed beam (rack). The grooves of the upper strapping must coincide with the grooves of the lower strapping, otherwise you will get a skewed structure, which will gradually fall apart by itself.
Video
How to prepare the joints of the timber, see below:
Recently, the fashion for the construction of houses from logs or timber has returned. Such a house has the scent of a forest, it is easy to breathe in it, and the person living in it becomes a part of the surrounding nature.
A wooden profile beam is considered one of the versatile and ecological materials that is used in the construction of houses, gazebos, baths in personal plots. It is carefully processed and has special chamfers, in the form of corner cuts, with the help of which the beams quickly and reliably fold into the overall structure of the frame.
Construction from a bar does not require huge costs, the assembly of the house takes place with great precision, since the products are made on professional factory machines. The material is made from natural spruce, pine, cedar or larch without adding glue, so that there will be no poisonous fumes in the built house.
Building advantages
- Environmentally friendly, using only natural materials.
- Low thermal conductivity, keeping heat in the house, which contributes to energy savings, and with current fuel prices this is of great importance.
- In summer, the house made of timber is cool and comfortable.
- The construction is relatively light, does not require a massive stone foundation.
- Compared to rounded logs, it takes much less material to build a house from a profiled bar, and this is a good savings in money.
- If we compare it with laminated veneer lumber, then the cost of a profiled beam is two times cheaper, there is no poisonous fumes;
- The shrinkage of such wood is minimal, few cracks form on the sides, which do not require caulking later.
- Nice and neat appearance.
- The assembly of the frame is quite fast.
- The profile is designed so that moisture does not get into the mezhventsovy heater, which is a natural linen.
Cons of such a house
The most important disadvantage is the duration of the shrinkage of the constructed frame. This can take several seasons, only after that you can cover the building with a roof. However, shrinkage of timber takes less time than shrinkage of rounded logs. If the owners are in a hurry, you can buy laminated veneer lumber, but the fumes from the glue can affect your health, especially if an allergic person lives in the house.
When building from a bar, it is required to impregnate the wood with fire retardants under pressure, then the wood will be protected from the effects of fungi, mold and insect penetration.
Mounting on staples
When building a house, you can use different fixings of a bar to a bar. The easiest option is considered to be the connection of wooden parts with simple staples, butt-to-joint. A minimum of time is spent, but this method has its drawbacks. Significant gaps are formed in the corners of the structure, which will then have to be repaired, caulking the corners.

You will also need to purchase a large number of connecting brackets and corners of various configurations. This is also an extra cost, and the appearance of wooden bars deteriorates - not every owner wants to contemplate fasteners made of metal. So the choice of attaching a bar to a bar with corners is a matter of taste.
Half-tree mount
This method of fastening involves cutting grooves in a special way on two connected beams. Still such cuts are called "in the paw". In this type of mounts, it is important to make correct and accurate measurements in order to avoid gaps. If everything is done correctly, you will get a perfect gash, leaving no gap during assembly.

This type of connection is placed in several initial rows immediately on the foundation, even if then other fastenings of the bar to the bar are used.
Dovetail
One of the most reliable and strong connections is considered "dovetail" or "warm corner". In the bar, on one side, a trapezoid-shaped groove is cut out, resembling a swallow's tail, and on the bar on the other side, a thorn is cut out, where the edge of the first bar will be tightly inserted. It is not easy to assemble such a structure, professional carpenters cope with such work, but the connection turns out to be very warm, especially if it is used at the corners of the house.

The bond turns out to be closed on all sides and the wind does not blow in the cracks, therefore it was given such a second name. The work of laying the beams using this method is laborious, but the result exceeds all expectations, therefore it is this type of fastening that is considered the leader in the construction of wooden houses.
Installation methods
In order for the individual structural elements to be connected firmly, you need to use additional installation tools. These are nails and bolts, metal and wooden pins, wood grouses and corners, staples and wooden spikes. Each method has its own characteristics. Using metal assembly means of connection, you need to take care of the impregnation of the metal so that later inevitable corrosion does not appear on the tree, for example, when fastening a bar to a bar with bolts.
When installing the first row on the foundation, anchor bolts are used, mounting the beam to the T-shaped head. Before laying out the initial level, you need to have wooden parts that are well dried and soaked in an antiseptic. The crown layer should be the basis for the whole house so that the frame does not deform.

In the joints of the castle, especially at the corners of the house, it is recommended to use wooden pins. For them, a hole is drilled in the middle of attaching the bar to the bar, and a round wooden bar is hammered close with a mallet. This type of installation is suitable for both straight and oblique joint corners.

The pins are made of strong wood, so that the assembled structure will be very durable. They are hammered in clearly perpendicularly in a staggered manner at a distance of 1 or 1.5 m. When driving in, a gap is left so that during shrinkage the pressure on the crown does not lead to the formation of cracks. The standard diameter of the dowel is 25-55 mm. Its length is selected after measuring two rows of beams. Nagels are both round and square. When assembling a house, pins are selected that match the color of the main wood, then they will not be noticeable to the eye at all.
The use of wood grouses
Capercaillie is a metal rod with an external thread. The head is a square or hexagon. After screwing into wooden beams, wood grouses form an internal thread there. They are taken in cases where significant pressure is exerted on the products fastened in this way. Such joints can withstand enormous loads much stronger than any screw.

When installing such products, a hole is drilled that is smaller than the diameter of the wood grouse, up to about 70%. The length of the hole should be slightly longer so that the rod does not break when pressed, especially when it comes to hard woods. Screw them with a wrench into the wood itself or into a dowel. The fastening of the timber to the timber by wood grouses is very strong and reliable.
Installation of vertical parts
The vertical struts of the building frame are installed in several different ways:
1. With staples (as shown in the photo).
2. Strapping with a cut (full or half bar).
3. Metal corners.
4. Corner posts (bevels).
Fastening the timber to the timber vertically must be perpendicular and stable so that the frame of the house has a solid foundation.

The full cut connects the parts using a cut to half the thickness of the lower beam. Its width corresponds to the thickness of the vertical post. If the connection is in half, then a cut is made on horizontal and vertical beams.
Less effort is expended when installing uprights using metal corners. You do not need to make many cuts, measure their accuracy. But you will have to spend a certain amount on the purchase of corners.
Splicing a bar
The need for longitudinal connection of parts appears when the size of the room exceeds 6 meters. Snapping is performed in different ways of cutting joints. They do it in turn, first on one side of the row, and in the next row they tie the bars on the other side. So it alternates constantly. From a staggered tie, the stability and strength of the wall will be better, and the appearance will be more aesthetically pleasing.

Whatever form the joint is used, it should be perfectly flat, soaked in an antiseptic and slightly dried. When joining parts, do not forget about flax fiber insulation. Severely overdried parts can subsequently form gaps.
When building from a profiled beam, the best connections will be an oblique lock, as in the photo, and a tie in a tenon. If you do the work diligently, then the house will turn out to be not only reliable, but also outwardly very attractive.