You can make a rocking chair with your own hands. To do this you will need a drawing of a plywood rocking chair. Plywood is best suited for such a product due to its ductility. Using an electric jigsaw, you can make a design that combines two important elements of the product at once - the sides and runners. The strength of a plywood product can be increased by choosing a design without joints.
- Electric jigsaw.
- Screwdriver.
- Plywood sheet, the thickness of which will be more than 15 mm.
- Slats made of oak or pine with a section of 1 by 5 cm (20-30 pieces).
- Self-tapping screws whose dimensions are equal to the length of the slats.
After this, you need to prepare a pattern and transfer the image onto plywood, which is cut out with an electric jigsaw.
DIY drawings of plywood rocking chairs give free rein to your imagination. Beginner carpenters need to pay close attention to such a complex material as plywood. The chair parts are glued in three layers, and using an electric jigsaw you can make precise and strong connections.
You need to remember that plywood sheets for the middle layer should be taken twice as thick as for the outer layer. Thus, if the total thickness is 2 cm, then you need to glue 0.5-1-0.5 cm. In this case, the parts are assembled exclusively using waterproof glue. If you use PVA glue in the process of creating a chair from plywood, you will also need to secure it with nails. The joints are glued and secured with screws on both sides. In this case, the supporting surfaces must be protected by layers of thin lath or rubber.
It is worth making a rocking chair from plywood for the reason that it is a pliable material with which you can implement any technical solutions, even the most daring ones. For example, it becomes possible to make a shell chair.

Rocking chair in the shape of a hemisphere
The convenience of such a product cannot be denied - it is high and stable. You can use it to make a hanging hammock or swing. Please note that the thickness of the sand boards should be more than 1.2 cm, and the connecting half-washers should be more than 2.4 cm. Do not forget to saturate the finished wooden chair with a water-polymer emulsion or liquid acrylic varnish. This is necessary in order to give strength to the product, as well as relieve residual stress on bent parts and joints.
The process of creating a chair
The process of creating a rocking chair from plywood with your own hands is as follows:
Step 1
We develop a diagram and prepare patterns. To do this, you need to redraw the drawing onto thick cardboard and cut out the silhouette of the chair fragments. Armed with a pencil, we mark the patterns on plywood sheets.
Step 2
We take an electric jigsaw and carefully cut out the elements of the future rocking chair made from solid wood. The sidewalls, two racks, support arrays and planks are sawn from the densest fragment. Now we need to create a cross member and a strip, the dimensions of which are 50 by 40 cm. To create seventeen planks and fifteen cross members, we will need a sheet 1 cm thick.
Step 3
We find a thin sheet and cut elements in the shape of squares for the seat and back. Don't forget to clean the elements with sandpaper. The finished transverse elements are glued to the thin part of the seat and back. All parts are carefully varnished and, if desired, can be treated with a coloring compound.
Step 4
After all the wooden elements have dried, they are assembled into a single whole. Don’t forget to drill holes in advance for the fasteners, the heads of which will be hidden under special plugs.
Step 5
In order to make room for your feet, you can use an unnecessary holder from a rake or shovel. In total, the length of the structure will be 53 cm.
How to make chair covers
Now that you know how to make a rocking chair with your own hands, let's move on to the overlays. We turn the product over with the runners up and warm up the pre-prepared strip with a construction hairdryer. We place the finished swinging bar on the runner and securely wrap it along the entire length with cotton cloth. Be careful not to get burned on the hot chipboard. After the wooden rocking chair has cooled, remove the fabric and glue the linings using PVA glue. At the same time, we fix the ends with small nails. We recommend placing small beams, pieces of plywood or washers under the nail heads. We remove this temporary fastener after the timber chair is completely dry from the glue. We drill blind holes for fastenings and fix the ends. Please note that the pads for a chair that rocks are attached using metal hardware only at the ends. This will avoid scratching the floor when washing the pads. DIY rocking chairs are ready.
Another option for assembling a chair

Photo of the design - rocking chairs made of wood Material for work
For those who did not like the first option, the following scheme is suitable. Note that the video will help you understand how to make a chair from bent plywood yourself.
First, prepare the diagrams - you can create them yourself, or you can find them on the Internet. Schemes are necessary in order to avoid errors during the work process. Drawings are processed on graph paper. Don't forget that the scale should be 1 to 1. When working, rely on the photo of the chair that you want to get in the end. The drawing is transferred point by point, and the parts of the made chair are laid out in such a way that the plywood board is used to the maximum.
All elements are cut out with a jigsaw.

Cutting out rocking elements
Now you can assemble a wooden chair with your own hands. The finished elements are twisted with self-tapping screws, which should not stick out.

Build process
Elements can also be fastened with tenon joints. The screw caps are hidden under the plugs. As you can see, a rocking chair can be made with your own hands from wood. This will require a minimum of money and effort from you.
Schemes and drawings of rocking chairs:
Drawing 1 Drawing 2 Drawing 3
Drawing 4 Drawing 5 Drawing 6
Drawing 7 Drawing 8
Drawing 10 Drawing 11 Drawing 12
Drawing 13 Drawing 14 Drawing 15
Drawing 16 Drawing 17 Drawing 18
Drawing 19 Drawing 20 Drawing 21
Drawing 22 Drawing 23 Drawing 24
Drawing 26 Drawing 27
A homemade rocking chair will cost many craftsmen less than a store-bought product. Self-made furniture will be of higher quality and more environmentally friendly; you can think through your own design and construction concept. A rocking chair will be a successful addition to the interior design of a room, a device that will calm you down, give you a good mood for work, and relax you. This product will also become indispensable when rocking a child. For the baby himself, such a chair is a real swing.
If a person has nothing to do with carpentry, then a natural question arises: how to make a rocking chair with your own hands? Initially, you should decide on the type of rocking chair; there are several of them. There are different types regarding design features:
- A rocking chair that has radius runners. This model is classic and most popular. It has a low landing, since on rounded “radii” it is very difficult to maintain balance when swinging.
- Chair with runners of variable curvature. In this case, the “radii” do not represent part of the roundness, which means the swing can have a large amplitude. In this case, use will be safer and more comfortable.
- Armchair nirvana. There are two subtypes: elliptical and spring. The first is considered unsafe, as capsizing often occurs, but the swing is soft and smooth. Spring models are more suitable for widespread use, but making a rocking chair with your own hands such an upgrade requires skill and experience.
- Rocking chairs 3 in 1. All three modes are presented here: chair, rocking chair, lounger. Depending on the degree of reclining of the structure, the position of the body is determined. Multifunctional furniture, but large in size.
The presented design options can be made from almost any material: wood, metal, wicker, rattan. The seat can be hard, soft or a combination. Materials can be combined, and in some models it is even necessary. Thanks to photos on the Internet, you can choose the product model you like.
Wicker model
Making furniture from wicker or rattan with your own hands is quite difficult. Rattan is an expensive material, but a product made from it has a long service life, and the body is more resistant to mechanical stress. The same cannot be said about the vine, but it is more accessible and pliable to work with.
To create original wicker furniture, you can watch the master class. Such instructions will be quite sufficient to implement the project. First, the material is prepared:
1. Rattan cannot be collected by yourself - it is a tough vine that grows in certain areas of America. The vine is harvested independently: branches are collected throughout the year. Length and thickness may vary. When the vine is collected, it is placed vertically outside to dry.
2. Processing of rods involves stripping. The branches are placed in a bath of warm water, where the material should spend about 12 hours. The branches will become elastic. When each twig bends well, you can remove the bark from them.
3. To continue working, you need to give each element the appropriate form. Thick branches are fixed in clamps in the appropriate position, and thin branches are divided into several parts, called shreds, using a splitter.
4. Each shank must be passed through a press so that they become flat and suitable for weaving.
5. The prepared vine is placed in a dryer for three days, where the shape of each element of the future product is permanently fixed. Only from such a vine can a rocking chair be made.
The next stage will be the manufacturing itself:
1. First, a frame is made from thick branches or wooden planks. The sizes are determined independently. All parts are fixed with nails or wire. The item is placed in the dryer for several days.
 The frame is being made
 2. Braiding consists of covering the back and seat with tires. Furniture glue is applied to the body, which will serve as an additional connection. The shanks themselves braid the sheathing rods in a checkerboard pattern.
 We braid the back and seat
 3. When the body is ready, the runners are attached and the product is tested. The chair needs to be slightly rocked; if this process proceeds easily, and the chair itself does not tip over when rocked, then the center of gravity is determined correctly.
4. The last step is to open the vine with furniture varnish.
The made rocking chair can be used in the country house, veranda, balcony, garden, hallway. In addition to the positive feelings while using this piece of furniture, this element will become a wonderful authentic design decoration.
On video: making a fully wicker rocking chair
Wooden rocking chair
Making a rocking chair from wood with your own hands is quite simple, the main thing is to make the appropriate preparation. If this is the first time such work is being done, a master class will help with this. . First we prepare the tools:
- wood hacksaws, jigsaw;
- sanding machine or sandpaper;
- screwdriver;
- set of drills;
- measuring tape;
- hammer;
- putty knife;
- level;
- construction corner;
- brushes, pencil.
Preparation of the material is also important. A wooden rocking chair is made partly from plywood. It is better to choose the remaining wooden parts from an elastic material. It would be great if it were flannel.
After collecting tools and material, you can begin to work. Initially, a drawing of a rocking chair is made in accordance with the parameters of the future product. The diagram is an exact copy, but on a reduced scale:
1. You need to cut out the side elements from plywood with your own hands, which are semicircular bases with grooves for flannel. A jigsaw, wood saws and a sander will come in handy here.
 Making the sides
 2. Flannels are prepared; you can make them from plywood with your own hands, but provided that the plywood is at least 30 millimeters thick and flexible in its base.
 We make flannels
 3. The side parts made of plywood are connected to each other using 30x50x600 mm bars. Crossbars (flannels) are attached to the frame from above using a screwdriver at a distance of 2-3 cm from each other.
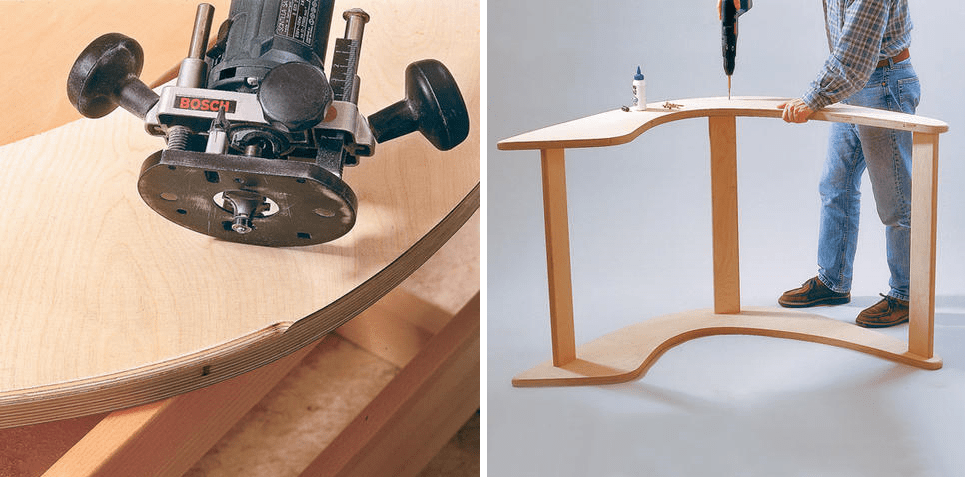 Assembling the structure
 4. We attach the flannel to the frame; for this we use a screwdriver.
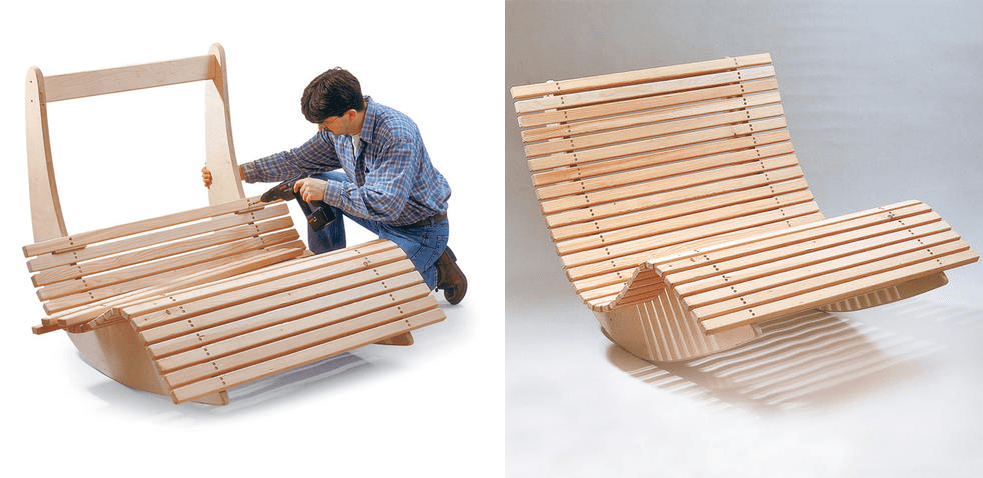 Screw the flannel to the frame
 5. The plywood rocking chair is awaiting finishing. Places where flannel is attached to the sidewalls are covered with putty. When the putty has dried, you can coat the product with wood varnish.
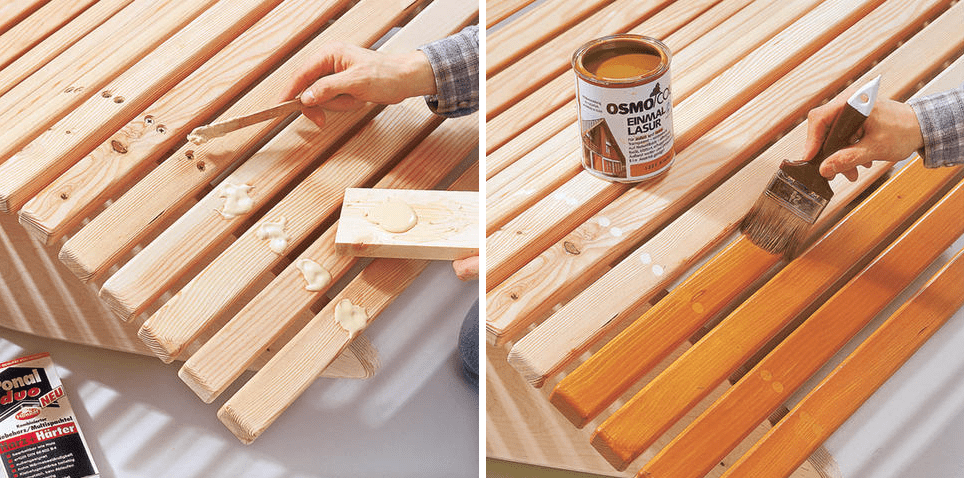 Finishing
 A rocking chair made of plywood can be additionally equipped with other elements. For example, you can make the seat soft. To do this, a foam rubber base is laid on a wooden base, on top of which the fabric is laid.
On video: how to make a rocking chair out of wood.
Metal chair
There is another class of product - metal rocking chairs. Not every master will be able to make such a design, since this requires more serious equipment and skill. Although, it’s worth trying to make a rocking chair out of metal with your own hands. This can be done by looking at the photos, or by watching the master class.
To work we need the following components:
- steel rods;
- galvanizing;
- steel corners;
- welding machine;
- drill with special drills;
- Bulgarian.
Often, arcs for runners are made from a profile pipe, and corners are cut from the profile itself, which will serve as fasteners. From a profiled metal sheet you can make all the necessary elements to create such a structure:
1. First, drawings are made according to the product design. To do this, you can take a ready-made chair and transfer this sketch, but also think about a way to attach the rounded runners.
2. Steel rods are cut into 1 meter lengths. After this, the frame is welded, to which the rods will be welded. The distance between them is about 1 centimeter. The metal curls into an oval.
3. After this, the master must attach the seat to the oval base. The seat itself is made of galvanized steel. Fastening is carried out using bolts, and holes for them are made using a drill.
4. The final stage will be painting and sanding the sharp parts.
If we compare the operating conditions of wicker, metal and wooden furniture, then the most universal option is wicker. It does not damage the floor surface, is easy to move, and can be used in any room or outdoors.
You can decorate such a piece of furniture with textiles, in particular decorative pillows, quilted bedspreads, and warm blankets. Thus, a note of comfort and coziness is introduced into the overall idea.
Most people associate a rocking chair with home comfort, rest, and relaxation. Sitting in it, it’s nice to drink a cup of coffee, read a book or dream by the fireplace, covered with a blanket, on a long winter evening. Regular rocking calms, relaxes, and gives peace. It’s not for nothing that everyone loves to swing so much even on ordinary chairs, often breaking them. But it is not always possible to purchase rocking chairs - they are not cheap. In this case, you can make the item yourself.
Types of rocking chairs
There are a great variety of rocking chairs. They differ in design, scope of application, material of manufacture and upholstery, design.
Type of design
Rocking chairs can be divided into the following types according to the type of structure.
- On simple radius runners - skis, rocker arms, arcs. These chairs were the first to appear and are still in use today. They are easy to manufacture, but have a drawback - the risk of tipping over when strongly rocked. In this regard, they are made with a low landing so that the center of the generating circle is greater than the center of gravity. There are also varieties with a closing horizontal arc. This model requires the construction of individual drawings taking into account the height and weight of the person for whom it is intended.
- On runners of variable curvature. They have no risk of capsizing. Thanks to their length, when tilted back, they prevent the chair from falling, and when tilted forward, they simply push the person out of the seat. When making this model, it is better to use a ready-made drawing, since the process of its construction is quite complicated.
- On elliptical skids. They swing very softly. They are often equipped with bumpers at the rear, a step at the front, or springs. It is not possible to make a model on springs at home; this requires special types of wood or a rubberized metal strip.
- Glider - sliding rocking chair. Unlike previous designs, its base remains stationary. It swings due to the installed pendulum mechanism. This piece of furniture is a difficult option for a novice craftsman.
- Vanka-vstanka is a garden tumbler chair. Does not lose stability in any position. This is due to the fact that the seat is also runners. If you lean back too much, the chair will move to an almost horizontal position, but will not turn over, and with a little effort it will return to its original position. It is quite difficult to construct a drawing of such a chair, but you can use a ready-made one.
Options for rocking chairs depending on the structure - photo gallery
The classic rocking chair has the main disadvantage - the risk of tipping over when strongly rocked  Elliptical bars provide smooth swinging
  On runners of variable curvature there is no risk of tipping over
  The glider chair will not leave marks of scuff marks on the floor in your home.
  The Vanka-Vstanka rocking chair does not lose stability in any position, and from the side it resembles a person lying down
Glider - the ideal chair for young mothers - video
Variety of materials
The following materials can be used in the manufacture of rocking chairs.
- Tree. Conifers, oak and larch are suitable for this. The craftsman will need experience in wood carpentry and knowledge of how to connect parts.
- Plywood. The best option for a novice craftsman would be plywood. Working with it will require a minimum of skills and tools; all parts can be cut out with jigsaws.
- Vine and rattan. It is better not to take on the job without the skills to work with these materials. You will need skills in proper harvesting, drying and processing of vines, as well as weaving skills. In addition, it is worth considering that the rattan palm does not grow in Russia; its homeland is Indonesia and the Philippines.
- Metal. Products made from it are durable, strong, but heavy. To work with this material, you need special welding or forging skills, as well as pipe bending equipment if the chair is made from pipes. As a rule, the frame is made of metal, and the seat is made of wood. Such a chair in an apartment can damage the floor, and it looks more appropriate in a country house or country house.
- Profile pipes. Suitable for making elliptical arches. This material, like any metal, also requires welding skills.
- Plastic pipes. Lightweight, durable, easy to work with. You only need fittings and a blowtorch. Moreover, the cost of such a product is low.
Types of materials for making rocking chairs - gallery
 Plywood is suitable for making a chair by a novice craftsman
  The rattan palm does not grow in our country, its homeland is Indonesia and the Philippines
  To work with metal, you need welding or forging skills
  Polypropylene pipes are light, durable, and easy to work with.
  Conifers, oak and larch are the most popular materials for making rocking chairs
  To make products from wicker you will need special skills
Application options
Depending on the place of use, rocking chairs are divided into items for home or outdoor use. If you plan to use the product outdoors (dacha, garden), keep in mind that the material will be affected by sunlight, precipitation, and air temperature.
Metal is not afraid of changes in humidity. It only needs to be treated with an anti-corrosion compound. Due to its heavy weight, it is better to place this chair on a stone base. It will push through loose soil or a wooden podium. The best option for the street is a metal product with a wooden seat or with removable cushions.
Wooden chairs must be treated with a waterproof coating. This must be done especially carefully if the product is made of plywood. Before assembly, hot drying oil is applied to the ends of the parts, and then they are slightly flattened with a hammer so that moisture does not penetrate inside. After this procedure, the elements are coated twice with waterproof varnish.
Wooden rocking chairs should not be kept outdoors all the time. Otherwise, the product may lose its original appearance.
The most successful outdoor option are plastic chairs. They do not rot, are not afraid of the sun and wind, and do not require protective coating. Such products are durable and lightweight, they can be moved to any place if necessary.
You should not use upholstered chairs outdoors; it is better to cover them with a blanket or place removable pillows. The upholstery will get wet in the rain and deteriorate.
“Street” seating options - gallery
 A chair made of plywood and wooden planks is the simplest option for a novice craftsman
  A plywood chair with a roof will save you from sunburn
  The rocking sofa can accommodate several people at once
  Plastic pipes are a fairly inexpensive material; even a beginner can make a rocking chair out of it.
How to make a rocking chair with your own hands
Things made with your own hands carry a completely different energy than purchased ones. When making them, you can make any of your wishes come true. Making a rocking chair is not difficult; even a beginner can cope with this task. You need to be patient and follow the step-by-step instructions exactly.
Types of handmade chairs from various materials - gallery
 You can cut a chair of absolutely any shape from plywood.
  The presence of a footrest creates a greater relaxing effect
  A chair covered with threads will surprise your guests
  A wooden chair with soft upholstery will help you relax after a hard day
  An armchair made from natural materials is suitable for an eco-style interior
  This original rocking chair will decorate your country house
  Pipes can serve as the basis for a future chair
  A wrought-iron rocking chair will look natural on your summer cottage
  Knitted elements in interior items create a homely atmosphere
  A pipe and a tree will always be found on the farm. You can easily make a country rocking chair from this material
We turn the most ordinary chair into a rocking chair
The easiest option to get a rocking chair quickly and inexpensively is to make it from an old but strong chair or armchair. You only need to make a couple of runners. To ensure structural stability and prevent tipping, the center of gravity must be shifted downward. To do this, the legs need to be filed under the arches on which the chair or armchair will later be attached.
How to make runners from solid wood - video
Instructions for making a vanka-stanka
To make this chair yourself, it is better to use plywood. You can construct a drawing by making calculations yourself, or use a ready-made diagram.
Preparing tools and materials
Before starting work, you need to prepare materials and tools. You may need:
- electric jigsaw with wood files;
- disc sander with a set of attachments of various grain sizes;
- screwdriver or drill;
- hammer;
- brush;
- sheet of plywood 20-30 mm thick;
- 50x25 mm block for cladding;
- 3 connecting bars 30x50 mm;
- self-tapping screws or confirmants;
- wood glue;
- wood antiseptic;
- primer or drying oil;
- dye;
- roulette;
- pencil;
- graph paper.
Now you have everything you need. Before proceeding to the next step, treat the plywood sheet with an antiseptic. While you are working on the drawing, it will dry.
Drawing a diagram
The design of the vanka-stand does not require taking into account the individual parameters of future users. If you wish, you can make amendments to the finished diagram. For example, if necessary, such a chair can be made double. Thus, we will assume that you have the drawing.
We transfer it to graph paper, and then to thick paper in the full size of the parts. We cut out the patterns and draw out the sides. We will make them from plywood, fasteners from bars, sheathing from slats.
Both sidewalls must be absolutely identical, there must be no bulges or irregularities on the swinging surface, the line must be smooth!
We make parts
Using an electric jigsaw, he cuts out sidewalls from plywood and connecting drawers from bars. The best connection between the parts of the chair is a tenon connection. If the drawing provides for it, we make tenons and cuts for them in the sidewalls. We cut the facing strip from the slats. To ensure that there are as few scraps as possible, when choosing slats, ensure that their dimensions are a multiple of the finished plank. If you have any leftovers, keep them, they will be useful to you when the product needs to be repaired.
We sand all the parts, grind them, and then chamfer them. We process the ends especially carefully. We lightly break their fibers with a hammer so that moisture does not penetrate into them. All elements must be primed and painted, the ends - twice.
Assembling the chair
We connect the sidewalls with drawer bars. If you have a tenon joint, then insert the tenons into the cuts under them, having previously coated them with wood glue. If not, then we mark the joints on the sidewalls, make holes with an 8 mm drill, and at the ends of the bars - 5 mm. We tighten it with the help of confirmants - euroscrews.
Now all that remains is to attach the facing strips. In order for them to lie flat, they must first be marked. Each board should have 4 marks, that is, 2 on each side. To make the work easier, you can make a template from a piece of slats by drilling 2 holes in it, then the work will go much faster.
To prevent the planks from cracking when fastening, drill holes along the marks with a thin drill and screw them to the side with self-tapping screws. The distance between the slats should be 15 mm.
Cover the product with primer and paint. The rocking chair is ready, you can enjoy it.
Video on making a rocking chair from plywood
Making a rocking sofa
Using the basics of making a Vanka-Vstanka chair, you can make a rocking sofa. In this case, you will need three side panels.
This light and comfortable chair is suitable for both home and garden. The seat and back can be braided with leather strips, colored cord, or simply stretched with durable fabric.
Photo of making a chair on radius arcs
 First make a drawing
  Prepare all the details of the future chair, mark the places where the elements will be attached
  Assemble the chair according to the diagram presented
Making a chair out of wood
Wood is a more complex material than plywood. There are several options for drawings of wooden rocking chairs.
The product can be without armrests and have a back that follows the curves of the back.
If you do not have sufficient woodworking skills, you can make a chair whose elements are straight lines. The only exception will be arcs.
The procedure for making such a chair is the same as for the plywood model.
- We make drawings and patterns.
- We cut out the material. A board of 3000x200x40 mm will be used for the runners, and a board of 3000x100x20 mm will be used for the remaining parts.
- We sand and polish.
- We prime and paint all the elements.
- We mark the joints of the parts and drill holes for the bolts.
- We do the assembly.
- We put a soft pillow and swing.
How to make a rocking chair out of wood for a child - video
We use a pendulum mechanism in the manufacture of a glider
To make such a chair, you need to have good drawings. Although, there are craftsmen who build them themselves, taking dimensions from factory products. The pendulum mechanism is assembled on ball bearings. This applies to both metal and wooden structures. The seat should not be attached to the base, but suspended from it. This allows the chair to swing in a horizontal plane.
How to make a metal pendulum chair - video
Making a wicker chair from wicker
Wicker products are widely popular. If you know how to weave from wicker, you can make such a chair at home. However, the process of making it is quite long and requires patience and effort.
It should be noted that a wicker chair should be comfortable and durable. Its flexibility is achieved due to the vine, which is also an environmentally friendly material.
We use plastic pipes to simulate the sound of the sea - video
We make a chair from metal “like wicker”
If you know how to forge products, then it will not be difficult for you to make a rocking chair from metal. It can also be made by welding from a profile pipe, preferably an elliptical section. The seat, back and braid of the armrests can be made from ropes, belts or strips of fabric.
A simple metal chair for a summer cottage - video
If one person managed to create something, then another will certainly be able to repeat it. All you need is desire and strict adherence to instructions. And it’s not so important what your chair is made of. If you put your soul into your work, the result will bring joy.
After a working day, every person wants to rest and relax thoroughly. Comfortable furniture helps with this. A homemade rocking chair with your own hands will help you save significant financial resources and create comfortable and practical furniture that meets your personal needs. For many masters, the opportunity to demonstrate their skills and show off their abilities to guests is important.
Before starting work, you need to familiarize yourself with possible design options, operating features, and evaluate your strengths in carpentry or plumbing.
Signs by which you can classify hand-made rocking chairs:
- For apartments, private houses, street. The option for apartment buildings should be silent, small in size, and marks on the floor from the rocking chair are unacceptable. In this case, you can make a pendulum rocking chair with your own hands. In private homes, any size is allowed that fits the overall design of the room. The main requirement for a garden look is resistance to weathering.
- Material of manufacture: classic wood, avant-garde metal or plastic for the street.
- Permitted weight, which must correspond to the weight of the user.
- Structural solutions.

In the interior of the apartment

For a private home

For the street

Wooden classic

On a metal frame

Made of plastic
The first three points are easy to determine, but the fourth should be dealt with in more detail.
Rocking chairs made of wood on radius runners are the easiest option to manufacture. The simplicity of the profile of the arcs (skis, rocker arms) makes the rocking smooth, but in this case you cannot get a large amplitude. Tipping is prevented by a low center of gravity of the seat, installation of restrictive crossbars or cutouts along the edges of the runners.
A rocking chair made from a profile pipe often has skis of variable curvature - with a smaller radius in the center and a larger one at the edges. This design prevents tipping over at large amplitudes. The “nirvana” profile promotes a smooth rise from the chair, which is especially important for older people.
A DIY plywood rocking chair can be made with ellipse-shaped sides, which promotes smoothness, but does not protect against tipping over at maximum deflection. To prevent “accidents,” models are equipped with limiter crossbars, the front of which serves as a support for the legs.
Pendulum designs on bearings have a fixed base - only the seat swings. The option is optimal for apartments, since there is no noise from runners rubbing against the floor, which does not damage the coating. A drawing of a chair with a pendulum mechanism for self-production is not difficult to find.
Multifunctional “3 in 1” models are suitable for large rooms; they allow you to use the chair as a stationary chair, swing with a small amplitude, or lie like in a hammock. The designs are difficult to manufacture and bulky, so such models are often purchased ready-made.

On radius runners made of natural wood

With a base of profile pipes

From plywood

With pendulum design, metal

Pendulum wooden
Materials and tools for DIY
Which material to choose for making a homemade rocking chair depends on the skills and experience of the craftsman working with materials. Round or profile metal pipes are used to make furniture frames that will be used outdoors: steel treated against rust will last outdoors for decades. These options have several disadvantages:
- the impressive mass will require a couple of people to move the chair;
- the floor covering must be super wear-resistant, or you will have to solve the problem of finding softening pads for the runners;
- for apartments they use a thin-walled pipe of small diameter, which is difficult to weld without special semi-automatic equipment.
Wood is great for home furniture options. If you have certain skills, the blanks can be bent, obtaining the exclusive outlines of the frame. Installation outdoors will require the use of antiseptic and particularly durable paint and varnish coatings, otherwise the life of the chair will be short-lived.
Plywood is the best and least expensive option for your first experience. During production, a minimal set of tools and devices is used; the finished product can be easily decorated. Moisture-resistant plywood will withstand short exposure to sunlight and rain.
Rattan, bamboo, willow branches and reeds - wicker furniture is made from these materials. The blanks are purchased at a building materials store; you can assemble the willow yourself, but for weaving you will need to study the technology and develop skills.
Polypropylene pipes can support the weight of a person when used to make runners or as a frame. The appearance of this product is unusual.
Plastic bottles are exotic in furniture, but such designs also exist. Most often, bottles are used to create a seat and back, and the base is made of more durable materials - wood or plywood.

Natural wood

Plywood sheets

Natural rattan rods

Artificial rattan

Polypropylene pipes
In preparation for work, they inspect the available tools and, if necessary, purchase, rent or borrow missing ones:
- For metal structures, it is necessary to have a welding machine, a mask, and an angle grinder. A craftsman cannot do without a pipe bender. It’s not difficult to do it yourself - it will be cheaper than going to a metalworking shop. The cost of a purchased device is comparable to the price of a factory chair.
- To work with wood you will need: an electric jigsaw or a hacksaw with narrow, replaceable blades. You will have to cut the wood lengthwise and crosswise, and for this they use different configurations of teeth on the saw part. An angle grinder with a special attachment will help polish the surface faster. This can also be done with a drill, which will definitely be needed. For decoration, you need to prepare brushes and containers for varnish, stain, and paint.
- The frame made of plastic pipes is welded with a special tool - an “iron”, a soldering iron, or welding.
- For rattan weaving, special hooks are purchased.
- A standard carpenter's set is also prepared - a chisel, a hammer, a rubber or wooden mallet.
It is difficult to say what comes first - the choice of material for furniture or the preparation of tools. More often they proceed from the available inventory - buying electrical devices for one-time use is impractical.

Required Tools

Welding machine
Step-by-step instruction
The manufacturing process for a rocking chair from any material always consists of the following sequence of actions:
- Selection of design and development of drawings.
- Procurement of materials and preparation of tools.
- Frame assembly.
- Installation of seat and backrest.
A wooden rocking chair is created with your own hands using the following algorithm.

Diagram for a rocking chair made of plywood

Diagram of a metal rocking chair
Design
It is difficult to design swinging furniture yourself without experience. When calculating the curvature of the runners and the geometric dimensions of parts for assembly, the following are taken into account:
- weight and anthropometry of the user;
- center of gravity of the finished product, which affects the smoothness of the “run”;
- body tilt angles in different modes of use;
- radii of curvature for comfortable rocking and prevention of capsizing.
For the first experience, it is better to find ready-made drawings of a rocking chair made of plywood. This will help avoid mistakes, waste of time and materials.
Having decided on the design, life-size drawings are transferred to a sheet of paper of a suitable size, for example, Whatman paper. By cutting out the configuration of the side walls, runners, jumpers, and other parts, templates are obtained for application to the prepared materials.

Size calculation scheme

Tilt angles in different modes
Making the base and runners
Using an old frame is an example of how easy it is to make your own rocking chair. In this case you will need:
- restore the surface of the wood by sanding it and covering it with paint and varnish;
- sew and secure a new seat.
One of the options for making runners is cutting out the sidewalls from plywood. To give strength, each wall is made of 3 layers: the inner one is made of a sheet 10–12 mm thick, the outer ones are made of 8 mm material.
The sequence is:
- using a template, transfer all the elements of the rocking chair drawing onto prepared sheets of plywood;
- cut out parts with a jigsaw;
- fasten the sheets with bolts through through holes or self-tapping screws;
- clean and polish parts on all sides;
- coat the workpieces with varnish or paint;
- install protective rubber or plastic pads at the points of contact between the runners and the floor.
For runners, you can use boards that are wide enough to cut curved parts. Board thickness from 40 mm.
For another option for obtaining curved parts, bars soaked in water are bent according to a template. This process is time-consuming and requires powerful clamps. This method is not suitable for making a chair with your own hands; it is better not to use it without experience.

Preparing the template

We cut out the parts according to the template

We secure the sides with self-tapping screws

Varnish
Assembly
The final assembly of plywood models involves making cuts in the parts and attaching strikers to them using self-tapping screws, glue, or using metal corners and screws. Parts in solid wood products are secured with glue using a tongue-and-groove joint. Exposed glue is immediately removed with a clean rag so that no traces remain.


Features of making rattan products
The main advantage of rattan furniture is its lightness of construction, which is why the material is popular when making children's rocking chairs with your own hands. The child will be able to move a piece of furniture independently.
Another advantage is that the material is completely ready for use, calibrated according to the thickness and length of the twigs, unlike willow branches, which will require long processing. However, more often it is not natural, but artificial rattan that is used. It is a tape that can be easily cut to the desired length, thereby reducing the amount of material waste. In addition, this artificial analogue of rattan is pliable, easy to work with, and bends easily, which allows even a craftsman with insufficient weaving experience to create an interesting and high-quality version of a rocking chair.
To work you will need:
- screwdriver with a set of bits, screws, thin drills;
- awl, tape measure, marking pencil;
- scissors;
- hacksaw;
- jigsaw;
- furniture stapler and staples;
- sanding machine for processing wooden structures;
- furniture fasteners, screws.
Materials for manufacturing are selected depending on the model. For the frame you may need plywood, wooden beams, furniture fasteners, self-tapping screws, artificial rattan tape, furniture glue.
The process of creating a wooden chair consists of several main stages. First of all, you need to choose the shape of the future chair and create patterns from which the main parts of the frame will be cut:
- seat base;
- back;
- handrails;
- runners
All these elements are made of wood, so the next step is to transfer the patterns to the material and then cut out all the parts. For beginners, the easiest option would be to purchase a ready-made frame in furniture stores or workshops, or use a ready-made chair as a basis for a rocking chair, to which you will need to attach runners.
Since the rocking chair must be woven with artificial rattan, it makes sense to first braid the parts and only then begin to assemble the elements.
For the first experience, it is better to use the simplest version of the checkerboard weave of stripes.
- It is necessary to measure the length of the tapes with which the base for the weave will be created. To do this, the beginning of the tape is located on the inside of the frame, then it is thrown over the frame bar and brought out to the front part of the braided structure, the end of the segment must be wound back into the inside of the frame, where it will be secured. For example, if the frame has a rectangular shape, the tapes will be laid along its short side - the width of the structure.
- Having decided on the length of the segment, you need to cut the number of strips that will fit tightly one to the other.
- Each tape is stretched over the frame, with the ends hidden in the inside and secured with a regular furniture stapler. The tapes are laid next to each other without gaps. The best option is to first attach all the cut strips along one of the inner sides of the frame strip, and then proceed with laying and fastening on the other side.
- Now you need to decide on the size of the tapes that will braid the laid base. In this case, it is necessary to weave across the fixed sections, placing the ribbons along the long side of the frame. The ends will be secured in the same way as when preparing the base, from the inside of the frame strips.
- The required number of strips is cut, and the prepared sections are attached to one of the inner sides of the frame along its short side (width) as close to each other as possible with a furniture stapler.
- The strips are threaded through the stretched base tapes in a checkerboard pattern. For example, in the first row you need to place a strip at the very beginning under the first warp strip, and in the second row the ribbon should go above the first warp strip. Next, each strip is woven through one base tape, and the end is always secured with a furniture stapler inside the frame. When completing the work of weaving each strip, it is necessary to align the rows, tamping them in the same way as craftsmen who make rugs usually do. To do this, use a flat tool (for example, a screwdriver) to align the rows, trying to ensure that each new row is placed as closely as possible to the previous one.
- The side parts are braided in a similar way.
- As a result of the work performed, not a single connection of the tape with the frame will be visible, since all ends are fixed inside the frame strip.
The back of the chair is woven in the same way. If desired, you can decorate the legs of the hand-made model. The simplest method is circular weaving, in which the tape is laid in a circle, and each new turn is located as close as possible to the previous one, so that the texture of the wood is not visible at all. If the master would like to use more sophisticated options, he will either have to find and watch several master classes, or study special literature with diagrams and explanations for them.
Now that all the elements are decorated, the structure of the chair is assembled, the parts are connected to each other using furniture fasteners. When connecting elements, you can additionally use glue to make the structure even more durable. Lastly, the runners are installed. The most common option for attaching them is to connect them using furniture screws.
To ensure that the floor covering is not damaged during use of the chair, plastic or rubber gaskets can be installed on the runners. To do this, strips are cut from the selected material onto the lower part of the runners. The material is then attached using furniture nails. Additionally, you can use glue to make the pads more tightly attached to the wooden base.

Tools for work

Cutting out the frame parts

Assembling a chair from sawn elements

We braid the seat

We braid the back

We strengthen the structure with glue

The rocking chair is ready
Features of models made of plastic pipes
A rocking chair made of plastic pipes is an excellent way to “use” leftover material after making a drinking or irrigation water supply. To create a frame, you will need scissors for PVC pipes and a special soldering iron (welder).
For the side surfaces you will need a pipe with a diameter of 32 or 25 mm, for jumpers - 20 mm. Tees are purchased based on the number of connection points. It is better to plan to purchase with a reserve in order to practice soldering on individual parts. The price of tees starts from 5 rubles, so a supply of 4–5 parts will not cost much.
To strengthen the structure, pieces of reinforcement with a diameter of 12–14 mm are inserted into the pipes.
A template is prepared in advance, according to which pipe sections are cut, providing a margin of 3–4 cm for each part: when soldering, the tube is inserted into the tee by 1.5–2 cm.
If you work carefully, the runners can be given a rounded shape without heating. If this cannot be done, then clean sand is poured inside the tube, heated in the oven to 90–100⁰C. To prevent the sand filler from spilling out, a plug is welded to one side. It will remain on the part even after the work is completed to prevent moisture from getting inside. The same plugs are welded to all open ends of the pipes.
Once the frame is assembled, a foam rubber mattress covered with raincoat fabric is attached to it if the chair will be used outdoors. For fastening, strips of fabric (ties) sewn to the mattress are used.

PVC pipe shears

Welder for plastic pipes

Side element diagram

Scraps of reinforcement are inserted inside the pipes

We weld the fastening points with a welding machine

Rocking chair made of plastic pipes
How to make a rocking chair out of metal
Making a metal rocking chair can be done by a craftsman with welding skills. In this case, you will need a pipe bender for a round or profile pipe: bending it evenly without a special device is not easy. You can use a template and clamps, and weld the ends of the bent and clamped metal with a jumper.
The step-by-step process differs little from making a rocking chair from wood or plastic pipes:
- Prepare or find ready-made drawings.
- Weld the sides.
- The pipe is bent and the skids are secured with a weld seam.
- Assemble a single structure for the right and left sides.
- The sidewalls are connected with jumpers.
- The seams are processed with an angle grinder.
- Cover the frame with a moisture-proof primer and paint in 2-3 layers, following the instructions for drying the layers.
The work ends with the installation of wooden crossbars on the seat and back of the structure. And the material remaining after construction is an opportunity to implement unusual ideas for home decoration.
Making a rocking chair with your own hands is quite simple for people who have the skills to work with tools. A little patience, effort, time spent, and now a new piece of furniture has already appeared in the house, which will make your stay comfortable and enjoyable.

Preparing the drawing

We secure the runners with a weld seam

Connecting the structure

Ready-made rocking chair on a metal base
13715 0 7
How to make a rocking chair from plywood with your own hands - drawings and assembly instructions are included
A comfortable and beautiful wooden rocking chair in the store is not cheap. However, you don’t have to buy such furniture, because everything can be done with your own hands. Read this article about how to make reliable and inexpensive furniture from plywood yourself for a comfortable stay.
Advantages of a homemade plywood rocking chair

Using plywood as the main material for furniture assembly guarantees the following advantages:
- Manufacturing furniture with curved shapes. Plywood, unlike solid wood, can be bent in different directions, giving products complex curved shapes.
- Ease of production. Most plywood furniture can be made by yourself using available tools from your home workshop.
- Affordable price. Finished products will cost less than similar, but solid wood products.
- Great looks. Plywood is glued from veneer with a solid pattern, and therefore the finished furniture looks no worse, and sometimes even better, than similar products assembled entirely from wood.
- Strength and durability. Due to the special arrangement of veneer in the board, plywood demonstrates higher fracture strength in comparison with similar indicators of solid wood.
- Environmental Safety. Multilayer plywood is a product made from natural raw materials - wood, and therefore this material is safe for humans.
Types of rocking chairs
What kind of chairs can be made from multi-layer plywood? There are many options, let’s consider only the most interesting.


How it swings
From the review it is clear that in terms of design, all rocking chairs come in 3 types, namely, models with bent runners, models with a pendulum and hanging models. But regardless of the modification, the principle of swinging of all rocking chairs is pendulum.
The seat in all of the listed models moves due to a forced shift of the center of gravity relative to its original position. Subsequent displacements occur by inertia. As it swings, the inertia weakens and the pendulum stops until you set it in motion again.
Drawings of a plywood rocking chair
When choosing a chair model for self-assembly, we give preference to those drawings that will be easier to translate into reality. I offer several such drawings.

The drawing shows a model of upholstered furniture assembled on solid sidewalls, cut to the shape of curved runners, turning into armrests. To connect the sidewalls, you can use transverse inserts made of plywood or planed boards.

The supporting frame of this chair is assembled from plywood parts. There are cross slats on top of the frame. The lower part of the sidewalls is reinforced with a bent strip of runners. This design will be an excellent element of the surroundings of a country terrace or personal plot.

Puzzle Rocker translated from English means “rocking chair assembled from mosaic fragments.” 4 fragments shown in the diagram are cut from multilayer plywood. Then these fragments are put together without the use of fasteners and the chair is ready. If necessary, the rocking chair is easy to disassemble.
Design requirements and dimensions
The dimensions of plywood furniture are selected so that the overall dimensions correspond to the thickness of the material used. That is, the larger the chair, the thicker the plate from which the parts will be cut should be. The preferred option for any chairs is plywood with a thickness of 25 mm or more.
What you need for work

The most important tool for working with plywood is a jigsaw, which will ensure sufficient accuracy of the cut.
Required materials and tools:
- Multilayer plywood - thickness 30 mm.
- Fasteners, wood screws and other hardware for furniture assembly.
- Wood glue.
- Paints and varnishes for decorative and protective finishing of furniture.
- Jigsaw.
- Screwdriver with a set of drills and bits.
- Wood clamps.
- Sander or hand grater with replaceable sandpaper.
The process of creating a chair

Making furniture from plywood is not much different from making chairs from other board materials. The process is gradual and all stages are performed in the following sequence:
- Cutting the material in accordance with the selected drawing.
- Preparation of parts - chamfering, drilling holes, forming grooves, etc.
- Furniture assembly.
- Finishing, including sanding and treatment with paints and varnishes.
Let's consider the above points in more detail.

If the material is purchased for subsequent painting, simply select a sheet of the required thickness, not paying attention to the texture of the fibers. If the finished furniture is supposed to be varnished after assembly, we don’t skimp and purchase the plywood that initially looks good.
We try to purchase material that has been stored correctly - we are talking about humidity and the absence of sheet curvature. The purchased material must be smooth and dry. Pay attention to the cut line; all layers must be tightly glued together without peeling.
Preparation of plywood and general rules for working with it

Plywood is a board glued together from sheets of natural wood veneer. On the one hand, the layered structure of the material simplifies the work, since plywood can be bent.

On the other hand, this feature makes sawing difficult, since an incorrectly selected tool and unprofessional cutting lead to the veneer layers cracking and crumbling along the cutting line of the slab. That is why, when assembling furniture from multi-layer plywood, we follow the instructions and recommendations proposed in this article.

How to prepare material for subsequent sawing? You don't need to do anything special, just make sure the slab is dry enough and doesn't have any curvature. If there is curvature, lay the plywood on the bars so that the sheet bends in the direction opposite to the curvature.
Making patterns and transferring drawings

Once we have decided on the choice of drawing, all that remains is to mark the slab in accordance with it. That is, you need to transfer the drawing to plywood, while increasing the scale of the image to natural size. If the design of the furniture to be assembled does not have complex shapes, the drawing from the paper is transferred along a ruler and square.
If you plan to make furniture with complex shapes, for each piece, patterns (templates) are cut out of thick paper or cardboard, which are subsequently traced on a sheet of plywood.
Sawing plywood into parts
For curved cutting, it is preferable to use a jigsaw, since the tool is accessible. If possible, the workpieces are cut on a band saw, provided that a blade with a fine tooth is used.


Assembly of the structure

The chair is assembled in accordance with the drawing. The strength of the finished product largely depends on the choice of fastening hardware. To achieve maximum reliability, we use self-tapping screws only in unloaded connections. In areas with a high degree of load, we use fasteners consisting of bolts and nuts.
The advantage of a bolted connection when assembling furniture is that the nuts can be tightened during use and thus eliminate play and creaking.
Final balancing

How to balance the runners for smooth rocking? Make sure there are no protrusions or flat areas on the runners that could prevent them from swinging. If there are such areas, round them using a sander and sandpaper.
In addition, to ensure smooth rocking without jamming, use the chair on flat, hard surfaces. If the furniture is to be used on a personal plot, it is preferable to make the runners wide so that they do not press into the ground.
How to bend plywood for a rocking chair
How to make curved parts from plywood without cutting out their outline from a single sheet, but by bending strips along a given radius?
| Illustrations | How to bend |
 |
Steaming and bending. This is a classic method in which the part is soaked in boiling water, and then molded and fixed according to a template. After drying, the workpiece retains the specified radius. The method is relevant for thin plywood. |
 |
Cutting and bending. On the inside of the intended fold, cuts are made to ¾ of the thickness of the sheet. After this, the workpiece bends. To fix the radius, glue is poured into the cavity of the cuts and a strip of veneer is glued over the cuts. This method is preferred for materials with a thickness of more than 25 mm. |
How to make chair covers

Properly assembled furniture looks good in itself, but soft pads will make it more comfortable. The simplest option is to make pads in the shape of the seat and back with ribbon ties. You can sew such overlays yourself, or you can buy them ready-made.
DIY collapsible chair


Let's sum it up
Now you know how to make a plywood rocking chair yourself. If, after watching the video on choosing a design and assembling furniture, you still have questions, ask them in the comments to the article.
October 25, 2018If you want to express gratitude, add a clarification or objection, or ask the author something - add a comment or say thank you!