To update the interior of a room, you don’t have to start a renovation. An additional piece of furniture made by yourself will help change and enliven the interior. One of the practical and stylish things in the room can be a DIY ottoman. Homemade poufs have many advantages over store-bought ones, since you can choose the shape, size and material for its manufacture. In addition, when creating a masterpiece, you can use any available materials, so a DIY pouf will cost almost nothing. Today we invite you to get acquainted with non-standard ideas that will help you create a unique and striking piece of furniture for any room.
How to make an ottoman with your own hands from scrap materials?
Ottomans came into our everyday life from the East many centuries ago and almost immediately gained popularity, since this piece of furniture could simultaneously serve as an armchair, a table, and a footstool. Today, craftsmen offer a lot of interesting options for making cute options from scrap materials. Making an ottoman with your own hands is not a difficult job, but it is very exciting; moreover, a thing created with your own hands radiates a special warmth and has an aura of home comfort.
Plastic bottles as a base for a pouf
If you do not want to saw out or cut out the base for the pouf, then you can use plastic bottles for this purpose, which are available in any home in unlimited quantities.
Important! The color of the bottles in the finished product does not matter - you can use any beer or water bottles with a volume of 1.5-2 liters.
To make a high-quality and sustainable ottoman you will need:
- 16 bottles with a capacity of 1.5 liters or 9 bottles with a capacity of 2 liters. Use bottles with caps
Important! You can create a large circle, square or rectangle from round bottles. Choose the shape of the product according to your desire and preference.
- Packaging cardboard. Any cardboard from household appliances that has not been thrown away for years can be used to make a pouf.
- Scotch.
- Foam rubber.
- Upholstery. The fabric must be durable and of high quality so that it can be wiped, cleaned and washed. You can use leather or furniture fabric, which is sold in a specialized store.
- Hot glue gun.
- Zipper for the case.
- Scissors.
Important! If you are planning to create a large ottoman that will serve as a table or chair, then for ease of manufacturing, connect the bottles into separate sectors and sections, securing them with tape, and then begin to form the overall structure.
Step-by-step instruction:
- Take bottles with tightly closed lids and connect them to each other using tape. If the future product will have a round shape, then start connecting the bottles from the middle: take one bottle and, moving along the radius, attach new elements to it with tape.
- After completing the circle, cut out two circles of the same diameter from cardboard, which should be slightly larger than the bottle structure. This will be the top and bottom of the base.
- Tape the cardboard tightly to the plastic structure. The frame for the pouf is ready.
- Cut 3 blanks from foam rubber: 2 circles of the same diameter and 1 rectangle, which will wrap vertically around the frame.
- Secure the workpieces using a construction stapler or thread.
- Sew a cover for the ottoman with your own hands from furniture fabric.
Important! It is better to make a cover with a zipper, so that later it can be easily removed and washed. You can sew several options for covers and update the appearance of the product from time to time.
- You can also use cardboard boxes for the frame. The main thing is that there is no damage to them. Instead of foam rubber, you can use padding polyester, insulation, or several layers of dense fabric.
- If you plan to use the ottoman for personal needs, then use thick fabric to make the cover and trim the seams with a border. For a children's ottoman, use a brighter, more colorful fabric, as well as a denser layer of foam. Add an additional functional element to the finished product in the form of a strap, which will make it easier to carry. The child will be happy to carry such a pouf with him as a toy.

Ottoman made from a plastic bucket
An interesting solution for creating a furniture masterpiece is to use an unnecessary plastic bucket for the pouf frame. To make a useful and beautiful thing you will need:
- Plastic bucket.
- Thick jute rope.
- Stapler.
- Hot glue gun.
- Scissors.
- Cardboard or thin plywood.
- Upholstery fabric.
- Microfiber (several new cloths).
- Tape Velcro.
- A large button or handle from a furniture cabinet.
Step-by-step instruction:
- Wash the bucket, remove the metal handle from it.
- Turn the bucket over and wrap the outer surface tightly with rope.
Important! Place each stitch on glue so that the rope sits tightly.
- Cut the end of the rope and hide it carefully.
- Place the bottom of the workpiece on the cardboard and circle it.
- Cut out a circle according to the intended template.
- Lay out the template on the upholstery fabric, cut out the blank with an allowance of 5-10 cm.
- Combine fabric and cardboard. Make a hole in the center and thread a bolt from a furniture handle through the cardboard and fabric. Screw the knob onto the bolt. If you use a large button, use it to connect the fabric to the cardboard in the middle.
- Roll the microfiber into a tube and wrap the bolt radially between the cardboard and the fabric, creating a kind of roll. Securely fix the microfiber with glue so that it does not unwind.
- Stretch the upholstery fabric and secure it on the reverse side with a stapler.
- Cover the back of the seat with another piece of fabric and place it on glue to hide the cardboard marks.
- Cut the Velcro into 4 equal pieces and stick them crosswise to the bottom of the bucket and the base.
Important! The fluffy part of the Velcro should face the seat and the bristles should face the bucket.
- Connect the lid and base.
The do-it-yourself ottoman is ready and now you can sit on it comfortably!
Pouf from a stool
A well-knitted stool from durable wood can delight its owners for many years to come if it is made into a stylish ottoman. To repurpose an old stool into a modern piece of furniture you will need:
- Plywood.
- Foam rubber for the seat.
- Glue.
- Upholstery fabric.
- Stapler.
- Self-tapping screws.
First strengthen the structure of the old stool with self-tapping screws and proceed as follows:
- Shorten the legs of the stool a little. Check the work with a level so that the product does not wobble later.
- Attach 4 sheets of plywood to the stool legs with self-tapping screws.
- Screw the fifth sheet of plywood to the bottom. This will be the bottom of the future craft.
- Cut out the foam for the seat with an allowance of 5 cm.
- Coat the top of the pouf with glue so that the foam does not bunch up.
- Attach the upholstery fabric and foam using a stapler.
- Cover the rest of the structure with fabric and secure it with staples.
- Screw on the wheels (optional) or legs.
Important! Foam rubber can be attached to the sides with slats to give the structure a round shape and make the ottoman more beautiful.

Wooden ottoman with a drawer for small items
For those who love to work with wood and have carpenter skills, we suggest making a fairly simple, but very functional and beautiful pouf with a drawer. You can put children's toys, magazines or shoes in this pouf.
To make a practical product you will need:
- Laminated board or chipboard sheet. The material is needed to make a circle with a diameter of 30 cm and rectangles measuring 40x30 cm.
- Wooden blocks in the amount of 4 pieces and size 4x8x8 cm.
- Wood glue.
- Furniture wheels with special fasteners (4 pieces).
- Metal corners (4 pieces).
- Self-tapping screws.
- Screwdriver, screwdriver.
- Foam rubber and upholstery fabric for the cover.
Step-by-step instruction:
- Connect the chipboard boards prepared to size so that you get a box 40x40 wide and 30 cm high. Use metal corners and screws to fix the material. The corners of the structure must be straight. Coat the joints with additional glue.
- Glue the bars to the bottom of the structure, on which the wheels will later be attached.
- Install the cover using glue and self-tapping screws. Choose any shape you want for the base.
- The frame is ready, start sewing the cover. Cut out foam rubber and furniture fabric according to the shape of the lid. Sew a 10 cm strip of fabric along the contour. You can sew canvas, frills, and drapery as desired and to your taste.
- Place a layer of foam rubber on the lid and pull the cover on top.
How to sew a pouf?
If you like to sew, then you can make a soft ottoman with your own hands at home, not only from multi-colored fabric, but also from old clothes. Any sweater can turn into a very noticeable and comfortable piece of furniture. The main thing is desire and imagination.
Option #1. Simple fabric pouf
If you don’t have time to tinker with patterns, then use a simple method for making an original piece of furniture:
- Cut 2 circles from the fabric with the corresponding diameters of the bottom and top of the product and seam allowances.
- Cut 2 rectangular pieces of the same size. The width of the rectangles should be equal to the height of the pouf, and the length should be half the circumference of the upper and lower parts of the product.
- Sew the rectangular pieces widthwise on one side to create a long ribbon.
- Sweep away the resulting ribbon and circles. Sew circles along the seam. If the seam is not even enough, cover it with a decorative border.
- Fill the finished case with any suitable material.
Important! For the internal filling of the pouf, use foam rubber or padding polyester. These materials hold their shape perfectly and do not deform.
- Sew the zipper into the open edges of the rectangular tape.
Important! Make a hole for the padding material at the bottom so that it is not noticeable. If you wish, you can sew it tightly or sew a zipper into the hole so that you can change the material if necessary.
You can make a pouf in the shape of a cube. Parts for the product must be square. You will need 4 pieces for the sides, and 2 for the base and bottom. Sew the pieces together, and to clearly define the edges of the cube, use a canvas of a contrasting color.
Important! To make a cube, use thicker fabric to give the product strength and elasticity.

Option #2. Pouf made of multi-colored fabric
Sewing a bright piece of furniture is not difficult at all. To work you will need:
- Fabric of different colors.
- Lining fabric.
- Large buttons (2 pieces).
- Filler.
- Needle and thread.
- Sewing machine.
The process of making a bright masterpiece is quite simple:
- Draw a circle of the desired size on paper (the kind of pouf you want to get). Divide it into 12 parts. If you have fewer colors, you can divide the circle into 6-10 parts.
- Attach the finished patterns to the fabric, cut out triangular blanks with a small margin for seams.
- Cut the lining fabric in the same way.
- Grab the petals of the circle with threads, and then sew them on a machine. You should get two round bases - upper and lower. Sew the bases from the wrong side, leaving one part unsewn.
- Turn the cover inside out and place the filling inside.
- Carefully sew the last part. Cover the seam area with large buttons.
Important! To avoid spending money on buying new fabric, use scraps from old clothes.
If you like to crochet or knit, you can make a soft frameless ottoman with your own hands:
- To work, you will need the thickest knitting needles with a diameter of 9 mm and fairly thick wool. You can also use cotton ropes (20-30 pieces).
- Tie them into a long rectangle.
- Fasten the side of the workpiece with a rope to make a spacious skirt, and use the same rope to tighten the bottom to make a bag.
Important! To fill the bag, you can use old things or purchase foam rubber (holofiber).
Option #3. Furniture made from an old sweater
To make an original piece of furniture, you will need:
- Old sweater.
- Scissors.
- Needle and thread.
- Felt.
- Lining fabric for the cover.
- Stuffing material.
Step-by-step instruction:
- Cut a round or square ottoman bottom from felt. This element will serve as the primary blank.
- Take a sweater and turn the sleeves inside.
- Sew the remaining hole with an even seam.
- Sew a piece of felt to the bottom of the sweater to create a bag-cover.
- Prepare a cover for the stuffing from lining fabric. If the primary felt blank has a round shape, then you will need a piece of fabric in the form of a rectangle, for example, with a length of 70 cm and a width of 50 cm. If you decide to make a square ottoman, then calculate the required dimensions for four parts.
- Sew all the parts together and leave a fold at the top for the lace, which will tighten the hole after filling the case with material.
- Place the cover inside the sweater.
- Fill the case with material. Pull the lace as tight as possible.
- Straighten out your sweater and enjoy your new piece of furniture.

Option number 4. Ottoman ball
If you don’t know how to make a round ottoman with your own hands to decorate a child’s room, then this option is for you. To make a baby ottoman with your own hands, prepare the following materials:
- High density fabric in two colors.
- Paper for making patterns.
- Scissors.
- Needle and thread.
- Sewing machine.
- Polyethylene.
- Silicone filler in the form of balls.
The process of creating a ball ottoman is as follows:
- Make a pattern on paper, observing the required dimensions. You can use any round piece of furniture to create a pattern, for example, a table lamp shade or a large ball. Measure its circumference and divide the result in half. Divide the number into 5 parts so that the middle 3 and the outer 2 are the same size. As a result, you will get the diameter of the base in the form of a circle and the width of the stripes that make up the spherical cover of the pouf.
- Transfer the resulting markings to the item of your choice, starting with a detail in the form of a circle. Draw the next line below, along the pre-calculated width of the strip.
- Cut the plastic bag along one side and cut off the bottom. Place the bag on the marks of the first strip and secure the edges with tape. Transfer the quarter strip onto the bag and cut. Prepare the middle strip piece in the same way.
- Transfer all the details onto graph paper, cut out the details of the ottoman from fabric of two colors, leaving 1 cm for the seams.
- Sew the strips, leaving one side unstitched.
- Attach one strip to the round piece. The ends of the strip should meet. Stitch them and connect the base to the strip of seams, leaving 1 cm from the edge.
- Sew a similar piece for the opposite side of the cover. Stitch the workpiece to the middle strip. Do not sew up the ends of the middle strip.
- Sew the second semicircular piece with the middle strip. Press the seams.
- Fill the case with silicone balls, and to make the shape elastic, add small pieces of foam rubber.
- Sew the hole with a hidden stitch.
What can you make an ottoman from with your own hands?
Above we told you how to make ottomans with your own hands; a master class for each product option will help you realize your plans. However, all the materials for making an original piece of furniture cannot be included in one article, since there are a huge number of objects around that are suitable for creating a masterpiece, such as these.
Tires
You can put a wonderful DIY ottoman made from tires at home, on the veranda of your garden plot, or right in your dacha, replacing expensive rattan furniture with practically free ones.
To make practical furniture, just cut two circles from plywood and place them on top and bottom of the tire. Then, secure the bases with self-tapping screws and decorate the entire workpiece with twine. To make the ottoman a little higher, you can screw on two legs.
Important! Using 2 car tires and a sheet of bendable plywood, you can make a chair with a backrest.
Plywood and vinyl
Sheets of plywood with dimensions 45x45 and cuts of 45 degrees are used to make the frame. The vinyl is cut to the size of the plywood with a margin of 2-3 cm. Place a soft cloth and thin foam rubber on top of the vinyl, and cover the entire structure with a plywood sheet. Bend the vinyl upholstery and secure it with a stapler. To attach the frame, use metal corners and self-tapping screws.
Important! You can decorate the vinyl trim with decorative carnations. Place the tracing paper onto the vinyl and create an interesting design using studs. The paper is easily removed, and the result is a beautiful plywood ottoman with an original pattern.

Artificial fur
The fluffy material can be used to make a seat or to create an entire product.
Plastic pipes
Making a pouf from plumbing pipes looks like this:
- First, you need to cut the pipes into pieces 30 cm long (about 9 pieces), then paint the pipes with acrylic paint in several layers and treat them with protective varnish.
- After drying, the pipes must be secured with an adhesive gun.
- You can use polyurethane bathroom mats for the seat. Fold them in half and make slits along the perforations (the length of the cuts is 5 cm). Roll the mat to form a bud and insert the rolls into the pipes. The buds should fit tightly, then no additional fastening will be required.
Important! When making a pouf, pay attention to the floor in the room:
- Since laminate is very sensitive to any mechanical influences, it is better to make a pouf without wheels and legs for such a covering.
We hope that after reading our article, you have chosen a suitable option for making an original, functional piece of furniture and decorated the interior of your home with it. Now you can relax, watch TV, read in a soft homemade ottoman or chair, or you can place the ottoman in the hallway and use it to conveniently take off your shoes. And most importantly, when making your masterpiece, you used unnecessary things and materials, while spending a minimum of money!
Sometimes you really want to update your interior, give it a new style, and additional pieces of furniture will be the most suitable assistants in this matter. And if it’s easier to buy a wardrobe or sofa in a store, then making an ottoman with your own hands is very simple.
Ottomans came to us from the East many centuries ago and immediately gained popularity. In the recent past, they occupied an important place in city apartments with small square footage, since they simultaneously served as a table, an armchair, and a footrest.
Homemade ottomans have a lot of advantages over store-bought ones. You can choose the appropriate shape, size, color and type of material. In addition, in the manufacture of such an ottoman you can use any available means, and such a piece of furniture will cost you almost free.
Soft ottomans: simple and easy from what is at hand
When you start making an ottoman, be sure that you can handle such a simple and easy job without much worry, and we will help you with practical recommendations and advice. You will need:
- Sewing machine;
- Textile;
- Stuffing material;
- Paper to apply the pattern template.
To begin, prepare a pattern using the diagram below. Lines B and C on it indicate the places where the paper is folded. It also shows what the template will look like when expanded.
- Take the unfolded template and attach it to the fabric. You will need to cut 8 identical pieces of fabric. To avoid spending money on new material, use old clothes.
- On each piece, bend the sharp corner inward by 5-6 cm and stitch so that after assembling the pouf, there will be an octagonal hole in the upper part into which the stuffing will be placed.
- Sew the blanks from the inside out in pairs to each other (when cutting, do not forget to leave a seam allowance of 1 cm above the pattern size). This way you will get 4 parts from 2 blanks, stitched together on one side.
- Sew 2 parts in the same way: these will be the two halves of your pouf. Sew them together and turn the cover inside out.
- Fill the finished pouf cover with the selected material (it can even be scraps of fabric). Cut another piece to fit the remaining hole, trim the edges and sew by hand.
Tip: it is not at all necessary to use the same color fabric for the ottoman. A multi-colored ottoman will enliven the interior, especially in a child's or teenager's room.
This ottoman is very soft and light, small children will enjoy playing with it, and you don’t have to worry about their safety.
An even simpler scheme for making an ottoman
You don’t always have the time or desire to tinker with patterns, so we offer you another, very simple option.
- Cut 2 circles from fabric. Their diameter should be equal to the diameter of the top and bottom of the product. Don't forget to leave seam allowances!
- Now cut out 2 rectangular pieces of the same size. Their width will be the height of the pouf, and their length will be half the circumference of the upper and lower parts.
- Sew the rectangular pieces together widthwise on one side to create a long ribbon. Baste one of the circles to it and stitch along the seam. Do the same with the second circle. If the seam is not smooth or neat enough, you can trim it with a decorative border.
This way you can quickly and easily make a pouf cover that can be easily filled with any suitable material. All that remains is to sew the zipper into the unstitched edges of the rectangular tape.
In exactly the same way, you can make a cube-shaped pouf. The only difference is that the pieces must be square, and for the sides you will need four fabric pieces rather than two. Sew the parts together, and in order to more clearly define the edges of the cube, use a canvas of a contrasting color. Thicker fabric will give additional elasticity and help keep its shape.
Please note: padding polyester and foam rubber are perfect for filling such a pouf. These materials do not deform and hold their shape perfectly.
Make the hole through which you will place the stuffing material at the bottom of the pouf so that it is not visible. If you wish, you can stitch it tightly after the pouf is stuffed, or sew in a zipper so that you can replace the material if necessary.
We use improvised means: an ottoman made from plastic bottles
This option will allow you to save significantly on padding materials. The interior space of the ottoman is filled with plastic bottles. So, you will need to stock up on the following:
- Plastic bottles of the same shape and volume;
- Thick cardboard (use cardboard boxes, just make sure they are not damaged);
- or synthetic winterizer (you can also use insulation or several layers of dense fabric);
- Scotch;
- Glue;
- Scissors.
From cardboard, cut out two identical circles of the diameter you need - these will be the top and bottom of the ottoman. Place the bottles on the bottom circle so that they fill the entire space and tie them tightly with tape. Cover with the top circle and rewind with tape so that all the parts are evenly and firmly connected to each other.
The base is ready, now let's start finishing the ottoman.
- Cut out two circles and a rectangle from insulation (foam rubber, padding polyester). The parts should be slightly larger than the base elements, taking into account seam allowances. Connect them together and sew them together by hand using tight stitches.
- Sew the cover for your ottoman using the same principle as in the second paragraph of this article.
- You can add an additional functional element in the form of a strap to the finished product. It will make it easier to carry and will surely appeal to children, who will happily carry such an ottoman with them as a toy.
- If you are planning to make an ottoman that you will use yourself, take a thicker fabric for the cover and sew a border along the seams. For a children's ottoman you will need soft material with colorful colors. It is advisable to use a denser layer of foam rubber.
This ottoman is not only easy to make. By making it yourself, you will save yourself from the need to recycle plastic bottles, and this is a great reason to take part in the fight for a cleaner environment!
A new look at old things: making furniture from clothes
This is not a fairy tale or fantasy; an old sweater can really turn into an original ottoman, not only very comfortable, but also a noticeable element of the interior. Making such a piece of furniture is very simple, because the main condition is an original, bright, beautiful or funny pattern on the sweater that you will use in your work.
So, you will need:
- A sweater that you won’t wear anymore, but it’s a pity to throw it away;
- Scissors;
- Thread and needle;
- Felt;
- Fabric for the cover (lining material is perfect);
- Prostyrene foam for stuffing.
Cut the bottom of the ottoman into a round or square shape from felt. This part will serve as the primary blank. Take the sweater and turn the sleeves inside, sew the remaining holes with an even seam. Sew the felt blank to the bottom of the sweater to create a bag-cover.
Tip: By using solid-colored sweaters with chunky knits like argyle or cable knits, you'll get a stunning, classic-vintage ottoman that will look great in any decor. These knitted patterns are suitable for square and rectangular shapes.
Now you need to prepare a cover made of dense lining fabric for polystyrene foam. If your initial piece of felt is round in shape, then you will need one piece of fabric of the required size (for example, 50 cm wide and 70 cm long), but if you decide to make a square ottoman, then calculate the required dimensions for four parts.
Sew all the pieces together, and leave a hem at the top for the lace, which will tighten the lace after you fill it with padding. You should fill the cover after you place it inside the sweater. Pull the lace as tightly as possible so that the filling does not spill out, straighten the sweater and enjoy your new piece of furniture!
Non-standard solutions in the manufacture of ottomans
Soft ottomans can be of any shape, even spherical. This will be just a great option for, which will become one of your child’s favorite toys.
The ottoman ball is quite easy to make yourself; for this you will need:
- Sewing machine;
- Threads;
- Needle;
- Scissors;
- High density fabric, two colors;
- Graph paper for drawing up a pattern;
- Polyethylene;
- Silicone filler in the form of balls.
The process of creating a ball ottoman consists of the following stages:
- First of all, you need to make a pattern on graph paper, observing the required dimensions. To make the task easier, use a round object, such as a large inflatable balloon or a lampshade for a floor lamp. Measure its circumference and divide the resulting size in half. Divide this number into 5 parts so that the middle 3 and the outer 2 are the same size. You will get the diameter of the base in the form of a circle and the width of the stripes that make up the spherical cover of the ottoman.
- Transfer the resulting markings to the item you have chosen, starting with the circle-shaped part. Draw the next line below along the pre-calculated strip width.
- Take it, cut it along one side and cut off the bottom. Straighten and place on the marks of the first strip, secure the edges with tape. Transfer a quarter strip to polyethylene and cut. Prepare the middle strip piece in the same way. Trace the pieces onto graph paper before cutting.
- Now the details of the ottoman need to be cut out of fabric of two colors, leaving 1 cm for a seam allowance. Sew them into stripes, leaving one side unstitched, and iron them.
- Attach the first strip to the round piece. The ends of the strip must meet exactly with each other. Stitch them and connect the round base to the strip with a seam, leaving 1 cm from the edge.
- Sew a similar piece for the opposite side of the cover and stitch it to the middle strip. At the same time, do not stitch the ends of the middle strip. In the same way, sew the second semicircular piece with a middle stripe and iron the seams.
The case for the ball ottoman is ready, all you have to do is fill it with filling. To make the shape elastic, add small pieces inside. Close the hole with a hidden seam.
Let's complicate the task: a wooden ottoman with a drawer for all sorts of small items
If you have the skills to work as a carpenter, then you can easily make a fairly simple, but very beautiful and functional ottoman with a wooden drawer on wheels. You can put toys, magazines, shoes or clothes in this ottoman. For it you will need:
- laminated board or chipboard sheet for making a circle with a diameter of 30 cm and 4 rectangles 40 X 33 cm;
- 4 wooden beams with dimensions 4 x 8 x 8 cm;
- PVA glue;
- furniture wheels – 4 pcs;
- metal corners – 4 pcs;
- self-tapping screws;
- screwdriver (screwdriver, drill);
- foam rubber for stuffing;
- fabric for decorating the cover;
- sewing machine.
Take chipboard boards prepared to size and connect them to form a box 40 x 40 cm wide and 30 cm high. Coat the joints with additional glue.
Place on the bottom corners of the box. Secure them with self-tapping screws, coating them with glue for a more secure fastening. Attach furniture wheels to these bars. Install the cover using glue and self-tapping screws.
The frame of the ottoman is ready, now you need to sew the cover. Take special furniture fabric, it wears out less. Using the shape of the lid, open the top of the cape and sew a 10 cm strip of fabric along the contour. Here you can also add frills, drapery, and canvas to suit your taste.
Place a layer of foam rubber on the lid of the ottoman to ensure softness. Pull the cover over the top. To make it, you can use any fabrics and decorative elements.
Video about making an ottoman with your own hands
As you can see, it’s very easy to make an ottoman with your own hands, and the photos we posted in this article will help you. Share with us in the comments your experience in making such pieces of furniture, and we will be happy to discuss with you all the intricacies and features of such work! Comfort to your home!
You can even make an ottoman for your home yourself using different materials and techniques: crocheted or knitted, sewn from improvised materials or even from an old sweater.
Our review presents interesting master classes on how to make an ottoman for a hall or hallway and non-standard ideas for using the product in the interior. So, let's find out how to create a stylish piece of furniture step by step and what you need for this.

There are many fillers for making frameless furniture. Each material has its own characteristics and features. 
If synthetic materials are not suitable, you should choose natural ones:
- Wood sawdust and shavings from waste cedar and pine. The raw material repels pests and has a healing effect, but it needs to be changed periodically.
- Pooh presents is a light filler.
- Buckwheat husk is popular. This filling allows you to create comfortable furniture.
To the benefits Natural fillers include the absence of harmful chemical components.

Synthetic materials are also used as fillers:
- Expanded polystyrene looks like small balls. Elastic granules allow you to create additional volume.
- Holofiber is a lightweight filler. It allows you to get upholstered furniture.
- Polyurethane foam is an elastic material that does not provoke allergies.

ADVICE: The filler can also be an old blanket, pillow or rag.
Products filled with balls can be used outdoors, because the material does not absorb moisture. For creation items furniture improvised means are also used. Original materials include cereals, legumes, dry grass and cotton wool. There are a large number of options for furniture fillers
Knitted square ottoman
Let's find out how to make a knitted ottoman with your own hands. Furniture made from handmade yarn is an original solution for the interior and a soft object for a comfortable pastime. The stylish item looks like a sample from a store.

To make a soft ottoman with your own hands, you need to knit six squares of wool of the same size. Knitting is done by crochet. The “sampler” texture and bobble screeds are used. You can watch the knitting method in the video.
ADVICE: Such a pouf is suitable as an addition to an ottoman, as well as as an item for decorating bedrooms and living rooms.
- Lyon brand yarn, 450 grams, gray – 5 skeins;
- needles for creating tapestries;
- crochet hook, size 6.5 mm;
- pouffe filling;
- special fibers and foam;
- plastic bags.
 Step-by-step instruction:
- Connect the squares using seams. To do this you will need a double thick thread.
- You can check the shape of the product on the box.
- Filling a piece of furniture. To strengthen the product, it is worth using materials such as plastic bags, foam or newspaper.
ADVICE: To prevent the filling from penetrating through the knitted pattern, it is recommended to place a pillowcase or soft lining inside.

Once filled, connect the two remaining sides. The yarn product is ready for use.


Master class from an old sweater
Let's figure out how to make an ottoman with your own hands from an old sweater. The lower part of the clothing can be used to decorate the upper surface of the product. Even when cutting off the sleeves, unsightly seams will not appear.
 Assembly technology:
- Turn the sweater inside out and cut a circle at the collar.
- Sew up the arm holes with strong threads.
- Then turn the product inside out.
- The bottom should be slightly rounded.
- Place a special polyester lining inside the sweater. Then cut out two circles and connect these elements.
- The product must be filled with soft filler.


TOTAL: After stuffing the pouf, you should sew up the hole. The decorative product has many uses for the home. This is an excellent solution for decorating your home interior.


Crochet an ottoman
You can knit a round pouf with your own hands. To knit a product with a diameter of 50 cm you will need 2-3 balls of Bobbin yarn. A detailed description is presented in the photo below.

But the knitting technology is as follows:
- First a basket or bag is knitted
- Filled with filler
- And then the “lid” is knitted separately and sewn to the base of the ottoman


How to sew an ottoman bag with your own hands: photos and ideas
You can make an interesting product for your child. A DIY ottoman bag is suitable for creating a cozy place to spend your leisure time.

A soft piece of furniture can be made from two pieces of fabric, bean pellet filling and a zipper. Like option Not suitable for small children, as filler granules may fall out of the unzipped zipper. There is a danger of the child choking. If necessary, the zipper can be sewn up.


IDEA the fact is that we sew like a bag - BUT we sew the OPPOSITE corners and get the design as in the photo
Master class: how to sew a fabric ottoman
Universal products can be made from fabric. This provides additional seating and leg rest space. In this master class you will learn how to make a round ottoman with your own hands.
For manufacturing you will need the following components:
- 1.25 meters of thick woolen fabric;
- lightning;
- scissors;
- measuring tape;
- sewing pins;
- a piece of leather;
- filler;
- sewing machine.

The process of creating ottomans
- Cut out a circle (46 cm), a rectangle (length 142 cm, width 40) and a square (side 48 cm).
- Cut the square into two parts.
- Sew a zipper to both sides. The zipper should connect the two halves.
- Then cut out a circle from the square using a ready-made template.


- Fold the rectangle in half along the short side.
- After this, this part needs to be sewn to one circle, and then to another.
- From a strip of leather can you make a handle.
- Additionally, buttons are attached to the leather strap.


You can use polystyrene beans as a filler. Foam or polyester is also used. It is recommended to sew the zipper together before use. This DIY round ottoman is ready to use.
Ottoman-banquette in the hallway for shoes
To create an ottoman for the hallway with your own hands, you will need two drawers and some other materials. Such a product is not only practical, but also functional. You can install shelves inside and put shoes or things there.

You will need the following components:
- two wooden boxes;
- batting and foam for drapery;
- fasteners;
- sheet and burlap;
- special paint;
- wood plank;
- wood glue;
- tools;
- brush;
- stapler

To make an ottoman in the hallway with your own hands, you need to follow these steps:
- The boxes are glued along the long side.
- A bar is attached to the bottom where the rollers can be attached.
- Then foam and batting are fixed to the top surface.
- The burlap is sewn together with the sheet. The sheet acts as a lining.
- The box is coated with special paint. If desired, you can apply an aging effect.
- The cover fits over the drawers.

You can make other ottomans from boxes with your own hands. The photo shows original options. One of the options involves opening the drawers, inside which you can place shelves for shoes. And on top there is a soft pillow with filling.

- A practical option can be made from one box. First, the box needs to be sanded and painted with spray paint. Filler is laid on the plywood, and fabric is laid on top.
- The material is fixed on the reverse side with a stapler. Z
- The plywood is then attached to the surface of the box. You can attach rollers at the bottom.


How to make an ottoman from a stool
When deciding which ottoman you can make with your own hands from available materials, it’s worth a try. For creative manipulations you will need an old stool.

Let's start assembling:
- Disassemble the chair and remove the seat.
- Cut out the blanks. Circle in plywood and foam.
- Use glue to attach the foam to the board.
- Put a fur cover on top and secure the ends with a stapler.
- Assemble the chair.

It is necessary to let the chair stand for at least a day for the glue to harden. The fur needs to be combed.
Detailed in this article.
Ideas for ottomans using improvised materials
Let's consider options for ottomans with original design. Common objects, bottles, tires and rags serve as filler and frame.
Bottles
Unusual creation option DIY ottoman made from plastic bottles. The bottles need to be held together in a round shape and secured with tape. The bottom and top of the product are made from cardboard.

The bases are made from foam. They are fixed with tape. The cover is made of beautiful fabric. You can see the design made from bottles at photo. A similar item is suitable for decorating a living room.
Tires
Interesting models can be made from tires. How to make an ottoman depends on the availability of available materials and skill. The tires need to be fastened together. A material similar to foam rubber is placed inside. The holes are then covered with thin boards. A soft base is mounted on top and a cover is put on. To decorate the structure you need to use dense fabrics.

Ottomans for children
To make an ottoman with your own hands, you can use drawings and diagrams. Bright and colorful fabrics are used to make products. Try these options:
- The model, made of two pieces of material of different colors, looks interesting. Plain fabric can be used at the bottom.
- A wonderful solution is square-shaped structures.
- An original composition can be achieved by using fabrics of different colors.
- Children will love the cone-shaped ottoman.
- You can even sleep on a long ottoman. To make it you will need flat pillows and a long blanket. The pillows are placed in a fabric cover and secured in place.


Ottoman in the interior with different designs
The choice of ottoman option largely depends on the type of room. For the hallway, you should choose frame models with a rigid base. Cylindrical designs help smooth out the angularity of the room. For a comfortable stay in the living room, models with soft upholstery are suitable. To create an accent, you should choose a product made from a material with a bright color palette.


Round poufs are an ideal option for small spaces. Rectangular ones are recommended to be placed near armchairs and sofas. The product for the kitchen must be made of moisture-resistant fabrics. For a child's room, you need to choose safe, comfortable and soft models.


We hope that our master classes will help you figure out in detail how to make an ottoman yourself from simple materials. Homemade products will add comfort and coziness to any room. Original seats are suitable for different interiors.

How about minimal investment? You can make a designer ottoman with your own hands, which, in addition to its decorative function, also solves several practical problems. This is a rather unusual accessory that immediately attracts attention. With a little creative imagination, you can make a completely unique product from old tires or suitcases, and the addition of wheels will make the design also mobile. Today, the editors of the online magazine site will hold several master classes on making an ottoman from unusual things, with the help of which you can make first simple, and then more complex and unusual interior items.
The ottoman came to us from the East; they don’t use it very often there, preferring to sit on small structures. It quickly gained its popularity due to its mobility and versatility. The main advantage of the design is that it is easy to make yourself from old things that you decide to recycle. Today you can buy a beanbag or a rigid frame ottoman of any design and finish. But why shell out money for something that you can easily do yourself in just 1-2 hours?

Unconventional ideas for making your own pouf from unusual objects
Manufacturers produce a wide variety of ottomans: for a child’s room, hallway, bedroom, and even for country holidays. They are offered at a fairly high price, but why spend personal finances on something that you can do yourself? And for this you don’t need to be a professional at all, just show a little imagination and follow our instructions.
Step-by-step instructions for making your own ottoman from plastic bottles
The easiest way to make an ottoman is from plastic bottles. You must first prepare the following materials:
- plastic bottles - 14 one and a half liter pieces;
- transparent tape;
- plywood sheet;
- material for, decor;
- double sided tape.
- thin and thick foam rubber or .
Advice! First you need to unscrew all the caps and leave them in the cold overnight or put plastic bottles in the freezer. The next morning, immediately screw on the caps and place them under the battery. In this simple way, the strength of the bottles increases.
Step-by-step photo description of making a pouf with your own hands from plastic bottles.
| Illustration | Description of action |
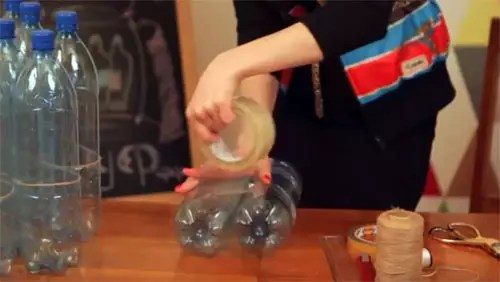 | Connect with an elastic band 2 times for 2 bottles, 2 times for 3 bottles and 1 time for 4 plastics. Then secure the structures with tape. |
 | Connect the entire structure together and fasten it. |
 | Cut 2 ovals from plywood according to the size of the bottom of the ottoman, make small notches on them on the outside. Glue thick fabric onto one oval - this will be the bottom of the structure. |
 | Glue the plywood to the structure top and bottom using double-sided tape. |
 | For greater strength, tie the ovals with twine along the notches. |
 | Wrap thin foam rubber around the ottoman and sew with thick thread. |
 | Cut out the top of the structure from wide foam rubber. |
 | Sew the seat to the foam sides. |
 | Sew a cover from bright fabric, pull the cord along the bottom base and put it on the workpiece. |
 | The finished product weighs no more than a kilogram. |
You can watch the master class in more detail in the video.
Related article:
Photo examples, drawings, diagrams, materials; Features of manufacturing furniture for the garden, children's room, bathhouse, gazebo, tips and recommendations from craftsmen - read in our publication.
Ottoman for a children's room made of plastic, 20 liters
If you have a 20-liter bottle left, you can use it to make one for the youngest children. For this you will need:
- 1 twenty-liter and 4 one-and-a-half liter plastics;
- scotch;
- fabrics and decor.
The work is performed as follows;
- Cut off the top of a 20-liter plastic.
- Insert one and a half liter bottles into it, which will act as legs.
- Next you need to decorate the workpiece. To do this, you can use dense soft fabric, colored tape, fur, the options depend on your imagination.

The nuances of making a tire ottoman with your own hands
You can make a creative ottoman with your own hands from an old wheel. It is quite heavy, so or is more suitable. In addition, this is a great option for or. The manufacturing procedure is as follows:
- Wash the tire thoroughly and dry it.
- Cut 2 circles from plywood, the diameter of which is equal to the diameter of the tire.
- Drill several holes in both pieces of plywood and tighten.
- Starting from the center of the structure, glue the twine in a circle in the shape of a snail.
- In order for the ottoman to be left outside, it should be varnished.
- For mobility, wheels can be installed on the bottom side.

For a more detailed master class on making an ottoman from an old tire, watch the video.
How to make a pouf from an old plastic bucket
If you have an old plastic bucket, you can also transform it into a soft seat. To work you will need:
- measuring tape;
- chalk or a piece of dried soap;
- glue;
- stapler;
- foam rubber and non-woven fabric;
- textile.
Before you cover the ottoman with your own hands, you need to measure the diameter of the bottom and top of the bucket. Next, the operating algorithm is as follows:

The finished ottoman will become a real decoration of any interior.
You can watch the video in more detail about the process of making an ottoman from an old bucket.
Related article:
: what is it, advantages and disadvantages; step-by-step production of a coffee table, armchair, sofa, bench, rack; decor features with photos - read in the publication.
Non-standard solution: do-it-yourself ottoman made from a cable reel
A comfortable child seat can be made from an old electrical cable reel. To work you will need:
- padding polyester;
- glue gun;
- braid for decoration.
Progress:

Interesting ideas for making poufs for the bedroom
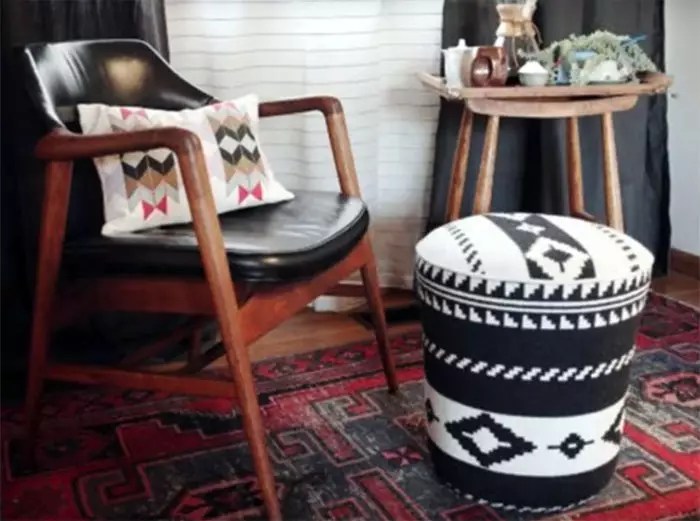
Soft frameless poufs are perfect for the bedroom, which, in addition to their functional load, also act as a bright accent in the interior; photo examples are proof of this. And if you use expensive fabric for decoration, the soft design will emphasize the owner’s wealth and taste.
How to knit a round pouf
Needlewomen can please their family with their creativity and knit a cover for a bag with filling. This is a great addition to a stylish interior decorated in. You should first sew the bag, fill it with foam rubber, and then begin the main work. Master class on making a knitted ottoman with your own hands:
- Tie two circles, their size should correspond to the diameter of the bag.
- Sew the edges of the blanks to the middle.
- Sew a zipper into the hole.
- Place the cover on the bag and fasten the zipper.

Another interesting master class on making a knitted ottoman can be watched in the video.
The nuances of making a soft frameless square pouf
The procedure for working is practically no different from making a round pouf, only the templates should be prepared in a square shape. Each part must be knitted separately, the inner cover must be sewn, into which the filler must then be poured. You can also make a frame model, for example, from, which is covered with foam rubber and decorative fabric. For a more detailed master class on making a pouf from pallets, watch the video.
How to sew a frameless pear-shaped pouf with a soft back
A modern accessory that many families love so much is the pear bag. To make a soft ottoman with your own hands, you need to master the sewing technique. Before work, prepare the following materials:
- upholstery fabric size 320x150mm;
- smooth material for interior decoration – 300×150 mm;
- filler. It is advisable to find expanded polystyrene with holofiber with a volume of about 1 m³;
- zipper with a length of at least 60 cm;
- pattern paper and thread.
The manufacturing procedure is as follows:


Work for half an hour or how to sew a pouf in the form of a bag
You can sew a bag of any shape from beautiful fabric. For work, you should prepare a flowing fabric for the inner cover and a beautiful material for the outer surface. Before you sew a bean bag ottoman with your own hands, you need to make patterns for 4 sides, the bottom and top, photos of ready-made solutions will help you choose an interesting design.
Then transfer them to the fabric and cut them out taking into account the seam allowances. After this, sew all the fragments of the inner cover, leaving a small hole into which to pour the filler. All manipulations can be carried out with decorative fabric, the patterns of which can be made according to the same patterns.

How to properly assemble and finish soft square and round ottomans on a rigid frame
More complex work will require a little more time and carpentry skills. But there is nothing difficult in such work, just look at a few of our step-by-step instructions and you can do everything yourself.
Detailed instructions for making a square soft ottoman on wheels with a drawer for small items
With a little work, you can make a more solid design - a square ottoman with a removable lid on wheels. This is also an additional toy, and you can also store slippers for guests in it. For work you will need the following materials:
- sheet of plywood 12-16 mm thick. Sizes are for children and adults;
- wooden block 20×40 or 40×40 mm;
- wheels;
- piano loop;
- foam rubber for soft seats up to 100 mm thick;
- padding polyester;
- upholstery fabric;
- carpentry;
- glue.
An ottoman up to 40 cm in height is suitable for children, and up to 55 cm in height for adults. In the table we have prepared the dimensions of the parts for an ottoman intended for children and adults.
| Detail | Quantity, pcs. | Dimensions for children, mm | Dimensions for adults, mm |
| Front and back panel | 2 | 350×250 | 400×370 |
| Side panels | 2 | 326×250 | 368×370 |
| Bottom and top | 2 | 350×350 | 400×400 |
| Wooden blocks for sides | 4 | 40×40×250 | 40×40×370 |
| Blocks for the top | 2 | 350×1450 | 550×1650 |
| Upholstery fabric for side panels | 1 | 350×1450 | 550×1650 |
| Sintepon | 1 | 300×1410 | 450×1610 |
| Foam rubber | 1 | 350×350×50 | 400×400×100 |
| Cover material | 1 | 500×500 | 650×650 |
Step-by-step manufacturing process


Second life of an old stool
Do not rush to throw away an old, but still strong stool. Just a couple of hours and you will add an interesting designer piece of furniture to your interior. The manufacturing process is as follows:


Detailed master class on making a pouf on a wooden frame
This ottoman can be made of any geometric shape. Let's consider one of the simplest ways: making a round product. For this we need:


Conclusion
Making an ottoman with your own hands is not at all difficult. To begin with, you can practice on simple designs. In the process of work, creative inspiration will appear, which will help you create more complex things. Unique items made by yourself will always be a bright accent in the house, delight loved ones and surprise guests.


We hope that our instructions will be useful to you, and you will soon delight your family with a new invention. Have you ever made ottomans with your own hands? Tell us in the comments what model you have already made or are planning to make. And finally, we offer you to watch a master class on making a large ottoman with a carriage tie.
When you want to bring something new into the interior or update your style, additional furniture attributes will help you. For example, anyone can make an ottoman with their own hands - both an experienced craftsman and a beginner in this field.
Poufs are popular for a reason, because they can be used as a chair, table or as a footrest.
Poufs are popular for a reason, because they can be used as a chair, table or as a footrest. Plus, they take up little space, which is a huge plus for homes with limited space.

You are not limited in the choice of shape, parameters and raw materials.
Ottomans made by yourself have many advantages: you are not limited in the choice of shape, parameters and raw materials. To create an ottoman, you can use any available materials and it will not require large expenses, or it will be completely free.

Handmade ottomans have many advantages.
Anyone can make an ottoman with their own hands, regardless of skill level. Some of the available ones will be models made from plastic bottles or tires. With a little more effort, you can make a pouf from boards. And if you have carpentry skills, you can easily make a wooden pouf with drawers. Having experience in cutting and sewing, you can create a unique product of any shape and model.

According to the instructions, you will receive a high-quality, original piece of furniture that will serve you for a long time.
A pouf bag that will delight children will be original and quite simple to make. To create it, you will need to sew a bag with a lining and fill it with polystyrene foam - it is sold in many construction supermarkets.

Having experience in cutting and sewing, you can create a unique product of any shape and model.
In any case, the main thing is to patiently and slowly follow each step, according to the instructions, then you will receive a high-quality, original piece of furniture that will serve you for a long time.

Anyone can make an ottoman with their own hands, regardless of skill level.
Several master classes on creating poufs from scrap materials
- Pouf made from plastic bottles.
Anyone can make it, for this take:
- plastic bottles, volume 1.5-2 liters;
- thick cardboard (equipment packaging will do);
- foam;
- upholstery fabric;
- scissors;
- thread, needle;
- scotch;
- glue.

When the ottoman is ready, the hole can be sewn tightly or a zipper can be sewn in its place.

Note: The cap on each bottle must be screwed on tightly. Secure the containers to each other with tape and place them on the first circle so that it completely occupies its space. Place the second circle on top, make sure that the elements are securely and evenly fixed.
In any case, the main thing is to patiently and slowly complete each step.

Next, start finishing the product - cut out two round and one rectangular parts from foam rubber, be sure to leave some allowance for seam allowances. Connect them together with strong stitches. Instead of foam rubber, you can use padding polyester, insulation, or dense fabric folded in several layers.

Anyone can make an ottoman with their own hands - both an experienced craftsman and a beginner in this field.

Some of the available ones will be models made from plastic bottles or tires.
- DIY ottoman from an old bucket.
To create it you will need the following materials and tools:
- jute rope;
- construction glue gun;
- cardboard;
- upholstery fabric;
- microfiber;
- stapler;
- large button.

Remove the handle from the bucket, place it upside down and wind the rope tightly in a circle. In order for it to hold well, each stitch must be placed on glue.

Instead of foam rubber, you can use padding polyester, insulation, or dense fabric folded in several layers.
When the entire bucket is wrapped with rope, proceed to making the seat of the pouf. Make a circle out of thick cardboard that matches the diameter of the bucket. Prepare a circle from fabric too, but 10 centimeters larger. Using a button in the center, connect the fabric and cardboard. Shape the microfiber into a tube, wrap it around the button between the fabric and the cardboard, securing it with a glue gun. Fill the cardboard base to the brim with tubes. The top fabric should be stapled to the back of the cardboard. Now glue the part to the base and the work on the ottoman is completed.

First, you will need to cut out two equal round parts (or squares if you want to get a square ottoman) of a suitable size - this will be the top and bottom of the ottoman.
- A tire pouf is a great idea for a cottage or living room.
Prepare the following materials and tools:
- old tire;
- twine (at least 20 meters long);
- self-tapping screws;
- glue gun;
- a sheet of plywood 3-5 millimeters thick;
- jigsaw;
- electric drill.

First, you should measure the inner diameter of the tire before it thickens, divide this value in half and add one and a half centimeters to the result - you get the radius of the desired circle.

You can also add a strap, which makes it possible to easily move the product.
Draw it on a sheet of plywood and cut it out with a jigsaw. You should make two circles - on the seat and the bottom of the ottoman. Then drill holes in the tire and plywood, secure the parts together with self-tapping screws.
Now you can glue the rope to the tire. To create a unique design, start from the center of the seat, laying the twine in a snail pattern.

The top fabric should be stapled to the back of the cardboard.
Use clear, fast-drying, high-strength adhesive.
When the top of the pouf is completely covered, proceed to the sides of the tire. To make it easier to attach the twine, turn the product over from top to bottom. After the first circle, let the glue dry thoroughly to avoid the rope moving.

Make a case for the ottoman according to the above diagram.
Note: do not rush, apply a lot of glue, process the future pouf circle by circle. It is better if you work together - one will check that the rope lies without gaps, and the other will continue gluing. By working on such a pouf yourself, you can easily allow gaps to form and the string may move from the surface of the tire.
When the glue has dried well, coat the finished pouf with clear varnish.
The product can be decorated with legs or wheels.

As decoration, attach buttons, rhinestones or borders to the seams.
- How to make an ottoman quickly without patterns.
For work, prepare:
- textile;
- stuffing material;
- scissors;
- needle, thread;
- measuring tape.
Prepare two identical round elements from fabric, the parameters of which are equal to the top and bottom of the product. Allow a few extra inches for seams.

First, measure the inner diameter of the tire before it thickens.
Then cut out two equal rectangles - their width is the height of the ottoman, their length is half the circumference of the upper and lower zones.

The seams can be decorated with ribbons and borders.
Apply seams to the resulting rectangular elements from one edge so that they form a long ribbon.
Then you need to baste the first circle to it, stitch along the seam. Then do the same with the next circle. The seams can be decorated with ribbons and borders.

Do not rush, apply a lot of glue, process the future pouf circle by circle.
This is how you can make a pouf cover without wasting time on patterns. The filler can be a variety of materials. To prevent the opening for stuffing from being noticeable, place it at the bottom of the product. When the ottoman is ready, the hole can be sewn tightly or a zipper can be sewn in its place.

Following this description, you can build a cube ottoman.
Following this description, you can build a cube ottoman. The only difference is that all the parts should be made square, and there are four of them in the side parts. In order for the product to better hold its shape, use dense fabrics, and choose synthetic padding or foam rubber as a filler.

In order for the product to better hold its shape, use dense fabrics, and choose synthetic padding or foam rubber as a filler.
There are a whole lot of affordable, unusual ideas on how to make an ottoman with your own hands, don’t be afraid to fantasize and experiment.

There are a whole lot of affordable, unusual ideas on how to make an ottoman with your own hands, don’t be afraid to fantasize and experiment.
VIDEO: How to make a round ottoman with your own hands