The ancient tradition of making and installing carved frames on windows in a wooden house was remembered relatively recently, when the first boom in the construction of log houses from rounded logs and timber passed. Having lived in a new wooden house for several years, the owners almost always begin to treat it as a living being, so it is not surprising that on the windows and entrance doors Amazingly beautiful carved patterns began to appear from wood, serving as both decoration and protection.
Functions and purpose of carved platbands
Most experts involved in the culture and history of wooden architectural monuments, note that the carved frames on the windows, photo, are almost a status item. A house without carved patterns looks wooden hut, even if very large and beautifully decorated, with platbands - turns into a mansion.
Traditionally, carved window frames are installed for two purposes:
- Protection of cracks around the perimeter of the window frame from the penetration of rain, snow and wind;
- Additions and decorations to window openings and facades wooden house generally.
For a wooden house, builders traditionally offer wooden or metal-plastic window frames complete with double-glazed windows. window profiles. Regular plastic trims made of PVC can also be ordered in a carved version. It’s just that you most likely won’t be able to choose a design or pattern; carved plastic window frames are made according to traditional templates by stamping and only give the appearance of handmade work.

Advice! Today, many restoration workshops and firms have three-coordinate milling machines, capable of automatically cutting out a pattern of any complexity from polycarbonate, foam and epoxy plastics.
Such work will not be cheap, but the quality of carved frames for plastic windows will be even higher manual cutting. All that remains is to choose the design and pattern.

Rarely any home owner can speak more or less clearly and reliably about the third task of window casing. This is about protective functions, protecting wooden house from " evil eye", illnesses and uninvited guests. You can have different attitudes towards beliefs and traditions, but it will obviously not be amiss to take into account the specifics of choosing a pattern for the trim in your home.
Patterns and figures on carved wooden frames
It is clear that any self-respecting owner will not hang the first available frames on the windows of a wooden house; the process of selecting a theme and design can take a long time, so you should not overuse the use of symbols whose meaning is unclear or unknown. If the mystical and cultural part of the carved frames creates psychological discomfort, you can treat carving as a way decorative design window openings wooden house.
It was no coincidence that they were invented to decorate carved frames, and were carefully stored and passed on practically unchanged. Most wood carvers cut simply as copyers, so you will have to plan and decipher the design on your own.
Advice! In any case, before using carved wooden frames on windows with patterns and pictures of incomprehensible content, it makes sense to try to understand the meanings of the carving elements, patterns and figures.
For example, figurines and images of animals have always symbolized positive wishes for prosperity and prosperity to the home:
- The snake or dragon has always signified wisdom and strength to protect the home;
- Birds in flight mean cordiality and friendliness; birds sitting in the corners mean attention to guests and news;
- Fish, deer, bunches of wheat and grapes mean a wish for prosperity.
It was not customary to depict domestic animals and human figures, especially in the same canvas as climbing plants and flowers.

More modern designs on carved wooden frames usually have a traditional regular pattern.
These can be intertwined flowers, leaves grapevine, arranged in a regular pattern. In the carved compositions of the 18th-19th centuries, more modern images of columns, porticoes and chapels used in wooden architecture that era.

Most of the carved frames are ordered from master carvers. If desired, it is not difficult to make carved window frames with your own hands using templates or ready-made diagrams. The simplest lines and drawings can be transferred to a workpiece and cut out with an engraving nozzle, with more complex circuits you'll have to tinker and remember your drawing lessons at school.
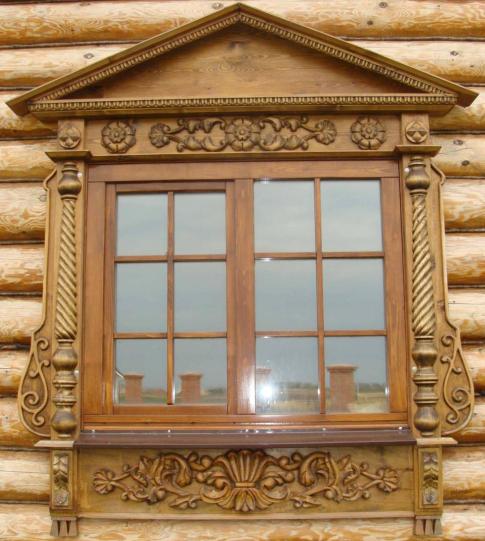
The upper part of the frames was called the ochele, this is the most complex and beautiful part of the decor. On the one hand, the ochele set the general tone of the carved composition, on the other, it served as a canopy over the window opening. At the top of the composition there was a diadem, symbolizing the rising sun, and in the center there was always a medallion or crown of plants. The lower part of the window was covered with a carved apron, usually in the form of an open fan.
If the mystical and cultural part of the carved frames creates psychological discomfort, you can treat the carving simply as a way of decorating the window openings of a wooden house.
An ordinary interwoven pattern of vines or flowers will be far from any mystical content, while the beauty of the trim and carvings of the window frame of a wooden house will only intensify. Carved frames with a regular pattern have a serious advantage over a complex multi-tiered composition:
- Firstly, patterns of carved window frames are transferred to a wooden or plastic blank much easier and faster than a drawing with a complex multi-tiered composition;
- Secondly, even if you cut out an intertwining vine or edging with your own hands and make small mistakes, it will be almost impossible to see them in a patterned field, this is how human psychology works.
Therefore, before making carved window frames, choose a simple pattern for yourself, with a minimum number of individual details. Even the most uncomplicated pattern on the facing strips can transform the appearance of a window in a wooden house beyond recognition.

Options for making carved platbands with your own hands
Wood carving has always been and remains quite an expensive undertaking, so instead of buying ready-made trims, cut or stamped on furniture equipment, you can try to make it yourself decorative strips with simple patterns. At home or in a carpentry workshop, you can use one of three methods:
- Transfer the template to the prepared board and cut out patterns using an engraving set;
- Cast patterns under the carved platband from polyester or epoxy resin followed by painting or finishing with wood-look laminate film;
- Cut out the overlay pattern of the platband using a jigsaw.
Before you try your hand at making carved frames, you need to select suitable material. For carving and engraving, you will need hard types of wood; beech or oak are good, pine or spruce are a little worse, poplar and aspen are not suitable. To cut out the overlay pattern, you can use a regular floorboard, but the material must not have knots, defects or complex interweaving of fibers.
Templates for cutting out an overlay pattern
To make the simplest patterns, you can use the simplest drawings of intertwining plants, flowers, and grapes. Essentially, this is a flat tracing paper from more complex carved reliefs. This pattern can be used to decorate the vertical side trims of the casing.

To decorate a window frame, you need to look not for regular, but for single patterns, for example, a composition of symmetrically arranged figures or interlacing plant stems.

The same pattern can be translated into a contour line and turned into a flat ornament, which is quite simply cut out of plywood, boards or even MDF boards.
The most complex relief or three-dimensional patterns are made using the typesetting method. Initially, ordinary wooden frames are made from planks, individual elements The cladding is carefully adjusted to the size of the window and assembled into a finished frame.

All other decorative elements are sequentially cut from wood, cast from casting polymer or sawn from MDF boards, after which they are sanded, primed and glued to the prepared frame.

Making carved platbands with your own hands
Most often, patterns for window decoration are cut out of waterproof OSB boards in the form of overhead decorative elements. Initially, on tracing paper, a piece of graph paper and using a program, the necessary template for the drawing is developed.


Next, you need to make a working template with which you can transfer the pattern to wooden backing unlimited number of times, photo. To do this, the printed pattern is glued onto a sheet of fiberboard and cut out using a perforated attachment for a drill or ordinary metal scissors.
After marking the wooden blank, you can begin cutting out the casing. The easiest way to make cuts is with a jigsaw on a carpentry bench.

Along the line of the completed cuts, you need to carefully sandpaper remove the chamfer so that during further processing the front surface of the carved pattern does not chip. If a sufficiently thin strip was chosen as a blank, then the cut out carved part of the decor can be glued onto a fabric base.
In the same way, small overhead elements in the form of rhombuses, squares, rings, and braids are cut out. After sanding, the cut out elements are ground on an electric grinder with a wood polishing stone. With the help of a circle you can simply create a rhombus or any other geometric figure the required shape, forming edges or transitional curved planes.
After gluing the decor, the carved frames are primed with hydrophobic impregnations and subjected to aging. This is done in order to remove the whiteness of freshly sanded wood. For this purpose, solutions of iron, copper, and chromium salts are used. As a result, it is possible to choose the color and shade of the carved frame to match the wooden window frame. All that remains is to open the wood with varnish or oil impregnation and install carved decor on the window.

Conclusion
Very often the owners wooden houses Instead of making new decorative elements, they prefer to buy old carved frames that have been preserved in villages, abandoned houses and buildings. Often the cost of a set of carved frames for three windows on the facade of a building is cheaper than hand carving one casing modern master. In some cases, among the old decor, you can find real works of art made by hand by craftsmen of the last century. Such carved frames are usually subjected to deep restoration and are installed not on the outer parts of the windows, but indoors.
Russian architecture of ancient times is associated by most with wooden carved window frames. Their shape stands out among many others for its diversity and beauty.
Just recently, in any corner of the country one could find craftsmen who knew their craft and made mind-blowing platbands. Then, the popularity of such works faded away, but is now resuming with renewed vigor.
In this article we’ll talk about a wonderful way to decorate window openings using carved wood frames. Such elements are most suitable for a wooden house, buy ready-made stencils possible in life size or print, adjusting the dimensions at your discretion.
We will also tell you which materials are best suited for making decorative trims on the windows.
The main function of carved wooden frames was precisely to decorate window openings. Everyone tried to distinguish their house from others and be different. The structural function of wooden trims is to close the gaps between the window opening and the frame. This is done to minimize the entry of dust and dirt into the home, as well as rain, snow and wind. In addition, platbands also perform a function.
In the old days, it was believed that carved wooden frames were able to protect a home from the evil eye, and were a special amulet for the people living in it. That is why various ornate patterns have their own specific meaning.
Modern architecture
Provides the following functionality for do-it-yourself carved wooden platbands:

Note. Often it is impossible to do without decorative carved platbands, especially in log houses, since other materials will lead to the loss of the external attractiveness of the structure.
- Carved platbands made of wood have their own operating characteristics that you need to pay attention to:
- The negative impact of air temperature fluctuations, high humidity, contribute to loss appearance and material deformation.
- When choosing wood for platbands, take into account the properties of each species, because it also has its own characteristics of processing and use.
- Difficulties often arise when combining wooden elements and plastic, so give preference to materials that imitate wood.
The meaning of platband patterns
Each of the patterns of carved wood frames has its own sacred meaning.
- Placed on the kokoshnik Sun, which is used as a symbol of energy and life.
- Snake- the embodiment of fertility and wisdom.
- Cross- a symbol of a harmonious combination of material and spiritual.
- Plants on the frames - the unity of man with nature.
- Earrings in the patterns - hospitable hosts. The earrings testify to the hospitality of the owners of the house.
Note.
Wood is used to make carved window frames. At correct processing and periodically you can not be afraid of the negative influence of the external environment.
How to make carved platbands?
Materials for carved window frames
Larch– the most durable wood that is not susceptible to putrefaction and mold due to the high content of resins in it. Although these qualities do not allow it to be used to create carved elements due to its strength and hardness, it is very difficult to work with larch.
 Alder, linden, aspen- the most pliable materials from which wonderful carved platbands are obtained. In addition, it must be taken into account that such materials need to be treated with antiseptics and fire retardants.
Ash, beech, oak– resistant to negative influence external environment. But processing such wood is quite difficult.
Pine and birch– the most popular materials for making carved platbands, since working with them is a pleasure. From such wood we obtain openwork patterns breathtaking beauty.
Apple and cherry used for the manufacture of the smallest parts for platbands.
Note.
For the manufacture of carved window frames, in addition to wood, MDF is also used (only for interior design), PVC (wide range of colors), polyurethane (for rounded windows), metal (protects the installation seam).
Methods for installing platbands
Telescopic method The L-shape allows you to attach decorative elements by inserting them into the groove of the window frame. The advantage of this method is that as a result the attachment points are completely invisible.
Invoice method- the most popular method of attaching carved platbands. Fastening occurs using nails or special glue.
Features of carving wooden frames for windows
In order to make these decorative elements for windows with your own hands, you will need templates. They come in a variety of shapes, with elaborate and bizarre patterns. If you have experience in wood carving, the job will be easier than for a beginner. You can choose a drawing on any specialized online resources or purchase it in a store.
The selected fragments must be enlarged to the size of your window, this will make it easier to work with. For carved wooden platbands and a template, take fiberboard, cardboard high density or the same paper.
Important!
Cutting small parts is many times more difficult than large ones; moreover, they quickly lose their original appearance and require replacement over time. Also, take into account the angle of inclination of the upper carved platband to prevent the ingress of snow and drainage of water.
The top trim on the window is called a kokoshnik, and the bottom is called a towel. The most popular carved frame designs are birds, animals, plants and figures.
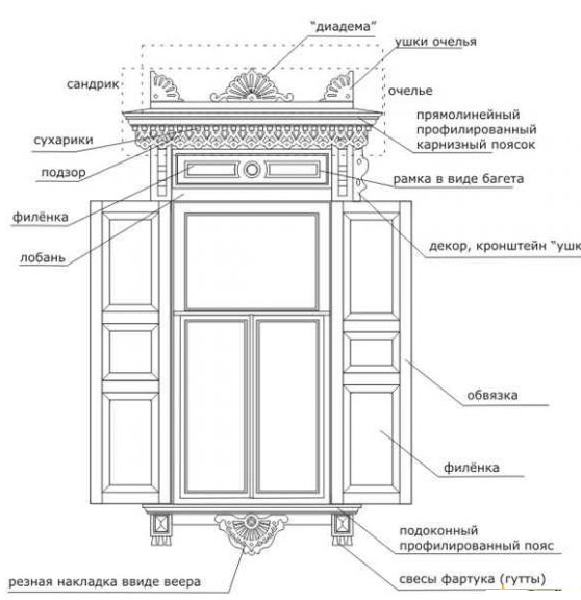
Details of the carved window casing
- window sill or lower strip;
- vertical rail;
- top bar;
- hangers;
- diadem;
- flowerpots.
The most decorative and beautiful are carved platbands, which are cut through. Wood is suitable for this type of work. light shades, or any other that is covered with white paint. In this way, you can decorate the windows on the dark side of the house, then the design will appear brighter in all its glory.
When carving using the overhead method, it is necessary to secure the parts that were cut separately onto a single board. Glue or nails will help you with this. In this way, you can decorate a window to which a casing has already been nailed earlier. The protrusions are coated with paint a tone darker for expressiveness. The combination of both carving methods allows you to create unique beauty on your windows.
Making carved window frames
First of all, you need to select a pattern and print it in an enlarged format. In addition, the design must be placed correctly on the wood. To prevent the formation of cracks in the material, place the stencil of carved window frames along the grain of the wood. It is recommended to highlight the slot locations in color, and then proceed directly to work, which is divided into stages:

Carved elements must be cleaned with sanding paper, and dust must be removed with a vacuum cleaner. The applied thread is attached to the window using nails, the heads of which are then removed. To ensure reliable fastening of the platbands to carved wood windows, a special glue is used, which is applied from the reverse side. Also, to attach carved frames to windows, through or blind tenons or liquid nails are used. To preserve the original material without loss of quality, treat it with fire retardants and, as well as against bark beetles.
The originality of carved frames for windows and doors is striking in its spirituality. If you are not afraid of carpentry and want to make wooden trim with your own hands, then all that remains is to come up with a composition for framing.
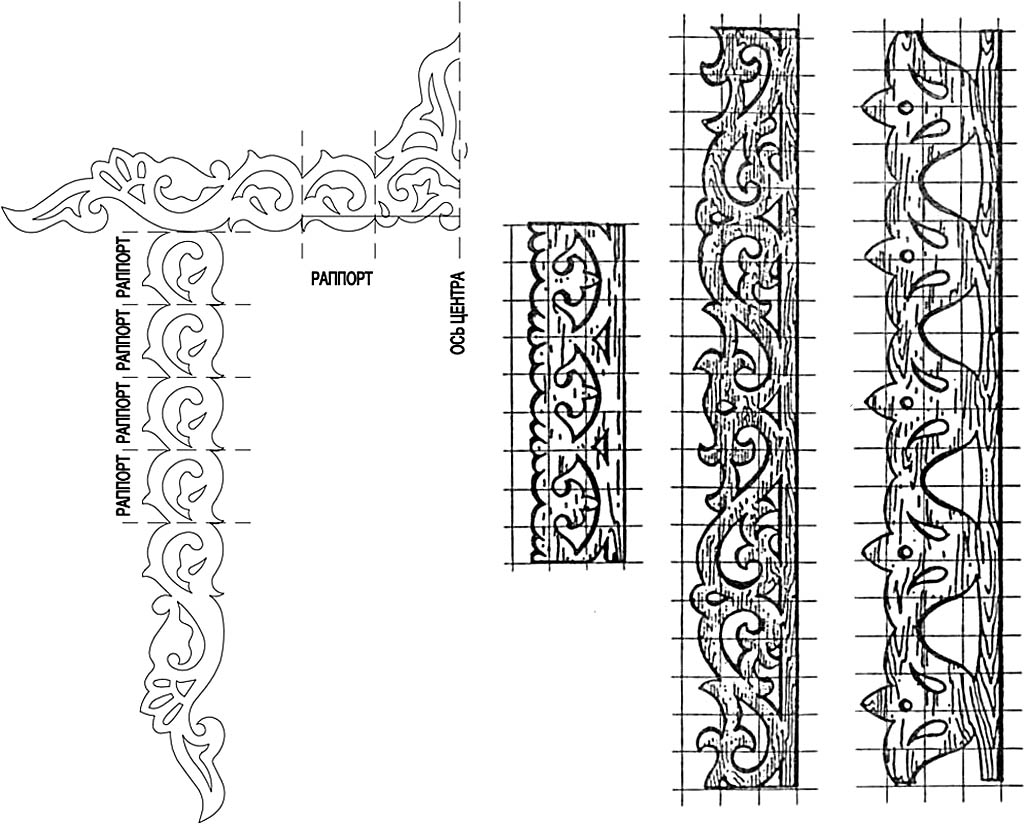
Below are sketches of carved frames in a small size and mediocre quality. But these templates can be downloaded for free. The main thing is the idea, and the template can be made the right size.
How to make templates for carved frames (stencil)
Optimal and simple ways, how to make templates for cutting.
Using a graphic editor
There are many programs for image processing (Photoshop, etc.).
Photocopying
If you don’t want to deal with programs, you can make a photocopy of the drawing and immediately set the desired copy size (enlarge, reduce, compress, expand). Or scan and print the sketch on a printer in the desired format.
Manually - scaling by cells
In the end, you can make a template manually using the technology of scaling (copying) by cells (linear scaling).
By scaling by cells, you can change the proportions of the drawings. For example, you don't like the original form and you want to change it. To do this, when transferring the drawing, keep one of the sides at the original size, and increase the second in the new square.
Scaling by cell
Changing the proportions of a picture when scaling by cells
From drawing to template
Template for platbands The template for platbands is made of cardboard, life-size. A separate template is made for each element, pattern and ornament.
The resulting template is placed on the board and the outline is traced with a pencil.
Making holes You can immediately mark the locations for the holes. Holes are drilled inside the pattern, in places where there will be a turn when carving. First, the internal patterns are cut out, and then the external ornament.
Platband carving
Another way to apply a design to a workpiece is copying.
The method involves the use of carbon paper. A sheet of copy paper is placed on the board, and a drawing is placed on top. The drawing is secured with push pins. An outline is drawn with a pencil and copied onto the wood.
Stencil template for carved trims
Now you know how to make a stencil template for carved platbands.
Templates of carved window frames - photo gallery
Window trim template - 1
Window trim template - 2
Window trim template - 3
Window trim template - 4
Window trim template - 5
Window trim template - 6
Window trim template - 7
Window trim template - 8
Window trim template - 9
Window trim template - 10
Window trim template - 11
Window trim template - 12
Window trim template - 13
Window trim template - 14
Window trim template - 15
Window trim template - 16
Window trim template - 17
Window trim template - 18
Window trim template - 19
Window trim template - 20
Window trim template - 21
Window trim template - 22
Window trim template - 23
Window trim template - 24
Window trim template - 25
Window trim template - 26
Sketch of window frames - rooster
Sketch of window frames in the form of a cockerel on a spire
Sketch of window frames - horse
Sketch of window frames - horse
Sketch of window frames - boat
Sketch of window trim - butterfly
Sketch of window frames - leaflet
Sketch of window frames - maple leaf
Sketch of window trim - pattern with fish (right)
Sketch of window trim - pattern with fish (left)
Sketch of window trim - pattern with a bird (left)
Sketch of window trim - pattern with a bird (right)
Sketch of window frames - ornament with goldfish
Sketch of window frames - acorns
Sketch of window frames - flowers
Sketch of window frames - flowers
Sketch of window frames - roses
Sketch of window frames - ornament of interlacing leaves (right)
Sketch of window frames - ornament of interlacing leaves (left)
Sketch of window frames - ornament of weaving leaves-2
Sketch of window frames - ornament of weaving leaves-3
Sketch of window frames - ornament with grapes
Sketch of window frames - ornament with flowers
The use of carved platbands in exterior decoration at home can transform any structure, even the most primitive in architecture. The word “platbands” itself is based on the meaning “on the face.” It is not surprising that with such decorations the house acquires recognition, unusualness, originality and completeness of the image.


Peculiarities
The platbands themselves have several functions. Decorative is just one of them. With the help of such elements you can visually make narrow house wider, and the low structure “increased in height.”
Thanks to such decorations, the gaps between window frame and a wall, which in turn leads to a reduction in noise levels from the street. In addition, dust and water do not penetrate into the cracks, and cold does not penetrate into the house itself.
Using carved platbands, you can make the building colorful in national terms and decorate it as antique. It is important that the application of these elements is appropriate. Wooden frames on a plastic window will look just as strange as metal ones on a log house.


Kinds
Carved window frames can be made from plastic, MDF, fiberboard, metal and wood.
The most common and common option is wooden. They look great, often striking with rich carvings, and can be restored. Maple, alder or birch, as well as pine, are often chosen as the basis for creating figured elements. Such wood cannot be called particularly resistant and durable, but it is easy to cut and inexpensive.
For the manufacture of small elements Apple or cherry trees are often chosen.
Products made from beech, oak, larch or ash resist precipitation and temperature changes well, but processing these species is much more difficult.


There are several types of wooden platbands:
- Flat. There is no “decorative subtext” in them. Such models are used for only one purpose - closing cracks in the house in the most economical way.
- Shaped. The models have a convex surface. They may have protrusions and depressions in the form of cut-out patterns. In such “frames” the windows look very elegant. Window shutters are often especially expressive.
- Curly. Such products are distinguished by their special individuality, originality of shapes and slotted elements. They can fully be called decorative elements of the house. To make these products, you need a vertical milling machine.
The problem with wooden frames is that over the years the material can darken, crack or rot. To prevent this, they must be periodically treated with a protective varnish.


Metal trims look no worse than wooden ones and organically fit into the appearance of the facade, decorated using siding. The material allows you to decorate the product with complex patterns and combined colors. Such platbands are durable and can be installed without much difficulty. But we should not forget that metal is susceptible to corrosion, so measures must be taken to prevent traces of rust from appearing on the frame around the windows.


Window PVC is better The whole thing will be decorated with plastic trims. Unlike wooden ones, these can be made in any shape and color. They will not crack over the years, will not rot, and will not be eaten by insects. The products are easy to install. They last a long time and do not require special care.
The only problem is that these products cannot be made independently, and options with truly thin relief carving Manufacturers do not offer it.


Fiberboard allows you to make any designs on it and is easy to process. That is why it is often used to decorate windows. To prevent such products from absorbing water over time and deteriorating, they must be laminated before use.
A material similar in structure is MDF - a fine fraction of wood. Essentially this is an improved version of fiberboard. This material can also be used to make platbands; it can be processed no worse than wood-fiber board.


The carving itself also differs by type.
- Proreznaya. It is created over the entire area of the casing and resembles airy lace.
- Invoice. IN in this case openwork elements are placed on a solid base, to which they are glued or nailed. With this approach, thinner, lighter and clearer ornaments are obtained than when using blind carvings (not through).


Platbands also differ in the type of installation.
- Invoices They are simply attached to the wall near the window and nailed with nails without heads, or glued on.
- Telescopic cr-shaped protrusions are inserted into the gaps between window frame and a wall. Installing them is not as easy as overhead ones, but they provide more reliable isolation of the joint from external influences.


How to make and install?
To make wooden platbands with your own hands, you will need the following tools.
- drill and drill bits for it;
- jigsaw with a set of files;
- chisels;
- sandpaper;
- flap disk for a drill made of sandpaper;
- sander;
- milling cutter


First you need to decide on the openwork that will be present on the platbands. People with talent and proper training can make the desired image themselves. You can also find a huge variety of drawings on the Internet.
The selected option must be transferred according to the template onto the board. Sometimes the template has to be enlarged. The simplest thing is to make a printout of the desired size, transfer the diagram to cardboard and cut it out.
Board thickness at slotted thread should be at least 3 centimeters. If the carving is overhead, you can use wood 1 centimeter thick to create the openwork.
Getting started with the creation process slotted platbands, many people wonder whether it is possible to create a design on several of them at the same time, stacking future products in a stack. After all, the drawing is the same.


A professional with the appropriate equipment can allow this option to solve the problem. As for home craftsmen, they often have jigsaws of insufficient power. As a result, the process of processing several boards at the same time is very slow.
When the lines are straight, the saw works at an acceptable speed; in rounded areas the process takes too long. As a result of the “wholesale” approach, the time gain is not as significant as we would like.
It must also be taken into account that even high-quality files deviate too much when processing wood large thickness. Therefore, sloppy cuts may appear on the bottom boards. Therefore, when getting down to business, you need to think carefully about all the nuances of the process.


It is important to position the drawing correctly on wooden blank. To prevent the platbands from cracking, the elements must “run” along the wood fiber.
First you need to cut out the excess wood in certain places. The files are selected in such a way that required hole the diameter was slightly larger than the width of the instrument.
A file is installed in the slots obtained at the first stage, and all excess is removed according to the intended pattern. You need to act precisely, but taking into account the fact that the window frame will be viewed from afar, small errors should not puzzle the craftsman too much.


If the product has a figured edge, it is also created using a jigsaw. When cutting too complex shape some places may not turn out very elegant. The situation will be corrected by further processing with a chisel. The finished look is given to products at such mandatory manufacturing stages as sanding, priming and painting.
The fastest way to sand is using a sander. With an emery wheel on a drill, the procedure is slower. Manual sanding is very time consuming. If you bring the appearance flat surfaces before finishing with a grinder, and sanding the small parts manually, you can get the desired result without delaying the process of creating platbands.
A primer is needed to ensure that the beauty made from wood with your own hands is not exposed to dampness, exposure to the sun, fungus and wood-boring beetles. Any impregnation for external use is suitable. It is most convenient to immerse the future casing in a container with an appropriate solution for a few minutes. Another option is to go over all the curls and grooves with a brush.


Can be used for coloring different compositions. It is convenient to use wood oil that soaks into it. This coating will only need to be updated after a few years. Before re-processing, you will need to clean the surface and remove dust from it. When choosing this method of protecting a product, you need to take into account that the oil is expensive and the choice of colors is limited.
If you use opaque paints, you will need to repaint the trim once a year. In order for the products to maintain a neat appearance, before applying new paint, it is necessary to remove the old paint, re-prime it, and only then apply a fresh coat.
Final stage work - installation of platbands. They can be mounted on a wall or backing board and only then on the façade around the window.


- If you want to decorate your home wooden platbands, you can purchase selected material that has passed chamber drying. In such a chamber, moisture is rapidly removed from the wood, bringing its level to a maximum of 12 percent. Boards that are cracked and warped during drying are rejected, and only a high-quality product reaches the consumer. Therefore, when buying it, you don’t have to worry about the fate of future products.
- It is better to look for boards that have undergone special treatment in hardware stores or sawmills. In no case should specimens have large knots, resin residues or other traces of a negative property that could make themselves felt when creating a pattern. It is best to order boards whose width is 10-15 centimeters and thickness 3-4.
- Before starting the actual creation of platbands, it makes sense to hone the carver’s skills and the skill of creating a specific design on cheap boards.


If you want to create not just beautiful, but also meaningful products, it is better to take into account the meaning of some elements of the design of the platbands, which have appeared on the facades of Russian-style houses since ancient times - decorations on houses were not only worn decorative function, but also the function of a talisman.
When creating platbands, the owner of the house was given the opportunity to express himself, conveying certain information to others. For example, the sun in the center of the upper part of the casing means energy and life. Snake like decorative element represents fertility and wisdom. The cross, inscribed in the carved decor of the window frame, symbolizes the harmony of spiritual and material aspirations.
Beautiful things are the weakness of every person, and if they are made with your own hands, pride in yourself overwhelms your feelings. Wood carving can be classified as such creativity. How original and unique your house looks with carved platbands, where the owner put a piece of his soul into the work.
What is a platband? It looks like decorative overlay and mounted with outside windows and is a decoration where a decorative technique is used.
It can be:
- Plants that demonstrate unity with nature.
- The sun located on the kokoshnik, personifying energy and life.
- Earrings indicating the hospitality of the owner of the house.
- A cross symbolizing harmony between the spiritual and material world.
- A bird that speaks of the union of all times.
- A snake representing fertility and wisdom.
- Wings confirming strength and power.
Platbands vary in style, material, and shape. They are the completion of construction, where the individuality and style of the home are emphasized. And at the same time, they perfectly mask all the imperfections of the opening (cracks).
Application area
 Widespread use of framing around various openings has found itself in doors and windows. The location of the planks can be either on the outside of the street or inside the room.
Basically, the same type of platbands are installed, but the threads may differ. And at the same time maintaining the general theme. For example, in a children's room, the bar will have a bunny. Flowers are carved around it. Then the teddy bear in the kitchen should also be framed with the same flowers.
Nowadays they are considered a brand plastic double glazed windows. Some people manage to bet on them wooden plank. In this case, you need to paint it in White color or choose a double-glazed window made of wood.
Planks around window opening perform some functions:
- They unite all the buildings in the yard into a single style.
- Reduce heat loss.
- Protect from dust and litter, moisture, draft.
- Increases sound insulation.
- I emphasize the uniqueness of the residential building.
- An opportunity to express the traditions of a region, family, country.
- The ability to visually stretch and expand the house.
- They add completeness to the construction.
- Cover the assembly seams.
In the days of our ancestors, house owners firmly believed that window trims were not only beautiful and original look, but also provided protection from the evil eye and evil spirits. Therefore, we paid close attention to their production and tried to make them only in a unique form.
Kinds
 The product can be a colorful, luxurious carving or have modest shapes. The lower part is called the “towel”, the upper part is called the “kokoshnik”.
 If we consider the platbands by material, they can be from:
- wood;
- metal;
- plastic;
- foam and polyurethane;
By form:
- teardrop-shaped;
- curly;
- semicircular;
- flat;
Before you start work, you should stock up on templates or stencils for carved platbands; without their help it is impossible to achieve excellent result. And only a master who has been working on wood carving for many years can perform his work without them.
Today you can get stencils freely - in stores, magazines, and the Internet.
You can apply any design on them that the customer or craftsman desires. Plant outlines, animal figures, and patterns of geometric lines and shapes are very popular.
The style of the product can be different, and here the most unusual fantasies of the performer are realized.
How to do it?
 Stencils made in Photoshop
 Stencils are made in different ways:
- Using a graphic editor. The desired image is found and processed in Photoshop. Every computer has the Paint application, it is used for editing, coloring and drawing. By visiting this page, you can develop personal images, from simple to complex projects. It is possible to add text and various elements to existing picture files.
- Photocopies. A drawing that you really like is selected and, when copied, it is immediately enlarged to the desired size. The second option is to scan and print the sample on a printer.
- Manually. The technology used here is scaling (copying) and by cells (linear scaling).
Making threads

We make a template from cardboard, the size should be natural. A personal template is made for all elements of the design.
Now, you need to lay it on the board and trace the outline with a pencil.
We mark the locations for the holes. Let's say you need to cut out a piece of paper. First, a hole is drilled, then a leaf is drawn out with a jigsaw. Following the holes, we make all the internal patterns, then move on to the external ornament.
There is a copying method for drawing. Here we use carbon paper. We trace the drawing through it onto the board and get a pattern on the wood.
Required tools:
- sandpaper of various numbers;
- jigsaw;
- drill with a set of drills;
- set of chisels;
Instructions:
- We make the pattern the same on all windows. To do this, we use a stencil or sketch.
- We place the pattern on the workpiece correctly, where we place all the elements not across the fibers, but along them. This will prevent the thread from cracking.
- We paint over the slotted areas with a pencil.
Wood carving is done in two ways:
- Invoice. In this option we use a thinner workpiece, then the work is simplified. Here we make individual elements, which we will then put together on a single board.
- Proreznaya. In this case, we make a slit through it, resulting in the appearance of lace that elegantly and beautifully frames the window.
Installation of platbands

Create beautiful product- that's one thing. But attaching it to the window correctly is another matter.
Aesthetic appearance and long service life closely depend on the quality of installation of the platbands.
There are two methods of mounting on wooden windows:
- Through tenon. The method is simple and not very reliable. Spikes should be installed in places where they will not be visible. Here it turns out additional protection from moisture.
- Dull thorn. The tenon goes into the casing. Whereas a hole for it is drilled in the frame. You need to lubricate the tenon with glue and insert it into the groove. Fastening is considered complex, but it is more reliable than with the first method.
Mounting on plastic window produced liquid nails, in order to avoid compromising the integrity of the structure.
Step by step guide:
- We take measurements from the window.
- We choose a type of wood and dry it well. The choice of width and height does not play a big role for carved platbands, the main thing is that the thickness is 3 cm. This is the case if the carving will be slotted, for an invoice - 1 cm.
- We sand the wood with sandpaper, starting with coarse-grain sandpaper, and finally with scratch paper.
- Cut out the stencils.
- Take a simple pencil and apply a drawing or pattern on front side wooden surface. We paint over the through slots.
- Let's start cutting out the pattern. Let's start right away with through holes. Where the jigsaw will enter, it is advisable to use a drill for a more accurate cut.
- We carefully sand the holes with sandpaper.
- To remove dust from blind holes, use a vacuum cleaner.
- When using elements of applied threads, we attach them to nails without heads. Moreover, to be on the safe side, let’s apply glue along the back side.
- Now take a damp rag and wipe the pattern until the area is completely dust free.
- We will consider the finishing operation to be stain, with which we will tint the casing or immediately coat it with varnish.

- If you are just starting to work on a stencil on a platband design, you should choose a simpler design with large shapes. The smaller the drawing, the more complex it is. It is good to try elements of the design from through holes.
- Open elements are cut out with a jigsaw.
- Beech, larch and oak – expensive material and difficult to process, but they have long term services.
- The easiest material to process is linden.
- The material most often used is pine.