The hallway is a place where things are usually stored when going out, so it cannot be done without a hanger. Some people attach a board with nails to the wall, but it doesn't look very nice. Therefore, it is best to use a floor or wall hanger, which you can build yourself. A handmade product will not only save your budget, but will also add uniqueness to your home.


Preparation of tools and materials
When you are about to start work, you need to prepare all the necessary tools: drill, screwdriver, self-tapping screws, hacksaw, measuring tape. It is important to have the skills to handle them so as not to make a lot of mistakes and harm yourself. To give the product a neat and aesthetic appearance, you will need varnish or paint.

As for materials, you will need:
- Wooden blocks or metal elements that will create a strong and reliable base that can support heavy jackets. You can use a base from an unwanted artificial tree or from a sturdy floor lamp.
- A column of suitable size that is easy to purchase ready-made. The cheapest option is a dry and bare trunk of a young tree (without knots or bends), treated with sandpaper. Its height should be 15-20 cm.
- Hooks, the number of which should be sufficient to be placed freely on the base.

- An adhesive designed for reliable fixation of all elements, including self-tapping screws.
- To ensure that the hanger stands firmly on the floor and does not slip, thin rubber must be glued to its base.
- To strengthen the center of gravity, it is necessary to make a shelf for storing accessories, which will need to be fixed above the crosspiece mount.

Manufacturing process
First you need to create the bottom of the hanger. To do this, pre-prepared bars need to be sawn in half, sanded and joined at right angles. To ensure that the joints are strong and do not wobble, you need to make indentations along the width of the bar and connect all the parts. Then you need to cut out four bars and attach them with self-tapping screws to the legs and trunk, which will become a reliable support for the hanger.


You can unscrew the screws only after the holes made with the drill are ready. This will help protect the future product from the appearance of cracks, which could render the piece of furniture unusable. The diameter of the screw must be larger than that of the drill.

For reliable fixation, you must first lubricate the holes with glue, and only then screw in the screws.
To make the upper part of the structure, you need to attach a pre-prepared square with hooks. You can also attach four bars to the trunk, which will be aligned with each other at the corners. It should be attached not to the very top, but a little lower. Holes are drilled with a drill, filled with sealant, and only then screws are screwed in. This will help the product hold heavy items.

Having finished creating the hanger, you need to start designing it. First, the entire structure must be processed using sandpaper. Then you should treat it with paint and varnish. You can paint the surface with different colors or draw patterns to get an original product.


Original solutions
The following interesting options can be distinguished:
- Making a hanger for the hallway can be much easier, if you have an old (quite heavy) floor lamp at home. It needs to be freed from unnecessary elements (wires), cleaned and painted. Metallic paint will look impressive. Iron hooks are inserted into pre-drilled holes. You can weave hooks bent from strong wire.


- It will look very unusual hanger made from real wood. To do this, you will need to dry it thoroughly, remove the bark from it, and also sand it. In this case, there is no need to make a stand, since the roots of the tree will securely hold the structure. But it is necessary to file and bring the roots into proper shape so that they do not interfere and look beautiful. You can use tree branches as hooks, having shortened the strongest ones to the required size in advance. Such a hanger will become a decoration of your home, and it will simply be impossible not to notice it. However, finding a suitable tree is not an easy task, which makes it very difficult to translate this idea into reality.


- Save space while maintaining functionality a wall hanger will help. To create it you will need bars, two boards for making a frame, one board for creating a shelf, metal corners, slats and hooks. To speed up the process, it is better to use processed materials. To build the structure, you need to mark the mounting location on the wall and mount two boards to it, located vertically to the floor. The length of the fasteners depends on the length of the product. It should match the length of the shelves.


At a short distance, slats are attached to the vertical boards. You need to build a shelf for shoes from the bars below. The height of the shelf should be sufficient for you to sit on it. All joints are secured with corners to increase the reliability of the structure. Covering with slats will help make the product beautiful and neat. Installation of the top shelf begins with the fastening points. Using a drill, holes are made into which screws will then be screwed.


For beauty, you can use forged corners and hooks, and the finished product can be treated with stain or paint.
- You can combine a hanger with a small cabinet by making deep shelves and hooks. To do this, prepare several durable boards of the highest quality that have been pre-treated. You can use boards from an old bed or sofa, because wood remains durable for decades. It is well processed. Before work, it is worth making a drawing that will show the dimensions and number of shelves. Following the drawing, you need to cut the boards, then attach them to the bottom shelf. Boards are attached to the back of the side boards, the height of which depends on the number of shelves.

You need to remember that the hanger will contain not only outerwear, but also various accessories, so it needs to be especially well attached to the wall. You can use iron corners and self-tapping screws, or you can screw them onto dowels.
You can decorate the finished structure with a small mirror, which will be located on the side. If it is frameless, then you need to attach it to a solid plywood panel. It needs to be fixed. The mirror itself is glued with special glue, and a shelf is placed closely underneath it, which will serve as additional support. If such a design does not seem safe, then you can build a frame for the mirror. It needs to be made from a textured board, treated in advance with sandpaper and covered with stain.


A little imagination - and the simplest hanger will become an interior decoration. It can not only be painted one color, but also covered with fabric or wallpaper. The decoupage technique is well suited for this case, which will give the product an extraordinary look.
- You can decorate the corridor with a non-standard product, which (in addition to storing things) will also perform other functions. A hanger in the shape of a chair will be designed to store outerwear and seating. There will be a shelf for shoes under the seat, and on the high back there will be hooks for clothes and a shelf for hats and gloves.


A strong branch found in the forest or park can become the highlight of the hallway. Just coat it with varnish and screw in hooks, and it will become a worthy element of the apartment.
- Hangers made from water pipes will look very unusual. In this case, you can hang clothes on valves or taps.
- It is very economical and original to use wooden hangers, which can be mounted into the wall at different levels. Already in the products themselves, you can make holes for hooks or use store-bought options that have a self-adhesive surface.
- Old skis are another interesting idea for decorating a corridor. By painting them a fresh shade and attaching hooks to them, you can organize your storage system in a few minutes.

There is no way in the hallway without a hanger - you can’t throw taken off raincoats, coats and hats on the floor. You can, of course, drive several large nails into the wall, but this is not at all aesthetically pleasing. And the wallpaper will become greasy, getting dirty from outerwear. The real one will be much more pleasing to the eye and more practical - or, as you like. And you can build it yourself, and you don’t need to be a furniture ace to do this.
Tools
We will need skillful hands, simple home tools and a minimum of materials. You can even use waste, by the way. Or beautiful twigs with twigs found in the forest.
So, the arsenal of the tool will be as follows:
- A screwdriver and self-tapping screws with a diameter of 4 millimeters with a head of the appropriate shape. The length of the screws is 3-5 centimeters (depending on the material).
- Grinder saw for cutting boards or chipboards.
- Dowels (in case of wall construction).
- Drill or screwdriver (preferably electric).
- Tape measure, level, pencil for marking.
- Sandpaper for finishing.
To create some variants of hangers, metal corners and a jigsaw may also be useful (if you need to cut out shaped surfaces). If you want to create, then you will need a welding machine. However, for simple products it is not needed.
Simple DIY hallway hanger
Materials
Now about the materials. The most popular are wooden boards, plywood and bars, as well as their trimmings. Hangers are often made from wood boards - it is better to take laminated ones, which look more attractive. However, you can also paint regular chipboards by first priming them. It will also turn out impressive.
And if you have an old floor lamp with a stable base that you can’t get around to throwing away, then you can give it a second life in the form of a floor-type hanger. To do this, just remove the lampshade along with the lamp mount and disconnect the power cord. All that remains is to paint the product in your favorite color, not forgetting to first attach hooks to the upper metal circle - woven ones made of wire work well here.
By the way, hooks for hanging in the hallway are an important detail. They should be large and comfortable. You can buy them at a furniture fittings store, or you can use your imagination. Natural materials are a good help in work. Moreover, the products made from them are exclusive - no one will have anything like them. For example, you can use twigs and branches, sanded and varnished, as hooks. Beautiful and functional.
Another interesting and original option is hooks made from teaspoons bent in half. Or aluminum forks. In both cases, the handle is the lower (main) part of the product. You can also bend hooks from thick wire, decorating them with decorative elements - beads, for example.
Photos of wall in do-it-yourself racks for the hallway
From forks From keys From clothespins Old door handles
From sticks From spoons From bicycle handlebars From knots
How to make a hanger in the hallway with your own hands
But, before you start creating a masterpiece, please look at the drawings that we have selected for you.
Drawings of hangers in the hallway
 Wall-mounted
  Floor
Floor
Wall models
The basis of the hanger is the shield on which the hooks will be placed. It can be made solid (from a wood board or a centimeter sheet of plywood) or lattice. The last option is preferable - it is lighter, and less material is used.
- To assemble such a shield, two parallel horizontal boards (bars) are attached to the wall using dowels.
- Then vertical boards about 7 centimeters wide are nailed to them, and hooks are attached to them.
- The size of the product depends on the dimensions of the wall and the entire room. Decoration is optional. It can be varnish, paint, self-adhesive. The main thing is not to forget to carefully process all the edges and ends so that there are no rough spots.
- If desired, you can attach a shelf for hats on top of the hanger with metal corners - a board about 20 centimeters wide.
- And if the hanger is made to cover the entire height of the wall, then it’s a good idea to provide the bottom one as well. It will have to be supported below by bars 5 by 5 centimeters.
The following video promises to teach you how to create wooden wall hangers for your hallway with your own hands from one board:
Floor products
Here it is important to take care of a heavy base that should not tip over.
- As already mentioned, you can take improvised materials such as the bottom of a floor lamp.
- The frame of a floor fan that has stopped working will also work.
- Another tip is to use a Christmas tree stand - there are many of them available now.
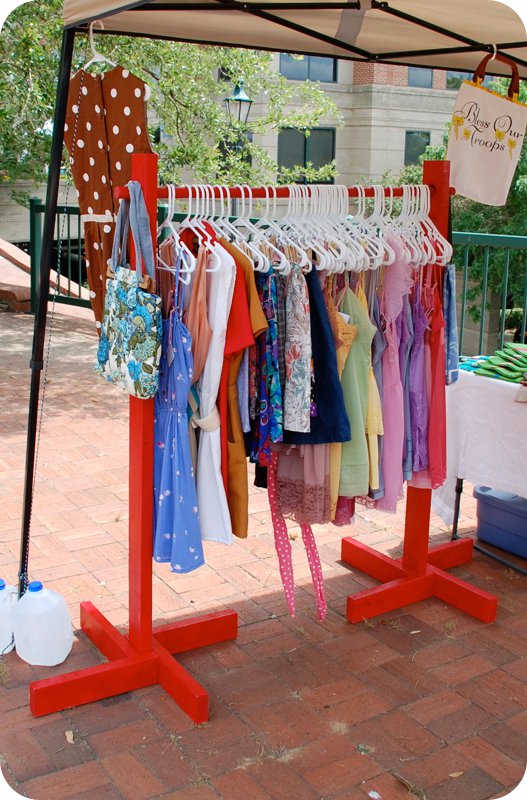
- The easiest and cheapest way is to put together a wooden cross from thick blocks and then decorate it.
Now - the hanger post.
- It can also be made from a block one and a half meters long, and several short bars can be attached to the upper part with metal corners for expansion (our hooks will be located on them).
- However, another option will look much more creative - this is if you use a suitable dry tree without bark, sand it and varnish it. Here you won’t need hooks - the twigs will play this role.
For those who have a welding machine and like to work with metal, you can make a heavy and durable metal hanger. To do this, you will need a pipe with a diameter of approximately 3 centimeters, as well as steel rods for legs and hooks with a diameter of 1.6 and 1 centimeter (respectively). There will be three legs - they are smoothly bent and welded to the pipe. Several hooks are made at the top, just like in similar finished products. And then the structure is painted.
Floor hanger that is easy to create with your own hands

Made of wood and chipboard
Natural wood is easy to process and finish, and is also environmentally friendly. In addition, almost every skilled owner will have scraps of slats, bars, boards or pieces of plywood. A little imagination, a couple of free evenings - and here in front of the admiring household members is an original hanger. All you need is two longitudinal strips, several transverse ones (by the way, it’s good to use ready-made platbands for this purpose) and hooks of your choice. For example, wooden knots, furniture handles or bright plastic cups.
Wood boards are a very useful material. You can use a jigsaw to cut out all kinds of shaped products from them. For example, a hanger, the contours of which are made in the form of a stylized tree - this is now fashionable. Having cut it out, we paint it a cheerful color (not forgetting to smooth out the unevenness with sandpaper first) and fasten it to the wall with dowels. Then we attach clothes hooks at the ends of the branches. By the way, for such a tree you can use thick plywood.
Before moving on to the actual production of the hanger, we recommend that you pay attention to the master class in the video below, which will tell you how to create a creative tree-shaped hanger for your corridor:
You can also build a simpler version from chipboard. do-it-yourself hangers in the hallway, for example, a solid or lattice panel (the simplest design of a wall hanger). And by taking laminated boards, we will get rid of the need to finish them. But the ends must be processed - for this purpose a special edge is sold, which is welded with an iron. And one more thing: you only need to cut laminated sheets from the inside out, otherwise they will crack.
Do you want to create a wooden hanger for your hallway with your own hands? And, preferably, with a shelf for hats? Easily! Watch the following video carefully:
Such hangers can be used not only for outerwear in the hallway, but also as mini-wardrobes in the room. It all depends on what type and design you choose. Rack hangers for clothes are functional, easy to move from place to place, and free the backs of chairs from unnecessary clothes.
This article contains several interesting and simple ways to make a floor clothes hanger with your own hands. They won't take much time or effort.
Choose the option you like and go ahead to interior changes!

Necessary materials:
- Two long copper pipes 3 m and 2 cm thick, each of them will need to be cut into the following parts (this can be done at the hardware store where you will buy everything):
- 1.5 m long– the height of the hanger (this height should be enough for both jackets and coats, but you can take more or less as desired);
- 1 m long– the size of the pipe on which you will directly hang things (it can also be longer or shorter, calculate how many things you want to place there);
- two tubes about 20-25 cm long– we will use them to make hanger legs.
That is, you get 2 copper tubes of 1.5 m each, 2 of 1 m each, 4 of 20-25 cm each.

- 4 copper elbow bends (tubes bent at an angle of 90 degrees) for attaching pipes to each other, match the diameter to the pipes (approximately 2 cm);
- 2 T-connectors;
- 2 pipe caps;
- Glue (epoxy glue or consult with the store salesperson which of what is available will work);
 Step-by-step instruction:
Step 1: Measurements
Measure the space on the floor where the hanger will be placed to make sure it will fit. If you take the indicated dimensions, the result will be 150 cm x 100 cm x 45 cm.
TIP: Adjust dimensions if necessary.
Step 2: Assembling the hanger legs
We begin to fold the floor hanger itself from the legs, make a support and a stand. To do this, take the first pair of 20 cm tubes and attach them between a T-shaped connector, and then we do the same with the second pair.
Step 3: Attach the protective caps
To prevent dust and dirt from getting into the middle of the pipes that will serve as legs, you need to close the holes. Attach a pipe cap to each of the two legs folded in the previous step at one end.
Step 4: Base
- On tubes with caps on the other side, attach an angle in this way: when the angle is on the floor, the T-shaped connector located in the middle of the leg should be directed upward.
- Take one of the meter long pipes and insert it into the corners, now the base of the hanger is ready.
ATTENTION: To securely fix the structure, you can use glue (at least in all joints), but then the hanger cannot be disassembled and folded again (when moving, for example).
Step 5: Side Posts
Insert a one and a half meter pipe into each of the T-shaped connectors, thus forming the side posts.
Step 6: Finishing Touch
- Attach a corner to each of the newly installed racks (they should be directed towards each other), and insert a meter-long pipe into them.
- You can also attach felt pads to protect the floor. The floor hanger is ready!

Note: Since this structure can be easily disassembled (if no glue was used), its length can be changed, for example, depending on the time of year: in winter there are more things - longer pipes were installed, in summer shorter ones.
Hanger made of PVC pipes (budget option)
The method of making this floor hanger is similar to the previous one: the pipes are folded like a construction set to form a hanger. But here we do not use copper pipes, but PVC, so it will be much cheaper. And, of course, another new design idea.

Necessary materials:
- PVC pipe 2 m long and 2.5 cm in diameter, it needs to be cut into the following parts: 12 cm (6 pieces), 80 cm (1 piece), 20 cm (2 pieces) and 10 cm (1 piece).
- PVC pipe 50 cm long and 2 cm in diameter, cut into 3 pieces of 15 cm each.
- 4 corner bends with a diameter of 2.5 cm.
- 3 corner bends with a diameter of 2 cm.
- 6 T-connectors with a diameter of 2.5 cm.
- PVC glue.
- Aerosol paint.
- 4 PVC adapters from 2.5 cm to 1.25 cm.
- 3 PVC adapters from 2.5 cm to 2 cm.
- Felt pads to protect the floor (optional).
Step-by-step instruction:
Step 1: Cut the tubes into pieces of the desired size
First of all, we have to cut the PVC pipes for rack mounting. You can do this yourself at home with a PVC cutter or ask at a hardware store.
After cutting the pipes into pieces, their edges can be sanded so as not to be scratched when assembling the hanger.
Step 2: Sorting materials
Now we have all the necessary parts and for convenience it is better to sort them, then the assembly process will be faster and more orderly. Arrange the materials in piles, depending on their purpose.
- For the hanger stand you will need: 4 corners, 4 adapters from 2.5 cm to 1.25 cm, 3 T-connectors and 6 tubes 12 cm long (diameter 2.5 cm).
- For each hand hangers: T-shaped connector, PVC adapter from 2.5 cm to 2 cm, 15 cm PVC pipes with a diameter of 2 cm and an angle with a diameter of 2 cm (you can also put a pipe cap on it).
- For stand: one PVC tube 80 cm long, two 20 cm, one 10 cm and a cap.
Step 3: Assembling the hanger
- Stand

Secure each two tubes with a T-connector. Insert one of the three resulting structures between the other two, as shown in the photo. Place the corners on the edges of the other two, turning them down so that the hanger stands on them.
- Hands

Place the T-connector, adapter, tube and cap together as shown in the photo.
- Rack
Insert a tube 80 cm long into the stand into the T-shaped connector, attach one of the arms of the hanger to it, then attach a tube 20 cm long, another arm of the hanger, again the same tube and arm, a tube 10 cm long and, as a final touch, put the cap on top .

To make the structure hold better, it can be secured with a special PVC glue. Be careful with the arms of the hanger to make sure they are glued in the right direction - with the corners facing up.
Step 4: Painting
The design of the hanger is ready, but it still doesn’t look very aesthetically pleasing. Apply spray paint of your chosen color carefully and evenly, without staining the room.
TIP: to make the hanger more stable, you can pour sand into the pipes from which the stand is made. After such a little trick, the hanger will not fall and turn over.
Pipe hanger with several levels
Another hanger of this type, only with expanded functionality: here you can not only hang clothes, but also put shoes. Compact and convenient wardrobe.

Necessary materials:
- PVC pipes with a diameter of 20-25 mm:
- 4 length 100 cm
- 2 length 65 cm
- 4 length 48 cm
- 6 20 cm long
- 8 5 cm long
- 10 T-connectors
- 6 corner bends
- Plate for bottom shelf

We fold it completely similarly to the two hangers described above.

Wooden floor hanger in 10 minutes

Necessary materials:
- Wooden sticks (4 pieces) 180 cm long and 2 cm in diameter.
- Rope: we will use this to tie wooden sticks together (you can also use leather cords, wire, or some other decorative material, as long as it holds the structure firmly and securely).
- Spray paint: We used gold to paint the bottom of the hanger legs (you could also use a different shade or color).
- Paint: We used four different colors of paint, one on each hanger leg (but of course you could use the same color for all legs).
- Painting tape: When using spray paint, this will help you avoid over-painting.

Step-by-step instruction:
Step 1: Paint the supports
- Paint the legs in your chosen colors and let the paint dry.
- Place masking tape where you want the spray paint to end and carefully apply the paint to the legs. It is better to do this outside, or cover the floor with newspapers so as not to stain anything. Peel off the masking tape.

Step 2: Forming a hanger
Connect the wooden supports together with rope, and then gradually move them apart. The result should be something similar to the base of a wigwam, the legs should be spaced wide enough so that the hanger is stable and easy to use.

This hanger takes up a lot of space, so it is best to place it in a corner.
Interesting ideas and photos
Tree hangers
This can be a neatly sanded tree trunk or branch, or a folded wooden structure. The main thing is that there is one support and branches from it - the handles of the hanger. An original and useful addition to the hallway. 

Designer hangers
The number of elements and design may vary, but what all these floor hangers have in common is that they can be quickly folded and disassembled just as quickly (if you didn’t use glue). Sometimes more expensive and noble materials are used, such as copper, sometimes wood or PVC, in any case the result is beautiful and extraordinary.


25.11.2016 23:54
Not every home has space for a full-fledged dressing room or a spacious closet. And even if there are some, it doesn’t mean that there is no problem where to throw a robe or handbag - a hanger at hand will never be superfluous.
The simplest, most stylish and at the same time cheapest idea is to make a hanger from a tree trunk or branch with your own hands. The Rustic style is very fashionable today - residents of big cities strive to bring a small piece of living nature into their interior. And even homeowners who live outside the city prefer the atmosphere of country life both outside and inside the house.
Quite a lot of commercial furniture brands turn their designs into rustic shapes and textures, so is it worth spending a decent amount to purchase a stylish piece of furniture if you can make it yourself without much effort?
Below you will see hangers created by designers as replicas, imitation of a natural tree trunk and hangers made from a real trunk.
A floor hanger made from a tree trunk in a bedroom or hallway will not only solve the problem of where to hang clothes or accessories, but will also become a pleasant accent in the interior design.
A suitable trunk can be found in the nearest park or forest. It is enough to trim unnecessary branches with pruners, keeping their “hooks” at the base of the trunk of the required size. You can remove the bark from the trunk or leave it in its natural form - it all depends on the intended design.
In addition, a wooden hanger can be painted in any color to match the interior colors or play with contrast.
For a floor hanger, it is enough to come up with a strong base as a weighting agent - this can be a heavy piece of wood or a support.
If you can find a high enough trunk, the hanger can be installed to the full height of the ceiling. Here you will need accuracy of calculation, but you will not need additional fasteners.
Several small sections can be cut from a tree trunk with branches. By mounting them on a wall, on a board, or in a charming frame, you have a cute and highly functional multi-hook hanger. This hanging system does not take up space, is very convenient and at the same time has a surprisingly cute decorative effect. A hanger made of wooden hooks from a tree trunk would be perfect in the bathroom or hallway, and, of course, in the kitchen - there are always a lot of little things that need to be hung.
Another interesting way to involve a tree trunk in home decoration is to hang it from the ceiling or in a window opening. And this hanging Rustic decor can serve as a support for hangers.


You can use a cute tree branch to store your favorite jewelry, costume jewelry, or simply decorate it with family photos, homemade hearts, and beautiful trinkets.

Tree trunks, branches, saw cuts and slices are often used in the decor of Scandinavian interiors or country houses, for example, chalets - so actively use this rustic decor in the design of such interiors. Rustic accents are also added to cold industrial interiors, loft, and simpunk to give the interior a little warm touch.

Below you will see many amazing examples of how to use a tree trunk in interior design and home decoration - a hanger made from a tree trunk or branch with your own hands! Get inspired!


Pay attention - what a zeal for nature modern designers have - we see in the decor: like wood, like moss and even dirty boots... like)


DIY interior design ideas, interior design ideas, DIY decor ideas - GET INSPIRED!


What can you make from driftwood for your home?
Shelves, display racks from stairs

In a cozy home it is impossible to do without a hanger - floor, wall or ordinary hangers in the closet. But in addition to its utilitarian function, storing clothes in a straightened form is also a way to show your creativity, the opportunity to do something with your own hands for household use. An original do-it-yourself floor clothes hanger or original nailed hooks in the hallway - how can you do without them? To make the simplest tremmels for jackets or horns for hats, you don’t need to be a jack of all trades, all you need is a tool and a few creative ideas.
Hanger as an art object or decorative element
To quickly clean up your home by arranging things in your closet, it is important to have enough space to easily accommodate:
- dresses and jackets;
- hats and caps;
- bags and belts;
- scarves and neckerchiefs;
- blouses and sweaters;
- business suits;
- outerwear for the off-season;
- skirts and trousers.
But for each such thing you need a special device:
- wall hanger;
- hangers (trempels);
- panel or shelf with hooks;
- clothes hanger in the hallway;
- rings and hooks for the closet for scarves and accessories.
It’s easy to build many types of clothes hangers - with your own hands, photo:

If you look through old things from grandma's closet or chest, there are probably some pretty interesting clothes hangers in there. Vintage trempels and homemade hangers, if they do not qualify as “antiques,” may well be the basis for renovation or even become a unique art object. No matter how hard they try to transform an old hanger, masters of folk crafts, needlewomen and just those who like to “get creative” with something! For example, a clothes hanger photo.

Grandmother's hangers were made in an era when plastic or plastic products were not produced. An old wooden base can be used as an original decorative object, especially if there is no closet in the room. They can be transformed in any way or use any suitable technique:
- decoupage;
- original painting;
- application for varnishing;
- pasting with posters, magazines, geographical maps, etc.
It wouldn’t hurt to make soft “shoulders” for the knitwear on the old base so that it doesn’t slip or stretch. These simple devices are also easy to make from scratch from scrap materials. But if you need a wall-mounted base for wooden hooks or an original floor-mounted clothes hanger-rack, then you need materials, tools and woodworking skills.
Wall mounted wooden hanger
Although a wall hanger is the simplest device that is suitable for self-production, you should not make it crude and primitive. Even if you plan to use it temporarily, for example, in the country, it is still better to make it beautiful so that the wall-mounted clothes hanger decorates the house for many years.

For a high-quality product you will need good wood, a board or a piece of timber, of the required length - the width of 2-3 freely hanging trempels with jackets. The board for the base must be strong and dry, without cracks, and treated with antiseptics. On this basis you will need to stuff several hooks:
- in line;
- in 2 rows;
- in 3 rows - in a checkerboard pattern.
The simplest single-row hanger is useful in any room:
- on the back of the bedroom door - under dressing gowns;
- in the bathroom or toilet - for linen while swimming;
- in the pantry - for work or seasonal outerwear;
- in the pool or sauna - under towels and bathrobes.
A child's room or a teenager's room also needs a simple wall hanger - teaching schoolchildren to be tidy, to hang everyday clothes on hangers so that they do not wrinkle.
Tip: The simplest hanger is a board with hooks and loops for mounting on the wall. But do not forget that it cannot be nailed to an unplastered wall or whitewash. An unprepared surface will cause clothes to get dirty. Therefore, a wooden board, plastic film or whatman paper must be hung on the wall in an unfinished room under a hanger. And wet outerwear will stain the wallpaper or painted wall on the prepared wall.

If you have some original idea for the design of a product, it is not necessary to make it in the form of an oblong rectangular disk. A do-it-yourself wooden base for a wall-mounted clothes hanger can be made in the form of:
- oval;
- wave-shaped panel;
- stave;
- heart;
- spirals, etc.
After making the base, the wood must be sanded and varnished or processed in another way. It is important that the wood does not give rise to splinters when using a homemade hanger. It is advisable to make hanger hooks or “nails” in any original way, suitable:
- old wooden thread spools;
- handles of broken screwdrivers, scissors and other household items;
- specially planed hooks.
Hooks, “nails” or “holders” for a hanger do not have to be made of wood or metal; they can also be bought at a hardware or construction supermarket. Natural material is also suitable - dry branches, twigs, cuttings or root cuttings. They must be cleared of bark, cut or sawed off excess, sanded and varnished.
Another standard hanger option is made from wooden slats nailed in parallel. They will become not only the basis for hooks, but also a decorative shield for clothes on a whitewashed wall or simply a beautiful piece of furniture. It will take a little more time to make, but this design looks more solid than just a board for hooks. And if you attach a visor to the hats, it will already be a full-fledged clothes hanger in the hallway with your own hands.

Homemade clothes hanger for the hallway
The hallway hanger should be enough:
- durable and strong;
- aesthetic;
- roomy;
- multifunctional.
Ideally, a small space of the wall in a narrow hallway should fit:
- outerwear for all family members or guests;
- hats;
- umbrellas and bags;
- shoes under clothes.
It is this versatility that is important to consider when building a homemade hanger for the hallway. Therefore, it is wise not just to make a board with hooks, but to decorate it beautifully:
- shield with hooks for clothes;
- visor for caps and hats;
- shelf for shoes;
- stand for bags and umbrellas.
Tip: The dimensions of such a hanger should not be arbitrary; they are measured against the part of the wall where the hanger should be located.

Usually a space of about 1 m in width is enough; the height of a clothes hanger in the hallway with your own hands should be greater than head level. There are 2-3 rows of hooks under trempels and outerwear, plus a visor (shelf) for hats. Reliability of connection The shelves of the side panel can be connected with strips at an angle of 45°C. The hanger must be attached to the wall with brackets or dowels.
Floor hanger rack
Another type of device for placing clothes at the entrance to a building is a do-it-yourself floor clothes hanger. You can often see them:
- in the clinic office;
- in the reception area;
- in the hall or vestibule;
- in an Internet cafe, etc.
They are usually called "standing" or "horn" hangers and are made of tubular metal. They are notable for the fact that they are convenient for hanging not only outerwear, but also hats, bags and umbrellas. And although they are not as stable as hangers nailed to the wall, they are more compact and mobile. They can be rearranged to any place or stored in the pantry for the summer.
In houses and apartments, this type of hanger is used less often than in public places, but it is also easy to make yourself. There are some good ideas, such as using:
- a cross for Christmas trees as a base and a long handle of a shovel as a stand, where ready-made long hooks are nailed;
- scraps of plastic pipes and couplings for the base of the hanger;
- process the base of a dried garden tree in the form of a multi-armed structure and install it on a cross or other base;
- cutting pipes of different sections as a telescopic stand;
- the remains of old chairs and stools and build a hanger on a rotating swivel mechanism (buy ready-made);
- as a basis - a tripod from an old camera, a floor lamp and other household items.

Attention: Whatever the design, it is important to observe the main condition - the stability of the floor hanger. And this depends not only on its design, but also on its support. It can be a rotating disk, 3-6 legs or a cross.
DIY coat hanger or trempel
It’s not difficult to make a clothes hanger yourself, using any available material as a base:
- thick wire;
- a fragment of a thick branch in the shape of a hanger;
- small plastic bottles strung on a metal base in the form of a large “clip”;
- bent metal plate or angle.
The base for the “hanger” hanger remains to be wrapped in padding polyester (another filling) and covered with any beautiful fabric. This is the best option for knitwear. A beautiful satin bow or a face from a small soft toy will help add originality. Children will love these hangers. The main thing is to find the right metal for the coat hanger hook.

Original do-it-yourself hangers from scrap materials
Interesting ideas for making hangers of any type yourself can be implemented using a variety of available materials.
1. Metal. Scraps of steel wire, tube or angle are suitable for a metal clothes hanger. Depending on the flexibility and thickness of the metal, the structure can be bent or joined by welding. The shape and design of the product is your choice, see photo:

2. Remains of timber, boards, veneer and other wood are suitable for a wall hanger or a universal product in the hallway. A detailed video will be useful for those who love woodworking;
3. Parts of old furniture can also be easily transformed into a hanger, for example, by building a multifunctional model based on a chair. This design is convenient because a jacket and suit trousers, a shirt and a tie are conveniently located on one module.
4. The original base for coat hangers will become an original fixture in a room where there is temporarily no wardrobe. Any wooden stalk that is suspended from the ceiling parallel to the floor at a level slightly above height will do.
5. An old "hunting" idea is to use deer antlers instead of hanger hooks. They can be attached to any base - for a wall hanger or a vertical rack with horns. Moose antlers will also work.
6. The design made of plastic pipes will appeal to fans of technical crafts.
7. Small hangers for the closet are also needed, for example, in the form of connected rings made of cardboard or plastic. They are suitable for hanging scarves and neckerchiefs, belts and belts.
8. A simple roll-up wire hanger with clothespins along the edges is an excellent device for storing trousers or skirts. The shape of such simple hangers can be classic, in the form of a curved paper clip or in the form of an intricate labyrinth - as your imagination suggests.

Hangers as a stylistic decoration
When choosing the material, shape and design of hangers, you should consider the style of your interior:
- a wooden hanger with chiseled decorations is suitable for an English office or a discreet classic hallway;
- soft hangers covered with bright fabric will decorate a bedroom in country, shabby chic, romanticism or boho style;
- metal-plastic structures will emphasize the originality of loft apartments and decorate the shelter of a lonely wanderer in the power of techno or hi-tech;
- old restored hangers fit vintage, retro, Biedermeier or Victorian styles;
- hangers of the simplest shape and design - an ascetic attribute in the style of minimalism or functionalism;
- original hangers with a “girlish” design are suitable for a Barbie-style children’s room;
- a chic and impressively decorated hanger - for a boudoir in a palace style;
- satin ribbons, sparkles, beads and stones are the attributes of a glamorous bedroom.
For more information about making a hanger yourself, watch the video: