When fishing in winter you have to deal with different temperatures - from zero degrees or a slight plus to frosts below -30. Good clothing and equipment, selected according to the weather, should provide good protection from any cold weather. But for greater comfort and better fishing results, you can also get a heater. With it you can raise the temperature in the tent to make fishing more comfortable. As a result, you can sit over the hole and feel almost at home. In addition, the water on the surface will not freeze, which will also make fishing more convenient. Choosing a heater for winter fishing - let's look at what options are available and how to choose the best one for yourself.
The simplest thing that can be used for heating during winter fishing.
Advantages:
- cheapness;
- ease of use, no need for any additional equipment;
- additional space lighting;
- light weight.
Flaws:
- low power;
- inconvenient to use as a heater for winter fishing.
Since the power of one candle is about 40 watts per hour, you need 40 of them to replace a portable gas heater. It’s not very convenient to tinker with so much, placing it around the tent and lighting it.
If the frost is mild, you can raise the temperature in the tent with a dozen candles. In any case, you can’t count on strong heating. But in mild frost, candles can perform their function quite well - it becomes comfortable in the tent, and the holes do not freeze. The main thing is to choose the right quantity.
Alcohol
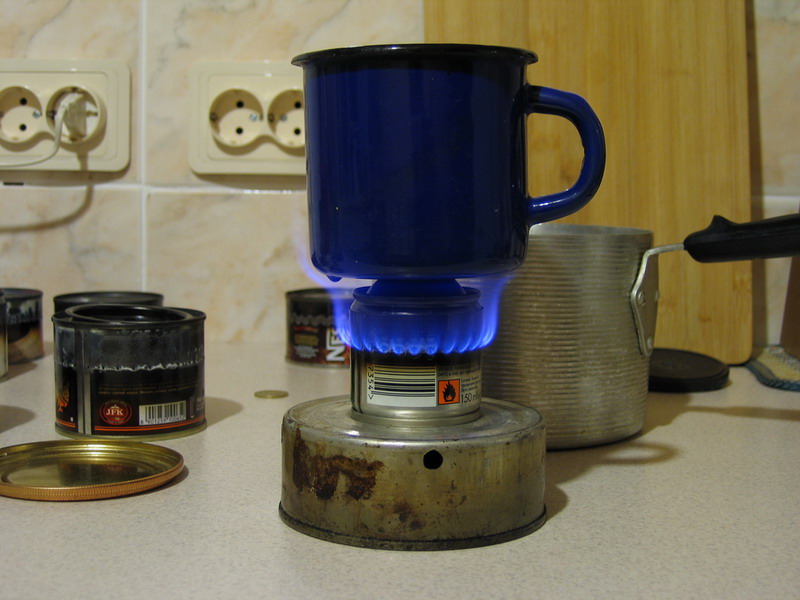
 Alcohol burns without soot or odor, so you can choose heaters for winter fishing that run on this fuel. A simple homemade alcohol lamp can be made from a tin can. But in order to constantly use such a heater, you need to have constant access to fuel supplies for it, which not everyone has.
Dry alcohol is also a good fuel option for heating a tent during winter fishing. One tablet burns for 10-15 minutes, just like liquid alcohol, without producing any odor or soot.
Advantages of this option:
- lightness and compactness, ease of transportation;
- simplicity and ease of use.
Flaws:
- small amount of heat;
- quite high price of fuel and difficulties with its acquisition.
Primus
 When “Ogonki”, “Bumblebees” and other gasoline burners appeared on sale, they became the main type of heaters for a long time, which were used to heat tents during winter fishing. And today many people use Soviet-made primus stoves for these purposes. There are also higher quality options from foreign manufacturers - for example, Coleman - and Chinese.
You can choose a heater for winter fishing of this type for anyone who simply has an old primus stove in working condition, and for those who can buy it inexpensively. If a gasoline burner is made with high quality, it will serve well for decades.
Advantages of Primus:
- work in the cold much better than their main competitors - gas heaters;
- compactness and light weight;
- high calorific value.
A gasoline primus, even a consumer-grade one, is a powerful heater that produces a lot of heat. Therefore, it allows you to quickly warm up during winter fishing and allows you to maintain a comfortable temperature in the tent.
Flaws:
- difficulty to use;
- the smell of fuel that you will have to breathe;
- unreliability.
Lighting a primus stove is more difficult than a gas heater, and it takes longer to light. It can explode if overheated, so you need to handle it properly. Another disadvantage is that primus stoves require careful care and periodic cleaning.
Gasoline and other liquid fuels also produce soot and a strong odor when burned. Being in a tent with a heater running on these types of fuel, you will quickly get used to it and stop noticing it. But an “outside observer” looking inside will immediately feel this aroma. In addition, the smell will permeate your clothes and all fishing equipment, in which you will then have to return home.
The smell of gasoline or other fuel from your hands, which appears after you adjust the fire, will not be critical for you. But it will fall on the bait, which you will put on the hook or adjust - and so on. This can have a fatal effect on the bite.
Gasoline heater
 It is a burner that runs on liquid fuel. In addition to gasoline, you can use other options - diesel fuel, kerosene, and so on. There are quite a few options for such multi-fuel burners on sale today. This gasoline heater is a modern version of a primus, which is created using new technologies, easier to use and more efficient.
Why you should choose this type of heater for winter fishing:
- simplicity and ease of use (compared to both “traditional” gasoline stoves and many other types of heaters suitable for ice fishing);
- compactness and light weight;
- high power.
Flaws:
- high price.
With such liquid fuel heaters, you can also use additional devices - diffusers, afterburners, and so on - that cannot be installed on a regular primus stove. They increase the efficiency of the burner.
Gas heater
There are both gas stoves on sale, which can be used for heating and cooking, and gas heaters. Fuel for them may be:
- in a small disposable gas canister;
- in a volumetric (for example, 5 liters) cylinder.
 What to choose - a tile or a heater - everyone decides for himself. The advantage of the first option is that you can heat water on the stove, warm it up, or even cook breakfast, lunch or dinner right while fishing. With a gas heater that was designed specifically for heating rooms, this will either be impossible or not so easy. But it performs its main function better than tiles, for which it was designed - space heating.
Disposable cans are attached to the heater either directly or through a flexible hose. The volumetric tank can be left outside the tent to allow more space inside.
Gas heaters, to which a disposable cylinder is connected via a hose, are more resistant to low temperatures. With the operation of models to which the can is connected directly, difficulties arise already at -5 degrees.
To choose the right heater for winter fishing, powered by gas from disposable cylinders, you need to understand that some of them are suitable only for cylinders from a certain company. They may be difficult to find for sale in small towns. It is better to clarify this point before purchasing.
Advantages:
- long work from one refill (when using a five-liter gas cylinder);
- a large amount of heat;
- ease of use;
- accessible and fairly inexpensive fuel.
Flaws:
- bulkiness and heavy weight (in the case of a five-liter gas cylinder);
- fire hazard;
- problems with working in the cold.
It is better not to leave a gas heater running unattended, even for a short time. This will help avoid unpleasant incidents. Due to unsteady pressure, the cylinders may spit gas. As a result, heaters powered by them spit fire. In a worst-case scenario, this can cause the tent to catch fire and burn out in less than a minute - 10-30 seconds. If the entrance to it is closed, it will be difficult or impossible to get out of it in time. The same spitting can occur during cleaning, as a result of which you can singe your eyebrows or damage your eyes.
In the cold, gas cylinders freeze. As a result, there is a risk that the selected heater for winter fishing on gas will not be able to light at all, or it will go out during use due to the fact that the gas in it has cooled.
Bake
Despite the fact that today in the store you can choose a heater for winter fishing of small size and weight that will run on gasoline, gas or other fuel, conventional stoves do not lose their relevance. Today they are used for fishing mainly in rural areas. But city residents should also pay attention to this option. A stove that can be taken with you on ice is quite easy to weld from sheet metal.
The assembled structure looks like this:
- there is a stand on the ice, thanks to which the oven will not melt the ice;
- the stove itself stands on a stand;
- a pipe comes off from it, which goes out through a hole in the wall (less often the roof) of the tent.
The hole through which the pipe comes out of the tent must be edged with non-flammable material, such as fiberglass.
You can use wood or coal as fuel. A medium-sized bucket of coal is more than enough for one fishing trip.
The stove has important advantages over other heater options:
- efficiency - a lot of heat;
- safety - cannot explode, does not burn oxygen in the tent;
- free or low price of fuel.
Due to the fact that the stove does not burn oxygen, there is no risk of poisoning. In addition, the air inside the tent remains fresh. And even the heat that the stove provides is different, not the same as from a gasoline or gas heater - it is more pleasant.
Of course, there are also significant disadvantages:
- heavy weight, inconvenient transportation - the weight of the fuel is added to the weight of the stove itself;
- You need to periodically add firewood or coal to the stove while taking a break from fishing;
- In order for the stove to produce heat, you need to constantly maintain a fire in it.
The thicker the oven walls and the larger its size, the longer it retains heat. Cast iron stoves take quite a long time to cool down; this process takes even longer in the case of brick stoves. But for ice fishing you can only take a light and small stove. Accordingly, it cools down after the fire has burned out in it, almost instantly.
Safety regulations
 When using a liquid fuel or gas heater in a tent, precautions must be taken. If you forget about them, you can get severe poisoning.
When any carbon-containing fuel burns - gasoline, fuel oil, diesel fuel, natural gas, wood and coal - carbon monoxide (CO) is formed. It is colorless, tasteless and odorless, so it cannot be felt.
Symptoms of carbon monoxide poisoning:
- headache;
- heaviness and throbbing in the head;
- dizziness;
- noise in ears;
- stunned;
- suffocation;
- dry cough;
- nausea and vomiting.
If you feel signs of poisoning while near a heater running on gas or liquid fuel, you should immediately go out into fresh air. However, the likelihood of this happening in a tent while fishing is low. But you shouldn’t sleep with the heater running, it’s quite dangerous. At the very least, the next morning you may have a severe headache that will last for more than a day, and in the worst case, you may simply not wake up.
- When using dry alcohol for heating during winter fishing, you have to light a new tablet every 15-20 minutes if you need to constantly maintain a high temperature in the tent. On the one hand, this does not take much time, on the other hand, it distracts from fishing, which can be inconvenient, especially if there is a feeding frenzy. You can make your own kind of stove for dry alcohol, which will hold several tablets at once. The outlet must be made adjustable so that the draft can be changed. In this case, a stove loaded with several tablets can be made to burn for a long time.
- It is better to carefully pack gas and gasoline burners before transportation. It’s good if the kit comes with a suitcase or case in which you can place the device, isolating it from other things. If a piece of debris accidentally gets into the heater, heating may end before it even begins.
- To transport gasoline or other liquid fuel, it is better to buy a reliable canister, although it is not cheap. Pouring the flammable mixture into one and a half liters or five liters is not a very reliable option and carries a risk of leakage. It will work as a temporary solution.
- The less propane and more other gases are in the mixture in the cylinder, the more likely it is that its contents will freeze and you will not be able to use a gas heater. Therefore, when choosing a heater for winter fishing that runs on gas, it is advisable to select cans with the correct composition for it - with the highest propane content. On some cylinders the composition of the contents is not written at all; they are not so rare on sale. It is better to refuse to buy such a pig in a poke. If you nevertheless purchased such a cylinder, be prepared for the fact that it may cause the heater to work poorly in the cold.
- Some people heat frozen gas canisters over an open fire to get them working again. Naturally, this is a rather extreme method of heating, which can lead to an explosion. The problem with heaters powered by disposable gas cylinders can be solved differently, without risk to health and life. You need to take two cans with you when fishing. While one is working, the other needs to be kept in your bosom to keep it warm. When the first cylinder freezes and the gas heater goes out, you need to swap the cylinders. This way you can maintain heating in the tent for as long as you like. The disadvantage of this option is that you will have to put an ice-cold gas cylinder in your bosom, which is not very comfortable.
I highlighted this topic separately, since there is no such independent topic, but in almost all other topics, as well as in news and in comments to photos, people actively communicate on the topic " heater in a winter tent"
I think many will view this topic with pleasure and interest and benefit from it, and will also share their heating methods. Well, for the especially lazy ones who are too lazy to scour the Internet...
Options like " Is it better to pour all the alcohol into yourself or constantly drink from the bottle- not accepted!"
My personal opinion:
It is better to heat your tent in winter with an alcohol burner or a candle (paraffin burner). but in no case with dry fuel, or with any gasoline stoves or kerosene gases; I also do not recommend gas burners.
To heat my tent in winter, I sometimes use paraffin candles or a large homemade alcohol lamp (like in school chemistry classrooms). Although, if the tent is well ventilated, it is possible to warm up briefly with gas or gasoline burners. Also, you cannot use paraffin burners with wicks made of synthetic materials (foam rubber or plastic, or synthetic ropes) - the wick is only made of natural flax or cotton!
Don't poison yourself!
Below are examples of homemade and industrial ones. alcohol burners (taken from here http://talks.guns.ru/forummessage/21/482201.html).
A treatise on homemade alcohol burners.
I looked into the topic http://talks.guns.ru/forummessage/21/436285.html Alcohol burner Tatonka
.
He smiled: it looks like the questions are about alcohol. burners appear on the forum every year.
Back in 2008, I was going to write a report, but I never got around to it, and then I forgot. Now I decided that I still needed to post something, I went into my trash, dug up a bunch of my own surviving copies and sat down to write:
General. About a year ago I became interested in the issue of making an alcohol burner. Since we needed some means of heating food, unpretentious, compact and lightweight, working without firewood or dry fuel.
After reading these threads:
Individual means for heating food
Methylene alcohol burner
Help with the pot
For secretive solo trips, the Bundes performed very well
After wandering around the shops and not finding anything similar to an alcohol burner, I began to study the issue. I found a lot of information on burners on the Internet.
For starters, Wikipedia:
Beverage-can stove, which shows the four main types of alcohol burners:
Further: The greatest site on any type of burner: Zen Backpacking Stoves (zenstoves.net), which has answers to almost every question on burners and fuels.
There are also principles of operation of stoves and burners of various types: http://zenstoves.net/How.htm
For information.
Comparison table of some fuel types:
Fuel - Boiling point, deg. C - Vapor (gas) pressure at 25 deg. C, kPa - Specific energy capacity, kcal/gram (liquid)
Gasoline - 14-135 - 48-103 - 10.4
Kerosene - 200-260 -<1 - 10.3
Diesel - 288-338 -<1 - 10.2(газ)
Propane - -42.1 - 939 - 11.0
Butane - -0.48 - 242 - 10.8
Isobutane - -11.8 - 348 - 10.8 (alcohol)
Ethanol - 78.3 - 7.85 - 6.4
Methanol - 64.5 - 16.90 - 4.7
Isopropanol - 82.3 - 6.02 - 7.2 (dry fuel)
Hexamethylenetetramine - 281 - n/a - 7.41,3,5-Trioxane - 115 - n/a - 4.27
Taken from http://zenstoves.net/Fuels.htm
From the table you can see the optimality of ethyl alcohol: the average specific energy intensity, but also the average boiling point. Because The main and best principle of operation of alcohol burners is the combustion of not the alcohol itself, but its vapor, ideally boiling alcohol.
Looking ahead, I will say that the practical energy content of ethyl (med., pit.) alcohol is as follows (from personal experience): in a properly made burner in laboratory conditions (T. ambient 20 degrees C, T. water initial 20 degrees C) 20 ml alcohol burns for ~5 minutes. and during this time 0.5 liters of water boils in a sealed container. (A liter boils in 8-9 minutes). This is a certain point of reference, derived from many samples. Naturally, alcohol is 90-95%, ethyl. A very useful thing on the farm
Another good site with many burners: Wings THE HOME-MADE STOVE ARCHIVES. And a whole lot more - just look for them.
I note that while reading the forum, I was skeptical about the statements of some participants (since 2004) that an alcohol burner can be made from ANY tin can. This is true, but more on that later.
After reading the information, I began to experiment.
I started with the most common design on the internet:
Open type alcohol burner. (Open Jet Alcohol Stoves) aka "SHAK", Tatonka, Trangia.
Detailed manufacturing instructions: http://antigravitygear.com/alcoholstoveinst.html
I made several samples from beer cans for experiments and conducted tests. I didn't like their work. About this in comparison with cans.
From the experiments, this was confirmed: the optimal diameter of the holes (nozzles) of the burners is 0.6-0.8 mm, the quantity is 20-30 pieces. Why are there many small holes, and not several large ones: it is more difficult to blow out and to form a uniform torch flower. The performance of the burner is determined by the total area of the holes and for the power it makes no difference: small and many or large and few.
Not being satisfied with the results, I thought about a tin can and moved on to the following design:
Low pressure alcohol burner with side combustion. (Low Pressure SideBurner Alcohol Stoves) aka Tin Can.
Essentially this is a tin can with holes filled with alcohol and a saucepan on top.
Well, we don’t need something simple, do we?
As in the current examples strateg"a:

Or gelogen"a:

That’s when I started with calculations and complex designs based on 0.8mm-30pcs-20ml-0.5l in 5 minutes at 20 degrees Celsius.
Detailed and intelligible description of production: Zen Alcohol Sideburner Stove.
Minuses:
It does not work normally without a pan on top, external heating is advisable - ignition in a bowl with alcohol.
After experimenting with different sideburner designs (http://zenstoves.net/BasicSideBurner.) and Penny Stove (http://www.csun.edu/~mjurey/penny.html), I finally came up with this design, which has proven itself well:

The coin covering the filler hole is hidden under the nylon lid from the same coffee can. To stop it from rattling, put a piece of paper/napkin/rag, chirkash and matches.
Made from two cans of coffee/condensed milk, etc. using scissors, a knife, a pair of pieces of wood and a thin awl (I drilled holes, d 0.8mm).
Pay attention to the nozzles:

They are formed to raise the flame upward like this:


Combustion.

After these models I made several small pieces “for one mug” from aerosol cans. Volume of filled sp. 40-60 ml. It’s an excellent thing, convenient, but when it burns, it stinks (or smells) for a long time of the former contents of the cylinder, and eventually it dissipates.


Later, a pair of “ideal” jars came to hand with almost airtight lids, which in the end also worked well, for which nothing was needed except a ruler and a drill (awl). One thing - the diameter is too big for a small mug:


Another “ready jar”:

The “manufacturing” process, 2008:
Combustion. The line of holes needed to be a little lower - it burns rather weakly:

In the course of all this, it turned out that burners whose height does not exceed the diameter (across - square), and the height of the line of holes (nozzles) - no higher than 2/3 of the total height of the burner work optimally.
Making an alcohol burner from two tin cans.
The instructions are here: http://zenstoves.net/ZenStove.htm
There are a couple of olive tins lying around at home.
To work you need:
ruler (optional),
knife,
scissors,
thin awl,
thick awl (optional),
screwdriver (optional)
and a couple of pieces of wood.

Marking of cans:


Forming a filler “funnel” on the top (press in a circle):

Cutting cans:

Trimming but marking:

You can stop here and move on to piercing the nozzles, but then it won’t work correctly without a pan on top.
Further. Helpful advice: to insert two parts of cans of the same diameter into each other, you can slightly flare the “outer” part with a screwdriver, rather than crushing the “inner” part.
She will still hesitate, but “more correctly.” Like this: (press the screwdriver at an angle, roll the can along the edge of something (mouse pad))

Whatever it is (Big Mustache burner, 2007, topic “Individual means of heating food”):
There is another mistake in this burner: the line where the halves meet, if not sealed, should preferably be higher than the nozzle holes.
Punching the filler hole (before docking):

Pushing the upper part into the lower part (you can do the opposite, but the short one is easier into the long one), pressing, tapping, the final Bang! (more careful with the hammer):

For aesthetics, you can roll the edge back (it does not affect the speed; for cans with a protruding rim, this operation is not necessary):

Marking holes. Distance between holes = (diameter)*PI(3.14)/(number of holes). In my case, d=65 mm, quantity 25, distance 8.16 mm.
Marking almost by eye:

Piercing holes (care is required, if possible, it is better to drill):

Formation of nozzles (special perversion):

Tests. The maximum volume of alcohol poured = (radius squared)*PI(3.14)*(distance from the bottom to the holes). For this burner = 116 ml. Filled with 20 ml using the following device:

And 2 ml outside. Coin for the filler hole. Ignition:

5 seconds, burning:

Works.
Boiling tests.
Filled with ~35 ml.
Installation in a sprat jar: this method of installation (together with wind protection) helps to quickly reach operating mode and stabilizes combustion at low temperatures by increasing the temperature of the tank with alcohol. In “laboratory” conditions it is not necessary.
Ignition through the holes at the bottom of the “sprat” with a turbo lighter or a flaming match:

A 1.5 liter bucket contains 1 liter of water.

Approximately 9 minutes:

Note tvn: in the cold the boiling time will naturally be longer!
Burning of residues:

All. Final release. (just trim the top with a hammer):

Wipe it and you can store it somewhere with a lighter and a container of alcohol:

Comparison of two types of burners.
First of all, what makes homemade burners inferior to branded ones (Tatonka, Trangia e.t.c.): the impossibility of transportation with filled fuel.
In all other respects there are no losses. You need a head on your shoulders and your arms are not too crooked.
There are two types of burners: open (Tatonka type) and closed with side combustion (Tin Can type).
See above.
Advantages of (homemade) open type compared to closed type: no external ignition required.
That's all. Also, the “flower” of the flame is smaller in diameter, but is that a plus or a minus?
What else I personally didn’t like about them: the long time it takes to get to work
and this:
This burns alcohol as if in its “pure form”; burning only vapor is better. More economical.
Advantages of a closed type burner with side combustion compared to an open one:
ease of manufacture (especially the “glass” with holes), better operating mode (due to full heating of the fuel tank), efficiency (for correctly made ones, maintaining pressure, without extra holes), quick access to operating mode (with external (! ) ignition).
Minuses:
external ignition is required. Warm the closed K.B. from above by pouring alcohol onto the upper part - wait for the crayfish to whistle. And there is some inconvenience of filling in “quickly”, but this is mine, but in general - as much as your imagination allows.
I didn’t notice a huge difference in the operation of the burners between aluminum and tin. (Have everyone given up on those beer cans?). The difference in weight is 15 grams.
That's all.
P.S.:
Replies like “And my gas burner/primus is better!”, I think, are inappropriate.
from the site http://talks.guns.ru/; published 17-6-2009 23:06; forum thread "Survival"
There are many videos here about making alcohol burners yourself http://www.youtube.com/watch?v=4zFaP1BS8hc
Well, don’t forget that any burner must be placed on a stand = otherwise the ice or snow will melt and the burner will fall... God forbid the fuel spills and catches fire!... :shock.
Fishermen are often more concerned about low temperatures overboard, which are very difficult to combat when fishing. Winter suit with fleece, fur-lined mittens, felt boots and even special thermal underwear as for astronauts it is unlikely to be of significant help even in 20-degree frost. Therefore, in order not to freeze on the ice or in the piercing wind, additional means of heating are simply necessary.
The thought immediately comes to mind mobile home or tent, it’s very difficult to do without it on an open reservoir in winter and you can freeze in a matter of minutes. Stiff legs and arms don’t make winter fishing any more enjoyable. Plus, freezing for a long time is very harmful to health. Therefore, choosing a good tent for winter fishing will guarantee that you will not survive in the forest in winter, but will turn winter fishing into a comfortable and exciting activity.
Setting up a tent for winter fishing
 First thing to do before setting up a tent for winter fishing- this is to determine which direction the wind is blowing and position the tent so that the entrance and ventilation holes face the opposite side. Thanks to this, the tent will be protected from direct penetration of cold air and will be more stable.
While inside the tent, the fisherman must leave at least one open vent, no matter how severe the frost. Otherwise, condensation will quickly form inside the tent, which will lead to more cooling. When setting up a tent for winter fishing, be sure to ensure that it is the lower part was covered with snow. In this case, you will not only insulate it, but also give it greater stability. You can freeze the bottom part to ice, but just be careful when removing the tent later.
Heating a tent for winter fishing
 One winter tent for winter fishing will not be enough and is very ineffective in terms of retaining heat. There are different ways to get out of this situation. Typically fishermen use:
- candles for heating tents for winter fishing
Candles for heating a tent for winter fishing are the most economical and compact way; they are cheap and take up little space. Wax or paraffin candles produce enough heat when burned to maintain the temperature inside the tent, but only to a certain temperature outside. But from experience we know that even at minus 15 outside, this wax option doesn’t save much. Plus, it is possible for the fishing line to come into contact with the fire from the candle.
- gas stoves for heating during winter fishing
 Special heaters are produced for winter fishing enthusiasts. They differ in the fuel used to heat the tent, as well as in the working volume. Some copies work without refueling for two to three hours, others a little longer. Most often, such heaters operate on gas fuel. The most popular means of gas equipment is a cylinder with a tile. The tile generates much more heat and quickly warms the space of the tent, but it should be remembered that the tile with a cylinder is quite bulky equipment.
- dry fuel for heating a tent during winter fishing
Other fishermen use hot water bottles with dry fuel to heat their tents during winter fishing. You can easily make such a heating pad yourself. To do this, we make holes in a regular tin can for air to enter and the oven is ready. It is suitable for both heating a tent and heating food. But dry fuel gives off a lot of unpleasant odors, and if you burn it, for example, all night, you can get poisoned and even lose consciousness. Therefore, using this heating method is not recommended.
How to heat a tent for winter fishing
 In addition to the above-mentioned methods, many fishermen heat their headscarves with a kerosene stove during winter fishing. Some fishermen, when traveling by car, take cast iron stoves for their tents. They run on either gas or wood. And in order not to get burned, a pipe is connected to the stove, which goes out into the street. This stove burns all night long, so the temperature in the tent will be very comfortable.
It is extremely important to remember safety when winter fishing!
Heated dry tents can easily ignite from the slightest spark or overheating of heating devices, be very careful!
How to insulate a tent for winter fishing
However, warming the tent is half the battle; you also need to keep this warmth in it. To retain heat, some manufacturers make tents with double walls. It is noticeably warmer in such structures. But if you have a very ordinary scarf, then you can try to modernize it. You can use any non-toxic building material designed for hydrothermal and noise insulation. This material can be used to cover the floor of the tent, saving space for holes, then the cold from the ice will enter the house much less. You can also make tent covers in the form of caps from this material. And then you will be guaranteed excellent winter fishing for pike, burbot, bream, carp, perch, and carp!
For those who are really interested in the topic, we suggest watching a video about heating tents for winter fishing.
Video - heating a tent for winter fishing
Enjoy your winter fishing and remember to stay safe on ice and in a heated tent!
© When using site materials (quotes, images), the source must be indicated.
You may be surprised, but the vigorous Russian winter successfully competes with the best days of summer and fishing and mushroom autumn in terms of the number and duration of city dwellers’ outings into nature. The beauty of the snow-covered landscapes is unique, winter fishing is uniquely romantic, and after a ski trip you feel especially invigorated and healthier. However, a heater or stove for a tent is vital for winter tourists and fishermen; They will also come in handy in the summer, when it suddenly gets cold or is caught in bad weather. This article is about how, how and in what cases to heat a tent correctly and safely.
The most important
Camping cooking and heating devices are not always compatible in one device. Food on a camping trip is usually prepared outside or in the “hallway” of the tent, under the awning. A heating camp stove operates in a cramped room where, if it is tightly sealed, there may not be enough air for normal breathing. Cases of burning in tents are not very frequent, but they occur consistently. That's why a heating camp stove should be extremely economical even in places abundant in fuel– the less oxygen is spent on its combustion, the less likely it is to form carbon monoxide. The choice of fuel type is also important: it is best if, with a lack of oxygen, it simply goes out without releasing carbon monoxide (see below).
Another significant point is related to the same circumstances: the small volume, large heat losses of the room and the probable lack of oxygen in the air, as a result of which heating a tent according to heating technology is very significantly different from heating buildings and structures. 1-4 person tents are critical in this regard: 2-4 person tents may have less than 1 cubic meter per person. m. In 1-person and large group tents, there is most often over 2 cubic meters per inhabitant. m, but for a 1-person tent the ratio of the outer surface area to the internal volume is large.
In any case, it is impossible to hermetically close yourself in a tent: in the morning, from their own exhaled carbon dioxide, people will wake up broken, exhausted and little able to continue moving. However, molecular-kinetic (warm air flows) heating of a small room is ineffective if there are even the slightest cracks in it; simply, the heat is immediately blown out. Therefore, a heater for a tent for 1-4 inhabitants should operate primarily with thermal (infrared, IR) radiation, and soft, long-wave radiation; in physical terminology - far IR (which is closer to millimeter radio waves). Near hard IR (with the spectrum maximum closer to visible light) at low outside temperatures and in conditions of large heat losses in the room will burn the skin, cause a fire, but will not really warm you up. For large 6-20-person tents, this requirement is softened: they have a ratio of the heat-losing surface to the volume of the room that is several times smaller, and each sleeper emits approx. 60 W of heat, so heating a large tent can be almost entirely molecular kinetic.
Note as a consequence: A camp sauna-tent can be set up for an hour and a half even at minus 40, but those who want to lounge in a tent before lights out in shorts and a T-shirt will have to be disappointed - IR heating does not allow this. In general, if you want the comfort of home in nature, stay at home and watch a movie about strong guys surviving in impossible conditions. Or order a non-volatile eco-house in the forest - only 2-3 million USD for a 2-room 26 sq.m. m residential.
A special case is heating a tent while fishing in winter. The fact that the angler sits crouched is half the battle. It is also necessary that the holes do not freeze. But then the bottom and/or fastenings of the tent can get stuck to the ice so that you can’t get it off. Here again, soft infrared comes to the rescue: its flow from the flashlight heater (see below) is directed obliquely down to the holes, and the residue reflected from the ice allows the fisherman not to become numb.
And in a very extreme, emergency situation - how to heat a tent in an extreme situation. For example, time is golden autumn. Warm up, let's go in sneakers, shorts and short sleeves, otherwise we'll get tired of the load and run out of steam. Suddenly there were clouds, the temperature suddenly dropped to zero, and snow began to fall; in the mountains this is possible even at the height of summer. While they were taking out and putting on warm clothes, someone showed signs of a cold and frostbite. You can’t go on like this, you need to set up camp and get treatment or call rescuers. While the tent was being set up, the victims got worse and new ones appeared. In such circumstances, the ability to build a heater from scrap materials, the ease and speed of its start-up, and the rate of heat release are of particular importance.
Methods and features
Let's get some money in advance, as they say. Heating a tent in winter or during a sharp cold snap without the danger of burning in it is possible. ways as their availability and launch speed decrease:
- Heat saving.
- Catalytic chemical heating pads.
- Using a tent such as a wigwam, tent or yaranga.
- Using heat accumulators from improvised means.
- Fire and chimney.
- 2-circuit liquid fuel heater, see below.
Further, a camping heater can be located in a tent and consume oxygen from the air in it. The heat generation of such devices is usually high, the time to start and warm up the tent to an acceptable temperature does not exceed 5-10 minutes, so we will sort to increase the likelihood of burning or poisoning by fuel vapors:
- A winter tent with a standard stove - if used correctly, should be classified as a previous one. list.
- She, with a homemade camping stove.
- Portable catalytic liquid fuel heater - if there is a lack of oxygen, catalysis fades, oxygen consumption stops, the fuel tank cools down, and fuel evaporation stops.
- The same applies to gas - it works the same way, but in inexpensive models the gas continues to flow from the cylinder. For trips in the off-season, you need cylinders with summer and winter gas: summer gas does not stimulate catalysis in winter; winter is dangerous in summer.
- Homemade alcohol burner - if there is a lack of oxygen, ethyl alcohol goes out without having time to release any significant amount of carbon monoxide.
- Candle heater - paraffin candles go out from a lack of oxygen when carbon monoxide has already begun its effect. True, if you do not light them again, but breathe on the street, by the morning the symptoms of poisoning in a strong, hardy person will disappear.
- – very economical, can be quickly made from scrap materials, but consumes a lot of oxygen. On a hike, you can safely run the wood chipper in sufficiently ventilated shelters: a wigwam tent, a hut, under a canopy/canopy on a fallen tree, in a grotto/cave.
During a winter hike in remote areas, a fire in a tent can be more dangerous than incineration: If you lose your shelter, you can lose your life. Heaters that do not consume oxygen from the tent are fireproof if basic precautions are taken. "Oxygen" According to the degree of increasing fire danger, they are distributed in a different way:
- Alcohol burner;
- Homemade tent stove;
- Candles;
- Standard tent stove;
- Wood chip stove;
- Catalytic liquid fuel;
- Catalytic gas.
As you can see, even the preliminary selection of a heater for a tent encounters contradictory conditions.
To find the optimum, in addition to your own experience and careful study of sources of adequate information, you also need to take into account the conditions of the hike:
- 1-2 days for the weekend to the place by road transport, which remains there until departure;
- Winter fishing;
- An overnight trip solo or in a group of up to 4 people - each person carries a full luggage for themselves. Including the tent, because it is easier to maintain a positive and breathable atmosphere overnight in a single or double tent than in a 4-person tent;
- The same thing, but in a large group - one carries a tent, the other a stove, and their luggage is distributed among the others;
- Star Trek.
In the first case, the volume and weight of the luggage are not of great importance, but safety is important, because children and green beginners will ask for it. The optimal choice is a catalytic kerosene heater; in extreme cases (the car is frozen and won’t start) - 1-2 homemade wood chips, a supply of alcohol, an alcohol burner and a kit for a candle heater for general use, see below.
A portable catalytic gas heater is most suitable for fishing. If we get to the place by car, then it is better to throw a candle hand warmer into the trunk (see below); as a last resort - a heat-saving tent, a supply of alcohol and a homemade alcohol burner. The same set, plus a wood chipper for each person, is suitable for solo extreme sports enthusiasts and small groups.
Note: An experienced winter fisherman can, instead of an expensive burner that requires gas costs, use a tent fishing stove based on wood chips, which can be made at home using scrap materials in just a few minutes. However, then you need to know exactly the features of your tent, fishing in your favorite places and make a stove taking them into account. For example, about the stove for the popular fishing tent Sable, see the video below.
Video: homemade stove for a tent in 6 minutes
A large group usually spends the night in one tent: there are more than 2 cubic meters of air per head, and there is less surface area that loses heat than in a single tent. Then you also need to add a tent heater to the individual emergency kits; all of it together does not pull the backpack.
A star trek does not mean that the group goes straight to the bar of a star hotel. In a star hike, also known as a radial hike, a base camp is set up, from which 1-2 day routes around the surrounding area are made. Equipment for the base camp is delivered to the site either by transport or on foot by the vanguard of the group; He is also setting up the base. In any case, a camp duty officer remains at the base, so the fire safety requirements for the stove are reduced. It is even possible to equip a homemade tent with a homemade stove (see below). The man on duty heats it in the same mode in which catalytic heaters are used on a solo hike - in a small group (see below), and if necessary and there is enough fuel, he heats it during the day - there is enough air in the tent.
Note: since in a large group at least its leader (instructor) is experienced, then for hiking in places with a lack of fuel, instead of a tent stove you need to take a catalytic kerosene heater. It is much safer than gasoline (kerosene does not flare up and flares up for quite a long time, especially at low temperatures), you can teach a beginner with the intelligence of a bonobo chimpanzee to use it and conduct control training an hour before going out, and the fuel for a kerosene catalytic heater weighs less and takes up less volume , than gas for the same trip time.
How to warm up
No oxygen consumption
We exclude catalytic chemical heating pads from consideration: they are expensive and provide little heat. You can use a heating pad to warm up a sleeping bag or balloon tent (see at the end). Just in case: a chemical warmer is a flatbread or a thing like a sausage, which to start it is bent until something crunches inside, or a protruding string is pulled. Then the components inside mix and an exothermic chemical reaction begins. If the chemical heating pad has cooled down, throw it away; it cannot be refilled.
Teplotent
Heat-saving awnings for tents were not popular in the days of “tarpaulin-rubber” tourism and remain so to this day, but in vain. After all, today the ideal material for heating tents - metallized plastic film - is easily available. PET film is also very durable: even with a Mares knife you can’t cut it very well, let alone pierce it with a random knot. When folded, the heat tent takes up almost no space and weighs practically nothing.

Firstly, a tent heat awning traps air heated by the tent. Secondly, it reflects back its very soft IR. In summer, in a tent under a warm awning, you can sleep on top of a sleeping bag almost everywhere except the Far North, in any weather. Just don’t make the awning like the one on the right in the picture: it’s only there because of precipitation. The awning should be cut according to the shape of the tent with an indentation of approx. on all sides. 0.5 m and with the same gap between the lower edge of the awning and the ground. It is better to give more heat removal in front, approx. 1 m. Then in the “hallway” it will be possible to cook food in the wind, and the waste heat of a kerosene stove or stove will heat not the cosmic space, but the tent.
The heat tent is assembled by welding plastic with a soldering iron through Teflon film. It can also be easily repaired in field conditions: with threads, cord, wire, pins or just sharp knots.
Note: Supplying a tent with a heat awning increases the efficiency and duration of ANY method of heating it.
Into the Stone Age

Our ancestors weren’t fools if they survived then and reached civilization? A tent such as a wigwam, plague or yaranga (see figure on the right) retains heat very well and is absolutely safe in terms of fumes, because ventilated. You can heat it with anything, from a catalytic burner to a fire. Heating is optimal, soft infrared: the inclined walls reflect it onto the inhabitants. One condition: in order for the tent to stay positive, the heater must work all night. Disadvantage: if the heater is fiery (stove, fire), the top of the plague tent becomes covered in smoke. In winter, under the sleeping bags you need to lay beds made of spruce branches or, if there is no such or hay-straw, carry rolls of foam rubber with you. Not heavy, but cumbersome.
The best plague tents are Finnish Lavvu, but domestic models are almost as good as them. It’s easy to sew a winter tent-chum with your own hands. In this case, for insulation you need to use clothing (not linen) fleece with the fluffy side inward. A three-layer tent with padding polyester or thin foam insulation picks up moisture while camping and day by day becomes heavier, swells and warms worse.
We are accumulating heat
Collecting heat from an outdoor tent fire is also the oldest method of heating on a camping trip. It is effective in places where there is enough wood fuel and there are stones of approx. into a fist made of dense heavy rocks: granite, gneiss, basalt, gabbro. The ideal option is a rounded moraine cobblestone. You will also need a cast iron cauldron (better) or a steel bucket with a lid. The technique for heating a tent using natural heat accumulators is as follows:

- We collect stones to fill the dishes without the top and stack them in a pyramid;
- We build a log house (well) or hut (house) fire around a pile of stones, see fig. on right;
- While dinner is being cooked and eaten, we add fuel and rake coals on the stones;
- We place the bucket/cauldron on its side next to the burnt-out fire and roll hot stones into it with a stick. There is no need to wrap them in foil, as advised in RuNet: a metal vessel will perfectly re-emit hard IR into soft one;
- We place the container with stones level and, to avoid heat loss due to convection, fill the load with sand or dry earth;
- Cover the container with a lid and hang it in a tent 0.5-1 m from the floor. Option (worse) – bet on 4-5 stones.
The hanging option heats the tent for up to 6 hours; with installation on the floor - 3-4 hours. In addition, the installed bucket/cauldron can be tipped over. To prevent hot stones from rolling around the tent, the lid must be secured with wire or (if available) with a standard latch.
Warmth - down the drain!
Winter heating of the tent with a fire and a pipe (see figure below) allows you to sleep on top of your sleeping bags at -30 outside. On YouTube you can find videos “exposing” the impossibility (neither more nor less) of this method. Indeed, it is not always applicable. Thus, the elevation of the bottom of the tent above the air intake end of the pipe must be at least 0.7 m. The recommended 0.5 was probably taken as a result of thoughtless rounding. Further, fires come in fire, light and smoke varieties. In this case, you need a nodya fire (pos. a) or a roll-on (pos. b). Nodya can smolder all night, but it requires even logs from 1 m thick to an arm or thicker.

Finally, you need a thin-walled stainless steel pipe with a clearance diameter of 50-80 mm. Simple steel will either burn out or not transfer enough heat to the air; aluminum will melt. Wrapping a section of pipe in a fire with asbestos, as is advised in some places, is nonsense, it is also a heat insulator. Also, a pipe is needed at least 2-2.5 m long; then warm air can be supplied to the tent with a flexible hose. The pipe is assembled from elbows with locks. In general, installing a heater turns out to be quite cumbersome, but for a base camp, heating with a pipe and a fire may be an option that relieves the attendant from looking after the stove and does not require additional fuel costs.
With air separation

In a 2-circuit camping heater running on gasoline/kerosene/diesel (see figure on the right), the burner flame heats the heat exchanger, through which tent air is forced. 2-circuit heaters are safe in all respects, because... They are placed outside and are very economical: 3 liters of diesel fuel is enough for continuous operation for 2-5 days. Disadvantages: high cost, bulkiness and energy dependence. They are used when a car remains at the base (it will need to be started periodically to recharge the battery) or in winter campsites with electricity.
"Oxygen"
Tent with complete stove
This is the most expensive, but also the safest option if you use the oven according to the instructions. Almost all manufacturers of hiking equipment produce winter tents with stoves, but according to user reviews, some specialization can be seen depending on the nature of the hike. Among domestic ones, the following are preferred:
- Chum, Zima, Vyuga - for a multi-day hike or a large group hike with a base camp.
- Penguin, UP (1,2,4) – for singles (UP1) or overnight trips in a group of up to 4 people.
- Bullfinch, Bear, Stack - fishing.
The listed oven models are equipped optionally, i.e. You can buy a stove later. Among the domestic camping stoves, Dymok, Snegir (with a heat exchanger), Sogra, Windrose, Poshekhonka or Onego camping stove (Maslov stove) are suitable. The latter is available for making yourself, see the video below.
Video: do-it-yourself Onego tent stove
Stove in the tent
The danger of fumes from a homemade tent stove is quite high, so sometimes camp stoves are made according to the scheme with a heat exchanger (pos. 1a in the figure) and placed outside. The disadvantage of this scheme is the complex, heavy and bulky fireproofing in the tent, so it is better to make a heating stove for a camping trip with a remote afterburner, pos. 1b. For house stoves, this scheme is rarely used due to its technological complexity. For example, it is easier to increase the efficiency of a country potbelly stove by introducing a long horizontal elbow - a hog - into the chimney; In a tent, this approach, of course, is not applicable.

As a tent stove with a remote afterburner, it has a huge advantage: in it the temperature of the flue gases at the end of the chimney source is much lower than in other metal stoves. As a result, reliable fireproof cutting of a pipe in a tent turns out to be much easier and more compact: it turns out that a piece of fireproof fabric from 35x35 cm with wire sewn into it or a flared stainless steel eyelet, pos. 3 in Fig. The gap between the grommet and the pipe is plugged with a rag made of the same non-flammable fabric (shown by the blue arrow).
It is impossible to cut from asbestos fabric: it generates a lot of carcinogenic dust. Typically, satin-weave fiberglass is used, but this is also not optimal - in the vicinity of a heated pipe, fiberglass becomes fragile over time and begins to gradually accumulate dust with glass micro-needles, which is also not at all useful. The best choice in this case is basalt fabric for body armor. It is heavier than fiberglass, but absolutely reliable and safe.
Drawings of a folding camp stove with a remote afterburner are given in pos. 2. Its “foldability” only seems relative: when folded (dimensions in parentheses), this stove allows you to load an 80-liter backpack with it in a standard way, i.e. a strong man in a group can carry both the stove and his luggage, and a separate stove porter is not needed. The minimum thickness of stainless steel for this stove is 0.5 mm.
Note: when independently designing a camp stove for a tent, it is advisable to focus on the heating engineering of engineer Bystrov’s temporary stove.
Gas-gasoline
A catalytic heater for a winter tent produces soft infrared and consumes less oxygen than fiery ones, but still quite a lot. There is nothing you can do to keep it warm, the fuel needs an oxidizer. Therefore, they use camp heaters with catalytic afterburning twice a day: in the evening they are turned on for the period from setting up the tent until lights out; Be sure to turn it off at night! Then in the morning, the tent attendant (he gets up from sleep half an hour before everyone else) turns the heater back on while he warms up breakfast. In a small tent, it is better to direct the IR flow obliquely from top to bottom; in 6 or more local areas, a floor heater with uniform radiation in all directions will be more effective, pos. 6 in Fig. For a fisherman's scarf, a mini heater-lantern, pos. 3.

Catalytic nozzles for cookers and stoves (item 1) are emergency, they eat up the oxygen in the tent very quickly. Gas heaters are more suitable for weekend camping and fishing; they are fireproof and using them does not require special experience. For a catalytic tourist heater for a hike of more than 2-3 days, it is better to take a kerosene one, see above. If you are hiking with a base camp and transporting the vanguard, it may be more convenient to use a panel heater (item 5), because You can cook 2 dishes on it at once. But in this case, you need to keep your eyes open behind the connecting fitting (red arrow in position 5): suddenly a flame appears there, you need to immediately close the cylinder valve and check the connecting hose. For a single extreme sports enthusiast who carries everything with him and can only rely on himself, a catalytic kerosene mini-heater with a hob, pos. 7.
The catalyst base – platinum or nickel – is of great importance for the reliability of a catalytic heater. In general, afterburners on platinum are less susceptible to the so-called. poisoning of the catalyst and are not prone to sudden failures, however, the chemical purity of the catalyst material and its microstructure are also important. Not cheap platinum “China” can fail at the most inopportune moment, but branded nickel can serve for years. Visually, you can get your bearings by the type of afterburner: if the burner looks like a solid surface (item 2) or a tiny button (item 3) and glows yellow-orange when in operation, it is probably platinum. If there is a rather large “bump” that heats up to a maximum of light red (pos. 4), then most likely the afterburner is nickel. In general, when choosing a catalytic camping heater, it is better to rely on the manufacturer’s reputation and its guarantees. Tourists are a fastidious people, life is camp, but there are no serious complaints about the catalytic heaters Kovea, Coleman, Camping, Pathfinder.
On alcohol
The history of ethyl alcohol as a camp fuel goes back centuries, and for good reason: the only way to get burned from alcohol is to get drunk. With a lack of oxygen, the alcohol flame goes out, releasing almost no carbon monoxide. True, alcohol is a fire hazard: it is highly fluid, permeates everything that is and is not allowed, its saturated vapor pressure is high even at subzero temperatures, and its flash point is low. Therefore, you should take a homemade alcohol burner with you as an emergency one, especially since it can be made at home from a coffee can, see fig.

A jar with a tin lid, pos. 1-3: it can be ignited by pouring 4-5 ml of its own into the lid; then the startup will take up to 5-7 minutes instead of 1-3 when igniting from a tray. In a jar with a plastic lid (items 4-6), you will have to, firstly, hermetically seal the gaping top with tin, which will now become the bottom. Secondly, punch through the filling hole, which is closed with a coin. If it flies off the burning burner, a strong flame will burst out of the filling hole, followed by splashes of burning alcohol. In general, not an option for a hike.
Alcohol vapor nozzles are located at the height of the can 2/3-3/4 from the bottom. The higher the nozzles, the weaker the flame and the greater the possible filling of the burner. In this way, its thermal power and operating time can be adjusted within fairly wide limits: fuel consumption varies over time from 1.5 to 6 ml/min. For the safety and efficiency of this burner, it is extremely important that the nozzles are of the same diameter of 1-2 mm, located evenly around the circumference at the same height and ensure the formation of flames. Therefore, the manufacture of an alcohol burner from a can is carried out as follows. way:
- An awl or scriber's scriber is fixed horizontally to a wooden block of the required thickness;
- The can is pressed against the marking tip and turned;
- Next, the jar is wrapped in a strip of paper, on which the beginning/end of the circle is marked;
- The paper strip is marked into 12-15 equal parts (for an 80 mm can);
- The centers of the holes are marked on the paper on the shell (round sidewall);
- Pierce the holes with a round awl of the required diameter;
- The awl is inserted horizontally and perpendicular to the shell in this place;
- Each time when punching another hole, the tool, without removing it, is smoothly turned upward at the same angle of 45-50 degrees. It is convenient to use a template made from a piece of plywood for this.
Note: a lot of different information on liquid fuel burners, descriptions and homemade drawings can be found on the English-language website zenstoves.net
Candles
Heating a tent with candles is, so to speak, fashionable, but also the worst way. The thermal power of a candle is only 40-50 W, and saturated paraffin hydrocarbons with a slight oxygen deficiency produce a lot of carbon monoxide. In the old days, cases of burning from candles in large, high ballrooms were not uncommon. If the tent is heated with candles, then it is necessary to raise the canopy at the entrance from below by 3-4 cm, and open the window on the opposite side. The only advantage of candle heating is uniform heat release over a long period of time.

However, good heating simply with candles is not easy to achieve even in a one-person tent: the heat of a candle is predominantly molecular-kinetic. To convert it into soft IR, a structure made of ceramic flower pots (items 1 and 2 in the figure) is required, which is fragile, bulky and quite heavy. Its effectiveness greatly depends on the distance between the visible end of the flame and the lower cut of such a cap, so for heating it is better to use short, thick holiday candles. Their burning time is 3-4 hours, which reduces the risk of burning.
Note: A “pot” converter of molecular kinetic heat into soft infrared is best used with an alcohol burner, branded or homemade. Branded cooking and heating sets of this type are produced from unbreakable ceramics, pos. 3. I prepared dinner, put on the cap - it warmed up by the time the scarf went out. There is not enough oxygen - the alcohol flame will turn very yellow, weaken, and stretch upward, which is immediately noticeable, but will not cause dangerous fumes.

However, household lighting candles can be successfully used during autumn, spring and winter fishing to warm hands, dry mittens and wet cuffs. In this case, the candle is placed in the casing of an old thermos (see figure on the right) or something like it; A window is cut below to install a candle and allow air to enter. A candle fishing heater, with a slight minus outside, maintains a tiny plus in the tent, sufficient to prevent the holes from freezing and not enough for the scarf to freeze to the ice.
Heating without a heater
Did you know that there are tents in which, without heating, you can sleep in your underwear under a blanket when it’s minus 30 outside? These are single-person balloon tents (cocoon tents), suspended from trees, see figure:

All lovers of tourism and simply relaxing in nature have to solve the problem of heating. You can't light a fire in a tent. And I really want to dry my clothes and equipment after a hike. What can we say about winter tourism!
The ideal solution for this is a portable gas heater. It is lightweight, safe and easy to use. A wide range of models will allow you to choose what you need.
Advantages of a portable gas heater:
- light weight and compact dimensions;
- convenient source of fuel - a gas cylinder - safe, lightweight, instantly ready for use (can be inserted inside the heater or connected with a flexible hose);
- high efficiency and cost-effectiveness of the heater;
- safe - minimum flame size, automatic safety;
- convenient to use;
- instant warmth - no need to wait for the air to heat up, infrared radiation will instantly warm you up immediately after turning on the device;
- can be used outdoors.
You can use a portable gas heater to heat your tent, ice fishing, car, garage, or just outdoors. It all depends on the power of the device.
You can also choose a heater for the most convenient gas cylinder size for you - from a miniature gas cylinder to a full-size propane cylinder