Good day to all. It's April outside. Many gardeners are already preparing for the summer season. They not only plant plants in their garden, but also love to decorate it. Recently, it has become especially fashionable to decorate your garden with crafts made from waste material - plastic bottles, tires, and so on. I also decided to decorate my garden with a handmade craft. And I made a forest clearing with mushrooms and stumps.
To make it I needed:
- A semicircular plastic plate and a small plastic ball.
- Cement, sand, water.
- Disposable cups (volume 0.5 l. and 0.1 l.).
- Knife.
- Filling mold (old oven sheet).
- Brushes.
- Oil paints.
- Green plastic bottle.
- 5 liter plastic bottle.
- Primer for painting.
- Masking tape.
- Scissors.
- Matches, candle.
- Sandpaper.
- Glue.
- Additional (flowers, butterfly, ladybug).
First, I took a plastic plate with a round bottom and, for insurance, greased it from the inside with a drop of sunflower oil so that the mushroom cap would come out well. I diluted the cement solution and poured it into a plate. As you probably already understood, this is the future mushroom cap.
A little later, when the cement had already set, but had not yet completely hardened, I took a 0.5 liter disposable glass, cut off the bottom and placed it on top of the cap, bottom down, and also filled it with cement solution. The mushroom is ready.

I left the mushroom to dry for a couple of days in a warm place. Then I easily took it out of the mold, and I also removed the glass from the stem. I also made two small mushrooms. I poured the hats into a small plastic ball, which I first cut in half, and the shape for the legs was 0.1 liter disposable cups. Once the mushrooms were completely dry, I sanded down any rough edges.

The mushrooms are ready, it's time to make a stump. To do this, I took a 5 liter plastic bottle and cut off the bottom of it to the required height.

I covered the outside of the workpiece with masking tape so that the cement would stick better. The stump preparation is ready.

Since I wanted to make a clearing, I needed a form to fill it. I thought for a long time about what to make it from and then the idea came to my mind to use an old baking sheet in the oven. I took a leaf, filled it with cement mortar and installed a stump blank and mushrooms inside. I left it all to dry for a couple more days.

When everything froze and began to stick together well, I began to shape the stump. Once again I mixed a solution of cement, sand and water, lightly wet the stump blank with water and began to apply cement to it. I smoothed out all the unevenness with a damp brush. Inside the stump, I also applied cement to the sides of the bottle and to the bottom. Once I liked the shape of the stump, I left it to dry until completely dry. This is what happened.

Then I sanded everything again until it was smooth. The remaining dust was swept away with a soft brush. I applied primer for painting. Once the primer was dry, I painted everything with oil paint. The stump turned out brown, the mushroom caps were painted dark brown on top and light brown on the bottom, and the grass was painted green.

I gave the paint time to dry and then started decorating the forest clearing with additional decor. I took a green plastic bottle, cut a strip from it and, using scissors, gave it the shape of grass. I deliberately cut an uneven strip, since the grass should be of different heights.
When I take my forest clearing into the garden, I will put a pot inside the stump and plant flowers in it. It will look very beautiful. I hope you liked my garden craft.
Goodbye, see you again.
Turtles and gnomes, mushrooms, flowers and leaves - all these cute garden sculptures can perfectly decorate and enliven a summer cottage or an area next to a country cottage. They can be made from various materials, including cut from, for example. Or hew out from.
But it is much easier to cast garden decorations from common materials: and. By the way, you can do this yourself.
Features and varieties
Since the figures decorating the site, as well as the figurines, will constantly be in the open air, they must be made of durable and frost-resistant material (cement, for example, is used only above, and it is recommended to add moisture-resistant ingredients to plaster). The top of the product is coated with protective compounds that will protect the surface from moisture and destruction.
Let's not forget that large, heavy figures may require a foundation (so that they do not sink into the ground). Often inside the garden decor there is a frame (made of wire, reinforcement, or other materials).
- Cement can be used as a basis for sculptures, which is convenient and easy to work with, and it is also used for. Concrete products are durable, have a long service life, and are easy to manufacture. They can stand outdoors all year round - you only need to periodically update the surface of the decorative coating (tint or restore a layer of varnish, for example).
- Gypsum is a cheap and accessible material. This is his big plus. There is also a minus - the sculptures turn out to be quite fragile and require careful care. To increase ductility and strength, PVA glue is added to the gypsum-based mixture. There is also the option of making gypsum-cement mortar. More on this later.
Read on to learn how to make a solution for country garden sculptures from cement, concrete or plaster.
Composition and structure
 In order for our figures to turn out not only beautiful, but also not to fall apart within a short period of time, we need to use high-quality components. Fresh (flowing, not caked) cement, washed, sifted and dried river cement, clean (not from a puddle or sea) water. The gypsum must also be of high quality: white, dry, crumbly.
Here are some recipes for solutions:
- For one part of cement powder take two to three parts of sand. Water is added to the dry mixture, bringing it to the desired consistency (usually the thickness of sour cream, sometimes a little denser).
- A gypsum solution is made by mixing gypsum powder with water until it becomes semi-liquid (basically, like a concrete mixture, until it is creamy thick).
- Gypsum-cement mortar consists of five parts cement and one part gypsum, slowly diluted with water to form a dense (but flowable) mixture. PVA glue is added to the composition in the amount of one tablespoon.
As already mentioned, it is also recommended to add PVA glue in small quantities to purely cement or gypsum mortar. Read on to learn how to make decorative sculptures from plaster, cement, and concrete for your garden with your own hands.
This video will show you how to paint a garden gnome or any other sculpture you made:
We make it with our own hands
How to prepare the mixture
To make a concrete mixture, you need to take dry cement and sand, mix them, and then slowly add water. You can make the solution in a basin or bowl of a suitable size and mix with a wooden spatula or spatula. Don't forget to protect your hands with gloves. done in a similar way.
Gypsum powder, on the contrary, is poured into water (so that lumps do not form). You can use special sculpture plaster, as well as construction plaster (sold in hardware stores). The one that contains gypsum is also suitable. The solution is used immediately.
When making a gypsum-cement mixture (remember - it must be dense for easy application to the frame). You need to pour water into the dry mixed ingredients in very small portions. In all three cases, PVA glue is added at the end.
Read below to learn how to make molds for garden sculptures.
How to prepare a mold for products
Made from clay or plasticine
There are also ready-made forms for garden decor (sold in stores). Making a stencil yourself requires having a sample figurine. You will also need clay, which can be easily collected in a quarry.
Having slightly diluted the clay to a plastic state, you need to immerse the sample figurine in it. First, we press its front half to make an impression, then the back half. Now the clay form needs to be dried - in the air or in the oven. Two parts are cast and then glued together.
Before pouring gypsum or cement-sand mass, it is necessary to lubricate the inner surface of the mold. Vegetable oil, petroleum jelly, paraffin. You can also make a composition from two parts of grated soap, seven parts of water and one part of vegetable oil.
For lighter plaster, instead of clay, you can use plasticine, which is easier to mold. We sculpt a figure out of it, not forgetting to draw a dividing line. Then we apply lubricant - a solution of soap and vegetable oil is suitable. Then apply the gypsum mixture with a spatula or brush, and the layer should not be more than two millimeters.
If necessary, after drying, you can apply another layer. Or several. We work on a flat plane (slightly larger in size than the future sculpture).
This video will tell you how to make a mushroom sculpture for your garden:
Made of metal and wire
For animals, birds, and people, a metal frame is made, which must be wrapped in places of thickening with a metal mesh with small cells or wire.
To save cement, you can put rags or old crumpled newspapers inside the structure. A fairly thick sand-cement (or gypsum-cement) mixture is applied to the frame.
From scrap materials

From natural materials
A textured leaf (such as burdock) printed on cement can make a beautiful birdbath. To make such a decorative product, you need to pour a mound of wet sand onto a flat surface, cover it with polyethylene and place the selected sheet with the textured veins facing up.
Then spread a layer of cement mixture no thicker than two centimeters (reduce the thickness slightly towards the edges). Let's prepare the base - a piece of plastic pipe filled with concrete. Let's insert it in the center. After two days the leaf is ready. Let's paint it.
You can also make so-called “living” sculptures, inside which lawn grass will be placed. Or other plants.
To do this, you need to prepare a metal frame of the desired configuration, covered with wire. It is covered with a metal or polypropylene mesh, then soil is poured (where living plants will be planted), after laying a layer of straw.
If you still haven’t decided what kind of sculpture you want for your garden, then the following video will help you with this:
Original and cute DIY garden crafts made from cement will help decorate your home area and garden plot. With their help, you can create an original version of landscape design yourself without any special material costs. It's not difficult at all, very exciting and useful. After all, cement crafts can be not only decorative.
Basics of making garden figures from cement
Cement is an inexpensive, plastic and durable material. Therefore, anyone who wants to decorate their site with interesting figures or compositions from them can learn to work with it.

The main task for a beginning sculptor: learn how to mix cement correctly. To prepare cement mortar you will need the following components:
- cement grade not lower than M400;
- sand (coarse, clean, river);
- water.
You will need about 2-3 times less cement powder than sand. The sand must be sifted to remove small debris and random objects. Water is poured into the mixture of dry ingredients little by little, stirring gently. The finished cement-sand mixture should be quite thick. Usually it is brought to the consistency of sour cream. Mix the cement using a spatula or spatula in any suitable container. You can use a basin, bowl, small container. When working with cement, you only need to wear gloves.
From ready-made cement-sand mortar, you can make a wide variety of garden figures using the frame method or molding. The manufacturing method, as a rule, is determined by the shape, size and other properties of the future sculpture. Garden figures made from a cement-sand mixture can be either voluminous - fruits, mushrooms, animals, or flat - tree leaves, flowers. Craftsmen who are starting to create cement crafts with their own hands for the first time can start with simple small figures. Over time, it will be possible to complicate the task.
Return to contents
Cement figures on a frame

When creating a figurine, you should achieve maximum resemblance to natural stone.
The frame for the craft can be made from plaster wire mesh, using it to assemble the necessary shape - a boulder, a cylinder, a cone. “filler” is placed inside the frame: rags, plastic bags, old newspapers.
Cement paste is applied to the finished frame with a spatula. It must be evenly distributed over the entire surface of the product. The finished craft is covered with plastic film and kept indoors until the cement hardens and dries completely. After this, it can be taken out into the open air and placed in the garden. Due to the light “filler” the figure will have little weight.
When making decorative cement boulders, you should try to make them as similar as possible to natural stone. Therefore, the applied solution is not leveled on the frame. Using a spatula, a wooden stick and other available items, various holes, protrusions and other irregularities are made on the future boulder.
Return to contents
Molding cement figures
In order to make molded figures, you will need formwork (mold), into which the “dough” of concrete or cement will be poured. After hardening, the formwork is removed. It can be made from plastic containers, wood, rubber. Balls are made by pouring a solution into an ordinary plastic toy children's ball through a small hole. Before pouring cement into the prepared mold, it must be lubricated with warm paraffin or wax. To do this, you can use a regular candle, slightly warmed over the fire.
Return to contents
Simple garden crafts made from cement

The simplest to make are the figures of beetles, turtles, ladybugs, hedgehogs and other small animals. The basis of such figures is a hemisphere.
To make it, half the ball, lubricated with wax, is filled with cement mortar. The cement needs to be compacted a little and the filled form should be turned over onto the board.
After about 2 - 3 hours, when the cement has hardened a little, the mold is removed. Using various decorative elements - fine gravel, haberdashery fittings and the like, you can get the desired figure.
The finished craft is covered with polyethylene until dry. After this, a decorative and protective coating is applied.
Return to contents
How to make your own mushroom?

To make a mushroom you will need a plastic bottle and a metal bowl, which will serve as a mold for the cap and stem of the mushroom. The main thing is to maintain the necessary proportions so that the structure is stable and looks good.
You need to cut off the neck of the bottle, then fill it with the solution and leave until it hardens. The inner surface of the bowl should be covered with cling film, carefully smoothing it out. After this, the form is filled with cement mortar. The cement must be dried so that it can be cut with a knife so that a recess can be made for the leg (approximately 7-8 cm). After some time, the cap is removed from the mold, the edge is ground off with a knife or file. Now you can decorate it on top: “plant” a fly or a worm on it, make small pimples if it is a fly agaric.
A large mushroom with a thick stalk can be turned into a fabulous old boletus. You can make an old man's face by pouring cement into a plastic New Year's mask of Santa Claus, having previously sealed all the holes with tape. After removing the mask, you can touch up your face with a knife, or attach eyes using beads or buttons. The mask is then attached to the stem of the mushroom. While the cement has not hardened, you can make arms and legs for the old man, give him a basket, a staff, or just a flower.
Return to contents
Intricate cement sculptures
Having gained experience, you can begin to create more complex sculptures. It is better to make such sculptures from several elements. It will be easier and more convenient. A monolithic cement sculpture will be too heavy. It will be difficult to move, and its strength will decrease. Large parts of the sculpture are best made on a frame from old vessels or containers, covering them with concrete.
The frame for long and thin elements - limbs, neck, etc. - is best made from old plastic pipes or fittings (wire, mesh).

Giraffe flowerbed.
A flowerpot for a small flowerbed in the shape of a giraffe will look original. To work you will need:
- suitable tank;
- wire;
- wooden blocks and slats;
- a piece of plastic pipe;
- small fittings;
- Decoration Materials.
The reservoir for the flower bed can be a large plastic bottle with the top cut off or a small oval basin, which needs to be braided with wire or covered with a fine mesh so that the cement does not slip.
The prepared container is installed on a frame made of wooden blocks. You need to mix the finished cement with a plasticizer (alabaster or gypsum) in small portions before applying the mixture to the frame. Plasticizers reduce the setting time of cement.
The frame of the figure is gradually covered with cement paste and given the desired shape. The bar legs are made with a slight thickening at the bottom; these will be the hooves.
The neck can be made from a plastic pipe and a short mane can be placed on it. Then the head with horns is molded on a wire frame. All small parts are attached to a wet cement surface. This way they will hold up better.
The surface of the finished figure is carefully smoothed with a damp hand to eliminate minor defects. Then the sculpture is covered with polyethylene and dried for at least 4 days. On the first day, the giraffe needs to be moistened with water from time to time. The dried figure must be sanded with emery cloth. Now you can start painting. A layer of varnish must be applied over the paint.
After the decorative coating has dried, you need to install the figure in the garden, fill the reservoir bottle with soil and plant the plants. It is better for a giraffe to overwinter indoors to avoid cracking.
From year to year, the trend of decorating country gardens with amazing flower beds, waterfalls with cascades, winding paths and rock gardens is gaining momentum. When designing their plot, any owner wants not only to transform the territory, but to get the so-called effect “so that it is not like everyone else.” In order to make beautiful and original decorative elements it is not at all necessary to spend fabulous sums. After renovation or construction, a small amount of cement and putty always remains. Why not put them to work? Original hand-made cement figures will be the “highlight” of the landscape design, making the site more attractive and interesting.
Just look at this magnificent garden decoration. An exquisite garden figure can easily be confused with the work of a professional craftsman.
For many, the figure evokes interesting sensations that are difficult to express in words. It rather has a philosophical internal content, like figures for a garden in the Feng Shui style
In addition to its decorative value, the sculptural hand also performs a practical function. It acts as an original stand for a flower bed with ground cover and low-growing plants.
To make a figure we will need:
- Cement mortar;
- Concrete putty for exterior use;
- Strengthening impregnation for concrete;
- Fine-grained sandpaper;
- A pair of latex or rubber gloves;
- Container with high sides.
We make the solution from a mixture of cement and sand, maintaining a 3:1 ratio, which we dilute with cold water to the consistency of thick sour cream. To give a concrete figure unusual colors, it is advisable to use special pigments. Dyes are added to the dry mixture at the mixing stage and only then diluted with water.
To make a sculpture in the shape of palms, we take gloves and gradually fill them with solution, trying to avoid the formation of voids with air. Then we place the filled gloves in a container, giving them the desired position.
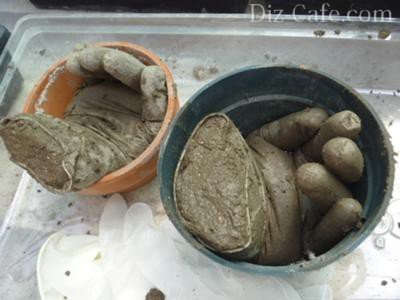
While the solution has not hardened, you can safely experiment with the form, choosing the most optimal option: simply by closing your palms, making a fist or intertwining your fingers with each other
You can increase the strength of the figure by installing a frame: insert pieces of wire into the finger compartments filled with solution, being careful not to damage the rubber with sharp edges.
Having decided on the shape of the sculpture, we leave the gloves filled with the solution in the container for 2-3 days. During this time, the solution will harden and acquire sufficient strength.
When the cement is completely dry, cut the gloves and remove them from the surface of the figure. Remove the remaining rubber using scissors and tweezers. At this stage, a lot of patience will be required, since the rubber will be removed in parts.

The original figure is ready. All that remains is to choose a worthy place for it in the garden and fill it with the mixture for planting ground covers and succulents
We cover the concrete figure with a layer of putty, carefully leveling the surface, and again leave it to dry for several hours. At the final stage, all that remains is to sand the surface of the palms and cover them with strengthening impregnation.
Exhibit #2 – elegant flowers made of concrete
Flowers poured from concrete can be a bright decoration for the front part of a house or a recreation area. Harmoniously combined with green spaces, they look great both along the border of winding garden paths and against the backdrop of an emerald lawn.

The main advantage of such garden figures is their resistance to temperature changes, thanks to which they can decorate the site for more than one season.
Making elegant flowers from concrete is not at all difficult. To do this, it is necessary to prepare a form that we will fill with the solution and the cement filler itself. The easiest way is to use ready-made silicone molds intended for baking. The variety of silicone molds available is quite extensive.
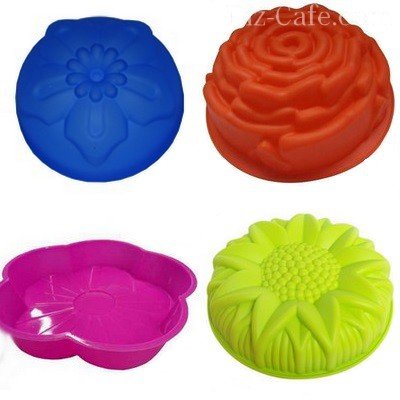
From silicone blanks you can make flowers of all shapes and sizes: from ordinary field daisies to multi-petaled chrysanthemums and dahlias
To make concrete flowers we will need:
- Cement mortar of the same proportion as in the previous example;
- Acrylic or oil paint for exterior use;
- Machine oil or drying oil;
- Polyethylene film.
Some craftsmen also use plastic bottles cut lengthwise, cut halves of rubber balls and other containers of suitable size as forms.
Since the key detail in creating flowers from concrete is the form, in order to be able to reuse its internal walls it is necessary to coat it with machine oil or drying oil. To increase the adhesion of the finished mixture and lighten the weight of the figure itself, it is advisable to add pieces of expanded clay to the solution.

Fill the form with the solution, compacting the contents as it is filled. Holding the edges of the mold, you need to shake it a little so that bubbles with excess air from the solution appear on the surface
Cover the form filled to the brim with plastic wrap and leave for a couple of days until hardened in a dry place hidden from direct sunlight. After the concrete has acquired sufficient strength, we take the flower out of the workpiece and lay it out on a flat surface. It takes 4 to 6 days for the figure to dry completely in a shaded place. For now, we can fill the vacated form again, forming the next flower.
To prevent the formation of cracks on the surface of the flower, it is recommended to moisten the solidified figure with water once a day. If a crack does appear, it is not difficult to correct the situation by covering the flaw with liquid cement mortar. In order to increase the strength of the finished concrete flower, its surface should be treated with a strengthening impregnation, which can be purchased at a construction center.

To decorate a flower made of concrete, it is better to use acrylic paints, which can maintain the brightness of the flower throughout the season.
The choice of shades when decorating a flower depends on the color palette of the flower bed and the taste preferences of the artist himself.
Exhibit #3 – sea pebble turtle
A motley tortoise, settling on a country plot, will help create that special atmosphere of coziness and comfort.

With its presence, Tortilla the turtle will certainly lift the spirits and delight children and guests of the site
To implement the idea, you need to prepare:
- Medium-sized stones of any shape;
- Pieces of metal rod;
- Cement mortar;
- Impregnation for concrete;
- Acrylic or oil paints.
The size of the figure depends only on the artist’s idea and the amount of materials needed. Having chosen a place to install the figure, we level the area for its placement.
We form a small hill from stones, which looks like the body of a turtle. To arrange the paws of the figure, we lay metal rods at the level of the bottom row of stones, which will subsequently serve as the frame of the structure. You can “plant” the turtle’s head on the same frame, or lay it on the ground. After the bottom row is laid and the metal rods are inserted, we cover it with cement mortar. All voids between the stones should be filled and compacted with cement. Using the same principle, we lay out subsequent rows, carefully fixing the stones.
Having laid out the body, we proceed to making the paws and head of the animal. We select small stones and place them in a heap around the rods. To fix the stones and give the desired semicircular shape to the paws and head of our character, it is better to use a solution of a thicker consistency. After we have formed and fastened the paws of the figure, we begin the finishing work. To do this, level the surface and plaster it with a more liquid cement mortar. We lay sea pebbles on the not yet hardened layer of cement.
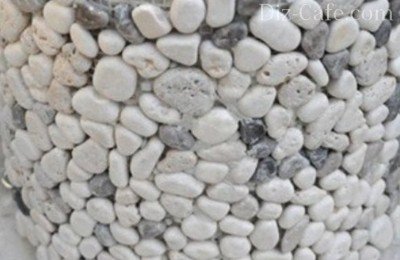
Flat, smooth pebbles will perfectly imitate shell plates. To secure the pebbles in the shell, it is enough to lightly press them into the “plaster layer”
Leave the finished figure for 2-3 days to dry completely. After the concrete has hardened, the body and shell can be painted with special pigments, and flat sea pebbles with acrylic paints.
It's not all that complicated. A little imagination and patience - and a new memorable character will appear on your site, which will become a successful addition to the landscape design.
In the Middle Ages, statues decorated suburban areas solely for practical reasons - to ward off evil spirits and bring good luck to the owners of the estates. Today everything has changed and garden figures made of concrete are installed for decoration. Of course, to create a classical sculpture you will have to spend money on expensive bronze or marble and hire a sculptor who can build a monument the size of a man. However, art sculptures, sculptural additions and small plastic arts, which are gaining popularity, allow owners of country real estate to try their hand at creative endeavors.
The garden plot can be decorated with bright decorative figures made of concrete
To make unusual figurines for the garden with your own hands, you can adopt several popular ideas.
Artificial boulders for rock garden
To make hollow stone, you only need a cement concrete mortar (1 part cement to 3 parts sand and water) and a plaster mesh. The following steps are followed:
- The frame of the future stone is formed from any lightweight material (literally anything will do: pieces of used mounting tape, crumpled sheets of paper, and so on).
- The resulting “mass” is wrapped in mesh.
- A very thin layer of cement mortar is applied to the frame (it is not necessary to level it much in order for the artificial stone to be as realistic as possible).
- The finished decorative stone is covered with polyethylene until completely dry.
 Technology for manufacturing hollow artificial boulders from cement
 Healthy! It is not recommended to dry such a boulder in the fresh air, as it can spread.
In the same way, you can create perfectly round cement balls with your own hands, which can be painted in bright colors and enliven your summer cottage. In this case, you can use an old children's ball as a “filler”.
Leaf-shaped birdbaths
If you want to create more complex figures from cement, then you can install unusual birdbaths on the site. To do this, you will need to find a leaf of any large-leaved plant (mallow or rhubarb) and prepare the same composition of the sand-cement mixture as described above. The resulting mixture should resemble cottage cheese in consistency. It is also necessary to prepare a piece of polyethylene and a piece of pipe and a tin barge with a diameter of about 10-15 cm.
 Using a burdock or rhubarb leaf, you can make an unusual birdbath
 After that:
- Form a small hill of sand on the polyethylene (it is better to moisten the sand a little).
- Place a piece of cellophane on the resulting mound and secure it with stones.
- Place a burdock leaf without holes on the surface.
- Coat it with a solution about 2 cm thick in the middle and 1 cm for the edges of the figurine.
- Install a pipe in the central part of the sheet and fill it with the remaining concrete.
- Wait for the mixture to dry completely (2 days) and remove the remaining leaves.
 To prevent the concrete figure from cracking when drying, moisten it with water
 The resulting drinker can be coated with a primer and painted in any color.
Flowerbed in the shape of a hand
At first glance, it is difficult to make such a “creation” from concrete with your own hands, but you can make a hand using an ordinary medical glove, and also:
- cement mortar (1:3);
- putties (it is better to buy a special composition for outdoor work);
- strengthening composition for concrete;
- sandpaper (fine-grained);
- deep container.
 Using ordinary rubber gloves you can make an unusual flowerbed or fountain
 To make an unusual flower bed:
- Gradually fill the gloves with cement mortar.
- Place them in a container, giving them the desired shape (for example, you can clasp your palms, form a fist, or create an unusual interlace of fingers).
- To enhance the strength of the garden figure, install a frame in the form of pieces of wire inside the “arms”.
- Leave the resulting workpiece for 2-3 days until the solution hardens.
- Cut the gloves and remove them from the surface of the “hand” using tweezers.
- Cover the figure with putty, wait a few hours and level the surface with sandpaper.
 To make the figure last longer, reinforce it with wire
 After this, the resulting form can be filled with soil and flowers can be planted in it.
Healthy! If you want to give the figure an unusual shade or, on the contrary, to get as close as possible to the structure and shade of natural stone, then use special pigments that are added during the process of mixing the cement composition.
Concrete fungus
Another fun idea for decorating your garden is a fungus made from concrete. In this case, the cement mixture should be like plasticine so that a future “craft” can be easily formed from it.
 You can make mushroom figurines from cement
 To obtain such a fly agaric:
- Make a small depression in the sand using a bowl to create a mold for the future mushroom cap.
- Place any leaf on the bottom of the resulting hole to make the cap rough.
- Place a piece of pipe or a tin can without a bottom in the center to strengthen the structure.
- Form a “leg” from a rolled piece of roofing felt or linoleum and fill this form with cement.
- Wait until both components of the garden concrete mushroom figure harden.
- Fill the top of the leg with a sand-cement mixture and attach to it the cap from which the pipe sticks out.
- Wait 3-4 days and give the sculpture any color.
 You can paint the finished figurine after it has dried or during the preparation of the concrete solution
 Concrete flowers
Such products fit harmoniously not only on concreted recreation areas, but also in areas with green spaces.
To make artificial flowers you will need a special matrix. It is best to choose a ready-made silicone mold, which housewives often use for baking, or use special decorative formwork. If there is no mold for filling, take a cut plastic bottle or an old rubber ball.
 To make more realistic flowers, use ready-made silicone molds
 To create a flower arrangement, prepare:
- already known cement mortar (1:3);
- oil or acrylic paint (the main thing is that the label says “For exterior use”);
- drying oil (usually machine oil or Vaseline will do);
- polyethylene.
After that:
- Lubricate the walls of the matrix with oil to extend its service life.
- Add a little expanded clay to the cement mortar to lighten the weight of the future decorative element.
- Fill the mold with the solution and shake it a little to compact the mixture.
- Add the mixture until it reaches the edges of the matrix and cover it with plastic.
- Place the workpiece in a dark place for 2 days.
- Take out the frozen product and place it on a flat surface.
- Wait 4-6 days.
- Treat the flower with strengthening impregnation.
- Apply paint.
Healthy! To prevent concrete figures from cracking during the drying process, they must be moistened with water daily.
Other ideas
If you have mastered the production of such figures, then you can also expand the range of materials and skills used to create:
- Frame sculptures. Using reinforcement (frame), you can make an angel, a dog or any object. In this case, cement is applied directly to the frame of the composition, and a construction mesh is used to ensure that the finished decorative element remains hollow.
- "Drowning" sculptures. Unusual and sometimes frightening figures, as if crawling out of the ground, are made from gypsum, which is diluted with water until a solution has the consistency of sour cream. The finished composition is poured into a clay mold and left to dry for a day at a temperature of about +15 degrees.
 In your garden plot you can create very believable and creative figures from plaster
 - Mosaic figures. The finished cement turtle or mushroom can be decorated with colored mosaics, which are laid directly on the raw mixture.
In the same way, you can make creative bins for your summer cottage, decorate the sidewalk and much more.
In custody
In order to decorate your site with unusual sculptures, you don’t have to turn to designers and sculptors, because all you need is a little imagination, patience, cement and sand.