Olesya S.
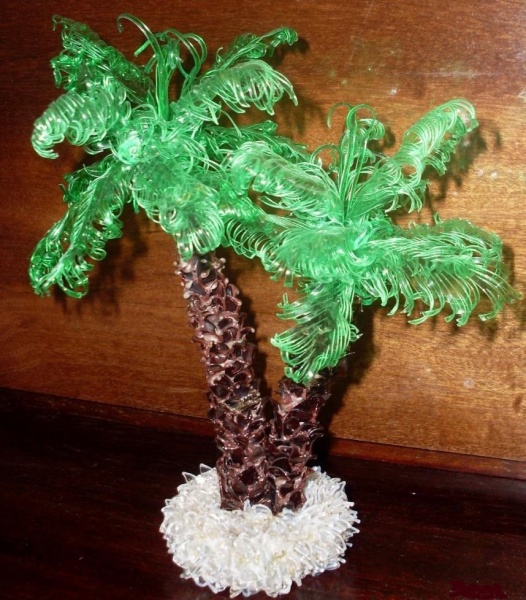
Date palm, coconut palm, banana palm. Which one do you like? Today we will make an evergreen, beautiful palm tree from plastic bottles, which will decorate your estate and give you an exotic and warm mood. Feel the tropics right in your own backyard thanks to the very simple master class on how to make a palm tree with your own hands.
For the manufacture of exotic wood from plastic bottles you will need the following materials:
- Brown plastic bottles of the same diameter (approx. 2 l.), for the barrel;
- Green plastic bottles (allowed different sizes) for palm leaves;
- Scissors, stationery knife;
- Scotch;
- Plastic pipe or metal rod.
1. Let's start making the palm tree trunk. To do this, take a brown bottle and a knife. Remove the cork; you won't need it anymore.
2. Cut the bottle crosswise, with the bottom part being slightly larger than the top.
3. Cut the part of the bottle with the neck into six equal parts with scissors, reaching the beginning of the narrowing of the upper part, stop. Each cut part should be shaped into an oblong triangle or petals. To do this, round and narrow the cut parts.
4. Do the same procedure with the remaining half. Also use a hot knife or awl to make a hole in the bottom of the bottom half of the bottle with a diameter the size of the neck hole.
5. Make a fold at the base and bend the resulting plastic petals one by one.
6. Having opened all the petals, you get a hexagonal flower.
7. Do the same procedure with the other remaining half.
8. Cut the remaining brown bottles in the same way, make cuts and form petals. You will end up with many halves that will need to be inserted one into the other, with the neck facing down.
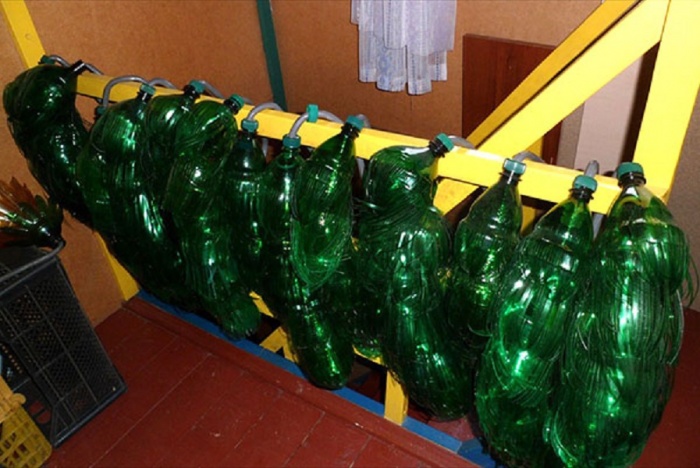
9. We begin to form the trunk of an exotic beauty. To do this, take a metal rod or plastic pipe and thread all the blanks of the brown bottle onto it. Secure the lowest part with tape. When forming the trunk, it is important to distribute the bottles so that the petals occupy all the free space and leave no empty spaces (in a checkerboard pattern). The height of the palm tree depends on the number of blanks. The palm trunk is ready!
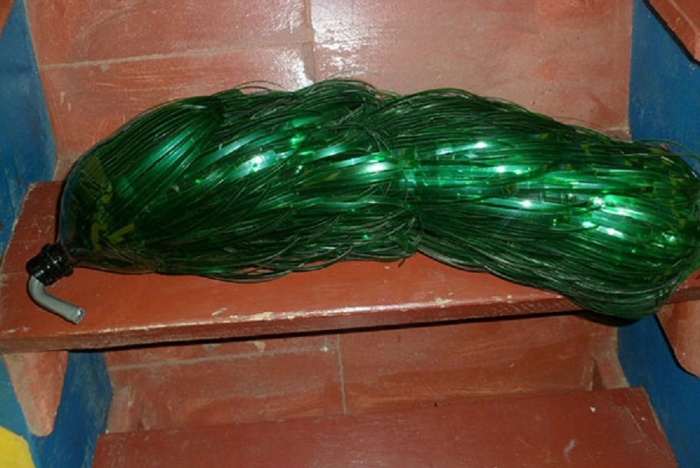
10. Let's start making palm leaves. To do this, take green bottles and a stationery knife. Remove the caps from the bottles; they are no longer needed.
11. Cut off the neck and bottom.
12. Then cut the resulting workpiece lengthwise into three identical parts, starting from the bottom, not reaching the top by about 2-3 centimeters.
13. Open the cut parts, leaving a hole in the center for attaching the greenery to the base of the trunk.
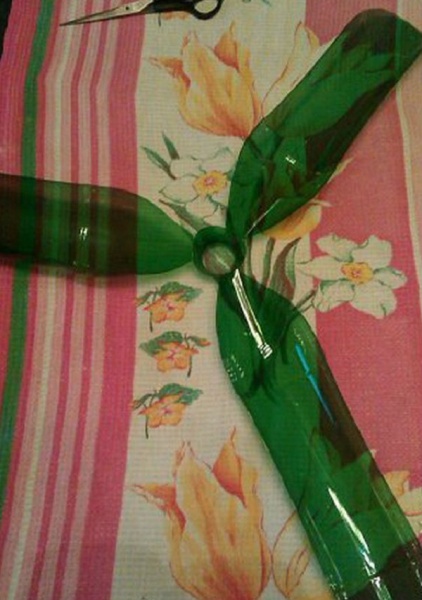
14. Bring the foliage of the palm tree to a natural and familiar appearance. To do this, make cuts on all sides of the petal, not reaching the middle by about 1.5 centimeters.
15. Round the petals a little and make the cuts diagonally.
16. Fold the resulting thin strips through one. Thus, the foliage of the palm tree will become more luxuriant.
17. Do the same with the rest of the remaining petals. For lush palm greenery, use a large number of green bottles.
18. Let's start assembling this exotic beauty. Place the made plastic greenery on the remaining pin of the previously prepared table. If the bottles are different in size, then place the large ones first, and then the smaller ones. To form a palm tree cap, you need to lay the bottles in a checkerboard pattern to get rid of unnecessary spaces of greenery. We attach the last green blank to the pipe with tape. To prevent the palm from being blown away by the wind, it is important to secure it by burying the bottom of the rod on which the palm blanks are threaded into the ground half a meter.
A hand-made palm tree does not require maintenance, but at the same time is an excellent interior decoration. The master class offers you the opportunity to create two versions of a palm tree - for the desktop and for the area near the house.
If you want to decorate your interior with exotic elements, then you can try to make a palm tree with your own hands, using one of the techniques presented in this master class.
To create your own simple option palm trees you will need the following materials:
Wire, the thickness and diameter of which will depend solely on your desire for the future size of the tree;
Pliers;
Sheets of paper with adhesive side;
Any material for wrapping a palm tree, here a simple pipe cleaner is used;
Make several pieces of wire of the desired length, their number should be about 8-10. The length of the wire is the height of your palm, so try to make it optimal for what you want. Attach a square of adhesive paper to one end of the wire, which will be palm leaves. Place future leaves on each wire.

Using scissors, give the squares the desired petal shape, making cuts in each of them that reach the wire.


Palm leaves must be joined together to form a tree. Now you should take a strip of pipe cleaner of any color to make it look more realistic, the most suitable would be a pipe cleaner Brown. Take all the wires with leaves in your hand and connect them using a winding brush. Once you reach the desired height of the palm, you can cut off the excess from the pipe cleaner. Leave one or two centimeters, this will later give the palm tree stability.

Set up the palm tree, giving the leaves the desired shape.

Make a palm tree with your own hands big size To place it in the yard of the house, you can use simple plastic bottles.

To do this, you need to collect green and brown plastic bottles, take a couple of iron rods and prepare a drill, as well as a knife and scissors.

First you need to make a trunk. From each bottle we cut off the bottom with a height of at least 20 cm. The edges should be cut into teeth and bent for clarity. This will allow you to obtain a scaly structure of the palm trunk. Also, in each bottle blank, you should drill a hole equal to the diameter of the iron rod; it will serve as the base.


Now we take the green bottles and cut them in half. Next, we cut the edges of each bottle according to the shape of the leaves. We leave the necks on one half, and drill holes for the twigs at the ends of the others.

The blanks are ready, it's time to start assembling the palm tree!

Attaching palm leaves is not as difficult as it may seem. It is necessary to take an elastic rod, quite rigid, but not thick. We insert the cut green bottles one into the other, neck to neck, and on the last bottle we leave a cork, which we drill and put on a rod; at the end the rod must be bent so that the leaves do not fall off.
The palm tree made from plastic bottles is ready!

A simpler option is also possible

Plastic bottles are an excellent material for developing creativity. A huge number of crafts fit organically into landscape design adjacent areas. This hobby also performs a noble function, preventing clogging environment non-degradable waste. There are many ways to make a palm tree from plastic bottles. The proposed options will help you build a real masterpiece that will become a worthy element of decorating the site.
First option
A real palm tree is impressive in size. To make a plant close to the original, you will need a lot of plastic bottles. Therefore, it is better to distribute the task of collecting containers in advance among the immediate environment. Brown and green containers are designed for classic palm trees. Extraordinary and extravagant individuals can experiment with plastic bottles blue color or other shades unconventional for palm trees.
Advice! Palm long time will retain its original attractiveness if plastic bottles are pre-soaked in a warm soapy solution and the remaining labels and adhesive solution are carefully removed.

Materials required for work:
- plastic containers;
- scissors and stationery knife;
- wide tape;
- thick wire for leaves;
- metal rod for the barrel.

The aesthetics of the craft will be ensured by bottles of the same volume. For large plant 2-liter containers are optimal; a medium-sized plant can be made from a 1.5-liter container. 0.5 liter bottles are appropriate for a dwarf specimen.
A palm tree made from plastic bottles is assembled with your own hands in stages:
- initially the branches are designed for a lush crown;
- then the trunk is assembled;
- Finally, the structure is connected together and securely fixed to the surface.

Let's look at how to make a crown step by step:

The number of branches at the top may vary, but is aesthetically pleasing appearance palm trees are achieved with a minimum of 5-7 lush leaves.
When the preparation of the crown is finished, they move on to assembling the palm trunk. Here you will also need almost the entire plastic bottle, with the exception of the bottom. The container is cut lengthwise into 5 equal fragments, as shown in the photo:

Palm blanks are strung on a rod, each new level comes with an offset. The result should be something like this:

Advice! To connect the crown and trunk of the palm tree together, at the top metal fittings parts are welded where the wire with leaves can be threaded. This is the most reliable way fixation. Small, light leaves are secured with tape.


It is preferable to make a heavy structure solid foundation. There are several options for installing a palm tree from plastic bottles:
- the trunk can be fixed on a metal platform, which is subsequently buried in the ground;
- the reinforcement is buried half a meter into the ground and concreted;
- lighter products can be filled brick chips with further compaction of the soil around the palm trunk.

Second option
The following method of forming a palm tree from plastic bottles with step by step algorithm actions.
Work begins with labor-intensive process barrel assemblies:
- Need a third part plastic containers, cut off from the neck side.
- All blanks are cut into 8 parts, leaving intact small area near the base.
- In order for the palm trunk to have a scaly surface, each segment is bent outward.
- Reduce waste plastic bottles Using the bottom of the container will help. To do this, use a hot knife to make a hole of a suitable diameter at the bottom. Otherwise, the process of forming blanks is identical to the algorithm described above.

Palm leaves can also be made into other shapes. The crown will be presented in the form of wide foliage, reminiscent of a fan. You can use green and yellow plastic containers for it.
Comment! The splendor of the crown directly depends on the number of leaves from the bottles, and their width depends on the size of the containers.
It is better to make the crown of a tall palm tree from a 5-liter container; for a medium-sized plant, 1.5-liter containers will be sufficient. Cutting the leaves of a fan is quite simple:
- remove the bottom of a plastic container;
- the bottle is cut lengthwise into 3 parts;
- each segment is rounded at the end;
- the petals are cut into fringes on both sides, leaving a narrow untouched strip about 1.5 cm wide in the middle;
- splendor is achieved by bending the fringe in different directions.
Finally, the elements strung on the cable and fittings are fastened together.

Third option
Another method involves creating a palm tree using the bottoms of plastic bottles. It should be noted that such a container will require much more.
Crown design step by step:
- At each bottom it is necessary to make a hole whose diameter corresponds to the prepared base. The work is performed with a hot knife or drill.
- Green bottle blanks are strung on a rigid cable.
- The edges of the wire are secured with caps so that the parts remain in place.
Summer residents who spend the summer on their plots in the fall are faced with the problem of disposing of plastic containers from all kinds of soft drinks. A plastic bottle tree can be an unexpected way to turn trash into garden decoration.
How is this possible? It’s very simple, if you carefully study the instructions on how to make a palm tree from bottles, prepare everything necessary tools, Consumables, and be sure to stock up on a good mood.
Bottle palm tree: possible benefits and methods of use
 As you know, plastic used for the production of food packaging does not decompose for hundreds of years when it gets into the soil. Centralized removal of this kind of waste is not established everywhere, and no one wants to litter nearby areas with plastic waste. What should a summer resident do in such a situation? Do you really have to take old plastic bottles to the city?
Don't rush! If you carefully collect bottles of brown and green plastic, in the off-season the whole family can turn this container into an unusual evergreen tree in an evening.
A palm tree made from bottles will perfectly decorate:
- local area;
- unsightly corner of the garden;
- plot next to outbuildings;
- children's playground;
- a border of earth near an open one.
 A palm tree made from plastic bottles according to the instructions below can become a spectacular decoration at any party, wedding, theme evening or children's party.
Manufacturing original item decoration will not cause difficulties even for people far from this kind of creativity. The main thing is to prepare everything you need before making a palm tree from plastic bottles.
What do you need for a palm tree made from plastic bottles?
 What should you stock up on before starting work? First of all, home handyman You will need green and brown plastic bottles. The green ones are blanks for the foliage of the tree, and the brown ones are the future trunks of the evergreen beauty. Moreover, the height of the plant and the splendor of the crown directly depend on the amount of containers collected.
Scroll necessary materials and tools for creating a bottle palm tree include:
- plastic containers;
- sharp stationery knife and scissors;
- durable tape;
- metal rod or plastic tube for the barrel;
- thick rope or braided wire for the base of the leaves.
When selecting plastic bottles for a palm tree, you need to take into account that trunks and leaves made from containers of the same diameter look better. If you have smaller green bottles in stock, they can be used for leaves in the middle of the crown, but small brown vessels will have to be used for tree trunks of a different type or size. Different shades of plastic are not a hindrance. They will only add vitality and brightness to the man-made plant.
Bottle palm: manufacturing instructions
 Step-by-step description of all the intricacies of creation plastic wood will help quickly, literally in the evening, step by step to create a palm tree from plastic bottles of the intended height.
The process consists of three operations:
- leaf assemblies;
- creating a plastic plant trunk;
- connecting all parts and installing the finished tree.
Before making a palm tree from plastic bottles, the container must be washed and all paper and film labels removed from it.
Although there are many options for creating a plastic tree, the most magnificent long leaves with any chosen method are obtained from large, for example, two-liter bottles.
Making a palm tree crown from bottles
 In prepared green bottles stationery knife or cut with scissors bottom part. It is no longer needed, and the upper half will become a blank for the sheet.
 It is carefully cut into thin pieces towards the neck longitudinal stripes. The larger the diameter of the plastic bottle, the thicker and more luxuriant the green palm leaves will be.
 These are not the only option for creating leaves. If you cut the top of a plastic bottle, as in the photo, into four “petals”, and then cut each of them several times, you will get beautiful feathery foliage.
 The resulting leaf fragments are successively strung on a strong rope or durable electrical cable. A lid must be screwed onto the first piece in order to secure the “petiole” of the leaf with a knot at the top. The last part of the bottle is screwed in the same way.
 A palm tree made from plastic bottles can have a top of any size, but trees whose crown consists of at least 5–7 leaves look better.
 There should be a long stalk at the base of the finished palm leaves in order to later assemble and securely fasten the entire structure.
Assembling a palm tree trunk from bottles
 To obtain a tree trunk similar to a natural one, you will need almost the entire bottle, except for the very bottom.
 From the bottom almost to the very neck, longitudinal cuts are made on brown bottles, dividing the container into equal petals.
 Only a small fragment of the bottom goes to waste
 This is what it looks like finished part future palm tree trunk made from bottles.
 The assembly is carried out in the same way as the green leaves of a tree were collected. To secure the palm tree in an upright position, its trunk will need a strong, rigid core. It can be made from a metal rod of suitable length and diameter or a tube.
Assembling a palm tree from plastic bottles
 The finished palm leaves are attached with glue or tape to the top of the tree so that they form a uniform crown diverging on all sides.
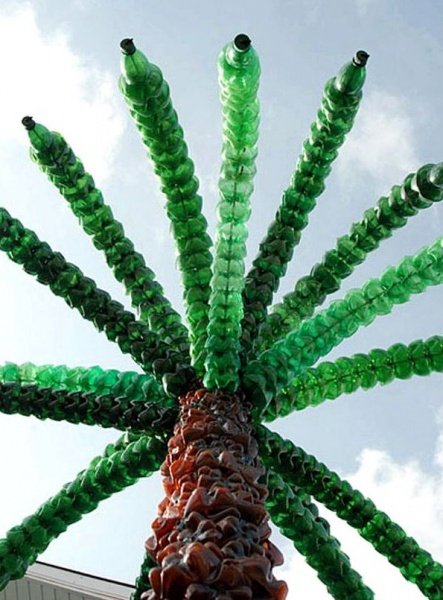
 This is what the finished tree top looks like.
 The design turns out to be quite heavy. Therefore, it is advisable to secure it with such a heavy base. If it is not possible to make a welded platform or suitable material, the rigid plastic or metal base of the stem is buried at least half a meter. This kind of “root” in the hole is strengthened with brick chips and compacted after filling with soil. Large trees are best concreted.
Video on how to make a palm tree from plastic bottles personal plot, will explain all the nuances creative process, will help you turn your yard or corner of the garden into a real oasis with your own hands.
One of the options for making a palm tree from bottles - video
Do you want to have it on your garden plot evergreen palm? Or make it stand in a tub in your home all year round without the need for watering and care? It doesn’t matter that it’s cold outside, such a miracle is completely within your power. Everything is very simple - just know how to make a palm tree from plastic bottles.
What do you need
The material from which we will make our palm tree is found in every home. Save several two-liter containers of water or beer in the colors we need - green and brown. So, let's decide what we might need before making a bottle palm tree.
- Thick rod for the trunk. Optimal use metal rod, but a willow twig or a smooth, even branch of any tree will do just fine.
- Brown plastic bottles. The more there are, the higher the palm trunk will be. In general, they are needed in quantities of 10 to 15 pieces.
- Similar green bottles for the crown - 2-3 pieces. It’s the same here - the more bottles, the more magnificent the palm foliage.
- Awl or drill.
- Knife or scissors.

Let's start by preparing the barrel. For bark, cut out a piece 10 centimeters long from a brown plastic bottle. To do this, cut off the bottom of the container. We perform this procedure with each bottle. You can also use the top part of the same container, from which you should cut off a narrow neck and then measure the same height to the cut line. We form teeth along the edges of the blanks, like a crown, and bend them to the sides. The height of the cloves should be about 5 centimeters.
Second phase
The next step in our instructions on how to make a palm tree from plastic bottles is to prepare the foliage. For the base of the palm tree crown, we take one of the green bottles and cut off the bottom, but leave the neck itself with the thread for the lid - it will be useful for securing the entire leafy structure. We remove the neck of the remaining bottles too. Then we cut out leaves on each resulting piece, not reaching the end by 5 centimeters. The edges of each sheet can be decorated with cloves, it’s up to your desire and imagination. Just remember, the teeth on plastic bottles are very sharp, so don’t cut yourself! The larger the container, the longer the palm tree’s foliage will be. Now we assemble the blanks one on top of the other on the neck and fix them with a screw cap.
Third stage
All that remains is to make holes, including in the lid on which the crown is attached. They can be drilled with a drill or made with a heated awl. Now all that remains is to assemble the palm tree. Secure the base of the structure in a pot of soil or dig it into the area where your palm tree will grow. Place brown bark pieces on it one after the other, and then crown it with a ready-made lush green crown. The palm is ready!

Now you know how to make a palm tree from plastic bottles. This process does not require any money, but it will be good entertainment for you and your children, teach them to make small miracles with their own hands, decorate their home or plot and find non-standard methods the use of such seemingly ordinary things as plastic bottles.