When creating a bathhouse, the question of heating it always arises. When choosing from ready-made options, it is better to give preference to the one that will not only be of high quality, but also economical. If you don’t have the funds to build a stone heating source, you can make a sauna stove with your own hands.
Requirements for metal heat sources
When making a stove yourself, it is important to keep on hand the necessary tools, a set of drawings for the construction of homemade sauna stoves, and have experience as a welder. When working with steel sheets, keep in mind that at a temperature of +150 degrees, a change in the properties of iron occurs, at +250 its endurance under constant loads disappears, and at +550 the steel becomes dark brown, which indicates a change in linear properties.
You need to work especially carefully when heating the metal to +900 degrees! At this temperature, unwanted deformation of the future furnace is possible.

Taking these nuances into account will ensure:
- long-term accumulation of thermal masses;
- warming up the bath and raising its temperature in a short time;
- high level of safety for people washing themselves.
In addition, these ovens do not require much space due to their small size.
Pros and cons of metal stoves
The bathhouse must maintain a temperature of +50 degrees. For this purpose, it is recommended to install homemade metal sauna stoves. Their use has the following advantages:
- small-sized structures, which is important for small rooms;
- you cannot suffocate, since such an iron “homemade product” removes combustion products through the chimney pipe;

- Due to the high heat transfer coefficient, the steam room quickly warms up. On average about 1.5 hours;
- shelf life, which directly depends on the quality of the work performed and materials;
- absence of smoke when lighting a bath with raw wood;
- low cost.
Such homemade metal stoves also have some disadvantages:
- small dimensions of the structure exclude use in spacious bath rooms;
- rapid cooling period. In order for the stove to heat, the heat must be constantly maintained;
- high probability of ignition of objects located near the walls of the structure.
Types of metal furnaces
There are 3 options:
- Open – with a small volume water tank and an open heater. To enhance the heat capacity coefficient of such a sauna stove, you will need to cover the stones with a galvanized lid.
- Closed. To increase the heat capacity, the outside and inside are laid out with refractory bricks using metal fasteners, and a special grate is placed.
- Combined. With this option, a complete set is formed: 2 valves, a firebox, a grate, 2 pipes (10 cm and 14 cm in diameter), a blower and 4 holes are provided for a pipe and a bypass elbow. For this, steel sheets about 0.5 cm thick are used.

Sauna stoves also come in cold and hot types. The first is suitable for heated rooms. It is impossible to get burned on its walls, since they only warm up to +50 degrees. The second option does not allow you to control the temperature in the bathhouse and is used when using the steam room irregularly.
Types of stoves depending on the type of fuel:
- electrical - housing with heating element and special elements for heat insulation;
- wood-burning A lot of wood is needed as fuel, a long time to warm up the room and constant monitoring;
- gas. They are convenient and reliable thanks to the presence of a safety device that reacts when the gas supply level decreases or when it is completely turned off.
 Metal wood stove
 Features of heating sources for baths and saunas
In a traditional Russian bathhouse, it has long been customary to provide a lot of steam and less heat. For this purpose, a closed heater is used, located above the firebox. It is lined with heat-resistant brick on the inside while maintaining a small air gap. For such a bath you need to heat the stones up to +500 degrees.
The Finnish sauna requires a low level of humidity - 5-15% and a temperature range of up to +85 degrees. The heater is used open, with slightly heated stones. To supply steam, just pour water on it.
Main components of metal furnaces
Their presence is provided in all bath structures.
Firebox
This is a two-chamber device. The upper part (furnace) is necessary for burning fuel, and the lower part (ash pan) is necessary for accumulating and collecting ash. These two compartments are separated by a grille, and each of them has a door. Often the lower compartment is left open for air flow, using it as an ash chamber. You can also make holes in the firebox door (dimensions 20x25 cm) with a damper to regulate the air supply.
Kamenka
Above the firebox door, located opposite the entrance, rods measuring 1 cm or more are fixed. The door of the heater itself should “look” at the steam room. Next, stones without mica content are placed in it. It is undesirable to use granite. The more cobblestones, the larger the hot surface.  Firebox
It is better to mount a hatch in the upper part of a sauna stove made of metal with your own hands to create access to the bottom of the compartment and ensure maintenance of the heater. A chimney cover is installed above it. The last stage is the installation of a water tank.
Chimney
This is a pipe for removing the resulting smoke and heating the water supplied to the stones. The chimney must be insulated, as due to its high temperature it is easy to get burned.
Its dimensions must correspond to the dimensions of the iron stove. The thickness of the passages should be equal to half a brick.
It is better to purchase a chimney already assembled with an outer pipe, an internal chimney, and a deflector.
Tank
It is mounted above the firebox. A tap is built into its lower part to gradually supply liquid to the hot stones. On the chimney side, the tank is covered with a steel semicircle with a hole for the chimney pipe. A lid with a handle is mounted on the part of the container that will be filled with water. Just like the chimney, it is better to buy a ready-made tank.
Additional items
These include doors and grilles. To save time, they are purchased ready-made.
Making metal stoves with your own hands
There are many drawings and options, but the set of constituent elements is approximately the same.
Tools
To get started you will need to prepare:
Grate for the furnace
Important nuances
You first need to determine the location for the future structure. If necessary, a foundation and two rows of bricks are laid. A pit 70 cm deep is made under it. Its bottom is sprinkled with sand and broken bricks on top. Next, the frame and formwork are installed, after which the surface is filled with concrete.
 Foundation for a metal sauna stove
 Important to remember:
- the gap between the stove and the wall is at least 1 m;
- Foil must be attached to the wall near the structure;
- it is better to make a chimney from a sandwich pipe with a heat-insulating layer;
- at the junction of the roof and the chimney it is necessary to form a passage unit;
- It is better to surround the structure with bricks to prevent burns.
Stove-heater
This simple variety has several ways to create it.
Option 1
Using an iron barrel without a bottom or top. The resulting container is half filled with bricks placed on edge and a grate laid on top. Stones are placed in the remaining 2/3 of the space and a chimney is installed. At the end, such a homemade stove in the bathhouse is covered with a lid made of sheets of steel.
Option 2
Bricks are not used for the construction of the stove. Sequence of work:
- Prepare diagrams and necessary tools.
- In a long pipe, cut a hole for the blower with dimensions of 5x20 cm. Inside the pipe above it, fix the mount for the grate.
- For the firebox, make a hole 25x20 cm. Above it, mount fastenings for rods, the size of which is about 1 cm.
- On the other side of the oven, create a hole into which the liquid will flow. Place stones in the heater.
- Make a slot for the chimney. Install a tap at the bottom of the pipe.
- Form a lid on the heating tank with a slot for the chimney, a hinge and a handle.

Option 3
This stove has 2 heaters. It is made by analogy with the previous ones. The difference is that 4 plates are used to connect two heaters.
Other possible varieties
In addition to stoves, the following are relevant:  Potbelly stove
- a conventional horizontal oven. A propane cylinder and scrap metal scraps are used. Openings for the doors and chimney are cut, a grid of grates is fixed to the corners, and the lid is installed in its original place. Legs and doors are installed;
- vertical boiler for a bath. It consists of a firebox, a water tank and a closed heater. It will be necessary to pre-form blanks for the bottom of the lid and partitions, and carry out the process of welding round grates. The constituent elements are made according to the scheme described above.
Many drawings of sauna stoves made of metal provide for horizontal and vertical design options with the firebox opening into a separate room, with a closed and open heater. A homemade potbelly stove is also common. This is an ordinary metal box with a door and a pipe. It requires a lot of fuel with a low heat transfer rate.
Final finishing
Regardless of the type and size of the sauna stove, the structure must be treated with heat-resistant enamel. To do this, the surface is degreased, and then the organic composition is applied in several layers. 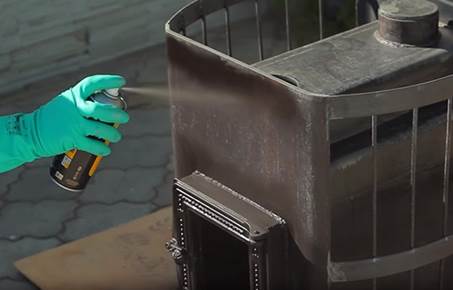 Application of heat-resistant enamel
Finished furnaces cannot be put into operation immediately. First of all, forcefully or naturally dry the bathhouse.
By following these tips and having experience in welding, you will get a stove that will bring you joy for many years. Choose an option that will optimally fit into the bath room and will not “eat up” additional space.
When creating a bathhouse, the question of heating it always arises. When choosing from ready-made options, it is better to give preference to the one that will not only be of high quality, but also economical. If you don’t have the funds to build a stone heating source, you can make a sauna stove with your own hands.
Requirements for metal heat sources
When making a stove yourself, it is important to keep on hand the necessary tools, a set of drawings for the construction of homemade sauna stoves, and have experience as a welder. When working with steel sheets, keep in mind that at a temperature of +150 degrees, a change in the properties of iron occurs, at +250 its endurance under constant loads disappears, and at +550 the steel becomes dark brown, which indicates a change in linear properties.
You need to work especially carefully when heating the metal to +900 degrees! At this temperature, unwanted deformation of the future furnace is possible.
Taking these nuances into account will ensure:
- long-term accumulation of thermal masses;
- warming up the bath and raising its temperature in a short time;
- high level of safety for people washing themselves.
In addition, these ovens do not require much space due to their small size.
Pros and cons of metal stoves
The bathhouse must maintain a temperature of +50 degrees. For this purpose, it is recommended to install homemade metal sauna stoves. Their use has the following advantages:
- small-sized structures, which is important for small rooms;
- you cannot suffocate, since such an iron “homemade product” removes combustion products through the chimney pipe;
- Due to the high heat transfer coefficient, the steam room quickly warms up. On average about 1.5 hours;
- shelf life, which directly depends on the quality of the work performed and materials;
- absence of smoke when lighting a bath with raw wood;
- low cost.
Such homemade metal stoves also have some disadvantages:
- small dimensions of the structure exclude use in spacious bath rooms;
- rapid cooling period. In order for the stove to heat, the heat must be constantly maintained;
- high probability of ignition of objects located near the walls of the structure.
Types of metal furnaces
There are 3 options:
- Open – with a small volume water tank and an open heater. To enhance the heat capacity coefficient of such a sauna stove, you will need to cover the stones with a galvanized lid.
- Closed. To increase the heat capacity, the outside and inside are laid out with refractory bricks using metal fasteners, and a special grate is placed.
- Combined. With this option, a complete set is formed: 2 valves, a firebox, a grate, 2 pipes (10 cm and 14 cm in diameter), a blower and 4 holes are provided for a pipe and a bypass elbow. For this, steel sheets about 0.5 cm thick are used.
Sauna stoves also come in cold and hot types. The first is suitable for heated rooms. It is impossible to get burned on its walls, since they only warm up to +50 degrees. The second option does not allow you to control the temperature in the bathhouse and is used when using the steam room irregularly.
Types of stoves depending on the type of fuel:
- electrical - housing with heating element and special elements for heat insulation;
- wood-burning A lot of wood is needed as fuel, a long time to warm up the room and constant monitoring;
- gas. They are convenient and reliable thanks to the presence of a safety device that reacts when the gas supply level decreases or when it is completely turned off.
Metal wood stove Features of heating sources for baths and saunas
In a traditional Russian bathhouse, it has long been customary to provide a lot of steam and less heat. For this purpose, a closed heater is used, located above the firebox. It is lined with heat-resistant brick on the inside while maintaining a small air gap. For such a bath you need to heat the stones up to +500 degrees.
The Finnish sauna requires a low level of humidity - 5-15% and a temperature range of up to +85 degrees. The heater is used open, with slightly heated stones. To supply steam, just pour water on it.
Main components of metal furnaces
Their presence is provided in all bath structures.
Firebox
This is a two-chamber device. The upper part (furnace) is necessary for burning fuel, and the lower part (ash pan) is necessary for accumulating and collecting ash. These two compartments are separated by a grille, and each of them has a door. Often the lower compartment is left open for air flow, using it as an ash chamber. You can also make holes in the firebox door (dimensions 20x25 cm) with a damper to regulate the air supply.
Kamenka
Above the firebox door, located opposite the entrance, rods measuring 1 cm or more are fixed. The door of the heater itself should “look” at the steam room. Next, stones without mica content are placed in it. It is undesirable to use granite. The more cobblestones, the larger the hot surface. Firebox
It is better to mount a hatch in the upper part of a sauna stove made of metal with your own hands to create access to the bottom of the compartment and ensure maintenance of the heater. A chimney cover is installed above it. The last stage is the installation of a water tank.
Chimney
This is a pipe for removing the resulting smoke and heating the water supplied to the stones. The chimney must be insulated, as due to its high temperature it is easy to get burned.
Its dimensions must correspond to the dimensions of the iron stove. The thickness of the passages should be equal to half a brick.
It is better to purchase a chimney already assembled with an outer pipe, an internal chimney, and a deflector.
Tank
It is mounted above the firebox. A tap is built into its lower part to gradually supply liquid to the hot stones. On the chimney side, the tank is covered with a steel semicircle with a hole for the chimney pipe. A lid with a handle is mounted on the part of the container that will be filled with water. Just like the chimney, it is better to buy a ready-made tank.
Additional items
These include doors and grilles. To save time, they are purchased ready-made.
Making metal stoves with your own hands
There are many drawings and options, but the set of constituent elements is approximately the same.
Tools
To get started you will need to prepare:
Grate for the furnace
Important nuances
You first need to determine the location for the future structure. If necessary, a foundation and two rows of bricks are laid. A pit 70 cm deep is made under it. Its bottom is sprinkled with sand and broken bricks on top. Next, the frame and formwork are installed, after which the surface is filled with concrete.
Foundation for a metal sauna stove Important to remember:
- the gap between the stove and the wall is at least 1 m;
- Foil must be attached to the wall near the structure;
- it is better to make a chimney from a sandwich pipe with a heat-insulating layer;
- at the junction of the roof and the chimney it is necessary to form a passage unit;
- It is better to surround the structure with bricks to prevent burns.
Stove-heater
This simple variety has several ways to create it.
Option 1
Using an iron barrel without a bottom or top. The resulting container is half filled with bricks placed on edge and a grate laid on top. Stones are placed in the remaining 2/3 of the space and a chimney is installed. At the end, such a homemade stove in the bathhouse is covered with a lid made of sheets of steel.
Option 2
Bricks are not used for the construction of the stove. Sequence of work:
- Prepare diagrams and necessary tools.
- In a long pipe, cut a hole for the blower with dimensions of 5x20 cm. Inside the pipe above it, fix the mount for the grate.
- For the firebox, make a hole 25x20 cm. Above it, mount fastenings for rods, the size of which is about 1 cm.
- On the other side of the oven, create a hole into which the liquid will flow. Place stones in the heater.
- Make a slot for the chimney. Install a tap at the bottom of the pipe.
- Form a lid on the heating tank with a slot for the chimney, a hinge and a handle.
Option 3
This stove has 2 heaters. It is made by analogy with the previous ones. The difference is that 4 plates are used to connect two heaters.
Other possible varieties
In addition to stoves, the following are relevant: Potbelly stove
- a conventional horizontal oven. A propane cylinder and scrap metal scraps are used. Openings for the doors and chimney are cut, a grid of grates is fixed to the corners, and the lid is installed in its original place. Legs and doors are installed;
- vertical boiler for a bath. It consists of a firebox, a water tank and a closed heater. It will be necessary to pre-form blanks for the bottom of the lid and partitions, and carry out the process of welding round grates. The constituent elements are made according to the scheme described above.
Many drawings of sauna stoves made of metal provide for horizontal and vertical design options with the firebox opening into a separate room, with a closed and open heater. A homemade potbelly stove is also common. This is an ordinary metal box with a door and a pipe. It requires a lot of fuel with a low heat transfer rate.
Final finishing
Regardless of the type and size of the sauna stove, the structure must be treated with heat-resistant enamel. To do this, the surface is degreased, and then the organic composition is applied in several layers. Application of heat-resistant enamel
Finished furnaces cannot be put into operation immediately. First of all, forcefully or naturally dry the bathhouse.
By following these tips and having experience in welding, you will get a stove that will bring you joy for many years. Choose an option that will optimally fit into the bath room and will not “eat up” additional space.
Having your own bathhouse is probably one of the common desires of people. But as you know, the main element of this establishment is the stove, which will be discussed in this article. How to make and install a continuous and periodic heating stove in small baths? What are the advantages of laying a heater? What are the basic requirements for making a heating device for a bathhouse with your own hands? Find answers to these and many other questions further in the article.
Types of sauna stoves
A truly good bathhouse is one that has a high degree of heat, and this cannot be achieved without a good stove. So, bath heaters come in several types, the main ones are listed in the table.
| Types of sauna stoves | |
| Electrical | Electric steam room stoves have a number of advantages. These include high thermal conductivity, affordable price, compact equipment, etc. This type of heating equipment allows you to create the optimal temperature in the steam room in the minimum amount of time. |
| Wood burning | The traditional option and, moreover, the most popular. Such structures come in both metal and brick. The components of such heating devices are: a chimney, an ash pan, a firebox and grates. Wood-burning stoves are characterized by a high efficiency rate. |
| Finnish | Finnish stoves can be electric or wooden structures, which, thanks to their attractive appearance, can decorate any bathhouse. Due to a well-thought-out device, such stoves allow warm air to disperse evenly throughout the steam room. One of the main advantages of Finnish stoves is their high fire resistance. |
| Cast iron | Cast iron stoves are considered significantly economical heating equipment for baths, as they require minimal consumption of combustible materials. Such structures come in continuous and periodic action and are characterized by high heat resistance. |
Having minimal construction skills, each owner, with effort and purchasing the necessary materials, will be able to equip a bathhouse with any type of stove.

Features and advantages of masonry heater
A heater is a type of sauna stove that has a special compartment for placing stones. In turn, the stones gain heat when the fuel burns, the water heats up and, as a result, steam is formed. The most popular today are heaters made of metal and brick, both of which have their pros and cons, which we will consider further.
So, brick heaters have the following advantages:
- durability and practicality of the device;
- the ability to heat large rooms while retaining heat for a long time;
- simplicity of the installation process;
- decent level of fire safety (due to the presence of a metal base);
- practicality of operation, etc.
Along with the above advantages, brick heaters also have their disadvantages: they are heavy, require intensive cleaning, long-term heating (more than 5 hours) is required for productivity, etc.
Metal heaters are considered an equally popular heating option. They are characterized by the following features:
- differ in small dimensions;
- have a compact design;
- multifunctional and ergonomic;
- They quickly gain temperature and maintain it for a long time.
All heaters are divided into two groups: open and closed. Open ovens allow you to use stones to generate steam, and you can pour water on them. This steam is not harmful to people, it turns out dry and does not burn the body. In closed structures, stones are placed inside; you can also pour water on them, but to do this you need to open the stove doors. The second type of stove retains heat much longer than the first.
As for the specifics of laying a heater, it requires certain skills and compliance with the instructions. Here are a few tips that you simply need to consider in your work:
- a brick structure is best assembled using clay mortar;
- the height of the section for stones should not exceed 7 brick rows;
- It is worthwhile to correctly place the ash pan, ash pan, and smoke exhaust pipe so that the steam room warms up as quickly as possible;
- When making design calculations, remember that the lower the stones are located in the stove, the more productive the source of vaporization.
Features of a metal furnace
Metal stoves for baths are used quite often: the material heats up quickly, quickly releases heat, and the structures themselves are light and small. However, such heaters quickly cool down and require a huge amount of solid fuel (wood). Many models of metal furnaces have a standard set of structural parts. Due to the presence of grates in such devices, it is virtually impossible to regulate the combustion process, so it is also impossible to control (decrease and add degrees as necessary) the temperature. Practitioners offer options for improving metal stoves for baths. To do this, the structure must be deprived of the grate and the firewood must burn directly on the base, and in the meantime, holes must be made in the ash door that will allow you to regulate the amount of air entering the firebox. The stages and features of making metal furnaces with your own hands will be discussed later in the article.
Stages of making a metal stove with your own hands
To make a metal sauna stove with your own hands, amateur craftsmen should do the work in several stages.
Stage 1. Prepare a project with drawings, indicating all the necessary measurements of parts and their specific position.
Stage 2. Prepare the necessary tools and material. Integral elements in the work process will be: a welding machine, an angle grinder, a tape measure, a chimney pipe, etc.
Stage 3. This stage can be called preparatory, since it is necessary to mark and clean the area for the future structure.
Stage 4. A vessel for water is made. There is a hole in the tank for a tap to replace the water.
Stage 5. A firebox, heater and vent are created. The grate bars need to be installed above the ash pit.
Stage 6. We are working on the foundation for the furnace. It is best to make the base out of brick. Brickwork on mortar should be done in two rows, this will be quite enough.
It is worth noting that metal stoves can be of different shapes: shaped, horizontal, rectangular, vertical. Rectangular structures are considered the most convenient to use. This form of heater promotes uniform heating of the room and maintains the thermal balance in the steam room.
How to build a brick oven with your own hands
When planning to build a brick stove for a bathhouse with your own hands, you need to responsibly approach the issue of choosing the main material, on which the strength, reliability and productivity of the structure depend. Fireclay brick is known for its excellent heat-resistant characteristics; along with it, red stove and ceramic bricks, etc. are used.
Work on the construction of a brick sauna stove usually begins with pouring the foundation, which can be of various types (stone, rubble, etc.). The classic option is a concrete base, which should be supplemented with waterproofing layers of roofing felt or roofing felt.
Having started laying the furnace, it is important to constantly, during the work, check the horizontality of the rows for errors and the verticality of the corners of the structure for inaccuracies. A brick heater can be made either open or closed; in any case, this is painstaking work that must be performed strictly according to the order instructions. On the second row of masonry, holes are formed for installing the blower; most often it is overlapped on the fourth row and fixed in the structure. At the level of the ash door, grates will be installed in the stove, which rest directly on the bricks of the previous row. When laying fireclay bricks in the future, you should pay attention to the presence of holes for the supply of secondary air. Next, the stove firebox is erected and a door is installed in it. Next, work is in full swing on the creation of the heater. Afterwards the chimney is equipped and a damper is installed. A water tank is installed, taps are adjusted, etc.
The above types of bricks are used in stove laying at different stages regarding their physical properties, which we will discuss in more detail in the next chapter of the article.
How to calculate the material, make a drawing for making a brick oven with your own hands
So, as it turned out earlier, for work we will need fireclay (heat-resistant) and ordinary bricks. It is not recommended to lay out the entire structure only from fireclay material, since such a stove will not last long and will collapse. This type is best used for laying the internal environment of heating equipment. How to alternate bricks correctly and at what stages should be indicated in the drawings. For inexperienced craftsmen, a huge number of already proven projects for creating this format of sauna stoves are presented on the Internet.
When creating a drawing yourself, you should pay attention to the following points:
- the doors for the firebox should be located opposite the entrance to the bathhouse;
- the foundation for the stove must be more than 20 cm high;
- When creating a design project, you need to note the rows that are being built without mortar.
Drawings from professionals posted on some construction sites imply the availability of ready-made figures, calculations, and the required amount of materials. In general, we can say that all expenses for the construction of a brick kiln depend on its dimensions and the presence of additional equipment in it.
Continuous and periodic heating ovens for a small bath
According to the principle of operation, bath stoves are divided into continuous and periodic heating devices. Constructions of the first type usually have thin walls and are suitable for loading a small amount of stones. The temperature in such heaters reaches 300 - 350 degrees. Such stoves can be heated in various ways, from electricity to liquid fuel, but gas is not used for the safety of users.
Intermittent devices, on the contrary, are characterized by thick masonry and the ability to use a large volume of stones. Such equipment has a high level of heat transfer. For heating such stoves, wood is most often used. In the lower section of periodic structures, the temperature reaches 1100 degrees. Such indicators are capable of completely destroying soot on stones, so they always remain clean at the finish line.
At home, metal stoves with constant heating are most often made; the thermal pressure of such structures is enough to provide small family bathhouses. In addition, recently, more and more often, combined devices are being assembled, which allow increasing the efficiency of heating equipment.

Choosing a location and installing a sauna stove with your own hands
The exact location for installing the stove in the baths must be determined at the design stage. For each building this is an individual territory, but still there are nuances that are the same for everyone:
- you need to carefully study the location of the beams and roof slabs;
- all parts of the stove must be thermally insulated from wooden surfaces;
- the firebox should be close to air access;
- It is best to install the stove between the dressing room and the steam room.
Before installing the stove in the bathhouse, the adjacent walls must be sheathed with a special protective material, for example, asbestos cardboard. Do not forget about waterproofing and treating metal structures with special means that are resistant to high temperatures. The distance from the wall to the heating equipment must be more than 26 cm. A properly placed stove in a bathhouse should not disturb visitors, while there must be maximum effective ventilation in the room and a functionally equipped chimney pipe.
For additional information, use the video:
There is probably not a single owner of a country house who would not want to build a real Russian or Finnish bathhouse on his property. To ensure that expectations coincide with reality, it is necessary to carefully consider the equipment and layout of the structure. And you definitely need to choose and install the stove correctly, because it is the heart of any steam room. Of course, you can buy a ready-made unit, but will the standard design allow you to realize everything you have planned? It is best to build a sauna stove that will fully meet all the owner’s needs with your own hands.
Homemade stoves for a wooden steam room: advantages and disadvantages
Almost all existing designs of homemade sauna stoves are not inferior to factory units in terms of appearance, efficiency and performance. In addition, they are easy to maintain and durable.
As for the possibility of saving space in the steam room, a home-made structure can be fit into an existing room more rationally. Although the choice of stove type depends mainly on the specifics of use (for example, if the bathhouse is two-story, then the stove can serve as a source of water heating) and the arrangement of the bathhouse premises, several general requirements can be identified:
- Sufficient thermal power and the ability to adjust it.
- Operational safety.
- The presence of additional elements for redirecting convection currents.
- Possibility of adjusting temperature and humidity.
All modern units for equipping steam rooms can be divided into two types according to the material of manufacture:
- brick stoves;
- metal heating devices.
To understand their performance characteristics in more detail, let’s take a closer look at each option.
Brick stoves for frame baths
Burnt brick has long been considered the best material for building sauna stoves. Even today, despite the availability of simpler and cheaper options, many people prefer a brick building. And not so much for its solid and presentable appearance, but for the ability to create an indescribable atmosphere of home warmth and comfort. No less important are other advantages of brick heat generators:
- High heat storage capacity. The stove heats up quickly and even after the fuel has completely burned out, it retains heat for 6–8 hours.
- Possibility to heat rooms of any size. Sauna stoves can have dimensions sufficient to heat structures with several rooms, including a steam room, a locker room and a room for gatherings with friends.
- If the operating rules are followed, a brick stove is safer than any other open-flame heating device.
Such a stove is not without its drawbacks, which you have to pay for the unique atmosphere and comfort. And, I must say, they are no less significant than the advantages:
- Difficult to install. To build such a furnace, bricklaying skills are required.
- Higher cost. Most often, this factor is due to the need to buy refractory materials and furnace castings.
- It takes a long time to heat up, so you need to melt it in advance.
- Big sizes.
As you can see, brick is far from a clear choice for building a sauna stove. However, if you want to create not just a steam room, but a full-fledged place for rest and relaxation, then this design is optimal. In addition, it is quite possible to build it with your own hands, if you use the procedures and drawings of existing furnaces.
Metal sauna stoves
Some lovers of steam baths consider a metal stove in a bathhouse unacceptable for use. Nevertheless, it is necessary to seriously consider this option, since it has a lot of undeniable advantages:
- The metal stove is compact and can be installed anywhere.
- Installation takes a minimum amount of time. If you know how to use a welding machine, such a furnace can be built in a few hours.
- Low cost. To make a stove it is not necessary to buy sheet metal. You can use various metal containers, pipe scraps, car rims and other scrap metal.
- Instant heat dissipation. A steel stove begins to radiate heat immediately after lighting, and will warm up the room in a matter of minutes.
If we talk about the disadvantages of iron sauna stoves, there are few of them. The faster it warms up, the faster it cools down. The temperature in the room will begin to drop immediately after the wood burns out. Of course, a massive heater can alleviate the situation somewhat, but even with it, metal stoves cannot compete with brick stoves in terms of heat transfer. Another disadvantage is the danger of getting burned on hot walls, although this can be easily eliminated by installing a protective screen.
The best option, capable of combining all the advantages of metal and brick sauna stoves, are combined ones (made of steel and lined with red brick). At the same time, the requirements for the tightness of masonry joints are reduced, and there is no need to construct a massive foundation.
Choosing a stove for a steam room: types of designs
To make the right choice, you need to have an idea about other features of sauna stoves. Today we can talk about classification according to the following criteria:
- heating rate;
- layout features;
- method of heating the heater;
- fuel used.
Depending on the temperature of the outer walls, all sauna stoves can be divided into “hot” and “cold”. In the former, the surface temperature reaches more than 100°C, which allows you to very quickly heat a large area. Such a stove is indispensable if the steam room is used occasionally, and constant heating is not provided in it. But the advantages of such structures also entail significant disadvantages. Firstly, touching hot walls can cause burns. Secondly, rapid heating is difficult to control, so the likelihood of accidental overheating of the air increases, and, as a result, getting heatstroke.
“Cold” stoves require longer heating, but the temperature of their walls, even with the most intense flame, does not rise above 50–60 degrees. It is impossible to accidentally burn yourself on it. In addition, the ability of “cold” stoves to accumulate heat allows you to maintain the desired air temperature for several hours. This makes it easier to operate structures intended for regular use. It is also important that heating extended over time allows you to set the optimal temperature and humidity in the room.
As for the layout, there are options for placing the stove both in the steam room itself and in the dressing room. The first design is certainly cheaper and easier to install. However, it has several disadvantages. So, when opening the door to add fuel, smoke may come into the room. In addition, due to high humidity, it will not be possible to store firewood next to the stove, and each time it will not be very convenient to run to another room to get it. The safety of the structure will also suffer, since in a cramped steam room the risk of touching a hot door increases many times over. Therefore, it is better to install an external combustion part, which can be placed in an adjacent room, and leave only the heater in the steam room. Of course, this option has the right to life only if the bathhouse has sufficient area.
If we talk about the method of heating a heater, today stoves in which the stones do not come into contact with the fire are especially popular. They are placed in a special enclosure welded to the casing of the heating device, or in metal baskets that are placed on the walls or chimney. In this case, the temperature of the stones reaches 400 degrees. The advantage of this method is the ability to heat the stove and regulate air humidity simultaneously with taking water procedures.
Batch ovens are designed in a completely different way. In them, the stones come into contact with combustion products, so they are heated to a very high temperature - 1000°C or more. But you can begin health measures only after the firewood has completely burned out and carbon monoxide has been removed from the interior of the stove. And in order to prevent the heater from cooling quickly, it is covered with a casing or a hinged door.
Often, sauna stoves are also equipped with a water tank. It is installed mainly on the back of the structure, passing the chimney through the container. Thanks to the lower heating and high temperature of the flue gases, it is possible to obtain water in quantities sufficient not only for rinsing, but also for full-fledged water procedures in a wooden font.
Knowing all the features of sauna stoves, it is not at all difficult to choose the right design, focusing on the features of a particular building, operational requirements and personal preferences of the owner.
Calculations, diagrams, drawings
Some craftsmen prefer to build a sauna stove “by eye,” arguing for the simplicity and undemanding nature of the structure. But the thermal regime and quality of the steam depend on how correctly it is designed (if desired, you can always install a steam generator in the bathhouse). For example, with excess power, the air in the steam room will heat up very quickly, but the stones will remain cold for a long time. If the performance of the heating device is not enough, it will constantly overheat, which will quickly disable it.
The parameters of a sauna stove are calculated based on the actual cubic capacity of the room. To determine the volume of a steam room, three quantities are multiplied - its length, height and width. After this, adjustments are made related to the characteristics of a particular structure. So, for bathhouses with a bare frame, the obtained value must be increased by 1.5 times, and for each uninsulated square meter of surface (windows, doors, etc.) 1.2 m 3 is added to the volume of the room. For example, the actual volume of an unclad building measuring 2x2x3 m with a window (1x1 m9 and a glass door (1x2 m) (taken equal to V = 2x2x3x1.5+1.2+2.4 = 21.6 m3.
Experienced stove makers calculate the power of the stove based on the fact that for each cubic meter of the actual volume of the steam room, 1 kW of energy will be required. So, in our case, a 20 kW heating device is suitable. To calculate the size of its firebox, the resulting power is multiplied by 2. For example, in the example discussed above, a firebox with a volume of 40 liters will be required. As for the linear dimensions, the height of the combustion chamber should be no more than 2/3, and the depth should be no less than 2.5 of its width.
Photo gallery: projects of wood-burning sauna stoves
The order of a small sauna stove will help to correctly calculate the material  Metal heater stoves can have a different location of the water heating tank
  The drawing of a stove for a steel bath needs to be made as detailed as possible
  Arranging a stove with an open heater will greatly simplify the masonry process
  A vertical sauna stove fits perfectly into a small room
  For a bath you can use pipes of any diameter
  The size of the steam room stove depends on the area of the bathhouse
  The chimney can also be placed on the side
Materials and tools
In order to build a brick oven, you will need:
- red and fire bricks;
- clay;
- sand;
- blower door;
- combustion door;
- grate;
- cleaning doors;
- asbestos cement slab;
- stones.
Since a brick oven requires a solid foundation, it is necessary to pour a reinforced concrete foundation. To do this, additionally prepare cement and crushed stone, as well as metal mesh or reinforcing rods.
The sauna stove can be made of either brick or stone, using pieces weighing from 1 to 5 kg. Rubble, granite or smooth stone are suitable for these purposes, but flint should not be used - when heated, it cracks into pieces.
In your work you will need traditional stove maker or mason tools:
- trowel;
- hammer-pick;
- bubble or laser level;
- mooring cord;
- plumb line;
- construction square 40x40 cm
- tamping;
- plaster rule;
- containers for solution and bulk materials.
To trim bricks, you can use a grinder with a stone circle. This will allow you to perform the masonry more accurately than when working with a hammer-pick.
If your choice is a metal stove, then prepare:
- sheet steel 1 and 5 mm thick (it is better to use heat-resistant varieties);
- grate;
- metal corner with shelf 40–50 mm.
The doors can be made from the same metal or you can use store-bought ones, hanging them on hinges and latches. As a chimney, you can take a steel pipe with a diameter of at least 100 mm. Its length should be at least 4 m - this will ensure good traction. By the way, a metal chimney can also be used for a stone stove.
As for the tools, to build a metal heater you will need:
- welding transformer or inverter;
- angle grinder;
- cleaning and cutting wheel for metal;
- electric drill with a set of drills;
- roulette;
- scriber.
If the design of the sauna stove includes a tank for heating water, then you should additionally take care of a piece of large diameter pipe, threads and taps that may be needed to install a hot water supply system.
Preparatory work
Work begins with preparing the construction site. If the stove is installed in the wall between the steam room and the dressing room, then part of the wall is cut out. When placed in a corner, the walls are protected with mineral thermal insulation, after which they are lined with red brick. When choosing a location, you should definitely consider how the chimney will be installed - perhaps its installation will be hampered by floor beams or rafters.
How to correctly calculate and install the foundation
You should be aware that even a small metal stove is an impressive structure, not to mention brick structures weighing hundreds of kilograms. Therefore, the first thing to do is to build a strong, reliable foundation.
To build the foundation:

If you plan to install a metal stove with subsequent lining with red brick or stone, then the dimensions of the foundation must take into account the dimensions of the final structure.
Rules for preparing the solution
For laying a brick heater, you can use both factory mixtures and a simple clay-sand mortar. River sand and fatty clay are best suited for its preparation - it is more plastic, and during the drying process it forms a strong seam. To determine the amount of both components, an experiment is carried out. To do this, small parts of clay and sand are mixed in different proportions, after which balls with a diameter of about 5 cm are rolled out of the solution. Lumps of clay, dried for several minutes, are squeezed between two wooden planks, observing the beginning of cracking of their surface. The optimal composition is considered to be one in which the ball began to collapse only after it was compressed to 2/3 of its original size. If this happens earlier, then the amount of clay in the solution must be increased.
To obtain a high-quality solution, the clay is cleaned of impurities and thoroughly kneaded. After this, it is soaked in cold water for 24 hours.
Another way to determine the quality of the masonry mixture is to lower a wooden spatula into a bucket of mortar. The mixture should not drain immediately after removing the tool from the container - this indicates an increased sand content. If there is a lot of clay, the composition will spread unevenly over the surface of the blade, forming lumps. The optimal composition forms a layer 1.5–2 mm thick.
Cutting blanks
To build a metal furnace, a steel sheet with a thickness of at least 4 mm is used. To cut it with a grinder, you will need a lot of time and effort, in addition, you will have to spend more than one abrasive disc. If possible, it is better to cut the metal in advance using a gas cutter or plasma cutter. Even if you or someone you know does not have such equipment, do not despair. Now, any nearby enterprise or car service center will have everything you need, including a specialist who can help you.
Step-by-step instructions for laying the walls of a brick sauna stove with your own hands
The design of a good-quality and simple “cold” heater differs slightly from other brick stoves. The firebox is made of fireclay or other fireproof material, and an ash pit is installed under it. In the ceiling between the working chamber and the blower there is a grate necessary for supplying air to the combustion zone.
The differences concern only the arrangement of the heater. It can be installed “white” or “black”. In the first case, the stones are laid on top of a metal plate, while in the second type of stove the heater is in direct contact with the fire, as a result of which they heat the room much faster and provide hotter and drier steam (if desired, you can use a steam generator in the sauna).
Drawings and instructions for one of these furnaces give a complete picture of its internal structure and the features of the flue.
The following instructions will help you lay out the walls correctly:
- The prepared foundation is covered with roofing felt, after which the “basement” or zero row is laid out dry. It is made entirely of red brick. The appearance of the sauna stove depends on how level the base is, so you should constantly monitor both the level of the structure and its geometric parameters.
- The first and second rows lay out the shape of the stove and the configuration of the niches under the ash pan and heater. They are advised to be made from fire-resistant red brick.
- An asbestos cement sheet measuring 550x650x10 mm is laid on top of the second row. It will form the bottom of the ash pit.
- In the third row, the same stove is installed on the other side, under the firebox.
- In the fourth row, a niche is laid out under the heater and the base of the combustion chamber is laid. The underneath and walls are made of fireclay bricks, after which a grate is installed.
- The fifth row extends the combustion chamber and partially covers the bottom of the heater. A small opening in its lower part will be needed to drain excess water.
- In the seventh row, a layer of stones is laid and the fire door is installed. To do this, pieces of steel wire are threaded into the ears cast on its frame. Then the cast iron part is installed in place and fixed with bricks, supports, etc. Before performing the next row, the wire is straightened and placed in the seams.
- In the eighth row, a channel is laid out that connects the firebox to the interior of the heater. Thanks to it, hot gases will be directed to the stones.
- Before laying the ninth row, a horizontal valve for the direct gas duct is installed.
- In the tenth row, a vertical damper is installed, through which the heater can be isolated from the chimney. This will allow the flow of gases to be directed into the chimney along the shortest path. The rest of the stones are laid out here, after which the heater cover is made from a steel sheet 1 mm thick.
- The combustion chamber is covered with a cast iron plate. Asbestos cord or basalt cardboard is used as a seal.
- The eleventh and twelfth rows finish building up the furnace mass, preparing the base for the chimney.
The grate bars are not fixed, so to ensure their stable position, grooves are cut in the bricks of the bottom row.
After the stove is folded, install a water tank and a chimney.
Construction of a small iron stove
If you have even the most minimal experience in welding, a metal sauna stove can be built in just one day. Small dimensions (the length, height and width of this model are 900x800x600 mm) allow you to install the heater even in the smallest steam room.
The production of the stove is carried out in stages:

The sauna stove is installed in place and filled with stones, trying to lay them as densely as possible. After this, focusing on the height of the heater, the top cover is made from metal 1 mm thick. The stove can be heated immediately after connecting the chimney.
Video: how to weld a metal sauna stove with a boiler
How to cover a steel structure with hollow bricks: building a combination oven
If necessary, a metal heater can be lined with stone or hollow red brick. Thanks to the increased storage capacity, the heat from the stove will emanate much longer, which is especially important for devices with a heater equipped “in black”. The decision to encase the stove in a brick shell is made at the design stage, since the increased dimensions of the structure require the necessary allowances when arranging the foundation. While working, you should adhere to the following tips:
- For masonry, only heat-resistant mortar is used - natural clay or a factory-made heat-resistant oven mixture.
- The distance from the brickwork to the metal walls must be at least 100 mm. The air gap will protect the shell from high temperatures and make it possible to retain heat for several hours longer.
- Vents are left in the lower and upper parts of the barrels - special openings, thanks to which the intensity of convection significantly increases.
- The outer casing can be made either solid or by laying bricks in a checkerboard pattern.
In order to save material, the brick can be laid not flat, but on the edge. Of course, the heat capacity of such a casing will be lower. By the way, you can convert the oven into a “colder” category by installing external screens made of metal sheets. They will prevent you from getting burned on the hot walls and will enhance convection heat transfer.
Other design elements
Putting the stove back in place is not enough. It will function only if there is good draft, which will be provided by a properly constructed chimney. In addition, in a real bath there should be not only dry steam, but also a sufficient amount of hot water. To do this, the furnace is equipped with a tank for heating it.
Installation of a chimney (stove pipe) in a Russian bath
Its design depends entirely on what oven it is intended for. Thus, a massive brick unit needs a pipe with an increased flow area, while even a chimney with a diameter of 100 mm will provide draft in a small heating device. When calculating a chimney, experts recommend starting from the size of the blower opening, taking its cross-section equal to 1/2 the area of the window for air supply.
The thickness of the chimney walls, as well as the cross-section of the internal channel, should not be less than half a brick. During the construction process, two types of mortar are used - clay for building up the pipe array indoors and cement or lime for working outside. Thanks to the latter, masonry joints will not collapse under the influence of moisture.
Although the installation of a chimney for a sauna stove is subject to more relaxed requirements than for heating appliances in residential buildings, it must rise above the roof level by at least 0.5 m.
The stove can be equipped with a metal or asbestos pipe. It is important to make its lower part heat-resistant, for which a thick-walled steel or cast iron section is installed at a distance of at least 1 m.
Installation of a hot water barrel (liquid heat exchanger)
The sauna stove can be equipped with an open or closed water heating tank. If the building is connected to a water supply system, then it is better to install a sealed container, be sure to equip it with a safety valve configured to operate when the pressure in the system exceeds 3-4 atm. Otherwise, you will have to fill the water heater manually, through the opening in its upper part.
Heating the water in the tank is carried out in two ways. The first is that the container is installed at the back of the firebox or above it. The second involves installing a water heater on a chimney. Passing through the internal channel, heated gases give off their heat, quickly heating the water to a high temperature.
To make a boiler, use a steel sheet with a thickness of at least 3 mm, welding its joints with a continuous seam. The pipe that is installed inside must be thick, otherwise, due to high humidity and temperature, it will quickly become corroded.
If the building has running water (for example, if your frame bathhouse has a bathroom), then the tank can be replaced with a liquid heat exchanger. Its contour is welded from steel pipes with a diameter of up to 1 inch, installing the structure at the rear of the firebox. To prevent water from boiling, the heat exchanger is equipped with a bypass valve, from the outlet of which a pipeline is laid to the heater.
Video: how to lay out a brick stove with a built-in water heater
How to finish the stove depending on its type
External decoration will help to give the sauna stove individuality. It can be done in various ways - from simple jointing of brickwork to cladding with marble or granite slabs. It all depends on the taste and financial capabilities of the owner.
Photo gallery: examples of finishing stone and iron stoves of different sizes
 The stove, lined with glossy slabs, looks like a fireplace
  Finishing with natural stone can be very unusual
  The firebox in the form of a fireplace portal looks unusual
  Granite is ideal for lining a sauna stove
  Flat stone can be used to decorate not only the stove itself, but also the adjacent wall
  A wooden fence, although not a full-fledged finish, can protect against burns
  A large structure can be built from facing bricks and simply unstitched seams
How to heat a stove with wood
Before heating the stove, it is necessary to close the heater channel and open the direct flue damper. This will significantly increase traction. Then firewood is placed in the firebox and afterburning is done using paper or rags soaked in kerosene or barbecue liquid.
After the firewood has ignited, it is necessary to open the valve of the channel that connects the firebox to the heater and close the direct gas duct. At this time, the stones should be covered with a lid.
The stove is heated until the temperature in the steam room rises above 60°C. After the firewood has completely burned out with a poker, be sure to check whether there is any unburnt wood in the corners of the firebox. If such pieces of logs are found, then you need to throw them away, otherwise they will smoke. The heat must be checked for the presence of blue flames. If they are, then you still can’t take a steam bath, because you might get burned.
Burning coals are thrown away in the same way as unburnt wood. After this, water is poured onto the heater, which will remove soot from its surface, and the walls and shelves of the bathhouse are washed from soot.
Video: how to choose a stove for a Russian bath and a Finnish sauna (advice from experts)
Building a sauna stove is not at all difficult. It is only important to choose the right heating device, and when constructing it, follow the recommendations of experienced craftsmen. As for operation, you should always remember the safety rules and features of the stove firebox.
With all the variety of metal sauna stoves produced by the industry, there is a clear division of products into classes and groups. The applicability of the models is determined by the operating conditions and obtaining the desired result in temperature and humidity conditions. To get a more clear picture of the possible choice, we have summarized the main characteristics of existing designs of iron stoves for baths in one table. Having received an initial understanding of the characteristics of certain groups, you will be able to make an informed choice of stove without spending additional money and time on search.
Purpose of the article: provide reliable information to potential buyers of sauna stoves and help in choosing the optimal model.
| The thermal power of the stove must be sufficient to warm up the steam room and adjacent rooms in a short period of time. The optimal time is considered to be warming up the steam room in the summer for 30-40 minutes, warming up the steam room and adjacent rooms in the winter at a temperature of -10°C for 2 hours. | |
| Sufficient heat storage capacity (stones) | The two most important parameters for sauna stoves are the mass of stones and their temperature during normal operation. To create a Russian bath mode in a steam room, you need to evaporate 100 grams of water per cubic meter of room. In this case, the steam should be “transparent” with a good degree of heating and the temperature of the stones should not drop by more than 100 degrees. Otherwise, you will get “heavy” and damp steam. Calculations show that at least 5 kg of stones are required per cubic meter of steam room (minimum), and the optimal amount is in the range of 6-8 kg per cubic meter of steam room. The temperature of the stones during normal operation of the sauna stove should be 200-250 degrees, which can be achieved if the design of the heater is closed or unventilated. |
| Availability of a steam generator to create the necessary modes | This point is directly related to the design of the heater and the previous parameter in the table. The water delivered by the steam gun to the central part of the heater evaporates to create optimal steam, slightly reduces the temperature of the stones and ensures an even supply of steam throughout the room. |
| Firebox material | For good stoves, stainless steel is used with a chromium content of at least 12-13%, ideally at least 17%. |
| Basic requirements for sauna stoves | Description of requirements for sauna stoves |
|---|---|
| Sufficient heating power | It should be taken into account that heating the air in the steam room and adjacent rooms takes minimal time compared to heating the walls, ceilings and floors in the bathhouse. Consultants in stores, as a rule, suggest using cubic meters in the steam room in calculations, which does not give a complete picture of the sufficient power of the stove. For example, warming up an 8-cube steam room in winter for 1 hour will require 4 kW. Since the stove itself, the heater, the water in the tank and the screen are simultaneously heated, we increase the thermal power by a factor of 3. We get a value of 12 kW. If the steam room is not upholstered and the log logs need to be heated, then we apply another coefficient - 1.5. We already get 18 kW. And when heating adjacent rooms, we increase the resulting power by 2. Sufficient furnace power in our case will correspond to a value of 36 kW. If you are not in a hurry and agree to wait not one hour, but two hours before the bath returns to normal mode, then it is enough to multiply the power by 1.5. |
| Firebox material | Most inexpensive sauna stoves are made of structural steel, the strength of which quickly decreases when heated. The combustion temperature of firewood is approximately 400°C, and this is the beginning of the formation of scale on structural steel. The walls of a working sauna stove heat up much more; accordingly, “black” steel, even thicker ones, will burn out much faster than stainless steel. If we take into account stoves in the middle price range, the chromium content in the steel used is 12-13%, which has a positive effect on both the cost of the product and the performance characteristics. |
| Category | Name | Price |
|---|---|---|
| Economy class | 1. | 9590 rubles |
| 2. | 9999 rubles | |
| 3. | 10800 rubles | |
| 4. | 18900 rubles | |
| 5. | 23,000 rubles | |
| 6. | 17900 rubles | |
| Middle class | 7. | 25850 rubles |
| 8. | 25,000 rubles | |
| 9. | 25600 rubles | |
| 10. | 25,000 rubles | |
| 11. | 25,000 rubles | |
| 12. | 28,000 rubles | |
| 13. | 29900 rubles | |
| 14. | 29900 rubles | |
| 15. | 30,000 rubles | |
| 16. | 36600 rubles | |
| Premium class | 17. | 43500 rubles |
| 18. | 52,000 rubles | |
| 19. | 69,000 rubles | |
| 20. | 96,000 rubles | |
| 21. | 89,000 rubles |
1. Heat-Extra — 9,590 ₽

If you have the opportunity to relax in a bathhouse for at least 5-6 hours, then your choice is a middle-class stove. By experimenting with the modes, you can choose the most convenient option and enjoy good steam for relatively little money. In this category we recommend furnaces from the company Fehringer.
If you want to get a real Russian bathhouse, then don’t save money - sauna stoves with a brick lining or soapstone chloride (or coil) meet the most stringent standards, and their price only reflects the quality of the products. In this category we recommend ovens from.