Recently, furniture made from natural materials has become increasingly popular. It is beautiful, environmentally friendly, has a special warmth, is durable, does not cause allergic reactions, and creates a special atmosphere of coziness and comfort. Wicker products occupy a special place in the furniture market. But furniture made independently is considered a special chic and source of pride.
It is beautiful, environmentally friendly, has a special warmth, is durable, does not cause allergic reactions, and creates a special atmosphere of coziness and comfort.
Made with your own hands, such furniture has advantages and certain disadvantages. Among the undeniable advantages:
- light weight, allowing you to move it to any place in the room or area of the site;
- does not require special care: it looks elegant and fresh, if you periodically wipe it with a damp cloth or sponge, this simple procedure protects the product from cracking;
- fits perfectly into any interior, adding lightness and sophistication;
- environmentally friendly, not emitting substances harmful to health into the surrounding atmosphere;
- when weaving is done correctly, it is durable and strong;
- complete freedom of imagination for home craftsmen;
- will significantly save the family budget;
- the opportunity to acquire skills that allow you to organize your own small profitable business.

Made with your own hands, such furniture has advantages and certain disadvantages.
Despite the undoubted advantages of wicker furniture, there are also disadvantages that must be taken into account:
- afraid of high humidity: cannot be left outdoors in bad weather;
- At the same time, the scorching sun will also not do any good: the furniture will dry out, warp, and lose its appearance, which will lead to a reduction in service life.

Light weight, allowing you to move it to any place in the room or area of the site.
Deciding on design and construction
Structurally, wicker furniture can be:
- frameless,
- frame.

Fits perfectly into any interior, adding lightness and sophistication.
For a frameless structure, it is enough to use sticks. They perform the function of hard ribs. The difference between frame products is the presence of a metal base; steel rods are used for it. The weaving seems to be “attached” to them. Wooden poles provide stability and rigidity to the wooden structure.

Does not require special care: it looks elegant and fresh if you periodically wipe it with a damp cloth or sponge.
If home craftsmen are taking their first steps in weaving furniture, they should not take on complex products: it will be extremely difficult for an inexperienced craftsman to complete them, which will lead to numerous mistakes and disappointments; you need to start with the simplest ones, which give you the opportunity to master the necessary skills.

In order for the product to be of high quality and durable, you need to properly prepare the raw materials.
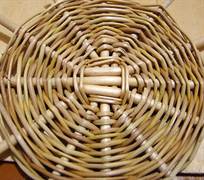
The furniture has several types of weaving:
| Type of weaving | Distinctive features |
| Single | Simple weaving is easy to master: each branch alternately braids all the posts of the frame. Usually used as the main method of making wicker items. Gives additional strength and keeps the shape of the product. |
| Openwork | Weaving is used in furniture decoration, adding special chic and originality. It can be used to create waves, corners, ovals, crosses, and diamonds. Requires perseverance, attention, accuracy. Before execution, you need to decide on the ornament, weave several single rows, then choose a decoration method. The most commonly used is straight openwork with stripes of light. A fairly complex type of work that requires significant skills. |
| Combined | This type is a combination of single and openwork weaving in their varieties. The design of wicker products using combined weaving is “aerobatics” and indicates a high level of craftsmanship. |

Environmentally friendly, does not emit substances harmful to health into the surrounding atmosphere.
Necessary materials
To make furniture from wicker you will need materials. It is worth noting that they can be different, and many are exotic and inaccessible to us: banana leaves, bamboo, water hyacinth, seaweed. But most of the furniture is made from rattan, willow twigs, bird cherry vines, alder, raspberry, and hazel.

Experts say that it is possible to harvest raw materials in the spring.
IMPORTANT! If you decide to use a vine, willow and bird cherry, which are particularly flexible and plastic, are best suited. Bird cherry is especially good in this regard.
When weaving correctly, it is durable and strong.
Excellent decorative elements are colored pillows and blankets of various colors.


Preparation of raw materials for robots
In order for the product to be of high quality and durable, you need to properly prepare the raw materials. Most often these are willow twigs.
- For weaving, you can harvest material that is collected from living trees in the absence of buds; the most suitable time for harvesting is late autumn. You need to make it before the first frost - such raw materials are easy to clean and store dry.
- Experts say that you can prepare raw materials in the spring, but you need to remember that you need to cut the rods before the buds begin to swell; if you are late, green leaves will appear on the new furniture.
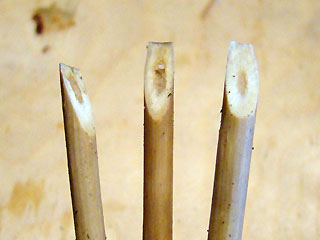
- You need to conduct a kind of flexibility test. The cut branch must be bent: if it does not break, then the raw material is suitable for the job. Thin vine used for fine binding of products is considered to be of high quality.

The opportunity to acquire skills that allow you to organize your own small profitable business.
Required Tools
To weave furniture from wicker, you don’t need many tools, but you should have:
- knives and pruners;
- tape measure and measuring tape;
- various templates.

Afraid of high humidity: cannot be left outdoors in bad weather.

This is the required minimum; with the help of such a set of tools you can weave simple and small-sized products.

The difference between frame products is the presence of a metal base; steel rods are used for it.
Manufacturing process: technology and manufacturing nuances
In order not to lose interest in weaving furniture and not to spoil a large amount of material, you should not immediately “swing” at large and quite complex products - a sofa or a table. It’s better to start with the simplest “braids”, for example, a chair. It consists of several elements: a lower bench, a seat, a backrest, and armrests. To work, you will need willow sticks with a diameter of up to 30 mm and thin willow twigs.

Wooden poles provide stability and rigidity to the wooden structure.

The beginning of the work is the manufacture of the frame.
ADVICE. When working on a chair, you will need curved parts. To bend the rods, you need to soak them, and when they become soft, remove any irregularities and bend them on a prepared template and let them dry.
You need to cut the branches at forty degrees - pruning will not harm the tree, and in a year or two new branches will appear.

The beginning of the work is the manufacture of the frame. If a craftsman is taking his first steps in weaving furniture, it is better to use the frame of an old chair made of metal or wood to make the work easier.

You need to conduct a kind of flexibility test.

When working on a chair, you will need curved parts.
ATTENTION! We must not forget about the armrests, which, however, are made at the request of the master, but serve as an additional element to strengthen the entire structure.
But most of the furniture is made from rattan, willow twigs, bird cherry vines, alder, raspberry, and hazel.

The procedure for making a chair.
- We make the frame. The frame itself is made of thick, durable sticks and a piece of plywood, which is used as a seat. One pair of sticks will act as the front legs; it should be 15-20 cm shorter than the second.
- The legs are connected with self-tapping screws, the seat is nailed down.
- Also, the curved elements of the chair back and armrests are attached to the frame with self-tapping screws.
- The frame is wrapped with willow ribbons and can be secured with glue for strength.
- The frame is braided using single weaving.

Bird cherry is especially good in this regard.

It’s better to start with the simplest “braids”, for example, a chair.
If desired, the resulting chair is treated with stain.

To make furniture from wicker you will need materials.
The final stage is decoration
High-quality wicker furniture practically does not need decoration: it is good in itself. If you want to add an element of creativity and “revive” it with bright colors, you can use willow ribbons in weaving, including dyed ones; they will be organically combined in the ornament of the product. Excellent decorative elements are colored pillows and blankets of various colors.

If home craftsmen are taking their first steps in weaving furniture, they should not take on complex products.

Thicker branches are used to make the frame.
VIDEO: we make wicker furniture ourselves
Making a rocking chair with your own hands
We have been making wicker furniture from willow wicker for over 20 years. During this time, we have accumulated a wealth of experience in this craft. Based on the traditions of old masters, we have managed to significantly improve the technology for making wicker products, especially wicker furniture and interior items. The range of products we manufacture is quite large and includes dozens of items. Of course, the highlight of it is, of course, the rocking chair.
So why a ROCKING CHAIR? And what is a rocking chair? When it comes to wicker furniture, any person has an association with a wicker rocking chair. By itself, a rocking chair, being a unique piece of furniture, can decorate any home with its presence and give it a sophisticated and unique look. Possessing an attractive appearance, the rocking chair also has a number of functional advantages. Any person who has it in stock knows this, and who dreams of purchasing it, is in anticipation of these advantages. It is convenient to sit in it by a roaring fireplace or in front of the TV while watching your favorite show, to escape from the everyday hustle and bustle, sitting in it while reading an interesting novel, or just sit down and relax, relax, reflect. The rocking chair is very convenient for nursing mothers. In addition, made from natural materials, in particular from willow vine, and passed through the hands of a skilled craftsman, wickerwork has beneficial energy.
In our time of proposals for plethere is more than enough shade furniture. With the advent of new materials and technologies, the variety of rocking chairs increases every year. However, not everyone is in a hurry to go to the nearest supermarket to buy a rocking chair. Ethere are those who interest enthe manufacturing process itselfwicker furniture. Any thing made by hand has a certain sacrament, and therefore this includes products woven from willow vines. Since the wicker rocking chair is a high-profile object of attentionthen andWe will talk about it further accordingly.
How to make a wicker rocking chair yourself? For a person who has no experience working with willow vines, this is of course “greatsecret". Nevertheless, there remains a great desire to solve it.Initial knowledge of weaving can be obtained in appropriate courses. There you can learn the simplest weaving techniques. Of course, you will receive invaluable lessons from a true master of this craft.
However, you can learn weaving from a book, but under one condition: learning must be accompanied by constant practice, diligence, and systematic consolidation of the acquired skills. In this case, perhaps the learning process will be longer, but folk wisdom says: “The longest road begins with the first step.” The main thing is to start. I’ll be honest, I, too, did not escape the fate of being self-taught. At the very beginning there was only a desire and a couple of books on weaving from willow twigs. I had to start in an ordinary kitchen by making the simplest products, vases and various baskets, in which I mastered all the necessary weaving techniques and studied the mechanical properties of different varieties of willow.Since my cherished desire was to master the manufacture of wicker furniture, I did not get hung up on the “small things” and stubbornly set about developing its technology. I desperately needed the advice of an experienced specialist in this matter, but I was not familiar with such at that time. The books contained very little information directly on the manufacture of wicker furniture frames. It was not easy, but the results were pleasing and inspired new experiments.
I made a real breakthrough in my further development when I met my colleagues. This happened at the city NHP exhibition, where I came out with the first samples of my furniture. Among them was a ROCKING CHAIR, which received special attention from the public. After the exhibition, my colleagues and I began to communicate closely and share experiences. From them I learned a lot of useful things about the technology of working with willow twigs. In turn, they began to show great interest in me, because I also worked as an artist-designer with a technical education. This collaboration has brought great benefits to all of us. We learned a lot from each other. We have increased the number of orders for wicker furniture. But our traditional technology for making furniture from wicker did not allow us to quickly satisfy the needs of our customers. It was necessary to somehow speed up this process. And the idea came. We quickly incorporated it into our craft. It turned out to be very simple and at the same time very effective. Our capabilities have increased significantly. We could quickly and mass produce rocking chairs and other pieces of furniture. The manufacturing process was divided into two stages. The first is the production of frames, where a specialist in their production worked. At the second stage, specialists worked on braiding finished frames. They brought the products to a finished state.
We have developed compact and very convenient templates for bending parts of wicker furniture frames. This entailed the introduction into our production of a technology for quickly bending willow sticks without pre-soaking them. As a result, we achieved significant time savings by eliminating the processes of soaking and lengthy drying of bent parts from the overall cycle.
When making wicker furniture frames, we use willow sticks no longer than 120 (cm). This is a very important factor, since in nature there are not so many long and linear sticks under 2-3 meters. But among the willow thickets there are quite a lot of trunks with straight and even sections with a length ranging from 100-120 (cm), which greatly simplifies the process of harvesting stick material.
Willow is not the only material for making wickerwork. The use of solid wood, plywood and glass helps to significantly expand the range of wicker products. In some of them, willow vine is used as exterior decoration. These can be openwork, woven fabrics on various surfaces, decors in the form of braids, bends made of willow twigs. The possibilities of the willow vine are quite large and each master uses them based on his creative ideas and his own artistic taste
Design of wicker furniture.
Skillfully made wicker furniture has a special appeal, creates coziness and unique style in the interior. This is one of the advantages of wicker furniture. But, in addition to external attractiveness, it must be comfortable for a person and have a sufficient margin of safety. That is, when designing furniture, everything must be taken into account anthropometric human parameters depending on height and weight. Of course, you can use the standard parameters, described in many books on making wicker furniture, but I suggest you a more flexible approach for this, which I still use now. A cardboard mannequin of a person, in which different parts of the body can bend, will help you with this.
To make such a mannequin, you will need to draw the figure of a man of average height in profile in a ratio of 1:10 to the actual dimensions, taking into account the structure of the skeleton.
Then, according to the drawing, cut out parts of the mannequin’s body from cardboard and connect them using hinge axes. The hinges can be made from fishing line. When assembling the dummy, melt the ends of the fishing line with a hot object so that you get some kind of rivets .

When calculating the proportions of your future furniture, you can conveniently place this “little man” in any proposed product, be it a rocking chair or just a chair, a stool... and then just draw the floor, seat, legs and back of the chair under it.


And everything else for you will be a matter of technique and your artistic taste. And the dimensions of the furniture in your drawing will also be in proportion to 1:10 to the actual dimensions.
But at the beginning needs to be designed intended product. To do this, you need to draw it from different angles, and then make a working drawing for it. Drawings and drawings give a better idea of the future product and will help in the manufacture of the product itself. Proficiency in technical drawing and drawing will serve you well here. The project can be shown to your customer when concluding a contract.
I offer my development of a moving mannequin in A 4 format. The model was developed in the KOMPAS program. Printed on a printer at a scale of 1:10. Shipping in a postal envelope. Cost 350 rub. along with shipping.

Further …

I suggest you first look and study the frame of the rocking chair. In our catalog it is listed under the code KK-3

Now let’s disassemble the frame of the KK-3 rocking chair into its component parts.
Next, we will analyze the structure of each part of the rocking chair.
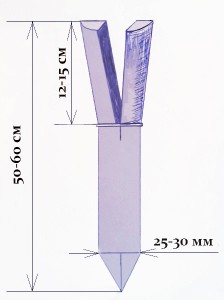
Lower arches (runners)
The most important parts in a rocking chair are the lower arches or runners on which the rocking chair swings. The functionality of the rocking chair depends on how correctly and efficiently they are made. The curved line of the runners must also be calculated. The front part of the runner, which has the shape of an arc, should turn into a straight line at the rear. This is necessary to prevent the rocking chair from tipping backwards while rocking.


Arcs can be made from willow sticks with a diameter of 25-30 mm. In our version, they are made from solid birch using the method of simultaneous bending and layer-by-layer gluing of slats 9 mm thick and 30 mm wide. It is obvious that with this manufacturing method, the rocking runners will have a more regular shape than natural sticks and will hold their bending shape well under load.
To start assembling the frame, you first need to assemble two side racks, each of which consists of 4 parts. This includes runners, front bars, front frame poles, side bars 
Front arches:
The front arches consist of two bent parts made of willow sticks with a diameter of 18-20 mm ( main
) and 16-18 mm ( additional
).
The length of the sticks of these parts does not exceed 120 cm. In the beginning, for work we only need main arc. This part must be made on a template. Soak the stick
tuck into the template and dry.
Front frame poles
can be made from willow sticks with a diameter of 25-28 mm. In our practice, to produce straight parts, we use birch sticks (cuttings) 25 and 28 mm in diameter. On front sticks the frame comes with cuttings with a diameter of 28 mm.
Anterior main arch
, after being removed from the template, you need to connect it to the front frame stick. Before this, the ends of the stick need to be sawed off at the required angle. Assembly is best done using self-tapping screws. As a result, we receive a finished structure for further work on assembling the frame. 
Next, we connect the resulting structure to the runner. During assembly, the butt (lower) end of the front main arc is planed into a miter and connected into an overlay with the front end of the runner using glue and screws. 
Side arcs:
We need these parts to complete the assembly of the side posts. Side arches bent on a template made of willow sticks with a diameter of 26-28 mm. The stick must be bent in such a way that its butt part is connected to the runner, and its apical part to front frame stick. The ends of the dried part are filed according to the dimensions in the drawing. Then the part is screwed into place.

The side racks are ready.

Now you can start installation cross parts.
First we install two front cross bars
, one of which, the top one, should have a slight bend. Their dimensions are determined according to the drawing. Then we put it in place rear cross stickseats. As a result, we got the approximate shape of the future rocking chair. 

Next we install seat cross bars
And lumbar arch
. The seat sticks are slightly curved and their dimensions are determined by the location of their installation. The diameter of the sticks is 24 -26 mm. Lumbar curve we bend it according to a template from a willow stick with a diameter of 18-20 mm. We put it in place after drying. ends of the stick lumbar arch connect to the upper ends of the main sticks of the front arc. At the same time, we trim the connected ends into a miter. We apply glue to the surfaces to be joined and fasten the parts with screws. 

Next we install support sticks seats. These parts can be made from straight willow sticks or cuttings with a diameter of 25-26 mm. The dimensions of the poles are determined directly at the place of their installation. Due to the fact that the parts are paired, their sizes should be the same, and the shapes of trimming the ends of the sticks should be a mirror image in relation to each other.


Next is the installation process crosses . Cross attached to rear cross member of the frame and to cross stick installed between the front seat support sticks. One stick crosses, lower, straight. The second, slightly curved, is placed on top of the lower stick and screwed with a screw at the place where they intersect. Sticks with a diameter of 24-26 (mm) are used here.


Now let's install additional detail on anterior arch And rear back sticks. Additional arc bend on a template in such a way that the apical end of this stick is adjacent to front frame poles. The butt part of this stick, during further assembly, will be connected to the back of the rocking chair. Therefore, we pre-plane the apical end of this part into a miter.
Rear backrest sticks are made from straight sticks with a diameter of 24-25 mm. Dimensions of poles according to the drawing. The ends of the sticks can be given a spherical shape for aesthetic reasons.


Next installation rear support sticks , front And rear beam . Rear back support sticks are made from sticks with a diameter of 24-25 mm. The ends of the sticks are cut at the required angle and adjusted to the installation site. Front support from a willow stick with a diameter of 14-16 mm. It can be installed raw, but the installation process itself is not entirely simple. It’s easier to bend it on a template and install it after drying. Rear support, diameter 14-16 (mm), placed in the wet position, since there is a three-dimensional arching of the willow stick. If you make a template for this part, it will be a big plus in your work. But, when practicing skills, this part is installed quite easily even when raw.


Now let's install last seat stick. This part has a special purpose. The seat rods rest on it and it also gives a concave shape to the back of the rocking chair, which makes it more comfortable. This part has a significant convexity. It is located on rear cross stick seats and with both ends rests on side arches. Attaches with one screw in the middle to the back cross rod seat.


The backrest of the KK-3 rocking chair is a ready-made unit that is installed on the frame. This operation is the final step in the frame assembly process. The back frame consists of seven sticks. Four sticks (18-16 mm) joined together form the main arc. The transverse backrest rod (16-18 mm) is first attached to it. Then an additional arc of two joined sticks (14-16 mm) is attached along the outer contour.
The manufacture of the main arch of the back begins with the assembly of its upper part, which is glued together from two willow sticks (16-18 mm) dried on a template.

In the resulting structure we install back cross bar, which has a slight bend. Then we trim the butt ends of the sticks of the main arch of the back. 
Add to o main stick arch back another arc, which is its continuation in the general design of the back of the rocking chair. We also dry this arc part on a template. We cut the joining end to a miter and install it in place using glue and screws
.
Installation additional arc on main arch of the back is the final stage in the manufacture of the backrest of the rocking chair. This part is made in the same way as the main arc.
When combined main arch of the back With additional arc Certainly not all surfaces will fit tightly due to the natural unevenness of willow sticks. Therefore, these parts should be adjusted using a knife and sandpaper. Fasten them also with glue and screws. For more dense gluing of arc sticks, you can use clamps.

The back is ready. We install it in place. To do this, we trim the ends of the back bends on a mustache. on size A . Apply glue to the joints of the parts and tighten them with screws.
The cross stick of the backrest will rest against the rear sticks of the backrest. We connect these parts using screws.


KK-3 frame ready for braiding.

The rocking frame, made entirely of willow sticks, can be braided immediately after drying. In our practice, we use birch cuttings for straight parts. The conclusion from this is that willow sticks will eventually acquire a bronze-golden hue, while birch sticks will remain light. There will be a contrast on the frame, which may disrupt the aesthetic appearance of the rocking chair. To avoid this phenomenon, we made it a rule to stain the frames in certain colors. But there is one condition - the frame of the rocking chair must be sanded with sandpaper for better adhesion of the stain to the surface of the wood.
The frame braiding is made gloss tape . For braiding the joints of frame parts, a tape with a thickness of 0.3-05 and a width of 5-6 (mm) is used. For weaving the seat and back, a ribbon 0.6-0.8 thick and 8-10 (mm) wide is used. When braiding the frame, the rods of the seat and back are also stuffed onto the frame.
The seat is made of rods with a diameter of 8-10 (mm). They are nailed to the transverse frame sticks, on which markings must first be made. It should be taken into account that after the seat rods are stuffed onto the frame, access to some of the joints of the frame parts becomes difficult for the braid. Therefore, these places should be braided before stuffing the seat rods.
To ensure that the front of the rocking chair has a smooth curve, the rods should be stuffed according to a template. It can be made from a wooden beam or log.

Under the template, it is imperative to place pads made of wooden slats with a thickness of 10-12 (mm). What is it for? When stuffing rods onto the seat, the template-blank is tightly clamped. To remove it later, the linings are knocked out with a hammer and the template is released. But the template should be removed only after the rods have dried. 
Once again, you need to remember that all joints of frame parts that fall under the seat must be braided in advance. Now the seat can be braided. The weaving of the seat should begin from the front of the frame from the place where the seat rods began to be stuffed.
Now let's stuff the backrest bars onto the frame. Here we need rods with a diameter of 6-9 (mm). To do this, you need to make markings on the frame and drill holes with a diameter of 6-7 mm for the rods on the upper part of the main arc along the inside of the back.

The rods with their apical ends are inserted into the holes in the frame. The butt ends are inserted into the space between the paired seat rods along the edge of the woven fabric and in front of the overhead cross seat stick. Then, the ends of the rods sticking out under the seat are trimmed with pruning shears. It is advisable to trim the ends while the rods are damp.
In the upper part of the back, above the transverse stick of the back, an openwork is obtained. In order to align the openwork rods from natural bends, we install a leveling arc approximately in the middle. The arc will strengthen the openwork and will work as its additional decorative element.


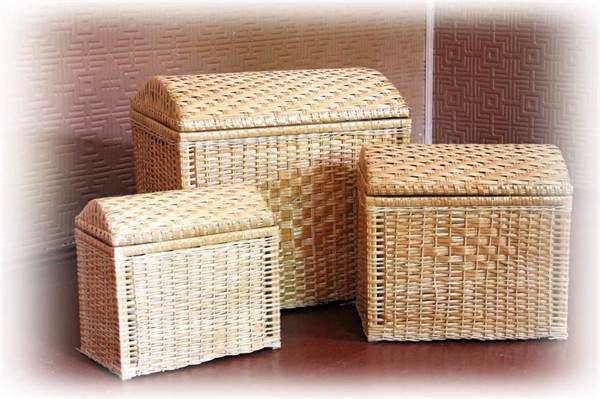
If you want to add variety to the interior of a country house or create rustic chic in a city apartment, then wicker furniture made from wicker, for which willow and hazel twigs, elm, turf, and bird cherry are used as raw materials, will help you. The products are made by hand, they are flexible and durable. Wicker tables and chairs will decorate the kitchen, sofas, armchairs and chests of drawers will add coziness to the living room.
The technique of weaving furniture has been used since ancient times. Baskets, boxes, and chests of drawers made of wicker decorated almost every village house. Modern products have smoother contours and greater practicality. For weaving on an industrial scale, specially cultivated varieties of willow with high decorative properties and increased flexibility are used. Cut young rods are subjected to heat and cleaned of bark. It is possible to plan strips for weaving from rods. Next, the frame of the product is made, which is then braided with rods or ribbons.
According to the type of weaving, all products are divided into groups:
- in frameless types of furniture, the stiffening ribs are the strongest rods. The frameless technique is popular in the manufacture of small-sized wicker furniture from wicker: bedside tables, chests of drawers, whatnots;
- frame models are made on the basis of frames made of metal tubes and rods. The equipment is suitable for products with high loads: sofas, armchairs;
- the stages of weaving furniture from wicker with your own hands on the basis of a wooden frame allows you to create combined models. They can be chairs, armchairs, tables.

Frameless

Frame
Finished products of original design have the natural light beige color of dried wicker or are covered with wood-colored stains. They fit harmoniously into any interior and evoke memories of hot summer. The external fragility and openwork of furniture does not affect its durability; with proper use, the products will last at least 25 years.
Advantages and disadvantages
Global trends in the use of natural products are also reflected in the furniture industry. The demand for wicker products is constantly growing, due to a number of advantages:
- high environmental friendliness of the material - willow rod breathes, does not emit toxic fumes when heated, does not accumulate dust, and has a light woody aroma;
- affordable cost allows you to update the interior without significant investments;
- The openwork of the weaving ensures good ventilation of the backs and seats. The heat exchange of human skin is not disturbed, he does not sweat in the heat;
- finished products are light in weight, they are suitable for rooms with wooden floors;
- high mobility of chairs, tables, chests of drawers allows them to be moved inside an apartment or country house;
- Furniture in natural shades with a unique design fits into the interior of any room. Vine combines perfectly with glass, wood, leather, mirrors, and forged metal;
- the wicker surface is easily cleaned from dust and dirt;
- exclusivity of products - weaving a vine turns out differently every time.
Making furniture from wicker with your own hands is difficult; it requires skills and prepared willow twigs. The disadvantages of wicker furniture include the need to comply with operating rules: protection from temperature changes, humidity, and direct sunlight.


Kinds
Many types of furniture are made using the weaving technique. The main ones are:
- tables and dining tables of different shapes. Elegant openwork tabletops look light and elegant. When combined with glass, the table can be conveniently used as a dining table. Coffee tables can have high carved legs or be made using Asian techniques like boxes;
- chairs, ottomans, stools have shapes ranging from smooth cubes to ethnic tambourines. Despite their apparent fragility, they can easily withstand the weight of an adult. Combined products with metal or wooden legs are designed for heavy loads;
- armchairs and rocking chairs with ornate arms, comfortable seats, and exquisite weaving of the backrest will become a real decoration for your office or living room. A leisurely swing will help you relax at the end of a hard day. The vine has a comfortable temperature, regardless of the surrounding air. It will be comfortable to sit in the chair even in a cool room;
- sofas with soft pillows will become the best place to relax or sleep. The openwork weaving of the backrests does not interfere with heat exchange; a reliable seat frame made of wood or metal creates a feeling of confidence. Light weight allows you to move the product from the living room to the guest room or children's room if necessary;
- sun loungers and deck chairs for relaxing by the pool or in the garden will give maximum pleasure and comfort. The products spring together with your body, the load on the spine is optimally distributed. To prevent the sun lounger from cracking from the sun, it is periodically moistened with water. Natural material will never cause allergies or irritation to bare skin;
- chests of drawers and nightstands have smooth shapes and fancy patterns. It is convenient to store things, bedding, towels in them; textiles will be able to breathe and absorb the subtle aroma of the vine. With small dimensions, chests of drawers are spacious;
- Whatnots are designed for storing useful items, documents, books. Elegant and light, they do not take up much space and are easily moved inside the room;
- wicker screens will allow you to hide your bed or baby's cradle from prying eyes. The products have different dimensions: from narrow partitions to large folding screens. If you install the screen near the window, you can refuse to use curtains.


A separate category includes furniture for children's rooms: cradles, cribs, changing chests, carrying cradle, wicker table. The products are absolutely safe for the baby’s health and have a beautiful design. Weaving of wicker furniture for children's rooms is often carried out on individual orders.
What style does it suit?
Highly decorative furniture made from willow twigs is easy to fit into any interior. Especially when using the desired decor and in combination with other materials. The basic rule is that it is not recommended to use single wickerwork in a setting. It is optimal to choose headsets with the same weaving style and color.
Here are some successful combinations:
- modern style requires the use of combined wicker tables with glass tops;
- In high-tech interiors, wicker furniture with metal fittings and decor is used. A set of chairs is sufficient to furnish the kitchen;
- country style allows you to furnish the entire room with wicker furniture. Decorative decoration with pillows and textile ruffles will add zest;
- the safari style allows the use of armchairs and sofas in light colors with decor made of leather or natural fur;
- sets made from unpainted wicker will harmoniously fit into a classic interior. A rocking chair will decorate a living room or relaxation room, a light dining set with embossed backrests will fit into the interior of the dining room;
- minimalism allows you to use wicker furniture in gray and black shades of the simplest forms. There should not be a lot of products inside one room;
- The luxurious shabby chic interior is in harmony with wicker sofas, bookcases and openwork screens. In addition, choose textile bedspreads made from coarse fabrics.
If you couldn’t find a suitable product for your interior in stores, make it yourself. To master the technique of weaving wicker furniture with your own hands, you first need to choose the simplest products: poufs, stools, bookcases.


Domestic wicker products made from wicker have more joints than those made from rattan, due to the shorter length of the rod. However, their cost is lower than imported ones. The weaving must be without torn or broken rods. A hole will soon form at the site of the defect. When choosing a chair, armchair, sofa, be sure to sit in it. The product should be comfortable, not sag or wobble.
Finished furniture is varnished; a crunch or squeak upon first use occurs in places where the varnish is soldered and does not affect the quality.
When choosing products, be sure to study the quality of the joints. To fasten the rods, wooden or metal pins are used, which are masked with decorative elements. Fastenings must be strong and reliable.
Tables, shelves, chests of drawers are chosen that are stable, without tilting when placing objects on them. Drawers in cabinets and chests of drawers are checked for ease of opening and reliability of fixation. The color of the furniture does not affect its quality or service life. It is selected based on personal preference. The most popular models of wicker furniture for novice decorators are light-colored dining room sets.


Rules of care
Natural willow twigs do not like high humidity. If they are constantly wet or stored in rooms with high humidity, the rods will swell and lose their shape. Wicker furniture should be periodically wiped with a damp, soft cloth. To maintain the elasticity of the rods, they are treated with linseed oil 1-2 times a year.
Grease stains on chairs and tabletops can be easily removed by dry cleaning with talcum powder. White marks from hot dishes are removed with an alcohol solution mixed with vegetable oil. If the stains are old, then a mixture of coarse salt and sunflower oil is applied to their surface. After 2 hours, the grains are brushed off and the surface is sanded with a soft flannel cloth.
Small cracks on willow rods can be easily masked with beeswax. If the varnish coating has cracked from time to time, then the defects must be sanded down with sandpaper, covered with paint, and a new layer of varnish. Colored stain helps to renew the color of faded dark products.
If armchairs, chairs or chaise lounges are used outdoors, then protect them with fabric covers from the sun's rays and plastic covers from the rain. Wicker furniture will create comfort and unique charm in your interior.
Video
Photo


Products woven from wicker can serve their owners for many years, performing not only a practical, but also a decorative function. They are successfully used as a piece of furniture both in the countryside and in the metropolis.
Making willow with your own hands is a science mastered by our ancestors several thousand years before our era. In historical documents from around the world there are references to various wicker boxes, fences, baskets and much more. The products that can be made by learning how to weave are beautiful and varied. Nowadays, willow weaving is not related to the everyday needs of a person; rather, it is a fashionable hobby and a way to bring beauty and style to the interior.
General information about wicker weaving
Modern willow baskets are not only accessories for the garden, they are full-fledged inhabitants of apartments. They not only bring practical benefits, but are also a highlight, a kind of accent in the design of the apartment.
It is important to note that collecting vines for weaving does not cause any harm to nature, but, on the contrary, rejuvenates the thickets.
Willow weaving is popular today both in rural areas and in large cities. Another advantage of this hobby is that there is no need to purchase materials for work. You can easily prepare them yourself. Willow is a very common plant and grows in almost all regions of Russia. If you love the outdoors, then going for the willow vine will be a pleasant and interesting adventure for you. In some large cities, shops that provide goods for various hobbies are beginning to sell wicker rods. There are not many such stores yet, but this is an excellent option for those who do not know where to find willow thickets in a large city.
Blank for weaving
Not only willow vine is suitable for weaving, but also walnut vine and other flexible species of shrubs and trees. It is better to choose thin, long shoots. Take those twigs that do not branch.

For this type of hobby, both unbarked and peeled vines are suitable. Large products are woven from the unrefined wood: fences, large baskets for fruits and vegetables. Peeled vines are used to make vases, trays, laundry boxes, bread bins and much more. An unpeeled vine is called unrooted, a peeled one is called debarked.
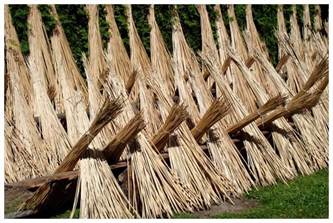
The preparation of materials for weaving is carried out in autumn or spring. In summer, willow shoots, due to active growth, are very brittle and are not suitable for weaving.
Shoots harvested in spring are cleared of bark immediately, without additional preparation. Shoots harvested in the fall are boiled before cleaning. Harvesting and preparing vines for weaving is not a difficult task, but it requires time and effort.
But when willow weaving for beginners will captivate and draw you in step by step, and the finished wicker item will become a source of pride for you, the time and effort spent will be fully repaid by the charge of positive energy that you will receive.
Required Tools
What will we need during the work process? Willow weaving for beginners, described step by step in the article, requires at least a good amount of patience. Making a basket from wicker is more difficult than weaving it from newspaper tubes. Natural material is less pliable to work with and can break.
You also need some tools for the job.
Prepare:
- Awl.
- Secateurs.
- Side cutters.
- A spray bottle filled with water to spray the vines.
Technology
Classically, baskets are woven starting from the bottom. Then they weave the walls and the bend. Handles come last.

For beginners, it is advisable to start step by step with willow with round-shaped product models. To make it, you will need to learn just a few techniques:
- Round bottom manufacturing technology.
- Rope weaving.
- Layer weaving technique.
- Bending.
During the weaving process, the work must be compacted and pressed down so that the basket does not turn out to be too flimsy. The rods should be laid tightly and evenly, without covering each other.
Once the technique of making a round basket has been mastered, you can move on to more complex openwork products made from wicker. Experienced craftsmen decorate their baskets with braids, weaving birch bark, straw and wooden beads into them. The design and shape of such baskets are limited only by the imagination of the master.
You can weave almost anything from a vine. Often landscape designers order wicker figures from vines to decorate the garden. They decorate the garden plot with wattle fences, and on the open veranda it is quite possible to place a rocking chair made of wicker. You can also weave stools and a small table made of willow for outdoor gatherings.

Even decorations and New Year's gifts are made from this affordable, eco-friendly material. A cradle made of untreated twigs is suitable for a children's room. Children love to sleep in such natural, environmentally friendly cradles.
Rectangular wicker baskets placed on shelves and racks are suitable for storing clothes, magazines and newspapers, and all sorts of household items.
Any housewife can find use for wickerwork in her home. The ability to weave from wicker will definitely be useful to you in life, at least for arranging your own life, and maybe it will become a source of additional income for you.
Now that you have learned about what wicker weaving is and how to weave from willow, the master class below will teach you how to weave round baskets from wicker. With such a basket you can go on picnics with friends or to the dacha with children.
Weaving willow baskets for beginners (master class)
Let's start making the basket by preparing the willow vine. It is best to cut the vine in May, before the willow begins to bloom. You can also cut the vines in August, when new long shoots grow on the willow.

Preparing a vine from willow branches
We immediately remove the bark from the cut branches and leave our vine for five days in the shade in the open air.
After the vine has been prepared and rested, we begin weaving willow baskets. The technology is as follows: we weave the bottom and edges of the product with whole round twigs, and the walls with vines split into several parts.
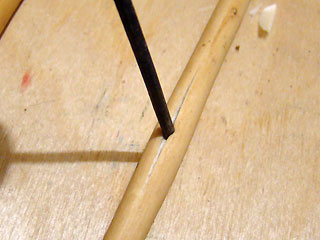
How to split a vine
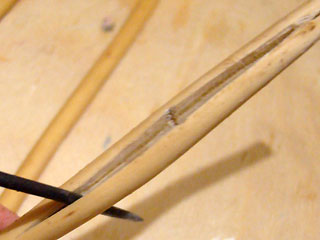
To split the vine into pieces, you will need a special hardwood cleaver. An incision is made at the end of the vine with a knife, a cleaver is inserted into it, and the vine is split into 2, 3 or 4 parts.
The split branches are soaked in water for several hours, and then the brown center is removed. It is recommended to use a plane to process split vines.
Before weaving from the vine, it needs to be moistened. This can be done with a spray bottle or by lowering the branches into water for a few minutes.
Having prepared a sufficient amount of vines, we begin weaving willow baskets.
Carefully consider the process of creating a basket in the figure. First, the bottom of the basket is woven, then the ribs are added and the sides are woven along them. At the very end the handle is done.
If you know the technology of making baskets from paper tubes, then know that willow weaving for beginners step by step is almost the same.
We carry out the work in this order:
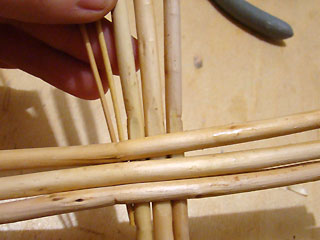
- To make the bottom of the basket, split five rods in the middle with a knife and insert five other rods into the holes. We insert the tips of the first two into the same holes.
- We make a braid of the bottom. The first rod needs to cover the split twigs from above, and the second one needs to cover those threaded into the split twigs from the bottom.
- We also perform the third and fourth turns.
- We spread the crosspiece rods in the shape of a fan and braid them with two willow branches.
- We press the twigs together using an awl.
- When the bottom reaches the size we need, we install the ribs of the basket into our willow weaving. For beginners, we will explain this process step by step. For the ribs we use round twigs. We cut their ends obliquely to a distance of about 5 cm. We insert the sharp ends into the bottom braid. We cut off the excess ends of the vine. The edges of the bottom are woven from four round twigs, which are inserted 4 cm near the side ribs of the basket. To give the basket the required shape, we make a blank, as in Fig. 9. Nail the bottom of the basket to it using small nails.
- We finish the braiding of the bottom and cut off the excess twigs.
- Let's move on to weaving the sides. We cut off the ends of the new twigs. We take twigs of medium thickness. We insert new branches along each twig of the base.
- We bend the new rods under the two adjacent ones to the left, down, and then up.
- We also bend the remaining branches of the vine. The last two branches cannot be bent. We simply wrap them around the first ones. We weave the sides of the basket until they reach the height we need.
- We begin to weave a handle. We take thick shoots of the vine, bend them and determine the length of the handle. We cut off the excess vine.
- We sharpen the ends of the vine and insert them into the walls of the basket. We insert five branches next to the handle and wrap them around the handle. We hide the extra ends of the vine between the walls of the basket.
- We take a thin twig and wrap it around the edges of the handle. We hide the ends of the twig and cut off the excess.
- Weaving a willow basket with your own hands is completed. A simple round willow basket is ready.

Follow the procedure shown in the pictures. A little practice and you will succeed.
Conclusion
Having mastered the technique of weaving round baskets from wicker, you can then learn how to weave square and oval baskets and boxes, learn how to weave a willow fence for beginners step by step, then move on to making wicker furniture and more complex products. The growth of your skills and mastery depends only on the amount of your free time and desire to engage in wicker weaving. Willow weaving is an interesting and accessible activity for everyone.
Wicker sofas, armchairs, tables and even cabinets look great in a farmhouse. But they also have a place in a typical city apartment. In furniture stores you will find a number of similar furnishings. They have one drawback - a rather high price compared to similar products made from other materials. It's very easy to explain. An openwork sofa or rocking chair in the English style are handmade items, often very skillfully. But DIY wicker furniture is accessible to anyone who has the necessary tools and enough time and patience. Read our article about how and what to make it from.
What do you need for work?
Weaving willow furniture with your own hands is a very exciting activity. But, like any type of creativity, you need to prepare for it. The rods are collected at a strictly defined time, but tools and additional materials can be purchased at any time. You will need:
- all kinds of fasteners - nails, screws, metal corners, hinges;
- plywood;
- sandpaper;
- wood glue;
- hammer;
- drill;
- sharp knife;
- wire cutters;
- screwdriver
Important! A good instrument is an expensive pleasure, so it is better to buy it gradually. It may be very useful in which you store all this. You will also need some free space for a workshop and something like a warehouse where you will keep the rods. There are special requirements for them.
What kind of furniture is there?
By looking through the catalogs of furniture companies that work on individual orders, you can see that sofas and armchairs can be very different, and it’s not just about the patterns and color of the rods. DIY wicker furniture can be:
- frame;
- frameless.
In the first case, the main load-bearing function is assumed by the frame. This type is divided into two types:
- carpentry and frame;
- just frame.
Important! In the first case, a wooden base is made, which is then braided with twigs. In the second option, the role of such a base is performed by duralumin tubes of various thicknesses. If you decide to do something in this style, you will have to look for, for example, an old folding bed or something similar. The tubes can be replaced with metal rods. True, the product will be heavier.
Appearance
In appearance, do-it-yourself wicker furniture from wicker can be:
- openwork;
- combined;
- single.
Openwork products look the most elegant. The master weaves different designs. In a combined pattern, several methods of weaving rods are used, while in a single pattern, only one standard type is used.
What should you think about in advance?
Before you start making wicker furniture with your own hands, think about what properties the items on which you are willing to spend a lot of time and effort should have. In any case they should be:
- safe;
- durable;
- practical;
- beautiful.
Otherwise, there is simply no point in taking on the job. If you set such goals for yourself, take care to master the execution of nodes and connections.
Connections
In the manufacture of wicker furnishings, two connection options are used:
- detachable;
- one-piece.
Detachable ones are easier to assemble and transport, however, when using them, the number of elements is limited. One-piece ones are stronger, but they are fixed with nails or glue. But if you need to transport such furniture, you can only load it into the car entirely. Accordingly, it is better to do it where it will stand.
DIY willow furniture - preparation
To start making wicker furniture, in addition to materials and tools, you will need a few more things:
- blueprints;
- knowledge of the peculiarities of preparation of rods;
- knowledge of basic weaving techniques.
You can make drawings yourself, or you can also find something suitable on specialized websites or in numerous books on weaving.
What is wicker furniture made from?
Furniture can be woven from different plants, but in Europe willow is most often used for this purpose:
- Rods should be selected with a thin core. The thinner it is, the better the material will be.
Important! This does not mean that you should immediately discard branches with a thick core. They are also needed, but for different purposes. They are used to make stiffening elements or even frames for small objects.
- The second point to pay attention to is the width of the sheet. The leaves should be narrow, especially if we are talking about openwork weaving. Branches with narrow leaves are especially elastic.
Important! You need to select the rods in the summer, but cut them in late autumn, when the movement of juices has already stopped. It is best to do this in late October - early November, when there are no severe frosts. You can do this in early spring, when the cold is gradually receding, but life in the branches has not yet awakened. The rods cut at this time are perfectly cleaned and practically do not break. If you collect twigs in the summer, they must be immediately cleared of bark.

What else is suitable?
Willow is not the only material for wicker furniture. Branches of other plants are also suitable:
- bird cherry;
- raspberries;
- hazelnut.
Important! For a novice furniture maker, bird cherry is perhaps even more suitable than willow, since it bends very easily and is no less easily cut into several strips. In principle, nothing prevents you from using several types of rods for one product.
Preparing the rods
Have you chosen the right rods? Now they need to be cut off. This is done, of course, manually, that is, with pruning shears or garden shears:
- the cut is made obliquely, at a distance of 1-2 cm from the hemp, if you are preparing the material in the fall;
- 3-4 cm - if you decide to do this in spring or summer.
Important! The cut should be smooth.
Sorting
After you have cut the vine, it must be sorted depending on the diameter of the branches and their length. It is customary to divide rods into three categories:
- small, with a length of no more than 1 m and a thickness of 2-6 mm;
- medium - up to 10 mm thick and up to 2 m long;
- large - more than 2 m in length and from 10 to 15 mm in thickness.
Important! It is better to store the vine tied; the number of twigs in the bundle depends on the category:
- small – 100 pcs.;
- medium - 50 pcs.;
- large – 25 pcs.
Such materials should be kept in a dry room, where the temperature is not particularly high, but you can also do this outdoors, in a snowdrift. Severe frost will damage the business, as will dampness. If you have harvested a lot of vines, you can make a lattice platform at a height of 40 cm from the ground. Knittings are laid in layers - for example, the first is laid across the platform, and the next - along.
debarking
Before weaving, the rods must be freed from bark. You can do this at any time. If you cut the vine in the fall, there are two ways to prepare it in advance:
- artificial revival;
- heat treatment.
Important! After artificial revival, the rod turns out perfectly white. If you steamed the vine, over time the product will acquire a red or red-brown tint.
Artificial revival
Having decided to use this method, simply soak the rods in water:
- Trim dry ends.
- Tie a loose bun
- Pour water into a large bucket.
- Place the bundle in water.
- Soak the bunches in water for 2-3 weeks. Before the buds appear.
- Try peeling off the bark - if it comes off easily, the vine is ready.
Important! The water should have a temperature of 14-16°C.

Steaming
If artificial revival seems too long a process, boil or steam the rods. To do this, you will need a large metal tank or boiler, although sometimes wooden troughs are used:
- Pour water into the tank.
- Place the rods there so that they sink completely.
- Put it all on the fire.
- Bring to a boil.
- Cook for 20 minutes to an hour and a half, depending on the quality of the vine.
- Immediately after boiling, place the rods in cold water.
- Wait until the vine becomes warm.
Important! The vines are steamed in special chambers. The container must be sealed tightly.
Removing the bark
To do this you will need a pinch - a forked rod. If you have prepared everything correctly, you just need to pull the vine through the gap in the pinch, and it will come away without effort.
Important! The free end of the pinch is usually stuck into the ground or into a gap specially made for this purpose (for example, in a table or in a stove in a workshop). You shouldn't squeeze it too hard.
Making ribbons
For some elements, tapes rather than rods are used. To do this, the rod is split lengthwise with a special cleaver:
- Make a cross-shaped cut at the end of the rod.
- Insert the cleaver.
- Divide the rod - you will get 4 ribbons.
Sofa
What is DIY wicker furniture for beginners? It's probably better to start with a frame sofa. It will be durable, even if you still have poor weaving skills and have not mastered the types of joints.
Important! If in the process of creating a wicker sofa you realize that the idea has failed, do not be discouraged, you can still try to make a regular sofa, after studying our selection it will not be very difficult:
Prepare:
- vine;
- sticks with a diameter of 2.5-3 cm;
- sandpaper;
- hammer;
- jigsaw;
- hacksaw;
- roulette;
- screwdriver;
- fasteners;
- glue;
- stain.
Important! Besides this, you also need foam and fabric to make a soft seat.
Preparation
Your sticks and rods, of course, already have no bark. Therefore, you just need to sand them thoroughly with sandpaper.
Important! There is no need to be particularly zealous - at this stage it is important that you do not get a splinter.
Assembly order:
- Cut 2 pieces of 60 cm and 2 pieces of 40 cm from the sticks.
- Make a rectangle out of them, firmly fasten it with self-tapping screws.
- Determine how far your sofa seat will be from the floor.
- Cut 3 blanks to the estimated length for the front legs.
- Attach them with self-tapping screws to the front of the frame.
- Add the height of the backrest to the estimated length.
- Cut 3 blanks for the rear legs (the middle leg can be made 10 cm higher).
- Mark the seat height on them - it is the same as for the front legs.
- Attach the rear legs to the frame according to the marks.
- Cut out the blank for the back - it's just a stick of the same thickness as the rest of the frame elements; it can be either straight or curved.
- Fasten the workpiece to those parts of the legs that rise above the seat.
- Cut 3 sticks for the stiffeners - they are equal to the width of the seat.
- Connect the front and rear legs in pairs with these ribs.
- Cut 2 sticks equal to the length of the seat.
- Connect the front and back legs with them.
- Measure the distance from the outermost front leg to the middle back leg.
- Cut 2 of these sticks.
- Attach them with self-tapping screws.
Important! All stiffeners are mounted at the same height.

Finishing the base
You can, of course, use only rods or only tapes for braiding. But the product looks much more impressive if you combine different types of material. You should start by wrapping the parts on which the caps and other not very beautiful fastening elements are visible, with prepared tapes.
The tapes are first lubricated with wood glue. The following order will be:
- Take a rod and bend it in an arc.
- Attach it to the right side of the back with nails: one end is attached to the rear outer leg, the other to the rear middle leg.
- The top point of the arc is secured to the top bar of the back frame with a small nail.
- Attach exactly the same arc on the left side.
- Bend another rod in an arc, attach one end to the side front leg, and the other to the middle front leg.
- Nail the most convex part of the arc to the back bar of the seat, in the middle between the side and middle legs.
- Do the same on the other side.
Important! The seat can also be made of plywood.
We begin to braid
It is better to start braiding a sofa from the seat:
- Take 1 long rod of medium thickness and nail it to the back of the seat frame, from the bottom.
- Pass this rod over the rod of the already made arch and bring it under the front part of the seat frame.
- If the rod is long, wrap one turn around the front frame bar, then pass it under the arc and attach it to the back bar.
- Fill the entire seat in the same way - you will have a row of transverse rods.
- From the future armrest, begin to braid these rods with other, thinner ones, passing them alternately under the existing elements and above them.
- Attach new rods from the underside of the seat.
- When the entire top of the seat is filled, braid the tops of the legs. But first you need to lay several long rods around the entire perimeter to cover the stiffening ribs and fastenings. And for transverse layers it is better to use tapes or thin rods.
Back
After the seat is braided, you can proceed to the back. The operating procedure will be the same:
- Fill the space between the seat and the upper part of the backrest with vertical rods.
- Braid them with thinner vines or ribbons, while the free ends should remain behind the back when attaching each new “stitch”. And so that they do not unravel, they can be coated with glue.
Important! The armrests can be made separately by screwing them to an existing structure with self-tapping screws and wrapping the joints with tapes.
Once the entire sofa is woven, all you have to do is make it comfortable to sit on. To do this, just sew a pillow the size of the seat. You don't even have to attach it.
Important! Perhaps, after your first successful experience in furniture production, you will want to continue creating original interior items, but before that, study the proposed materials.
You can make other objects in the same way - for example, chairs or armchairs. Surely you have already thought through the design of the room and are convinced how interesting such furniture will look in the interior of any room.
Wicker weaving dates back to Ancient Egypt and Ancient Rome; wicker chairs and boxes were found during excavations. In ancient times, various baskets were woven from willow. During the Renaissance and the Middle Ages, boxes, bread bins, baskets and baskets, baby cradles, and carts were created using wickerwork. A master class on simple and quick weaving from dense wicker will help beginners quickly master the technique.
In Russia, initially, in most cases, baskets and fishing gear were woven; later, with the development of trade, weaving began to be used for packing transported goods into boxes for sale. In the 19th and early 20th centuries, before the Great Patriotic War, many factories were created in the country for growing cultivated willow and weaving furniture and household utensils from it. Entire plantations abandoned during the war began to be revived and weaving factories, mainly baskets, were created anew. There were entire villages that were engaged in wicker basket weaving.

Initially, grapevines were used for weaving, but more often in Europe and Asia flexible willow twigs were used for weaving. In addition, in Asia they weave furniture from materials such as rattan and bamboo.
Due to the fact that in today's Russia there are few masters in wicker weaving, some have become interested in how they can weave a basket from willow vine with their own hands, because there is a desire to have such a natural thing with a special aura in their everyday life or in the interior. The natural energy of this item brings coziness and comfort to your home.
Harvesting vines for weaving products for beginners
Before you start creating a wicker item, you must first prepare a vine for weaving.
You can, of course, buy ready-made rods to start weaving right away, but it’s better to learn how to prepare the material yourself, this will help later in working on the product.
For weaving, shoots of the first year of growth are used, and they are collected all year round. The branches should be cut at a sharp angle with a knife or pruning shears, so as not to harm the tree; it is more useful to leave 3-4 buds on the branch remaining on the tree. When collecting twigs, it is important to check them for flexibility: the first twig cut from the tree must be bent in the place where the thicker end is; if it is not cracked, then it is suitable for decorative weaving. Spring shoots have a very soft bark, so the bark can be removed without pre-treatment, and if the shoots were collected at another time of the year, then the rods must first be soaked for 1-2 weeks or steamed for 1-2 hours, or boiled for 20 minutes, removed bark After peeling the bark, the shoots must be dried, otherwise the rod in the finished product will delaminate and break. The rods should be sorted to make it convenient during painting and weaving. Before work itself, the vine is again soaked in water to gain flexibility.
Painting can be done with aniline dyes, a solution of potassium permanganate or herbal decoctions, immersed in the dye for a while, then the rods are rinsed with clean water and dried on a flat surface, preferably on the floor, so that there are no stains in the color.
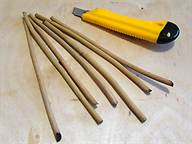
Some rods are too thick to weave small to medium-sized items, so you will need some tools to cut the rods into narrower strips.


And a pinch or pinch helps to remove the bark from the twigs.

Mastering weaving with a simple master class
Immediately before weaving, it is necessary to soak the willow twigs in hot water, and also during work it will be necessary to moisten them with water - all this to maintain the flexibility of the twigs.
For beginners in wicker weaving, it is better to start with a simple element - from the bottom, this is the basis of many wicker items, using a photo or video master class.
It is better to take rods for weaving with a reserve, because... for beginners, the rods often break during work; soaking or wrapping with a wet cloth for the bottom requires seven or more sticks with a diameter of 4-7 mm, a length of about 20 cm, more is possible, depending on the desired size of the bottom and thin rods (up to 3 mm in diameter) 30 pcs. and more, the length of which must be at least 50 cm. The thicker ones are used to create the skeleton (rays), and the thin ones in the form of a rope braid all the ray sticks.
The first step is to make a cross, around which weaving will then be carried out. You need to take 3 thick sticks (you can take four for each side of the cross), cut off a third of the thickness on them in the middle part and sharpen the ends from the thinner edge, for the convenience of inserting other sticks into the crack. The other three or four sticks must also be split in the middle with a knife or awl.
This should be done carefully so as not to split too much or the entire stick, because this cannot be corrected, and the product will be defective.
Then it all comes together.


It is imperative that all the inner sticks, on which part of the thickness was cut off, be turned to one wrong side, and the fit of the outer sticks to the inner ones, in the place of the crack, should be as tight as possible.
Now you should take two thin twigs and begin the braiding process. The ends of the so-called rope must be hidden in the crack of the axial sticks.
Two twigs diverge in directions, one will first go above the axes, an arc will go under the axes, then they change position. The inner guides must be braided first.


Two rows are braided (you can make three such rows of braiding), then you need to move the axes to the position of the rays, like the sun, in a circle so that the distances between all the rays are equal. The diagram in the photo below:

The braiding begins not of three sticks at once, but of each one separately in the same manner.
When the twig used to braid ends, you need to weave the next twig of similar size and color, as shown in the photo.
We must try to ensure that the ends of the finished twigs come out on the wrong side, then the front side of the bottom will be smooth and beautiful.

The twigs must be taken of different lengths so that the growth occurs evenly in different places. The larger the bottom of the product, the greater the distance between the beams of the cross, so if the product is large, you need to use more beams.
For the oval bottom of a basket or cradle, use a similar cross pattern:

Furniture for skilled hands with job description
Weaving of furniture is done by skilled craftsmen in this craft with their own hands, because it was necessary to weave a lot of different bottoms and baskets for these bottoms and gain experience. Also, to make furniture with your own hands using wicker weaving, you will need not only experience, but also a greater variety of materials and tools. Furniture requires strength, because... a greater force of gravity will act on it than, for example, on the bottom of a basket or cradle, so first a frame of sticks (2 cm thick or more) is built. Next, you need to attach racks to the frame, which will later be braided with thinner twigs or strips/ribbons of twigs; during the weaving process, perpendicular racks are regularly added for rigidity. You can braid with different types of weaving.
Despite the fact that today you can buy almost any furniture in furniture stores, it is quite difficult to find something to your liking. This is especially true for non-standard models, which are represented, in particular, by wicker furniture. Do-it-yourself wicker furniture is no worse than ready-made furniture made by professionals. The main thing is to thoroughly study the technology of its manufacture, and then an excellent result will not be long in coming. Furniture that you create yourself will be an excellent addition to your garden decoration and will also highlight the unique style and design of your garden. Furniture created using weaving technology is very aesthetically pleasing and reliable; these are its clear advantages over other types of furniture. Such furniture is not afraid of moisture and other aggressive influences.
Disadvantages of ready-made wicker furniture
Ready-made wicker furniture is quite expensive, it is inaccessible to the middle class of users, and this is its main disadvantage. But it looks very elegant and harmonious, so many people want to learn how to make it with their own hands. This is not only profitable, but also interesting.
For work you need to prepare the following materials and tools:
- fasteners;
- plywood;
- nails;
- skin

Before you start weaving furniture with your own hands, you need to clarify that it comes in different types. Thus, there is frameless furniture, which requires the use of strong sticks that act as stiffeners for such furniture. Wicker furniture can be joinery-frame and frame, i.e. created from individual elements. In such products, duralumin tubes act as a frame, which, however, can be safely replaced with metal rods. Weaving is done between such rods. There is also stick furniture. In this case, the sticks are a supporting structure, and do not play the role of stiffeners. There are also semi-rigid and soft wicker furniture.

Preparing for work
Having decided to make furniture by weaving with your own hands, you should prepare drawings and study the basic methods of weaving:
- single;
- combined;
- openwork.
In combined weaving, several rods are used at once. To prevent wicker furniture from falling apart before your eyes in the first days of use, you should ensure that its components are securely fastened. When working, you can use the following types of connections:
- one-piece;
- detachable.

When using a detachable connection, the product can be easily disassembled and, if necessary, quickly assembled. But this method is used extremely rarely. The second fastening technique is more widespread, because The result is a more reliable product. The permanent fastening method involves the use of:
- hammer;
- self-tapping screws;
- nails;
- glue.
The disadvantage of wicker furniture assembled using this method is that it is large in size; if it needs to be transported, it cannot be disassembled, which means it is more difficult to transport it to a new installation site.
Wicker furniture is made from willow according to pre-prepared drawings. To work, you need to stock up on reliable sticks with a diameter of 2.5-3 centimeters. This material is the basis of the furniture frame. First you need to prepare the sticks by removing the bark from them. They are then left to dry. The surface of the material should be sanded. This is done in order to eliminate the possibility of skidding during weaving of furniture and during its use.

Select a sketch
While the material is drying, you can choose a suitable sketch of the furniture and decide what size it will be. When making a sofa, decide what size the width and length of its seat will be. You should determine what the distance from the floor to the seat will be, as well as what height the back of the sofa will be.
After the preliminary work, you can begin making furniture. First you need to make a frame for the seat. To do this, 4 sticks are cut to the required size. For example, consider the following dimensions of sticks: 4 pieces of 60 cm and a pair of 40 cm. Weaving furniture at this stage involves installing sticks with self-tapping screws so that the result is a rectangle. Then they move on to cutting out the front legs of the sofa. There should be 3 of them. They are also made from sticks. The height of the legs should be equal to the selected distance of the seat to the floor. For example, let’s define this distance as 40 cm.

The legs are attached to the seat using self-tapping screws. They are installed at an equal distance from each other. In our example, at a distance of 20 cm. The sofa will not stand if there are no back legs. To calculate their height, we do the following: add the height of the back to the height of the front legs. Let's assume that the height of the backrest is 25 cm, then the legs will be 65 cm high. These elements are mounted along the edges of the wicker sofa. For reliability, a leg 75 cm high should be installed in the middle. The legs are attached to the seat with self-tapping screws.
Making the back of the sofa
To do this, choose a stick longer than the expected length of the seat. Using self-tapping screws, it is attached to the upper ends of the legs located at the back. Since the leg in the middle is higher than the rest, the back will have a beautiful curved shape.

Bar sorting
Now you can start making ribbons to create your own wicker furniture. To do this, we divide the twigs into 4 parts. To do this, you can use a stick cut in the shape of a star with four rays. The stick will help you make cuts at the ends of the twigs, after which you can separate them with your hands. Such twigs will allow you to hide the heads of nails and screws.

We add rigidity to the frame
Wicker furniture should be rigid and reliable. One stick should be fixed between the legs located on the sides of the sofa. This must be done using self-tapping screws. In addition, the legs installed in the middle should be strengthened together. The stiffening ribs of wicker furniture should be at the same height.
The furniture's wickerwork is complemented with a few touches. So, you should use a willow twig, which needs to be rolled into an arc and installed in the back of the sofa on the left. It is fixed with nails: the ends of the twig are attached to the legs located at the edges and in the middle. The top point of the arc is attached to the back. Do the same with the right side of the back. The wicker sofa is complemented with another rod. Its size should already be larger than the first twig. It is rolled into an arc, the ends of which are fixed with nails to the front legs installed on the sides of the wicker furniture. The upper part of the rod is attached in two places to the seat of the wicker sofa.

Final touches
When making wicker furniture with your own hands, the places where the heads of screws and nails are visible are wrapped with tape. The method for their preparation was described above. Weaving the sofa at this stage is accompanied by the use of glue. Furniture made by weaving with your own hands must have a seat. It is made from plywood according to the dimensions of the frame. This element is nailed to wicker furniture. The top of the plywood is covered with decorative pillows or a soft blanket. The sofa is ready to use!
Wicker furniture is such a piece of furniture that arouses admiration from almost any person, thanks to its unusual appearance, reliability and simplicity. Wicker furniture is popular for the reason that it is in great demand among homeowners, or owners of country houses or apartments with large loggias. If you are interested in wicker furniture, then you should definitely study this article in order to find out all the details of production.
Features of wicker furniture production
Making wicker furniture with your own hands can be a profitable business. And if you don’t know how to produce these products, then step-by-step instructions will help you.
So, first of all, it’s worth saying that self-woven furniture is made quite simply and quickly. And if you correctly follow the manufacturing technology, it is quite possible to end up with an ideal product. Features of manufacturing wicker furniture using natural materials, as a rule, depend on the type of design chosen. For example, there are some differences in the frame of the item, as well as in the methods of weaving it.
Wicker furniture can be openwork, combined or single. In the process of performing this work, you can make all kinds of patterns, combine weaving, or use standard weaving of one type. Self-woven furniture, first of all, should provide you with safety and last a long time. When weaving furniture items, it is necessary to ensure the high-quality connection of the knots in this design, and at the same time give it rigidity and reliability. When weaving furniture, the following connections are used: detachable and permanent.
The first element is quite simple when assembling and disassembling furniture, but the number of individual connections is limited. This usually depends on the features of the furniture itself. Products with one-piece elements are made using glue and nails. These products are more durable and last for decades. Although there are also disadvantages - there is no way to disassemble them in case of necessary transportation.

Preparation of material
It is impossible to imagine making wicker furniture without high-quality material. Therefore, for future wicker furniture it is necessary to prepare appropriate material. To be able to weave furniture yourself, you can use branches from a variety of plants: hazel, bird cherry, raspberry, willow and even nettle. It is necessary to pay special attention to the fact that to begin this work, it is better to use bird cherry, since this plant is quite pliable for weaving and can also easily be cut into several ribbons. Bird cherry also perfectly retains its original shine and shade. In order to start harvesting rods, you should choose a time from mid-October until the onset of the first frost. You can also harvest branches of this plant in the spring.
In order to make openwork furniture, twigs should be collected in early spring. One of the main differences in the quality of the collected material is their thin core. Branches with a thicker core are, as a rule, suitable for assembling the frame of large products, as well as for making all kinds of gazebos or braided deck chairs. In addition, the choice of material can be made based on the width of the leaves: if the leaf is narrow, then the branch will be more flexible, and the product will be more delicate and beautiful.
There is a technique with which you can get a white rod - it should be boiled. To do this, you need to take a container with hot water and put all the collected workpieces into it. Next, you should boil the rods for an hour. And to obtain lighter tones, they need to be cooked for at least 2-3 hours.
In order to obtain dark shades, you need to boil the pieces for 4-5 hours. After this procedure, all the rods must be removed and immediately cleared of bark. This is necessary so that they do not lose their beautiful appearance. The bark is removed using a splitting tool. The furniture turns out very beautiful thanks to the use of whole rods and glossy ribbons in weaving. To be able to make such rods, you need to divide them into 3-4 parts using a knife or a splitter. These parts make beautiful and thin ribbons.

Design features of a wicker chair include the following elements:
- Sidewalls;
- back;
- seat;
- Legs;
- Tsargi.
The armrests of the chair are an additional element of the manufactured product. Willow sticks are used to make the chair. Their diameter should be approximately 29-30 mm. Thin twigs of this plant (from 6 to 10 mm) are also used. In order to make one item you need to spend up to 30 long rods. The bends are made using a special tool - a jig. With its help, all existing unevenness of the rods is leveled. The process of making furniture begins, as a rule, with cutting out all the necessary parts - twigs and branches. To make furniture that has a curved appearance, the shelves should be bent according to a specific pattern. The lounge chair consists of the following components:
- Backrests;
- Convenient and comfortable seating;
- Armrests;
- Bottom bench.
The manufacturing technology of wicker furniture is divided into several stages. Therefore, making wicker furniture with your own hands can take you a lot of time.
So, first, a frame is made from thick rods, and the braiding is made in the areas where the elements of the object meet. This product has a very beautiful appearance, as well as high armrests. They, in turn, serve for comfort, as well as to increase the rigidity and durability of the chair.
The lower bench is the supporting frame of the furniture. It is necessary primarily for the strength and reliability of the item. The frame has:
- legs,
- covered leggings,
- bearing crosspiece,
- support frames,
- seats,
- Podluchek.
The back of the chair is made from the upper parts of the rear legs and rods located in the upper part of the backrest.
The seat for the chair is made from dense and durable branches. They are usually attached to a perpendicular rod of the seat and to the frame rods (rear and front).
During the production process of the frame, its legs are attached to the seat frame and to the crosspiece of the leg.
The next stage in the work is the process of tightening the leg and installing the striker.
The armrests are made using pre-processed elements - soaked and curved willow branches.
Then the armrests are installed to the front of the seat frame, and the butt ends are attached to the sides of the arms.
The next stage of work is to secure the upper ends of the armrest rods to the upper sections of the rear leg rods. After all the main rods are installed, the decorative branches of the armrests are installed. They go around the back of the chair along the entire top. Using willow tape, all connections of the product are braided. Next, the rods for the seat and back of the chair are installed.

conclusions
Making wicker furniture as an additional or main income can become a promising business. However, before opening such a business, you need to know all the features of production and some details. In general, consider all these tips in order to launch a similar business in your city.
Wicker furniture is an exclusive interior item that amazes with its originality at first glance, delights with its elegant appearance, reliability and ease of use. The popularity of its various types is constantly growing thanks to the modern hobby of owners of private houses, dachas and city apartments with large loggias with ethno interiors.

It should also be noted that wicker furniture is made very quickly, and if certain nuances and requirements are met, a very high-quality product can be obtained. Features of independent production from natural materials largely depend on the type and structural structure of each item. In particular, there are differences in the frames of products and methods of weaving, which can be single, combined, openwork, etc. In the process, you can make original drawings, combine different options, or get by with one method.

Do-it-yourself wicker furniture should be safe, reliable and durable. It is very important to monitor the quality of connections of all elements and components of the structure, while simultaneously creating the necessary rigidity and strength. The connections used in manufacturing can be detachable or permanent.
Detachable elements greatly simplify the process of assembly and disassembly, but the number of individual connections is limited by the specific nature of the furniture. One-piece products are most often created using nails and glue. They are considered the most reliable and durable, although they limit the possibility of transporting and moving products.

To weave furniture, you can use twigs of many different plants: willow, alder, bird cherry, hazel and even nettle and raspberry.
Experts advise beginners to start weaving from bird cherry, as it is more pliable, easier to cut into small pieces and ribbons, maintaining a pleasant shade and natural shine for a long time.
The best time for harvesting rods is the period from October until the onset of frost, as well as all spring months. During these periods of the year, the rods are very well cleaned and can be stored dry for a long time. For openwork weaving, it is best to cut the thinnest twigs in the spring. The most important indicator of twig quality is the thin core. Rods with a thick core are used for making the frame of large products, gazebos, braiding of flower beds and sunbeds. You can choose the material according to the width of the leaves: the narrower the leaf, especially for willow, the more flexible the vine and the more openwork the product will be.
There is a special technology for obtaining white rod - it must be boiled. To do this, take a large container with boiled, hot water, and then lower the workpieces into it. Cook the rods over high heat for one hour. They are boiled for another couple of hours to obtain light shades. To obtain a darker color, it is necessary to cook the material for at least 4 hours. After boiling, the rods are immediately cleared of bark so that they do not lose their beautiful appearance. Remove the bark with a splinter or a rough glove.

Very impressive products are obtained if whole rods and glossy ribbons are used simultaneously in one weave. To make such tapes, the rods are divided into 2–4 parts with a knife or a special small splitter. The thinnest strips are cut from the resulting parts of the blanks.

The main structure of a wicker chair consists of the following parts:
- seat;
- sidewalls;
- back;
- kings;
- legs.
Armrests are an additional part of the product. Basically, willow sticks with a diameter of no more than 30 mm and thin willow twigs (from 5 to 10 mm) are used to make the chair. Usually, it takes up to 20 long rods to make one chair, depending on its design features and design solutions. All bending is done using a specialized tool - a jig, which is used to level out the unevenness of the twigs. The manufacture of products begins with cutting the twigs into individual parts. To make a bent part, you need to bend a soaked stick to fit a special template.
A wicker design lounge chair consists of several parts:
- lower bench;
- comfortable seat;
- backrests;
- armrests.
The frame is made of thick sticks, and the braid is left at the joints of the elements. This design has beautiful decorative features, and the wide and high armrests perform two functions simultaneously: they provide convenience and comfort, and also increase the strength and durability of the chair.

The basis of the load-bearing frame of the chair is the lower bench, which is important for the reliability and stability of the structure. It consists of a covered leg, legs, a load-bearing cross, under-beams and a frame to support the seat. The back of the chair is formed from the upper elements of the rear legs, transverse parts and the rod of the upper part of the back. The seat of the chair is made of durable and reliable paired rods. They are attached to the transverse rod of the seat and to the frame rods (front and rear).
During the manufacturing process of the frame, its legs are attached to the crosspiece of the leg and the seat frame. Next, the leg is tightened and the shoots are installed. Then the top of the backrest, the transverse rods of the seat and backrest are mounted. The armrests are formed from pre-processed parts - curved and soaked willow sticks.

Armrests are nailed to the seat frame, to its front rod, and butt ends are attached to the side arms. Next, attach the upper ends of the armrest rods to the upper ends of the rear leg rods. Having finished installing the main rods, install the decorative rods of the armrests, going around the back along the top, and also braiding all the connections with willow ribbon. After this, set rods for the back and seat are installed.
Video
This video shows the process of making wicker furniture.