To make vegetable beds look no worse than flower beds, place them in the center of the plot in a circle, and the area of the garden should be large enough to implement the idea. Beds with tall plants can form something like a living border, and low plants will act as a background green cover.
For owners, it will be convenient to arrange it in a radial, radial direction or in a standard rectangle. When planting, consider crop compatibility and crop rotation rules. Some gardeners even arrange their garden beds in the form of a simple ornament, which looks quite impressive, especially from a small height. The main thing, as you already understand, is to approach this issue with creativity.
How to make a garden bed
Making the bed itself is not difficult:
- Most often it is made in a rectangular shape with a width of no more than 1-1.2 m, this is quite enough for sowing 2-3 rows.
- If you place the bed near a fence or against the wall of a building, then it is better to make the width within 60 cm. The appearance of the bed and the ease of caring for the plants will depend on this; it will not be difficult to reach the center.
- Its length depends on the location, usually within 1.8-2.2 m.
- The distance between them is 40-60 cm, which can later be paved with slabs or boards.
Vegetable beds are located in the north-south direction.
All the same rules must be taken into account when laying out flower beds and. On decorative beds, rounded contours look better than strict rectangular ones.


Preparing a site for a garden bed
As you have already seen, building a bed is quite simple; it is more difficult to prepare the soil for planting with your own hands:
- The area littered with construction waste is cleaned, loosened and a new topsoil layer is added.
- To make the beds beautiful, they draw borders, surround them with pegs and stretch string.
- Dig with a shovel first along the stretched twine as deep as possible.
- Work the shovel vertically to create a clear boundary separating the dug up area from the one adjacent to it, thus digging in a new bed.


Digging a bed
Now let's move on to the processes of forming the right beds:
- Check how tightly the earth is compacted at the depth of one shovel bayonet. If it is too densely packed and densely penetrated by weed roots, you need to use a hoe with strong teeth or dig up to a depth of 2-3 bayonets. This is too labor-intensive work and it is then difficult to make a bed with your own hands, so sometimes it makes sense to turn to specialized companies for professional help using the necessary tools.
- When digging, it is convenient to carry out, if necessary, immediately add lime, dolomite flour or sand.
- All that remains is to strengthen the boundaries of the bed by simply trampling down the adjacent paths; the edging can be done in different ways: with stones, digging in slabs or bricks placed on edge, paving stones, tiles and paving slabs, or wooden palisades. The tiles are laid on a lightly compacted bed of sand or small crushed stone.
- 2 days before planting, moisten the soil using a watering can or spray bottle.
- Loosen it with a pitchfork, remove the remaining plant debris, add sand and compost in a layer of 5-10 cm, mix with the soil.
- Water and after a day you can start planting vegetables.
It is better to first plant freshly cultivated soil with potatoes, due to which the soil will be well loosened.


A few more examples of garden beds:
Only a person far from farming can say that plants don’t care in which bed they grow. The shape and size of the beds determine the level of soil moisture, the intensity of gas exchange and the species composition of microorganisms that live in the upper layers of the earth. All these factors have a direct impact on the quality of the substrate, and consequently on the level of productivity - the main criterion of success for any gardener. How to use a scientific approach for the benefit of your garden, how to create not only a neat appearance of the beds, but also increase the productivity of your plot as high as possible? We will try to answer these questions in this publication with a large-scale selection of photos of a wide variety of beds.
Principles of arranging beds
A garden bed is a relatively small, often quite isolated area of soil where you can provide individual care for a plant of a particular crop, create a moisture regime and fertilize it. It is obvious that in a summer cottage or garden, plants with different agricultural techniques are grown, often with opposing care requirements - without an individual approach it will not be possible to achieve high yields. It is for this purpose that differentiation is necessary on the site - dividing the territory into zones, and the zones into beds.


If the purpose of the beds is more or less clear to every gardener, then such nuances as the level of illumination, the composition of the soil and even its consistency, necessary for different crops, are not always taken into account by everyone. Unfortunately, failure to understand that cucumbers and tomatoes, for example, require different approaches leads to a significant loss of yield. By creating simple trenches for planting certain crops, or isolated beds, the owner of the site can give the plants proper care - all efforts will invariably pay off in the quality or quantity of the harvest.


Cultivation methods
There are two main (and at the same time diametrically opposed) approaches to farming:
- traditional;
- ecological.
The traditional method of cultivating the land is a thing of the past, incredibly labor-intensive and often irrational, extremely traumatic for the ecosystem. It is based on human attempts to control the processes in the soil and its condition. The traditional method of farming includes the following activities:
- digging up the soil twice (per year);
- herbicide treatment;
- uncontrolled amount of fertilizer applied to the soil;
- With this principle of farming, beds are cultivated in such a way that they have a small number of capillaries and, as a result, an insufficient number of microorganisms.
- All these factors inevitably lead to low yields and depletion of soil resources.


The second approach, ecological (natural), is based on the ability of the soil to regenerate itself. There are many principles of natural farming, but they are all based on the fact that humans rarely interfere with the natural course of processes occurring in the soil. Digging up the soil is replaced by surface loosening, and weeding once a week or two is replaced by timely mulching.


Modern farming methods are based on an ecological method and with this approach microorganisms, plant roots and insects independently restore the soil structure. An increase in the number of capillaries increases gas exchange processes, as a result, plant roots are naturally enriched with nitrogen, which leads to an increase in both the quality and quantity of the crop. All this can happen without chemical fertilizers at all or with a minimal amount of them.


Types of beds for a modern vegetable garden
Only at first glance it may seem that the beds differ from each other only in size and shape. Although these indicators are of great importance for plants that require an individual approach and isolation from other crops. The beds may differ in the very principle of formation, for example, they may be not on the site, but above it, located on the so-called “green wall” or inside large-diameter plastic pipes. It all depends on how to care for each specific type of plant.


Box-shaped bed
The box bed is one of the most popular methods of soil cultivation today. This method of planting allows not only to create a separate place for each crop, but also to organize the landscape of a summer cottage or vegetable garden at a high aesthetic level. It is not difficult to organize a garden bed in the form of a box - a fence in the form of low shields is installed on the prepared and marked site (hacienda or small backyard).


To organize the fencing of the bed-box, you can use:
- flat or wavy slate;
- unnecessary boards;
- polycarbonate sheets;
- plastic;
- any waste material that can withstand soil moisture for more than one summer season.


Next, layers of organic matter and the soil itself are poured into the prepared compartment. Such beds are not dismantled for the winter, and in the spring, after surface loosening, it will be possible to plant seeds or seedlings of certain crops again. This approach is not only practical and rational, but also aesthetic.


Beds with high sides
Raised beds are usually shaped like ridges or trapezoids. The rise of the soil is usually ensured by a “cushion” of compost layer, on top of which soil is poured. In areas of our country where the mole cricket is common, a layer of compost is not used; lifting is carried out only by pouring soil. The mole cricket usually makes nests in the compost layer (a warm and humid place is an ideal habitat) and can spread throughout the entire area very quickly.


Raised beds are most often used for growing melons:
- cucumbers;
- pumpkins;
- zucchini;
- Sometimes some varieties of potatoes are grown this way.


Beds with high sides are created for one season. In most cases, the embankment subsides greatly under the weight of snow and loses its functional purpose. If weaving plants (for example, cucumbers, some types of zucchini) will be grown in a bed with a box design, then it would not be a bad idea to equip the fence with a vertical lattice (made of wood or metal, created using weaving, or any available means).


If such a structure is equipped with a high dome covered with film, then an ordinary garden bed becomes a greenhouse. Growing seedlings in such portable structures is very convenient and practical.


"Warm" beds
The beds are called “warm” because their lower layers contain fresh, unrotted manure. The mound of manure is carried out in late autumn, so that all processes take place during the winter period under the cover of snow. In early spring, after the snow has melted, such beds are cleaned so that they are warmed by the sun and decomposition processes begin.


Next, the manure begins to rot with a large release of heat. As a rule, in compost heaps during “burning” the temperature inside can reach 40-50 degrees. But the layer of manure on the beds is not high and this effect does not occur; moreover, winter exposure significantly slows down the “burning” processes. All these manipulations and preparations are needed in order to plant crops in a ready-made, “warm” bed. This is usually done for planting plants with a shallow root system - cucumbers, radishes, etc.


After the end of the summer season, all manure is processed. If you remove the top layer of soil, you will find humus underneath, which is a very valuable substrate. This natural fertilizer can be scattered throughout the garden or summer cottage. And at the end of autumn, it will be possible to put manure back into the bed and start the process of preparing a “warm” bed over a new one.


Beds with drainage
In clay buds, in very low places into which all the water constantly drains and in wetlands, it is necessary to arrange beds with drainage. They are not difficult to make - usually a 50-60 cm layer of soil is removed, then sand about 20 cm high is laid out at the bottom of the resulting hole, then sawdust and humus are poured in, and only after that soil is added. Drainage and gas exchange in beds of this type are excellent - an ideal place for growing root crops (for example, potatoes).


Material for making beds with your own hands
Creating a bed of any configuration requires some preparation. In order to arrange the beds in the form of boxes, you will need to use the following materials:
- slate or boards, plastic or polycarbonate of such a height that there is at least 30 cm in the ground, and at least 20 cm on the surface of the entire size of the product;
- pegs made of wood or metal, which will be needed to secure the fencing material;
- non-woven material that can be used to cover the bottom of the prepared trench.


After the workpiece - the dug hole - is covered with non-woven material, it will be necessary to fill it with the following layers on top:
- sawdust or straw - approximately 10cm;
- dry foliage (which you prepared in advance in the fall) - about 10 cm;
- a mixture of compost and soil, ratio 1 to 2 (layer size 10 cm or more);
- a clean layer of soil of at least 10 cm.

- marking on the ground - usually done using pegs and a stretched cord. When calculating the size of the bed, it is important to understand that the narrower the trench, the faster it will dry out;
- Next comes the preparation of the material for the fence - cutting it, preparing pegs. If the box is not very large, then it will be more convenient to assemble it in advance using self-tapping screws. Such structures are reusable, they can be removed for the winter if the beds are moved;
- then a fence is installed on the garden bed;
- then non-woven material is placed at the bottom of the pit;
- A layer of sawdust, dry leaves, soil mixed with compost and just soil is poured in successively.


And in conclusion. Your plot can not only produce a good harvest, but also look aesthetically pleasing. Landscape design can manifest itself not only in the courtyard of a private house, but also in the garden and vegetable garden. But the main principle for arranging beds on the territory should still be the plants’ needs for sunlight. In a properly located bed, plant care will require minimal care.


A dacha is not only a place to relax from the bustle of the city, but also a good opportunity to grow some of your own organic vegetables and berries. Some grow a little exclusively for the table, others grow a little more for winter storage. However, often striving for a high yield, we forget that the beds are not a second job, but a place of rest. Therefore, in order for growing vegetables and berries to truly bring pleasure, the garden beds at the dacha must not only be productive, but also comfortable and beautiful. Moreover, you can make such beds with your own hands from almost any materials.
When describing how to make garden beds at the dacha with your own hands, garden beds are often divided into types according to the material from which they are made. However, this approach does not reflect the functional and aesthetic capabilities of the beds. Therefore, it is more correct to start laying out the beds by determining their shape and location on the site. In this way, you can create a convenient and beautiful vegetable garden that can fit into a plot of any size.
Shape and location of beds on the site
For a small plot, it is good to organize beds in the corner of the plot. The beds will look great if you divide them according to a beam or radial pattern.

Fig.1.

Fig.2.
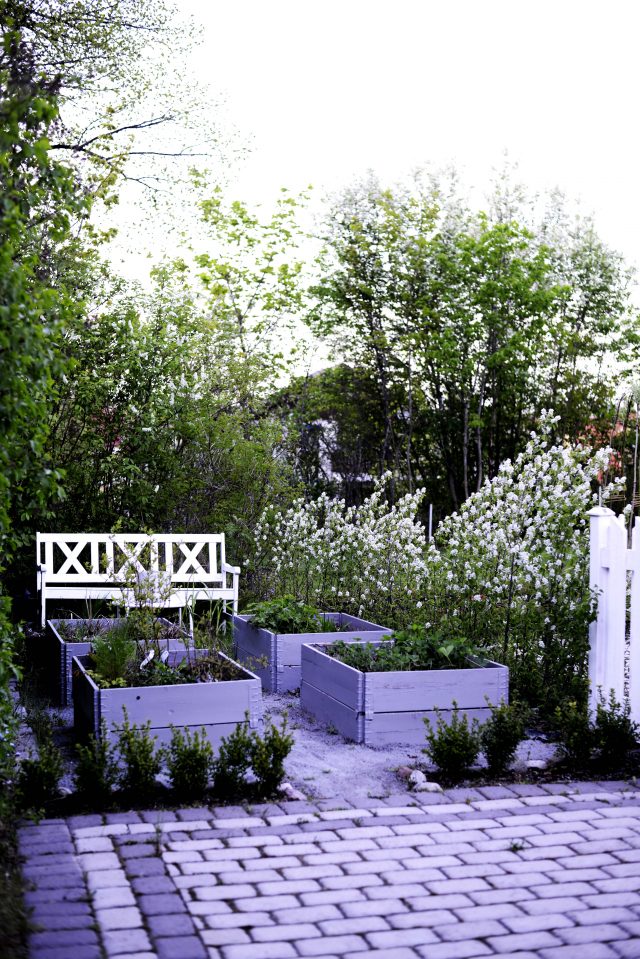
If the plot is large, then the beds can be laid out along the central path. Here you can make a circular or rectangular garden shape. By planting plants of various colors, for example, salads of various varieties, cabbage, pumpkin, the garden beds will look no worse than a flower bed.

Fig.3.
However, when making a composition from different types of vegetables, you should take into account the principle of their compatibility and be guided by the table below. Otherwise, it is unlikely that you will be able to get a high yield from the beds.

Fig.4.
Bed sizes
Returning to the beds, it should be said that the most important parameters of the beds are their height and width. The geometric dimensions of the beds have a direct impact on productivity, ease of plant care, protection of plants from freezing, ease of arrangement of beds and their appearance.
Width of beds
The width of the bed can be arbitrary, but is usually 80-90 cm. This width is enough for two or three rows of plants. A bed up to 90 cm wide will allow you to easily reach the center from any side. However, if the beds are located close to the fence, then it is advisable to make them no more than 50 cm wide. This will make caring for the plants much easier.
Height of beds
The height of the bed is also very important. Unlike the width of the bed, the height is a little more complicated. The fact is that in high beds the probability of perennial plants freezing is much higher than in low ones. This is due to the fact that the layer of snow that protects against freezing is always greater in a bed located at ground level, and snow falls earlier. In high beds the opposite is true. Therefore, it is advisable to make high beds for annual plants, and for perennial plants it is limited to a bed no more than 15 cm high.

Fig.5.
Raised beds are very convenient for growing annual plants. The main convenience is that you don’t have to bend down to the ground every time you need to pull out a weed or remove a stepchild. In a high bed, water will not stagnate and the soil will not become very compacted, and therefore there is no need for annual digging, but only loosening is sufficient. Having a high bed makes it much easier to organize a warm bed, which will allow you to harvest an early harvest. However, the height of the beds should not be more than 60 cm; an exception can be made only for growing low-growing plants, for example, lettuce, onions, parsley, etc.

Fig.6.
Warm beds
Having mentioned warm beds, a few words should be said about their structure. A warm bed consists of several layers. The bottom layer is thick branches, cardboard and other organic debris with a low decomposition rate. The middle layer is foliage, tops, hay, straw, etc. garden waste with an average rate of decomposition. The top layer is compost and soil. The thickness of each layer is approximately 20 cm. The lower two layers gradually rot and release heat. Therefore, the bed thaws much faster after winter and seedlings can be planted in it earlier. This is how an early harvest is achieved.

Fig.7.
Of course, a warm bed can be made without being high. However, in this case, instead of simply laying the above-described layers in a box (fencing the bed), you will first have to dig a small ditch, which will significantly complicate the work of constructing a warm bed. Plus, a high bed will provide good drainage, which is especially important when the groundwater level is high.
How and from what to make paths between the beds
When laying out beds and planning a vegetable garden, do not forget about the paths between the beds. Paths are not only a transport artery, but also a decoration for the garden. Good paths will create a feeling of neatness and harmony.
Paths between beds can be made in various ways. Often paths are made of paving slabs, crushed stone, or simply planted with lawn grass. Functionally, all types of paths are not much different, so here, first of all, you should be guided by your aesthetic preferences.

Fig.8.

Fig.9.
Having considered possible options for location on the site, shapes, types of beds and their sizes, we can move on to the question of choosing material for garden beds in the country. The most common materials when constructing beds are: wooden boards, brick or stone, slate and ready-made structures made of plastic and galvanized steel.
Materials for making beds
Board beds
Wooden boards for making beds are a favorite material. Making beds from boards is very simple and does not require any preparation or special tools. All you need is a nail saw and a hammer. Of course, the disadvantage of wood is its high tendency to rot, but this problem can be solved quite simply if the wood for making beds is pre-treated with an antiseptic. Thus, the bed can last 5, 10, or 15 years. If you choose oak or larch boards for the beds, then such a bed can last longer.
Beds from wooden boards can be made not only in rectangular shapes, but also in any other shape. If the bed has the shape of a rectangle, triangle or any other shape with corners, then you can make a bed by simply knocking the boards together with nails, with the boards positioned horizontally.

Fig. 10.
The required height of the bed is ensured by installing several tiers of boards.

Fig. 11.
If you need to make a rounded bed, then you can go in two ways: assemble a bed from short pieces of boards, placing them in a circle or installing the boards vertically. In both cases, the boards are connected in the same way using nails or self-tapping screws. Combinations of these methods are also possible.

Fig. 12.
If you have doubts about the reliability of protecting wooden beds from rotting using modern water-based antiseptics, then you can use traditional methods: treat the wood with hot drying oil or lay roofing felt on the inside of the beds.
Brick and stone beds
Brick and natural stone are no less popular than wooden planks. Moreover, the service life of such beds is not limited. If the bed is of low height, then the brick as a fence for the bed is installed vertically or at an angle, and no additional preparation is required. In this way you can make a bed of any shape.

Fig. 13.
Raised beds made of brick are somewhat more difficult to make. In order to make a high bed of brick or stone, a foundation is needed. As a foundation, a concrete strip with a cross-section of approximately 20x20 cm is poured on a sand cushion 20 - 30 cm thick. It is advisable to reinforce the strip with a steel rod. The result is a strip foundation of shallow depth. Brick or stone is laid on the finished foundation.

Fig. 14.
When making high beds from brick, you should firmly decide on their shape and location on the site. High beds made of brick are a fundamental structure and it will be very difficult to move them after construction.
Slate beds
For most summer residents, the favorite material for building beds is slate. Indeed, slate is often available in abundance at the dacha, especially after the roof has been replaced. Naturally, it is simply impossible not to use this material, especially considering the fact that slate is durable, not afraid of moisture, and it is very easy to make such a simple structure as beds from it.
Slate beds can be made of any shape and size. If corrugated roofing slate is used, it is cut into pieces and dug into the ground vertically to a depth of 20 - 30 cm. When positioned vertically, the slate is more durable due to the presence of waves. For rectangular beds, slate can be used in any size. Round slate beds are made from small pieces.

Fig. 15.
You can purchase flat slate sheets especially for garden beds. When making beds, slates of this type are fastened together using metal corners. For structural rigidity with high beds, an additional corner is installed along the bed in increments of 1 - 1.5 m.

Fig. 16.
How to cut slate? When creating beds, slate will have to be used in different sizes. Cutting slate is very simple using a grinder with a stone wheel or a diamond wheel. There will be a lot of dust when cutting slate, so be sure to wear a protective mask and safety glasses.
Ready-made bed structures
Ready-made structures for fencing beds are no less popular. Two types are widespread: plastic and galvanized sheets. Plastic fencing for garden beds allows you to make it of any shape and size. Metal ones allow you to quickly make beds of any height.

Fig. 17.
Of course, it is difficult to make a round-shaped bed from ready-made metal structures, but simplicity and reliability are often paramount.

Fig. 18.

Fig. 19.
We considered all possible options for shapes and arrangement of bed materials. The solutions described are the simplest and will make your beds comfortable and beautiful. However, just as there is no limit to perfection, there is also no finite number of possible options for designing beds. Don't be afraid to experiment and use non-standard approaches, so your garden will be the best!
Spring for all summer residents and gardeners begins the same way: dig up all the soil, divide it into beds, make a neat earthen roll for each. Then wait until the soil warms up, plant the plants and begin fighting weeds that occupy the entire area, including paths. But improvements can be made that will help produce a larger harvest at lower costs (labor, first of all).
Beds help us a lot when cultivating vegetable crops in greenhouses and vegetable gardens. The fencing of the bed (sides) does not allow the plant soil to crumble and maintains the required shape of the bed.
And if they are arranged correctly, the yield will also increase.
Dimensions of garden beds
Width of beds
First, about the width of the beds. If there is an approach to the bed from two sides, then its width can be from 70 to 100 cm. Making a bed less than 70 cm is not economically profitable, because the narrower the bed, the higher the cost of arranging 1 square meter. m beds. It is not advisable to create beds wider than 100 cm, because it is inconvenient to cultivate the middle of the bed (it stretches far). Beds that can only be approached from one side should have a width of 50-60 cm. Correctly selected bed width will contribute to better tillage, weeding, and, accordingly, increased yield.
Width of passages between beds
 The passages between the beds should allow you to move freely along them with tools and mow them with trimmers. The minimum is about 45 cm. The width of the passages depends on the height of the beds. The minimum width is permissible for beds up to 20 cm in height. With higher sides of the beds, passages should be 50 cm or more. After all, we constantly walk between the beds with buckets and watering cans, and in the narrow passage between the high beds we will have to lift the buckets over the sides and carry them on outstretched arms. Correctly selected width of passages between the beds will contribute to better processing, which, in turn, will lead to increased yields.
Height of beds
The most common height of beds is about 15-20 cm. It would be great, of course, to have beds 70-80 cm high and process them while standing, but this will require a lot of labor. But a very realistic height of 30-40 cm will allow you to care for plants while sitting on a stool or, for example, on a folding chair, which can be very important for older gardeners. Such high beds are usually arranged with a heating bottom layer. In addition to the opportunity to prepare a kind of nutritious “pie” in such a bed, which is extremely beneficial for plants, high beds are easier to process, which will also lead to increased productivity.
Length of beds
The length of the beds can be very different. It is determined by the configuration of the site, its topography and other reasons. Most often, the length of the beds is from 4 to 8 meters. It is better if the bed is oriented from south to north, then the sunlight will illuminate the plants more evenly.
Longitudinal slope of beds
It will be ideal if there is no slope of the bed in the transverse and longitudinal directions. In any case, this is what we should strive for. The permissible slope is 2-3 cm per 1 meter. With a greater slope, water will flow down the slope when watering, and the plants at the bottom of the bed will receive more moisture. But this is not always possible due to the topography of the site. Then we place the beds across the slope of the terrain and plan the area with terraces.
Fencing material for garden beds
The materials for the sides must be durable, since the sides are subject to heavy loads. Materials must be resistant to water, sun, frost, bacteria, mold and insects. They should last a long time and not be very expensive. A variety of materials are used, but we will look at the most common ones - wooden boards and flat slate.
Tree
Naturally, the most common material for making the sides of beds is wood. A board with a cross section of 40x200 mm or 50x200 mm is perfect for this purpose. The main, but very significant drawback of such beds is their fragility. If the boards are used without applying a protective layer, they will last no more than three years. And if you use strips of boards in an area with high humidity levels, then the rotting process occurs even faster. Changing the sides of beds so often is an unaffordable luxury. You can, of course, treat the boards with an antiseptic, which will slightly increase their service life, but this “chemical filling” will inevitably get into the soil and, accordingly, into your plants. So you should think ten times – are you ready to eat this very “protection”. In addition, ants tend to infest and live in wooden boards used to fence garden beds, a real curse for any gardener...
Flat slate
 An alternative to wooden beds is slate. To make the sides of the beds, it is best to use flat slate 8 mm thick. The main advantage of this material is durability. It is not afraid of exposure to water, cold, insects, microorganisms and will last you your entire life. Another indisputable advantage is accessibility. It should also be noted that the cost of flat slate is low, so purchasing special strips for beds will not hit your budget.
Stripes for beds
 In order to get smooth paths and neat beds, gardeners today use special strips made of flat slate. In addition, they have an attractive appearance. Thus, an area with beds made from such strips will become much more well-groomed and functional. Depending on the length of the beds, you can choose the optimal strip size.
The strips are available in lengths of 2.4 m and a width of 39 cm, and also in lengths of 1.57 m and a width of 30 cm. They, as well as metal profiles for fastening, can be cut to length at retail outlets to fit the size of the beds.
P When using strips 30 cm wide, supporting struts are installed, respectively, every 1.57 m. This distance is quite enough to create a strong structure, especially since the lower part of the side is buried in the ground, which gives it additional rigidity. In general, bA large mass of earth is bursting and trying to squeeze out the sides of the beds from any material - be it wood, slate or even metal.If, when digging the earth, you stand on the bed, the pressure will increase even more. Therefore, when using strips of flat slate with a width of 39 cm, you need to install an additional support post in the middle of the strip, that is, through1.2 m. Naturally, the creation of such high beds must be justified; there is no particular point in a large volume of ordinary soil. Such a bed should be “complex” - with drainage, etc. But we’ll talk about the features of constructing raised beds a little later...
To increase the rigidity of the slate sides, they are buried several centimeters into the ground, which also protects the beds from weed roots. Usually 3-5 cm of depth is enough, but it is clear that this depth will most often vary along the length of the side; a perfectly flat surface is rarely found.
For connecting the sides along the length, a galvanized profile is best suited - angular, respectively, for corners, and T-shaped for connecting strips along the length.
The sequence of building a new flat slate bed.

In general, there are two options for constructing beds from slate strips. The first is to install the profile from the outside, while the strips do not need to be attached to the profile; they will be pressed against the ground. The second option is to install the profile inside, and, of course, the strips must be bolted to the profile. To do this, you have to drill both the profile and the strips. The first method, of course, is less labor-intensive, since you don’t have to bother with a drill, bolts, and so on. But at the same time, the supporting profile will interfere with free passage along the rows, although this is not a big problem - it’s just that in this case the distance between the beds needs to be made wider.
In the second option, you will have to work hard, but the passage will remain free. Although this method also has a drawback - the profiles located inside the bed will interfere with the process of digging up the earth. But, since you still have to dig up the beds much less often than walk between them, and even mow the grass in the aisle, the second option may be preferable.
In general, if installed correctly, the profile may end up in the passage if you use strips 39 cm wide and 2.4 m long. In this case, you need to make the passage at least 60 cm. You can also cut the strips in half into 1.2 m sections. Then there is no need for intermediate support posts.
Although the choice, of course, is yours.
Filling the bed
- To protect against rodents, a metal mesh is placed on the bottom.
- Wood waste is laid as the bottom drainage layer: chopped branches, bark, and so on.
- The next layer is paper waste, which makes it difficult for weeds to germinate.
- A peat mixture with soil or unripe compost is placed in the middle.
- The top layer is soil removed before constructing the trench with the addition of organic fertilizers. If it is not enough, you will have to supplement it with what you brought.
Each layer, except the last, is sequentially shed with water and compacted.
Row spacing
The soil between the rows is compacted tightly.
The free space can be concreted, covered with gravel, sawdust or covered with a terrace board. Or whatever your heart desires. For example, sow lawn grass. In this case, the row spacing should be wide enough for the trimmer to work comfortably.
 Advantages of flat slate beds
The benefits of beds made from strips of flat slate are obvious.
Firstly, you have a reliable and durable fence for your garden bed, which, due to its physical characteristics, is completely unaffected by natural interference. Such strips for beds are an indispensable material for forming beds and garden paths. Slate does not rot, does not deform and does not allow moisture to pass through at all, it is durable, waterproof, does not burn, and protects against rodents. Installation of beds and paths from strips is very simple and allows you to easily and quickly change and, if necessary, move the structure from place to place.

Second advantage The point is that by raising the ground level in such a bed higher than usual, you give yourself the opportunity to take care of the bed - loosen, mulch, plant seedlings without bending your back, and even while sitting on a chair.
But, besides this, such high beds have other advantages over regular ones:
- the ability to completely control the composition of the soil, adding substances necessary for plant growth;
- good drainage will not allow water to stagnate, regardless of whether the planting site is located in a lowland or on a hill;
- raised beds with a good layer of compost have a soil temperature higher than the surrounding soil; this allows plants in cold areas to feel more comfortable and produce a bountiful harvest faster; seedlings can be planted in heated soil earlier;
- the high level of the bed prevents walking on it, the ground remains very loose for optimal air exchange;
- Climbing plants do not need to be tied up; when planted along the edge of the bed, they hang down freely.
 Third, and, perhaps, the most important thing, the advantage of such beds is that the slate does not allow water to pass through. Therefore, you don't have to worry about your garden bed in hot and dry weather. At the same time, it was noticed that at the edge of the beds, that is, near the edges of flat slate, plants grow better than in the center of the bed. This is explained by the fact that dSlate, like any other concrete product, accumulates heat and releases it to your plants at night. So you are guaranteed an increased harvest.
In addition, using 8mm thick flat slate compared to 4cm thick boards gives you a gain of over 6cm in both width and length. It doesn't seem like much. But this is in every garden bed! So adding useful area to beds can be very significant and important, especially for owners of small plots.
And finally, such a bed made of flat slate can simply become a decoration for your site. It can easily be, for example, painted in different colors or even painted. But keep in mind that you must first clean the slate surface from dust with a stiff brush or brush on a drill. And on the edges of the sides - put a cut rubber hose, it is possible in different colors.
Several regular or raised slate beds turn the site into a compact enterprise for the production of vegetables or berries.
A gardener and gardener with many years of experience, Sergei Nikolaevich:
 - Previously, I was forced to spend a lot of time and effort digging up the entire garden, it was real hard labor. The brought land was no longer enough for the next year, but there was still a harvest - nothing but tears. And now - grace, a resort. Sitting on a chair, I cultivate these wonderful beds for my pleasure. The soil is light, and the harvests are such that I’m already thinking of reducing the number of beds, and in return, creating a lawn for my grandchildren and flower beds for beauty...
The copyright holder of all materials on the site is Construction Rules LLC. Full or partial reprinting of materials in any sources is prohibited.
Do you want your garden beds to not need to be loosened, weeded or watered? Learn how to make vertical beds and a strawberry pyramid.
Vegetable garden planning and selection of fencing materials
The beds can be not only beautiful and neat, but also self-watering. These are easy to work with and weeds don’t grow on them. It seems that this is a gardener’s pipe dream, but the so-called beds for the lazy can be done by anyone.

Before you plant them, measure the area that you are willing to dedicate to a vegetable garden. Zoom out and draw this rectangle on paper. Now imagine yourself as draftsmen. Using a ruler and pencil, draw beds 1 meter wide on the canvas; their length should be a multiple of two. The distance between the beds is 40 cm. This is quite enough for convenient passage.
Now you can go to the garden to transfer the markings from the paper to the terrain. Secure the ridges with stakes and rope. Of course, they must be even and have 4 90 degree angles.
You will not only get beautiful beds, but also perfectly level ones if you drive four pegs in the corners and then pull 2 ropes diagonally. They should be the same.
The edging for landings can be made of different materials. Some people use brick for this. You can use empty plastic bottles. To do this, cut off the necks at the widest point of the shoulders, pour earth or sand inside the container, turn it over, place it in a previously dug hole so that the bottle is half or a third in the soil. Prepare the second and the rest in the same way and install them next to each other using the same method. If desired, the bottles can be painted; in this case, the correct beds will look very cheerful even when greenery has not yet grown on them.

If you have slate, you can protect them with this material. To do this, a ditch is dug around the perimeter. Its width should be slightly larger than the width of the slate sheet. Place it in a hole, cover it a third or half with soil, and compact the sheet in this place on both sides.
You can make beds not only from slate, but also from wood. Thick boards or timber are suitable for them. This material is pre-coated with an antiseptic in 2 layers, when it dries, a fence is made. If you have thin boards, then install retaining pegs on the inside and outside of the bed to secure the fence. If the boards are thick enough or you have timber, fasten them at the corners with self-tapping screws to form a rectangle.
You can buy ready-made metal beds; sheets about 7 mm thick are coated with paint. Such fences are supplied already with fasteners.
Now you know that you can make a fence from:
- plastic bottles;
- slate;
- wood;
- gland.
Warm and self-watering beds
Plants do not like cold soils, and many, for example: cucumbers, watermelons, melons, zucchini, pumpkins, prefer warm beds rich in organic matter. For them, these will be simply ideal.
To create warm beds, you can use any of the presented methods. If you have a garden in a lowland, then use the “for the lazy” option. In this case, there is no need to first dig a trench, but simply mark the bed and place all organic debris on it during the summer: mown grass, leaves, thick plant stems, tops, kitchen scraps. Don’t forget to periodically water the warm bed; it should be covered with dark cellophane film so that the process of overheating goes better.
During the season, the organic matter will half decompose, settle, and many weeds will burn out. In the spring, all you have to do is pour a 7 cm layer of fertile soil on it and plant pumpkins. They will grow well in such places.
Next year you will plant other plants here that will be comfortable in such a ridge. If you want it to provide heat for several years, then arrange it a little differently, but it will take some work.
Dig a pit 60 cm deep, lay stumps and old boards at the bottom, which must first be sawn. Chop tree branches and stems of plants such as Jerusalem artichoke with an ax. Place shredded cotton rags on top. Grass and leaves are placed on such a base and watered. A warm bed will warm the plants for a long time due to the effect of rotting.
Under no circumstances should you place plant remains, branches, or other disease-affected organic matter on a warm bed. After all, the spores of some harmful microorganisms are very tenacious and will cause damage to plantings.
To spend less effort on moistening the soil during the summer season, provide a drip irrigation system.
The photo shows how to assemble the purchased one and what it consists of.

This is what a drip irrigation system looks like in a garden.

Instead of pipes, you can use a hose, even an old one. Holes are made in it so that water flows from each under one large plant. If you are making a watering system for carrots, beets, onions, and herbs, then the holes will be 5–10 cm apart.
Recesses in rubber can be made using a regular nail of a suitable diameter. Place the tip of it in the hose, hit it with a hammer, and the hole is ready. A branch of the water supply is connected to such a device using pipes, solid rubber hoses and adapters.
To reduce the amount of water evaporation, there is no need to weed or loosen the soil, cover the top of the drip irrigation system and the soil with a thick dark film or black non-woven material or roofing felt, roofing felt.

Holes of the required diameter are cut in these materials using a knife or scissors, and plants are planted in them.

How to make a path in the garden?
Look how good it looks between two beds. It’s comfortable to walk on, and after the rain your feet won’t get dirty in the ground. Therefore, it is not only beauty, but also convenience.

Such paths in the country are made of edged stone, the thickness of which is 4 mm. Here is the entire list of necessary materials:
- small crushed stone;
- coarse sand;
- carved stone;
- cement-sand mixture;
- reinforcing mesh;
- building level;
- rubber or wooden mallet.

To make the path smooth, first make markings. To do this, stretch a rope around the perimeter, tied to driven pegs. When laying stones, tap well with a mallet to remove any voids underneath.
Fill the gaps between the path elements with cement laitance. At this stage, you cannot wash off the solution that appears, and after a day you will remove it with a spatula.

For tall plants, consider how you will tie them up. You can use ready-made metal trellises, between which a rope is stretched, or you can make them yourself from wood. Then you will have such an amazing vegetable garden, which will have beautiful beds with picturesque paths.

There are other ideas on this topic that you might like, check them out.
Pyramid for strawberries in the garden

If you want to collect sweet berries in large quantities, then create a strawberry bed like this. This building has a lot of advantages.
- The berries will be less affected by gray rot, since they practically do not touch the ground and are well ventilated.
- The strawberries will be sweet, since the bed is well warmed up and each berry is illuminated by the sun.
- This design saves space as it occupies vertical rather than horizontal space.
- It is easier to care for bushes and you do not need to bend over to cultivate those that grow at the middle and upper level.
- The strawberry bed looks well-groomed, beautiful and neat.
Choose a suitable place, it should be sunny, as strawberries love to grow in such areas. It is necessary to position the pyramid so that one of its edges faces north.

Clear the prepared area of weeds by digging it up and removing the roots of wild plants. Place a chain-link mesh here, the size of which is 2 m 40 cm x 2 m 40 cm. Place a box of boards measuring 220x220x25 cm on it. Of course, they must first be treated with an antiseptic. To prevent strawberry stems from being cut on the sharp edge of the boards, trim the wood with a plane.
Pour fertile sifted soil into the resulting box to a height of 15 cm. In its center, place an asbestos-cement or plastic pipe with a cross-section of 10 cm. You must first drill two holes in it - the upper ones with a diameter of 1 cm, and the lower one with a diameter of 0.5 cm. They are necessary for irrigation. Plug the lower end of the pipe.

Sprinkle a mixture of compost and manure on top of the first tier and tamp down well. Then install a second box, the dimensions of which are 170x170x25 cm. You also need to pour soil into this second tier.
When pouring soil, water it thoroughly to allow the soil to settle. Don't forget to add a mixture of humus and compost to feed the plants. You can also add a little mineral fertilizer for strawberries and work it into the soil.
In the same way, 3 more floors are created. Here are their sizes:
- third - 120x120x25 cm;
- fourth - 70x70x25 cm;
- fifth - 20x20x25 cm.
Start planting strawberries from the top layer. 4 bushes will fit here (one on each side), on the next one place 12 plants. Going even lower one step, plant 5 bushes on each side on this middle floor. On the second tier from the bottom you can fit 24–28 bushes in total, and on the lowest tier - 32–36 pieces.
You can vary the dimensions of the pyramid at your discretion, as well as its number of floors. In addition to this one, you can build other high beds for strawberries, for example, like these.
Vertical bed for strawberries
See what materials are needed to make raised beds.

For them you can use:
- pipes;
- polyethylene bags;
- old barrels;
- pots with nests;
- slate sheets;
- wooden and plastic boxes;
- tires;
- wheel disks.
- wide plastic sewer pipe;
- central tube for irrigation and liquid fertilizers with a cross-section of 4–6 cm;
- sackcloth;
- plastic or metal funnel;
- drill.

We start with the design of the plastic pipe. Step back 10 cm from the bottom and make holes in it using a drill. Depending on the variety of garden strawberries, they should be 15–20 cm apart from each other. Before reaching the top 15 cm, finish making the holes.
Drill many holes with a diameter of 4–5 mm in the central irrigation pipe, wrap it in burlap so that they are not clogged with soil, and install it in a large pipe. Seal the lower part of this watering system with a plug or stopper, and insert a funnel into the upper part.
A bed of tires is made even faster. To do this, you need to place these rubber wheel parts one on top of the other, cut holes, fill the containers with soil and plant the strawberries.

You will learn more about how to make beautiful beds from pipes by watching the video materials.
You will find many ideas on how to design a vegetable garden in the latest video.