Fasteners in a frame house- a fairly simple topic, but it is important to think through everything in advance, so as not to run to the stores and buy one kilogram of nails, but to immediately purchase 150 kilograms (usually that much is spent on an average home) of the necessary fasteners on a base at a big discount.
I did so, but it still wasn’t enough; I’ve already gone back several times to buy new boxes of nails.
But of course, there are a lot of extra nails and screws left a large number of. Therefore, I want to make the task as easy as possible for my readers.
I would like to note right away that in a frame house forbidden use screws or self-tapping screws, since the load everywhere is shear, not tensile, and neither self-tapping screws nor self-tapping screws work for shear, so there is nothing to discuss here. Some builders are still confident that self-tapping screws can be used and will try to persuade you to do so. Don't give in.
But great for cutting nails work, they are incredibly difficult to cut. We are, of course, talking about the load-bearing part of the house, and not about the decoration.
And I also want to say about corners. Angles are not used by professionals in frame construction (not counting the temporary attachment of trusses to the frame). Use them Can, but it’s not profitable in terms of time and money, decide for yourself. Again, be wary of builders who recommend their use.
Foundation fasteners
The following fasteners are used for a pile foundation:
if you have screw foundation, then you need steel anchor bolts.
if you have a bored foundation, then you need studs m10 and washers with M10 nuts (if you do it like I do, filling the studs in the filler) or anchor bolts for concrete.
if you have a slab foundation or a strip foundation, then you will need again anchor bolts for concrete.
Fasteners for frame house frame

All boards in the frame box are hammered with ordinary smooth construction boards nails diameters 3.1-3.5 mm and length 80-90mm(usually 90 mm if the board is 50 mm thick and 80 mm if the boards are 40 mm thick).
An exception may be lathing on walls or floors, where it is better to use screw or razor nails.
Fasteners for cladding frame houses
Fasteners for floor covering.
60mm nails— it’s better to use rough or screw ones + glue (or self-tapping screws of the same length).
Such nails help to hold the floor tightly so that it does not creak and is not “alive.”

Fasteners for exterior wall cladding.
50 mm nails- better ribbed or screw ones.
This applies to both OSB-3 boards and plywood, as well as inch boards (which I will use for cladding frame house I).

Fasteners for interior wall cladding.
If the inside lining is plasterboard, then you will need special self-tapping screws for plasterboard length 25 mm(less often 35mm) length. Just remember to tighten the screws correctly:

If you have lining inside, then it can be secured with 50-70 mm nails.
Metal tile fasteners

For installation of metal tiles, special roofing tiles are used. self-tapping screws dimensions sizes 4.8x20 and 4.8x38 millimeters (metal-metal, metal-wood).
Window fasteners
There are several methods for fixing windows in a frame house.
- On the anchor
- On plates
Accordingly, in each case you will need appropriate fasteners. I’ll tell you more about installing windows in due time, when I fix them myself.
Siding fasteners

Galvanized self-tapping screws with a wide cap (at least 8mm) long not less than 15 mm or galvanized nails with a wide cap (less often) no less long 40 mm.
Fasteners for wooden facades
Galvanized nails 50-70 mm(preferably galvanized, since zinc coating is done using electrolysis, and not the usual “hot” method).

Deck fasteners
For terraces, it is better to use self-tapping screws made of stainless or galvanized steel. There is a special fastener for terraces, but for the price it comes out as half a terrace.
It is also recommended to fasten the deck boards with hidden “snake” fasteners. 
In this video you can look at almost every fastener in visual detail:
So, fasteners are very important element frame house, which you should pay close attention to if you don’t want it to fall apart or simply burst at the seams over time. Do not give in to the persuasion of builders who want to build you a house using screws, self-tapping screws and other inappropriate things.
Read reviews from real residents of frame houses on the forum or in my article and gain experience so that no one deceives you.
The house design is drawn up taking into account all possible physical and mechanical impacts on the house and on Construction Materials, including calculation of loads on a particular element. An important role in calculating the durability of a structure is played by the choice of fastening material - this is especially important when building a frame house.
1. House design and calculation of structural resistance
Building a house according to a project is not just an approximate assembly sequence and following the drawings. This is taking into account all the features included in it, including, of course, fastening methods and hardware materials.
A special feature of a frame house is the hinged connection of its elements. This means that it allows rotation of the connected structures. If we look at the frame of a house, we will see that lateral loads can cause the vertical post to tilt in any direction.
This is being prevented additional elements, tightening the frame - upper and lower trim and installation of jibs.

In general, the load on the frame is leveled and evenly transferred to the foundation. But all this is legal if all parts, all nodes and frame elements are firmly connected. From here - vital role fastenings and hardware materials.
We can safely say that if in monolithic houses the basis of structural strength is not so much the material as the binder ( concrete mortar), then in framing nails By analogy - fastening materials.
2. Nails and screws - the main fastening hardware
Metal fastening materials appeared in construction relatively recently. The main and only method of fastening wooden structures fastening units were cut out in them - spikes, with the help of which one part was attached to another. An example of such connections is cutting out a “bowl” in logs when constructing log houses - houses made of thick logs.
But let's not delve into the depths of time.
Today there are a lot of fastening hardware, the main of which are:
- Wedge-shaped nails driven into the thickness of the material
- Self-tapping screws with screw threads, screwed into the material
- Staples driven partially into the material
- Bolts connecting elements without embedding into the material
In this article we will address the issue of choosing between nails and screws in the construction of a frame house.
Nails are driven into the junction of two parts, simultaneously connecting firmly to one and the other part. Essentially, a nail is a wedge driven into the thickness of the material.
It pushes (wedges) the material apart and stays inside due to elastic forces: the structure of the material presses on the nail from all sides and this pressure allows it to hold firmly in the thickness of the substance.

A slightly different principle applies when using self-tapping screws (or screws). A self-tapping screw is essentially a wedge with a thread. It is not driven into the material, but screwed in. This makes it easier for the wedge to enter the material. The self-tapping screw is held in the material not only due to the pressure of its thickness on the sides, but also due to the walls of cavities and grooves formed by screw spirals in the wood.
From the point of view of vertical loads, fastening with a self-tapping screw is much stronger than a nail fastening. To remove a self-tapping screw, you need to overcome not just the elastic forces of the material, but also destroy the retaining grooves, that is, destroy the material.
The use of nails and self-tapping screws, for example, in concrete gives an almost eternal connection. True, for this you need to use special nails - very strong dowels, screw them into self-tapping screws (or simply mount them) until the concrete hardens.
3. Taking into account the properties of wood
This is a theory, but in practice there are some peculiarities, especially when working with wood. Wood is a relatively soft material, but also quite elastic.
Its defining feature is that wood is greatly affected by humidity. The structure of wood easily absorbs and releases moisture. At the same time, the cellulose fibers, which mainly make up wood, change their size. The tree expands as it gets wet and contracts as it dries out.
It is clear that in interaction with environment- from atmospheric precipitation to water vapor from the room - the tree constantly “breathes”, i.e. changes its size.
What happens to the fastening material in these cases?
When wood swells or contracts, the nail remains in a compressed state. Even very dry boards fastened with nails do not fall apart.
At the same time, these compression-tension cycles destroy the integrity of the “grooves” of the screws, and the connection disintegrates - the self-tapping screw in dry wood can simply be removed from its socket.
What happens in the fastening joints during swelling and contraction of wood? Relative to each other, each element expands and contracts without affecting the position of the nail.
The self-tapping screw weakens the connection, since it itself “sits” in the wood precariously.
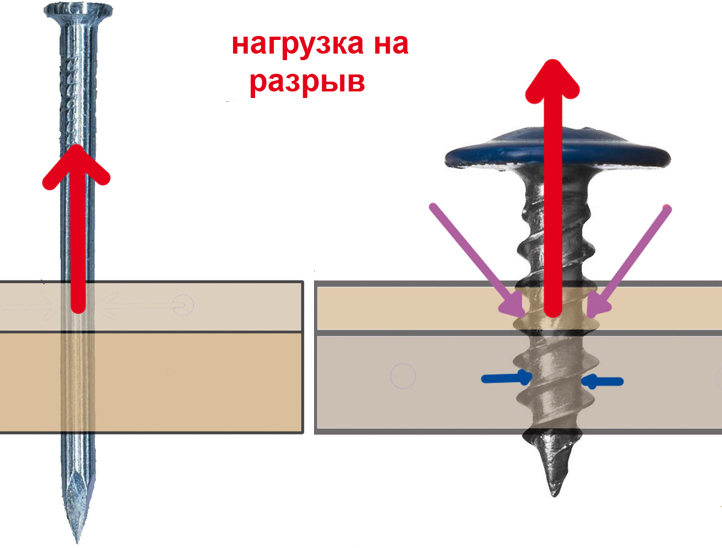 Tensile loads
4. The influence of the hinge structure on fastening materials
The second feature of frame houses is the articulation of its structure. The joints of the elements are subject to very strong not only vertical, but also lateral loads.
The nail takes out the side easily - steel is much stronger than wood.
Self-tapping screws are also stronger, but they are made of special steel - hard, but brittle. Any other material is not suitable for creating carvings. They withstand pull-off loads perfectly (unlike nails), but such loads on the frame are relatively few. Such loads are significant on external finishing elements attached to the frame and the like.
But the self-tapping screws may not be able to withstand shear (or shear) loads, and these are precisely the lateral loads that mainly act on the hinge joint. Brittle metal simply breaks.
 Shear loads
5. Use of nails and screws in structures
Thus, we see that the use of nails is better in places where shear loads act primarily, namely where they are attached:
- Frame and ceiling beams
- Racks
- Rafter legs
In this case, nails are selected according to the thickness of the boards. To strengthen the connection, it is recommended to drive the nails at a certain angle. In addition, “reinforced” nails are often used - screw and ruff nails, on the surface of which there are additional threads and grooves that increase the “breaking” resistance.

Self-tapping screws are best used in places where pull-out loads apply:
- OSB fastening
- Minerals
- Siding
- Lathing
You also need to screw in the screws correctly, with the obligatory countersinking of the recess under the head:

For obvious reasons, corrosion resistance is very important for self-tapping screws. In critical components, it is preferable to use galvanized self-tapping screws.
6. Conclusion
Thus, we can conclude: the use of nails or screws should be chosen according to the design of the house. At joints experiencing shear loads, it is better to use nails, and for tensile loads, it is preferable to use self-tapping screws.
Over the last decade, screws and self-tapping screws have become so popular that we almost don’t remember about nails. At the same time, in the West, for the most part, only nails are used in frame construction. So which is better, nails or screws?
We conducted a small test to show one of the main disadvantages of screws, which many people forget about.
To prevent self-tapping screws or metal alloy screws from bending when screwed, they are hardened during the manufacturing process. After it, the metal becomes hard but brittle. This is the main disadvantage of screws and self-tapping screws. But to be precise, only galvanized self-tapping screws (white, yellow) are subject to hardening. Black self-tapping screws are usually made from oxidized steel C1022, although this is also relatively brittle.
The nails are not hardened, so they can withstand heavy loads better. If the load increases excessively, the nail will bend but not break, unlike screws or self-tapping screws. That is why they are still used in construction when assembling frames in areas with high loads. Screws are often assigned the role of fastening finishing materials.
Another advantage of nails is that with special nailing guns, the process of assembling structures is accelerated significantly.
Now a little test. For comparison, we took two screws 6x90 and 4.5x70, two self-tapping screws 4.8x110 and 3.5x55, as well as a small nail 3x75.

A short video will help you see the difference between them.
It can be seen that hardened screws are the most fragile and break almost immediately. Black steel screws are more durable, but also cannot withstand several bends. But to break a nail, you need to make a couple of dozen sharp bending movements.

This test does not mean that we are advocating the use of nails. We just want to show that the choice of fasteners should be treated with due care. And, of course, there are plenty of places where self-tapping screws will give a head start to any nails.
You can often hear the opinion that frame houses are one of the simplest, most rational and inexpensive types of building structures. Based on this idea, many developers choose frame technologies for construction, thinking about savings and even the possibility of building a house on their own. Unfortunately, the idea of simplicity and low cost of frame technologies applies only to those that do not correspond to any building regulations and the rules of buildings that are erected by guest workers and inexperienced DIY enthusiasts. However, the same can be said about building log houses from wood with your own hands.
Frame technologies indeed have many advantages, but only in cases where the house is erected by experienced builders from industrially produced components for frame house construction. An inexperienced or illiterate builder, working with frame technology, can make many more mistakes than when building a house from solid wood or stone materials. Where, when building a house from massive wall materials only a few technological operations are required, frame technologies will require a much larger number of technological “passes”. With a larger number of operations, the risk of making mistakes, non-compliance with technology and improper use of materials increases significantly. Therefore, frame houses built without a project and the involvement of qualified specialists “at random” or on trust in guest workers may be short-lived and will soon require overhaul due to unsatisfactory consumer qualities (freezing, wet insulation, heavy expenses for heating, rotting structural elements, destruction like individual elements, and the entire structure as a whole). Unfortunately, in Russia the list of regulatory construction documentation for the design and construction of frame houses is significantly limited. Currently, there is a set of rules in force in 2002, SP 31-105-2002 “Design and construction of energy-efficient single-apartment residential buildings With wooden frame”, developed from the outdated 1998 National Housing Code of Canada.
In this article we will provide short review main mistakes and violations of frame house construction technology.
Construction without a project.
This is a universal “general” mistake when choosing any construction technology. However, it is in frame technology that the cost of errors can be especially high and lead to cost overruns instead of savings, both due to the use of an excessive amount of material (frame made of large-section timber) and the need for repairs due to insufficient sections of beams, a rare step in their installation. destruction of structural elements due to unaccounted loads, incorrectly chosen methods of connection in nodes and fastening materials, biological destruction of wood due to impaired steam and moisture removal.
Wood construction " natural humidity».
Almost nowhere in civilized countries are houses built from raw wood, just as before in Rus' they never built houses from freshly cut tree trunks. SP 31-105-2002 clause 4.3.1 states: « Bearing structures(frame elements) of houses of this system are made of lumber coniferous species, dried and protected from moisture during storage.” Raw wood is only a semi-finished product for the production of building materials. In Russia, sellers and suppliers delicately call raw lumber wood of “natural moisture.” Let us remind you that a freshly cut tree has a humidity of 50-100%. If the wood was rafted on water, then the humidity is 100% or more (the amount of water exceeds the amount of dry matter). “Natural moisture” usually means that the wood has dried out slightly during processing and transportation, and it contains between 30 and 80% moisture. When drying in the open air, the amount of moisture is reduced to 15-20%. Normal equilibrium moisture content of dried industrially wood in contact with the atmosphere will have a moisture content of 11-12%. When drying wet wood the lengths of lumber are reduced by 3-7%, and the volume of wood by 11-17%. The use of “natural moisture” wood for the construction of frame houses leads to uncontrolled shrinkage of the wood, which changes linear dimensions structural elements, can lead to deformation, cracking and rupture of wood with destruction of fastening elements. When a wooden frame dries out, numerous cracks and gaps open up, significantly increasing the thermal conductivity of the walls of a frame house, tearing insulating materials preventing the penetration of moisture. When wood shrinks, its density increases, which leads to better conductivity of vibrations and sounds.
Construction from lumber without preliminary antiseptic treatment.
Even in the most properly designed frame house, a certain amount of condensation is inevitable on the media sections, of which there is much more in frame houses than in buildings made of solid materials. A moistened tree containing polysaccharides in its structure is an excellent nutrient medium for various forms microflora and microfauna, representatives of which are capable of destroying the structure of a tree in a short period of time. SP 31-105-2002 (clause 4.3.2) states that all wooden elements located closer than 25 cm from ground level and all wooden elements not made of dry wood are subject to antiseptic treatment.
Misuse materials.
In classical frame technology, the corner posts of the frame should not be made of timber or three boards knocked together closely - in this case, increased heat loss through the “cold corners” is ensured. The correct “warm corner” is assembled from three vertical posts located in mutually perperdicular planes.
Materials that can bear loads are used to cover the frame. For example, OSB must be structural and intended specifically for outdoor use.
Insulation of vertical frame walls is permissible only with rigid insulation boards. Due to shrinkage and sliding over time, fill-in and roll insulation can only be used on horizontal surfaces or in roofs with a slope of up to 1:5. When using economical versions of low-density insulation slabs, it is recommended to secure each row of slabs with spacers between the slabs to prevent slipping. This decision makes the structure more expensive, increases the thermal conductivity of the wall, so it is more profitable to use high-quality, more expensive insulation more high density. The size of the openings between the frame racks should not exceed the transverse size of the insulation slabs - 60 cm. It is even better if the size of the opening is reduced to 59 cm in order to eliminate gaps between the racks and the insulation slabs. You cannot fill the walls with scraps of insulation - there will be many gaps.Incorrect fastening of materials.
Black self-tapping screws can only be used for fastening sheet materials. The use of black self-tapping screws in a load-bearing frame, especially in a frame made of damp wood, can lead to the rupture of these unreliable fasteners that have low shear strength.
In all cases of assembling the load-bearing elements of the frame, galvanized nails or chrome-plated or brass-plated screws with a minimum diameter of 5 mm are used. Use of perforated steel fasteners without ligation wooden elements do not always guarantee the design strength of the frame.
It is unacceptable to fasten fastening elements of beams and other elements of the load-bearing frame to OSB boards, especially with nails.
When nailing sheet elements or screwing them with self-tapping screws, it is unacceptable to recess the cap or head deeper than the plane of the surface of the material. From the point of view of structural strength, the deepening of the head or cap by half the thickness of the material is considered a missing fastening element and must be duplicated with a correctly installed screw or nail.
Minimum distance from the edge of the covering material to the cap or head of the fastener is 10 mm.
Since 2012, the International building code for residential buildings (International building code, paragraph 2308.12.8) requires to prevent shifting during earthquakes, wind loads, etc. secure the frame of all newly erected frame buildings to the foundation with anchor bolts through pressure plates measuring at least 7.6 by 7.6 mm with a steel plate thickness of at least 5.8 mm. The minimum diameter of bolts or anchors is 12 mm.
Construction of frame houses using “innovative” technologies.
The most common technology in the world frame construction provides for the sequential assembly of “platforms” - floors with floors, followed by the assembly of walls on them and their installation in a vertical position. In this case, it is convenient for builders to move along a continuous surface, it is convenient to work with materials, any deviations from the design position can be eliminated before the construction of walls begins, and the floors themselves rest securely on the underlying structures. For some reason, domestic builders are trying to invent their own options for building a frame house with the assembly of walls “on site”, mixing the technology of building a frame house with half-timbered technology or “posts and beams” with the installation of floors in last resort, which is fraught with the need to insert or “hang” floor beams, the need to move on temporary flooring, with a high probability of getting injured when falling from a height.
Errors in working with floor beams of a frame house.
Most mistakes are made with the fastening of beams. It is best to rest the beams on the top frame load-bearing walls, for runs. It is prohibited to reduce the cross-section of the beam by cutting down the cutout for joining with the trim. If it is necessary to connect the floor beam with the strapping beam or beam purlin, it must be secured through a backing support bar with nails, or using steel beam supports. The steel beam support must have a height equal to the height of the beam and be fastened with nails through all mounting holes. Fastening beams using smaller supports, not punching through all fastening holes, fastening with black self-tapping screws, fastening only with nails without a support bar are mistakes.
The most common spacing of floor beams in the world practice of frame house building is from 30 to 40 cm. This spacing of beams makes it possible to obtain strong floors that do not sag under shock load. The installation of floors with a pitch of more than 60 cm is generally not recommended. The minimum thickness of sheet materials for flooring on floor beams is 16 mm for a beam spacing of 40 cm.
Often beams-purlins that work in bending are assembled from boards flat, rather than installing them on an edge.
Load bearing capacity floor coverage increases if the covering sheet material of the subfloors is additionally glued to the floor beams.
The load-bearing capacity of frame floors can be increased due to rigid transverse connections of the beams. Such connections are installed in increments of 120 cm and can serve as support for internal non-load-bearing partitions (through the subfloor). Also, transverse struts serve as an obstacle to the spread of flame during a fire.
How to properly drill holes in floor beams:
I-beams:
Composite I-beams can only be cut or drilled in certain locations per the manufacturer's specifications. The upper and lower elements of I-beams must not be disturbed. No more than 3 holes are allowed per beam. One hole with a diameter of up to 40 mm can be drilled in any part of the I-beam with the exception of the support parts. I-beams glued Wood-OSB-Wood are designated “Top”. At self-production beams based on OSB, the direction of the force axis of the material should be taken into account.
Floor beams made of sawn wood:
Errors in working with the cladding of a frame house.
According to foreign building codes and recommendations of the American Engineered Wood Association (APA), the frame can be sheathed with OSB boards both vertically and horizontally. However, if the OSB board is sewn along the frame posts, then the force axis (indicated on the OSB panel by arrows and the inscription Strength axis) will be parallel to the posts. This arrangement of the plates is useful only for strengthening weak frame struts that work in compression without significant lateral and tangential loads (which is almost unrealistic in real operating conditions). If OSB boards are sewn perpendicular to the racks, they strengthen the building frame to absorb tangential and lateral loads that arise when exposed to wind and base movements due to soil movement. Particularly relevant is horizontal cladding of OSB panels in frames with missing slopes, to impart the required structural rigidity. If OSB sheets are laid across the racks, then the force axis will be perpendicular to them, and the OSB sheets will withstand greater compressive and tensile loads. So, for example, in the domestic SP 31-105-2002. "Design and construction of energy-efficient single-family residential buildings with a wooden frame" provides (Table 10-4) the recommended parameters for the minimum thickness of plywood for cladding the frame: if the plywood fibers are parallel to the frame posts at a pitch of 60 cm, then minimum thickness plywood is 11 mm. If the plywood fibers are placed perpendicular to the posts, then more thin sheets 8 mm thick. Therefore, it is preferable to sew OSB sheets with the long side not along, but across the racks or rafters. For the outer cladding of one-story frame houses, OSB 9 mm thick can be used. But during construction two-story houses and any houses in the zones strong winds The minimum thickness of OSB for external cladding is 12 mm. If frame house is sheathed with soft fiber boards of the Isoplat type, then the frame design must have jibs that provide lateral rigidity to the structure.
Between everyone sheet materials sheathing must be left with gaps on thermal expansion 2-3 mm in size. If this is not done, the sheets will “swell” as they expand.
Joining of sheathing sheets is carried out only on racks and cross members. The sheets are sewn “staggered” to ensure greater strength of the load-bearing frame structure using chain ligation. External cladding should connect the wall frame with the lower and upper trim.
« Pies" of the floors of the walls and roof of the frame house.
The main mistake in the design of frame pies for floors, walls and roofs is the possibility of the insulation getting wet from moisture penetrating inside. The general rule for building walls in heated rooms is that the vapor permeability of materials should increase from the inside out. Even in the floor, where they often do the opposite: a vapor barrier is laid on the ground side, and a vapor-permeable membrane on the room side.
Any insulated frame house pie must have a continuous layer of vapor barrier from the inside. “Continuous layer” really means that the vapor barrier should not have any defects: the sheets must be glued together with an overlap along the entire protected contour, without exceptions. For example, almost all builders at the stage of assembling the frame forget to lay a vapor barrier under the junction internal partitions To external walls according to standard schemes connection devices of clause 7.2.12 SP 31-105-2002.
Additionally, all gaps between sheet cladding materials in wet rooms and on the roof must be taped waterproofing materials to prevent moisture from getting inside the insulated “pies”.
In addition to preventing moisture from entering the insulated cake, it is necessary to ensure the removal of moisture: the outside of the frame wall should either be sheathed with OSB boards, which is a “smart” vapor-permeable material that can increase vapor permeability when the environment is humidified, or protected by a semi-permeable membrane that ensures the removal of moisture from the insulation. Cheap single-layer membranes have unsatisfactory vapor permeability and require an air gap between the insulation and the membrane. Also, cheap single-layer membranes provide poor protection against moisture penetration from the outside. It is preferable to use expensive superdiffusion membranes, which have really good vapor permeability and can be mounted directly over the insulation.
Ventilation of a frame house.
Figuratively speaking, inner space a properly built frame house is identical to the internal space of a thermos: heat loss through the walls is very small, and moisture transfer through the walls is most often practically absent (but can persist during use). Accordingly, it should be vented outside. Without a thoughtful one, this becomes impossible. In a frame house, ventilation valves must be installed in each room, or the windows must have a micro-ventilation mode or built-in slot ventilation valves. Should be installed in the kitchen and bathroom exhaust ventilation. Abroad frame houses for permanent residence practically no one builds without supply and exhaust ventilation with a recovery system.
At the end of the article, we present illustrations of the widespread “folk” construction of a frame house, in which, upon closer examination, there is not a single correctly executed element.
The typical mistakes that we described in the article are easily preventable. Before you start building your first frame house or hiring builders, study in detail the albeit slightly outdated, but only set of rules available in Russian frame house construction SP 31-105-2002. By paying attention to all the details and subtleties of creating a power frame of a building and ensuring the durability of its operation, you can avoid costly mistakes when building or ordering your frame house.
Building a frame house is similar to assembling a construction set. The wooden frame house is assembled in accordance with the diagram. At the same time, the strength and reliability of the future structure depends on the quality of the assembly components. What are the features of the main components and connections of a frame house? And how to properly fix the lower and upper trims, racks, jibs, and crossbars?
Bottom trim connection nodes
The lower one is a frame made of wooden beams or several boards knocked together, which is laid on top. On a concrete foundation under bottom trim lay the so-called beds - boards. They perform the main function - they level the foundation and hide those flaws that could have been made during its pouring.
The beds are attached to the concrete foundation using anchors. The installation sites are located at a distance of no more than 0.5 mm. In this case, at least the ends of the beams are secured with anchors.
Connection of the beam to the concrete foundation.
To install anchors, holes of a certain depth are drilled. They pass through the board and go deeper into the thickness concrete foundation. The depth of drilling and driving in the anchor is determined by the height of the house wall and the design of the foundation. For traditional 2.5-3 m frame wall on concrete base The depth of lowering the anchor into concrete is 15-20 cm.
The second option for installing anchors is to concrete the anchor studs during the process of pouring the foundation. When casting concrete slab or tapes in specified places, hollow cones with internal thread. After the concrete has hardened, anchors are screwed into these elongated cone-shaped studs.
Features of the anchor connection
- The holes in the beam are drilled 2-3 mm larger than the diameter of the anchor pin.
- Under the heads anchor bolts you can put wide washers to increase the area of their contact with wooden surface, and increase the strength of the fastening connection.
 Anchor fastening of the lower trim.
 Before fixing, mandatory waterproofing is carried out - roofing material is placed on the concrete or its surface is covered with a special waterproof compound, mastic. After installation, check the horizon. Deviations from the horizontal level are allowed in dimensions of no more than 0.5° per 3 m.
Bottom trim assembly on a columnar foundation
The fastening of structural units of a frame house described above is used on strip and slab foundations. For columnar bases, a different scheme is used:
- For ease of fastening, the upper part of the columnar supports should have a flat horizontal head with holes.
- Place on top of the headrest wooden beams, which perform the function of a grillage.
- Recesses of the required depth are drilled in the beams. They are drilled under the holes in the headband.
- Fix the beam with bolts or screws.
 Trimmed plank strapping on pile foundation.
 On a note
It is necessary to attach the timber to the foundation. Shallowly buried strips and slabs are subject to significant movement when freezing. Reliable connection The upper and lower frame ensures the reliability and durability of the entire structure.
Design of frame house components
Vertical frame posts are installed on top of the lower frame and secured with nails. Fastening with metal corners used for T-shaped connection of beams without cutting. It's easier to do. Fixing beams with metal nails is used at the junction with partial cutting of the lower beam. This is a more difficult connection to make with your own hands.
A joint without cutting is used for corner frame supports. Butt joints with fixation with plates or corners are used in the main components of a frame house, if the construction is carried out with your own hands, without the involvement of professionals. If they work experienced builders, then they use a partial insertion connection. It prevents strong movements of the timber and frame boards when drying out.
On a note
The size of the cutting for the vertical frame post is 30-50% of the thickness of the bottom trim beam.
The corner joint without cutting is fixed with metal plates using wood screws. In this case, reinforced steel corners with several perforations are used. As well as durable self-tapping screws in light golden and silver colors.
Strengthening the corners for fastening the corners of the house is carried out due to technological processing - the metal plates are hardened during the manufacturing process. Either through the use of metal with large thickness sections, up to 2-3 mm.
 Methods of fastening racks.
 A notch joint is often used to attach studs in the middle of a wall. The supports are inserted into the prepared recesses and additionally secured with nails. Then they are secured in a vertical position with jibs - diagonally inclined slats that rest against a vertical post on one side and a horizontal frame on the other. For ease of support, the ends of the jib are made beveled - part of the end is cut off.
Temporary jib
During the assembly of the frame, temporary jibs are also installed, which fix several vertical posts. Temporary jibs are placed between the upper and lower trim at an angle. They connect several vertical posts and are fixed with nails.
Temporary jibs are placed with outside frame. To attach them, you do not need to cut down, but they need to be fixed in such a way that upon completion of construction, the temporary auxiliary beams can be easily dismantled. Therefore, nails are used to fix them.
 Temporary jibs for racks.
 Temporary jibs hold the posts upright until permanent jibs are installed at the bottom and top of each rack. Once the permanent jibs are in place, the temporary fixing beams can be removed.
On a note
The construction project contains a description of the components of a frame wooden house in the drawings. They often do not describe in detail the method of attaching temporary jibs, since they do not bear the main load and support the frame temporarily.
Upper harness knots
The top frame of the frame house is laid on vertical frame supports after installing the corner posts. If the perimeter of the house is large enough (more than 6 m), then in addition to the corner pillars, intermediate ones are also placed - in the middle of the wall. And only after that the top harness is placed.
After laying the top row, temporary jibs are attached - across the entire wall. Next, attach the remaining vertical racks and jibs to them. After which the temporary jibs between the upper and lower trim are removed.
It is most convenient to assemble the walls of a frame house in a lying position, knocking together the lower frame, vertical posts, crossbar, jibs and top frame. And only after that raise the walls to a vertical position, where all that remains is to fasten all the walls of the house together. To firmly connect the walls of a frame house, a second top frame is used, which is overlapped with the first top frame.
 Double top knots.
 When using a double top trim, you can do without the use of steel corners. In this case, there is no need to partially cut off the ends of the boards, making a “claw” connection. Because such connections with cutting out part of the end violate the integrity of the board and, accordingly, weaken it.
Beams are placed on top of the second top frame interfloor covering. The beams are laid on the end, the distance between the beams is set depending on the size of the spans and fastened with nails.
Wall corner
The corner of a frame house is the place of maximum heat loss. As a rule, it is in the corners that condensation accumulates and it is them that need to be insulated first. Therefore, even at the stage of assembling the frame, it is necessary to ensure that the corners of the future frame house are warm. How to do it?
Smooth fixing plates are placed on the outside of the vertical beam. They connect adjacent single-level surfaces of the vertical post and horizontal beams. The fixing corners are located on the side. They connect mutually perpendicular surfaces. What else is important to know about angles?
During construction in regions with cold climates, non-solid materials are used as vertical posts. wooden beam, and assemble a corner post from separate boards. The resulting structure resembles a well. Insulation is installed in this internal space, which retains heat and limits possible heat loss.
 Installation of corners in the frame of the house.
 It must also be warm; for this, single racks are used, but the load on window and door openings is removed using a crossbar. The crossbar is fastened along the entire length of the frame wall by cutting into all vertical posts. It is important to take into account that under each window opening There should be at least 1-2 vertical support boards.
Knots of the rafter system
To nodes rafter system include all connections between its elements, namely:
- Fastening floor beams to top harness.
- Attaching the rafter beam to the top trim.
- Fastening the racks on the gables to the top trim and to the outer rafters.
- Attaching the internal posts to the rafter beam and to the ridge.
- Fastening struts - inclined beams that support the rafters and rest on the beam.
- Attaching the crossbar to inclined rafters.
- Fastening the sheathing.
 Knots of the rafter system.
 The fastenings listed above can be done using corners or using nails if the elements of the rafter system are connected overlapping each other.
Fasteners
The following elements are used as fasteners for the components of a frame wooden house:
- Fastening plates (angles or flat plates with or without holes). Plates and angles are attached to beams or supports using wood screws.
- Staples (straight and angular) are wire fasteners of a certain diameter. Their edges are bent and inserted into the ends or side surfaces of the beams.
- Bolts - used to tighten adjacent beams and rafters, inserted into through holes and secure them with nuts.
- Nails.
All connecting, fixing and fastening elements for frame buildings are made of metal. To fasten load-bearing elements, reinforced corners made of hardened steel or increased thickness, 3-4 mm, are used. To fasten the supporting elements, angles made of ordinary steel with a thickness of 2-3 mm are used.
 Variety of fastening elements.
 In order to protect against corrosion, galvanized steel is used for the manufacture of corners and plates. Rust protection is especially important in outdoor construction, when metal fasteners in walls can become a point of moisture condensation, causing a section of the wall to become wet. Therefore, galvanized fasteners are in great demand in various components of a frame house.
Node connection errors
A drawing of components requires the presence of sketches and descriptions. However, despite this, novice builders often make offensive mistakes. Let's list the main and most frequently repeated erroneous actions that novice individual builders make when assembling a frame:
Not all jibs are installed. This is not true. The jibs ensure the wall's resistance to wind loads. In addition to the jibs, to withstand the wind it is necessary to use rigid slabs in the outer cladding.
- Use as corner posts solid timber or boards placed tightly next to each other. This corner will be cold. Moisture will condense and mold will develop.
- Use “black” screws for fastening. They are not strong enough, especially if the wood purchased for construction is not dry enough. When drying and warping, the “black” screws can simply be “torn off”. More durable option– self-tapping screws of golden and silver color, coated with galvanization or a layer of chromating, phosphating.
- They use wood that is not dry enough, which causes severe shrinkage and “breaks” existing nodes and connections.
- And another mistake is not to use nails. These proven fasteners are often stronger than any self-tapping screws.
Frame construction – new technology, in which, despite its apparent simplicity, there are many nuances and features.