To keep you in a great mood in any weather, make new things from available materials. Quick crafts that take less than an hour to make.
The content of the article:
Sometimes you want to pamper your child with a new toy, but you don’t have the financial resources or time to make one. Therefore, we decided to select for you the fastest simple crafts that you will spend no more than an hour on. The family budget will not suffer, since they are made mostly from waste material and all sorts of leftovers.
How to make a doll from threads and a dandelion with your own hands?

You will create it while relaxing in a cozy chair. The main thing is to place everything you need nearby so that you don’t have to get up again. This:
- threads;
- half a sheet of cardboard;
- scissors;
- strip of flesh-colored fabric;
- markers.
- Wrap the threads around the card in an impressive layer.
- Tie the finished winding with thread. Determine where the doll's head will be. Mark it by also rewinding it with thread.
- Do the same for your right and left hands. To make a doll's hands from threads, wrap your hands at wrist level and cut the yarn in the area of the toy's fingers.
- Also use threads to separate the torso from the legs, and perform them using the same technique as the arms, just make them longer.
- Measure a strip of flesh-colored fabric according to the volume of the head, glue its sides.
- Wind hair threads around your hand and cut through the resulting roll on one side. Glue to the head, trim the bangs if desired.
- Use markers of different colors to draw facial features.
- Sew a sweater for a toy or tie it with a piece of fabric to make an apron. You can tie a handkerchief to make it a cloak. Children are happy to make such clothes, and they will certainly appreciate a new doll made from threads.
If you are making a girl doll, then you do not need to mark her legs. Let the threads cut evenly at the bottom become a skirt.
Such simple crafts will surely delight the kids. You can also create a fluffy dandelion from leftover threads.

For this charm you will need:
- yellow and green yarn;
- wire;
- PVA glue;
- knitting fork or metal staple;
- scissors;
- gypsy and thin needle.
- Wind the yellow yarn around a crochet fork. Thread a thread of the same color into the gypsy needle. Sew it down the middle.
- Lubricate the resulting line well with glue. Remove the created fabric of yarn from the fork and roll it with a roller.
- A thread is wound in the middle to give the workpiece a dumbbell shape. Coat the middle of this part with glue on top and wait until it dries.
- Such simple crafts are interesting for both adults and children. They are made quickly, but part of the time is spent waiting for the glue to dry. Therefore, it is better to make crafts in the evening, and continue the entertaining needlework the next day. What are we going to do now?
- Cut the resulting dumbbell in the middle. On the first and second flowers, you need to cut the loops with scissors and carefully comb them to get fluffy caps of two dandelions.
- The green yarn from which we will make sepals must be cut into pieces 4 cm long. We thread the same thread into a gypsy needle, sew the pieces across, but not in the middle, but 2/3 away from the edge.
- Trim the top with scissors, trim it, make another line parallel to the first.
- Apply glue to the back side of the flower and attach the sepals here. Wrap it with the same thread you used to stitch it. Glue both ends and leave the workpiece to dry.
- Meanwhile, you will wind the green thread onto the glue-coated wire. You will get a stem.
- Insert a thick needle into the sepal from below and twist to make a hole for the stem. Install it there, having previously lubricated this part with glue.
- The leaves can be crocheted, but since we are making simple crafts, cut them out of green paper or cardboard and glue them to the stem.
How to quickly make crafts from animal tissue?
If you want to spend less than 30 minutes making a new toy, then make these funny mice. They don't even need to be sewn. By making the slits in a certain way, you will make these rodents.

See if you have:
- pieces of felt;
- juice straws;
- beads or small buttons.
- For each mouse you need to cut two parts from one fabric. The first will become a body, pointed on the muzzle, rounded on the other side. Cut out the ears in the shape of a figure eight.
- From a fabric of a different color you need to cut out a small circle for the nose and two larger ones for the ears, and glue them in place.
- Using scissors or a utility knife, make 4 cuts on the body of the mouse. Two will be vertical, at the back of the head, and the other two you will make in the rump area to place the straw here. Place the ears on the head, threading them through the slits.
- All you have to do is glue beads or buttons instead of eyes and marvel at how quickly crafts are made from simple materials.

If your child is bored, you can make a fabric applique with him. Such funny bunnies are also sewn onto the worn knees of children's trousers to update this item.

Transfer the applique onto the fabric and cut it out. The bunny is decorated by sewing a bow to his ears and a carrot on his body. Attach eyes and other facial features. If this is an applique, then you need to glue the hare onto the cardboard.
And here are some simple crafts - in the shape of birds. You can cut them out from leftover felt, glue on a nose, eyes, wings and perform a home performance.

DIY crafts from pine cones for children

They are also made simply and quickly.
To make gnomes, take:
- Pine cones;
- light plasticine;
- pieces of felt or fleece;
- glue;
- brush.
- Let the child roll a ball out of plasticine and use the back of the brush to make indentations for the eyes, mouth, and nose. They will be filled with pieces of plasticine of the corresponding color. So, the eyes can be brown or blue, the mouth red.
- Attach the head to the top of the pine cone. Cut a triangle out of felt and glue its sides together to form a cone. Place this cap on your character's head.
- Cut out mittens from the remaining fabric and attach them to the pine cone with plasticine.

For a craft made from pine cones like an owl, we will also need:
- 2 acorn caps;
- yellow paint with a brush;
- plasticine;
- accessories in the form of feathers, ribbons.
- First, you need to paint the cone and the acorn cap, and continue subsequent work when they are dry.
- Let the child roll small balls from black plasticine and stick them to upside-down acorn caps - these are the pupils.
- Make a nose out of orange plasticine, attach it in place.
- This owl craft made from pine cones is decorated with feathers or ribbon.
- pine cone;
- pieces of thick fabric;
- two toothpicks;
- cotton wool;
- 2 ice cream sticks;
- white paint.
- Let the child paint the pine cone and remove it until it dries completely.
- Mom will cut out a scarf from plaid fabric and tie it around the snowman’s neck. Make headphones from felt and glue them to the character’s head.
- The child will make a snowman’s nose and mouth out of plasticine and attach it to his face.
- Make your hands from wire wrapped in a strip of fabric or ribbon. You need to wrap the wire around the bump.
- Place toothpicks in the snowman's hands, with pieces of cotton wool glued to the bottom of these sticks.
- Paint the popsicle sticks and when dry, place the snowman on these skis.
Quick and easy to make and these are the piglets. Glue the scales from the cones to the fir cones in the form of ears. Attach the snouts that will become the acorn caps. You can use plasticine rather than glue for this.

Paint the piglets pink, you can use spray paint for this. Once it's dry, only then will you attach the little black beads that will become the eyes.
For this craft you need an unopened pine cone. But over time, the scales open up. To avoid this, dip the cones in wood glue diluted with water for half an hour.
Remove them from the solution and shake them off. After 3 days, the cone will dry completely, securing the scales, which will now not open. After this, you can cover this natural material with paint and make new objects.
The next simple craft is a forest corner. For her, take:
- CD disk;
- plasticine;
- spruce and pine cone;
- acorn cap;
- glue;
- paints;
- eyes for toys.
- Paint the disk green and draw flowers on its surface.
- Let the child roll the caps and stems of the mushrooms and connect them.
- The base for the hedgehog can be sculpted from plasticine or polymer clay. Then cover it with brown paint.
- When it dries, stick scales from a fir cone into the back of the hedgehog. Place a cap on his head.
- Glue the eyes, nose, mouth, put a cane stick in your hand. In the other there will be a basket with mushrooms, which are molded from plasticine.
- Attach the hedgehog to the stand, after which another wonderful craft is ready.
Tie floral wire to the pine cones and place picturesque flowers in a jar previously wrapped with twine.

You can also make another craft from pine cones for the garden, such as a wonderful decorative basket.

If you need to quickly make a hedgehog to bring to kindergarten, mold its body and head from beige plasticine, and roll out its eyes and nose from black plasticine. Stick in the seeds, which will become spines.

Simple crafts for a great mood
Now the sun rarely comes out, and the weather is increasingly cloudy. To avoid succumbing to despondency at this time of year, create mischievous tricks that will certainly improve your mood.

Place these cheerful flowers in a vase at home, which can be made from almost nothing. All you need to do is:
- colored paper;
- cardboard from a white box;
- marker;
- stationery knife;
- tape;
- scissors.

Color the eyes with a black marker and bend the petals forward.

Cut a stem from cardboard. At the top, on one side, glue the finished part, on the other, a pre-cut flower with petals.

Fold a green sheet of paper in half, draw an oval line on it, and cut along it. If available, use zigzag scissors. Keep the notches simple.

Tie the paper flowers with a ribbon, and if you have taffeta, then use this fabric for decoration. You have got a bouquet that will never fade and will make you happy.

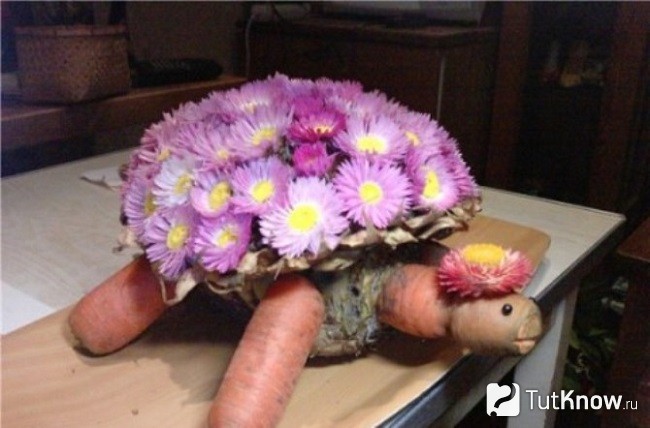
You can attach flowers with a toothpick to washed beets or pineapple. You will get a beautiful shell for a turtle. You will make her arms, legs and head and neck from carrots. Attach these parts to the body using toothpicks as well.
If you want the New Year to come quickly, decorate white objects in your apartment by turning them into snowmen.

Attach black magnets to the refrigerator, and now a holiday character has taken up residence in your kitchen. If you draw on a white vase or glue round eyes and an orange nose in the shape of a carrot, then another snowman will amuse everyone gathered at the table.
See what other quick and easy crafts you can make.
Every home owner wants to feel as comfortable as possible in their home. This becomes the reason why there is a desire to decorate the interior not only beautifully, but also in an original way.
However, often the funds for this are not enough, because the services of professional designers, like beautiful things, are not cheap. Therefore, recently, an increasing number of homeowners prefer to decorate the interior of their home on their own using crafts from improvised materials that are inexpensive.
It is worth noting that the main advantage of such crafts is not the cheapness of the materials. The most attractive thing is that every item you create is unique. But it is the uniqueness of the design that attracts attention.

Products that were created with one’s own hands emanate a special energy. And thanks to this, an atmosphere of comfort and warmth appears in the house.

An important circumstance is that such structures can act not only as ordinary decorative elements. With their help, you can organize your space much more conveniently. After all, they can be used to store a variety of small items that are necessary for the household.
Do you think this is impossible because you need to have any special skills? No, even a child can handle this job of creating crafts.

Pay attention to the photo of crafts from improvised means, which is presented below. It shows an example of creating a key holder, which is not only a beautiful addition to the interior, but also serves as a small hanger for keys.

And the process of its creation is not complicated. Let's look at it in more detail.
Key hanger
Surely, many people are familiar with the situation when they have to raise the whole family to look for keys. After all, people often do not burden themselves with buying special small shelves for storing keys and other small things.

And since the key is a fairly small item, it is easy to lose it among larger things. To avoid having to constantly look for keys, many people keep them in their purses.

However, we can offer you a more interesting and original storage method. And for this we will build a key holder.

Its main feature is that in appearance it will resemble a product decorated with brickwork.

We will tell you step by step how to make a craft in the form of a key holder from available materials. But first, let’s look at exactly what tools and materials will be needed to create it: a thick sheet of cardboard or plywood, thick napkins, hooks, glue, varnish, paints.

Stages of performing a key holder
At the first stage, you need to cut out the back wall of the future key holder. As a material, you can use either thick cardboard or a not too thick piece of plywood.

In the second stage, you should cut out small rectangles from cardboard that will imitate brick. Please note that they must be the same size.

In the third step, you must glue the cut out “bricks” to the base using glue. Remember that there should be a small gap between them. You should also not cover the entire surface of the product with them. After all, in the central part there should be a small sign with an inscription, and in the upper part there should be a picture.

Note!

At the fourth stage, you should start lubricating the bricks with glue. Do not skimp on the glue at this stage, because it is necessary so that you can place the crumpled napkin on top of it. It can also be covered with a small layer of glue on top for better impregnation.

Using a stick or the back of a brush, press the tissue into the gaps to create corners. Leave the product to dry.

Please note that any crafts made from improvised materials at home must be durable. Therefore, we strongly recommend not to skimp on binding materials.

At the fifth stage, the process of creating a visual resemblance to natural brickwork begins. Once the panel is dry, coat it with paint. The seams must be painted with bronze paint.

At the sixth stage, you should coat the bricks with paint a second time. However, this time you need to use a dry brush. To do this, dip it in bronze masonry, wipe it on paper so that it becomes dry and then dip it again in the color with which you painted the bricks.

Note!

Remember that to achieve maximum similarity, you should only move the brush in one direction.

At the seventh stage, which is the final one, you should coat the finished product with clear varnish and attach the hooks on which the keys will hang.

Crafts for the garden
If you are the owner of a country house, then for you the decorating process is not limited only to the area of the home. Therefore, to improve the area around the house, you should use garden crafts from improvised means that will decorate any garden or vegetable garden.

To make them, you can use plastic bottles, hemp, tires and old soft toys. In this case, it all depends on what set of tools and materials you have.

Crafts made from tires are extremely popular because they are quite simple to create, but at the same time they look original and interesting.
Note!


For example, you can create a real cup from tires, which will become a wonderful flower bed. To create it you will need one tire, a round board (the diameter of the board must be larger than the tire), paint, and a small piece of rubber.

The tire and board must be painted the color you like. If you have artistic skills, you can use them to decorate the product with beautiful images.
If you do not have such drawing skills, you can paint the design one color or polka dots. The handle of the cup should be secured with a large stapler. And now your product is ready.

We draw your attention to the fact that even children’s crafts made from improvised materials can become a worthy decoration for your garden. Use crafts your kids made from plastic bottles and cups. Despite their simplicity, they look quite original.

If they are small in size, use them to decorate the porch or window sills. This way, you can focus on them, and they will not get lost in a large area of the garden.

Photos of crafts from improvised means


If you have a couple of free evenings, why not start making crafts for the kitchen and home? After all, you can create a bunch of useful or simply beautiful little things with your own hands from improvised, natural and even waste materials. In this material, we presented 50 inspiring photos and 12 super ideas with step-by-step master classes on making decorative items, storage accessories, kitchen utensils and more.
Idea 1. Tablet stand made from a cutting board
Watching your favorite TV series on your tablet or peeking at a recipe book while cooking will become easier if you make a special stand for this from... an ordinary cutting board. Making this kitchen craft with your own hands will take no more than two hours, and it will be used every day.
To make a holder for a recipe book or tablet you will need:
- You can use an old cutting board or buy a new one (wood is best, but bamboo will work). Its size should not be much larger or smaller than the tablet.
- A small wooden plank, or better yet, a piece of molding (this is what will hold the tablet/book).

- Another block of wood or plywood from which you can cut a sharp triangle;
- Paint or stain in the desired color, for example, to match the countertop, facades or kitchen apron ;
- Paint brush or staining rag;
- Jigsaw or saw;
- Wood glue or any other strong adhesive.
Instructions:
- Using a saw or jigsaw, cut your strip or molding to the desired size (the width of the board), sand the edges with sandpaper, then simply glue it to the bottom of the board.

- Cut a support for the stand from a piece of wood in the shape of an acute triangle with a right angle as in the photo below and glue it too.

The angle of inclination of the holder will depend on the inclination of the hypotenuse of the triangular bar

- Paint the entire piece following the paint manufacturer's instructions and leave to dry.


- If desired, the handle of the resulting stand can be decorated with jute rope or ribbon. This way, when the stand is not needed, you can hang it on a hook.
Also, the craft can be further decorated - for example, by artificially aging it as in this master class, by drawing inscriptions, by burning a design, or by covering it with slate paint. In the following selection of photos you can get ideas for decorating original cutting boards.


Idea 2. Jute coasters
If your kitchen (or, for example, a country or summer kitchen) is decorated in a rustic, Mediterranean, rustic or marine style, then you will probably like this kitchen craft idea. In just a couple of hours you can make coasters for plates for the whole family and guests with your own hands.


To make one substrate with a diameter of 33 cm you will need:
- 10 meters of jute rope 1 cm thick (sold in construction and hardware stores);
- Hot glue gun;
- Scissors.
Instructions:
Just start rolling the rope in a circle, applying glue to small sections one by one and fixing them for a while. Once the mat is formed, cut the end of the rope and glue it down.

Idea 3. Organizer for cutlery and kitchen utensils made from cans
Tin cans cost nothing, but they are durable, easy to clean, and their shape is just right for storing all kinds of spatulas, ladle, forks, spoons and other utensils. If you put in a little effort and creativity, you can make a convenient and cute organizer out of them, which, even if it doesn’t fit into the interior of a city kitchen, will definitely fit in at the dacha. You can also use an organizer made with your own hands from cans to store tools, brushes, felt-tip pens and other small items.

Stand for spoons and forks made from cans
To make such a stand for spoons and forks, you will need:
- 4 or 6 clean and dried cans, without lids or burrs;
- Acrylic paint for metal or enamel paint (it will protect the cans from rust);
- Several wood screws and a screwdriver;
- Thick nail and hammer;
- Furniture handle or leather strap with fittings;
- A small wooden plank.
Instructions:
- Paint the jars inside and out and let them dry for one day.
- If necessary, saw the wood to the desired size, sand it, clean it and finally paint it (not necessarily to match the cans).
- Take a nail and a hammer and make a hole for the screw in all the cans.
Tip: To make this process easier and not damage the paint layer, place a small block on the table using a clamp, then wrap the block in felt and only then put a jar on the block (see the picture in the lower left corner in the next photo collage)

- Place the cans against the board and align them the way they will be mounted later. Mark the location of the holes on the board with a pencil.
- Make small holes in the board where the marks were marked, using a hammer and nail.

- Screw a screw into the hole of the first can to attach it to the board. Repeat the procedure with all remaining jars.
- Finally, install a furniture handle or leather strap on the end of the wooden board using the same self-tapping screws. Ready!

Here are a few other deco ideas and modifications to the design of cutlery stands made from cans.


Idea 4. Topiary for kitchen or home decor
Topiary is a small decorative tree that decorates a dining or coffee table, chest of drawers or mantelpiece. And topiary is an excellent addition to a gift, especially if you decorate its crown, say, with candies or flowers. Making such a craft with your own hands does not take much time, does not require the use of expensive materials, and even beginners can do it. Once you master the basic principle, you will be able to create topiary for any occasion, any shape and design. Take a look at our selection of DIY home decor photo ideas, you're sure to find something you'll like!


Kitchen Decor Idea for Halloween


To make this craft you will need:
- Base made of polystyrene foam, plastic or floral foam in the shape of a ball or other desired shape;
- A trunk (a straight tree branch, a pencil or any other small stick);
- Decorative elements for creating a crown: coffee beans, artificial flowers, pine cones, colored beans, etc.;
- Decor to disguise the pot filler, for example, moss, pebbles or sisal fiber;
- Flower pot;
- Filler for a pot that will fix the trunk. For example, cement mortar, the same polystyrene foam or alabaster (the best option) will do;
- Thermal glue in a gun;
- If necessary, you will need paint to decorate the trunk, base or pot. The trunk can also be decorated with ribbon or twine.
Basic instructions:
- To begin with, it is advisable to paint the base in the color of the crown elements so that possible bald spots are not noticeable. You can also paint the trunk and pot and leave them to dry.
- Cut a hole at the base of the crown, a couple of centimeters deep, for the trunk, fill it with glue and secure the trunk.
- Take the base of the crown and start gluing the decorative parts one by one. The principle of action at this stage is simple: first, large parts are glued, then medium-sized and, finally, small elements fill in the bald spots. You need to glue the decor quickly, before the glue is absorbed into the base.
- Dilute the mixture to fix the trunk in the pot according to the manufacturer's instructions and fill the pot with it, not reaching a couple of centimeters to the edge. Next, insert the barrel, hold it for a while and then leave it to dry for a day.
- Disguise the filling of the pot with a decorative “cover” (you can fix it with a little glue).
Idea 5. Serving board-tray
But the idea of an unusual serving board-tray, which, although not a cutting board (intended for displaying food only in dishes), can nevertheless be very functional. For example, it can be used to beautifully serve snacks, drinks (olives, pistachios, nuts, chips, etc.), sauces, honey, sour cream, jam. Thanks to the slate part, while the board is not being used for its intended purpose, it can simply be hung on the wall and used for writing.
To make this DIY kitchen craft you will need:
- Wooden board 5 cm thick;
- Stain of the desired color (for example, to match the countertop);
- Sponge, rag or brush;
- Chalkboard paint;
- Two furniture handles and wood screws for fastening them;
- Jigsaw or saw;
- Screwdriver or screwdriver;
- Ruler, pencil.
Instructions:
- Cut your board to the desired size using a hand/power saw or jigsaw. In this master class, the board is 60 cm long, but you can make it shorter or longer.
- Stain your board according to the manufacturer's instructions and let dry.

- It's time to paint the inside. To do this, first apply masking tape along the edges of the board to limit the painting area. Next, apply slate paint (in this case, you use paint in a can) and let it dry.


- Screw the handles to the edges of the board.

You can replace furniture handles with leather straps, paint the board a bright color, burn a design onto it, or attach two “legs” to the back of it.


Idea 6. Stand for mugs and glasses
If you're the type of person who collects wine corks (either for fun or in the hopes of one day making something useful out of them), then you'll love this craft idea.

To make one mug stand you will need:
- 8 corks (accordingly, to make a set of 4 stands you will need 32 corks);
- A roll of cork board, mat or coaster (for cutting out the base of the coasters);
- Hot glue;
- Leg-split.
Step 1: Lay out your corks in pairs in a square format as shown in the photo below. Using hot glue, apply a bead of glue between the two corks and press them together for 30 seconds. Repeat the procedure with all other pairs.

Step 2. Cut a square from sheet cork (board, rug) corresponding to the size of the future stand. Next, apply thermal glue on it, wait 15-20 seconds. and glue your blanks.

Step 3: Fill the gaps between the corks with glue and let it dry. For better adhesion of the glue to the corks, you can put some kind of press on the workpiece.
Step 4. Wrap the craft with twine and tie a knot.

Handmade coasters for mugs, glasses and glasses can be beautifully packaged and given to a friend
If desired, the stands can be made round, triangular or hexagonal by cutting off the excess with a knife.

Using the described principle, you can make such a hot stand with your own hands. By the way, an old CD will work as a basis in this case.

Idea 7. Wall panel
Another craft idea for the home and kitchen that you can make with your own hands from wine corks is a wall panel for decorating the interior and storing notes, memorable photos and postcards.

Framed cork panel from Ikea


To work, you will only need a beautiful frame (from a picture or a mirror), paint of the desired color, hot glue and a large pile of corks. Corks can be laid out in a herringbone pattern, in a checkerboard pattern, in even rows, and in other ways that you like. If necessary, for example, if there are not enough corks, they can be cut lengthwise or crosswise. To make the corks easier to cut, you need to soak them in hot water for 10 minutes.

Other interesting ideas for making wall panels with your own hands.
Idea 8. Universal knife holder
A knife holder is a very useful kitchen gadget that helps keep your workspace tidy and keeps your knife blades sharp for longer.


Making a knife holder with your own hands is very easy - just pick up a small vase and fill it tightly with bamboo/wooden skewers, colored beans or... colored spaghetti, as in our master class.

To make a knife stand, prepare:
- A container or vase is the height of the blade of your largest knife. The shape of the container can be any, but without any bends;
- Spaghetti, lots and lots of spaghetti;
- Several large ziplock bags (or just large bags that can be tightly tied in a knot);
- Alcohol (for example, vodka);
- Liquid food coloring in the desired color (or several colors if you want to make a multi-color filling);
- Baking trays;
- Aluminum foil or old oilcloth tablecloth;
- Paper towels;
- Kitchen scissors.
Instructions:
- Make sure your container is clean and dry, then fill it tightly with spaghetti. When the container is full, remove the spaghetti and add a couple more bunches of pasta to the pile as a reserve (in case you make up for broken sticks).
- Divide the spaghetti evenly between the bags and pour enough alcohol into the bags to wet all the sticks. Next, add 10-40 drops of food coloring to each bag.

- Seal or tie your bags, then place them in additional bags to avoid leaks. Slowly shake and turn the bags to mix the coloring into the alcohol and pasta. Next, place the bag on one side and leave for 30 minutes, then turn the bag over again and leave it for another half hour. Continue soaking the spaghetti in this manner (no more than 3 hours) until it reaches the desired shade.
- Cover your baking sheet with aluminum foil, then a layer of paper towels (or oilcloth). To protect your hands from staining, it is advisable to wear gloves. Remove the spaghetti from the bags, after draining all the liquid, place them on a baking sheet in a single layer and leave to dry. From time to time, the spaghetti needs to be sorted to dry evenly.

- Once your spaghetti is COMPLETELY dry, start placing it in the container.
- Shake the filled container and smooth out the spaghetti. Insert your knives to determine the optimal filling density, adding pasta or removing excess if necessary.
- Now, using kitchen scissors or other very sharp scissors, trim the spaghetti to the desired length without removing it from the container (it's best to do this over the sink). It is important that the spaghetti does not exceed the height of the container by more than 2-3 cm, otherwise it will break quickly.

Idea 9. Jars for storing spices and bulk products
Today we will talk about an express technique for making a paper basket, which can be used to store small items (keys, stationery), yarn, as well as for an unusual presentation of fruits, Easter eggs, bread or pastries for a holiday table or as a gift.

Even a child can weave such baskets quickly and easily

You will need:
- About 15 sheets of thin A3 paper, cut in half lengthwise (this can be printer paper, a full sheet of newspaper, or even baking paper);
- A container of suitable size with straight sides (for example, a jam jar);
- Glue in stick;
- One skewer;
- Spray paint (optional).
Instructions:
- Starting at one corner, begin to roll the sheet of paper tightly around the skewer to the diagonally opposite corner to create an even and long tube. Once the tube is ready, add a few dabs of glue to the corner of the paper to hold it in place and remove the skewer. Do the same with all the remaining sheets. In this master class, 30 tubes were required to weave 2 baskets.
- If necessary (for example, if you used newspaper sheets) or if desired, paint the tubes with acrylic paint.
- Take an even number of tubes and connect them together as shown in the photo in the upper left corner. In this master class, for a basket the size of a jam jar, 6 tubes were required, for a larger basket - 8 tubes.

- Start braiding: Take one of the outer tubes (which is under the grate) and lay it over the adjacent tube, then pass it under the next tube, then run the tube again over the next tube, etc. Continue weaving by lifting the already entwined tubes vertically (from now on we will call these tubes stands).
- When 2-3 cm remains from the first working tube, increase its length. To do this, apply glue to the new tube and insert it into the remaining “tail”. Continue weaving over and over again, adding paper tubes as needed.
- Once you have weaved a base of the desired diameter (the same size as the container), place the container on it and begin weaving around it, pulling the stand tubes close to the walls.
- Having weaved the basket to the end, remove the jar and carefully wrap the end of the working tube into the weave.
- Tuck the ends of the posts inside the weave and trim if necessary. Next, you can spray paint from a can as in our master class.
Idea 11. Wall holder for towels and kitchen utensils
From an ordinary grater you can make such a convenient and beautiful holder for a towel and storage of kitchen utensils or even live or artificial plants.


From a flat grater you can make your own kitchen decor in a country, Provence or shabby chic style

To make a heated towel rail and a tray for small items you will need:
- A grater (preferably an old one, but a regular new grater will do, as long as it is metal);
- Patina for metal (for artificial aging of the grater);
- A small cutting board or just a wooden board;
- Wooden die (for the bottom of the grater);
- Glue.
Instructions:
- Following the manufacturer's instructions, cover the grater with a metal patina, for example, green as in this master class.

- Install a wooden bottom in the inside. It must first be cut to the size of the upper part of the grater. As a rule, at the top of the grater there are protrusions from metal handles; it is on them that the bottom will be attached.
- Screw the grater to the board using self-tapping screws, after making holes in it with a nail and hammer.
- Place the board on the wall near the sink, hang a towel on the handle, and put your spatulas, ladles or flowers inside.
Idea 12. Flower vase
Glass bottles for wine, milk or other drinks are almost ready-made vases that are just waiting to be painted with acrylic paints and/or trimmed.


You can find all sorts of homemade products on your personal plots. DIY garden decorations allow you to bring the most original ideas and new ideas to life. Cool crafts, park figurines, and artificial plants are made from natural and synthetic materials, and even from garbage. They decorate the cottage and give a great mood.
Anything goes - suitable materials for decorating the garden with your own hands
Thrifty owners get scared when they see prices for garden sculptures and other decorative items in the store. At the same time, a dacha without interesting details turns into an ordinary vegetable garden and does not evoke the full range of positive emotions. An unregistered summer cottage is boring not only for children, but also for adults.
It's worth spending a little time decorating your dacha with fun and useful crafts. To make them, you can use whatever is at hand - from tin cans. Pebbles, twigs, wire, construction waste - from any illiquid property you can make things that will turn your plot of land into the most comfortable corner on earth, with a bright personality.
DIY garden crafts from scrap materials - all new items
When starting to design a garden with your own hands, it is better to get acquainted with current landscape trends in advance. Materials are now being used that were not commercially available before. Gypsum gave way to polyurethane foam, and plywood to thin plastic.

Country crafts made from driftwood look very organic next to a pond:

If the site does not have its own snags, you can get hold of them in the nearest forest. There are sometimes amazing specimens that just beg to be processed. Even a simple winding branch can be a finished sculpture.

Natural wood with its branches and curves allows you to exercise your imagination. Everyone will see something different in it, and almost no modification will be required. It is enough to remove dirt, peeling bark and obviously unnecessary elements - and the original wood craft is ready.
The finished wooden sculpture can be protected with varnish, wax or oil. This treatment is optional, but without it the wood will change color and crack over time.
With a set of chisels, a massive trunk can be covered with carvings or turned into a fairy-tale figurine. This method is good for old trees that are difficult to uproot. Human imagination and skillful hands transform a useless object into a work of art.

A mountain of different-sized knots that just look like trash can easily be turned into crafts. This conventional figure of a horse amazes with precisely captured movement and precise proportions, thanks to which it looks like it’s alive:

Painted stones
Stones in garden design are a classic that have been used for thousands of years. The modern trend allows for a departure from naturalness.
It is not necessary to preserve the original appearance of the minerals. They will look more interesting when decorated. Pebbles can be painted to look like cacti, snails, or an ancient castle.

How to paint a stone:
- Wash the mineral with a brush and detergent.
- Rinse and dry in the sun.
- Apply primer to the stone.
- Paint with acrylic paints.

The undoubted advantage of stone jewelry is durability. Even if they fade after a few seasons, the design can always be restored.

The photos below give you a lot of creative ideas. With their help, you can stylishly and inexpensively do everything for your dacha. Even the most spectacular products are made with your own hands without the help of professionals.


You really want your house to look stylish and expensive, but doing this with your own hands is actually easier than you might think. From the most ordinary, and sometimes unnecessary things, DIY crafts for the home look great.
Expensive furniture, works of art, modern gadgets will undoubtedly make your home look luxurious, but sometimes very little money, a little creativity and neatness are enough to get an interior that looks expensive and stylish, and all this attractive splendor is very inexpensive.
If you want to put your hands and soul into decorating your home, here are some ideas on how to do it.
DIY crafts from jars
Use jars to organize small items such as cotton balls, ear buds, and bath salts. This useful decor is ideal for a bathroom or bedroom. The jars may be the same or not, this is not very important here. The important element here is the handles. These are furniture handles. When I visit hardware stores or furniture workshops, it is difficult for me to tear myself away from display cases with handles; I am especially attracted to transparent ones in the form of crystals. It truly looks luxurious. I always regretted that I didn’t have furniture where I could attach such luxury.
And here it is, a godsend for beautiful hands. Naturally, the lids on the jars originally came in all sorts of colors, but they were painted with simple white spray paint. And the luxurious handles were glued with metal glue.
From bottles
Such an exquisite decoration of the simplest bottles can be made using decal paper with transparent film. Of course, first you need to paint the bottle in the desired color, and then start decorating the surface.
You need to find an interesting pattern that suits your interior in shape and color and transfer it to the surface of the bottle. The design is printed on decal paper for a laser or inkjet printer.

By the way, such paper is called differently. Decal paper, gummed paper, decal and even transfer paper are all the same thing.
Then, the drawing is cut with scissors and lowered into the water. After 10-12 seconds, the picture will separate from the substrate. You can watch the video, a very interesting way to accurately transfer a design to the surface of a cup.
Read the guidelines for printing on decal paper carefully. Find out the paper type for your inkjet or laser printer; in the printer settings, check whether the paper type is specified correctly. Before applying to the surface, it must be degreased with alcohol. The treatment liquid must not contain acetone. Dry the applied design with a hairdryer or in the oven. Attention! The oven temperature should not exceed 150 degrees.
After application, coat with acrylic matte or glossy varnish, depending on the purpose of decoration.
With this paper you can make designs that will last for many years, such bottles and vases can be washed, nothing will happen to them.

Anyone who has a creative streak is sorry to throw away empty “glass containers”.
And this is a right regret, because even the simplest glass bottles look magical in the interior.
Serving napkins
Great idea! I talked about such exquisite home decoration in a previous article about. And I liked Lyudmila Sanzharovskaya’s comment that such table setting gives status to the owners of the house.

From newspaper and magazine tubes
I never thought that such practically free material would be so flexible. I was a guest at a children's creative center with a surprisingly cute name “White Rabbit”. The hostess showed me the children's handicrafts, I was amazed, here is a dish woven from newspapers. After all, you can’t tell it from a vine. This dish will be varnished, it will not be afraid of water, and it can be used perfectly in the kitchen or in the garden for fruit.

This craft requires more skill and experience. But, as they say, the worst is the beginning.

Stylish crafts made from cord
The pleasant natural color of cotton cord is a favorite material for DIY crafts. Flower pots and organizers look elegant and noble, especially in combination with brightly colored tassels made from floss threads or natrul materials such as leather.


You can make rugs and baskets from scraps. But if the rugs can be made only from shreds, cut into ribbons and tied together into one thread for knitting. It is better to make a basket on a cord around which the shreds are wrapped. The basket should keep its shape. You can put tangles, scraps and everything a needlewoman needs in her handicraft corner.

From an old sweater
You can make a craft box look stylish using just an old sweater that no one wears anymore.

Book holders
I found such a cute guy on the Internet, I already have an article about holders, but it’s hard to pass by such a charmer. An ordinary stone, so skillfully painted and doing its functional task so well. Although in the article about holders the idea of a silver or gold polyhedron looks very expensive, the painted stone looks very nice and homey.

Beans and brushes for stylish crafts for the home
This proposal looks more like a life hack, but it looks so stylish that I decided to place this photo in crafts for the home. The truth about “making” here is only the process of pouring beans into a transparent vessel of suitable size.

Crazy Shred
A wonderful technique for crafts for the home - crazy patchwork or crazy patchwork. The good thing about this technique is that all kinds of fabric scraps are used. Every girl who sews more or less has somewhere a treasured bag with scraps and leftovers. In the technique of real, academic patchwork, special attention is paid to the selection of fabrics. They even sell sets. But there are no restrictions in this technique and it is easy to do.
Here, a guest of my site, Luda Strakovskaya, shows how to sew a potholder using this technique, everything is simple and clear.
In fact, potholders are a very necessary and beautiful detail of the kitchen interior.

But there are options for this technique in the living room too. Decorative pillows for beauty, comfort and as a cohesive color element of the interior.

A scattering of puzzles
I don’t know about you, but I have a huge number of puzzles that have migrated from one box to another, got mixed up, rearranged, and now it’s no longer possible to assemble anything worthwhile from them. And here is such a nice and beautiful idea for a nursery.

Crafts from buttons
This is a classic of the genre. Anything can be made from buttons, and there is practically no person who does not like to look at buttons. And in hardware stores there are always crowds of people near the scattering of buttons sold at discounts.
Recently I went into a store, there was a table with high sides and inside there were piles of various buttons that were left in the store one or several at a time, leftovers and illiquid items. A special scoop is stuck into the slide; you can pick up buttons directly with the scoop.
Mom and daughter, daughter, 5-6 years old, are collecting buttons in bags, their faces are happy, overjoyed. I ask what you will do with them. Mom, hurriedly, - Oh, we don’t know yet.
I really want to see what they came up with with their buttons.
Maybe such beauty, for example.

Cinder candles
Candles are always needed in the house. To create a romantic mood, for relaxation and release from the negative energy of the past hard working day, and, of course, for cases when there is an emergency power outage in the house.
Oh, this incident is perhaps the most favorite in our family. Especially when the children were little. Everyone pulls up to the kitchen, the kettle is turned on, the candles are lit and moments of happy family unity begin. It would be nice if everyone’s phones were dead by this time.
After such gatherings, a decent amount of cinders remains, or rather, this amount depends on the time needed by the emergency service to fix network problems.
The cinders need to be melted and poured into cups left over from sets or for some reason not used for their intended purpose.

Or you can make the “cup” itself from the same molten mass.

More ideas for a wooden nursery
A kind of stadiometer, or rather an age meter made of wooden square planks, will decorate and allow you to observe changes in the size of the hand of the owner of the room.

Well, or just decorate a children’s room on a budget, involving both kids and adults in the creative process.

Friends, decorating your home with your own hands is a pleasant thing when ideas have been formed and all that remains is to select materials and tools for crafts. When your soul is rushing and you want both this and that, there is no need to rush. I hope this article helped you decide, or at least was simply useful.