Good afternoon, dear readers!
Today I will tell you how to configure a TP-LINK router using the TL-WR841N(d) model as an example.
My thoughts on this model:
I think that TP-LINK has done a very good job with this model, as it is easy to set up and has a good price/quality ratio. It is perfect for the average home user who just needs Internet and Wi-Fi. I advise you to take this model if you are a simple user who doesn’t require anything more from a router. Many of my friends have had this model (on my recommendation) for more than 3 years. Works stably, performs its function on 5+
!
So, if you have already purchased this router, then let's configure it. Our procedure:
- Setting up a Wi-Fi network on the TL-WR841N(d)
Connecting the TL-WR841N(d) router to a PC
To begin, connect the power supply to the router and plug it into an outlet. If the indicators on it (on the router) do not light up, then turn it on with the button on the back.
You probably noticed the disk that came with the router, so here we are going to configure without its use.
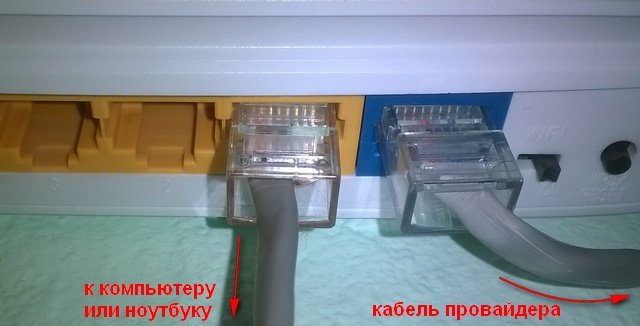
We insert the second end of the wire into the network card of the laptop/computer from which we will configure the router.

If you did everything correctly, then we can move on to the next point.
Setting up an Internet connection (setting up a WAN connection) on the TL-WR841N(d)
We need to go into the settings of the TL-WR841N(d) router. To do this, on the computer to which it is connected, open any browser and in the address bar go to 192.168.1.1 , or 192.168.0.1 . You should be prompted for your username and password. Specify admin And admin (default password and username). By the way, how to enter the router settings, the standard IP and standard login/password are indicated on the bottom of the router on a sticker

So, we entered everything correctly, entered the username and password. The router settings page should open to us.
The most important thing is to configure the router to work with your Internet provider. If this is not done, or done incorrectly, the Internet through the router will not work. A Wi-Fi network will appear, but without Internet access.
In settings go to the tab Network - WAN. Us in the dropdown list WAN Connection Type you need to select the type of connection that your Internet provider uses. It could be: Dynamic IP, Static IP, PPPoE, L2TP, or PPTP. For example, for me personally PPPoE(the most common connection type).

Setting up PPPoE, L2TP, and PPTP
If your provider uses one of the above connection methods, then select the one you need and set the necessary parameters that the provider should give you: username, password, IP address. This depends on the type of connection and provider you choose.

The main thing that needs to be achieved from the settings on this page is that the router connects to the Internet and starts distributing it. If the Internet works, then press the button Save, and we continue. If you can’t set it up, then call your Internet provider and ask them for all the information that is necessary to set up the router.
If your computer has a high-speed Internet connection configured, then we no longer need it. There is no need to run it. Our router will now launch such a connection. You can remove it altogether.
It may also be that the provider binds by MAC address (you need to check with the provider), in which case you can clone the MAC in the router settings, on the tab Network - MAC Clone. Or, there you can change the MAC address of the router. You can also call your provider and ask them to remove the old MAC from the binding and bind your new MAC address.

If the router has connected to the provider and is distributing the Internet, then you can continue setting up. To check whether the router distributes the Internet, just try to go to any website from the computer with which you are setting up the router (which is connected to the router port LAN)
Setting up a Wi-Fi network on the TL-WR841N(d) and setting a Wi-Fi password
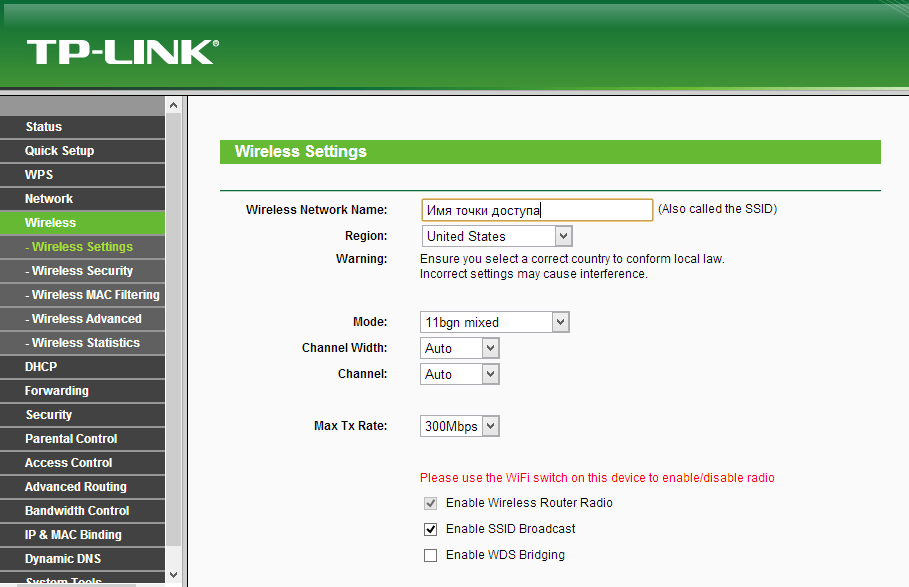
To configure Wi-Fi, you need to open the tab on the settings page Wireless - Wireless Settings. On this page we need in the field Wireless Network Name come up with and write down a name for your WiFi network, and in the Region drop-down menu select the country where you live. Leave the rest of the settings as they are in the screenshot below.
To protect our wireless network with a password, go to the tab Wireless - Wireless Security. There you need to select the security type WPA/WPA2 - Personal(Recommended).
In field PSK Password create and write down a password that will protect your WiFi net.
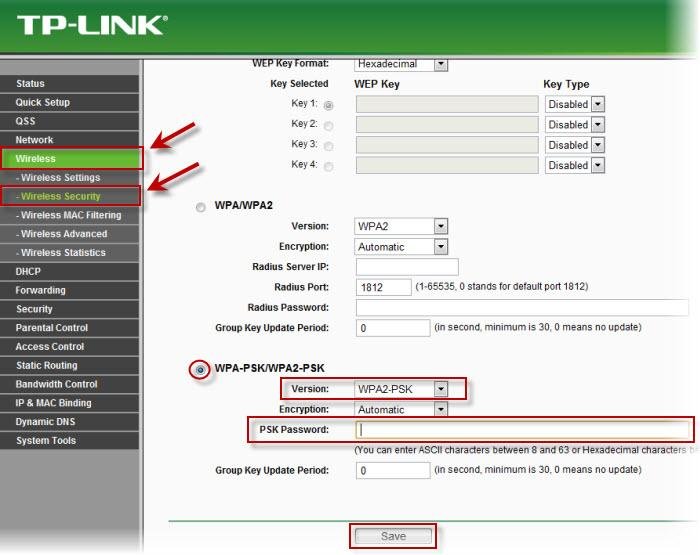
Save the settings by clicking the button Save.
Changing the default admin user password
While we are in the settings Tp-link TL-WR841N, I advise you to immediately change the standard password that is set to protect your router settings. So that everyone who connects to your network will not be able to go into the router settings and change them (for example, we gave the Wi-Fi password to a neighbor/friend).
Open the tab System Tools - Password. Enter your old username and password first (default is admin). Then, below, enter a new username (you can leave admin) and a new password. I advise you to write down this password somewhere so you don’t forget. Save the settings with the button Save.

That's all, the configuration of the Tp-link TL-WR841N router is complete.
All that remains is to reboot the router. This can be done by turning off/on the power, or from the settings, on the tab System Tools - Reboot, you need to press the button Reboot.
After setup and reboot, a Wi-Fi network will appear with the name that we set during the setup process. And to connect to a wireless network, use the password that we also set when setting up the router.
I hope this article helped you! I did my best. If you have any questions, ask them in the comments to the post. If you have a suggestion, you can send them to the email address
In the next article I will tell you
Thank you for your attention! See you again!
A router is an ideal device for creating Wi-Fi fi networks. But many people have problems setting it up. In this article we will talk about how to set up tp link router.
You brought your router home and have already opened the box. Great. In front of you should be several pieces of paper, a disk with software, a network cable and the router itself. Let's start setting up:
- Setting up a tp link router starts with connecting the device. It is advisable to place it close to the computer, because The manufacturer provides a small cable in the kit. We connect the router to the power supply and plug it into an outlet.
- Connect the router to the network. To do this, we are looking for a blue socket, under which there is the inscription “Wlan”. We plug the wire included in the kit into it.
- We connect to the computer. We use another wire, plugging it into one of the yellow connectors on the router. The other part of the wire needs to be connected to the port on your PC, which is located on its back side.

WAN and LAN ports. WAN - Internet input. LAN - local network (connecting local devices)
Let's look at the buttons and connectors that can be found on your router:
- Button to start and shut down the device.
- Connector for power supply.
- WAN. The blue port to which the network cable is connected.
- LAN The yellow port is needed to connect to a computer.
- Button to launch the QSS function. Used to connect your phone, tablet, TV or laptop to Wi-Fi.
- Reset. Designed to completely return the device to factory settings.
Almost all ports and buttons on the router are labeled, which makes them easy to find.
We figured out the router itself and connected it.
Take a thin needle, carefully insert it into Reset and hold for 10 seconds.
Setting up the router
So, you have connected the device to your PC. Now let's go to tp link router settings. For this:
- We launch absolutely any browser. We look for the address bar and enter a special IP address into it. You can find it on the back of your device.
- After the previous paragraph, you are asked to enter your username and password. To find them, just like in that case, turn your router over. If you are too lazy to search, then enter the standard ones - admin/admin.
Let's update the firmware before moving on. Go to the website “tp-linkru.com”. This is the official website of the manufacturer of your equipment. Find your device model there and download the latest firmware. Unzip it. Return to your router's web interface. We look for the “System tools” menu item and go to equipment upgrade. There, using “browse” we point to installed file.
Let's go back to the settings:
- Necessary install login and password for wai fi network. To do this, find the “system tools” item in the web interface. In the drop-down menu, click on “Password”. In the window that appears, you must fill in all fields. In the old lines enter admin/admin. Fill out the rest as you wish. Save.
- We return to the left side of the web interface. Click on “Network” and then on “Wan”. Next you need to set the network type. It all depends on your provider, so it’s better to check this point with them. After setting, don't forget to save.
- Now in “Network” select the “MAC clone” item. There, just click on the bottom button, which clones the top address. Save.
- We are looking for the “Wireless” item. Open "Setting". Next, enter ssid in the required line. If desired, indicate your region.
- Let's go to wireless security. Enter the password in the password field. Be sure to remember it in order to use the wifi network.
Great. You are completely done with the setup. If you wish, you can reboot your router.
Various problems with the router
Now let's talk about some possible errors during and after setup.
If you have forgotten your password, you need to return your router to factory settings. This is done using a thin needle and the “Reset” button. Press and wait for about 10 seconds. After this procedure set up equipment again.
In cases where it is not possible to log into the web interface of the TP router link, you need to try returning the device to factory settings. You can also use another browser for this.
If your device does not see wai WiFi network, then try bringing it closer to the router. If this does not help, then go to the web interface and enable visibility for all devices.
There are also times when problems are caused by a device failure. In controversial cases, you can contact a professional who will help you resolve this issue.
Let's sum it up
Set up a wifi router not difficult at all. Many people are intimidated by the English interface, but if you follow the instructions given, you will succeed.
If you are a novice user of the Rostelecom provider, then you probably were offered to rent or purchase additional equipment, such as, for example, a TP Link router, when signing a service agreement.
Almost all device models from this manufacturer are ideally adapted to distribute an Internet signal to all home devices. Where to start, how to set up a router to distribute the Internet and use the World Wide Web at home on different devices?
Contents of the article
- 1 General information
- 2 Basics of connection and setup
- 2.1 Automatic method
- 2.2 Manual method
- 3 Connecting IP TV via router
General information
Like other types of routers, TP Link is designed to exchange the received network traffic packet between all devices connected to it. That is, all home equipment can access the Internet via Wi-Fi wireless connection technology, provided that the specific equipment supports it. But the user must understand that the speed will decrease in proportion to the number of connected units of other devices.Any router has ports for receiving and distributing the received signal. On the case there is always a connector called WANN, through which the equipment connects to the Rostelecom Internet network, and several LAN connectors for connecting other home equipment. And if the router is equipped with a wireless network adapter, then the connection can be established immediately via Wi-Fi technology.
The manufacturer has equipped most of its models with security software, that is, traffic is filtered and unwanted attacks from intruders are blocked.
Connection and Setup Basics
In order for everything to work, and you can access the Internet from any device, you need to correctly configure the TP Link Rostelecom router. There are two options here - getting automatic settings or the manual method.Automatic method
We looked at the automatic settings method. If after all the manipulations the Internet pages do not open, then you can set the settings manually, which is discussed below.
Manual method
Now you need to set the values for the output of other devices via Wi-Fi wireless technology:
Now your personal wireless network is protected; the built-in software will filter out unwanted requests from intruders.
Connecting IP TV via a router
Usually you don’t need to enter any additional settings, the TV receiver should connect to the network itself, but if nothing happens, follow these steps:Important! Sometimes it happens that all the settings you have made are lost; this can happen if, for example, the general supply of electricity or home Internet is turned off.
In order not to configure the equipment every time, you can reserve software settings on your website on the Internet:
In case of any equipment failure, you can easily use the recovery option; you should do everything in reverse order and set the previously existing settings from your saved file.
When there is a need to connect more than one gadget to the network, you need a wi-fi router. Routers allow you to distribute the Internet to several devices simultaneously. There are many models of such set-top boxes, and this section will provide detailed instructions on how to connect a tp link router.
If the device was recently purchased and has not yet been used, before connecting the TP-Link router to the computer, you need to check the package contents. The set-top box must come with a power supply, USB cables and instructions.
After the product is unpacked, you can begin preparing it:
- Connect the set-top box to the network and check that all indicators on the panel light up.
- Connect the router to the PC using a cord marked “Ethernet”, inserting one end of it into the yellow connector of the set-top box, and the other into the network port of the computer.
- Connect the cable from the cord intended for connecting to the Internet to the blue connector of the router.
On a note. If, after connecting the router to the network, the indicators do not light up, you need to press the “Power” key located on the back of the device. When they become active after turning on the power, there is no need to touch the key.
Pre-configuring the connection in Windows
When the TP-Link Wi-Fi router is ready for use, you need to make changes to the connection settings in the network menu of the operating system.
This should be done in the following sequence:
- Using the start button, go to the control panel.
- Go to the Network Management Center and go to the sub-item for changing adapter data.
- Find the active network, display the menu by right-clicking and select the properties sub-item.
- In the window that appears, click on “Network” and go to the Internet version protocols.
- Activate commands to automatically obtain IP addresses and DNS servers.
- Go to the alternative configurations tab and set the configuration mode to automatic.
- Confirm the changes by clicking the “OK” sticker.
After making the necessary settings, you need to access the router interface, proceeding in this order:
- Launch your internet browser and wait for the page to load.
- Enter “192.168.0.1” or “tplinklogin.net” in the address line.
- Enter the default login and password information. Most often this is the combination “admin”.
On a note. If the specified combinations do not work, you can view the device identification data on the label that is glued to the bottom of the case.
Step-by-step guide on how to set up a TP-Link router

After entering the device menu, you can go to the router settings.
To do this, you need to follow the following algorithm of actions:
- In the network menu, find the “Wan” section and click on it.
- View the list that opens and select the wan connection type.
- Set up a connection with your provider. Here you will need to select the type specified in the contract. It can be "PPPoE", "L2TP", "PPTP", "Static IP" or "Dynamic IP".
- Enter the user identification data specified in the same document.
- Confirm the change in settings and check the activity of the Internet connection.
On a note. If the agreement with the provider is lost, you can find out your login and password by contacting technical support. After the user provides his passport details, the information will be provided.
Setting up a Wi-Fi network on a TP-Link router
When the connection to the Internet is established, you can proceed to the final stage of work - Wi-Fi settings.
To do this you need to do the following:
- Through the control panel, go to the wireless connections subsection, select the settings tab. In the English version of the interface, these items are designated as “Wireless” and “Wireless Settings”.
- Set the name of the network and select your region.
- Leave the default data unchanged and confirm the settings.
- Select the wireless modes security tab and set the encryption type to “WPA/WPA2”.
- Enter the created access code and confirm the new parameters.
Advice. To protect the router interface and prevent intrusion by third parties, it is better to change the identification combinations that give access to administrative settings. To do this, go to the system tools tab and select the “Password” sub-item. Then you will need to enter new keys and save them, and then restart the device.
Possible problems during connection and setup

Usually, connecting a TP-Link WiFi router yourself does not cause any difficulties.
But in some cases the following problems may arise:
- The computer does not recognize the set-top box. In this case, you need to connect the router to another gadget or reboot it.
- The router interface does not open. Some device models are not compatible with the Google Chrome browser, in which case it is advisable to sign in from another gadget.
- The settings menu does not load. In this case, you will need to check the wireless connection parameters; IP and DNS addresses should be set automatically, as evidenced by the checkboxes next to these items. If they are removed, you need to put them back on.
- I can’t enter the menu at the address specified on the router panel. In such situations, the reason may be that the data was entered incorrectly, or that it was changed after the set-top box was installed. In the first case, you will need to check the correctness of the recorded combination, and in the second, “roll back” the settings to the factory settings by pressing the “reset” button on the panel and holding it for 10-15 seconds. After this, when logging in, the data registered on the device panel is indicated.
- After setting up the set-top box, access to the Internet was not obtained. The reason for such trouble may be problems on the part of the provider. To confirm or deny this, you need to connect your PC to the network directly and check the connection activity. In other cases, you cannot access the Internet because the cables are not connected correctly or are damaged and need to be replaced. If this doesn't help, the router may be faulty.
TP-LINK is one of the leading manufacturers of network equipment. We will provide detailed information on how to connect or reconfigure a TP-Link router. The procedure for connecting the device, setting up a wired and wireless network, changing the password and updating the firmware will be discussed. The information obtained will allow you to easily configure your home network in TP-Link routers.
What data is needed to connect the router?
To change the parameters of the router itself, you will need two things: a browser and a password with an access login. The latest data can be found on the label attached to the device body. As a rule, the standard login and password are the English word admin.
To use the Internet you will also need authorization data, which you must obtain from your provider. However, they must be specified in the service agreement. They must be entered in the router or a specialized program, if provided by the provider. Be sure to know the connection type (PPPoE, L2TP, PPTP and others) for proper configuration. When using a dynamic IP, you need to know your IP address, subnet mask and the like. If all these parameters are already in hand, you can connect to TP-Link.
How to connect a device to a network, PC or laptop
The procedure does not cause any great difficulties, and is performed for 5-10 minutes. Follow the steps in the following instructions one by one:

Models with Wi-Fi can be configured over the air. This is relevant if you are not able to connect the router to your computer via LAN. This completes the manipulation of the wires. The process then continues in the web interface.
Login to the web interface
Manipulations with the modem are performed only in the web interface. You can access it from a computer with a network cable connected or via Wi-Fi on a wireless model. Attention! You can use the interface at any time, even when the Internet is down. To log in, follow the instructions below:
Router settings
Let's move on to the most interesting part - changing the router parameters. The main window contains more than 10 different sections. Most of them are not needed by the average user. Internet activation occurs in a maximum of two sections. Next, we will tell you in detail how to set up a TP-Link router, about creating a wired connection, setting up Wi-Fi, changing the login password and other useful things.
Connecting to a wired network

The router has a quick setup feature. Beginners are recommended to use this section. Click "Next" and follow the installer prompts:

When setting up other types of connections, fields for entering your login and password will appear. Here you need to enter the data provided by the provider. The user can change the settings in the “Network” section. In some TP Link models, next to the choice of connection type there is a “Define” button, which will help you find out your type. Based on the WAN, the corresponding characteristics are already configured. 
For example, to use PPPoE, fields for login/password and parameters specific to PPPoE already appear in the window.

Connect via wireless network
For devices with a Wi-Fi module, you will also have to set up a wireless connection. This can be done with quick setup (the penultimate point involves entering all the important parameters).

Let's figure out what Wi-Fi settings on the TP-Link router should be changed. Broadcasting should be set to “on”. The SSID or network name is what will appear on other devices when searching. Specify your region, mixed mode. Leave the channel and its width automatically. Advanced users can choose it themselves, taking into account occupied channels by neighboring routers. If you want to set a password for the access point, select the WPA2-PSK security type. Finally, all that remains is to enter the password for the wireless network point. Click the “Next” button and complete the process.
Similar settings are found in the “Wireless Mode” section. To change the SSID or channel parameters, select the “Wireless Settings” sub-item. You can change the password in the “Wireless Security” section. When making any changes, do not forget to click the “Save” button. If the selected settings have not changed, reboot the device.

Through these menu items, routers from the manufacturer TP-Link are configured.
Changing the password for logging into the web interface
All owners are recommended to change the standard password and login for the router. This is due to the fact that an attacker, if the Wi-Fi password is missing or has been hacked, will be able to enter the modem settings and “have fun”. Eliminating the problems created will not be difficult, but it is better to avoid this. The interface allows you to quickly and conveniently change input data:

If you have forgotten your login information, perform a factory reset.
Advanced Settings
The router has a lot of additional functions that expand its capabilities. Consider some of the advanced settings:
- Guest network. Allows you to configure a public guest network, limit incoming/outgoing traffic or operating time.
- Changing addressing. It allows you to set static IP addresses or use DHCP.
- Forwarding – setting up virtual addresses, web telephony, conferences and the like.
- Parental control features. Limiting Internet access time or specific resources.
- Manually setting a routing table (for specialists).
- Binding MAC addresses to specific IPs.
You can find out more about how to configure specific functions of your TP-Link router in the instruction manual.
VPN
This technology allows you to hide information from prying eyes. Encryption is performed, so even your provider will not be able to track your visits. However, only those models that have a pre-installed VPN server can use VPN. You can perform the setup using the following steps (for English firmware).