Rice. No. 4
Mounting wedges are installed under all vertical elements of the window frame - these are vertical trims and vertical imposts. Distance (side) blocks are installed at a distance of about 200 - 250 mm from the corners of the window frame; the dimensions of the side blocks are selected similar to the dimensions of the lower support blocks. Installing spacer blocks in the very corners of the window frame is unacceptable, since the blocks will prevent thermal deformation of the window during seasonal and daily changes in the air temperature and the window itself.
10. Aligning the window block frame vertically and horizontally, temporarily fixing it in the required position
The frame of the window structure, together with the tapes glued to it, is placed in the opening and, using plastic wedges, is aligned vertically and horizontally and is pre-fixed.
11. Final fixation of the window block frame in the opening
Holes for fastening elements are drilled in the wall. The frame of the window structure is finally fixed to the wall with fasteners. When installing fasteners, be careful that the box is not stretched by the fasteners!
12. Gluing tapes at the bottom of the window structure
Carefully remove any dust generated when drilling holes in the wall. Prime those areas of the opening surfaces to which the tapes will be glued. Wait for the primer to dry. Vapor barrier tape “ROBIBAND VM V 100” is glued to the lower surface of the opening. When gluing, the tape should be directed towards the room. The length of the tape piece must be sufficient to cover the entire length of the lower horizontal assembly seam, taking into account the formation of overlaps or edges at the corners for reliable sealing of the corners. “ROBIBAND NL 120” tape is glued to the outer plane of the stand profile or the outer plane of the rebate intended for installing the drip lining with a narrow adhesive strip. When gluing the tape, it should be directed towards the street. The length of the tape segment must be sufficient to cover the entire length of the lower horizontal gap, taking into account the formation of laps or edges at the corners for reliable sealing of the corners.
13. Filling installation seams with polyurethane foam insulation
A container of polyurethane insulation (PPU) is prepared for use in accordance with the instructions for use of the specific foam. It is recommended to use polyurethane foam with high initial and low secondary expansion. Before filling the installation gap with polyurethane foam, it is necessary to moisten the surfaces of the installation gap with water by spraying. Do not wet the areas of surfaces to which the tape will stick, as nothing will stick to a wet surface! After moistening, the installation gaps are filled with polyurethane foam. The degree of filling the gap depends on the degree of expansion of a particular PU foam. Test releases are recommended. The amount of polyurethane foam in the seam should be enough so that the polyurethane foam, when it expands, pulls the tape, but does not tear it off.
Before gluing tapes onto wet foam, re-wet the surface of the foam, since otherwise large voids may form in the foam!
14. Gluing “ROBIBAND VM” tapes to the opening
The protective paper is gradually removed from the adhesive strip of the vapor barrier tape “ROBIBAND VM 120”, glued to the vertical and upper horizontal sections of the window frame, and the tape is glued to the surface of the window opening. Make sure that when gluing the mounting foam does not get between the tape and the surface of the opening. The protective paper is removed from the “ROBIBAND VM 100” vapor barrier tape located in the lower part of the opening, and the tape is glued to the front plane of the stand profile or to the front plane of the rebate intended for installing the window sill. Edges (sides) are formed in the corners of the opening to reliably protect the joint. The protective paper is removed from the “ROBIBAND NL 120” tape, and the tape is glued to the bottom of the window opening. Edges (sides) are formed in the corners of the opening to reliably protect the joint.
15. Installation of ebb and window sill
A sill and a window sill are installed on the window block. All operations must be performed carefully to avoid displacement of the window frame.
16. Hanging sashes and installing fixed glazing
The sashes are hung and fixed glazing is installed. The doors close. All operations must be performed very carefully to avoid the frame of the window structure from moving.
17. Quality control
Quality control is carried out after 24 hours. Quality control consists of checking the tightness of the tapes along the entire perimeter of the installation seam, both from the indoor and outdoor sides. If the tape is glued tightly, without peeling or gaps, then we can assume that the installation was done efficiently.
The PSUL tape should expand and completely cover the gap.
18. Finishing slopes
The finishing of the slopes is carried out in accordance with the adopted constructive and design decisions.
Need more information?
You can watch on our website an educational film on the installation of window structures, which shows the entire process of high-quality installation of a window unit.
When planning to replace old windows with new ones, many wonder how difficult it is to install them yourself. The answer is a job of medium complexity. In terms of time, replacing a medium-sized window with dismantling the old one takes about 3.5-4.5 hours. This is for a person with no experience. Company employees who do this all the time spend less than an hour on it. But the installation of plastic windows by the owner of the premises cannot be compared with the hasty work of “professionals”. They simplify the process to the point of indecency, arguing that prices have not been raised for 6 years and they have no time to waste time on trifles. If you are lucky to find truly masters, then you can entrust the installation to them. If not, take a weekend and install it yourself.
Construction of plastic windows
To properly understand the installation process, you need to have an understanding of window design. Let's start with materials and names. Plastic windows are made of polyvinyl chloride, which is abbreviated as PVC. Hence the second name - PVC windows.
The main element of any window is the frame. For plastic windows, the frame is made from a special multi-chamber profile. It is divided by partitions into a number of cells - chambers. The more of these cells, the warmer the window will be. When they talk about how many cameras there will be in a plastic window, they have the number of cells in the profile.
In the middle of the structure, in the largest chamber, a blue insert is visible. This is a reinforcing element of increased rigidity. It gives the profile the required strength. In plastic windows this insert is made of plastic, in metal-plastic windows it is made of metal (usually aluminum). That's the whole difference between them.

There is also a division of profiles into classes: economy, standard and premium. The best choice if you need normal windows is the standard class. In economy class, the partitions are too thin and they begin to freeze almost from the moment they are installed. Premium has a high price due to options that, in fact, are not needed.
If you want to have the best profile for plastic windows, take the standard class of any factory. There is no particular difference between products from different companies. They have long been standardized and all managers’ stories about the advantages are fairy tales. If they are made on factory equipment, there is no difference between them: all factory profiles have long been standardized.
Window profiles are white as standard, but can also be brown to match the color of any wood, and even pink on request. Windows made from colored profiles are more expensive than similar white ones.
Window structure
To understand what is being discussed in the description of the installation process, you need to know the name of each component of the structure.

It consists of:
- Frames. This is the base of the window.
- If the window consists of several parts, the frame is divided into parts by an impost - a vertical component. If the window is made of two parts, there is one impost; If there are three parts, there are two, etc.
- The opening part of the window is called the sash, the stationary part is called the capercaillie. A double-glazed window is inserted into them - two, three or more glasses, hermetically sealed together. A foil tape is laid between the glasses to ensure tightness. There are double-glazed windows with special properties: with reinforced glass, tinted and energy efficient, which, according to manufacturers, reduces heat loss through the windows. There are also double-glazed windows with inert gas pumped between the glass panes. It also reduces heat loss.
- Double-glazed windows are pressed to the frame with a cap - a thin plastic strip. The tightness of the connection is ensured by a rubber seal (it is usually black).
- Locking fittings are installed on the sashes. This is a specific set of mechanisms that provide opening and locking. They can be different, as they provide different functionality: opening, opening with ventilation, opening + ventilation + micro-ventilation.
- To ensure tightness, rubber seals are installed on all parts - frame, impost and sashes.
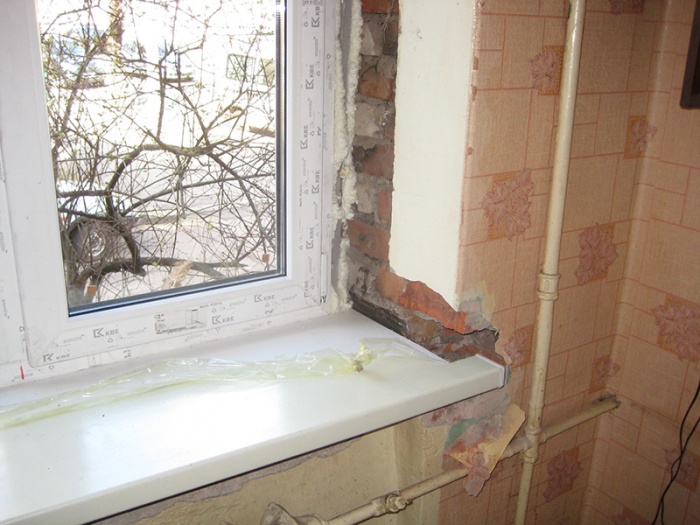
At the bottom of the outer side of the frame (the one facing the street) there are drainage holes that are closed with special caps. Through them, condensation that forms inside due to the difference in temperature outside and indoors is discharged outside.

The window also has a sill - a board on the outside that removes precipitation and a window sill on the inside. Side and top parts from the street and indoors. They can also be made of plastic or made using a different technology.
How to measure a plastic window
When ordering windows, you will be asked for six sizes: the height and width of the window, the length and width of the window sill and slope. To measure everything correctly, you need to determine whether your window opening is made with a quarter or without.

Inspect the opening. If the outer part of the window is narrower, the opening is a quarter. In this case, measurements are taken at the narrowest point: openings rarely have ideal geometry, so you will have to measure at several points. Find the smallest value, add 3 cm to it. Transmit the height as it is.
If the opening is smooth, the calculation proceeds differently. Measure the width and height. Subtract 3 cm from the measured width and 5 cm from the height. This will be the height and width of your window. We remove 3 cm in width, since a gap of at least 1.5 cm is required on both sides under the mounting foam. We subtract 5 cm in height, since the same 1.5 cm is needed on top, and 3.5 cm on the bottom will be used to install the window sill.
The length of the window sill and ebb is taken with a margin - 5-10 cm more than the width of the window opening. During installation, both the ebb and the window sill are “recessed” a little into the adjacent walls, and the excess will go there. The width of the tides is standard, so the nearest larger one is chosen. On window sills the situation is different. Its width is chosen arbitrarily - at the request of the owner. Some people like them wide so they can put something, others prefer them flush with the wall. So there are no rules here.
When ordering, you will need to indicate how many and what parts will be in your window: whether there is a capercaillie or not, where it is located, how many sashes, which side they are on, how they should open. You will need to indicate the type of fittings (ventilation, micro-ventilation).
Preparation
If you are replacing windows, installing plastic windows yourself begins with dismantling the old one. Problems usually do not arise: breaking does not build. After dismantling, it is necessary to inspect the opening: remove everything that can fall off. If there are any protruding parts, they must be removed - using a hammer, chisel or power tool. When the plane is leveled, all construction debris must be removed. Ideally, sweep everything away, even the dust, otherwise during installation the foam will not “grab” well on the wall.

If there are too large potholes or cavities, it is better to cover them with cement mortar. The smoother the opening, the easier the installation will be. If the wall material is loose, they can be treated with binding compounds: penetrating adhesive primers.
How to install correctly: choosing an installation method
There are two different methods: with and without unpacking (disassembling) the window. When unpacking, holes are drilled through the frame and anchors are driven through them into the wall. This method is more complicated, but the fastening is more reliable.

This is an anchor bolt installation. There are three of them on each side.
When installing without unpacking, metal plates are attached to the outside of the frame, and then they are attached to the walls. This is naturally faster, but the fastening is very unreliable: under significant wind loads, the frame will warp or it will sag.

If you really don’t want to disassemble the window, you can mount it on a plate, but use not narrow and thin ones, but thick and wide ones, which are often used when installing a rafter system.
In principle, small windows installed on mounting plates, provided there are no significant wind loads, can stand normally. If you live in a region with strong winds, and they blow mainly through your windows, if the apartment is located in a high-rise building, in these cases installation with unpacking is necessary.
Below, watch an emotional and intelligible video that explains why it is better to use anchors.
Do-it-yourself installation of plastic windows: step-by-step instructions
Let's describe both methods: suddenly you need a method with mounting on plates. It is used in buildings made of foam blocks, the load-bearing capacity of which is low and the load from the windows has to be distributed over a large surface. This method of installing plastic windows is also necessary if the building is built using “layered” technology. For example, there is concrete in front and behind, and a layer of insulation between them. If the window must stand in the soft layer, then it will need to be secured with plates. Installation of PVC windows in brick, cinder block, panel, etc. the house is desirable on the anchor.
Installation and unpacking
Do-it-yourself installation of plastic windows begins with measurements. Measure the frame and window opening to make sure they are compatible. Afterwards you can start working. The process begins with disassembling (unpacking) the PVC window. Here are the steps:
- Removing the window sash:
- Close the window (the handle is turned down).
- Remove the plastic covers on both hinges. They are pryed off with a screwdriver.
- There is a pin on the top hinge that provides a movable connection. It is located in the center and protrudes slightly. They press on it until it sinks (you can take a metal plate, rest it against the pin and lightly tap the plate). The pin will slide out from below. Now you can grab it with side cutters or pliers and pull it down and pull it out.
- Hold the door up and open the lock. To do this, place the handle in a horizontal position. Having tilted the upper part towards you slightly, lift the sash, removing it from the lower pin.
The entire sash has been removed. To make it clearer, watch the video. It describes in detail how to remove and install the sash on a plastic window.
- On the wood grouse, remove the glass unit. It is held in place by glazing beads. They need to be removed, then the glass unit itself will be removed without any problems. Remove the glazing beads like this:
- Something narrow and strong is inserted into the gap between the bead and the frame. If you don't have a special tool, it's best to use a small spatula. Disassembly begins from one of the long sides.
- The spatula is carefully pushed into the crack with a corner and the glazing bead is gradually moved away from the frame.
- Without removing the tool, move along a little, again pushing the glazing bead to the side.
- This goes along the entire length. As a result, the glazing bead is almost separated; it is simply removed.
- With the short side, everything is simpler: you pry up the free edge and, by turning the spatula, remove it from the groove. Grab the free edge with your hand and pull up.
Now you can try to remove the glass unit. Just be careful: it's heavy. If that doesn't work, remove another one of the beads. Just make sure that the window is tilted and the glass unit does not fall out. Now, if necessary, you can replace the double-glazed window yourself. Watch a video on how to remove glazing beads from PVC windows.
- Removing the window sash:
- The freed frame is covered with a special self-adhesive tape along the outer perimeter. Its installation is recommended by GOST. With it the window doesn't get so cold.

- Remove the protective tape with the campaign logo. If you leave it, it will fuse too much with the frame under the influence of the sun and it will be problematic to remove it.
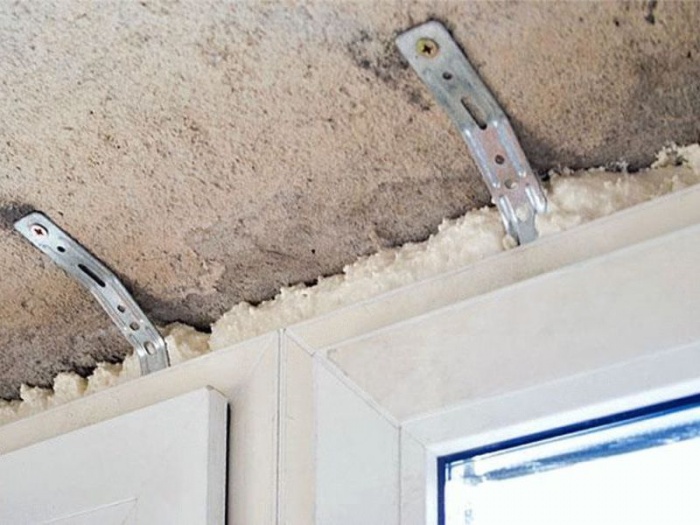
- The prepared frame is inserted into the window opening. Mounting wedges are used to position it. They must be installed in the corners and under the impost. The rest are arranged as needed. By placing them, the window is set strictly level in three planes. The position of the window is pre-fixed. This is what you can use mounting plates for.

- Take a drill and a drill bit that matches the diameter of the anchors. Make holes for fasteners. 150-180 mm retreat from the top edge. This is the first hole. The bottom one is approximately the same distance from the bottom corner. Another anchor is installed between them in a standard window: the maximum distance between two fasteners should not be more than 700 mm.
- Having made a hole, check whether the frame has moved (level in all three planes), then hammer in the anchor and tighten it. You cannot overtighten: the profile should not sag. Repeat this operation the required number of times.

- Install ebb tides outside. To do this, first a vapor-permeable waterproofing is glued to the outer part of the frame (it is self-adhesive). Small grooves are made on the sides of the window opening, into which the edges of the tides are then inserted.

- A layer of foam is applied to the part of the window opening from the outside, where the ebb will rest on the wall. Sometimes, if the height difference is large, a lining profile is installed here. and then an olive is attached to it. The ebb, cut to size, is placed under the projection of the frame and there it is attached to the frame with self-tapping screws.

- Along the lower edge the ebb also foams.

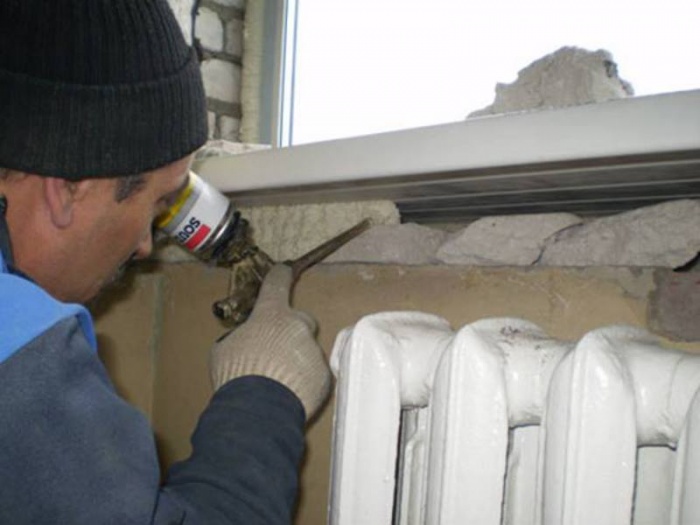
- Next, foam the opening. When installing plastic windows in the summer, the gap between the frame and the window opening is sprayed with water from a spray bottle. This is necessary for better polymerization of the foam.
- A vapor-permeable heat-insulating strip is glued along the contour of the frame - it is also recommended by GOST.
- Take a balloon with foam and fill the existing gaps to 2/3 of the volume. If the gap is large - more than 2-3 cm - foam is applied in several stages. A time interval of 10-15 minutes is required between two layers. When the first layer is partially dry, it is also sprinkled with water and the second is applied. This is repeated until the volume is 2/3 filled.

When installing PVC windows with your own hands, foaming can be done in several stages - depending on the size of the gap
- Without waiting for complete polymerization, the free edge of the heat-insulating tape is glued to the window opening. Just note that when using tape, the slopes will need to be made of plastic: the plaster and mortar will not “stick” to it.
- Assemble all parts of the window. All that remains is the finishing work, and they are not a hindrance.
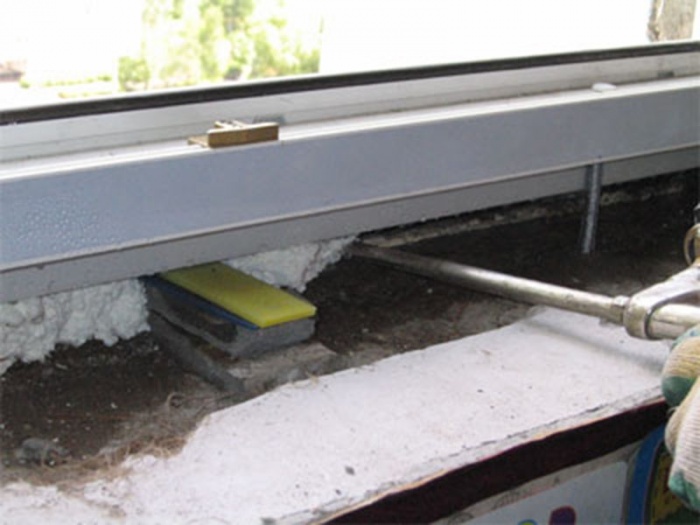
- A vapor barrier tape is also installed under the window sill in the lower part (also GOST recommendations). The window sill rests on support blocks made of hard wood treated with impregnation. The distance between them is 40-50 cm. They are made in such a way that the window sill is slightly inclined towards the room (about 5°).

Watch the video to learn how to correctly install a window sill when installing a plastic window. There are many secrets.
The last to be installed or sealed are the slopes. One more video on this matter.
Installation without unpacking
The main details are described above, so this chapter is short. Installation for this option begins with the installation of mounting plates. They are of two types: U-shaped and linear. It is important to choose the most reliable thick metal ones.

They are installed at the same distance as the anchors: 150-250 mm from the edge and no more than 700 mm between the middle ones. They are simply screwed to the profile with self-tapping screws.

Then installing plastic windows with your own hands with mounting plates is identical to that described above, starting from the moment the window is leveled in the opening. Only they attach not the frame, but the plates, and not to anchors, but to dowel-nails. Drill a hole, bend the plate, insert a dowel, put the plate in place and tighten the dowel. Further all actions are identical.
Now it’s clear why installers prefer them: a decent amount of work is spent on disassembly, anchoring, etc.: screws are much easier to tighten. True, if you take powerful plates, they will hold tightly. No worse than an anchor. For example, like in the video.
Installing windows yourself will save up to 50% of the money that would be spent on installation by a third-party company. But it is very important to do everything correctly, otherwise the savings will be questionable. Wooden houses have their own characteristics that you should be aware of.
Possible problems if windows are installed incorrectly
It is advisable to adequately assess your strengths in advance, because some mistakes can become very expensive:
- lack of casing - a house made of timber “walks” during shrinkage and begins to put pressure on the window frames;
- using polyurethane foam in the shrinkage gap between the top of the casing and the wall of the house - the hardened foam is very hard and will transfer pressure from the upper beams to the window frame, negating the functions of the casing;

- incorrect calculation of the dimensions of the plastic window frame - without taking into account the installation gap, you will have to expand the window opening;

- there is too much gap between the frame and the wall - if you simply foam such a gap, the slopes will always be cold, it is better to insert an additional expansion profile;
- lack of external protection of the installation gap - when foaming the distance between the frame and the casing, it is better to close the gap from the outside with PSUL tape, which provides protection for the foam from ultraviolet radiation, but allows moisture to evaporate;

- lack of waterproofing from the outside and vapor barrier from the inside - the foam is destroyed when exposed to the atmosphere, which leads to a deterioration in insulating properties;

- placing a window in a “cold zone” causes freezing of slopes and the formation of condensation on the inside

If there is the slightest possibility of making one of these mistakes due to inexperience, it is better not to save money and order window installation. For an experienced builder, DIY installation should not be a problem.
Pitfalls that plastic window manufacturers don't talk about
The tightness and high sound insulation of plastic double-glazed windows is presented as a definite advantage. But, unfortunately, not everything is so rosy. After all, the humidity in living spaces is constantly increasing, and thanks to unsealed wooden frames, a constant flow of fresh air is ensured. Of course, too large gaps can make the house very cold, so Euro-windows have long become a very popular product.
How to solve the problem with high humidity? One option is to use forced ventilation. But in the absence of ventilation holes, this can be problematic - a lot will have to be redone.
It is for such cases that window supply valves were invented - special profiles that are installed on plastic windows. What is especially pleasing is the ease of installation. It is enough to replace part of the standard seal with a special one and screw the valve to the window sash with several self-tapping screws. Unfortunately, the system will not work without an exhaust vent.
Another unpleasant surprise for owners of wooden houses is that companies that install plastic windows often do not provide a guarantee for their work, citing the unpredictability of wood behavior. So, even if all installation rules are followed, you may find that after a few years the windows no longer open. But you won’t be able to sharpen plastic with a file.
Manufacturing of casing (plugs)
The first thing the installation of windows begins with is the installation of the casing. But is it always necessary and how to do it correctly?
When can you do without a joint?
A new wooden house made of logs or beams will shrink in any case. And no one has canceled seasonal soil heaving. In this case, the casing is required - it will protect the window from distortions, torsion or bends.

It is important to use only dry and durable material for casing boards - a 50 mm thick edged board and a 150x100 mm or 50x50 mm edged beam. The width should be equal to the thickness of the wall.
But in a frame house you don’t have to make a frame - the frame itself is already formed for window and door openings and provides the necessary rigidity. Some builders also do not install a casing in a log house that has stood for more than 10 years, arguing that it has already undergone shrinkage and is not deformed. But for peace of mind, it’s better to do it in your home; this process is not that complicated.
How to make casing correctly

The last option is the most labor-intensive, but also the most reliable. If you have any doubts about your own carpentry skills, it is better to casing it into an embedded block. For this:
- In the window opening, in the middle of the beam, two vertical grooves measuring 5x5 cm are selected. This can be done with a chainsaw, a hand-held circular saw, a chisel and an ax. The second option is preferable if your hand is not equipped for precise chainsaw work.


- An edged board is laid on top of the embedding block and secured flush with self-tapping screws - two at the top and bottom. To do this, pre-drill a small recess with a diameter slightly larger than the screw head.
- If the “tenon-monolith” casing option is chosen, then the pre-cut T-shaped element is simply driven into the groove and also screwed with self-tapping screws.
- Vertical elements should not reach the upper edge of the opening by 8 cm - so that the 5 cm thick top laid on them is at a distance of at least 3 cm from the wall beam. This will be the shrinkage gap.
- The top should fit into the grooves with little effort, and not move freely in a horizontal plane. It is also fixed with self-tapping screws, screwed in at an angle.
- The insulation is placed in the shrinkage gap and closed on the inside with a vapor barrier, and on the outside with a windproof membrane. Under no circumstances should the insulation be covered on both sides with vapor-proof films - accumulated condensation will cause mold to form on the wood adjacent to the insulation.

And this is how casing is done “into the deck”:
When the frame is ready, you can proceed directly to installing double-glazed windows.
Do-it-yourself installation of plastic windows
The installation of double-glazed windows itself is not very complicated, but requires strict adherence to technology. Otherwise, the window will almost certainly condense and the frame will warp.
Checking the delivered glass unit
Under no circumstances should this moment be neglected! First, the dimensions of the window opening and glass unit are checked. So, if the opening is 184 cm, then the window frame should be 180 cm - the gap between the side posts and the wall cannot exceed 2 cm on each side. The height of the window opening, for example, is 120 cm, then the frame itself should be 116 cm, and at the bottom there is also a support profile (clover) of 3 cm. Thus, the gap at the top will be 1 cm. The clover must be included in the kit, and under You need to leave room for it when designing the window. It is needed so that a window sill can be installed from the inside, and the ebb can be screwed on the outside.

If mosquito nets are planned on the windows, you must also check the presence of fasteners. Handles are often “lost” because windows are shipped without them. But dowels are special fasteners that you need to select yourself.

Their length should be such that when fully screwed in, they only reach the middle of the casing board. And this is taking into account the gap. If the dowel is screwed into the wall of a wooden house, the window will begin to deform regardless of the presence of the frame.
Often they do not pay attention to small elements - decorative trims, fittings and drainage holes. They will also have to be counted. But the window sill and sill need to be ordered - if you forget to specify their necessity, you may find that the windows arrived without them. For installation, you will also need special linings for the glass themselves - their presence can only be seen by disassembling the double-glazed window.

They may not be included in the kit, so it is better to order them in advance. Wedges are convenient because, thanks to their different sizes, you can align the frame evenly by simply placing a wedge of the required thickness under the corners and posts.
Disassembly and preparation of double-glazed windows
The finished glass unit is delivered in assembled form. But to install it, you will have to disassemble everything down to the frame. For this:
- when closed, use a special key to remove the upper pins holding the swinging sash;
- the window handle is inserted, the sash is opened and removed from the lower fastenings;
- the glazing beads are knocked out from the inside of the window and the double-glazed windows are removed - you can use a hammer and an ordinary knife;
- you need to remember or mark the right and left glazing beads;
- the protective film is removed from the outside - under the influence of the sun it will not come off in a few months;
- external elements are installed - mosquito net holders and decorative plugs for drainage holes;
- holes are drilled for the dowels - first at a distance of no more than 20 cm from the corners of the frame, and then no more than 60-70 cm from each other;

Once the preliminary preparation is completed, you can proceed directly to installation.
Installation of frame and assembly of plastic windows
First, the frame is simply inserted into the window opening and temporarily fixed in it. For example, with temporary jibs nailed on the outside. But it’s much easier to do everything with an assistant - he simply holds the frame until it is leveled and screwed to the casing. Installing the frame also requires following the correct sequence:
- The lower edge is aligned with the level - a laser level is more convenient in this regard. Wedges of different thicknesses are placed under each rack to achieve a perfectly level position. Even minimal distortion will create problems during operation.
- Side spacers are inserted to ensure the same distance from the walls. If the width of the window frame is too small and literally “falls out” of the opening, you can use a special expansion profile. This is much better than foaming the resulting huge gap.

- The frame is also aligned vertically. Don’t forget that it needs to be installed in a “warm” zone - for wooden walls without external insulation, this is clearly in the middle.
- Once the frame is level, you can begin attaching it, starting with the side posts. First, holes are drilled in the wood through those already made in the frame, and then dowels are attached. First the top and bottom, with a mandatory check of the vertical, and then between them.
- Once the frame is fixed, the flashing is attached to the outside. Of course, this can be done as a last resort, but on the second floor it is not so easy to approach from the outside. The ebb is inserted into a special groove under the frame, screwed with two self-tapping screws along the edges, and the gap under it is filled with polyurethane foam.

- Decorative overlays are placed on the sash fastening elements. The lower ones are put on the frame, the upper ones - on the sash. First, the sash is installed on the frame, and only then the handle is attached in the open state.

- Double-glazed windows are placed on special gaskets. Without them, the window may simply burst due to the emphasis on the metal parts in the corners of the frame.


- The installation seam is foamed around the perimeter.
- A window sill is being installed. To do this, a finished window sill is placed on the window sill beam, and wedges are placed under it to level it. The window sill is removed, its end and delivery profile are coated with sealant, and the free space between the wedges is foamed. The window sill is placed again, pressed tightly against the profile and left until the foam hardens.

- In some cases, they do the opposite - first they install the window sill, check it for level and screw it to the casing with dowels. And only then a double-glazed window is placed on top of it. In this case, there is no need to align the frame horizontally. The only inconvenience is that the window sill material must withstand the action of the external environment. Of course, you can fix the ebb outside on top of the window sill and foam everything under it, thus protecting the wooden element.
Once the polyurethane foam has hardened, you can begin finishing the windows.
Slopes for a plastic window in a wooden house

The simplest option, which even girls can handle, is to cover them with plastic panels. For this you will need:
- L-shaped or starting profile - it is screwed to the wall close to the window frame;
- decorative plastic corner - it covers the end of the panel from the side of the room and is also screwed with self-tapping screws;
- the plastic lining itself for the slopes.

And you don’t even need to foam anything. But in order to ensure the necessary protection of the installation seam and good insulation, insulation should be laid between the wall and the slope and covered with a vapor barrier. On the outside, the seam is covered with a windproof film - waterproofing with good vapor permeability.


And in order for the windows to delight you with warmth and comfort, it is very important to protect the polyurethane foam from exposure to ultraviolet radiation, as well as from being pulled away by birds. There is no need to restrain the impulses of your soul if you want to start doing something with your own hands. And everything will definitely work out!
Plastic windows are increasingly being installed by owners of country houses, as they have many advantages over wooden products. They are also reasonably priced. But before installation, you need to carefully prepare for such work. To do everything yourself, you need to know the specifics of performing all operations.
All plastic products are supplied with parts for installation, so with proper preparation, you can install the window without outside help. It is necessary to perform all actions very carefully so as not to damage the structure. In order to secure the windows in the opening more carefully, it is worth working with an assistant. In some cases, before carrying out work, it is necessary to strengthen the opening.
Materials required for work
Before you begin installation, you need to prepare the following materials:
- wedges inserted for the correct positioning of windows;
- polyurethane foam;
- sealant;
- water vapor barrier material necessary to protect joints from moisture;
- anchor bolts.
Wedges are used during the installation process to more accurately install the plastic profile. Without these materials, it is much more difficult to monitor. Polyurethane foam is an insulating material that fills the space between the wall and the frame. When choosing foam, it must be taken into account that it must correspond to the temperature at which the work will be carried out. If you purchase a material intended for use in the summer, its use in winter may lead to the creation of a poor-quality insulating layer.

You will also need self-expanding sealing tape during work. This material is glued around the perimeter of the window from the outside, after which it expands. Sealant is used to fill the space between the slopes and the window sill.
How to determine the correct position of a plastic window
Before carrying out installation work, it is important to correctly determine the position of the frame relative to the thickness of the wall. The plastic window should extend about a third inside from the street side. This rule is not mandatory, but when moving the window in any direction relative to the specified distance, it is worth considering that the length of the sills and window sills must correspond to the project.
It is important to consider the size of the radiator and its position. The window sill should not overlap it by more than ½ of the width. If you completely turn off the radiator, this can negatively affect the temperature in the room in winter, as well as the condition of the window. If installed incorrectly, plastic windows usually begin to fog up.
The length of the window sill should be approximately 15 cm longer than the window opening. Thanks to this, you can process the edges of the window sill while finishing the slopes. The window sill comes with side plugs, which should also be secured after installing the window.
Methods for fixing plastic windows
The choice of a specific fastening method depends on parameters such as the size of the window opening and the wall material. This should also be taken into account when choosing fasteners for a plastic structure.

Plastic windows can be fixed in several ways:
- Using dowels or anchor bolts. They are fixed in pre-created holes in the wall.
- Plates with teeth that are located on the outside of the window profile. They are installed on a spacer and secured with self-tapping screws.
The first method described is considered more reliable. That is why large plastic structures are secured with dowels. The fastening that passes through the window block is more reliable and can withstand impacts.
If you decide to install a small plastic window, they can be secured using anchor plates. These fasteners can be hidden with slopes and finishing materials. But before carrying out work, small recesses should be prepared for them. This will avoid problems with plane alignment.
It is worth noting that when installing plastic windows, professionals combine the above methods. In this case, anchor bolts are used to secure the base of the profile and its vertical parts. The upper part is secured with plates.
Basic rules for installing plastic windows
To install windows correctly, you should follow several basic rules:
- Installation of plastic double-glazed windows should be done using polyurethane foam. This material allows you to give the structure additional rigidity. It also acts as a retainer and heat insulator.
- To protect the space between the window and the wall, it is necessary to secure a waterproofing material on the outside and a vapor barrier on the inside.
- Windows can be installed at any time of the year. Many professionals recommend carrying out work in winter, as this will allow you to immediately see whether mistakes have been made.
- Before purchasing foam, you must carefully study the features of the composition. Such materials differ in several respects. One of them is the solidification temperature. The instructions on the container indicate the most favorable conditions for using the foam. If they are ignored, the material may begin to deteriorate during the operation of the structure.
- When foaming the gaps between plastic windows and walls, it is necessary to fill in small portions. This allows you to use less foam.
- If the opening crumbles, it is necessary to clean the surface of old materials and strengthen it.
By following the described rules, you can install windows with your own hands, without making the mistakes that people who do not have experience in such work make. The technology for installing plastic windows in a brick house is quite simple, but it is important to carefully perform each step so as not to make a mistake.
How the opening is prepared
Before performing window installation work, it is necessary to thoroughly clean the opening from dirt and dust. It is important to remove all remaining paint and building materials. Before installation, it is also important to compare the dimensions of the opening and the plastic frame. If the gap is more than 4 cm, it is necessary to use not only foam. This is due to the fact that when using it, it will not be possible to create an even and high-quality seam. In addition, quite a lot of foam will be lost.
Before installation, you must remove the sashes from the frame. To do this, simply pull the pin out of the hinges. If it is necessary to remove a glass unit from the frame, remove the glazing beads holding the glass. These steps must be performed very carefully so as not to scratch the glass.
After removal, the sashes and double-glazed windows should be placed on a soft mat and leaned against the wall so that they are in a stable position. Double-glazed windows should not be laid flat, as this may lead to scratches on the surface of the glass.
After this, the protective film is removed and markings are applied to the places where the fasteners will be located. The distance between them should be about 40 cm. It is important to take into account that the distances from the corners should be more than 15 cm.
Installation process
After carrying out the described steps, spacers should be inserted into the window opening in the brick wall to create the necessary gap. The frame must be leveled using a building level. It is also important to control side clearances.

In the openings of brick houses, it is necessary to mark the installation locations of anchors. After this, holes are created in the walls. If fastening is done using anchor plates, it is necessary to bend them so that they fit well on the wall.
The next step is to install the frame. It is important to check the horizontal and vertical structure of the structure before. How will it be finally fixed? After this, the bolts are finally tightened until the head protrudes above the surface by no more than 1 mm.
After all the described work, the sashes and double-glazed windows are installed, as well as the functionality of the entire structure is checked. If you installed the products with your own hands for the first time, you should carefully inspect the opening and make sure that no mistakes were made during the work.
Installation of slopes
Before installing external slopes, it is necessary to measure the width and length of the opening. Cutting plastic slopes is done using a circular saw.
Important! Slopes should only be secured to clean and level surfaces.
At the first stage, the upper horizontal part is secured. It needs to be recessed as deep as possible, and the space should be filled with polyurethane foam. Worth remembering. That it should not be released too much, since when hardening the material can change the shape of plastic products.
After this, the installation of vertical slopes occurs. During this work, it is important to check the verticality of the elements. The installation of the lower slope occurs in the same way. It is important to ensure that all elements are correctly joined and there are no gaps between them. The corners between the plastic slopes are closed with a special part.
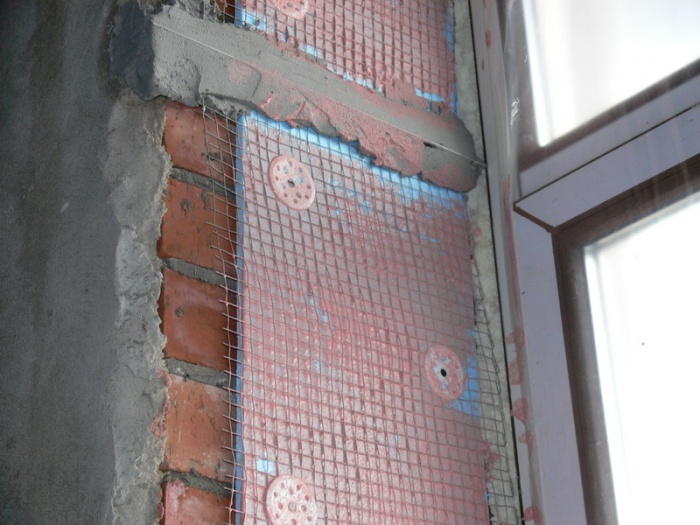
Installation of internal slopes should be done only after careful preparation of the surface. If the opening crumbles, it is better to clean it up to the main wall and only then carry out further work. After this, the opening is leveled and filled with insulation. If necessary, the window opening is strengthened.
Those who have decided to replace old wooden windows with plastic ones may wonder: is it possible to install them yourself? Although this is a job of average complexity, it can still be done by those who have at least some construction skills. Installing small windows in private homes is much easier than installing large windows on the balconies of apartment buildings. In this article we will look at a more complex option for installing windows in a multi-storey building.
If you are not an expert in this matter, then it is better to ask a more experienced craftsman to calculate in advance what size plastic windows need to be ordered. So that they are not too big or too small. When the windows are delivered to you, immediately check that all components and fittings are present, and also check that the window dimensions are accurate. Only then sign the windows delivery documents.
Do-it-yourself installation of plastic windows
First you need to dismantle the old windows. To do this, you may need a wood saw to cut the beams and window sill. You will also need a pry bar.If you do not live on the first floor, then when the windows are delivered they will be disassembled to make it easier for the movers to bring them into the apartment. This is good because you also need it. In addition, you will have to additionally disassemble the double-glazed windows by removing the glass, since they provide the main weight. The glass must be dismantled so that it is convenient for you to attach the window sill and ebbs. Dismantling of the drains is carried out by removing the plastic bead.

Before you start installing the windows, you need to attach the fasteners for the mosquito net, since then it will be difficult, because if you do not live on the first floor from the street, it will be impossible to do this. To do this, place the mosquito net against the window opening and screw the top fastenings, then the lower ones, but in such a way that the net can be removed, for example in winter. Therefore, the lower fastenings should be slightly lower than the size of the mosquito net.

Next, you can mount metal fasteners to the top and side of the window block. This is done using self-tapping screws, which should be included with the fittings.


If the window openings are long, then several window blocks are usually ordered, which are connected to each other with special fasteners (connectors). It is necessary to immediately fasten the windows with a connector on both sides, and additionally fasten them with self-tapping screws.


If you have ordered visors, they must be attached to the top of the window block by screwing them into the profile with self-tapping screws. This is done after you have installed the metal fasteners.

Next, you can start installing the window. If the windows are large, then you will need help from at least one person to help lift and place the window. Also, when you attach the window to the wall, you also need to hold them.
Immediately try to level the window block by placing wooden wedges under the bottom and leveling it horizontally.


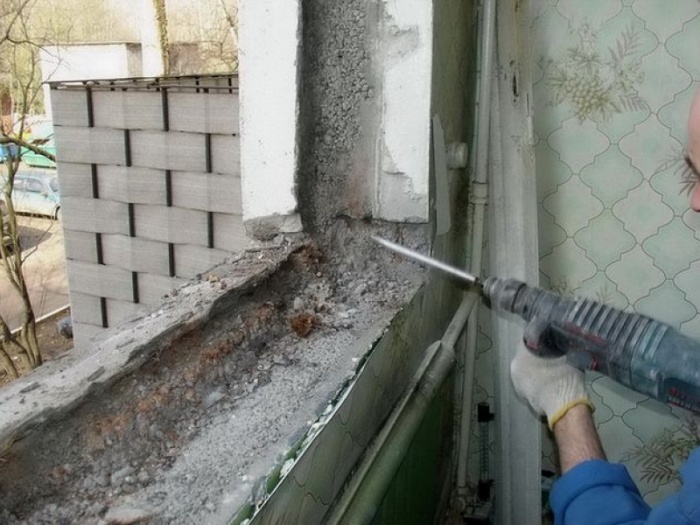
Once the window is approximately level, it can be attached to the wall on the side and at the top. To do this you will need a hammer drill and quick installation. After drilling the hole, bend the metal fasteners, and then hammer into this hole with a hammer for quick installation.


After you have secured all the metal fasteners, check the level of the window unit vertically and horizontally again.


If everything is in order, then proceed with the installation of further parts. First, you can fix the window sill; it is attached with self-tapping screws to the lower profile from the street side.


After this, from the street you also need to screw the sills into the lower profile of the window. Keep in mind that canopies, ebbs, and window sills will not always be exactly the size you need. Most often they are slightly longer. Therefore, you will have to cut off the canopies and ebbs with a grinder or metal scissors, and the window sill with a jigsaw or grinder. You will need a tape measure to measure the required dimensions and a square to accurately draw the lines along which you will cut.
At this stage, you can blow out the openings between the windows and slabs with polyurethane foam. To save a little on foam, especially if the gaps are large, you can use polystyrene foam.


Then the opening windows that have been removed are attached to the window block. To do this, you immediately need to screw the fittings (handles) to them, then insert the window into special grooves.


In order for the window to open freely in all modes, the window must be adjusted with a special key (hexagon). In the grooves on which the window is placed, there are special holes for the hexagon, where you can adjust the window by turning it with a key from above and below. The goal of the setting is to make the window easy to close and come off in all modes.