Make your task much easier by doing relief carving on wood, you can use a drill (electric engraver) with various attachments. Personally, I buy attachments for my drill at the poultry market. These are primarily various dental burs and cutters for metal:

Usually the drill is equipped with a flexible shaft. It is convenient to use when performing small parts in the thread. However, when using a flexible shaft, the drill loses half its power.
So, carving is best done on wood species with a monolithic structure: linden, beech, alder, pear. Pine, ash and oak are less suitable for this purpose. However, I'm in in this case Carved on pine, due to lack of other material.
First, we transfer the sketch to the board and shade the background that we will choose with a pencil:

Now we take a small bur with a round star-shaped section and use it to outline the elements of our drawing:
Then we select the background with the same bur, only with a larger diameter:

To select a background in large volume, it is convenient to use the limiter attachment that comes with the drill:

The cutting depth must first be adjusted and practiced on an unnecessary piece of wood.
Having chosen the background, sand it with fine sandpaper:

Now we move on to cutting small thread elements, in this case the veins on the leaves and the eyes on the berries:


We finally sand the entire panel and cover it with water stain:

Now we take a fine sandpaper and go over the entire drawing with it. The stain will remain in places where the background is below:

Please rate this post:
Wood carving is a very ancient and venerable art, passed down from generation to generation. The range of tools of a master carver can reach several hundred types various knives, gravers, etc. But application hand power tools allows you not only to replace most of this with one, but also to increase the speed of material processing.
Such a miracle device these days is a wood carving drill. It is also called a mini drill or hand engraver. Thanks to her, learning such a complex task is much easier. But here there are many subtleties and nuances. One of them is the difficulty of choosing the tool itself.
Engraver's choice
When buying your first drill, you should adhere to the rule of the golden mean. That is, there is no need to chase the price and buy a tool that is obviously problematic. And buying the most expensive one will not bring much contribution to the skill, and a fair amount of money will be spent. In order to do right choice, the following criteria must be followed:
- For the first tool, the price of the kit will be about 3-6 thousand rubles.
- The power of the tool is usually from 35 to 300 W. In this case, it is advisable to take an engraver with a power of at least 100 W.
- The speed of the tool is from 3500 to 35000 rpm. The electric motor must be able to adjust them to process different types of wood.
Thus, wood carving with a drill is not the most expensive hobby. In Moscow, as in any other city, you can easily buy the right tool or order it from China.
If you are not ready to shell out about 5 thousand for a new engraver, then you can make it yourself. But in this case, you will still have to buy nozzles and a flexible shaft. On the other hand, a boo might suit you. But at the same time, you need to pay attention to its condition, check that nothing is loose, and try to process the material with it.
Additional accessories
To make working with the mini-drill easier, you need various elements. Some of them are usually included in the kit. These include a flexible shaft with a handle and a limiter attachment. with a handle is needed to facilitate work when processing small parts. It is connected to the engraver itself, and the work is no longer done with the device itself, which weighs about one kilogram, but with a handle connected through a shaft. It is simpler and more convenient, and its weight is only 200-300 grams.

The limiter attachment is used to level out a blank background. This is a part of the material being removed that has one level. The attachment is put on the engraver itself, then the desired milling depth is set. This position is fixed with a bolt and you can start working.
Some devices may not be included in the kit; you will have to buy them yourself or make them yourself. Such a device, for example, is a tripod. With its help, the engraver is suspended, and work is done with a handle with attachments through a flexible shaft. This is necessary, because if the engraver is simply placed on the table, then vibrations will cause it to move along it, thereby interfering with work, or it will simply fall, which can lead to its breakage.
Some models are equipped with a foot pedal, but their use is not always convenient, especially when there are several devices.
Cutters and attachments
Grinding and carving with a wood drill is carried out using special cutters, wheels, rollers, etc. Cutters can have different shapes, grain sizes and purposes. Coarse-grained ones are intended for rough processing of large surfaces, and fine-grained ones are intended for detailed elaboration of the relief.
Drills are used to drill holes of various diameters, and rollers and wheels with sandpaper are used for grinding. Most of the necessary attachments are included with the tool. They are suitable for working with both wood and metal. But still, for full-fledged work wood requires specific cutters. For example, to create semicircular recesses, special cutters are used - the so-called “hedgehogs”.

Precautions and workspace arrangement
Before starting the device for the first time, you must carefully study the instructions. In order for wood carving with a drill to be comfortable, it is necessary to equip workplace. First of all, you should make a hood. You can use a regular vacuum cleaner for this. Extraction is necessary because fine wood dust gets into the lungs, which can lead to health problems.
If exhaust hood equipment is not possible, then you can protect the respiratory tract with a medical mask or gauze bandage, but this is not very convenient, especially during prolonged work. You should also not forget about eye protection. It is better to use construction or carpentry safety glasses.
Where to begin?
Wood carving lessons with a drill should start with simple things. To do this, take an unnecessary piece of board or block. With a simple pencil write any word on the wood. There is no need to make it too thin and small. You need to learn the basics of handling the tool.
Choose from a set of cutters that are suitable, with a round head and fine grit. When working, the pressure on the tool should not be too strong, otherwise chips, severe irregularities, and burrs may result. Wood carving is carried out using a drill using smooth hand movements. The photo clearly shows the process of milling a simple inscription.

After this, you can experiment with different cutters, making different depths of the selected design or pattern.

Relief creation
When working with a more complex pattern, which has many levels and relief elements, it is necessary, first of all, to choose the right material. Species whose wood does not have pronounced coarse fibers are suitable for this. These, for example, include beech, alder, linden, birch, and aspen. But oak, pine, and larch have coarse fibers, and their processing can be fraught with some difficulties.
After the sketch of the future product is ready, it must be transferred to the tree. The sketch can be redrawn by hand or using tracing paper. Next, wood carving with a drill is carried out in several stages:
- Firstly, the boundaries of the pattern are set using thin cutters.
- Secondly, if there is a dull background, it is removed using a limiter attachment.
- Thirdly, sampling a large volume of wood with great depth relief is carried out with coarse-grained nozzles.
- Fourth, larger elements are cut first, then smaller ones, and detailing of the larger ones is done.
- Fifthly, after the wood carving with a drill is completed, it is necessary to use a fine-grained sandpaper eliminate traces of cutters and minor defects, and use a zero to bring everything smooth.

Drawing conclusions
Everything will not work out the first time, so be patient, wood and tools. Practice while creating some small souvenirs or crafts. In the process of mastering the craft, an understanding will come of what needs to be done, how to do it correctly, and what other devices are needed for this.
Engraving is artistic look high-precision milling, used for applying an ornament, pattern, design, text to the surface of the product. Manual electric engraver on wood, designed for armor or line carving with a depth of 2 - 0.5 mm. Exist laser engravers, which are multifunctional 3D printers.
Some manufacturers position hand engravers as mini drills, which accurately reflects the design features. The main characteristics of the power tool are:
- spindle speed – 35,000 – 15,000 every minute
- power – 300 – 35 W
Thus, drills are much more powerful than drills; angle grinders have lower speeds. Therefore, the use of accessories from these tools is strictly prohibited. Wood carving with an engraver is carried out using equipment specially made for this purpose, designed for certain cutting speeds.
The pattern for line carving is applied to the surface of the workpiece, the wood is cut with cutters and drills to the required depth.
Armor wood carving with an engraver is multi-stage - first you need to select a background, apply markings, then create a relief at the lower level. By equipping the engraving kit with a flexible shaft, carving wood and other materials becomes much more convenient. In addition to this device, manufacturers produce the following types of equipment: With a minimum configuration (flexible shaft + tripod) for a wood engraver, the price is minimal; with an increase in the number of devices and equipment, the cost of a hand-held power tool increases significantly. Experts recommend that novice craftsmen buy a wood engraver in a minimum or medium configuration in order to determine during work which attachments and devices are most often required. Instead of an expensive set of drills, cutters, diamond drill bits from leading brands, it is easier to order 5 - 3 Chinese sets from Ali Express for the same money. The tool life does not differ significantly, the difference in money is significant. The only inconvenience is the long waiting time for the order (5 - 3 weeks, depending on the region of the Russian Federation). For example, a branded set from Dremel (catalog number 7105, two cutters with a diamond-coated ball tip) cost 800 rubles; on a Chinese resource, a set of 30 attachments costs 200 rubles. The flexible shaft is a multifunctional device: The flexible shaft is a full-fledged tool when equipped with an electric drive. For example, this attachment is often included with a sharpening machine. The ergonomic handle allows you to make ornaments of any complexity, configuration: The handle weighs 0.5 - 0.3 kg, which is much more convenient to use than the weight of the power tool itself (2.5 - 1 kg), which at this moment is placed on a tripod. In 99% of cases, attachments for the engraver are already included with the hand drill. However, during operation, each user purchases additional equipment depending on his own needs. The following attachments are most in demand by home craftsmen: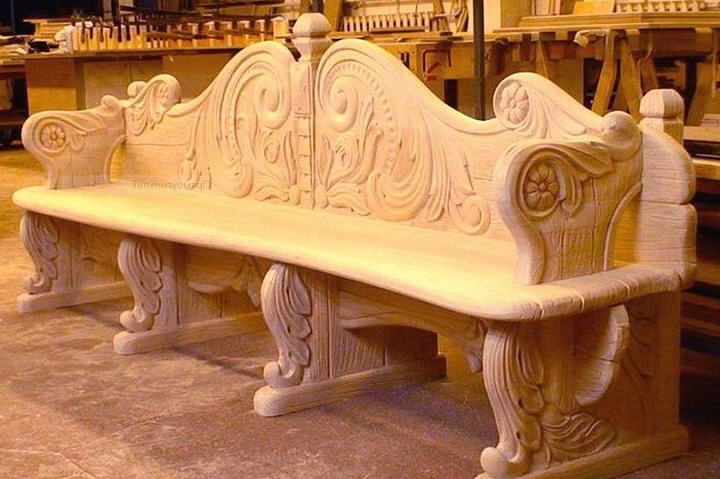
Accessories for wood drills
Very often, when performing a relief image on wooden surface, masters, in order to make their task easier, use special drills with various attachments. This equipment can be used as a dental bur or special hand engravers for a certain type of material (glass, wood, metal). Wood carving using a conventional engraver, especially for beginners, requires certain skills and presents some difficulties.
The very first problem that you will have to face is choosing a drill from the huge variety of options presented on the modern market.
Learn wood carving with an engraver for beginners with your own hands
How to choose the right drill?
Despite the great variety of drills on the market, choose the right one, knowing the necessary specifications, not that difficult. The main selection criteria are engine power, which determines the number of revolutions of the drill per minute, and torque.
When choosing a drill, you will always have to make a choice between the ability to withstand heavy loads and the ability to work long time at high speeds, because not a single car, unfortunately, combines these two important qualities. Exactly because of this reason the best option becomes the purchase of two drills with different technical characteristics.
The most the best option for wood carving will be:
- Powerful drill with reinforced tip.
- Compact micromotor capable of operating at high speeds.
If you really like to save money and also get along with technical equipment, then you can assemble the first drill yourself: for this you need to take a motor from washing machine or any other engine of sufficient power and, using a belt drive, connect to the sleeve from the drill. All this action requires dexterity and some skills, besides, the sleeve and tip itself will still have to be purchased.
Technical drills.Russian production produces quite powerful sleeveless drills “Profile” with a pedal - This model is very reliable and allows you to perform an incredibly wide range of technical operations: drilling, grinding and much more, despite the low speed.

For years, the drill machine from Foredom SR from the USA has gained its authority in the market (you can see this device in the photo below). Very reliable in operation, even under high loads. All spare parts can be purchased at almost any store that sells tools for jewelers. The choice of attachments is very large and varied: from power collet attachments to convenient quick-release attachments.
Micromotors.Micromotors These are unique mini drills - they are more compact and do without a flexible shaft. Their motor is mounted directly behind the tip. Such machines are very convenient to use for the most fine workmanship, it is for these purposes that they are very convenient.
Among the Russian ones, the DPM 25-2 drill with a specialized medical handpiece should be highlighted. It fits very comfortably in the hand, the burs can be changed easily and quickly, and the price for a machine with such characteristics is not at all high. But it should still be noted that the medical handpiece is not designed for heavy loads, and therefore, if used too often, it can quickly fail. The micromotor cannot be repaired, since the carbon brushes, which wear out over time, cannot be replaced. Thus, from time to time you will have to change the engine or purchase a new drill entirely. Otherwise, it’s not very bad, budget and convenient option. You can also look for good analogues from Korea.

The following drills are attractive for their functionality and reliability, but in Russia Marathon or Strong drills are quite expensive. They have very high speeds and power - up to 30,000 rpm and a power of 65W. For a micromotor, these figures are very respectable. The best masters They work with exactly these drills.

It should be noted that the above micromotors are only suitable for small burs and small bur cutters. Using large cutters on them, you will significantly reduce the resource of the tool and its service life. It is for this reason that it is necessary to have at least two types of drills in your arsenal.
Usually the drill is equipped with a flexible shaft. It is convenient to use when performing small parts in the thread. However, when using a flexible shaft, the drill loses half its power.
Tips for carving.So, carving is best done on wood species with a monolithic structure: linden, beech, alder, pear. Pine, ash and oak are less suitable for this purpose.
The first step is to transfer the sketch to the board and shade the background that you will remove.

The picture around the office should be outlined with a small drill with a round star-shaped section. After which the entire background is hammered with the same drill, albeit of a larger diameter, to complete the job faster.

In order to select a large amount of background, it is convenient to use the limiter attachment that comes with the drill.
The cutting depth must first be adjusted and practiced on an extra piece of wood.
After the background is completely cut through, it is sanded with sandpaper.
After this, the details are cut out in the drawing itself.

After completing the work, you should sand the entire picture and cover it with stain, then go over it with sandpaper so that the stain remains only in those places where the background is lower.
Video on the topic of the article
In the video lessons below you will see a couple of examples of how craftsmen work with wood engravers, as well as reviews of drills from some manufacturers.
All photos from the article
What kind of wood carving equipment can be found on sale? In this article we are going to get acquainted with how hand tools, so with electrical devices of varying complexity. We will find out what these products look like and what exactly they are used for.

Goals
First, a little theory. Types of wood carving do not and cannot have a strict classification simply because within the framework of creating one work of art Several techniques are often combined.
However, the techniques themselves can still be divided into several categories, which usually require different tools:
- Through slotted thread performed with cutters and chisels.
- Through sawing, in contrast, requires the use of a saw or jigsaw.
- Flat grooved thread involves the creation of figured indentations on a flat background.
- For flat-relief carving with a cushion background, the pattern and background are on the same level; During the processing process, only oval contours are cut.
However: there is also a flat-relief carving with a selected background, which is made below the main image.
The main tool for sampling the background level is chisels of various shapes.
- Finally, it is the most difficult, since it requires remarkable artistic talent from the carver.: vision of perspective, sense of proportions and spatial imagination. In terms of choosing a tool, creating wooden sculptures with your own hands is the most diverse. Literally everything is used here - from blunt knives to... chainsaws.

Facilities
Wood
All types of wood can be cut; however, a simple rule applies here: the finer the detail, the softer the material should be. That is why best wood for wood carving - linden.
In addition to softness, it has several more advantages:
- It is resistant to rotting (even in high humidity).
- It retains a pleasant aroma for a long time.
- It doesn't darken over time.
- When dried, linden shrinks minimally.
- Its wood cuts equally well in any direction.
The best choice for our purposes is sapwood from trunks aged 50 - 70 years. Instructions from the master: to estimate the age of the trunk, just count the growth rings.

Sapwood is the dense wood between the bark and the heartwood.
Hand tool
If desired, it can be purchased in a set; the price of a high-quality set of 5 - 7 items is only 1600 - 4000 rubles. However, it is also possible to purchase the instrument at retail.
What is useful to have at your disposal?
- Bogorodsk knife for sculpture carving.
- Knives - jambs with different angles bevel

The knife is a joint.
- Knife - cutter.
- different widths. The sharpening angle should be in the range of 18 - 20 degrees.
- Kit semicircular chisels with different radii.
- Klyukarzy - chisels with various shapes curved blades, allowing you to select wood without resting the handle on the workpiece.