During the garage conditions current and major repairs The motorist has to pay a lot of attention to the engine compartment and... Some operations with the engine can be performed from above, but when diagnosing or restoring the suspension, you will have to work on the car from below. There are two ways to ensure comfortable mechanic conditions in such situations: lower the repairman into the pit or lift the car onto an overpass. Most people prefer lifting the car because it is a less expensive option. However, before making an overpass, it is necessary to prepare a project and select materials and tools for it.
Methods for making a car overpass with your own hands.Popular types of automobile overpasses
Craftsmen realized a large number of various designs that help to conveniently position the machine before repair. Thanks to such successful results, popular groups of auxiliary equipment can be distinguished:
- For one bridge. In such a situation, the car will have only one axle, front or rear. The advantage of the form is its compactness, since it is not required large area for her. The disadvantages are that the method is not suitable for complex repairs.
- Full size type. The format allows you to pile up the car by completely raising the entire body to a sufficient height. The option is relevant for working under the entire bottom, but requires significant space and a larger volume of materials for implementation.
- Stationary type. Mounted in one place, for example, in a country house, which minimizes mobility. At the same time, it may have good equipment, a close distance to electrical and pneumatic connections, and an indoor type is allowed.
- Mobile variety. Presented in the form of cabinets made of metal or wood. For installation you need a flat area. After completion of the work, the construction is easy or different utility room. Easily adapts to any type of vehicle, subject to load limits.
Important! A mobile overpass for cars, made by yourself, can be intended for either one bridge or two.

How to make a collapsible car overpass yourself
Most motorists prefer collapsible overpasses. This is due to the fact that they can be made independently with minimal costs, which will allow them to quickly pay for themselves. During the development stages of this repair aid passenger car you will need to take into account some, which include:
- the width and height of the base pedestals on which the structure rests;
- length of the driveway and horizontal platform;
- width for inter-wheel space (track).
Basic knowledge in the field of strength of materials is welcome, which will help form strong components and joints of the product that can withstand the weight of the vehicle without rupture or deformation. You should not skimp on materials.
After various repairs There may be scraps of boards left. It is rational to use them to make a trestle with your own hands, since a wooden product will have minimum weight with optimal strength. A popular design is a pair of meter-long bars with an approximate cross-section of 200x200 mm. On one side wooden blanks cut at an angle of 40-450 to form the drive-in part. Next, we nail the parts onto a two-meter board with a cross-section of approximately 200x40 mm. We place the finished products under the wheels and can drive onto the mobile mini overpass made of boards using one of the bridges. For optimization, we recommend placing a front block on top as a sliding stop. Although the lifting height is small, it will allow a number of operations to be carried out under the machine.

Another wooden variety The structure is made from scraps of boards with blanks of equal thickness. Typically, the base for each support is a pair of strong, wide slats, about 40 mm thick. and 1.5-2.0 m long. They are filled with steps across the planks to the required height (about half a meter). The front part is also equipped with anti-rollback. For ease of carrying, loops-straps made of durable material. The total cost of the product is minimal.
A do-it-yourself metal overpass on a level surface is more reliable. The product will be much heavier than its wooden counterpart, and also more expensive to manufacture. However, the homemade product will last much longer and will be able to withstand heavy vehicles. To make a metal slide you will need any material:
- profile rolled products (hollow square or rectangle);
- pipes or fittings;
- corner.
Everything fits together using welding machine. Ready product We recommend painting. Vertical racks we recommend making from profile pipe. It is preferable to make the horizontal platform from reinforcement, and the entrance - in the form of steps from the corner. It is advisable not to increase the approach angle, so 30-350 will be the optimal value. The horizontal part at the top is completed with a vertical stop that prevents rollback. The height of the racks is selected at the request of the car owner. The design can be used both for full vehicle entry and as a mini-overpass for entry via one bridge.

Convenience for users is provided by the collapsible type of overpasses. The option refers to an intermediate type between stationary and mobile structures. Due to its large dimensions, when assembled, the slide provides a lot of space for repairmen, and when disassembled it takes up little space. The constructor consists of elements:
- four base cabinets;
- two horizontal slabs for moving;
- two inclined slabs for entry.
The pedestals are arranged in a special way so that each of them is under the wheel of a car. A maneuver in which the horizontal beams are removed, while the car remains standing on the pedestals, helps improve accessibility to the wheel arches. Under stationary option overpass, you will need to find a flat, free area. Cabinets are usually made of brick, cinder block or poured concrete. We weld entry and horizontal beams from metal corners, reinforcement and rolled steel. The reinforced platform can accept proper planning not only cars, but also trucks.

Step-by-step production
At home, after preparing a plan, you can begin production by assembling the cabinets. They can be made with right angles and dimensions of 60x60 cm and a height of up to 80 cm, or the top can be reduced to a cone with a platform of 50x60 cm. Assembly can be carried out from wooden OSB boards or cook from a corner. For an inclined ladder we use two three-meter corners 60x60 mm, located parallel at a distance of 40 cm. We lay a ladder between them at intervals of 60-65 mm. fittings with a diameter of 14 mm. and weld it. The horizontal ladder is made in the same way.
Conclusion
Each motorist chooses which type of overpass to assemble based on current needs and prospects. The optimal option is a mini version or a prefabricated structure. Craftsmen choose between cheap, practical wooden products and metal expensive but durable structures.
We want to be able to understand and repair everything, so as not to attract outsiders and not pay for it with funds that are now not so easy to obtain. Some delve into the design of various mechanisms simply for the sake of hobby. For both, information on how to build an overpass in a garage with your own hands will be relevant.
When it is not possible to make a viewing hole
Inspection pits have become very popular and widespread. They are relevant for garages with low ceilings, where it is not possible to raise the car. In some areas, groundwater is quite close to the surface, and it is necessary to do thorough waterproofing so that the inspection of the vehicle does not turn into acceptance cold bath. If this is also true for you, or you simply don’t want to bother with wasting effort on excavating soil, then an overpass will be the ideal solution.
There are two main types of overpasses:
- stationary;
- collapsible or mini-overpass.
Overpass construction

Many of us have seen stationary overpasses - they can be located on the sides of some sections of roads so that a driver experiencing technical problems can put things in order or temporarily eliminate a car malfunction. It is not difficult to make such a design at home. The main requirement will be the availability of sufficient space. If your garage is designed for two vehicles, then in place of one of them you can build a platform. Materials you can use are brick, floor slabs, wooden beams, metal channel and pipes. The most durable and durable construction will be metal.
Note! At correct production overpasses and calculations, you can raise your car almost a meter above the ground.

You will need pipes with a total length of up to 2 m. At approximately 1 m they will have to be buried in the ground and securely concreted. You will need from 4 to 6 such posts, it all depends on the size of the machine. Four corners measuring 7.5 by 7.5 cm are fixed on top, the space between them is filled with reinforcement rods, which are welded perpendicularly. In the same way, the driveway is installed at an angle. It is imperative to provide limiters in the design that will prevent the car from rolling back or driving further forward. The length is selected to suit specific needs.
Other types of overpasses

But not all of us have two cars or large garages in which to play football or hold a party, so it’s worth paying attention to mini-overpasses that can be dismantled or freely moved around the territory and stored in a garage or shed. Making them will require some ingenuity. Here are a few options for you to choose from:
- rectangular trapezoid;
- "rocking chair";
- reversible;
- based on sleepers.
- One-sided pyramid. To make this type of platform you will need a minimum of effort, time and money. You need to have approximately 17 m of boards on hand, 5 cm high and 30 cm wide, maybe less if you are an ace at driving on a narrow gauge railway, but it’s better not to risk it. Next, we cut out two beams of the same length with the following dimensions: 45 cm, 70 cm, 95 cm, 120 cm, 145 cm, 170 cm and 195 cm. After all the parts are ready, you can start assembling - just connect them together so that at one end they create a plane, and at the other they look like a ladder. You can use nails or self-tapping screws - whatever is at hand or more convenient for you. The assembly process should have resulted in two pyramids, cut off on one side. But such an overpass is not yet suitable for a car to drive onto it. The two blocks may suddenly separate and cause damage to the underbody, or the vehicle may overturn. To prevent this from happening, we do the following. On internal sides install two by two metal corner with holes. Next, choose two metal or wooden slats. We make holes along the edges and attach them to the corners. After such an operation, the stands will not move to the side. When the car is already on top, carefully unscrew the safety crossbars and carry out the necessary repairs.

A similar trimmed pyramid or trapezoid can be made from metal channel, it will turn out to be much more reliable and durable. Instead of climbing with a “staircase”, you will simply need to make an inclined drive.
Note! Using such a device, the car can be raised by 30 cm; if a greater height is needed, add a few more bars of greater length. Be sure to install restraints at the front to prevent the vehicle from rolling forward, and secure the rear wheels.

The “rocking chair” is also a very simple design that any car owner can make. We select two boards as thick as in the previous example, the length can be 1 m. We take four 10x10x30 cm blocks and place them as follows: one of them is on one of the edges, the second is almost in the middle with an offset to the first. We secure it firmly and do not forget to place emphasis. Now, when the car runs over its wheels, the boards will be thrown over due to a shift in the center of gravity; with further advancement, they will be supported by two bars. All! The car is up! Repairs can be made. You can vary the dimensions, focusing on the ground clearance of a particular vehicle and the length of the wheelbase.

There is another version of this overpass, it is a little more complicated to implement, but much more reliable. Designs may vary. Here is one of them. Take a 30×30 corner, larger if possible, adjust the length based on your car. We will need 8 such segments. We connect them in parallel using reinforcement bars. The result should be 4 bases same size. The lower parts can be made longer and wider for greater stability. Next we make two stops. One of them will be in the form of a bar, as in the previous example, we weld it to the edge. We install the second one with a slight offset from the middle. But it should be made a little differently - in the shape of an isosceles triangle. We movably connect it to the lower base. If you do not touch the stands, they will be folded at an angle. When the car moves along them, the wheel shifts its center, aligning the horizontal, and rests against the block. Now you can use the latches to secure the platform in this position.

Using a platform is an interesting approach to the matter. To make it, you need to get a corner we already love, or use square profile. Next, using a welding machine, 2 isosceles triangles are made so that the base is 1.5 times longer than the wheelbase, and the apex angle is obtuse. The platform is placed on them. Now everything is ready. The car drives onto the structure and, resting against the limiters, reaches the end.
Note! Place stands under the rear wheels to prevent the car from rolling away when it is on an overpass.
The sleeper-based trestle is very easy to make. Two sleepers are laid, one in continuation of the other. Strong boards are laid on the part with the recess, after which a small slide is created. That’s it – the platform is ready, you can move in and make repairs. The disadvantage is that the sleepers need to be stored somewhere, although it is unlikely that anyone will decide to take them away from you. For this kind of platform it is not necessary to use sleepers; anything that can securely support the boards will do.
Note! When building a homemade overpass, do not forget to protect your car by installing limiters - they will prevent the car from falling off the overpass.
As you can see, there is no particular difficulty in lifting the machine for servicing. Now you know how to make a flyover from scrap materials that are found in almost every garage. Tell your friends and share your experience.
Video
The video shows a homemade rocking overpass for carrying out car maintenance and repair work on it:
Watch a video about a homemade metal overpass for a car:
Photo
Mini overpass in the garage

For many car owners, their own garage overpass is not just a dream, but one of the most popular devices. Experienced auto mechanics know that it is almost impossible to get to the bottom of the car or the engine compartment without an overpass. And these parts of the car need constant repairs.
Of course, there is the option to rent certain time overpass or take the car to a repair shop for repairs. However, such options are quite expensive and quite impractical, since there are times when the vehicle cannot be transported due to serious damage. That is why we recommend that you seriously think about making your own overpass, the production of which is quite easy. In addition, it is better to spend one time on materials for an overpass than to spend a lifetime on expensive auto mechanic service or overpass repair.
What to do if it is not possible to make an inspection hole
To repair the chassis, undercarriage, or engine compartment, inspection pits are often used, which are convenient in small garages where it is not possible to make an overpass to lift the vehicle.
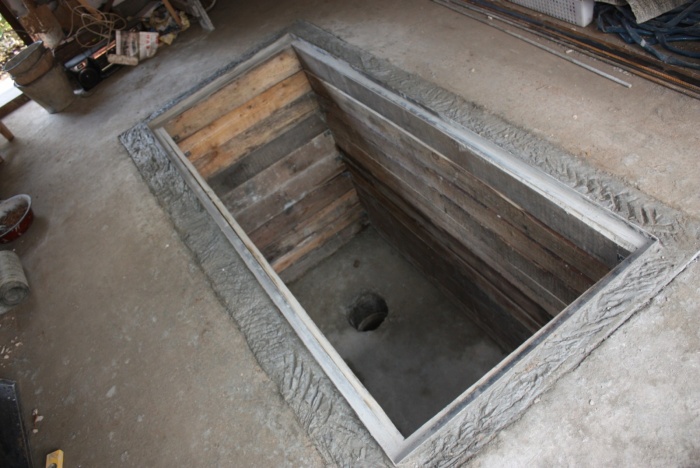
However, there are times when it is not possible to make a hole in the garage. For example, quite common problem for the manufacture of inspection hole is the level groundwater, which may be very close to the surface. Because of this phenomenon, additional waterproofing may be necessary to prevent water from penetrating into the pit. Otherwise, car repairs can easily turn into taking a not-so-pleasant, dirty, cold bath.

If your garage has such a problem or you simply don’t want to waste your time and effort on digging and finishing a hole, then the option of making a trestle is perfect for you. Nowadays, there is quite a wide variety of this design, among them two main types of overpasses can be distinguished:

Both the first and second overpass options have many varieties of design types. The type of construction is influenced by the size of the garage, the weight and type of car, financial capabilities and much more. That is why we will tell you about some of the most popular options for making a garage overpass.
DIY overpass in the garage
Many of us have seen stationary overpasses; as a rule, they are located on the side of the road so that a driver whose vehicle needs urgent repairs can troubleshoot problems. Making such a structure is not at all difficult; the main requirement is the availability of sufficient space. Wooden beams can be used as materials, metal pipes, bricks and corners. If you want to make a more durable structure, then make it metal. If you do the work correctly, you can lift the car to a height of up to one meter.
To make a flyover in your garage you will need the following materials:

Important reminder! When making a structure for an overpass, take care of limiters that will not allow the car to drive further than necessary or roll back. Limiters can be either removable or retractable.
Options for homemade overpasses
The “rocking chair” is quite simple to manufacture; it is quite simple and can be made by almost any car owner. We all know the principle of operation of an ordinary children's swing; its mechanism is that, due to the overweight, one side is always higher than the other. To make a swing for your vehicle you need to complete similar work, you need to make a platform, one of the sides of which will rise when a car drives onto it. To prevent the car from overturning, there are installed on the rear of the platform support pillars, and on the front part you need to make special portable supports, thanks to which the car will not roll down. The dimensions of the platform must be matched to the wheelbase and ground clearance of the vehicle.

What does it look like finished design, you can see in the video:
There are other options for manufacturing this design, one of the most common and economical options is manufacturing metal structure for partial immersion of the car. The great advantage of this device is that it does not take up much space in your garage, in addition, you can move it from the garage to the street or to another room with a hard floor surface. To make it, you will need iron corners and metal for the platform; this can be either reinforcement or solid sheets of metal. As an exception, you can use wooden materials However, before using them, make sure they are intact and durable.
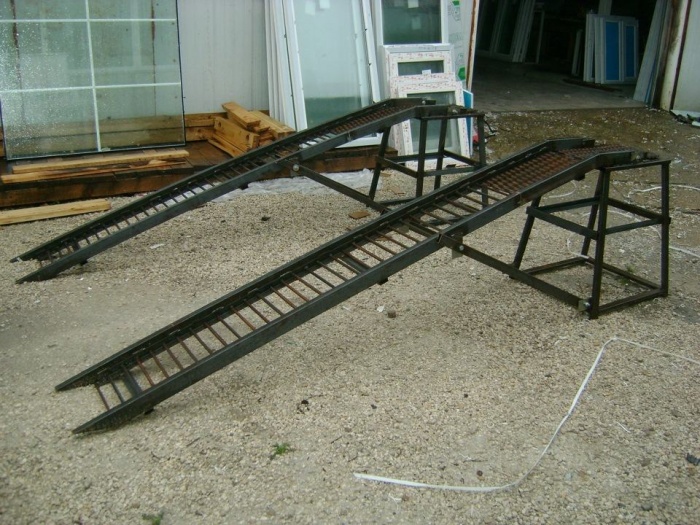
“The presented material will show you how to independently make a mini-overpass for repairing your car in the garage. Car owners know very well that as they operate, they often have to repair the car and carry out an inspection; it is best to do this in a warm and well-lit garage with inspection hole. But often modern garages they don’t have one, because there is a huge number of different car services and workshops. This is of course good, but you will have to pay for the services, and the cost of a car today is already affordable. So, in order to save money and repair the car yourself, you need to make a mini-overpass. The base will be a 50x50 mm corner, crossbars made of 12 mm reinforcement with a pitch of 75 mm.
This overpass is installed to the width of the vehicle track and is driven onto it by the front or rear wheels. Attention! When installing the car on an overpass, be sure to put the handbrake on and place a kickback or stop under the wheel.
What will you need to create a mini overpass for cars?
Materials
- corner 50x50 mm
- reinforcement 12 mm
- dye
Tools
- welding machine
- grinder (angle grinder)
- roulette
- brush
Step-by-step instructions for making a mini-overpass.
And so, first of all, let's get acquainted with the detailed drawing that the author compiled. Next, according to the dimensions of the drawing, it was welded this design, for which a 50x50 mm corner and 12 mm reinforcement were used.  The second part is made in exactly the same way.
The product is then painted bright yellow. 
After the paint has dried you can test it 😉  This mini-overpass is very convenient to store in the garage.
  It is so compact that you can even store it at home.