We form our first impression of a house or dacha even before we enter the property, sometimes before we even see the house itself. The first thing that catches your eye is the fence. Everything else comes after, and the first impression is from the fence. Some, albeit inexpensive, but attractive, make you want to stop and look: original ideas always attract the eye. One of the most interesting is a wicker fence or wattle fence. Moreover, they are woven not only from vines or branches: there are braids made from boards, and others from PVC rods. They all look different, but interesting and unusual.
What is a wicker fence made of?
Let’s immediately make a reservation that there are two types of wicker fences - “wattle fence” - made of branches and “wicker” - made of boards. The manufacturing technique is very similar, which is why both are classified as wicker fences.
This is a wattle fence made of twigs or branches

This is a wicker fence made of boards
What is wicker made of?
Now let’s talk about what such fences can be made from. A fence made of boards - Austrian wicker - is most often made from pine boards 20-25 mm thick, width - about 100 mm. The material is most often pine. It is more affordable, contains a large amount of resins, and therefore has a longer service life. But to extend its “life” it would be useful to paint it with compounds with antifungal properties.
The posts for such a fence are made from timber of at least 80*80 mm, but are more durable from profiled pipe. Size 60*80 mm or 40*80 mm, you can take square ones. Depends on how you attach the board. The span between the supports is 2.5-3 meters, and between them an intermediate one is placed - made of timber 40 * 40 mm or so. The exact span is determined by location and often depends on the flexibility of the board.
To prevent metal pillars from spoiling the picture, they are covered with boards, which are fastened through with pins and washers. You can make a base and pillars from brick, and between them - a wicker - vertical or horizontal - depends on your wishes.

What to use for wattle
Pleni is made from young one-year-old shoots of several types of wood:
- willows (concrete);
- hazel (hazel);
- willows (krasnotal);
- aspen;
- birch;
- PVC rod.
The best are willow and hazel. Their core is dense, which is why the service life is solid. Other breeds quickly lose their appearance and strength.

PVC wicker - durable and quite attractive
The PVC fence rod appeared only a few years ago. And although it is not natural, it is in good demand: wood, even treated, loses its attractiveness after a few years. Plastic is not afraid of either the sun or frost, and does not change its appearance for a long time. Its disadvantage is that you need to buy it, while the vine can be cut.
Preparation of rods
"Cleaner" for bark
The shoots are harvested in early spring or late autumn, their thickness is from 1 cm to 3 cm. For small fences - up to 1-1.2 m in height - tonic rods - 1-2 cm are used, for higher ones - those that are thicker.
It is better to clean the bark on the rods and cover them with stain or wood oil. Brown color can be obtained by soaking the rods in potassium permanganate, gray - in copper sulfate.
You can also use unrooted shoots, but then the bark will begin to peel off and the appearance will be unattractive. It is more convenient to strip the bark using a split thick branch or a “cleaner” (see photo). It is easy to make from a suitable sized piece of branch.
If you plan to make a fence later, bunches of branches are placed in the basement. Before use, the rods are placed in a container with water for a week, topping it up periodically. The rods swell, their elasticity returns, and the bark is easier to clean. If the process is too difficult, you can soak the branches for another week. It should go easier. To really make it easier, you can keep it over steam. Then the bark is removed like a banana peel, but the “soaring” process itself causes difficulties.
Pillars
The basis of any fence is pillars. They can be made from thick, even branches or trunks of young trees. Diameter - about 5 cm and more if you are planning a high fence. They are buried or hammered to a depth of at least 50 cm, the installation step is about 50 cm, it can be more or less - depends on the degree of flexibility of the prepared vine.
To make the poles last longer, they are treated with bactericidal impregnations, the ends are burned over a fire (the old-fashioned method), dipped in hot bitumen, and soaked for a couple of days in a solution of copper sulfate.
If you are installing a wicker fence to enclose an area outside, it is better to use timber or metal pipes as posts. If the weaving is horizontal, the cross-section of the tube does not matter - in the sense that both round and square will do. Even a round one will be easier to work with. And with vertical weaving, it is more convenient to install posts from a profile pipe. Cross members are attached to them, and it is easier to do this on a flat edge.
Types of weaving

Then, having made a couple of fences, you can move on to more complex designs. There are several diagrams in the photo.


How to make a wicker fence yourself
We will consider the simplest option - ordinary braid. To begin with, you can practice on a small piece - you will master the technique, then you can start serious construction. For example, for training, you can make a fence for a garden bed or flower bed.
Horizontal weaving
We drive six more or less thick pegs into the ground with a distance of 30-40 cm. We take the first vine and lay it in a “snake” pattern, intertwining it between the posts. The vine alternately bends around the posts, first in front, then behind.

We lay the second rod in a mirror image to the bottom one. If it starts at the back, then lay the next one at the front.

If there is a need to connect two vines, this is done on the nearest pole. The next one is simply laid as a continuation of the previous one. And the protruding ends are cut off after everything is assembled.
The third, and all odd rows, are laid as the first, fourth and even - as the second. In general, we alternate starting from the front of the pillar, then from the back. Periodically, at the intersection of the vines and near the pillars, they knock with a mallet - a wooden hammer, compacting the rows.

This is the horizontal fence. It can be continuous, or it can be a shield. With continuous weaving, pillars are installed around the entire perimeter, and vines are woven between them, one after another. It turns out to be an almost solid wall - the ends are brought out to one side and there they are cut at an angle so that it is not visible.
If there is no thick vine, you can put a whole bunch of thin branches at a time. It’s unlikely that anyone will remove the bark from them, and a solid fence won’t work either, but a small fence is easy. Such a fence made of twigs looks decorative; making it yourself is probably even easier.

When making panel boards, sections of some length are made. Install the required number of stakes - 4-6 pieces, and weave vines between them. After reaching the required height, the ends sticking out on the sides are cut off.
If necessary, the edges of the rods are nailed to the stakes. The resulting shields look like those in the photo. The sizes can be different - more or less depends on the desire and type of fence.

When the required number of shields has been collected, they are installed in place by driving the pointed ends into the ground. Nearby pillars can be tied together for greater stability. The result is a panel wicker fence. For an example of assembling fence panels, see the video.
Installation of a shield fence can also be done using metal poles. No special technologies:
- we drill holes below the freezing depth,
- throw in a bucket of crushed stone, compact it,
- We put up a pole, set it in height and check the vertical;
- concreting;
- We attach ready-made shields to the post.
One of the options for such an installation is in the video.
The same technology is used to make a wicker fence from boards. They just braid the boards and make the span between the pillars larger.

Vertical weaving
The rods in a wicker fence can also be positioned vertically. In this case, three to five crossbars are nailed to the pillars. The first crossbar is about 10 cm from the ground level, and then with the required step.
They weave like this: one end of the rod is pressed into the ground, for example, on the side closest to you. Then they bend, alternately stretching between the bars. The next shoot is placed on the other side. It turns out to be a mirror image of the previous one. So they alternate - in front/behind.

Wicker fence with vertical weaving
Since the vine has a noticeable difference in size at the top and near the root, they are turned in pairs, either up with a thick edge, or down. Then you get the same density at the top and bottom. If you don’t do this, it will turn out thick at the bottom and sparse at the top. How to weave a vertical fence, watch the video - a master class from a man who has made more than one wicker fence with his own hands.
They also make a vertical wicker fence from boards. Just so that it looks organic, and to extend the life of the boards, the tops are covered with a board stuffed on top. The ends are nailed to it. This also allows you to secure the boards, which is useful in this option - sometimes the loose ones fall out.

You can also attach boards to the bottom crossbar. Only either from above or from below: so that the wood does not move when the humidity changes. Another point: if you make it from a damp board, it is worth considering that if you first assemble everything without gaps, after drying you will have 1 cm gaps between the boards. This applies to both the horizontal and vertical model.

The upper and lower crossbars can be made of profile pipe. This is a more reliable material, which also guarantees greater stability.

Photo ideas
Many people think that a fence made of woven twigs and branches is just a decorative fence that cannot fully protect the site. If you look at the next photo, you may doubt this. Wow, such a fence, and almost opaque.

The main thing in this matter is a thorough approach. Place the pillars and braid everything very tightly between them. The service life may be short, but the costs are minimal. Moreover, both material and temporary.
If ordinary weaving is already easy, you can try and do something extraordinary. For example, a wicker fence made of branches located diagonally. And you can’t call it a frivolous building either.

There is another interesting way of weaving - a pigtail. Having practiced on small areas, you will be able to do something on a larger scale.

If you need decorative fencing in the yard, garden, or vegetable garden, a fence made of branches can be made thin. They even use fairly thick branches, but you need to work with them right away, before they have time to dry, or they won’t bend later.

By the way, if you use freshly cut willow twigs and stick them into the ground, after a while you can get a hedge: the willow takes root well. Something like the following might turn out.

When planting hedges, use the same weaving technique. They just mold it from rooted shoots. After they become woody, you will get a very reliable fence. It's not easy to break through.


Not only a fence can be made of wicker. There are a lot of interesting things, it turns out: gazebos, huts, elements of garden decor. 


Among the wide variety of types and options for fencing, wicker construction stands out for its originality and aesthetics. Such a fence is relatively simple and quick to make on your own and, most often, does not require expensive materials.
Wicker fence made of branches and boards
When wondering how to make a wicker fence with your own hands, you should first choose the right material. It must be strong enough to hold its shape and flexible enough to weave. Usually they take willow and alder twigs, birch and hazel. In addition, there are several schemes for making a wicker fence with your own hands.
Detailed instructions for installing a fence from branches

DIY wicker fence from branches - diagrams


To make a wicker fence from branches with your own hands, you first need to install supports. You can use metal pipes or fairly thick wooden stakes as posts. The thicker the rods chosen for the fence, the more solid the pillars must be, otherwise they may break under the load. Place supports at a distance of half a meter or sixty centimeters. Relatively thin ones are buried to a depth of thirty or forty centimeters, while thicker ones are dug to a depth of half a meter.

DIY wicker fence made from branches. Step by step photos

Before starting work, wooden rods should be soften. To do this, they are kept over steam for some time or lowered into salt water. After this treatment, the material becomes more flexible, there is no danger of breaking it, and the weaving process requires less effort. When the work is completed and all the elements are installed in their places, they will dry out, lose their elasticity and be securely fixed.

On the first post, the rods should be secured with wire. Next, they are laid in a snake pattern, going around the posts. The rows go around the pillars, first on one side, then on the other, alternating. If the fixation of the rods seems unreliable, then it is better to attach them to the posts with wire. It is better to leave five or ten centimeters between the ground and the lower edge of the fence. This will prevent moisture from entering and will prevent rotting. The fence will last longer.

how to make a wicker fence from branches with your own hands. Video
Wicker fence made of boards
To fence the area, you can make a wicker fence from boards with your own hands. It looks interesting and will serve as a good alternative to a picket fence or other fencing options.
The main materials are planed boards. Metal or wooden supports of sufficient thickness are placed at a distance of two or two and a half meters from each other. Their base is concreted to increase stability. The load from curved boards will be significant.

how to make a wicker fence with your own hands. Step by step photos
The boards are additionally secured to the posts with self-tapping screws. The wood must first be treated with antiseptic compounds to prevent rotting.

DIY wicker fence made from boards. Photo
The finished fence can be covered stain. In this case, the natural color and texture of the wood will be preserved. You can also paint such a fence in any suitable color that matches the color scheme of the rest of the buildings on the site.

Vertical weaving fence
A vertical weaving fence made of birch branches can become not just a fence, but an original decoration of the site. In addition, it protects against penetration because it looks quite dangerous. Making such a wicker fence with your own hands is not difficult if you have a sufficient amount of suitable material.

DIY wicker fence master class. Photo
For construction you will need:

How to make such a fence: instructions
Below is a master class on a DIY wicker fence with vertical weaving. Let's look at the main stages.

After some time, the birch fence will dry out and all its elements will be securely fixed.
Options for wicker designs
. Wattle fence
Wattle fences come in a variety of varieties. Very low, enclosing a small area, or high, human height. Wicker fences are made using both simple horizontal weaving of branches and more complex weaving methods. Complex weaving creates a special aesthetics, but without experience it is not easy to make such a fence. A fence with vertical weaving can be decorated with a figured top.
. Wicker fence made of boards
A fence made of interlocking boards can be constructed in several ways. In the first option, the material used is relatively flexible and it is intertwined not with the main support pillars, but with additional slats, located more often. In the second version, the boards are thicker, their flexibility is less and the waves are long. In the third option, the fence is made of boards with vertical weaving, which also looks very interesting.
Fence Wattle
. Flowerbeds made of wattle
You can use wattle to decorate flower beds. The result is attractive. The shape of such a fence can be rectangular, round or multi-faceted. The size of flower beds can vary from very small, in the form of baskets, to quite large. Various weaving options allow you to create original designs. For weaving, you can use bundles of twigs or individual branches.
Not so long ago, wicker fencing was the main way to separate private property. The emphasized antiquity and natural origin of the raw materials allow the wattle fence to organically fit into the countryside landscape. For this reason, they are in demand in large areas near and between populated areas, as well as in parks and various natural sites. If you need to create a rustic ambiance or the atmosphere of an ancient courtyard, first of all you should take care of the appearance of the fence. Depending on the direction of the rods, wicker fences are divided into horizontal and vertical. The first option is usually denser and requires a lot more branches. Living fences are also popular. They look fresher, and sometimes are additionally decorated with a hedge of lush plants. The wattle fence is one of the types of structures that can be made without special education.
Peculiarities
An ordinary fence is a light barrier made of shoots and flexible branches. This type of fence features chaotic lines and a makeshift structure. The material is used in its natural form, almost without being processed. Wicker fences are mainly decorative structures, because they are rarely erected to a height of more than 1.5 m. There are also tall modifications, but this option is not always justified, since large dimensions do not solve the problem of the fragility of the material itself, and even in a large fence there will be more cracks and they will, in principle, become larger.
The above nuances imply frequent repairs of the fence, as well as greater openness of the area for viewing by strangers. The main advantages of wicker are the low cost and lightness of the consumables. Wicker fences are still relevant today and can be combined with many styles of site design.
Where to use wattle
This is how small plots of land are fenced. The fences are also used as additional fences inside private property. Low variants are also erected along paths. They are often used to separate gardens, vegetable gardens and flower beds from the rest of the space. The fence perfectly demarcates the territory of two neighboring plots. Low and medium-high fences will not cast much shadow in any direction. The branches are excellent for constructing partitions used for zoning areas. This is how summer and children's playgrounds, gazebos, and terraces are set up. Fences are also used to decorate barbecue areas. Low wicker fences can be seen in themed restaurants. Pletni is an important element for expressing ethno-style. At dachas and other properties, a wicker fence goes well with other wicker items - chairs, rocking chairs and tables.
Selection and calculation of material
Such fences are usually woven from willow or hazel. These plants have long, smooth and flexible branches with virtually no transverse processes. This raw material is symmetrical, which is an important plus. Sometimes reed stems are used, as they bend well, but the structure is fragile. Bamboo is especially durable, but you will have to order it. To create wickerwork, vines without bark are used. Calculation of the required amount of material is done “by eye”. One armful is enough for a fence 50 cm high and long. This value is not constant and can deviate towards decreasing or increasing, since the diameter of the rods varies, and the density of the weaving is selected individually. Tyn can be erected from young branches of many bushes and trees, but only at a certain length - from 1 meter. In this case, the work will be more difficult, and the weaving itself will be chaotic.
Other nuances:
- Large, even branches of 4 cm in diameter are used as support. It is appropriate to use metal rods, boards, round beams, if they do not spoil the overall picture and do not stand out too much.
- The step between the crossbars is usually 0.3-0.5 meters.
Types of weaving fences
Weaving options are distinguished according to several criteria. Depending on the height, it can be high (fence height more than 2 m), medium (1-2 m) and low (below 0.7 m). The first type of weaving involves the creation of permanent structures, for example, an external fence. The second is used to separate zones and separate small summer cottages. The third type is associated with the creation of decorative partitions, fencing flower beds and paths. Depending on the principle of connecting the elements, horizontal, vertical and inclined weaving is distinguished, as well as the less common round and checkerboard. In the first case, we are talking about laying long rods perpendicular to the vertical supports. In the second, horizontal veins act as the basis for the vertical placement of branches. The inclined option implies diagonal placement in increments of up to 0.3 m. According to the installation method, weaving is divided into poles, which is done directly onto the supports, and in sections, when the canvases are woven separately and then placed between the pegs.
Step-by-step instruction
The wattle fence is constructed in several steps:
- Preparation of materials: branches of various thicknesses separately for the base and for the canvas.
- Preparing tools.
- Calculations on the territory.
- Creating a foundation.
- Installation of rods on the base.
- Eliminate deficiencies immediately after creating the fence.
The first step is to resolve the issue of choosing raw materials. The final decision should primarily be influenced by the planned configuration and purpose of the wicker structure. Materials need to be collected or purchased. The first option is preferable, since collecting stems does not take much time. However, there are two small periods of time in the year for this. The collected branches are sorted depending on their thickness. Large branches for supports must be processed. Then the exact location for installing the base is determined. The pegs are driven into the prepared soil to the required depth. Further actions depend on the chosen weaving option. Two main ways: horizontal and vertical. The first one is used more often. When the wattle fence becomes dense enough, all that remains is to decorate it. There are few traditional decorative options, literally two or three, but there are many more ways to decorate a fence.
Materials and tools for building a fence
The first step is to decide which type of plant will serve as the basis for obtaining the elements of the future design. It is recommended to choose between willow and hazel. Smooth, flexible and long branches are required. The minimum permissible thickness is about 1 cm. The role of support is given to branches with a diameter of at least 4 cm. Instead, it is permissible to use round beams, as well as iron rods, although due to the disruption of the natural appearance, this option is undesirable. The twigs should be collected in early spring or autumn months. They will need to be softened in water and cleared of bark. In addition, you need to collect tools. To create a wicker fence, you need tools such as nails, a screwdriver, construction line or thread, wire, a sledgehammer or large hammer, tape measures, a wooden mallet, hacksaws and pruning shears.
Preparing the base
The base can be made from almost any type of wood. You will need to make sharpened pegs from the material to insert into the soil. Install them at the same distance from each other. The recommended depth for driving supports into the ground starts from 20 cm and increases depending on the height of the planned structure to 50 cm. The ideal structure will withstand strong winds and settlement of the ground. The minimum permissible diameter of support pegs is 4-5 cm. Larch poles are among the most durable. If the pegs are made in the classic version (i.e., made of wood), then they are treated with impregnations, antiseptics and varnishes. These measures are aimed against rotting and fragility. The cuts need to be additionally charred. Under the base it is necessary to make drainage from sand and crushed stone. The height of the fence is determined based on the purpose and individual wishes.
Preparation of rods
The material is harvested in autumn or early spring. The movement of sap at this time is minimal and there are not many leaves on the plant. Priority is given to the straightest and longest stems. If the fence will not be erected soon, the branches are dried. For a standard wattle fence, shoots within a 3-centimeter width are selected. Wider rods strengthen the fence. Shortly before weaving begins, the branches are soaked in water to make them flexible and remove the bark. The duration of this stage of work is approximately a week, but in the case of freshly cut rods it is reduced to several days. A pincher is used to process the branches. You can also use pliers or wire cutters. The end of the branch is placed between the clamps and pulled towards itself. If the shoot is well wet, removing the bark will be easy. It is better to cover perfectly cleaned branches with stain and antiseptic. You can adjust their color. However, if you plan to build a large fence, it will take too much time.
The load-bearing elements of the horizontal version are pillars driven into the ground. The base should consist not only of pegs, but also sand and crushed stone drainage. Smooth, thick pillars are inserted into the soil with a gap of 1-1.5 m between adjacent elements. If the branches for forming a section are very thin, then a minimum distance of 1 m is selected. We take the rod by the thick edge and place it behind the second post, with the continuation of the branch we go around the outer stake and move along all the supports in a “figure eight”. It is advisable that one vine is enough to cover at least three pegs. Each subsequent row starts from the opposite edge. It is necessary to maintain uniformity in the placement of thick and thin rods, and so on throughout the entire fence. The thickness of the fence at different points should not differ much. When the structure reaches the desired height, you will need to trim the length of the rods.
To make the rows of rods more dense, they should be hit with a wooden hammer from top to bottom.
The method of installing the base is initially similar to the horizontal version. The support pillars are driven in the same way. Parallel to the ground, you will need to install at least 3 strips of twigs of approximately the same thickness as the pegs, or less. They are tied or nailed to supports. The total number of slats depends on the height of the fence - they should be placed no further than 25 cm from each other. To ensure that the fence has a neat appearance, a crossbar is placed along the top side, which is removed after completion of the work. Rods are vertically attached to the support strips, matching the height of the fence. With their thick edges, these branches rest against the ground and are then intertwined with horizontal supports. The rods need to be fixed at the top. Wire is designed for this task. Alternatively, you can use thin rope or weave several horizontal rods.
Decoration
Previously, sunflowers and cornflowers were planted near wicker fences. This type of decoration is considered classic. Modern options involve planting fresh flowers, as well as the use of artificial ones. A flower arrangement can be created from nasturtiums, chrysanthemums, asters, and daisies. The fabric of a wicker fence is a suitable place for climbing plants. A bench made of boards, sections and stumps will diversify the monotonous row. It is customary to hang pots on the tops of support posts. In the same way, you can use small stuffed animals, shoes, etc. You can approach decoration more thoroughly. For example, select and place several dozen large decorative stones of different colors near the fence, install 1-2 flowerpots with rich green vegetation and a wheel from an ancient cart on them. The result will be an effective and inexpensive composition. A wicker arch can be erected next to the gate.
Planting a living wattle fence
Such a fence will grow upward and thicker. Branches that become too tall are cut off or sent lower. The living fence practically does not protect the territory, but it can be used as a zone separator within the site. To collect living vertical wattle fence, you will first need to prepare the soil. For this purpose, places for support pillars are selected. We select the distance between the elements within 1-1.5 meters. Then the supports (4-5 centimeters thick) are driven into the ground 40 or 50 cm. To facilitate this process, the lower ends of the supports should first be sharpened. Next, we attach the transverse joists. Using wire, we install thinner rods in several rows (3 are enough at a height of 1.5 meters). Then it's time to plant the branches. Shoots up to 3 cm thick are immersed in the soil by 30 cm. The distance between the stems should not be less than 10 and more than 30 cm. Living wattle will grow and make the composition denser.
The branches should be placed with a slight slope to make it easier to change the composition if necessary.
Wicker fencing has its pros and cons, main advantages four:
- Beautiful appearance. Weaving allows you to make a fence a real work of art. High and low fences with different types of weaving can be a great addition to the design of the site.
- Environmental friendliness. A wicker fence made of wood is environmentally friendly. When creating such fences, substances hazardous to humans are not used.
- Low cost. If you make a fence yourself from wood from your own plot, then you can do without waste at all. But if you purchase ready-made fences, the price will depend on the material, the height of the product and the types of weaving.
- Ease of construction. You can decorate the area with wickerwork yourself, without resorting to the help of special companies.
Despite its low cost, beauty and environmental friendliness, a wicker fence also has significant shortcomings:
- Lifetime. The fence does not last long and is susceptible to wind, rain and snow.
- Not a permanent building. If you decide to build a wicker fence on your property, you should know that it will only serve a decorative function and will not protect you from uninvited guests.
- Complex repair. If at least one element of the fence breaks, you will have to disassemble the entire structure or section. The difficulty of repair is a feature of all wicker products.
Before installing a wicker fence, remember its advantages and disadvantages, pay attention to its service life and repair features, ease of construction and environmental friendliness.
Types of wicker fences
Fences differ in height, weaving method and appearance.
Wicker fences can be of three types in height:
- High hedges(not lower than 2 meters) can become reliable protection for the site. Such a fence will be a permanent structure if the pillars are made of stone and a wicker fence is installed between them.
- Low fences, height does not exceed 50-70 cm, intended for decorating flower beds, used as an element of landscape design.
- Wicker fences about 1 meter high installed for zoning the site. For example, to separate a recreation area with a swing, table and benches from the rest of the area.
According to the method of weaving, hedges are divided into:
- Horizontal- the most common and easiest to implement. Such fences are more durable than vertical ones.
- Vertical It’s difficult to make fences yourself without experience in weaving, but craftsmen create real works of art by decorating the fence with complex patterns.
Wicker fences are distinguished by the method of creation and use:
- A wicker fence with a height of less than 0.7 m is attached to a ready-made base; professionals use a metal one to increase its service life.
- Flat wattle fence is installed in sections, one length is about 2 meters. This weaving option is easier to repair, and if necessary, one of the parts can be completely replaced.
- Rounded decorative wickerwork is more often used for flower beds and flower beds as decoration.
What is wattle made of? Wicker fences can be made from almost any flexible material. The most short-lived are cattails and reeds.
The maximum service life is 4 years, then they dry out and quickly collapse. Much more often, vines and willow are used to create wickerwork; in recent years, fences made of boards have become especially popular, which not only have a beautiful appearance, but also a high degree of reliability. Companies that manufacture wicker fences can offer products made from PVC, which, although not a natural material, is strong and durable.
Willow wicker fences
Willow branches are flexible, pliable and durable, they are used to weave bodies, baskets and, of course, fences. Before starting work, the material needs to be prepared. Steam the rods until they become flexible.
You can weave willow fences vertically or horizontally. The second option is especially interesting. First, horizontal supports are made, then willow branches are installed vertically, burying the ends in the ground. After some time, the willow will turn green, it will seem that nature itself created the fence.
In order for willow wattle to last as long as possible, the tree needs be sure to treat with an antiseptic, and dig a drainage trench at the installation site and replace the soil with sand.
Wicker fences made of vines
Vine are flexible and long branches of trees and shrubs that are used to create fences and even build residential premises. Wicker wicker is popular due to its aesthetics, naturalness and beauty.
To make the fence reliable and last longer, it is important to comply with several requirements:
- To give flexibility and make it easier to work with the material, the rods are soaked in hot water or left for some time in a steam bath. After this, you need to immediately start weaving, and when the vine dries, it will become strong and keep its shape perfectly.
- The size of the rods also matters. For a small decorative fence, it is better to choose branches no thicker than 2 cm, for high wooden wicker fences - from 2 to 3 cm.
- Before starting work, you need to remove the bark from the vine, treat the branches with antiseptic agents, a solution of iron sulfate, varnish, stain, and potassium permanganate.
Vine is often used to make decorative fences that complement the design of a site, divide it into zones or decorate a flower bed.
Wicker fence made of boards
A wicker fence made of boards can perform not only decorative, but also protective functions. It is reliable and able to protect against unauthorized people entering the site.
For production, planed boards and poles (metal, wood or concrete) are used. The structure is held together by the tension of woven boards, but screws and nails can be used for reinforcement.
After construction, there is usually a small gap left at the bottom; it is filled with brick or stone.
They are especially popular wicker elements from boards in a brick fence, performing a decorative function. If you decide to build a wicker fence from boards yourself, then get ready for difficulties and be sure to find an assistant; it is extremely difficult to build such a structure alone.
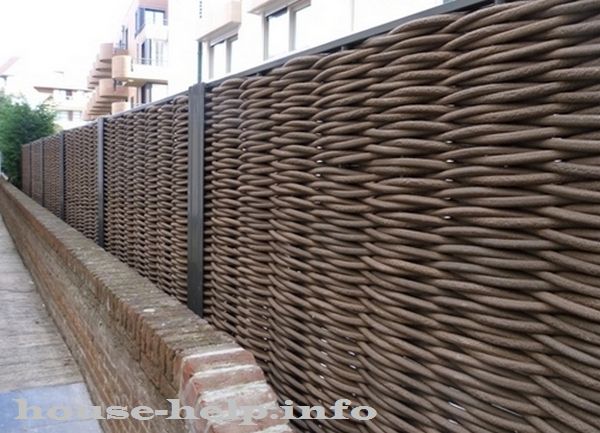
PVC wicker fence
Usually a wicker fence is associated with wood and natural materials, but in recent years it has also been produced from PVC, with a number of advantages:
- Durability. This is the main difference between PVC and wicker, boards and willow. PVC has a protective coating, modern painting and primer, which allows the fence to be used for several decades. During this time, the structure will not lose its attractive appearance.
- Installation mobility. Anyone can create and install a plastic fence. The design is lightweight and easy to transport.
- Convenient operation. Unlike wicker fences made from other materials, PVC structures do not fade in the sun, they do not react to temperature changes and humidity. In order for the fence to maintain its ideal appearance for a long time, it is enough to wipe it with a special product on time. Metal parts must be regularly treated with anticorrosive.
- Rich model range. Fences can be chosen in any color scheme that will ideally complement the landscape design of the site. It is also important to pay attention to the pitch and size of the PVC cells, which give the fence an unusual appearance.
- Acceptable cost. Due to the ease of manufacture, PVC fences have a low price.
Prices for wicker fences
 Prices for wicker fences depend on the material, from which it is made, the height and type of weaving. The cost of a willow or vine fence about 1 meter high is from 500 rubles per linear meter and more.
If you decide to decorate your area with a fence made of willow or vine, then you can do it yourself and for free. To do this, it is enough to prepare willow branches and stakes on which the fence will be held.
The cost of fences made of boards and PVC is from 750 rubles per linear meter.
DIY wicker fences
You can decorate the area with a wicker fence yourself. This will save you money and have fun. To make your fence original, you can master several types of weaving and think about additional accessories.
The easiest way to make a wattle fence is from willow or vine, it is more difficult to master the technology of making a fence made of wood and PVC. To do this, you will need special tools and assistants; it is difficult to weave from these materials alone.
Read more about how to make a wooden wattle fence yourself.
Wicker fences. Photo and video
Wattle - a real work of art. A variety of models, weaves and materials allows you to choose the ideal option for decorating your site. A wicker fence can become a reliable protector, a bright decorative element or a zone separator on a site.
A wicker fence as a protective structure is rare, but in landscape design it is an indispensable element. Wattle can be ordered from specialists or made independently from wicker, willow, boards or PVC.


A wicker fence is not so much a means of protection as a component of landscape design. It symbolizes the comfort and charm of village life and is also one of the most ancient inventions. So, today we will find out how to make a wicker fence with our own hands, and also consider the advantages of this element, its role in.
Strengths and weaknesses of wicker fences
The main advantages of this design include the following.
- Excellent appearance. Thanks to weaving technology, an ordinary fence turns into a true work of art! Regardless of whether the fence is low or high, in any case it will complement the design of your site.
- Easy to create. Such a fence can be made with your own hands, without resorting to the services of professionals.
- Cheapness. If you make the structure from wood from your yard, then the costs will be zero. Of course, if you purchase a ready-made structure, its cost will directly depend on both the material used in its manufacture, as well as the dimensions of the product and the type of weaving (we will talk about this a little later).
- Environmental friendliness. Products of this type are absolutely safe from an environmental point of view. The fact is that in their production no materials that may be hazardous to health are used.

Despite all the advantages described above, such fences also have disadvantages that you should also be aware of.
- Difficulty in carrying out repair work. If even one element breaks, you will need to disassemble the entire structure or, alternatively, one of the sections. By the way, without exception, all wicker structures are extremely difficult to repair.
- Such buildings are not capital. And if you intend to decorate your own area with a wicker fence, you must understand that it (the fence) will serve an exclusively decorative function. Simply put, it will not protect against thieves.
- Operational life. The fence will not last long, since wind and precipitation do not affect it in the best way.
Note! Before you start creating a wicker fence, understand its strengths and weaknesses, do not forget about its service life and repair work.
Classification of wicker fences
There are a number of parameters by which the structures described in the article are classified. So, according to their height, fences can be:
- low - 0.60.7 meters high, with which they decorate flower beds and areas in general;
- structures about 1 meter high - used for zoning the yard (for example, to separate a play area or recreation area from the rest of the territory);
- high - at least 2 meters; this is already reliable protection for your site, which is a capital structure (provided that the pillars are stone, and the wicker fence itself is located between them).

We will tell you how to make a wicker fence with your own hands a little later, but now we will classify fences according to the method of weaving. So, in this case they could be:
- vertical - it’s quite difficult to make these without experience, but if you have the appropriate skills, it’s quite possible to create a true work of art;
- horizontal ones are the most popular, since they are the easiest to make fences, which, by the way, last much longer than the previous ones.

Finally, according to the features of creating and using fences, they can be as follows:
- decorative round designs - used for decoration and flower beds;
- simple weaving - they are placed in sections 2 meters long each; this option is much easier to repair than others, since if necessary, one of the sections can always be replaced with a new one;
- wicker fences below 70 centimeters in height are installed on a ready-made base (experts prefer metal ones in order to increase their service life).
What material should I use to make a wicker fence? We will talk about this in the next paragraph of the article.
Materials that are suitable for wicker fences
There are several options, let’s take a brief look at each of them.
Option #1. Willow
If this material is prepared correctly, it will be not only flexible, but also quite durable. The variety of this culture is quite wide, but almost every type can be used when creating a wicker fence. By the way, a structure made of willow can be of two types:
- inanimate;
- alive.
By creating a living fence we mean planting young shoots in the ground, which, as they grow, will form that very fence. As for the fencing of non-living things, already cut shoots of the crop are used here.

Option #2. Hazel
In this case, the hedge is formed by young shoots, which are distinguished, first of all, by their flexibility. Raw materials should be harvested in early spring - even before buds appear on the hazel tree.
Option #3. Cattail, reed
Let us immediately make a reservation that the distinctive features of these natural materials are fragility and fragility. For this reason, using them for the purpose of a full-fledged fence is at least impractical, because after a couple of years the fence will be unusable and will have to be replaced. Moreover, with the help of reeds you can only create low structures to divide the area into zones or to fence flower beds.
Option number 4. grape vine
The vine rods are quite easy to bend because they are flexible and long. The vine is also resistant to high humidity and temperature changes.
As you can see, there are enough materials, but not every one of them suits us. By the way, looking ahead, we will inform you that there are other, no less effective materials. Now let's proceed directly to the description of the technology of how to make a wicker fence with your own hands.
We will start with willow, because it is the most popular.
Making a wicker fence from willow
Willow branches are not only pliable and flexible, but also quite strong, so they are used for weaving not only fences, but also baskets. The weaving itself in this case can be either horizontal or vertical. The first option is more interesting: first, horizontal supports are created here, after which the branches are installed horizontally, with one end of each buried in the ground. Very soon the willow will turn green and it will seem that the fence was created by Mother Nature herself.

Stage one. Preparatory activities
To ensure that the result of the work does not disappoint you and is truly of high quality, you must not only acquire consumables, but also do it at a strictly defined time. Ideally, willow shoots should be cut back between September and March. Not the other way around.
But sometimes even rods that were cut “on time” are not flexible enough for weaving. Here, brittleness can be eliminated with hot water. For these purposes, the rods are placed in heated and clean water for about two to three hours. As a result, the shoots will be saturated with moisture and gain the desired flexibility.
Stage two. Consumables, equipment
When creating a willow fence we will need:
- a vine whose diameter is approximately 20-30 millimeters;
- support pillars - logs or metal pipes;
- hammer;
- wire, preferably thin;
- knife;
- screwdriver;
- pruner;
- self-tapping screws
Stage three. Manufacturing instructions
Let's take a step-by-step look at the process of making a fence.
Step one. First we install the support pillars. We mark and drill holes for the supports; The optimal pitch for installing pillars is 1 meter. Having finished with this, we install the supports themselves. They should go into the ground approximately 35-40 centimeters - this will make the structure extremely durable and strong.
Step two. We stick thicker rods into the ground only 15 centimeters. In the future, weaving will be achieved thanks to these embedded rods.
Step three. Next, we install the lower rods approximately 10 centimeters from the surface. This is necessary in order to prevent the process of rotting. In parallel with the vine, we also pass pre-prepared wire from the bottom of the fence, which will give the entire structure greater rigidity.

Step four. Now we begin the actual weaving procedure. Using a checkerboard arrangement of twigs, we pass the vine through those that are buried horizontally, while pulling the tips inward. Having made three rows, we tap the top with a hammer to compact it. We braid metal wire into the structure every seven rows.
Step five. Using pruning shears, cut off the protruding ends of the rods. Of course, rods protruding beyond the support posts will not look beautiful.
Step six. We also trim the tops of the pillars to make it more aesthetically pleasing. If the pruning shears cannot cope with this, we use a hacksaw.
Step seven. Actually, the fence is already ready. After a few years, we treat it with a special impregnation so that it does not lose its original appearance.
Video - How to make a wicker fence with your own hands from willow
Making a wicker fence from birch
Wicker fences made from birch branches deserve our attention, if only because they look truly amazing! And if you add vertical weaving to this, you can get additional protection for the area. The manufacturing procedure itself is simple, but you still have to try. We start traditionally by preparing everything necessary.

Stage one. Consumables and equipment
In our work we will use:
- hammer;
- slats, preferably wider - this way you won’t need so many of them for fencing;
- screwdriver;
- wooden posts 10 centimeters thick;
- self-tapping screws;
- rope for marking.
When everything you need is ready, we get to work.
Stage two. Manufacturing technology
Step one. We carry out preliminary preparation of branches, select only the freshest ones - they are quite flexible. We clear them of small twigs and twigs and adjust them so that they are the same size.

Step three. After installing the pillars, we begin to attach the transverse strips. The length of each plank must exceed 3 meters (this figure depends on the pitch between the supports). To fix the planks we use self-tapping screws.
Step four. Now we fix the branches themselves. We insert the first one between the transverse planks from above, the second one in the same way, but as if in a mirror image. Then we repeat everything: we insert one branch in the usual way, the other in a mirror way, etc.
Note! In order to minimize the gap between the branches, we use a regular hammer.
After some time, when the fence has dried sufficiently under the sun’s rays, the process of its deformation will stop. This design will serve you for many years.
We make a wicker fence from boards
First, we note that such a fence looks more attractive than a traditional picket fence, which is why many owners of summer cottages prefer it. For manufacturing, you can use not only wood, but also veneer, plastic or even MDF. But the cheapest option is wood, so let's consider it.
Note! A fencing made of boards will not only decorate the area, but also protect it. It is durable, reliable and strong, so it will effectively protect the yard from unauthorized entry.
Particularly popular are plank wicker fences on brick fences - this is how they look the most attractive. And if you decide to create such a structure on your site, then immediately prepare for difficulties and get at least one assistant, since it will be quite difficult to cope alone.

Stage one. Preparing everything you need
To build wicker plank fences we need:
- processed boards measuring 15x221 centimeters;
- wood paint;
- support beams with a diameter of 10 centimeters;
- screwdriver;
- self-tapping screws;
- file
It is important that the thickness of the beams is at least 10 centimeters, since the weight of the future structure will be significant.
Video – Fence called “Wattage”
Stage two. Manufacturing procedure
Step one. First, we make measurements for installing support pillars. We pre-treat the pillars with an antiseptic and install them in 2-meter increments.
Step two. We cut the boards so that they all have the same dimensions.
Step three. We install vertical supports for weaving - they will serve as the basis for the future structure.
Step four. We start the weaving itself in the same way as in the options described above, that is, from the bottom. We take the first board, bend it and pass it through the supports, after which we fix it with self-tapping screws.
Step five. We install the next board in the same way as the previous one, but in a mirror way (that is, it must be bent in the opposite direction).

Step six. When assembling the second canvas, we exercise extreme caution. The boards of both canvases must match, and this is one of the main rules of how to make a wicker fence with your own hands.
Step six. Upon completion of installation, we treat all structural elements with special protective paint.
How to care for wicker fencing?
There is nothing difficult about care. Immediately after installation, we finish the wooden boards in order to improve their aesthetic qualities. After treating the surfaces, we coat them with varnish. Choose a varnish of a color that matches the overall design of your area.

Renew the paint every two years to ensure it retains its original appearance. At the same time, it is quite possible to experiment with colors - for example, create a kind of chessboard, alternately painting the boards with black and white paint. What you get will definitely please you!
Making wicker fencing from PVC
In most cases, the concept of “wicker fence” is associated with wood or wicker, but PVC, which has become increasingly popular in recent years, has significant advantages. Let's look at them.

- Affordable price. The manufacturing technology of the material itself is extremely simple, which is why it is inexpensive.
- Durability, which is the main difference between polyvinyl chloride and vine or wood. The material has a special protective coating, it is primed and painted with modern materials, so its service life reaches several decades. And, characteristically, during this period the appearance of the fence practically does not change.
- A wide range of. If desired, you can make a fence of any desired color, thereby improving your area. The material also has a cellular structure, which will make the yard design truly unusual.
- Quick installation. Anyone can do this, and the weight of the material is quite low.
- Ease of use. PVC fences, unlike the options described above, are impervious to high humidity or temperature changes, and they do not fade in the sun. And maintenance of the material consists only of periodic wiping with a special solution. Elements made of metal should be coated with anticorrosive.
Video - How to make a wicker fence with your own hands
How much will such a fence cost?
Specific numbers in this case depend on several factors, including:
- height of the structure;
- weaving method;
- material used in the work.
For example, a willow fence with a height of about 1 meter will cost at least 500-600 rubles per linear meter. Although, if you wish, we can build a willow vine fence on your site absolutely free of charge, for which you just need to prepare branches and supports. But a fence made of PVC or wooden boards will cost from 750 rubles per linear meter.

As a conclusion
Wicker fences are true works of art. There are quite a lot of weaving technologies, design options and possible materials, so everyone can choose for themselves what is ideal for the landscape design of the site. With sufficient strength, a fence can not only decorate, but also protect the estate from uninvited guests.
But it is worth noting that wicker structures are rarely used for protective purposes, although in the landscape it is an indispensable attribute! If you wish, you can do it yourself according to the instructions given in this article, or you can order it from experienced specialists.