A good owner will always have a whole arsenal of tools at hand: from nails and screws to pliers, a level and a set of screwdrivers, not to mention a drill, puncher and screwdriver. Very often simple home repair does not start in any way due to the fact that the master cannot find all the tools he needs in the apartment or garage. To prevent this from happening, all working tools must be stored in a specially designated place - a tool box.
What are the tool boxes, what requirements do they have to meet, and how to make a tool box with your own hands - this is an article about this.
Varieties of tool boxes
In fact, a tool box is a box with or without a lid, divided into several compartments of various sizes and shapes. Small drawers are designed to store fasteners, they can contain drills, tips, or other small parts. As a rule, such boxes are divided into several compartments, each of which has a separate lid. Such boxes are easy to carry, because they weigh a little.

Larger cases are needed to store and transport large tools such as hammers, saws, drills or jigsaws. Quite huge boxes will be needed to contain perforators, levels or mallets. These tool boxes are often made on wheels so that they can be moved and transported.
Professional toolboxes can differ depending on the skill of the craftsman: so a plumber needs one set of equipment, and an auto mechanic needs a completely different one. You can find such boxes in building supermarkets or in specialized stores, they are often sold complete with the tools themselves.

The cases are divided into several categories. This takes into account not only their size, but also the design, as well as the material of manufacture. Structurally, it can be:
- Open boxes with handle for large instruments and facilitate their transfer from one place to another.
- Multi-tiered boxes with many small and large compartments for complex storage of working parts and their facilitated transportation. Such a box can be thrown into the trunk of a car or carried by hand.
- Compact cases with an ergonomic handle that contain all the tools you need for small repairs or a trip to the country.
- Chests of drawers, consisting of several drawers, as a rule, are used permanently at the place of work.
- Tool belts are needed for those who work at heights or in hard-to-reach places.
- Trolleys are a kind of tool boxes on wheels, which are large in size. On such devices they move very large equipment, such as welding machines, Boers.

Important! When choosing a box for your tools, it is better to give preference to multifunctional boxes, where each part has its own place, and small compartments are closed with lids. Otherwise, all the tools run the risk of being mixed into one heap during transportation.
What are tool boxes made of?
Cases and boxes can be made from various materials, but the main requirement for them is the same - the boxes should be light, since the tools themselves weigh quite a lot. There are a few more nuances that you need to know about those who buy a case for their arsenal of tools:
- The bottom of the box should be as thick as possible, since it is on it that the entire mass of the contents presses.
- A full box should not deform when lifted - the walls remain perpendicular to the lid and bottom. If the walls sag, this indicates that the strength of the case is insufficient for such a set of components.
- Well, if the material of the box is fire-resistant, then expensive tools will survive even during a fire.
- If there are gaps in the box, dust and construction debris will enter the box and contaminate the tools. And in this case, the contents are threatened with oxidation and rust due to high humidity.
- Durability is an important factor, because a professional box costs quite a lot, and the load on it from metal components will be significant.

Today, the most popular materials for such boxes are:


Attention! All materials must comply with special standards, because if the box breaks at the most inopportune moment, all heavy tools will fall on the feet (or on the head) of the unfortunate owner.
If you can still make a metal or wooden tool box with your own hands, then you can really only buy plastic boxes.
How to make a DIY tool box
If the owner has decided to make a box for his inventory on his own, first of all, he needs to determine the size and choose the design of the box.

To do this, you need to inspect all your tools, measuring the most dimensional elements and taking into account small things (bolts, nuts, washers, etc.). According to these parameters, the dimensions of the container itself and the internal compartments are calculated.
Tool box design
Speaking about the design of the boxes, they do not mean their shape, but the way they open and the presence of additional sections. The following designs are considered standard:
- Case - portable box rectangular shape with a handle. As a rule, cases are divided into many departments, have removable partitions that allow you to independently divide the space inside the box. The weight and dimensions of such cases are usually small.
- Container - a larger box for a variety of tools. As a rule, it has the shape of a trapezoid with a rectangular bottom. Inside this box there are also partitions, and there may be separate smaller boxes (folded like a nesting doll). Sections of such a container can be pulled up and to the sides, forming a whole "trellis" with tools and fasteners. Large tool boxes of this type can be equipped with wheels, which is very convenient and practical.
- Multiboxes are arranged vertically and the drawers in them are pulled out along the guides, as in a regular chest of drawers.
With your own hands, it will be easiest to make a case for tools, because in this design there are no complex mechanisms and hinges with which additional sections come out.

Important! Although it is quite possible to build a container with boxes that fold over several floors with your own hands. To do this, each pair of "floors" should be fastened with metal brackets, providing mobility to the elements (as in the figure below).

Bringing an idea to life
Speaking of material for self-manufacturing box, then, of course, the easiest way to work with a tree. For the first experience, it is better to choose inexpensive wood - a planed coniferous board is quite suitable for boxing.

The whole process of making a tool box consists of several stages:
- Make a drawing of the future boxing. To do this, use a regular drawing paper and a ruler or professional program AutoCAD type.
- The resulting drawing is transferred to wood using simple pencil or marker.
- Cut out the details along the contour using a jigsaw or saw.
- Treat the tree antiseptics or stains to prevent it from rotting and making it "inedible" for insects and rodents.
- The box is being assembled. Now all the details need to be connected into a single structure, according to the drawing. To do this, it is best to use wood glue, which is applied to the ends of the parts and pressed against each other for a few seconds.
- It is better to additionally fix the elements of the box with self-tapping screws, making sure that the wood does not crack when screwing in the fasteners.
- Install the lid using conventional hinges or another device appropriate for the type of drawer opening.
- The lid is equipped with a handle for carrying and transporting the box with tools.
- Inside the box is marked into sectors, given the diagram and drawing. Additional partitions are cut out of the board and fixed in place with glue and self-tapping screws.
- The walls, bottom and lid of the box are polished in several ways. sanding paper, then painted or covered with several layers of varnish.
The box is ready to use, it remains only to fill all its compartments with the appropriate tools and fasteners.
The simplest tool box
Beginners in carpentry are offered more than simple design box for tools - an ordinary box with a handle, but without a lid. The advantage of such a box is that it is suitable for tools of various sizes, if desired, even a water level or a puncher can be placed here, or you can make a miniature box for an “apartment” master.
Such a box consists of only six parts:
- two long side elements;
- two short sides, the height of which should exceed the height of the long sidewalls, since the handle will be attached here;
- bottom, which should be made of whole piece wood, since it is the bottom that takes the load from the weight of the tools;
- handle, the role of which can be played by a bar, plank or piece round section- the choice depends on the size of the box and the estimated weight of its contents.
If desired, the design can be supplemented internal partitions or complicate it with compartments with lids or doors.

All elements are assembled into one structure, fixed with carpentry glue, then additionally fastened with self-tapping screws. Particular attention should be paid to the fasteners of the handle - it must be strong and reliable.
You can independently assemble a tool box not only from boards, depending on the arsenal of tools, plywood, chipboard, OSB, galvanized metal or aluminum sheet can be used.
There is nothing complicated in the manufacture of such a box, and the advantages of the product are obvious: tools and fasteners will be in a certain place, at any time it is enough to get the box from the pantry or garage and make the necessary repairs.
Hello everybody!
A toolbox today is a very indispensable thing for every owner. Most of us have a lot of different tools that we may not use very often, but nevertheless, we keep them, since not one repair can do without them. In order for the tool to be in one place, and it was convenient to transport it, we use special boxes. Often we just buy them in the nearest store, the range and variety allows us to do this. But why not make it yourself? The manufacturing process is not too complicated, anyone should be able to handle it, especially with a handmade thing, which is much more pleasant to use than a purchased option. This article will describe 4 different ways production of boxes, a photo report is attached.
Let's start making!
Manufacturing Method No. 1

We will need:
Material
Plywood;
- pine board;
- nails;
- wood glue.
Tool
- drill;
- hammer;
- chisel;
- manual frezer;
- ruler;
- pencil;
- roulette.
First of all, you need to find necessary material, plywood or trimming boards are suitable for this. Further, according to the presented drawing, it is necessary to mark up, then cut out all the details of the case. It is necessary to make special grooves into which the partition will be placed, for this we use a manual milling cutter, or another available tool.

The diagram shows the following body parts:
1 - wall (2 pcs.);
2 - sidewall (2 pcs.);
3 - bottom;
4 - groove along the thickness of the partition and a depth of 1/2–1/3 of the thickness of the material
When everything is ready, all elements of the box body should be sanded. Next, we assemble the body together, fix the parts with wood glue, and then additionally fasten with small nails.
Now we make a partition for the box, cut out a special handle, for this we use a jigsaw.

When the partition is ready, grease the grooves with wood glue and install it in its place.

Next, from the planks we make overhead handles, with the help of a planer we round the corners. Then we make tool holders from the rails, use a jigsaw, and a drill. The holes will serve for screwdrivers, and pliers, etc. will be installed in square cutouts. tool.

So that the box does not get dirty, and there is protection from environment, varnish the surface. As a result of the work done, we get such a homemade box.

Manufacturing method No. 2
Drawer-stool

Material
Plywood or OSB;
- wooden beam;
- self-tapping screws;
- wood glue.
Tool
Available cutting tool;
- screwdriver;
- ruler;
- pencil;
- roulette.
We take an existing sheet of plywood, make markings on it, and, according to the dimensions presented, cut out the lid (Fig. 1), then the longitudinal drawers (Fig. 2) and sidewalls (Fig. 3).

Next, we take a wooden beam with a section of 40x50 mm, cut out a handle, and 4 legs with bevels at the ends at an angle of 15 °.

Next, we assemble the structure together, using self-tapping screws as fixing elements.


Parts layout:
1 - cover;
2 - tsarga;
3 - handle;
4 - leg;
5 - sidewall.
When everything is ready, use sandpaper or a grinder to round off sharp corners and clean the surface. Next, you can apply a protective coating.
The end result should be such an unusual tool box, which, if necessary, can be transformed into an ordinary stool, for this it is enough to turn it over and put it on legs, with it it will be convenient to reach the place we need, at a time when growth does not allow do it.
Manufacturing method no. 3.
Box for the young master.

Does your child love to craft? We offer to make a small box with him, where he will store his favorite tool.
To make a box with our own hands, we need the following
Material
16 mm boards;
- round wooden beam;
- self-tapping screws;
- wood glue.
Tool
Available cutting tool;
- screwdriver;
- ruler;
- pencil;
- roulette;
- clamps.
First you need to take the existing boards with a cross section of 16 mm, then we make the markup, according to the dimensions provided, after which we cut the wood into the component parts we need.

The drawing shows the following details:
1 - sidewall;
2 - bottom;
3 - handle;
4 - handle stand;
5 - holder.

Using sandpaper, we grind the surface and remove sharp corners. When everything is ready, we begin to connect all the parts together, first you need to connect the bottom and sidewalls, then along the marked lines we put vertical racks and at the same time put the horizontal handle.
We fix everything with glue and screws. Then we install special holders for screwdrivers.

Now you can paint, choose the color and coating at your discretion.
The toolbox is ready.
Manufacturing Method No. 4

The next version of the tool box is well suited for carrying various and necessary equipment for us, it appearance will differ in solidity and reliability.
To make a box with our own hands, we need the following
Material
The board is not thicker than 12 mm;
- self-tapping screws;
- joiner's glue;
- pen;
- corners 8 pcs.;
- latch 2 pcs.;
- loop 2 pcs.

Tool
Available cutting tool;
- screwdriver;
- ruler;
- pencil;
- roulette;
- clamps.
For the manufacture of the box we use such wood as: pine, linden or poplar. Most optimal thickness boards will be 12 mm thick.

Next, we make the markup, according to the indicated dimensions in the drawings, after which we cut it into its component parts, as shown in the photo.

Full list of required parts.

In order to make sure that the wood was cut correctly, you need to put all the parts in a single box.
First, we assemble the bottom part and the lid of the box, for convenience we use clamps and corner clamps. We fix the parts together with carpentry glue.

Then, using a drill, we drill a hole for the self-tapping screws, we drill the holes.

Now we fasten the body of the portable part, put partitions, fix it with self-tapping screws.

Next, install the handle that we need to carry.
There are many professions in which different kinds tools. Most often, tool boxes are purchased for their storage, but sometimes high-quality storage is easier to do with your own hands.
 If you are interested in this or that type of craft, and you are not sitting at home idly by, naturally, you have a fairly large number of tools. To ensure that your tools are always at hand and securely stored, they need to be provided with a storage system in the form of a separate enclosed space called a drawer. for storing tools. In addition to safety, the use of such a box will greatly help in the work, since the filling will be neatly sorted into compartments and in the future you can find necessary fixture"blindly". Also, this device is necessary for car owners, or rather, owners of trucks and gazelles. The box must be well secured in the car. And this means that when making it with your own hands, you need to think carefully about where it will be located in the car and how to fix it there.
Decide on two criteria:
- Will you only store tools in it, or do you also need it for ease of transportation?
- what sizes of tools do you intend to store in it?
Crate classification
Body material:
- plastic - light in weight, convenient in everyday life and for transportation;
- metal - much heavier than plastic, but at the same time much stronger, more stable, have a more rigid structure, cannot be large due to the weight of the metal;
- metal-plastic galvanized - light, durable and roomy, suitable for both storage and transportation professional tools. But all these advantages determine the corresponding price - it can range from $150 to $500 and more.
- wooden - the most available material to make a toolbox. Moreover, it is easier to do it with your own hands from this material, or rather from plywood 10 16 or 18 mm.
By type of stored instruments:
- hand tools - as a rule, they are represented by one large compartment for large tools (screwdrivers, hammers, keys) and 2-3 small ones for smaller tools;

- an electric tool is a case that is functionally designed to store and move a specific power tool. Most often it has one main compartment for the device itself and several recesses for equipment.
- organizers - boxes designed to accommodate a large number tools of various sizes. They have many compartments, models with modular partitions deserve attention, which, for the convenience of the owner, can be rearranged from one place to another.
- professional tool - a special kind of cases with certain seats for specific tools that are more resistant to drops and adverse conditions environment.
- non-professional tool - consists of boxes of both small and large enough sizes with many compartments and niches for various kinds of tools, often these are cases in the form of bags.
There are many tool box companies such as stanley, fit– american firms, keter- no less popular Israeli company, Spanish company tayg, german Kroft and many others, differing in quality and price of products.
As an alternative to all these firms - the opportunity to make a tool box with your own hands. You can thus save on cost and get a completely competitive option that meets exactly your requirements.
Types of boxes
Tool boxes made in home workshops are mostly made of wood and come in a variety of shapes. Boxes of the classical form - "bast basket" are popular and easy to manufacture. in the second and third place - a box in the form of a chest - a container, and in the form of a case.
 |
 |
 |
Materials for making a tool box
- wooden boards 15-25 mm thick
- round wooden rod of the desired length
- self-tapping screws, wood glue, sandpaper for cleaning surfaces
- set of tools - Sander, electric drill, jigsaw, screwdriver
- measuring instruments - ruler
- screwdriver, hammer
Manufacturing steps

Using this technology, it is possible to produce boxes more complex structures, creating at the expense of perestenki required amount compartments and niches.
Using the same technology, it is possible to manufacture a closed box, which is more reliable and convenient for transporting tools.
Additional steps in the manufacture of a box with a lid
For self-manufacturing of currently popular transformer boxes you will have to break your head more, but it is quite possible to implement this idea.
To do this, with the help of computer programs, you need to develop the design you want, but a set of necessary elements, which can be purchased at specialty stores. The number and complexity of the selected elements depends on your requirements for the box. Assembly can be done on wooden base using aluminum strips and corners. Fasteners are made with rivets.
If you are a purposeful and creative person, then the process making a tool box will not be difficult, but by seeing the fruits of this work, you will increase your self-esteem and save budget funds.
Reading time ≈ 5 minutes
A real owner always takes care of the safety of his tools. Even a small set should be stored in an orderly, neat manner. skillful master can assemble a container for tools and fixtures on their own. Below we will talk about how to make a tool box with your own hands. The presented photos and videos will help in the work.
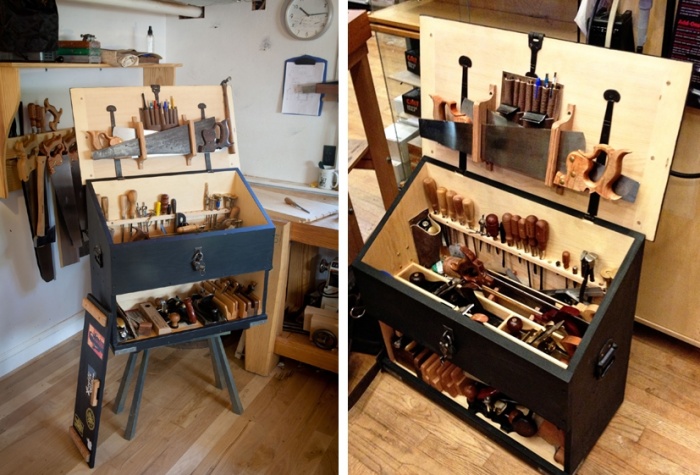
Outwardly, the box looks solid and stylish, it immediately declares a serious approach to the life of its owner. Its dimensions (70x40x45 cm), i.e. 70 cm wide, 40 cm deep, 45 cm high. This is sufficient to accommodate hand tool. The drawer has 3 drawers, as well as a top hinged lid that opens up a spacious compartment. This box allows you to protect tools from dust, organize safe storage.
Required Tools
For the manufacture of wooden box you will need the following tools:
- a circular saw;
- milling machine;
- grinder;
- clamp;
- hammer;
- wire cutters;
- file;
- wood saw;
- chisel.
Step-by-step instructions for making a tool box
The optimal material for the manufacture of the frame is oak wood. It's lovely durable material which differs in durability and resistance to mechanical influences. It is better to take as a basis - glued boards with a thickness of 19 mm. This material has no knots and rotten inclusions. With the help of a circular cut a strip 38 mm wide.

So that when gluing individual elements did not move relative to each other, a carnation is driven into the first part a little, its cap is removed with wire cutters, and then a second board is stuffed onto the protruding sharp tip.

The boards are additionally coated with glue and fixed.

The glue that has come out at the joints of the parts is removed with a chisel, you just have to wait for the glue to dry a little.

The result should be a 38x38 mm part. Its butt is polished.

The edge must be cut strictly at an angle of 90 °, so when cutting the part to the desired length, one must not forget about the cut angle.

This technique will help to ensure the accuracy of the cut angle.
The location of each part is marked so as not to get confused during assembly.

A groove is cut in each part along the entire length, it must go strictly in the center.

Grooves can be made either using a stationary circular saw or with a milling machine.

On parts that are intended for the manufacture of vertical corner supports of the frame, transverse markings are made.

in the rear corner details make another longitudinal groove. It is not needed in the front corner bearings.

For subsequent fastening in the end part of the blanks, you need to find the center, noting the point of intersection of the diagonals.


It is necessary to carefully check the compatibility of the blanks.

The blanks are processed with a file.

In a freely assembled frame, marks are made to subsequently lengthen the grooves.

The grooves are cut with a hacksaw for wood.

Remove all excess with a chisel.


These blanks are needed for drawers. A corner is sawn from the end part.

Each blank is drilled for bolting.

Observing accuracy, it is necessary to drill the prepared parts.

The part intended for fixing and dividing 2 drawers is cut out at an angle of 90°.

Having installed the details for the movement of the boxes in place and fixing them, they gradually begin to screw them.

The corners of plywood blanks are cut off, as in the photo.

The walls of the lower drawers are attached to plywood sheets with self-tapping screws.

Prepared horizontal plywood parts are attached to one side. First, this is done without the use of glue.

During fixation with clamps, it is necessary to check the diagonal so that the dimensions match.

Drawers are made from plywood.

Grooves can be cut either on stationary saw or with a cutter.


Details of drawers are fastened with glue.

The side parts of the boxes must have grooves for movement along the planks fixed inside.

For strength, the side parts are fastened with dowels, which are cut flush.

For reliability when gluing, small carnations are partially driven into the surface of the front wall of the drawers, their caps are removed.

By attaching the front panels to drawers, see if the individual elements are evenly spaced.

When gluing, it is necessary to observe the utmost accuracy, there should be no gaps.

At the end, the top frame of the box is made of plywood.

To make a precise cut at a 45° angle, it is advisable to use a special tool.

The blanks for the frame are connected and fixed when glued using a tension belt.
The image of the master is inseparable from the toolbox he holds in his hand.
Moreover, this is not just an element of fine folklore, but a functional device. Sooner or later, the number of tools reaches a critical mass, and all this wealth must somehow be streamlined.
In addition, there is a tool that cannot be stored simply in bulk. For example, files or drills. From friction against each other, these objects become dull. Yes, and during work, a tool lying around at random forces you to spend time looking for it.
If you need to take a repair kit on the road, for example - you are going to your country house for the weekend, you need a container for carrying. Or do you want to separate the locksmith and carpentry tool. And the garage kit should not interfere with the rest of the home repair supplies at all.

So - we need a box to store the necessary devices, Supplies and fasteners. There are many options for sale, convenient, compact, practical. Some are real works of art. However, they cost some money.
There is only one way out - to make a tool box with your own hands
First, let's define the purpose. What is a toolbox anyway?
Portable tool box
A small number of items are placed in it, usually the equipment corresponds to the type of work. Such a box must have a strong lock so that it does not accidentally open during transportation. During movement, the tool should not hang out inside, each element has its own niche, and, if possible, is fixed.
Stationary toolbox
True, this is a relative concept. It’s just that such a box is not carried with them to the place of work. It can be gently moved within the workshop. In this design, there are no fixtures for tools, but they are arranged in compartments and, as a rule, are divided into groups.
Dedicated tool box

Unlike the first two options, such storage is intended for a specific group of devices. For instance, wrenches, or a set of bits and drills for a screwdriver. In addition to the main contents, maintenance materials are usually placed in such boxes.