It's no secret that clothes love to be treated with care. In addition, careful owners try to store it so that a dress or suit, coat or raincoat is always ready to go out - cleaned, washed, ironed. Naturally, for such purposes one cannot do without a special storage facility. And if previously, for most families, having a wardrobe in an apartment or house was enough for storage, but today, with the increase in income and standard of living of the population, the range of clothing items has expanded significantly, and there is often not enough space.
Therefore, more and more often, owners are including a separate storage room in the layout of their homes - a dressing room, which solves numerous problems and simplifies the search for the necessary thing. Services for planning and arranging such a room are widely offered by many companies or private craftsmen, however, it will not be cheap at all. Therefore, a convenient DIY dressing room can be the optimal solution to this issue, especially if the budget allocated for home renovation is quite modest. In addition, by creating and implementing the project yourself, you can plan the arrangement of shelves and hangers with maximum convenience for yourself.
Types of dressing rooms and where they can be installed
Having a dressing room in a house or apartment helps free up space from bulky closets. And besides, it brings a certain order to everyday life, since all the things of family members are in one place, and they are always easy to find.
However, taking into account the fact that everyone’s living space is different both in quantitative terms and in its “geometry”, you will have to make your own choice of the placement and configuration of the dressing room.
Dressing room along the wall
Considering the small areas of modern apartments, most often the best option for placing a dressing room is along one of the walls of the hallway, bedroom, and sometimes you have to use the living room.

The convenience of this option consists of several points:
- Compact placement of the structure.
- Possibility of arrangement in most apartments.
- Additional soundproofing of the wall from neighbors.
- Material savings, since the cabinet's vertical spandrels can be fixed to the wall without using the back wall.

The disadvantages of wall-mounted storage organization include the following:
- It is difficult to make a storage facility of great depth, since in this case it will take up too much space.
- For the same reason, it is difficult or even impossible to install such a dressing room in a narrow hallway.
- Such storage will not become a separate room in which fittings could be carried out.
However, if it is not possible to allocate space for a separate storage room, a dressing room built along the wall is not the worst option.
Corner wardrobe option
A wardrobe located in the corner of the room is sometimes the only correct solution, since the design, to a certain extent, optimizes the space. So, areas of the walls in the corner, which are usually not used in the interior, can be allocated for such storage. For example, if there is not enough distance between this corner and the window or doorway to install some necessary piece of furniture, but it can be used to create a corner dressing room.

For example, if the bedroom in an apartment has a fairly large area, then a dressing room can be arranged in one of the corners of the room by installing a partition, the outer side of which will simultaneously serve as a bookcase. In this way, the space will be perfectly optimized.

Another way to use a corner area is to install a wardrobe in it. This option is perfect for a hallway, of course, if it has sufficient area and a suitable configuration.

For a square hallway, a more compact design of a corner wardrobe is well suited. It is convenient because you can go inside the closet to find the thing you need. But even such a closet is unlikely to become a fitting room, since there is not enough space for this.

So, the positive aspects of corner dressing rooms are the following:
- Optimal use of room space, that is, the use of areas that, as a rule, remain empty.
- When installing a partition to highlight a dressing area, this area becomes more functional than if it were left free.
- The room takes on an original configuration.
The disadvantages of this dressing room arrangement include:
- When installing such a partition, the dressing room most often has a small area.
- When choosing a corner wall cabinet, the dressing room does not have a separate place for fittings.
Dressing room in utility room
In many apartments in multi-storey buildings, both old and new, a storage room is already provided in the layout itself. This is a great success, since such a mini-room can easily be equipped as a separate dressing room, especially since there is space for racks and shelves. Often such storage rooms are simply littered with rubbish accumulated over the years of residence and, in fact, do not perform any useful function. It is worth paying close attention to the available optimization opportunities.

Naturally, it is better if the pantry does not have a window - this way, a larger area of the walls can be allocated for shelving and hangers intended for large items. If the pantry is equipped with a window opening, then you will have to use the surfaces around it more efficiently.

So, under the window you can place cabinets or shelves for shoes, and the tabletop-window sill above them can be used to store bags or organize a place for ironing on it. Shelves can also be installed above the window for hats or other boxes, for example, with seasonal shoes temporarily stored for storage.

Another room in the apartment that is not always used to the full extent functionally is the loggia or balcony. But here, too, it is quite possible to place a wardrobe, thus freeing up space directly in the apartment.
However, if this room is chosen for a dressing room, several points should be taken into account, without which its arrangement in a loggia would be impossible:
- The room should be insulated, and all its surfaces. Naturally, high-quality glazing is required using double-glazed window systems. You will have to think through a heating system, otherwise things will deteriorate and acquire an unpleasant odor from exposure to dampness, which is inevitable at the border of cold and heat.
- Windows should be opened to ventilate the room, and also closed with blinds or thick curtains, since sunlight can negatively affect the color of clothes and shoes - things will simply fade. Especially thick curtains will be required if the loggia faces the south side of the house.
Dressing room under the stairs
City apartments rarely boast of having a staircase. But in a private two-story house (or one with an attic), a convenient place for storing things can be the space underneath, which usually has good depth. Various wardrobe options can be arranged - open, as shown in the illustration, closed with hinged or sliding doors, or a block model, in which each of the blocks rolls out using wheels. Shelves or crossbars for hangers can be installed inside the blocks.

It is important - when choosing such a place for arranging a wardrobe, it is necessary to make the ceiling of this under-staircase space very durable and reliable. Just so that when people move up the steps, dust does not fall on things placed below.
Dressing room behind the partition
If the room has a rectangular shape, then in the end area it is quite possible to install a plasterboard partition that will separate the main part of the room from the dressing area. If you want to maintain the visual spaciousness of the room, this can easily be achieved by installing mirrored doors in such a dressing room.

Building a plasterboard structure is not at all difficult, especially since its construction does not require collecting certificates and permits. Such a partition has very little weight and will not burden the ceiling. So the option is quite suitable for both a private house and an apartment in a high-rise building.

If there is no desire or opportunity to install a solid stationary partition, then a thick curtain can be used as one. The fabric is hung on a cornice fixed to the ceiling, and a dressing room is installed behind the curtain. Such a simple enclosing structure will completely hide the storage of things, but it will always be accessible. In addition, a well-chosen curtain can add individuality and originality to the interior of a room.

This arrangement option is most suitable for the bedroom, since in such an improvised dressing room you can place not only items of clothing, but also bed linen. Such storage would not be very appropriate, say, in the living room.
Wardrobe in a separate room
It is only possible to allocate a separate room for a wardrobe in your own home or in an apartment with a large area.

In a private house, it is recommended to provide a wardrobe room at the design stage of the building. Without words, it is clear that this is the best option, since the storage room can be arranged in an area of the house convenient for the owners. Most often, the wardrobe is adjacent to the bedroom, less often it is located next to the hallway. In some cases, even two wardrobes are equipped:
- One is next to the hallway, and outerwear, shoes, as well as bags and hats are stored in it. For this category of things, a wall cabinet is often used.
- The second wardrobe is arranged as a separate room and is located next to the bedroom. Designed for storing bedding, underwear and other delicate clothing.
It is necessary to separate different categories of things for the reasons that it is somehow inappropriate to store bed linen and underwear in the hallway, since all the dust that enters the home from the street first of all ends up in this room. Again, storing shoes and underwear in one place is not entirely correct, although in many of the illustrations shown, all shoes are in the same storage with the rest of the things.
Shape, size and wardrobe layout
Shape and dimensions of storage
From the information presented above, it becomes clear that the dressing room can have different configurations - this most often depends on the available possibilities for its arrangement. For example, corner storage takes on a triangular or trapezoidal shape, but most are square or rectangular. It is convenient not only to store things, but also to try them on.

As for the size of this room, it directly depends on the area of the apartment or house. But usually a wardrobe takes up 1.2÷1.5 m² - this is a rectangular room with dimensions of 1.0×1.5 m. It should be noted that a corner triangular dressing room with the same area is more spacious than a rectangular version.
A rectangular dressing room, designed for one-sided placement of shelving, must have a width of at least 1200 mm. If you plan to install shelves on two sides of the room, then you need to plan a width of at least 1500 mm. After all, the main difference between a dressing room and a regular closet is that you can go into it - this factor should also be taken into account when planning the placement of shelves.

Several principles for organizing the interior space of a wardrobe are used. Shelving can be installed only along one wall, in a U-shaped or L-shaped pattern. The most rational option is a U-shaped distribution of shelves, since it makes it possible to make full use of the entire space of the room, as well as move around it in search of the necessary thing. At the same time, it is possible to organize a storage system in this way even in a relatively small area.
If the room (bedroom) has a small area in which it is difficult to select and fence off 1500÷2000 mm, then you will have to limit yourself to a wardrobe installed along one of the walls. This option does not take up much space and has a well-thought-out distribution of internal space.
In the same situation, when a dressing room has to be organized in a passage room, for example, in a hallway, the best option would be to place the shelving along parallel walls. In this case, to prevent the room from looking sloppy, it is recommended to equip the shelves with doors. Placing shelves in parallel will not make it difficult to move around this room, but the capacity of the cabinets will be maximized.
Wardrobe doors
Due to the fact that when arranging a dressing room, every centimeter is usually saved, the doors for this room or closet should not take up much space when opening and closing them.

If the area of the adjacent room allows, then you can use the simplest and most familiar swing door design. It is quite convenient, since when you open the doors you can see the entire room and things laid out on the shelves.

Another option for doors is an “accordion”, that is, when it is opened, the doors fold together. The option is quite interesting, but its installation will also require a certain space in the room adjacent to the wardrobe. In addition, the scheme itself is quite difficult to implement by an inexperienced master.

Therefore, the most preferred design, which will not take up extra space, is sliding doors, such as those installed on sliding wardrobes. At the same time, for comfortable operation of the storage facility, it is recommended to choose doors that open in both one and the other direction. The doors of such doors often have mirror inserts, which is convenient when trying on clothes.
The design of the compartment doors also cannot be called very simple. But with diligence, and even more so - with the use of special sets of metal profiles and the necessary fittings, the installation is quite feasible to carry out independently, without the involvement of an outside specialist.
Is it difficult to make and install sliding doors yourself?
Sets of special components and special aluminum profiles make this task quite feasible for any owner who knows how to handle a basic set of tools. A detailed illustrated version, with all the necessary calculations, is available to the reader on the pages of our portal.
Whatever door is chosen for the wardrobe, its design must still correspond to the overall design of the room into which it opens.
In some cases, instead of doors to close the dressing room, thick curtains of appropriate design are used.
Organizing storage on racks
The number of things that can be placed in it, as well as the ease of finding what you need, depends on how ergonomically the space in the dressing room is organized. Therefore, there are certain rules that it is advisable to follow when creating your own design of a room for storing clothes and shoes.
Shelving or wardrobes are divided into several levels:

- The lower level of the racks, as a rule, is reserved for storing shoes - this part of the structure is made in the form of inclined and sometimes pull-out shelves. The height of these sections is 300 mm for summer shoes and 400÷450 mm for winter shoes.

It is necessary to clarify that some dressing room owners prefer to allocate not just one lower tier for shoes, but an entire section of the rack, placing it from floor to ceiling.
- The middle tier of other shelving compartments is most often used to arrange crossbars for hangers with shirts, trousers or skirts. The height of these sections can vary from 870 to 1000 mm.

- Next comes a tier where drawers or shelves can be installed on which small wardrobe items will be stored. In the middle tier, pantographs or rods are equipped for longer items - dresses, coats, raincoats, etc. The height of this compartment can be from 1400 to 1700 mm. It is convenient to put knitwear in baskets or on shelves, which are also located in the same tier with the above-mentioned items.

- The upper tier of shelving is reserved for storing items of periodic or seasonal use - suitcases, bags, hats, pillows, blankets, etc. Some of these items are stored in boxes or baskets.

Modern designs of shelving and cabinets used in the dressing room use various holders, press hangers, drawers for small items, metal mesh baskets, convenient for storing knitwear, socks, underwear, etc.
Wardrobe ventilation
A dressing room is most often a closed, unventilated room with no windows. Therefore, it has to organize its own ventilation. Otherwise, over time, a musty smell will appear in the room itself, which will permeate all the clothes. And getting rid of it is quite a difficult task even with the help of the strongest perfumes and deodorants.
Ventilation is planned at the stage of drawing up the dressing room project. It is then that it is necessary to find the optimal option for organizing it or connecting it to a common ventilation system.

The principle of arranging ventilation in the dressing room is identical to the ventilation system in any of the rooms. Exhaust ventilation vents are planned in the ceiling surface or in the upper part of the walls. These vents are connected by air ducts to the home's ventilation system or have their own exhaust duct that goes vertically to the street. Sometimes, if necessary, an exhaust fan is installed. The flow of air into the room is ensured through the cracks under the door or through specially equipped windows in the lower part of the door leaf, closed with decorative grilles or overlays.

The air exchange organized in this way maintains a normal microclimate in the dressing room.
When choosing a fan for installation in the dressing room, you should pay attention to the noise level when it operates. This room most often borders the bedroom, so noise should be minimal. The fan can be controlled automatically or from a pass-through switch.
Lighting in the dressing room
A room without natural light in which things are stored requires the use of a considerable number of lighting fixtures. This is necessary to make it easier to find the item you need and then try it on.
An excellent help in organizing lighting is the presence of a large mirror in the dressing room, which enhances the light flux coming from electrical appliances. An important point in achieving a comfortable atmosphere is the choice of the color of the walls, ceiling, as well as cabinets, shelves and racks. So, if all surfaces have light shades, they will also enhance the brightness of the lighting.

Due to the fact that there should be a lot of lighting fixtures in this small room, it is worth thinking about their efficiency. You should not rely on using conventional incandescent lamps, as they not only consume a large amount of electricity compared to their counterparts, but are also not durable enough. In addition, the high heating temperatures of such lamps make their use unsafe under the conditions under consideration.
The best option for lighting shelves would be tubes that provide bright, but not harsh light, are designed for a long service life and are economical in terms of energy consumption.

You should not choose massive chandeliers or pendant lamps that hang from the ceiling by more than 250÷300 mm for overhead lighting. It’s just that when trying on, you can easily touch them with raised hands. The most suitable lamps for this room will be spotlight models built into the suspended ceiling of the room, as well as directly into the shelves.

Additionally, the lighting in the dressing room can be equipped with a motion sensor, which will eliminate the need to turn on the light with a regular switch - it will light up when the doors are opened, and turn off when they are closed. A motion sensor can be tied to the entire lighting system, or another option is to purchase ready-made lamps with a built-in sensor.
DIY dressing room
Arranging a dressing room yourself will allow you to get a practical and ergonomic space for storing most of the necessary things at minimal cost. In addition, when creating a project with your own hands, it becomes possible to create a comfortable placement of shelves and cabinets for each dressing room owner.
What materials are most often used
To begin with, it is worth determining what materials the dressing room and shelving inside the room can be built from.

- The frame of a partition wall is usually mounted from metal profiles or wooden beams. This design will not place any serious additional load on the floor (floor).
- The walls of the room, as well as the frame of the partition, can be covered with plasterboard or plywood (fibreboard, OSB) sheets.

It is preferable to use for covering the frame, since this material is “breathable”, therefore it does not accumulate moisture and counteracts the formation of unpleasant odors. And it’s more environmentally friendly than wood composites.
- To fill the space of the dressing room, ready-made cabinets, as well as self-assembled racks or cabinets, can be used. The frame for shelving is also made of metal profiles, pipes or wooden beams.

It should be noted that making a frame from galvanized metal profiles is not the best option for small rooms. It will definitely have to be sheathed on both sides with plasterboard or other sheet material. The design will certainly look neat, but it will take up too much useful space.

- On sale you can find perforated metal profiles specifically designed for forming frames for shelves - usually it is with the help of such parts that shelving in stores is assembled. These guides are fixed directly to the walls of the dressing room. After this, ready-made lightweight shelf structures or holder brackets for mounting crossbars are installed in the shaped holes of the profiles - they have corresponding hooks. Such systems are the best option, especially for small rooms. Convenience also lies in the “flexibility” of such a design - if desired, you can easily change both the number and height of the shelves.
Video: Installation of a universal wardrobe system - quickly and easily

- Another option for creating a frame for shelves is metal tubes connected to each other with special fasteners and holders, with the help of which they are also fixed to the wall. There is a fairly wide range of fittings for such tubular structures of varying degrees of complexity on sale.
- Rack shelves are often made of chipboard, but it must be taken into account that this is a fairly heavy material that requires a reliable frame. You can use well-processed thin boards or plywood 10 mm thick to create shelves.
Usually, if you create a dressing room with your own hands, any suitable material available in your home “stores” is used to fill it. Often old furniture is disassembled and used for this purpose - these can be cabinets or cabinets. To ensure that all this variety of material looks neat upon completion of the work, it is recommended that the finished structure be painted in one light color.
Creating a Project
Whatever the construction of the dressing room is supposed to be, work on its creation begins with the development of the project, taking into account the materials that are planned to be used.
The project is a drawing made according to the measurements taken of the place where the dressing room will be organized. To know what a project drawing might look like, several options will be considered below.
When creating a project, it is not at all necessary to draw the things that will be stored in one or another compartment of the structure, but it is advisable to make signatures of their location. This will make it easier to imagine and decide how convenient it will be to use the shelves and hangers. In addition, all distances between structural elements must be indicated on the drawing. After such a substantive study of the scheme, you can immediately draw up a list of all the necessary materials, parts, special components, indicating their required quantity.

- Wall-mounted wardrobe. This wardrobe option is suitable for installation in a hallway or bedroom. A closet is used if it is impossible to arrange a separate room or fenced-off space for storing things. In such conditions, such a piece of furniture will solve numerous problems, freeing up space in other rooms.

- This version of the project involves organizing, although small, a separate dressing room. In the example shown, the depth of the dressing room is 1100÷1200 mm, and its width is 2200÷2500 mm. That is, this project can be reproduced in the end part of the bedroom or other room bordering the recreation room. You can fit cabinets or even a cabinet of suitable parameters into the project.

- The third project option shown involves the use of an area measuring 2000x1600 mm. Such racks can be installed either openly, that is, without building partition walls, or inside a dressing room. The cabinets have a large number of functional sections, including drawers, shelves, and sections for storing outerwear and underwear.
Using the presented parameters as a basis, you can create a set of shelving from different materials without using the side panels of the structure.
Option for making wardrobe shelving using pipes
What you can use to build a partition for a dressing room was described above. In addition, our website contains many publications with information about working with drywall. Therefore, this section will describe the option of manufacturing shelving in a room already separated by a partition. And the frame for the shelving will be metal pipes. Moreover, in the example under consideration, these are completely ordinary VGP pipes.
How to install a light partition in a room?
By the way, a frame structure followed by sheathing with sheets of plasterboard is not the only option. There are other technologies that are very interesting and accessible to independent use. All this can be found in a special publication on our portal.
To manufacture this design, you can take any of the projects presented above, or you can create one yourself.
To work, you will need some tools that, as a rule, can be found in the “arsenal” of any home workshop:
- Construction level, tape measure, marker for marking.
- Electric drill,
- Grinding machine with a disc for metal.
- Pliers, hammer, adjustable wrench.
- and a jigsaw.
From the materials for installation of the structure shown as an example, you will need to prepare:

- Metal pipes with a diameter of 20 mm, which will become the load-bearing parts of the frame structure being created.
- Pipe flanges - for attaching racks and lintels to the floor, ceiling and walls.

- Holders for installing hanger bars.
- Connectors for perpendicular junctions of pipes and other fittings required for the project.

Chipboard, plywood 10÷12 mm thick or boards for making shelves and drawers.
Furniture fittings - corners, guides, hinges, handles, etc.
Boxes and baskets for storing things.
Self-tapping screws for fastening structural parts to walls, floors and ceilings.
Having prepared everything you need, you can move on to the first stage of work:

- The first step is to inspect the walls of the dressing room and, if necessary, make repairs - covering with plasterboard or plywood, painting or wallpapering. It is better to carry out this process before installing the frame, while the wall surfaces are free and easily accessible. The sheathing should be attached directly to the walls, so they must be relatively level. Drywall is fixed to brick walls using special glue, then additionally fixed with self-tapping screws. On wooden walls, both plywood and drywall are screwed with self-tapping screws, the heads of which are recessed into the material “under the counter.”

- At the same stage, ventilation is installed and electrical cables are installed to install ceiling lights. All these communications are covered with a suspended ceiling, into which spotlights are usually embedded. Thanks to this design, all the unsightly moments associated with fixing the wiring and ventilation ducts are hidden. The only disadvantage of a suspended ceiling for a dressing room is that it will not be possible to securely attach shelving racks to it.
- Next, according to the drawn up project, taking into account all the dimensions marked on it, markings are made on the walls. It must be quite clear and accurate, since the evenness of the placement of racks and shelves will depend on the correctness of its application.

- The next step is to assemble the racks and lintels for arranging the shelving. In the example under consideration, the master decided to use ordinary VGP steel pipes. Connections are made according to the coupling threaded principle using standard tees and bends. Pipe flanges are used to attach the racks to the wall.

For assembly, you will either have to purchase pieces of pipe of the required length with already threaded threads, or do the cutting yourself. In principle, this is also not particularly difficult if you purchase or rent a socket (ratchet) and a die of the appropriate diameter. A long threaded section at the end of the pipe is not needed - 12÷15 mm is enough.
When using furniture pipes, no threading operation is required - all connecting units are mounted using the appropriate parts, tightened with screws.

- To make the structure look aesthetically pleasing and prevent rust from appearing on the pipes, they should be coated. This process is best done by spraying using paint in an aerosol can.

- Finished metal structures, according to the marked lines and marking points, are fixed to the wall and to the floor. Horizontally located frame parts will serve as support for mounting the shelves. After the fasteners for the frame are marked on the wall, the frame is disassembled for their further installation along with the wooden shelves.

- The vertical parts of the frame are connected to each other through a tee. Before assembling the next connecting unit, they are threaded onto the posts through the drilled holes. These shelves at the rack rest on the body of the tee, and at the wall - on upward-pointing bends, screwed to horizontal crossbars, due to which they occupy a horizontal position. So, starting from the first tier, the entire rack is gradually assembled.

- In the same way, slowly, step by step, the remaining racks are assembled. And then they are fastened together with jumpers. These jumpers will perfectly cope with the role of crossbars for hangers.
Pieces of pipes with flanges are screwed to the upper ends of the racks through bends for final fixation to the wall. Very high reliability of all connections is achieved. And at the same time, such a structure, if necessary, does not take long to disassemble, modernize, increase or decrease the number of shelves, etc.

- In this case, the finished structure looks as shown in the illustration. The free space between the shelves can be used to install a finished cabinet or to install a large mirror.
A simpler option for making shelving
If there is no opportunity or desire to tinker with connecting sections of pipes, and there are enough chipboards accumulated in home storerooms to make shelves, then you can use another option.
In a furniture fittings store you can purchase special corner holders-brackets, which are fixed to the wall, and pre-prepared shelves are placed and fixed on top of them. This method of forming a structure is much simpler. Moreover, you can start assembling racks from a finished piece of furniture - a pencil case or cabinet, “tying” the remaining structural elements to it and the wall.

The preliminary work, before starting to fix the shelves on the walls, is identical to the first option for arranging a wardrobe with shelving on pipes.
We deliberately do not dwell on the independent production of cabinets from chipboard or MDF furniture panels - a separate detailed publication is devoted to this on our website.
How to make built-in furniture yourself?
An inexperienced home handyman is sometimes scared to take on such a task - the fear of failure is overwhelming. But there is no need to worry - there is nothing supernaturally difficult about it. About the technology, including the wardrobe for the dressing room, in a special publication on our portal.
* * * * * * *
So, above were presented only a few simple options that can be used to create a personal dressing room. However, when arranging a storage room, much will depend on the characteristics of a particular room. Therefore, when creating a project, it is necessary to take into account not only the size of the allocated area, but also the materials from which the walls and floors are built.
And information about the basic principles of organization and the stages of creating a dressing room will greatly facilitate both the design and implementation of your plans.
The decision on a convenient, competent arrangement of things is the main part of putting things in order in an apartment or house. It’s always pleasant to be in a clean, uncluttered room where you can breathe easily and there is nothing unnecessary lying around.
Beautiful dressing room.
The table is not littered with newspapers and books, things do not fall out of the cabinets on your head. The shelves are not cluttered with unnecessary little things. For constant order in the house and ease of cleaning, follow the basic storage rules:
- Go through the entire wardrobe of all family members, throw away things that you have not used for a long time. Excessive clutter creates a mess, even in a large room.
If you get something you haven’t worn for a year or more, get rid of it immediately, you definitely won’t wear it!
Dressing room in a separate space of the room.

- When you deal with unnecessary, unnecessary things, determine their purpose and distribute them among the rooms.
- Now determine how often you use the item, its place in the closet or wardrobe will depend on this.
Is there a need for a dressing room?

Dressing room in the bedroom.
Built-in wardrobes have gained popularity. And if you think about it, this is a justified idea. Things are distributed in places, everything is at hand, conveniently folded. With this organization, clothes last longer and serve longer, do not wrinkle, all items are visible in their drawers and compartments. Large furniture does not take up valuable square meters, the room is freer and more spacious. True, for a rational layout of the dressing room, you will need to competently fill it with the necessary functional equipment and modules for convenience. In addition to placing clothes, there is room for sports equipment and household items.

Project of a dressing room in a separate room.
Choosing a location for a dressing room
We determine the location for the future locker room: in newly built houses and apartments such a location is provided in advance; all that remains is to choose the configuration and filling of the room.

Convenient dressing room arrangement.
But what to do if such a room is not provided, then what to do, how to equip a dressing room? Then you need to use the services of a master, a furniture designer, who will help you choose the “right” filling for a small room and use every piece of space to your advantage.
Make sure there are outlets in the dressing room!
Partition the space and install a sliding door, provide filling and lighting; this option will work if you can allocate at least 1 meter of depth for the dressing room.

Built-in dressing room in the bedroom.
The location of the dressing room in the corner of the room is another layout option; the door is located diagonally and the room does not visually look smaller.
Options for locating a dressing room under the stairs and in the attic can be successful and interesting.

Large dressing room, convenient location.
Choosing a project for a dressing room
Based on the area and shape of the room, we plan the future “smart” closet. The layout can be L-shaped, U-shaped, linear, trapezoidal and pentagonal. The area of the resulting space is from 2 square meters. and more. If this is a dedicated room, its dimensions are 20-30 square meters.

Large dressing room.
Dressing room along the wall
The system is simple to construct - linear, located along the wall. A utility room is installed using a plasterboard partition.

Arrangement of a linear type dressing room.
The main requirement is that it should not be too long to avoid a lengthy search for the right thing. Although if you design such a utility room taking into account all the nuances, you can get convenient shelves for sports equipment and household items (vacuum cleaner, buckets, cans, travel suitcases, etc.)
The upper shelves contain those items that are not required daily. It doesn't hurt to think about having a ladder for the upper shelves.
Corner wardrobe device
In an apartment with a small area, a corner layout will be a convenient layout. The area is 3-4 square meters, which will solve the issue of rational storage of things.
The corner dressing room in the room can be triangular - two walls are used and a partition and a door are used diagonally.

Corner dressing room project.
The trapezoidal shape is located along the wall, and the missing ones are completed from plasterboard; we install a door in one of the walls.

Trapezoidal dressing room in the bedroom.
When arranging a dressing room, think over the lighting scenario; it is convenient when the lamps rotate and it is possible to direct the lighting to the shelves.
The L-shaped cabinet filling is located along two walls and meets in the corner. The most common design. The mirror is placed on the back of the door, facing the dressing room.

L-shaped dressing room layout.
Five-walled - the most spacious layout. Due to the extended walls towards the room, the area inside is significantly expanded. Modules, shelves, drawers are placed along four walls, and a mirror is usually attached to the door, since a full-fledged mirror for the fitting room will not fit there. This layout is recommended for medium and large bedrooms.

Project of a five-wall corner dressing room.
Dressing room in utility room
Some apartments of old construction, and even new buildings, have storage rooms. Does your apartment have a storage room? Consider yourself lucky if you have! Read the recommendations on how to organize a dressing room from a closet.
Do-it-yourself dressing room from the pantry - it’s not difficult to get a convenient dressing room for storing things. Storerooms are usually filled with unnecessary things and are used irrationally.
![]()
Dressing room from the utility room.
How to arrange everything correctly and rationally fill the furniture for the dressing room. We will fill the existing racks with things taking into account the frequency of their use. Below we have shelves for shoes. Provide hangers or a row of hooks on top for bags, hats, and belts. In case of missing shelves, we measure the dimensions and can order their production in a specialized store. There you can also purchase the missing modules, drawers, rods, and fittings.
Dressing room under the stairs
A staircase is an uncommon occurrence in an apartment, but in a private house, if there is an attic or second floor, it is doable.
It’s not difficult to use this space for a wardrobe; just think about which design option suits you. There is an open storage system.

Dressing room under the stairs with hinged doors.
Block-retractable and system with hinged doors or sliding doors. In the area of the highest height, under the stairs, rods are installed for winter clothes and long ones, which hang, and so, in descending height, we think about filling the closet, to the lowest for shoe racks and all sorts of small things.

Open wardrobe under the stairs.
Dressing room behind the partition
You can equip a wardrobe behind a partition yourself, without involving specialists. The partition can be improvised or stationary.

Improvised partition for a dressing room.
Improvised is the use of thick curtains to divide a room. The curtain is attached to the ceiling cornice or to the rod. The screen is suitable for a bedroom; behind it you can not only arrange a dressing room, but also store bedding, and in good lighting, create a boudoir with a mirror. But a model with a curtain will hardly look appropriate in the living room.
The second option is zoning with a plasterboard wall, this model is a little more complicated and more expensive, but there are no problems with the location, it can be installed in any room. No permits are required for such a construction. This structure can be dismantled at any time.

Dressing room behind a partition.
Wardrobe in a separate room
The advantage of an individual room designed for a wardrobe is undeniable. Free layout, arranging an area for each family member, equipping this room with the necessary accessories, comfortable furniture, a folding chair and a large mirror for the fitting area. Gives you the opportunity to apply any content, depending only on your wishes.


Beautiful dressing room in a separate room.
Systems for distributing items in a dressing room
The compactness of placement of clothes, shoes, and bedding largely depends on the design and layout of the room intended for the wardrobe. For convenient organization and functionality, you will need to be filled with systems for convenient storage of things; they have a lot of model options, each of them has positive and negative sides.

Convenient dressing room in the bedroom.
Main system devices:
- Modular system;
- Mesh;
- Frame;
- Panel;
What does the modular system and assembly principle look like? The system is developed according to your order and dimensions. Mounted along a wall or several walls. It consists of segments that have walls on the sides, top and bottom. All these sections are pulled together. The advantages of this concept are that it is inexpensive, easy to install from chipboard, and looks beautiful.

The mesh system is one of the most stable and can withstand heavy loads. A metal rail is mounted to one of the walls, supporting parts are attached to it, into which brackets are placed for arranging the contents in the form of racks, shoe racks, trouser racks, etc.

Mesh arrangement system in the dressing room.
The frame system is simple to install, it is easy to move the segments, and when using this configuration, natural air circulation is created. The frame consists of metal pillars fastened between the floor and the ceiling or between two walls; the filling is attached to the main frame at the required height.

Frame system in a dressing room project.
Racks that consist of a main panel rigidly attached to one of the walls, and on it are located accessories for organizing the storage of clothes and shoes, are called panel racks. This system has no partitions or side restraints. Installation allows you to hide uneven walls and other flaws, but is not a cheap pleasure and requires the use of original components for wardrobe modules; they are sold together with a decorative wall.

Installation of a dressing room with a panel system.
Clothing storage systems

Clothes storage systems in the dressing room.
The correct layout of a smart closet determines the number of things that can be placed in it, the convenience of their placement and the quick search for what you need.

Layout of the dressing room.
Long, winter clothes - provide a sufficient number of rods for hangers; the height for this compartment should be at least 150 cm.
For short clothes, shirts, blouses, jackets, etc., an area with a height of 90 cm, with a hanger bar.
For skirts and trousers, it is convenient to use hangers with several tiers or a trouser system.

Trousers for organizing a dressing room.
Underwear is stored in drawers or in organizers on shelves.

Organizer for underwear in the dressing room.
You can make maximum use of the wall space of the dressing room in height using a pantograph-elevator for things hanging in the upper tier of the closet. This device will allow you to zone the room according to the current season.

Pantograph for the dressing room.
Shoe storage systems
Convenient storage of shoes using a shoe rack or inclined racks, choose the one that is suitable for you in a particular case.

Shoe shelves in the dressing room.
Open shelves with compartments similar to mailboxes, racks without partitions - suitable for a narrow dressing room, a shelf width of 35-45 cm is sufficient, drawers, inclined racks, special baskets, open shelves on special holders for adjusting the height of the shelves.

Special shelves for shoes in the dressing room.
If the shelves are open, they are placed under the compartments for winter clothes. Adjust the width depending on the number of shoes; the height for summer shoes is about 30-35 cm, for winter shoes 40-45 cm.

Shoes on open shelves in the dressing room.
Description of designs
There are two types of structures - the classic one made of chipboard and the metal-frame one, consisting of modules. It is based on metal slats to which the necessary sections are attached. Sections are produced in specific sizes, so they complicate planning, for example, in an individual small or non-standard-sized room, but you can’t do without advantages here. The modular system has high strength and stability, durability and reliability.

Arranging wardrobes with a modular system.
The classic design is widely applicable, inexpensive in execution, allows you to arrange it according to the size of your utility room, it is possible to use third-party accessories for filling: rods, trousers, laundry baskets, transformable ironing boards, etc.

Self-installation
Making a dressing room with your own hands is a completely doable task. We have chosen a location, measure all the exact dimensions, and choose a layout. Before carrying out work, it is advisable to make a drawing diagram on which to draw the structure.

Do-it-yourself wardrobe drawing diagram.
With the help of such a drawing it will be easier to calculate the amount of required material and components. The next step is the purchase and preparation of building materials. Choose a door design: coupe, hinged or accordion door.

Profile frame for building a dressing room.
You will need a metal profile or wooden beam for the frame. For walls and cladding OSB plywood or plasterboard. It’s worth mentioning right away that both materials are easy to install, but in terms of environmental friendliness it’s worth thinking about. If the dressing room is supposed to be in the bedroom, it is better to choose plasterboard; this material breathes, absorbs excess moisture, and things will not have an unpleasant odor.

We cover the walls of the dressing room with plasterboard.
Let's start installation; for shelves it is better to use a special perforated profile, into the holes of which ready-made shelves and other necessary structures are inserted; it looks like shelves in stores. The profile itself (the main guides are attached to the wall. This type of design will allow you to easily vary the height of shelves and racks.
Another system for making a dressing room is the use of special pipes, connectors and various fasteners, all of this is now available for sale, this design is installed quite quickly and does not require a high level of skill.

Shelves in the dressing room are made of plasterboard sheets.
Shelves for the dressing room are made of sheets of thick plywood or chipboard; shelves made of chipboard will require a solid frame.
We decided to make a dressing room with our own hands without incurring additional costs; use scrap materials, old furniture or parts from it. If everything turns out to be different, to make it look beautiful, carefully paint everything the same color.
Each time dictates its own styles, including in furniture design. However, in addition to beauty, many interior items should also have additional functionality: have drawers, drawers and shelves. And in some cases - hiding places, small safes disguised as ordinary bedside tables, chests of drawers or other pieces of furniture, as well as built into bookcases and wardrobes.
Secretary with curved legs, decorated with carvings
Their presence always had its own meaning: here it was possible to hide something that was not necessary for others to see. And, starting from the 18th century, in any rich house one could find a secretary, or in the Russian version, a desk where the owner kept especially valuable documents: bills, money, jewelry.
Various hiding places and secret drawers are often discovered inside antique furniture that has survived to this day.

Furniture with secrets - table and cabinet with additional drawers
In past centuries, in the homes of wealthy people, a mandatory part of the office was a table or a cabinet with secret drawers, which were used to store especially important documents, money, and jewelry, which made it possible to protect them from thieves. Later in France, a special table-cabinet was invented, called a secretary, because it was really possible to store various secret documents and small valuables in it.

The drawers were often equipped with secret locks and secret locking mechanisms
The popularity of secretaries and other furniture “delicacies” equipped with various secret spaces was not accidental. Their design has its advantages that ordinary tables and cabinets do not have, and features that are unique only to such products.
They are no less relevant today: valuable papers, expensive jewelry, important correspondence and documentation are stored in stylized safes and hiding places. Among the obvious advantages of such furniture are:
- storage of valuables without access to them by strangers;
- their arrangement in different furniture elements;
- the possibility of making secret storage facilities with your own hands.
Among the factors characteristic of furniture with a secret, the design features of such products are highlighted, making it possible to prepare places for storing a specific type of valuables. As a rule, if hiding places are specially equipped, they are equipped with secret locks, and today - with an electronic security system.
Today, the furniture market offers products not only for personal use, but also for enterprises and organizations. In addition, it can be made to order according to individual drawings.

To open this table you need to place a special magnet in the right place, there are no more handles or levers
Hiding places in ordinary furniture
![]()
Hiding places are often installed under furniture - in the empty space between the legs
Antique furniture is a storehouse of secrets and mysteries. Old cabinetmakers turned furniture elements into real works of art. Today's craftsmen make modern furniture in the old style, helping to create a special interior and complement it with hidden elements.

Hiding places in antique furniture
Purchasing special tables, cabinets and bedside tables with hiding places is quite expensive. But this does not mean that especially important documents and jewelry will remain on the shelf in the closet.

Option for a hiding place in the house on a bookshelf
Ready-made furniture with hidden niches

Wall mirrors and specially designed paintings can also make great hiding places.
Today, various types of ordinary furniture equipped with secret spaces are produced. Secret places can be located in any part of it, and they can be equipped either by the owners themselves, or by ordering their production by craftsmen, secret places can be located:


A secret drawer or safe disguised as an outlet
Do-it-yourself or custom-made caches

Custom-made desk stash
There is not always a need to buy expensive exclusive furniture equipped with secret places. You can use a budget option by ordering the desired element of the furniture interior to specialists based on your own drawings. Or a home craftsman can try to create and equip it with his own hands.
These can be equipped secret places under or inside countertops, in the doors of cabinets and bedside tables, as well as shelves and drawers on which locks can be installed.
Of interest are small “turnkey” niches equipped in the depths of the desk drawers with a secret.

An interesting option for hiding in a chest of drawers
Hollow furniture legs and uprights

A simple hiding place in furniture - in the hollow legs of a chair
A hiding place arranged in these pieces of furniture is considered a classic. Making it is quite simple: you need to drill a hole of the selected size inside the furniture element. It is assumed that only one person will know about such a “secret” - the one who made it.
It is clear that the place for storing valuables equipped here does not imply a large number of them, which must be remembered to be disguised in a convenient way.
Advice. You need to make holes very carefully and not overdo it with their diameter, so as not to weaken the structure and lead to its breakage.

Stash inside the chair seat
Hides in boxes

The double bottom drawer is a true classic that still works today
Traditionally, hiding places are located in drawers of a desk or chest of drawers, where a “second bottom” can be made. For its equipment, take the same material from which the furniture itself is made, of the same size, secure it:
- Velcro;
- magnetic strips in a plastic frame;
- other convenient ways.

Small hiding place idea - a box within a box
You can put flat objects there:
- documentation;
- cash;
- photos;
- securities.
Hidden “treasures” must also be secured on the “second day”.

Drawers with secrets for regular cabinets
Hides in closets

Secret drawers, securely hidden in the most ordinary-looking bookshelves
Cabinets provide a wide field of activity for equipping secret places from thieves. Their large internal and external space allows you to hide a large number of items of various configurations.

Hiding places built into a regular closet
| Cache location | What can you hide? | How to secure |
| Under the bottom of the cabinet, in the far corner | Jewelry, small valuable items | ·Fold into a box of suitable size and place on the floor; ·pack in a bag and attach with Velcro to the bottom of the cabinet |
| Behind the back wall | Documents, securities. Jewelry, art paintings |
Secure in bags and attach with tape or glue |
| Behind the inner surface of the mirror | Only flat objects | Use tape |
| At the bottom of the cabinet - the formation of a second bottom | Any objects corresponding to the height of the second bottom | Fold into a niche, cover with the second bottom |
| In the far corner inside the closet, disguised as a shoe box | Items that fit the box | Place a drawer with a lid that locks with a key in a shoe box secured with screws to the floor of the closet, put a pair of shoes on top that no one uses, cover with a shoe box lid |

Pull-out panel in the closet, hidden from prying eyes
Attention! Before hiding a thing, you need to decide who may know about the existence of the cache and have access to it, so that if it is discovered by household members, you will not end up in a stupid position.
Video: how to make - The simplest cache
Many people mistakenly believe that multifunctional furniture appeared quite recently, when it was time to furnish not luxury apartments, but small apartments. Meanwhile, history takes us several centuries into the past to tell about the emergence of one of the most interesting and functional types of furniture - the secretary. Indeed, today the secretary is as popular as it was in the 18th century, when it first appeared. Today, together with the “Dream House” website, we will plunge into the world of retro furnishings and learn a little more about this furniture.
A little about the history of the creation of the secretary
As mentioned earlier, the secretary appeared in the 18th century, but some sources date its appearance to the 12th-13th centuries. It was behind the secretary that the ladies of that era wrote thousands of letters; in their numerous boxes they kept love messages and state secrets. Thus, the secretary cabinet easily replaced a desk, a safe, and a closet at the same time.
Modern models have been slightly modified, but, as before, they are a cabinet with drawers and a folding shelf that acts as a work surface. A large number of drawers allows you to keep all your writing utensils at hand, but at the same time, in perfect order. And secret locks and reliable locking systems protect important papers from prying eyes.


Modern secretary - desk
Originally considered ladies' furniture, the secretary quickly fell in love with the male half of humanity, becoming a workplace for emperors and kings. For example, Napoleon Bonaparte took a folding travel secretary with him on trips - when folded, it took up little space, but the desk was always nearby, even on the battlefield. And then doctors liked this functional furniture, allowing them to store doctor’s instruments and medicines in order.
Currently, desk secretaries decorate modern interiors, combining a work area and a spacious closet. The aristocratic look of furniture with a retro touch fits perfectly into both classic and modern interior styles. The main thing is to choose the right shape, color and finish of the secretary.


Secretary in the interior: application possibilities
Nowadays, secretaries are most often made “antique”: from dark wood, with carved decor. Such furniture is perfect for both Rococo and Rococo styles, but will absolutely not fit into modern styles. When choosing furniture for such an interior, you need to change your approach and look for more laconic forms with the absence of conspicuous finishing. Such modern secretaries are also present in small quantities on the furniture market. And if previously they were made exclusively from solid wood, now this furniture can be made from MDF, laminated chipboard, finished with veneer. And only a few can afford a secretary made of solid wood.


Secretary – antique furniture
Antique secretaries, as a rule, are large in size, they are made of expensive wood, have a rich dark color (brown, burgundy) and are decorated with carvings. Such aristocratic furniture, which emanates solidity and chic, is ideal for classic interiors.


Art Deco style secretaries have elegant shapes and are most often made in black or white. And writing cabinets in country style are, as a rule, simple in shape, unfinished, and sometimes have scuffs on the body.

In modern interiors, the secretary is sometimes part of a furniture set and represents one of the “wall” sections. It’s kind of built-in, which doesn’t take up much space and, at the same time, is part of the headset.

Where can I put a secretary?
This versatile type of furniture is mainly placed in the living room. Representing a compact workplace, it easily places a laptop on its surface, and there is still room for all kinds of folders and books. After work, all these accessories are removed, and the lid is closed, turning the secretary into an ordinary cabinet or.


But no matter how convenient and capacious the secretary is, it is not intended for long-term use. You can’t put a desktop computer on it, and it’s not very comfortable for your feet to constantly rest against the drawers. However, it is great as an alternative to a mini-home office.
The secretary can be placed not only in living rooms, but also in the library, office and even in the bedroom. The main thing is to find a place for a compact workplace, where it does not interfere and does not take up extra square meters. A corner secretarial chest of drawers fits this description perfectly, allowing you to store various things in a large number of drawers, and when the lid is open, it serves as a desk.


A compact workplace is necessary not only for adults, but also for children. Sometimes a secretary cabinet for a schoolchild is placed in the nursery; in this case, it replaces a desk and houses portable computer equipment and other study supplies. Perhaps the best option would be to use a large desk for work and study, and a secretary for a laptop or computer, but each parent chooses furniture based on the dimensions of the children's room, so there are no need for advice here.


The secretary and the bureau are two siblings
Often, along with the secretary, they also look for a bureau. Both types of furniture represent a compact workplace, only a secretary is more of a cabinet with a retractable or hinged lid, and a bureau is a type of table with an add-on. The latter stands steadily on four legs and has small dimensions that fit perfectly into almost any interior. Meanwhile, the presence of a work surface and shelves for papers allows you to use it for short-term work, for example, while sitting at it you can pay bills or write a shopping list for the store.


Both the secretary and the bureau are types of multifunctional furniture, but the first performs more functions, but the second is more compact. There is probably no need to have both of these pieces of furniture in your apartment at once, so it’s up to you to choose which is more necessary or which is better.
The classic secretary is a chest of drawers with a door that folds down from top to bottom, behind which there are many secret drawers and compartments. At first, this furniture was considered ladies' furniture. The open door served as a table for writing love letters, and pearls and diamonds glimmered in the locked hiding places. However, the design turned out to be successful, and it was borrowed for more prosaic purposes: storing documents and writing instruments. Let's try to assemble a simple secretary with our own hands so that markers, disks and folders with papers can finally find their permanent place.
Let's make a very simple secretary
Preparing for work
Our secretary will have the simplest device, but in terms of convenience and functionality it will not be inferior to the factory one. To make it you will need the following materials:
- Ready-made desktop stands for folders made of plywood (sold in office supply stores) - 6 pcs.
- MDF blank for the top cover – 890x330x16 mm.
- MDF blank for the back cover – 890x325x16 mm.
- Wood glue.
- Screws.
- Sanding paper.
- Double-sided tape.
The tools we will need are:
- Jigsaw with blade for curved cutting.
- Drill.
- Screwdriver or screwdriver.
As we can see in the picture, our module is mounted on an ordinary dining table with a tabletop size of 100x80 cm. The add-on for placing papers looks like a complex of interconnected horizontal and vertical stands, united by top and back covers made of MDF.
In a small apartment, it would be good to figure out how to make the secretary mobile. This condition is precisely included in our design. The trick is that our shelf module is removable, which means that if necessary, it can be quickly removed to any other place.
Marking and cutting MDF
First we cut out the top cover. To do this, we place the stand on the sheet with its side so that the back side of the future cover is flush with the horizontal shelf. The front side of the cover should protrude forward beyond the horizontal shelf by 1.5 cm. Mark the position of the first part of the shelf.

Mark the outline of the lid
We turn the stand over and mark the position of the second, mirror part of the shelf.

Cutting out the top cover
We cut out the top cover with a jigsaw, installing a file in it for a curved cut. The pendulum stroke must be turned off during operation. The dimensions of the cover should be:
- Length – 890 mm,
- Width at the junction of horizontal supports – 320 mm,
- The width at the ends is 170 mm.
We cut out the back wall in the form of a rectangle, according to the given dimensions - 890x325x16 mm.

Scheme of our secretary
We sand the finished lids and coat them with furniture varnish 2-3 times or cover them with self-adhesive film.
In the age of high technology, people quickly forgot that just two decades ago letters were written by hand and sent by mail. Today, progress has gone so far that there is no longer a need for paper correspondence, but still, in offices and bedrooms, many people need functional and beautiful furniture for working, for example, on a laptop.
This article was written to remind you of such pieces of furniture as a bureau and a secretary, and also to tell you about the origins of their occurrence and the features that distinguish one item from another.
The design of the bureau was created at the turn of the 17th and 17th centuries, in France, and was nothing more than a large casket on high legs with a hinged inclined lid above the tabletop, which was complemented by compartments or drawers for writing instruments. Such an item was often installed in bedrooms and served as a desk and jewelry box. The bureau took up little space and was comfortable to sit at; these qualities prompted furniture makers to develop the very idea of this item; as a result, a certain cabinetmaker J. Aubin, a courtier of Louis XV, modified the design of the table and decorated it with a cylindrical lifting lid, for which it received the name “ King's Bureau", and today it is a symbol of its era, one of the main attributes of an interior in a classical style.
A similar item to a bureau is considered to be a secretary - a tall bookcase equipped with a pull-out shelf or folding board for written work. Even at the very beginning of its existence, the secretary was an element of the furnishings of purely luxurious, aristocratic interiors
 1
1
Secretary in a modern interior
These days, interior design is no longer bound by any technological framework, fashion trends or other restrictions. Everyone is free to dispose of their personal living space at their own discretion and according to personal preferences. For some, the layout is important, taking into account the location of all technical innovations, while others need the spirit of tradition, a unique atmosphere and aesthetics in each item.

Such an object can be furniture with history, some kind of cult object that will transform the decor of a bedroom, living room or office. The secretary today is again becoming a popular piece of furniture, because it is not only very effective, but can serve as a chest of drawers, a desk and a bookcase at the same time, which is especially important in the space of a small room.
First of all, a secretary cabinet will be appropriate in a classic elegant interior with the same high-quality furniture, expensive fabrics and natural materials.
 1
1
It is also good to use this item in the neoclassical interior of a living room, a French-style bedroom (light wood or painted furniture), and an Art Deco office.
 2
2
Note that the choice of room for the location of the secretary in the house is not important; it can be installed in the dining room, hallway and even children's room in order to conveniently store all the essentials in one place.
Types and features of office designs
As was said, the bureau is an extraordinary object, very characteristic and catchy. It is simply impossible not to notice it in the setting, thanks to its unusual appearance, which, by the way, can vary somewhat and contain features of other pieces of furniture familiar to us.
Desk bureau
It can be presented in the form of a familiar, but compact table, with a convenient design of compartments for accessories, built on the surface of the table top, which, in turn, can be retractable or folding.
A more modern minimalist model looks like a regular desk, but with a hidden drawer system and a lifting top.
The bureau table is undoubtedly an excellent purchase for modern, practical interiors, and is especially useful in small children's rooms, cozy bedrooms or built-in home offices.

Classic bureau
A traditional bureau will also not take up extra space, but will look much more distinctive than a table.
This item should be equipped with a hinged lid, inclined or cylindrical, hiding two or three tiers of mini-compartments for office supplies and personal items.
Models of traditional offices today are made from practical, high-quality MDF material, and the straight lines of the silhouette allow the use of similar furniture in modern styles: contemporary, boho and even loft.

A bureau made according to a classic model, always made of solid wood, with figured legs, decorative fittings, often with artistic painting or carvings on the facade. Such a thing should be used when decorating interiors in vintage, retro, classic, and also boho styles, if the owner of the house likes such an item.
 1
1
Chest of drawers
The combination of the design of several objects in one testifies to the endless desire of human thought for functionality and comfort in everything. The hybrid of the furniture industry was no exception - a chest of drawers, where you can store personal belongings and, if necessary, use a folding tabletop for work.
 2
2
The design of a bureau-chest of drawers can be completely varied, from classic to ultra-modern, which allows you to use the item in any interior style, in any area of the room convenient for you.
However, the most unusual models of bureau-chest (varnished figured, or in the constructivist style with clear forms) will organically fit into equally bright interior styles: pop art, boho classic, empire and art deco.

Bureau-console
The most amazing version of the bureau, in our opinion, is combined with a console. It can be used even where the area is very modest: in a bright but narrow corridor; small bedroom, kitchen-living room, compact hallway.
The design of the console office is light and compact, often having only two support legs and fastenings to the wall. A narrow, long tabletop is sometimes complemented by a pull-out shelf and lined rows of compartments for accessories.
Vintage, shabby chic, classic style - this is the environment in which such an item looks appropriate for a setting with a touch of time.
 1
1
Whatever your city apartment is - prestigious or ordinary, large or small, comfortable or inconvenient, it is extremely difficult to allocate space for a home workshop. However, with a great desire and sufficient carpentry skills, a do-it-yourselfer can equip himself with a completely comfortable workplace, which can easily be transformed into a flat cabinet with an area of only 0.36 m2 on the floor.
It is better to make such a cabinet from the ceiling to the floor and fix it between them using four screw jacks; in this case, there is no need to drill concrete walls, drive dowels into them and secure the structure to the wall with screws. In addition, a tall cabinet with the same space it occupies has the maximum usable volume.
The design of the transforming workshop resembles an ordinary secretary with a folding table top. In order to make it, you will need particle boards with a thickness of 16-20 mm (all dimensions in the drawings are in relation to chipboard with a thickness of 20 mm), some plywood and hardboard.
The production of a workshop secretary begins with the side panels (their width is about 300 mm, and the length should be 15 mm less than the distance from the floor to the ceiling), shelves and crossbars made of chipboard.
When processing workpieces, the most important thing is to strictly maintain their dimensions and the perpendicularity of the sides. Even small deviations from the drawing can cause irreparable distortions when assembling the secretary.
To connect parts, it is best to use a very durable and technologically advanced docking unit, consisting
only from an M6 bolt with a spherical head and a nut. In this case, a hole for the nut is drilled in the shelf or crossbar, the diameter of which is slightly smaller than its “turnkey” size, which allows the nut to be pressed into it with some interference. In the sidewalls, crossbars and shelves, corresponding holes with a diameter of 6 mm are drilled for connecting bolts. In order for the connection of the secretary parts to be neat, it is necessary to strictly follow a certain sequence of operations.

1 - cross member; 2 - screws; 3 - loop; 4 - countertop door; 5 - dowels
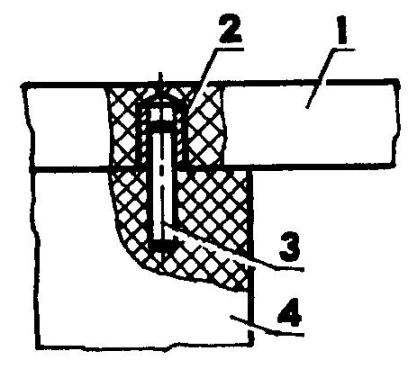
1 - tabletop; 2 - bushing (metal or plastic); 3 - retaining pin (steel); 4 - door of the lower compartment of the secretary

1 - upper compartment door (chipboard 820, 880×600, 2 pcs); 2 - handle (6 pcs.); 3 - tabletop door (chipboard 820.1200×900); 4 - overlay (s6 plywood, 1150×850); 5 - back wall (hardboard s5, 2660×1190); 6 - upper cross member (chipboard 820, 1160×300); 7 - side panel (chipboard s20, 2685×300); 8 - side-reinforcement (wooden slats 35×25); 9 - shelves in the upper compartment of the secretary (chipboard s20, 1160×250); 10.12 - middle crossbars (chipboard s20, 1160xx300); 11 - shelf in the middle compartment of the secretary (chipboard s20, 1160×200); 13 - reinforcement of the cross member (wooden slats 35×25); 14 - shelves in the lower compartment of the secretary (chipboard s20, 1160×250); 15 - lower crossbar (chipboard s20, 1160×300): 16 - lower compartment door (chipboard s20, 860×600, 2 pcs.)


1 - swivel leg (birch or beech, block 50×30); 2 - M6 bolt; 3 - door of the lower compartment of the secretary; 4 - wing nut M6; 5 - washer; 6 - gasket (rubber sЗ)

1 - gasket (rubber s3); 2 - bolt M8 or M10; 3 - ceiling; 4 - nut; 5 - side panel

1 - M6 bolt; 2 - side panel; 3 - M6 nut; 4 - shelf or crossbar


To begin with, one side panel is marked - on it the axes of all holes are depicted for the connecting bolts. It is desirable that the distance between the holes be the same: in this case, you can use a simple jig that will allow you to easily align the axes of the corresponding holes on the sidewalls, shelves and crossbars.
The conductor itself is assembled from two slats in the form of a kind of crossbar. A mark is applied along the axis of the holes, which, when installing the jig on the panel, is aligned with the mark on the panel. The jig is fixed to the parts with a pair of small nails.
It is also advisable to drill holes for the M6 nut in the crossbars and shelves along the jig. The latter is bent from a steel strip with a cross-section of 20×2 mm, after which two holes are made in the resulting corner: in the smaller shelf - with a diameter of 6 mm (the guide screw is fixed in it), and in the larger one - with a diameter 0.5 mm smaller than the size "under wrench" for the nuts used with M6 thread. As a rule, such nuts have a turnkey size of 10 mm, respectively, the diameter of the hole for the nut is 9.5 mm.
Assembling the secretary is, in essence, connecting the side panels with shelves and crossbars with M6 bolts. The nuts are first pressed into the latter and centered relative to the holes with a diameter of 6 mm in the ends of the shelves and crossbars using a rod with a pointed end. After completing the assembly, the “geometry” of the structure is carefully checked using a tape measure; for this, the secretary is laid face down on the floor and its diagonals are measured. If their sizes are equal, then a sheet of hardboard 5 mm thick is attached to the back of the cabinet (to the side panels, shelves and crossbars) with small screws and glue (casein, PVA or “liquid nails”).
The width of the secretary-workshop is quite large - 1.2 m, so chipboard shelves can sag over time. To prevent this from happening, it makes sense to reinforce them with wooden slats with a cross-section of 35x25 mm. These slats, moreover, will prevent tools and materials from falling off the shelves.
The next stage is hanging the doors and countertops. The first ones are installed using standard furniture hinges, which ensure that the doors are secured both in the open and closed positions. Well, the tabletop is connected to the crossbar with reinforced hinges, since these hinge units will have to experience increased loads. It is best to use three or four window hinges with card dimensions of 60x40 mm. You can, of course, attach them to the tabletop and crossbar with ordinary screws, but it is better to purchase plastic dowels with a diameter of 5 mm, press them into the holes drilled in the parts, and only then drive the screws into the dowels. The fact is that the screws do not hold well in the chipboard and fly out of their sockets at the slightest axial load.
As can be seen from the pictures, the doors of the lower compartment of the secretary-workshop are the supports of the tabletop when it occupies a horizontal position. So that the load from it and the heavy tool located on it is not taken up by flimsy furniture hinges, but is transferred to the floor, the doors are equipped with swivel legs made of wooden blocks, which are fixed both in the working and in the retracted position with a bolt with a spherical head and a wing nut. And to prevent open doors from accidentally slamming shut, metal pins with a diameter of 6 mm are attached to them, and holes are drilled in the tabletop, which are reinforced with metal or plastic bushings with an internal diameter of 6.5 mm.
It remains to equip the secretary with four screw jacks - and the work on its assembly will be completed. As can be seen from the figure, the jack is designed in almost the same way as the docking unit connecting the crossbar shelves to the side panels. The only difference is in the diameter of the bolt and nut - for jacks you will need fasteners with M8 or M10 threads. When installing the secretary, a sheet of rubber 2-3 mm thick is placed under the bolt heads.
If the particle boards were not lined with plastic, then the easiest way is to finish them with self-adhesive film, matching its texture to the surrounding furniture. The ends of the panels are pre-puttyed, sanded and painted with tar of a suitable color.
A sheet of 6 mm plywood is fixed to the tabletop: practice shows that the surface of a workbench in a workshop deteriorates quite quickly, but the plywood overlay can always be replaced if necessary.
In the middle compartment of the secretary there is a table lamp or fluorescent lamp and a multi-place electrical socket.
I.EVSTRATOV
Noticed a mistake? Select it and click Ctrl+Enter to let us know.
We will send the material to you by e-mail
Every woman dreams of having her own dressing room. Here you can hang all your clothes, arrange your shoes and place other things. In private houses, even at the project development stage, an appropriate room of the required area is provided. Those who live in a modern apartment can also boast of having such a room. If it is missing, it is not difficult to correct the situation. Those who have photos, drawings and diagrams will have a do-it-yourself dressing room in the near future. We invite you to get acquainted with popular solutions and their possible implementation.
Every woman dreams of a spacious dressing room.
Rules for organizing storage of things: basic provisions to help organize the space
The order in which things are placed in the dressing room largely determines the ease of use of the room and the service life of all installed elements. That is why special attention should be paid to the proper organization of the interior space of the dressing room. To do this, a diagram and drawing are developed in advance, which highlight areas intended for storing certain things or objects.
The mounted system should be divided into functional sections, highlighting:
- Lower compartment for shoes, small accessories (umbrellas, bags) and trousers. The height of this area should not exceed 70-80 cm. For shoes, it is worth providing special inclined pull-out shelves. Their height will depend on the purpose. For summer shoes, the height should be about 30 cm, for winter shoes - 40-45 cm;
- The middle compartment is for things that are used most often. This area includes pantographs, rods, and pull-out shelves on which small toiletries can be placed. The height of the middle zone depends on the length of the items. The average dimensions are in the range of 1.4-1.7 m. To place jackets and shirts, it is enough to provide a compartment 1 m high. For knitted items, it is worth providing boxes and baskets that can be placed on shelves;

L-shaped walk-in closets
The L-shaped layout has its own specifics. When installing dressing rooms according to this scheme, you can refuse to install any partitions, since the racks are actually part of the room in which they will be located. Considering that the cost of constructing partitions often accounts for 50% of the total cost, by giving preference to this type, you can significantly reduce your costs.

This layout is worth paying attention to if you need a dressing room of 2 sq. m. Photos of finished projects indicate that open shelving is most often chosen in order to rationally manage the available space.


U-shaped
Most people refuse to install a U-shaped dressing room in a typical apartment, believing that such a scheme can only be implemented in large areas. However, with the right approach, developing a drawing and diagram, you can intelligently manage even a relatively small space by creating an area for storing things in the corner of one of the rooms.

Perhaps such a solution will add extravagance to the created interior, but it will fully meet the requirements of ergonomics. The set itself is made monolithic. To ensure sufficient functionality, it is worth providing closed drawers, hangers, and special sections.

If you decide to allocate a whole room, and not just part of it, to arrange a dressing room, you should pay attention to a rectangular room. The elongated shape will simplify the process of developing a diagram and drawing, as well as subsequent installation of the structure with your own hands.

Wardrobes in the bedroom
When starting to develop drawings and deciding on the location of the dressing room, attention is most often paid to. This place for storing clothes can easily be called the most successful. That is why photos of ready-made solutions most often show a dressing room in the bedroom.
How rational such a solution is for a particular room can be determined at the stage of developing drawings after calculating the area of the sleeping area. If the dimensions of the room allow you to install a bed of the desired size, and there is still some space left, you can safely take on the installation work yourself.
Which scheme for organizing the internal space will be preferred is decided at the stage of drawing development. The best option is considered to be U-shaped, which allows you to fill the shelves as much as possible and provide enough space for movement. However, L-shaped or parallel is often found.

The design of the corner dressing room in the bedroom deserves special attention. Photos of ready-made solutions show that to implement it, it is enough to install a partition at the head of the bed and separate a small corner. However, this solution is only suitable for rooms with a large area.

Related article:
Construction of a dressing room from a storage room in a Khrushchev building
If you compare a pantry and a dressing room, the main difference will be in the system for organizing things. The latter provides mezzanines, shelves, hangers, drawers and other components designed for convenient storage of things for various purposes. Thanks to a well-thought-out layout, all things are accessible and visible. The accommodation option depends on the budget and area of the room.

To make a small closet from a closet convenient and functional, you should first familiarize yourself with possible planning solutions that are relevant for a small room. Using the latest technologies, it is easy to become the owner of an optimal storage system that can harmoniously fit into the available space. Based on photos of ready-made solutions, it will be possible to initially develop a diagram of the future dressing room, and then a detailed drawing. After this, it will be much easier to assemble and install the structure with your own hands.
We invite you to familiarize yourself with the photo of the dressing room with your own hands from the pantry, which have already been implemented:


Proper dressing room lighting
Must be good. However, direct sunlight may cause the fabric to discolor. It is worth abandoning natural sources in favor of artificial ones. Don't limit yourself to just one ceiling lamp. Its luminous flux will not be enough.

The best solution is to install a suspended ceiling or install a large number of small lamps located around the perimeter of the installed structure. In the photos of dressing rooms you can see fluorescent lamps mounted on the partitions, allowing for the proper level of illumination.

Requirements for dressing room ventilation
To prevent the appearance of a musty smell, good air exchange is organized in places where things are stored. For this purpose, not only natural, but also forced ventilation is provided. The first ensures air movement due to physical processes, which assume that cold air arriving from below rises upward. To implement this, an inlet opening should be provided in the lower part, and an exhaust opening in the upper part. If the ventilation duct runs close to the installed system, it is worth providing a branch to the exhaust vent.
The natural disadvantage is the low air exchange rate. Installation, which involves installing fans in the supply or exhaust openings, helps to correct the situation. However, most often preference is given to forced exhaust with a natural supply of fresh air.
To ensure that enough fresh air enters the room, the size of the supply openings is determined based on the speed of movement of air masses and the dimensions of the room. In accordance with regulatory documents, a single air exchange must be ensured.

Doors for dressing room
When starting installation yourself, you should decide on the type of doors to be installed. Their dimensions can be calculated from the drawing. The choice can be made in favor of coupe, hinged, or hinged types. Sometimes you can do without them. Photos of dressing rooms will tell you how to implement this option.


When choosing doors for a dressing room, you should focus on the overall stylistic design of the room. The structure being installed must fit harmoniously into the space. The width of the sashes and their design are selected individually.

Storage systems in the dressing room
The storage system should be chosen more carefully. Not only the arrangement of things during storage, but also the ease of use of the structure depends on this. Photos, drawings and do-it-yourself wardrobe diagrams indicate that there are a large number of ready-made storage systems that are worth getting acquainted with when starting to develop documentation.

Clothing storage systems
For organized storage of clothes, you can use not only drawers or shelves, but also special systems. The choice can be made in favor of skirts or trousers: special guides with transverse slats on which you can store the named wardrobe element.

An alternative to a skirt can be a hanger with several crossbars located one above the other. It may not be very convenient to use, but it costs much less.

Men who prefer a business style will be interested in a design designed to store ties.

Article
Despite its rather rich history, the secretaire has still not outlived its usefulness. True, now this furniture is practically not produced separately. But versions of chests of drawers with a secretory drawer are in considerable demand.
Chest of drawers - features
Now it is difficult to determine who and where the secretarial chest of drawers was first invented. The Spanish affectionate name varguena has survived to this day. Under this word lies a tall chest of drawers with a folding table and a niche with numerous drawers. But from the heyday of the center of Europe, models called bureaus have been preserved more.

There are few differences between them, but they still exist:
- At the bureau, the secretory section is covered with a semicircular lid. When opened, it hides inside and is called a cap. The secretary has a straight lid behind which the writing niche is hidden and plays the role of a table. Although, nowadays this tradition is often violated;
- A classic bureau has only a few drawers and very high legs. This is quite a miniature, elegant piece of furniture. The secretary chest of drawers is heavier and more weighty. The drawers go all the way to the bottom and the legs are very short;
- A secretary in its pure form generally looks more like a closet. The folding table is usually located in the center of the body.

One of the undeniable advantages of a chest of drawers with a secretory section is that it can successfully replace both a medium-sized wardrobe and a desk. The item is ideal for small rooms where you have to be tricky with the arrangement of furniture. In modern apartments it can be successfully installed:
- Children's room. A child will definitely like a correctly selected model. Lessons will be done with pleasure, and therefore successfully;
- Bedroom. You may not have to write on it, but such a chest of drawers will perfectly replace a dressing table and a closet. Basically, you will have a rather large personal “box”;
- Living room. In addition to useful functions, the item will look most solid in this room. Do not forget that, like all chests of drawers, its upper plane is a working surface;
- Cabinet. An ideal place to install a bureau or secretary. This is especially true for interior solutions in ancient styles. Such furniture does not fit well with modern trends such as modern or high-tech. Whatever one may say, the bureau chest of drawers “breathes” centuries-old traditions on us.
Types of secretarial tables

Folding
One of the most used table design options is a folding one. The flap that covers the compartment itself acts as a table. It is equipped with side holders or lifts with several degrees of freedom.

They are also equipped with shock-absorbing springs with position locks and adjustable force. The door itself is attached with hinges to the body of the chest of drawers. To reduce the load on the hinges, special supports must be placed under the bottom of the table. They can be open hinged doors of the lower sections or special retractable legs. At the top they are equipped with special platforms - holders. They bear the main burden. To close, just lift up until it locks. The holder can be a magnetic latch or a locking mechanism with a retractable tongue. You can easily identify it externally by the presence of a keyhole. Latches are of course simpler, but they weaken over time - the door can open arbitrarily. But the lock type is almost impossible to break. Unless you lose the key, it can be restored. In most cases it is standard. The exception is rare or antique options.

Ignoring the use of bottom supports for an open table will cause the hinges to break quickly. Especially if you use the secretory lid often. The same problem can result from a lid with a weak magnetic latch falling.

Features of this type include:
- Easy to use. Unfolding the table will take no more than a couple of minutes;
- Convenience. Writing at it is no worse than at a full-fledged desk;
- Space saving. Unlike a regular table, such a lid can be lifted, freeing up space for free passage;
- High-quality storage of writing instruments. A large number of internal shelves and drawers makes storing all the necessary little things as comfortable as possible.
Retractable

Pull-out table types are more relevant to bureau-type chests of drawers. In this case, the lid and the table are different objects. After lifting the lid, the table panel can be pulled out. This can be a small tabletop, fixed movably in grooves or using a roller system. Although, there are also very complex versions of retractable tables. Some models provide for extension not only forward, but also to the side. For this purpose, special folding brackets with springs and shock absorbers are used. In this case, the table can be combined with a special folding frame, which acts as a lower support. Their use for this type is highly desirable.

In the most interesting versions, the hinged lid is combined with a retractable table. In principle, this approach can simply be called an attempt to be original. In modern life, one type of table is quite enough.
Storage systems and opening mechanisms

The chest of drawers does not have to be used for its intended purpose. If you do not need this furniture for writing, then it is not necessary to load office supplies there. Place cosmetics and jewelry in drawers. You will quickly appreciate the convenience, and you will understand why in the 18th century young ladies could not imagine their lives without a secretary. If you store linen and clothes in the lower drawers, then small accessories such as belts and ties will feel great in the small compartments of the secretory niche. In a child's room, such a piece of furniture will allow you to carefully store small parts of construction sets, puzzles or fragile toys.

The following types can be used as facade opening systems:
- Retractable. All boxes are designed this way. In their modern form, they are equipped with side guides and rollers. Small drawers are made slightly smaller than the niche for them. Therefore, they can be pulled out perfectly without additional devices. The only significant difference is that the rollers do not allow the drawer to be pulled out all the way without harm to the system. He will certainly remain in the niche. Whereas their absence allows this to be done. The disadvantage of the roller system is sensitivity to distortions;
- Swing. Part of the facade side can be covered with shutters. They are attached with hinges to the body. Opens outwards and sideways. They don't like jerks. In chests of drawers, secretaries can act as a lower support for a table. In this situation, it is important that their lower part touches the floor. Otherwise you will need special holders. They look like a clothespin with a stop and are put on the edge of the sash;
- Folding. This is how the table is set up. Opens down until the position lock clicks. It can be equipped with a height adjuster that allows you to fix the cover in several positions. Do not pull the sash down after clicking in the lowest possible position. Furniture hinges are located at the bottom of the sash, fastening it to the body of the chest of drawers.
Frame

When choosing a secretary chest of drawers, it is worth considering that it has quite a considerable height. On average, this parameter ranges from 1 to 1.4 meters. The width is about 90 cm and the depth is 50 cm. Narrower models can also be found. But this is not very convenient.
The most common materials for the manufacture of frame elements are:
- Natural solid wood;
- Particle boards such as fiberboard, chipboard or OSB.
Tabletops

A separate design element is the top of the chest of drawers. It is usually made from the same type of material as the body. It can be decorated separately, but the rather high height of chests of drawers with a secretory section makes this a pointless exercise. More attention is paid to strength and reliability.

The following can be used as decorative elements:
- Antique varnish. For this purpose, craquelure is used. When dry, this varnish cracks, forming a whole network of small cracks. Often powdered bronze or gold plating is rubbed into them. This technique is called the “golden web”;
- Hand painted. For countertops it is better to use furniture enamels and varnishes. Apply in multiple layers. The color intensity and color transition are adjusted by shading with a rag. Each layer will require drying;
- Wood mosaic. Pieces of wood with different shades fit into any ornament and are attached using especially strong glue. Next, the entire surface is polished and covered with shiny varnish. Rattan can be used instead of wood, but it is more difficult to maintain.
Types of bases

The most common types of base design are:
- Direct placement on the floor. This is due to the considerable dimensions of this type of furniture. Provides maximum stability;
- Placement on a pedestal. A small platform appears at the bottom, protruding beyond the body of the chest of drawers;
- Legs. Most often they are short. The exception is bureaus that preserve manufacturing traditions. In this case, the floor must be perfectly flat;
- Base system. The legs are replaced or combined with extended sides. They are the main focus. Part of the load is evenly distributed in the front part along a narrow strip - the base.
Styles of secretory chests of drawers

The rich traditions and history of the secretary are most harmoniously combined with styles in the spirit of antiquity:
- Provence. Rounded corners and wavy façade. The drawers are made slightly convex, and the body is straight. The decor is modest, small;
- Boul. The main features include the use of lower support crosses and an increase in the number of legs (6 or 8) of the most bizarre shapes. A lot of gilded inlay;
- Chinoiserie. This is a successful attempt to combine European Baroque with classical Asian styles. Ethnic motifs and sophistication of forms. The main emphasis is on exoticism;
- Colonial. Heavy, massive models with expensive but modest finishes. Preference is given to high-quality, rare materials rather than an abundance of decor;
- Palace styles (Rococo, Baroque). They are native to this piece of furniture. They provide fancy convex shapes and curved, wide-set legs. They are very richly decorated with carvings, paintings, and gilding;


Nowadays, the chest of drawers has not lost its relevance. It is still a piece of furniture with a high level of comfort and functionality. If you are tormented by a lack of space, then feel free to purchase such a chest of drawers. It will provide you with high-quality storage of things and will successfully play the role of a desk.
If you have any questions or suggestions, you can contact us by email: ls@site
P.S. We do not sell furniture, we only help you get acquainted with what is available and navigate your choice.