Since ancient times the main decoration wooden architecture was - decorating the facade of the house with various patterns and entire drawings carved from wood. The central element of home exterior decor has always been window casings handmade folk craftsmen and masters.
This is what homemade carved platbands look like
Anyone can try to revive the ancient practice of wood carving and make window frames with their own hands, if they are not afraid of carpentry. The joy of creative process and contemplation of the result of one’s labors will undoubtedly bring satisfaction to the creator.
The window casing is structural element, designed to close the gap between the opening and the window frame.
Thanks to platbands we provide:
- uniqueness and originality of the facade;
- aesthetics and completeness of the exterior;
- noise level is reduced;
- protection from precipitation, cold and wind;
- safety of the insulation between the frame and the opening.
Ancient technology for making platbands
In the old days they believed that carved frames protected the house and its owners from the evil eye and evil spirits.
 Exterior and decoration of the house with carved platbands
 Each pattern and ornament was created not only as a decoration, but also as a talisman. At the top of the window there were most often symbols of the sun or a cross. Plant motifs show the desire for unity with nature. Carved curls and waves are signs of water, bestowing life and fertility. Snakes, birds and other animals also had their own symbolic meaning.
Significance was given not only to carved signs, but also to the properties of wood. The type of tree, place and conditions in which it grew were also taken into account by the craftsmen. For example, houses were never built from the trees that grew at the crossroads and no objects were made. The ornaments and techniques for making carved frames in each region and even in each village were different and unique.
Vary the following types wood carvings:
 Pattern option homemade casing for window
Type of wood for carved frames
Different types of wood are used for carving. Their difference lies in density, hardness, fiber structure, color, pattern.
The most pliable and convenient wood for carving is considered to be hardwood - linden, aspen and alder. Carved platbands The easiest way to make one for windows with your own hands is from linden. It is very easy to cut, but you need to be careful not to spoil the workpiece with an awkward movement.
 Carved aspen frame
 Linden wood is clean, light, with a uniform, almost imperceptible texture. Soft woods also have disadvantages: their loose structure absorbs moisture very well, although this problem can be solved by applying impregnation, varnish or paint.
From coniferous varieties For carving they use pine, cedar, fir, spruce. These rocks are well processed and are perfect for creating street platbands with slotted and.
Pine is the most common and affordable lumber, characterized by good performance properties, clear beautiful design wood
Due to its resin content, pine has good weather resistance. Beginners in carving can use birch - its wood is not as soft as linden, which allows you to get clearer and more accurate cuts. Birch lends itself perfectly to cutting both along and across the grain, and is easy to saw and drill. 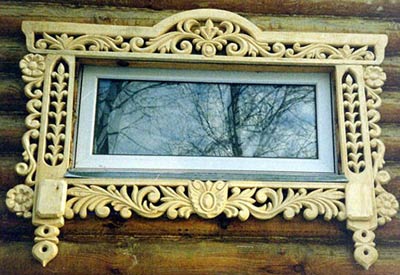
Hardwood frames (oak, larch, beech, boxwood, walnut) are very durable, but they are expensive and require more effort and time to process. The production of such platbands will be justified in the following cases:
- the region is characterized by strong temperature changes;
- in very dry air;
- for climates with high humidity.
For small elements made using the applied carving technique, you can use fruit tree varieties, such as cherry, apple, and pear.
Patterns for carved platbands - creating a template
To make it symmetrical and identical throughout the windows, it is necessary. Creating a template for decorative casing It won’t be difficult; it’s more difficult to decide on the variety of designs and ornaments presented on specialized websites and stores.
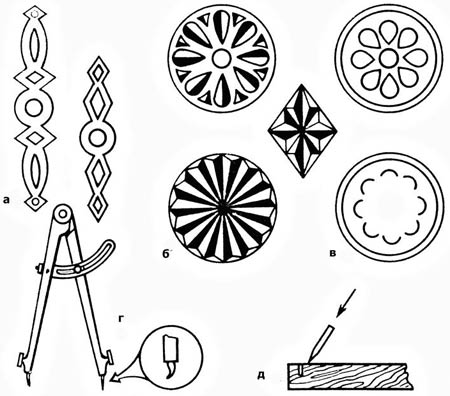 Pattern templates for carved trims
 For those who are carving for the first time, you should not choose complex patterns. A large ornament without too small or elaborate details is what a beginner needs. Ready-made templates you can copy it completely or come up with something new based on individual parts and their combination.
You can make your own templates in several ways:
- Processing with a graphic editor. You can create a finished image of the desired scale using Photoshop.
- Print or make a photocopy. The selected pattern is enlarged to the desired size and printed on a printer.
- Manual method. Manually transferring a drawing to a template using linear scaling.
It is best to do it on cardboard or thick paper. 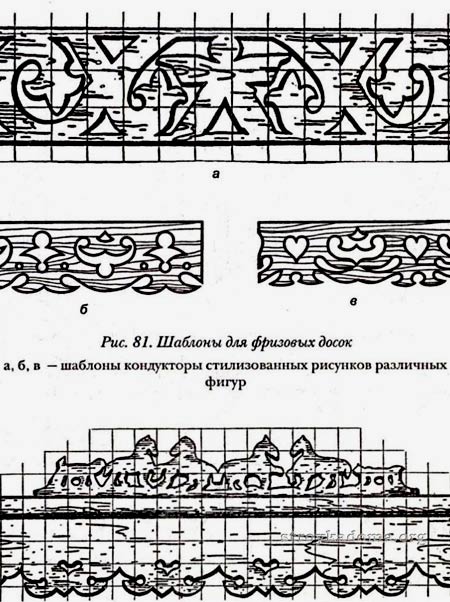 For all elements of the ornament, our own template is made in life size.
Transfer pattern from template to wooden base can be done as follows:
- Cut the stencil with scissors and, applying it to wooden board, trace the contours with a pencil.
- Draw the outline of the design using carbon paper.
- If you don’t have carbon paper, you can transfer the pattern imprint onto the wood by pressing firmly on the pen. A faint mark will remain, which is outlined with a pencil for clarity.
- The design on a wooden board should be placed across the grain, this will protect the carved elements from cracking.
- The slotted areas on the workpiece can be painted over with a pencil.
We will send the material to you by e-mail
The platband is a decoration and functional part of a window on the facade of a building. This tradition has been going on for a long time and does not lose its relevance today. Can be done beautiful trims on the windows in wooden house on one's own. Moreover, many products are made not only from wood, but also from other materials. Creating such elements requires certain knowledge and skills, as well as suitable tools.
The extraordinary color and style make the carved platbands a real decoration of the building
Currently, the installation of platbands on windows in a wooden house is again in demand. The photos below allow you to see best examples. This element emphasizes the desire to revive traditional decor.
The advantages of this element include the following:
- performs decorative function and helps to visually expand or stretch the building;
- complements the overall style of the architectural solution;
- protecting the space between the window opening and the wall surface from moisture and dust;
- reduction of heat loss and noise levels;
- emphasizes the individuality of the building and the style of the era you like.

This design also has some disadvantages:
- wood requires certain processing from high humidity and swelling;
- the need for constant processing and regular care;
- not compatible with metal-plastic windows.
Helpful information! When combining wood with metal-plastic, they must be made in the same color scheme.

DIY carved window trim templates
There are various platbands for windows in a wooden house. Their varieties often depend on the method of attachment to the window.

Based on the type of fastener, two types can be distinguished:
- telescopic products have L-shaped protrusions that coincide with the grooves of the window frame;
- Overlays are installed on the window frame using construction adhesive or nails and screws.
The original solution is the installation of carved platbands. At the same time, on the Internet you can find a lot of templates for carved window frames. With your own hands similar designs can only be done using special equipment.

You can consider the following types of materials to create such structures:
- wood is considered a traditional material;

- plastic models are resistant to temperature changes and ultraviolet rays;

- MDF is made from wood waste, therefore it is more environmentally friendly than plastic products;

- polyurethane varieties are characterized by practicality.

How to choose the right wood?
Wooden frames are popular. Wherein performance products depend on the type of wood chosen.
The following options are worth considering:
- Ash, beech and oak are hardwood varieties. They are durable, but difficult to cut patterns on;
- it's much easier to handle soft ones hardwoods– linden, aspen and alder. You can even carve patterns on their surface by hand. Such surfaces must be carefully treated with special compounds;
- It is recommended to create small elements from cherry and apple trees that can be attached to the base;
- Pine and birch are characterized by ease of processing and good performance properties.
Helpful information! Can be used different combinations types of wood. In this case, special protective impregnations should be used.

Secrets of making templates for window frames with your own hands: stencils and design
You can find various window trim templates on the Internet. You can print stencils with your own hands. The chosen ornament must be combined with the overall style. However, you should not mix geometric and floral patterns.
When making platbands, it is worth considering the following points:
- wall color palette and decorative items must be combined;
- It is important to choose the right size. Products should not be too small or wide;
- need to be selected quality option coverings. In this case, special paints and varnishes are used;
- a template is required to create external carved elements.
Helpful information! The design must be placed correctly on the workpiece. The parts should be located along the grain of the wood.

Platbands for windows in a wooden house: stages of production
Before you start creating window decor, you can select carved frames for windows in a wooden house based on the photo. A template is made in advance, which must be the same for the design of all window openings.
There are two main ways to create patterns:
- the overhead thread is different separate elements patterns that are attached to one base;

- with slotted carving, a through ornament is created that looks like lace made of wood.

For any manufacturing method, they must be used. You will also need special tools:, a hacksaw for wood, a set of knives and chisels, and a drill. Window trims are made in a wooden house from prepared materials. The product creation process includes several stages:
- accurate measurements are taken;
- The selected wood must be dry. The width of the boards depends on the dimensions of the window opening. The thickness of the material must be at least 30 mm when performing slotted thread and at least 10 – with an invoice;


- the resulting holes are rubbed with sanding paper;

- the prepared parts are attached to the base. In this case it is used adhesive composition or special nails.
Helpful information! When installing platbands, you cannot use self-tapping screws, as such fasteners cause cracking.

Installation features
The finished casing is mounted to the window opening in the following ways:
- installation on a blind tenon. Such parts are installed on inside. Special holes are created in the frame for them. Glue is applied to the tenon and it is inserted into the groove. Such fasteners protect the platbands from dust and moisture;

- a through tenon is used. In this case, the joint must be carefully treated with varnish.
Similar techniques are used if the window is wooden. For installation on metal-plastic, special liquid glue is used.
What kind of care is needed?

Carved products are primed, varnished or painted. Such treatments are carried out every few years. This will extend the life of the products and also maintain their attractive appearance.If plastic or metal products are installed, they do not require special care. It is important to protect products from corrosion and sometimes renew the paint.

Making beautiful frames with thematic patterns with your own hands will allow you to decorate window openings in an original and unusual way and add a special twist to the intended architectural style.

Save time: selected articles delivered to your inbox every week
The exterior decoration of a house (we are, of course, talking about private buildings) cannot be considered complete if the window openings are not decorated. Ready-made window frames can be purchased, although some articles indicate that they are rarely found on sale. No, there are enough of these protection and decorative elements on the market, and in large assortment and at a reasonable price. Even carved samples cost no more than 300 rubles per linear meter.
But upon careful examination, you will notice that they are all made somewhat monotonously, and the sizes are mostly the same. standard parameters and configuration of openings. If the house is being built according to a special project, and an original one, taking into account all the preferences of the owner, it makes sense to install unusual trim on the windows, emphasizing the individuality of the home. This article will tell you how and from what to make beautiful window frames with your own hands.
Material for platbands
On this point, all experts have a clear opinion - if you do it yourself, then only wood. Firstly, the material is the most affordable. Secondly, it is easy to work with wood with the simplest tool, that is, in the full sense of the word, you can independently make platbands from scratch, with the most complex pattern. Thirdly, wood goes well with any construction and finishing material. Consequently, such platbands are equally suitable for various buildings, regardless of their features and the overall design of the facade.

What to consider:
- Samples for platbands (board or plywood) should have a minimum of knots. Therefore, you should purchase lumber High Quality, although it costs more. Otherwise, when cutting out patterns or grooves, the tool will constantly come across such problem areas, and it’s not a fact that the board won’t have to be rejected as a result.
- The thickness of the samples is chosen arbitrarily, depending on the characteristics of the jigsaw and the type of wood. As a rule, for platbands ranging from 5 (overhead) to 50 (slotted) mm. How they differ will become clear as the presentation progresses.
Wood species
If you approach this issue seriously, and not just set yourself the goal of making strips with your own hands that close the gaps between window frame and an opening in the wall, then many points should be taken into account.
In cases where it concerns standard version in the form of a solid narrow plank, it is advisable to focus on hard wood. This parameter is directly related to the porosity of the material. Consequently, such platbands will last much longer, since they will not intensively absorb liquid, unlike soft rocks. Recommendations that they can be protected by painting with a moisture-resistant composition are hardly worthy of attention. Firstly, the naturalness of wood is lost, especially if the house itself is made of the same material. Secondly, updating the coating layer, taking into account the complexity of the patterns, is such a painstaking job and requires a lot of time that there are few people willing to do this regularly.
Of the affordable wood species, oak, ash, birch, and pear deserve attention. Despite all their advantages, there is a significant drawback - such workpieces are difficult to process with your own hands. Even the simplest selection of grooves is already a problem. If you lack experience hand tool will not help, and you will have to look for the possibility of using machine tools. That is, pay for the service.
For carved frames, you should focus on wood with a lower density. Mainly larch, pine, ash, linden, and spruce are used in construction and finishing. The last 3 species, although convenient for processing with your own hands, are not suitable for platbands, given that they are attached to the facade of the house. Such boards (planks) are characterized by hygroscopicity and insufficient strength. Therefore, difficulties will arise with protection from moisture (additional drying of workpieces, repeated impregnation) and fastening. Consequently, the durability of such platbands is questionable.

Climate Features
This factor cannot be ignored. It is better to immediately abandon soft wood for platbands if:
- the humidity at the location of the house is constantly excessive (for example, near large natural bodies of water) or, on the contrary, minimal (that is, the air is too dry);
- even during the day, the temperature varies widely (significant differences).
The best option for platbands is pine or larch. These types of wood are equally well suited for making any platbands with your own hands, regardless of the shape, size and pattern of the planks.

Drawing up a drawing of the platband
Any finished drawing can be altered to fit your window openings, respecting the scaling. Or design patterns of your own.

Necessary tools and equipment
Usually, " House master» uses what is at hand. But some tools are not in demand in everyday life, so you will have to purchase some.
- Electric jigsaw. There is no point in working manually. To achieve high quality patterns, you will have to spend a lot of time. In addition, it has limited use, since the platbands differ not only in the thickness of the board, but also in its width. This is the main difficulty of using a simple jigsaw.
- Screwdriver.
- A set of chisels - corner, cranberry, caesar, semicircular, and so on. Just one will not be enough. Even in a solid plank, you will need to make a selection of materials with different widths grooves, at different angles.
- "Thorn cutter." A specific tool, but it is extremely necessary for making eyelets and seams in platbands.
- Knives (cutter, joint).
- Set of drills (feather).
- Sander. Even with great diligence, give the wood absolute smoothness using sandpaper It won't work manually. Yes, and this will take a lot of time.
The procedure for assembling the platband
Since there are enough varieties of platbands, one of the simplest options is being considered. Its peculiarity is the symmetry of the samples located on opposite sides of the window. Having understood the manufacturing principle itself individual parts platband and their assembly into a single structure, it is easy to choose any of those described on the Web or develop your own.


Decorative elements
Next is the algorithm for manufacturing figured casing. No comments are required regarding solid strips. Selecting longitudinal grooves using a chisel(s) is all that is needed. You can perfectly decorate windows with simple, monolithic trim and in other ways. In addition to selecting grooves in wood, there are other options: art painting strips (brush, soldering iron tip) or firing.
- Based on the drawn up sketch, a stencil of the frame element is made. For example, which will be mounted to the left of the window.
- The corresponding pattern is transferred to the back (back) side of the selected plank.
- Holes are made along its contour. Their locations depend on the specifics of the pattern. It is into them that the electric jigsaw file will be inserted for further cutting out fragments in the designated segment. The picture explains everything well.

The final stage of this part of the work is cutting the board along the outer contour.
The second “sidewall” is made similarly, but in a mirror image. To do this, it is enough to turn the same stencil 180 0. This procedure is also followed to obtain the second pair of elements - the top and bottom of the casing.
No matter how interesting and original the design you like is, you should not choose patterns with small details or complex patterns for window trims. Firstly, the work of making individual figures is so painstaking, requiring perseverance and extreme precision, that not everyone will be able to complete it. Secondly, miniature elements are beautiful only when viewed up close. At a distance they merge, so for exterior finishing For window openings, it is impractical to use such complex, small patterns.

Cleaning the front surface of samples
There are grinders different types. That's why general recommendation– the grain size of the abrasive (skin or disc) is selected to be about 80. . Sufficient grinding quality will be ensured regardless of the type of wood.
Assembling the platband frame
Even if the casing is made in a shaped form, it makes no sense to attach such wooden patterned elements directly to the walls. There is no need to talk about strength, and it will not be possible to connect them reliably. How to proceed? Each master has his own opinion, so the author is just sharing his own experience. It is up to you, the reader, to decide whether to accept these comments for management or not.

As a rule, when measuring the geometry of a window opening, it turns out that all its cuts do not lie in the same plane. That is, during the construction of the walls some distortions appeared. When building a house, especially with your own hands, small tolerances are common. They are not critical if they do not exceed established limits. But for the installation of the platband, this fact is important. Therefore, for additional leveling purposes, you will have to make a subframe. Essentially, these are boards (slats) that close the gaps between the frame and the end parts of the wall along the perimeter of the window opening. It is on them that the platband is fixed.
The dimensions of the platband are selected so that it covers each side (external) window frame not less than 20 mm. In this case, you need to check whether the doors will open at an angle of 120º (generally accepted norm).
Conventionally, all platbands can be divided into 2 groups (according to the specifics of the frame assembly): monolithic, that is, when the pattern is cut directly into the board (plank) and overhead. These are separately made figures that are attached to the sides of the frame by gluing, mounting on tongues or in another way. The technology described above (slotted) refers to the first option.

Wood processing
Soil impregnation
This is rarely done, but such preparation of the material provides advantages. Firstly, the pores are filled with the preparation, which reduces the hygroscopicity of the wood. Secondly, during the subsequent application of the protective layer, the consumption paint composition(any of which is more expensive than primer) decreases.
Finishing
As a rule, varnish, especially if we are talking about a log house. In other cases, you need to focus on general design facade and shutters. .
The author hopes that this article will help the reader to optimal choice and it will become step by step instructions on making decorative elements with your own hands. For those who are interested in more complex options for window frames, we recommend that you understand such structural parts as “kokoshnik”, “towel”, “diadem”, “shoulder”. The work is much more difficult, but it is worth it - exclusiveness is guaranteed.
The originality of carved frames for windows and doors is striking in its spirituality. If you are not afraid of carpentry and want to make wooden trim with your own hands, then all that remains is to come up with a composition for framing.
Below are sketches of carved frames in a small size and mediocre quality. But these templates can be downloaded for free. The main idea is the idea, and the template can be made to the desired size.
How to make templates for carved frames (stencil)
Optimal and simple ways, how to make templates for cutting.
Using a graphic editor
There are many programs for image processing (Photoshop, etc.).
Photocopying
If you don’t want to deal with programs, you can make a photocopy of the drawing and immediately set right size copies (enlarge, reduce, compress, expand). Or scan and print the sketch on a printer in the desired format.
Manually - scaling by cells
In the end, you can make a template manually using the technology of scaling (copying) by cells (linear scaling).
By scaling by cells, you can change the proportions of the drawings. For example, you don't like the original form and you want to change it. To do this, when transferring the drawing, keep one of the sides at the original size, and increase the second in the new square.
Scaling by cell
Changing the proportions of a picture when scaling by cells
From drawing to template
Template for platbands The template for platbands is made of cardboard, life-size. A separate template is made for each element, pattern and ornament.
The resulting template is placed on the board and the outline is traced with a pencil.
Making holes You can immediately mark the locations for the holes. Holes are drilled inside the pattern, in places where there will be a turn when carving. First, the internal patterns are cut out, and then the external ornament.
Platband carving
Another way to apply a design to a workpiece is copying.
The method involves the use of carbon paper. A sheet of copy paper is placed on the board, and a drawing is placed on top. The drawing is secured with push pins. An outline is drawn with a pencil and copied onto the wood.
Stencil template for carved trims
Now you know how to make a stencil template for carved platbands.
Templates of carved window frames - photo gallery
Window trim template - 1
Window trim template - 2
Window trim template - 3
Window trim template - 4
Window trim template - 5
Window trim template - 6
Window trim template - 7
Window trim template - 8
Window trim template - 9
Window trim template - 10
Window trim template - 11
Window trim template - 12
Window trim template - 13
Window trim template - 14
Window trim template - 15
Window trim template - 16
Window trim template - 17
Window trim template - 18
Window trim template - 19
Window trim template - 20
Window trim template - 21
Window trim template - 22
Window trim template - 23
Window trim template - 24
Window trim template - 25
Window trim template - 26
Sketch of window frames - rooster
Sketch of window frames in the form of a cockerel on a spire
Sketch of window frames - horse
Sketch of window frames - horse
Sketch of window frames - boat
Sketch of window trim - butterfly
Sketch of window frames - leaflet
Sketch of window frames - maple leaf
Sketch of window trim - pattern with fish (right)
Sketch of window trim - pattern with fish (left)
Sketch of window trim - pattern with a bird (left)
Sketch of window trim - pattern with a bird (right)
Sketch of window frames - ornament with goldfish
Sketch of window frames - acorns
Sketch of window frames - flowers
Sketch of window frames - flowers
Sketch of window frames - roses
Sketch of window frames - ornament of interlacing leaves (right)
Sketch of window frames - ornament of interlacing leaves (left)
Sketch of window frames - ornament of weaving leaves-2
Sketch of window frames - ornament of weaving leaves-3
Sketch of window frames - ornament with grapes
Sketch of window frames - ornament with flowers